

感谢 恩培大佬对项目进行了完整的实现,并将代码进行开源,供大家交流学习。
一、项目简介

项目用 python实现,调用opencv,mediapipe,pytorch等库,由以下步骤组成:
1、使用OpenCV读取摄像头视频流;
2、识别手掌关键点像素坐标;
3、根据识别得到的手掌关键点信息,以图的方式构建数据结构;
4、用Pytorch提供的GCN图卷积神经网络训练数据并手势进行分类;
二、知识拆解
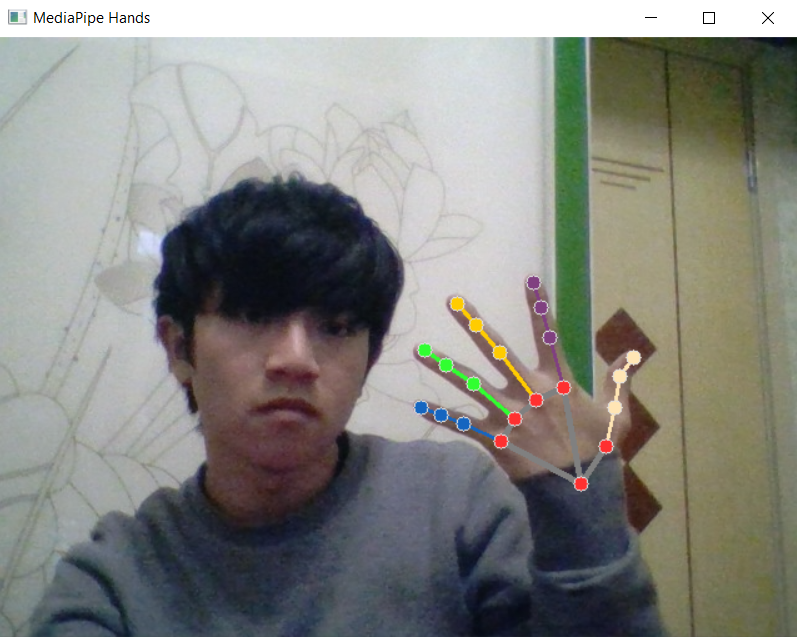
下面演示以下python版本,手指检测的使用方式。
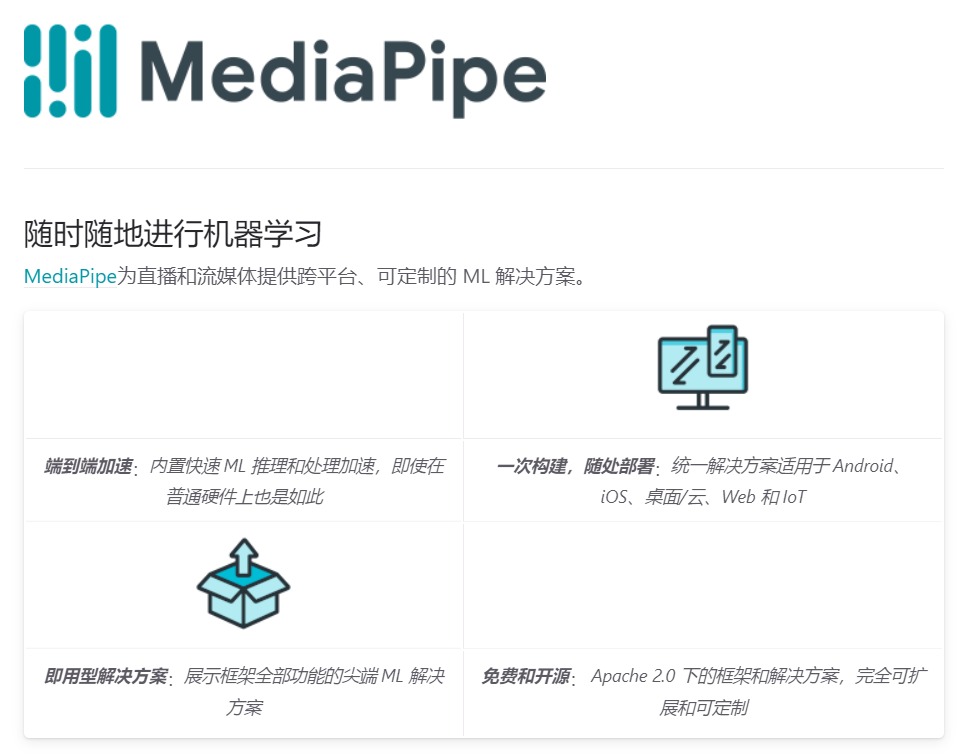
安装库:
pip install mediapipe
调用示例:
import cv2

import mediapipe as mp

mp_drawing = mp.solutions.drawing_utils

mp_drawing_styles = mp.solutions.drawing_styles

mp_hands = mp.solutions.hands

For static images:

IMAGE_FILES = []

with mp_hands.Hands(

static_image_mode=True,

max_num_hands=2,

min_detection_confidence=0.5) as hands:

for idx, file in enumerate(IMAGE_FILES):

Read an image, flip it around y-axis for correct handedness output (see

above).

image = cv2.flip(cv2.imread(file), 1)

Convert the BGR image to RGB before processing.

results = hands.process(cv2.cvtColor(image, cv2.COLOR_BGR2RGB))

Print handedness and draw hand landmarks on the image.

print('Handedness:', results.multi_handedness)

if not results.multi_hand_landmarks:

continue

image_height, image_width, _ = image.shape

annotated_image = image.copy()

for hand_landmarks in results.multi_hand_landmarks:

print('hand_landmarks:', hand_landmarks)

print(

f'Index finger tip coordinates: (',

f'{hand_landmarks.landmark[mp_hands.HandLandmark.INDEX_FINGER_TIP].x * image_width}, '

f'{hand_landmarks.landmark[mp_hands.HandLandmark.INDEX_FINGER_TIP].y * image_height})'

)

mp_drawing.draw_landmarks(

annotated_image,

hand_landmarks,

mp_hands.HAND_CONNECTIONS,

mp_drawing_styles.get_default_hand_landmarks_style(),

mp_drawing_styles.get_default_hand_connections_style())

cv2.imwrite(

'/tmp/annotated_image' + str(idx) + '.png', cv2.flip(annotated_image, 1))

Draw hand world landmarks.

if not results.multi_hand_world_landmarks:

continue

for hand_world_landmarks in results.multi_hand_world_landmarks:

mp_drawing.plot_landmarks(

hand_world_landmarks, mp_hands.HAND_CONNECTIONS, azimuth=5)

For webcam input:

cap = cv2.VideoCapture(0)

with mp_hands.Hands(

model_complexity=0,

min_detection_confidence=0.5,

min_tracking_confidence=0.5) as hands:

while cap.isOpened():

success, image = cap.read()

if not success:

print("Ignoring empty camera frame.")

If loading a video, use 'break' instead of 'continue'.

continue

To improve performance, optionally mark the image as not writeable to

pass by reference.

image.flags.writeable = False

image = cv2.cvtColor(image, cv2.COLOR_BGR2RGB)

results = hands.process(image)

Draw the hand annotations on the image.

image.flags.writeable = True

image = cv2.cvtColor(image, cv2.COLOR_RGB2BGR)

if results.multi_hand_landmarks:

for hand_landmarks in results.multi_hand_landmarks:

mp_drawing.draw_landmarks(

image,

hand_landmarks,

mp_hands.HAND_CONNECTIONS,

mp_drawing_styles.get_default_hand_landmarks_style(),

mp_drawing_styles.get_default_hand_connections_style())

Flip the image horizontally for a selfie-view display.

cv2.imshow('MediaPipe Hands', cv2.flip(image, 1))

if cv2.waitKey(5) & 0xFF == 27:

break

cap.release()

什么是图
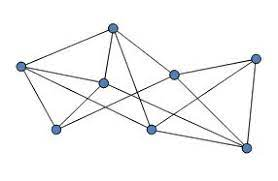
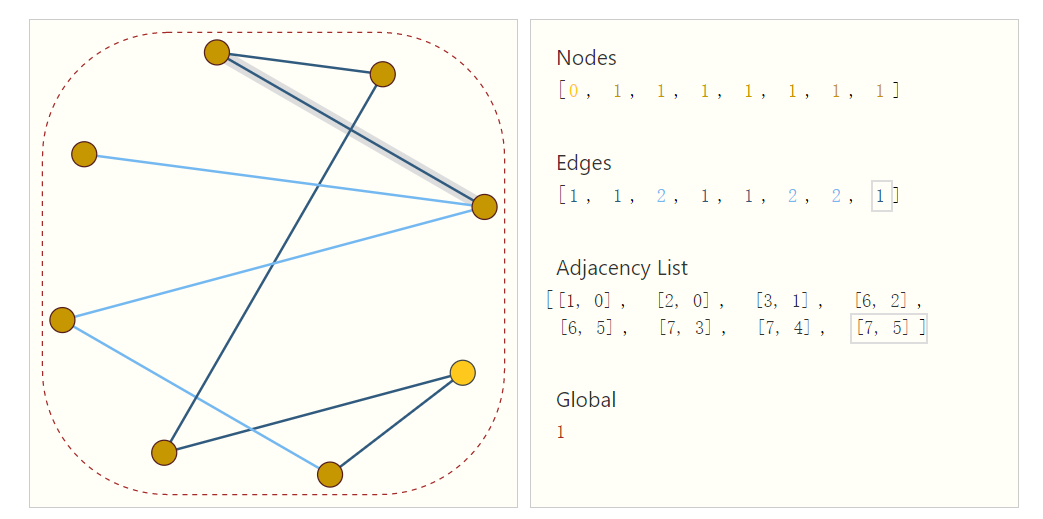
计算机怎么表示图
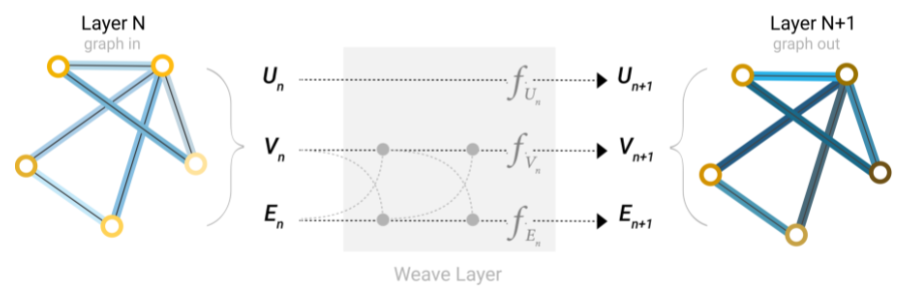
在计算机表示中,vertex(边)、node(点)、graph(图)都由embedding向量表示。
这里我们可以看到,图神经网络的思想也是,将图的点、边、图用向量来表示。我们需要关心的就是这些向量在数据处理中如何运用,以及我们是否有办法通过数据来学到这些向量的值。
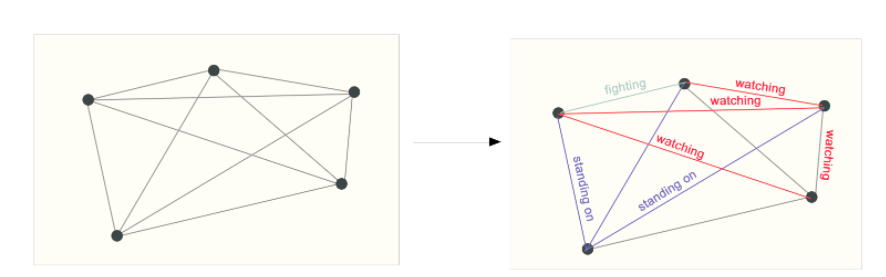
此外,在图的分类中,主要是有向图和无向图两种。
简单说来,你我都是朋友,这叫无向。你喜欢我,而我不喜欢你,这叫有向。

其它数据如何表示为图
引入图这种数据结构及其表示方法之后,我们自然有一个疑问,那就是如何将图片,文本等信息,用图来表示呢?
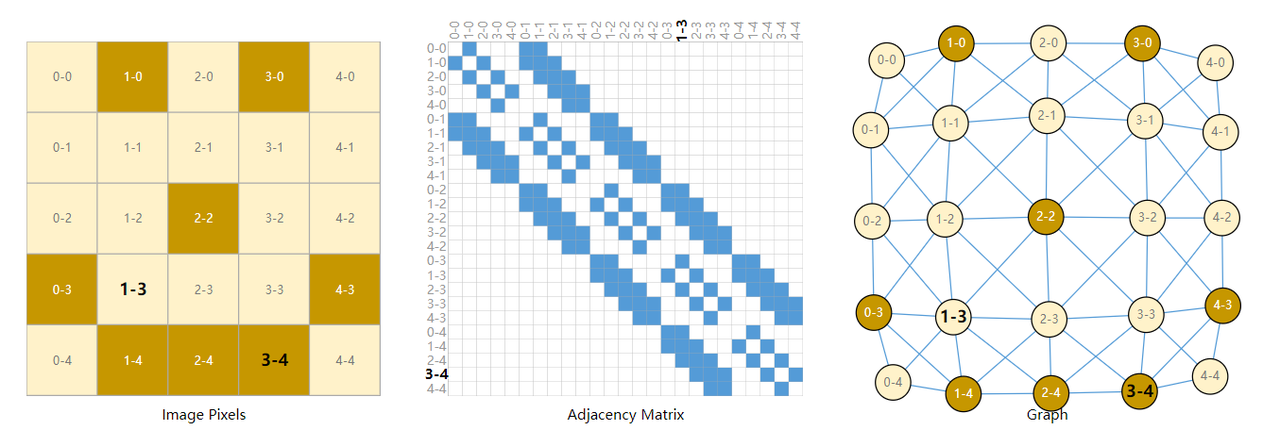

同理呀,其实分子、社交关系、文章引用等等,都很容易用图来表示。可见图的应用之广泛。
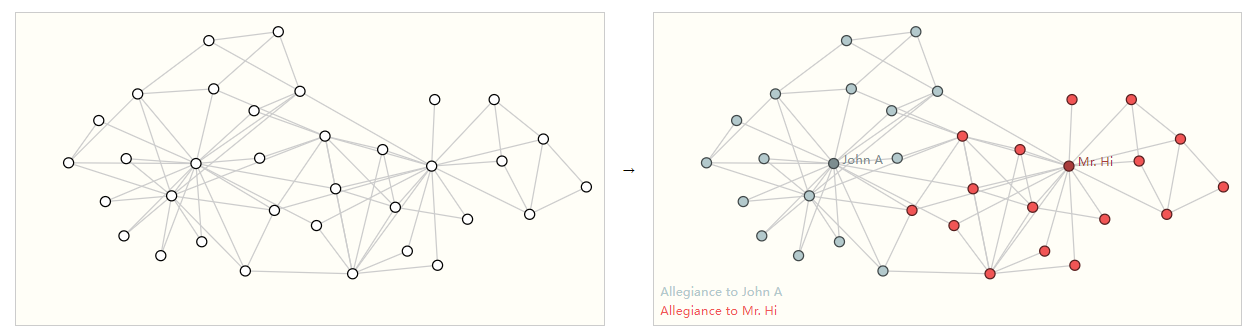
用图来解决什么问题
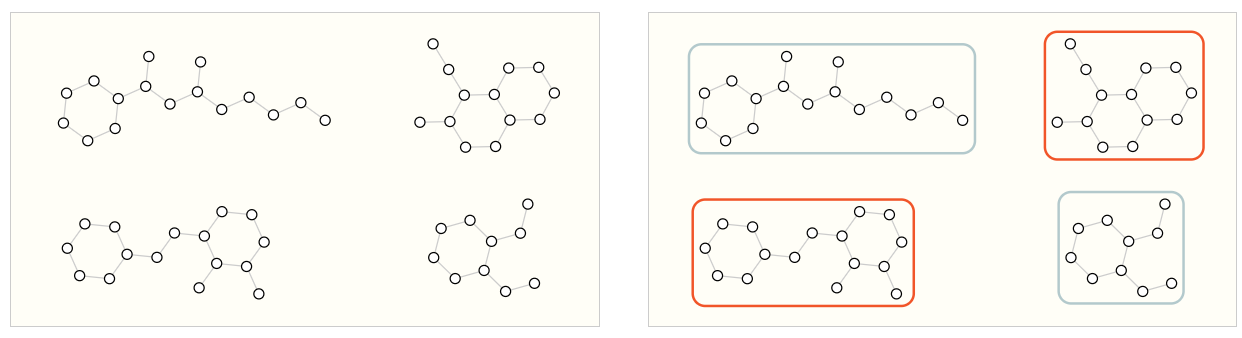
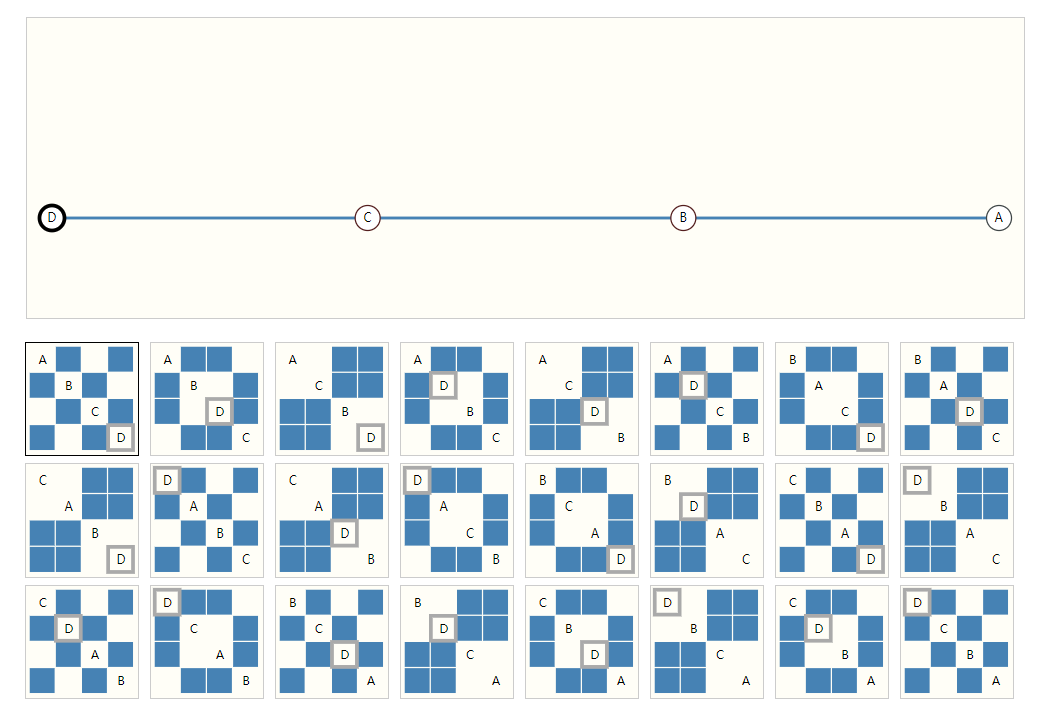
二是点层面的问题。例子,如下的图中,按照某种标准,将所有的点分为两类。
深度学习中运用图,有什么难题
其实这个问题,我们稍作分析便不难发现,邻接关系描述的信息本质就是,哪两个点连接了。
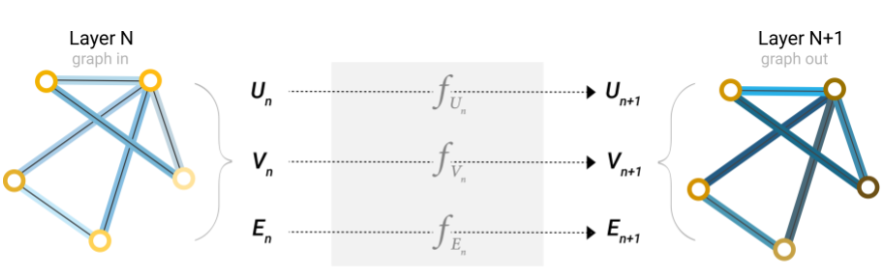
进入正题,什么是图神经网络
下定义也许不容易理解,只需要有个概念,它是一个神经网络,并具备以下两个特点。
1、输入是一张图,输出也是一张图。
2、对边和顶点向量做一系列变换,但是连接关系不会改变。
现在来看一个具体的问题。例如我要对以上图中的某个点做分类,假设这些点的embedding向量已知,那问题便简单了,直接输入一个神经网络做分类问题即可。这和传统的神经网络没有啥区别。
有了汇聚的操作,我们就能够通过神经网络来处理点、边的信息,并通过汇聚补全了。但细心的朋友已经发现,这样做并没有完全利用到一个图的信息。那我们如何能做到输入一张图的顶点、边的所有信息呢。
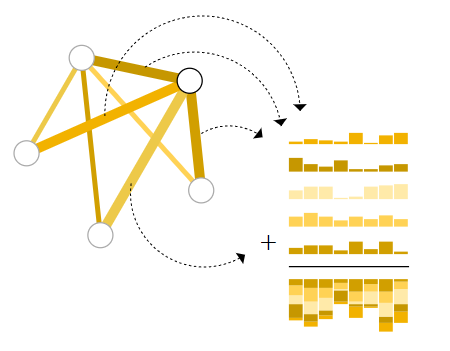
此时还有一个问题,那就是当图很大的时候,要将远方的点的信息传过来,岂不是需要消耗很长的时间。正因为如此,才提出了一个全局向量U,表示整张图的平均属性。
至此,图神经网络的基本原理便介绍清楚了。
那么GCN呢,讲的其实是在汇聚的过程中,设计K层汇聚网络,每次汇聚都往外看N步,那么每个点的视野范围便是K*N。其实等价于拿出邻接矩阵做乘法。
可以看到,图神经网络的灵活性非常高,基本上所有的数据都可以表示成图。但同时也带来了它的问题,想在这种稀疏的架构上做优化是非常困难的,况且图还是一个动态的架构。
三、实战演练
用mediapipe得到手部框,再用InterHand进行手部关节点的精确识别

更多疑问,欢迎私信交流。thujiang000

输入一个手部图片,返回3D坐标

class HandPose:

def __init__(self):

cfg.set_args('0')

cudnn.benchmark = True

joint set information is in annotations/skeleton.txt

self.joint_num = 21 # single hand

self.joint_type = {'right': np.arange(0,self.joint_num), 'left': np.arange(self.joint_num,self.joint_num*2)}

snapshot load

model_path = './snapshot_19.pth.tar'

assert osp.exists(model_path), 'Cannot find self.hand_pose_model at ' + model_path

print('Load checkpoint from {}'.format(model_path))

self.hand_pose_model = get_model('test', self.joint_num)

self.hand_pose_model = DataParallel(self.hand_pose_model).cuda()

ckpt = torch.load(model_path)

self.hand_pose_model.load_state_dict(ckpt['network'], strict=False)

self.hand_pose_model.eval()

prepare input image

self.transform = transforms.ToTensor()

def get3Dpoint(self,x_t_l, y_t_l, cam_w, cam_h,original_img):

bbox = [x_t_l, y_t_l, cam_w, cam_h] # xmin, ymin, width, height

original_img_height, original_img_width = original_img.shape[:2]

bbox = process_bbox(bbox, (original_img_height, original_img_width, original_img_height))

img, trans, inv_trans = generate_patch_image(original_img, bbox, False, 1.0, 0.0, cfg.input_img_shape)

img = self.transform(img.astype(np.float32))/255

img = img.cuda()[None,:,:,:]

forward

inputs = {'img': img}

targets = {}

meta_info = {}

with torch.no_grad():

out = self.hand_pose_model(inputs, targets, meta_info, 'test')

img = img[0].cpu().numpy().transpose(1,2,0) # cfg.input_img_shape[1], cfg.input_img_shape[0], 3

joint_coord = out['joint_coord'][0].cpu().numpy() # x,y pixel, z root-relative discretized depth

rel_root_depth = out['rel_root_depth'][0].cpu().numpy() # discretized depth

hand_type = out['hand_type'][0].cpu().numpy() # handedness probability

restore joint coord to original image space and continuous depth space

joint_coord[:,0] = joint_coord[:,0] / cfg.output_hm_shape[2] * cfg.input_img_shape[1]

joint_coord[:,1] = joint_coord[:,1] / cfg.output_hm_shape[1] * cfg.input_img_shape[0]

joint_coord[:,:2] = np.dot(inv_trans, np.concatenate((joint_coord[:,:2], np.ones_like(joint_coord[:,:1])),1).transpose(1,0)).transpose(1,0)

joint_coord[:,2] = (joint_coord[:,2]/cfg.output_hm_shape[0] * 2 - 1) * (cfg.bbox_3d_size/2)

restore right hand-relative left hand depth to continuous depth space

rel_root_depth = (rel_root_depth/cfg.output_root_hm_shape * 2 - 1) * (cfg.bbox_3d_size_root/2)

right hand root depth == 0, left hand root depth == rel_root_depth

joint_coord[self.joint_type['left'],2] += rel_root_depth

3D节点信息

return joint_coord
经过三维关节点提取后,我们便可以构建手部的图了。思考一下,我们的任务是对不同的图做分类,边的指向和长度是图的特征。基于特征的特点,我们可以尝试用边来构造这个图。注意手指之间是无向的,要做处理。
首先构造一个两层的图卷积神经网络
class GCN(nn.Module):

def __init__(self, in_feats, h_feats, num_classes):

super(GCN, self).__init__()

self.conv1 = GraphConv(in_feats, h_feats)

self.conv2 = GraphConv(h_feats, num_classes)

def forward(self, g, in_feat):

h = self.conv1(g, in_feat)

h = F.relu(h)

h = self.conv2(g, h)

g.ndata['h'] = h

return dgl.mean_nodes(g, 'h')
u、v分别为图的起点和终点。
然后按照每个点对于手掌的中心坐标的相对坐标为特征,输入原始图中。
构造图以及特征

u,v = torch.tensor([[0,0,0,0,0,4,3,2,8,7,6,12,11,10,16,15,14,20,19,18,0,21,21,21,21,21,25,24,23,29,28,27,33,32,31,37,36,35,41,40,39],

[4,8,12,16,20,3,2,1,7,6,5,11,10,9,15,14,13,19,18,17,21,25,29,33,37,41,24,23,22,28,27,26,32,31,30,36,35,34,40,39,38]])

g = dgl.graph((u,v))

无向处理

bg = dgl.to_bidirected(g)

计算相对坐标

x_y_z_column = self.relativeMiddleCor(x_list, y_list,z_list)

添加特征

bg.ndata['feat'] =torch.tensor( x_y_z_column ) # x,y,z坐标

测试模型

device = torch.device("cuda:0")

device = torch.device("cpu")

bg = bg.to(device)

self.modelGCN = self.modelGCN.to(device)

pred = self.modelGCN(bg, bg.ndata['feat'].float())

pred_type =pred.argmax(1).item()
完整项目代码地址:
运行时注意:
1、采集训练数据时,运行demo.py文件中的handRecognize.getTrainningData(task_type = ‘6’)。参数task_type取值为0~6,最多可识别七种手势。
2、运行时,假设采集了5种手势,要将对应的手部分类的输出层改为5。
self.modelGCN = GCN(3, 16, 5)

self.modelGCN.load_state_dict(torch.load('./saveModel/handsModel.pth'))

self.modelGCN.eval()

self.handPose = HandPose()

self.mp_hands = mp.solutions.hands
3、若需要gpu加速,dgl需要安装gpu版本。nvcc –version查看自己的cuda版本,然后去Deep Graph Library ![]() https://www.dgl.ai/pages/start.html ;查找对应的安装指令。
https://www.dgl.ai/pages/start.html ;查找对应的安装指令。
若运行遇到苦难,欢迎留言交流。
Original: https://blog.csdn.net/thujiang000/article/details/122788564
Author: 清华江同学
Title: GCN图卷积神经网络入门讲解+实战结印识别–详细注释解析恩培作品4
原创文章受到原创版权保护。转载请注明出处:https://www.johngo689.com/704536/
转载文章受原作者版权保护。转载请注明原作者出处!