

剪刀石头布手势识别
1.加载数据并解压
(1)使用wget下载训练样本和测试样本的压缩文件
!wget  https://storage.googleapis.com/laurencemoroney-blog.appspot.com/rps.zip

!wget https://storage.googleapis.com/laurencemoroney-blog.appspot.com/rps-test-set.zip
(2)调用os 与zipfile方法解压文件
import os
import zipfile

local_zip = 'C:\\Users\\......\\tmp\\rps.zip'
zip_ref = zipfile.ZipFile(local_zip, 'r')
zip_ref.extractall('\\tmp\\')
zip_ref.close()

local_zip = 'C:\\Users\\......\\tmp\\rps-test-set.zip'
zip_ref = zipfile.ZipFile(local_zip, 'r')
zip_ref.extractall('\\tmp\\')
zip_ref.close()
注:具体路径需要根据您自己的计算机进行设置。
[En]
Note: the specific path needs to be set according to your own computer.
(3)查看样本数据并列出前10个样本的文件名
import os
rock_dir = os.path.join('/tmp/rps/rock')
paper_dir = os.path.join('/tmp/rps/paper')
scissors_dir = os.path.join('/tmp/rps/scissors')
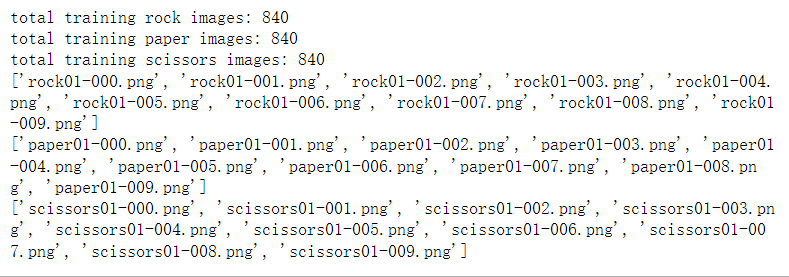
print('total training rock images:', len(os.listdir(rock_dir)))
print('total training paper images:', len(os.listdir(paper_dir)))
print('total training scissors images:', len(os.listdir(scissors_dir)))
rock_files = os.listdir(rock_dir)
print(rock_files[:10])
paper_files = os.listdir(paper_dir)
print(paper_files[:10])
scissors_files = os.listdir(scissors_dir)
print(scissors_files[:10])
运行结果

(4)可视化,查看样本图片
%matplotlib inline

import matplotlib.pyplot as plt
import matplotlib.image as mpimg

pic_index = 2

next_rock = [os.path.join(rock_dir, fname)
                for fname in rock_files[pic_index-2:pic_index]]
next_paper = [os.path.join(paper_dir, fname)
                for fname in paper_files[pic_index-2:pic_index]]
next_scissors = [os.path.join(scissors_dir, fname)
                for fname in scissors_files[pic_index-2:pic_index]]

for i, img_path in enumerate(next_rock+next_paper+next_scissors):
  print(i,img_path)
  img = mpimg.imread(img_path)
  plt.imshow(img)
  plt.axis('Off')
  plt.show()
运行结果:

2.数据预处理与模型构建
数据预处理
首先对训练样本和测试样本进行归一化处理;除归一化外,还对训练样本进行旋转、平移、剪切、缩放、水平翻转等一系列数据增强,以增加样本数量。从而提高了网络的泛化能力,降低了网络过拟合的风险。
[En]
First of all, the training samples and test samples are normalized; in addition to normalization, there are also a series of data enhancements to the training samples, such as rotation, translation, shearing, scaling, horizontal flipping, so as to increase the number of samples. so as to improve the generalization ability of the network and reduce the risk of network overfitting.
import tensorflow as tf
import keras_preprocessing
from keras_preprocessing import image
from keras_preprocessing.image import ImageDataGenerator
TRAINING_DIR = "/tmp/rps/"
training_datagen = ImageDataGenerator(
rescale = 1./255,
rotation_range=40,
width_shift_range=0.2,
height_shift_range=0.2,
shear_range=0.2,
zoom_range=0.2,
horizontal_flip=True,
fill_mode='nearest')
VALIDATION_DIR = "/tmp/rps-test-set/"
validation_datagen = ImageDataGenerator(rescale = 1./255)
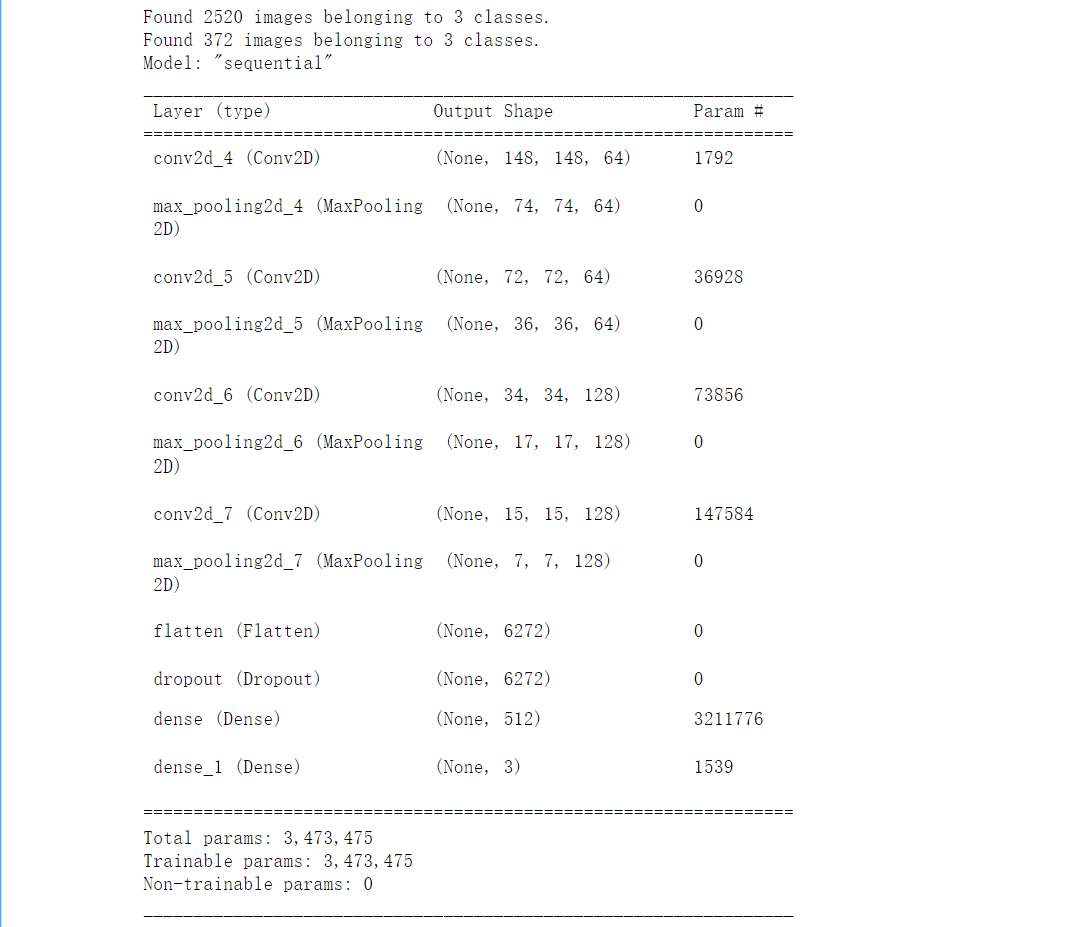
train_generator = training_datagen.flow_from_directory(
TRAINING_DIR,
target_size=(150,150),
class_mode='categorical'
)
validation_generator = validation_datagen.flow_from_directory(
VALIDATION_DIR,
target_size=(150,150),
class_mode='categorical'
)
model = tf.keras.models.Sequential([
tf.keras.layers.Conv2D(64, (3,3), activation='relu', input_shape=(150, 150, 3)),
tf.keras.layers.MaxPooling2D(2, 2),
tf.keras.layers.Conv2D(64, (3,3), activation='relu'),
tf.keras.layers.MaxPooling2D(2,2),
tf.keras.layers.Conv2D(128, (3,3), activation='relu'),
tf.keras.layers.MaxPooling2D(2,2),
tf.keras.layers.Conv2D(128, (3,3), activation='relu'),
tf.keras.layers.MaxPooling2D(2,2),
tf.keras.layers.Flatten(),
tf.keras.layers.Dropout(0.5),
tf.keras.layers.Dense(512, activation='relu'),
tf.keras.layers.Dense(3, activation='softmax')
])
model.summary()
模型结构:
- 整个网络有4对卷积+池化,后接一个全连接层,接一个输出层
- 每个卷积都是3×3的卷积核,每个池化都是2×2的池化核,最大池化做特征压缩。激活函数都是relu
- 网络输入是150×150的三通道彩色图像
- 4个卷积层,前两个卷积层是64个通道,后两个卷积层是128个通道
- 在全连接层之前要做一个flatten操作,最后一个池化层拉直成一个向量,在把128个通道两成一个更大的向量
- 这样就可以输入全连接隐层,全连接隐层有512个神经元,激活函数用的是relu
- 最后输出层是3个神经元,因为石头剪刀布是三分类问题,使用的是softmax激活函数,使得三个输出加起来等于1
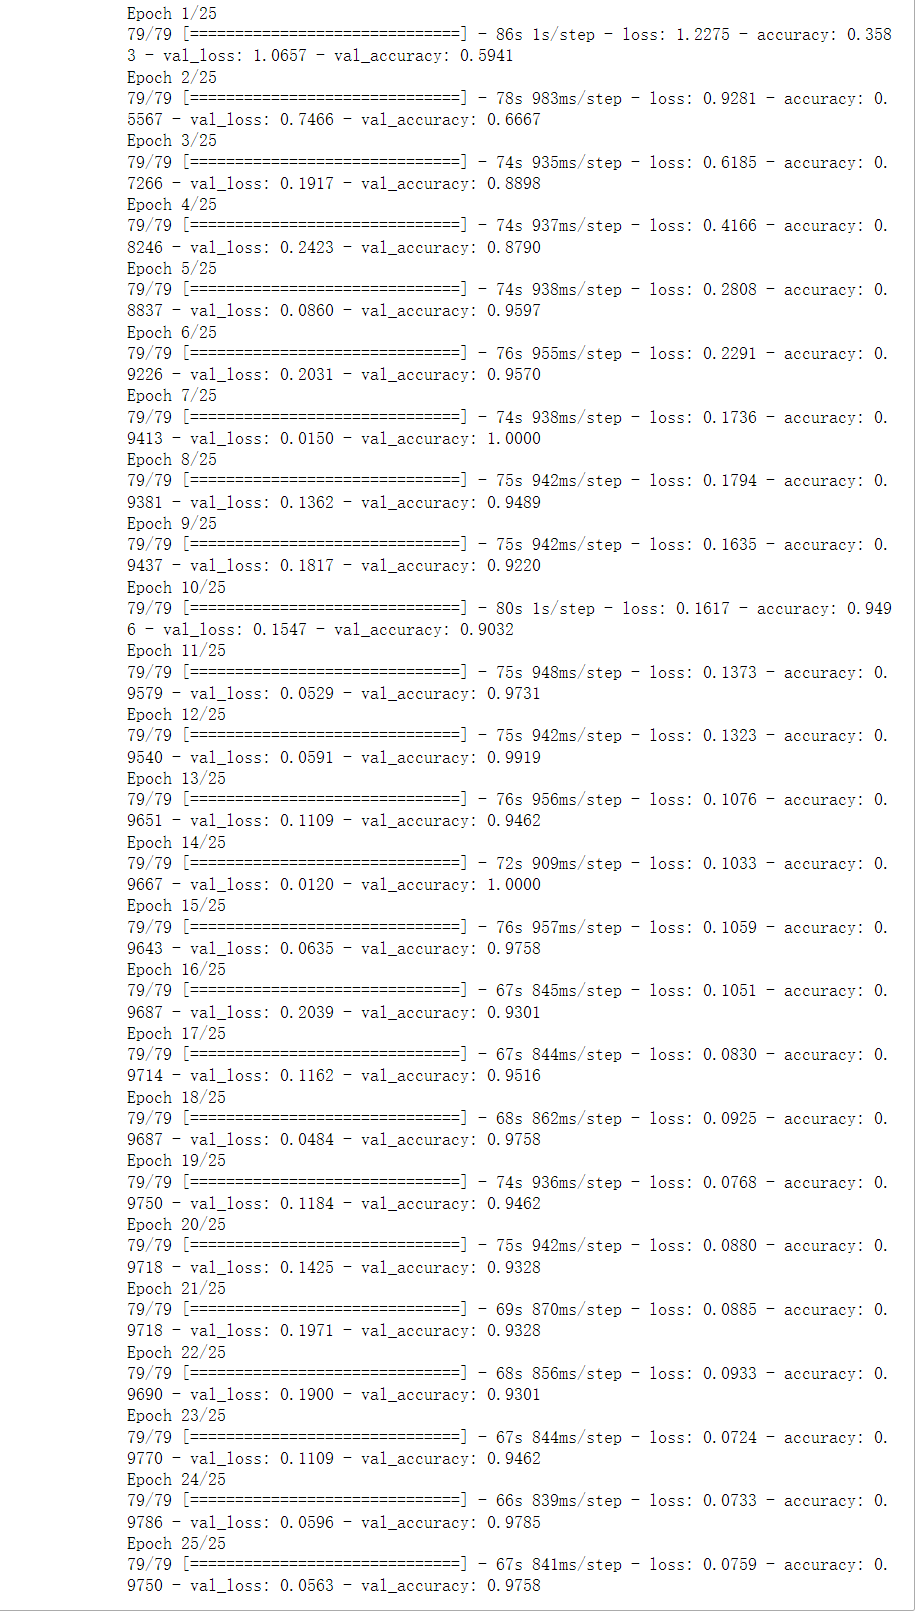
3. 模型训练与优化
model.compile(loss = 'categorical_crossentropy', optimizer='rmsprop', metrics=['accuracy'])

history = model.fit_generator(train_generator, epochs=25, validation_data = validation_generator, verbose = 1)

model.save("rps.h5")
运行结果:
4.模型评价
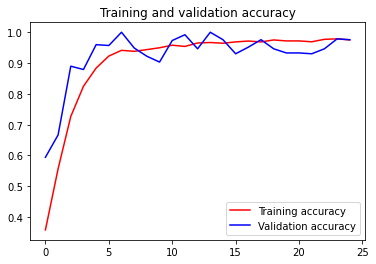
整体训练比较稳定,有时测试样本的准确率高于训练样本,这可能是训练样本不足的原因。此时,我们可以增加训练样本、调整或增加训练次数。在调整时,我们可以改变网络结构,比如增加网络的层数,增加隐层中的神经元数量。
[En]
The overall training is relatively stable, and sometimes the accuracy of the test samples is higher than that of the training samples, which may be due to the lack of training samples. At this time, we can increase the training samples, tune or increase the number of training times. When tuning, we can change the network structure, such as increasing the number of layers of the network and increasing the number of neurons in the hidden layer.
import matplotlib.pyplot as plt
acc = history.history['accuracy']
val_acc = history.history['val_accuracy']
loss = history.history['loss']
val_loss = history.history['val_loss']

epochs = range(len(acc))

plt.plot(epochs, acc, 'r', label='Training accuracy')
plt.plot(epochs, val_acc, 'b', label='Validation accuracy')
plt.title('Training and validation accuracy')
plt.legend(loc=0)
plt.figure()

plt.show()
准确率可视化:
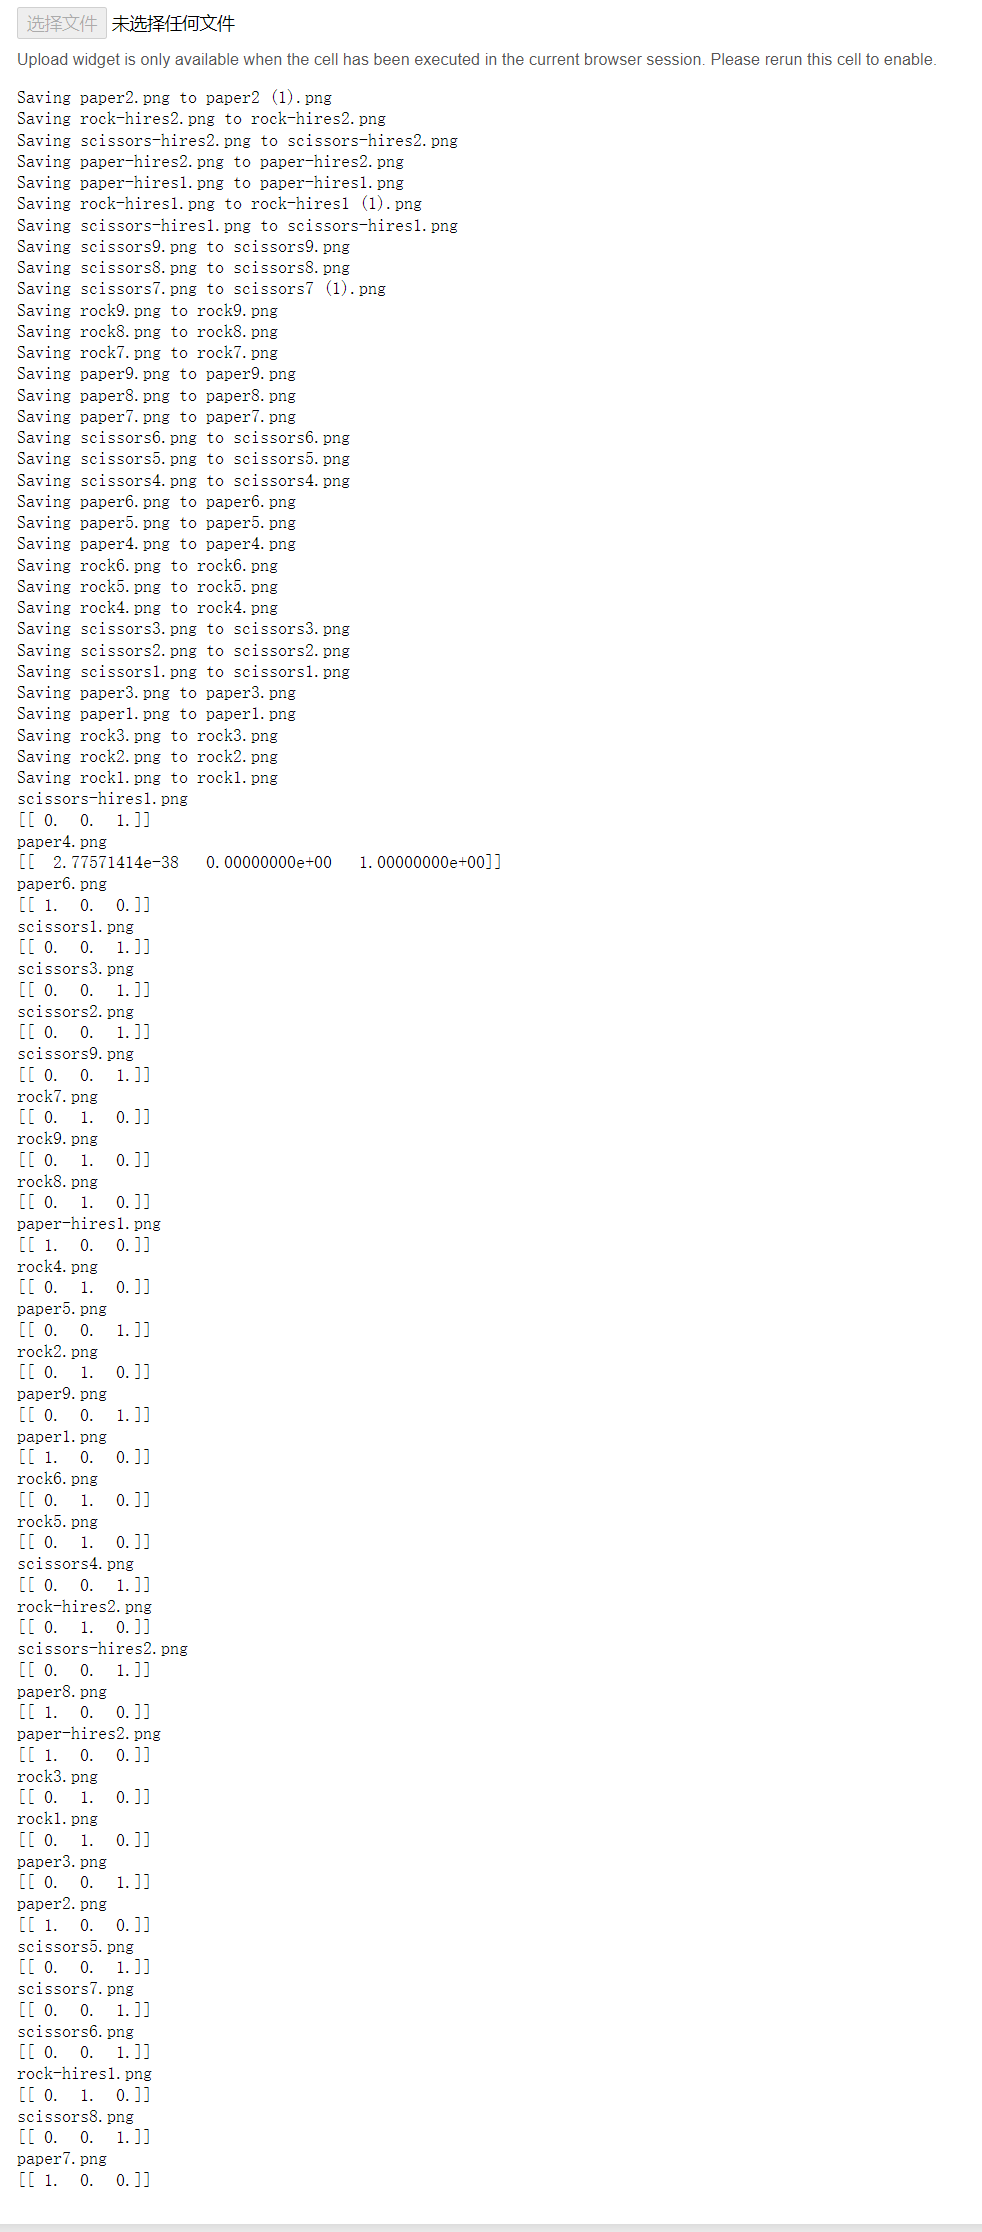
5.投入使用
import numpy as np
from google.colab import files
from keras.preprocessing import image

uploaded = files.upload()

for fn in uploaded.keys():

  path = fn
  img = image.load_img(path, target_size=(150, 150))
  x = image.img_to_array(img)
  x = np.expand_dims(x, axis=0)

  images = np.vstack([x])
  classes = model.predict(images, batch_size=10)
  print(fn)
  print(classes)
运行结果:
通过此次训练,学会加载数据,切分数据集,预处理,搭建网络,网络训练,优化测试,最后投入使用
Original: https://blog.csdn.net/fencecat/article/details/124059492
Author: Zkaisen
Title: 卷积神经网络手势识别之剪刀石头布
原创文章受到原创版权保护。转载请注明出处:https://www.johngo689.com/511736/
转载文章受原作者版权保护。转载请注明原作者出处!