

预备条件: 安装2080Ti的驱动
直接参考这个Ubuntu 18.04安装NVIDIA(英伟达) RTX2080Ti显卡。但是请注意,里边有个地方命令中包含了中文,
sudo bash NVIDIA-Linux-x86_64-430.26.run -no-opengl-files -no-x-check
一. 查看tensorflow-gpu对应的python,CUDA以及CUDNN的版本
通过tensorflow-gpu配置,得到如下信息:
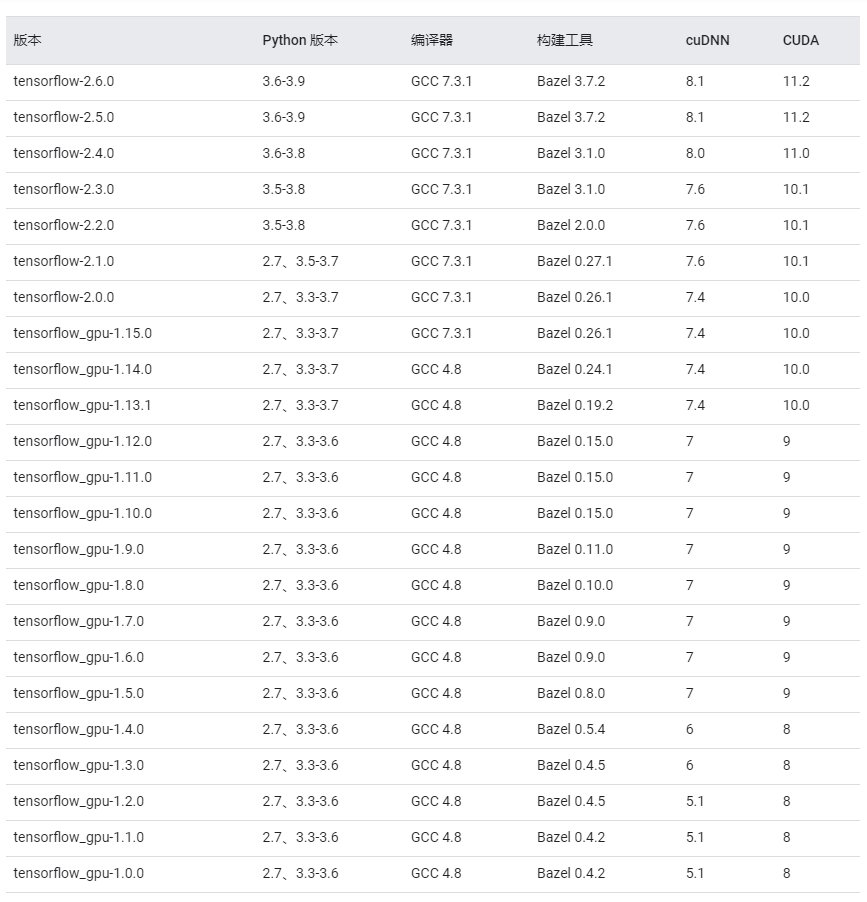

这里本人打算安装 tensorflow-gpu 2.3版本的,所以采用的 CUDA版本为 10.1, CUDNN版本为 7.6。
; 二. 安装CUDA
首先去官网地址
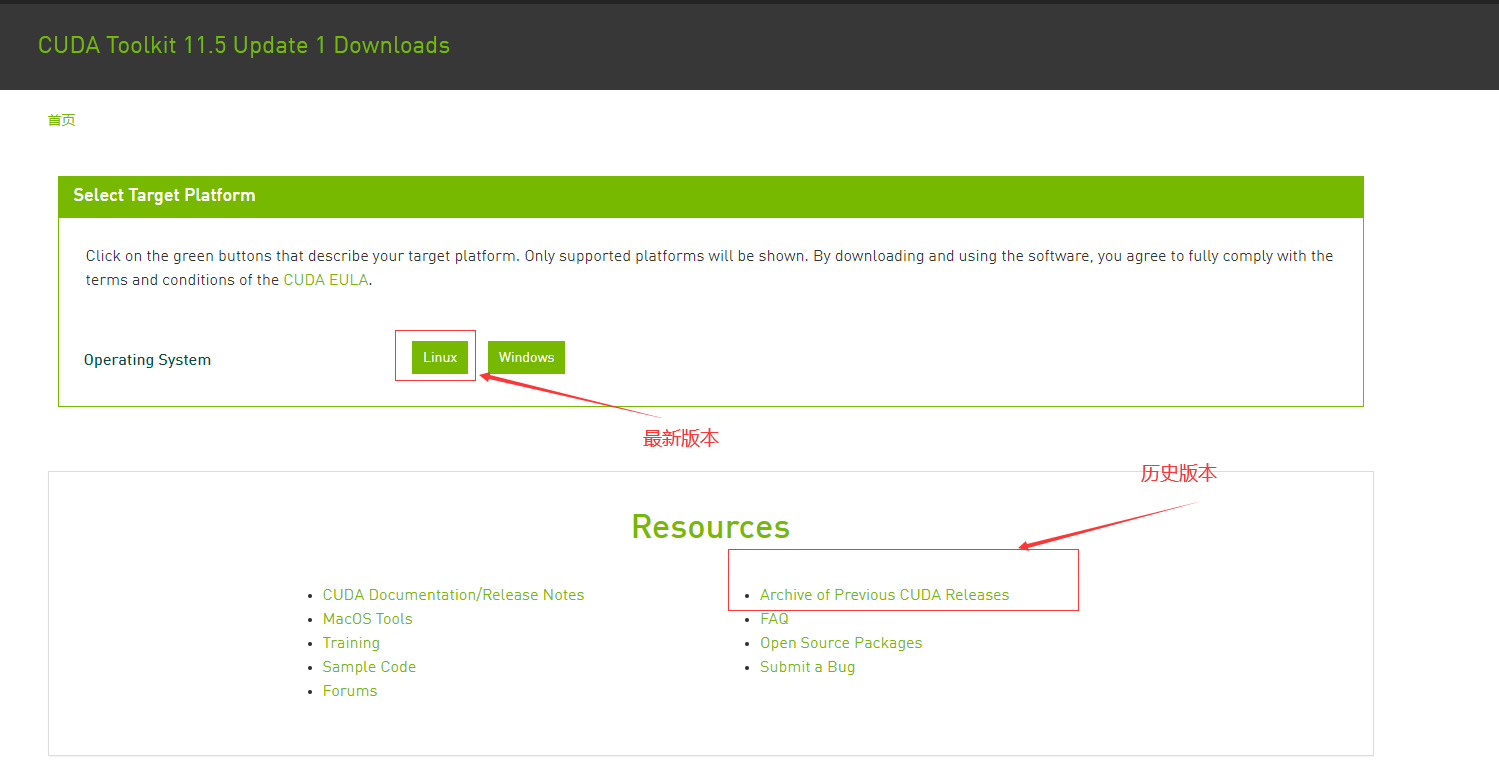
因为我们想要下载的 CUDA的版本是 10.1,截止目前 2021/12/22最新版本是 11.5。所以需要下载历史版本。你可以点击图中的历史版本的链接,也可以点击此链接去下载:
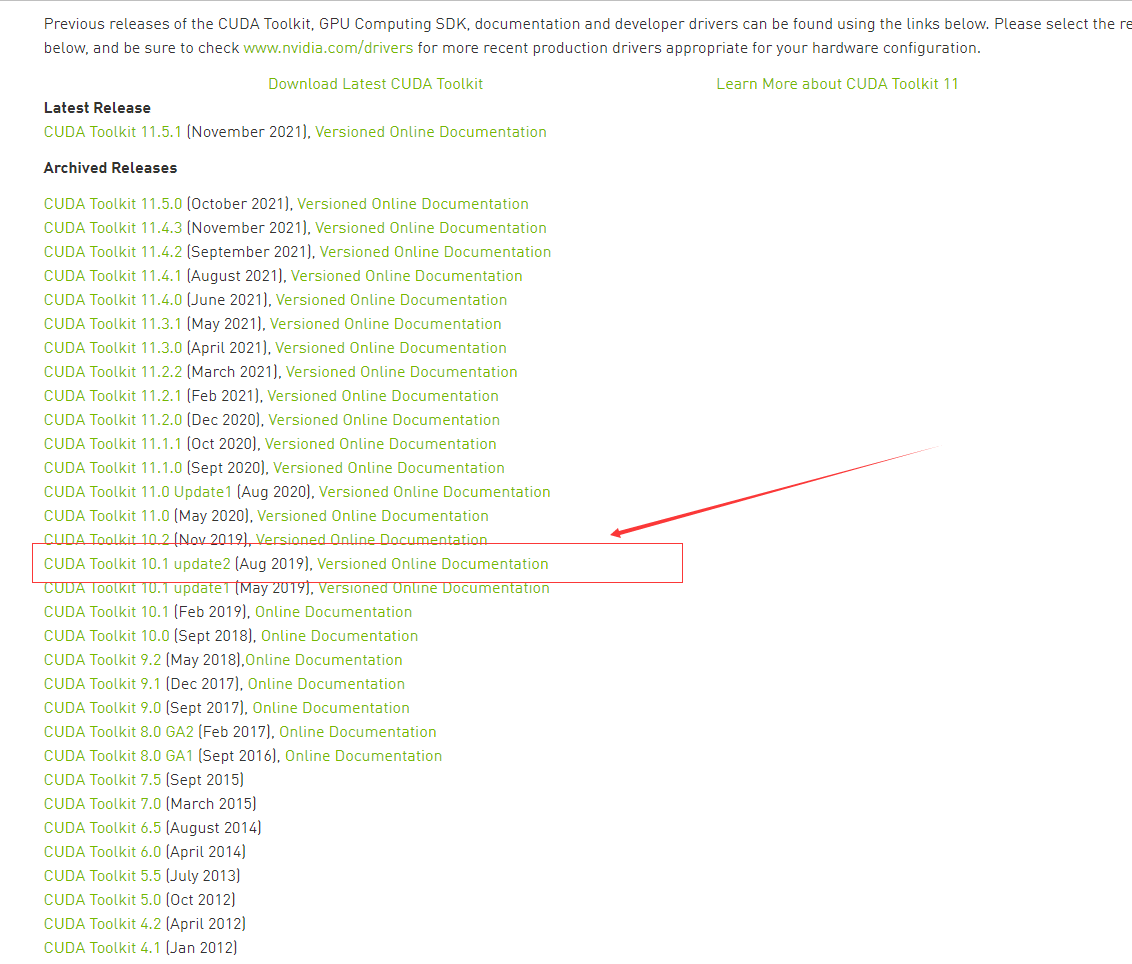
接着点击左侧的 CUDA Toolkit 10.1 update2
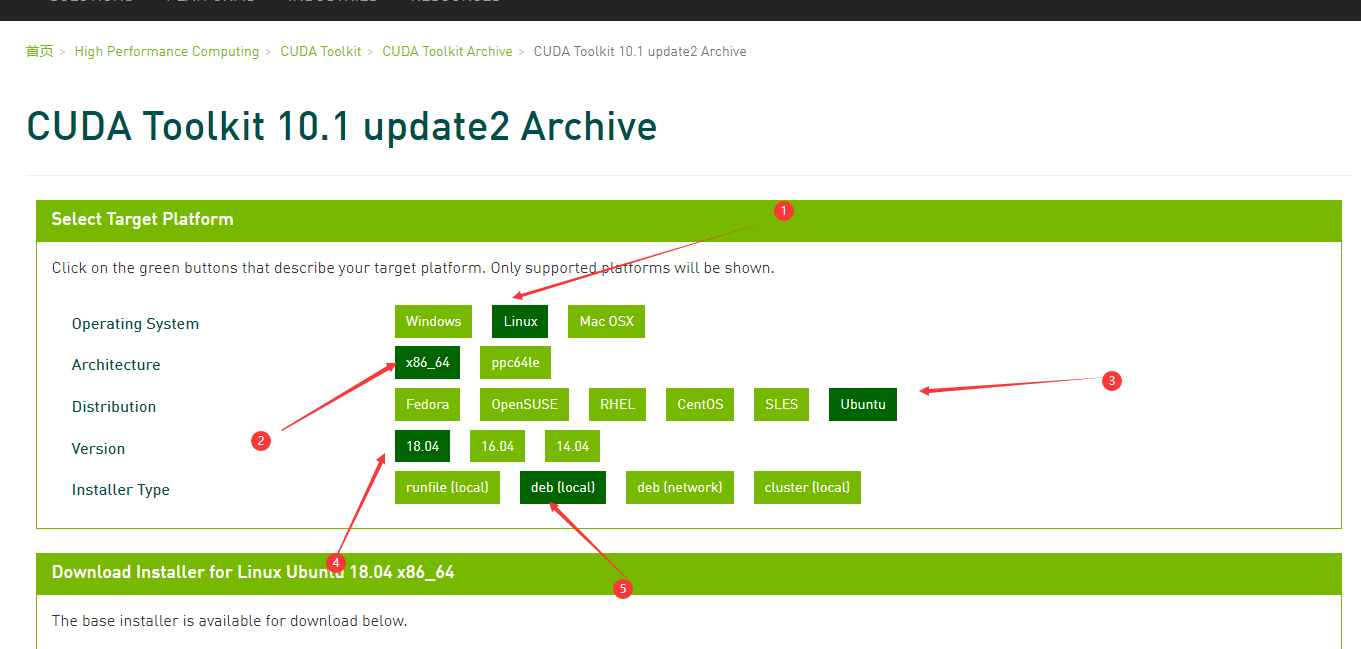
按照上面的点击顺序,可以看到下图:
[En]
According to the above click order, you can get the following picture:
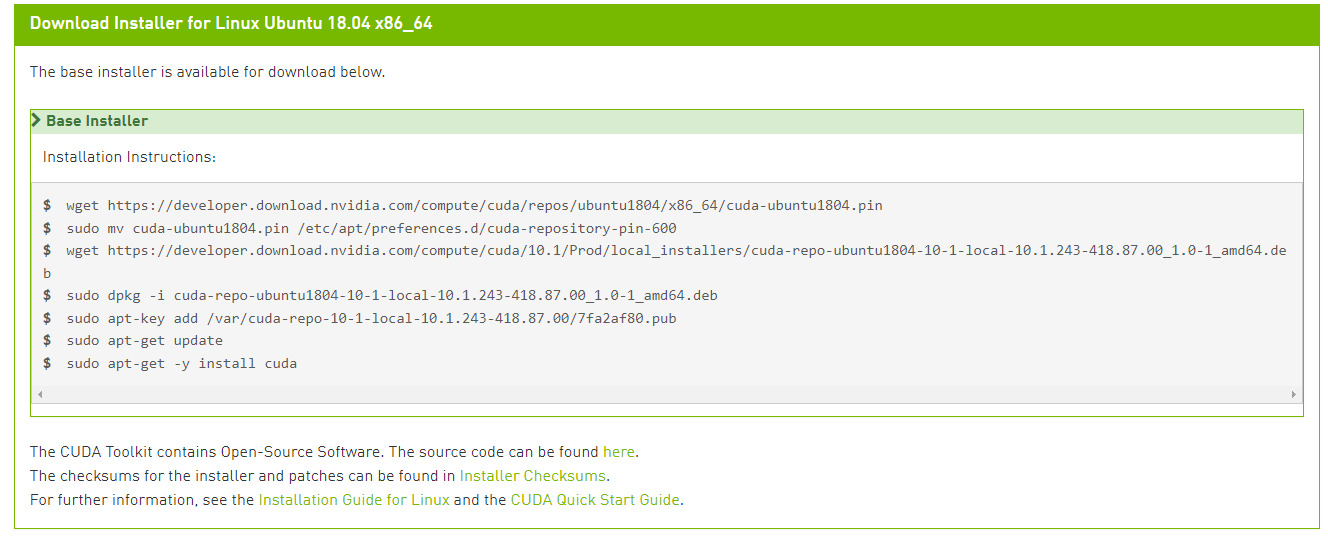
图片中的文字就是 安装步骤:
$ wget https://developer.download.nvidia.com/compute/cuda/repos/ubuntu1804/x86_64/cuda-ubuntu1804.pin
$ sudo mv cuda-ubuntu1804.pin /etc/apt/preferences.d/cuda-repository-pin-600
$ wget https://developer.download.nvidia.com/compute/cuda/10.1/Prod/local_installers/cuda-repo-ubuntu1804-10-1-local-10.1.243-418.87.00_1.0-1_amd64.deb
$ sudo dpkg -i cuda-repo-ubuntu1804-10-1-local-10.1.243-418.87.00_1.0-1_amd64.deb
$ sudo apt-key add /var/cuda-repo-10-1-local-10.1.243-418.87.00/7fa2af80.pub
$ sudo apt-get update
$ sudo apt-get -y install cuda
你如果想要安装不同于 10.1版本的 CUDA的话,你就按照上面图片点击后产生的安装步骤来(不要局限于我这个版本的)。
2.1 如何判断CUDA是否成功安装成功
这里介绍两种方式:
方法1:
$ cd /usr/local
$ ls
bin   cuda-10.1  etc    go       lib  sbin   src
cuda  doc        games  include  man  share  sunlogin
$ cd cuda-10.1
$ ls
bin     include    libnvvp           nvml    samples  targets
doc     lib64      LICENSE           nvvm    share    tools
extras  libnsight  nsightee_plugins  README  src      version.txt
$ cat version.txt
CUDA Version 10.1.243

方法2:
$ cd bin
$ ./nvcc -V
nvcc: NVIDIA (R) Cuda compiler driver
Copyright (c) 2005-2019 NVIDIA Corporation
Built on Sun_Jul_28_19:07:16_PDT_2019
Cuda compilation tools, release 10.1, V10.1.243
这样就表示我们安装成功了,当然可能见过如下测试方式:
$ nvcc -V
其实这个方法就是方法二,为啥我们这里不直接使用 nvcc -V呢?因为,我们没有把 nvcc进行环境配置,就是在别的目录下不能识别到这个可执行文件。下面是这个 nvcc的环境变量配置:
$ sudo vim ~/.bashrc

export PATH=/usr/local/cuda-10.1/bin${PATH:+:${PATH}}
export LD_LIBRARY_PATH=/usr/local/cuda-10.1/lib64${LD_LIBRARY_PATH:+:${LD_LIBRARY_PATH}}
$
$ source ~/.bashrc

$ sudo vim ~/.profile

PATH=/usr/local/cuda/bin:$PATH
export PATH
$ source ~/.profile

$ nvcc -V
nvcc: NVIDIA (R) Cuda compiler driver
Copyright (c) 2005-2019 NVIDIA Corporation
Built on Sun_Jul_28_19:07:16_PDT_2019
Cuda compilation tools, release 10.1, V10.1.243
三. 安装CUDNN
依然是打开CUDNN官网
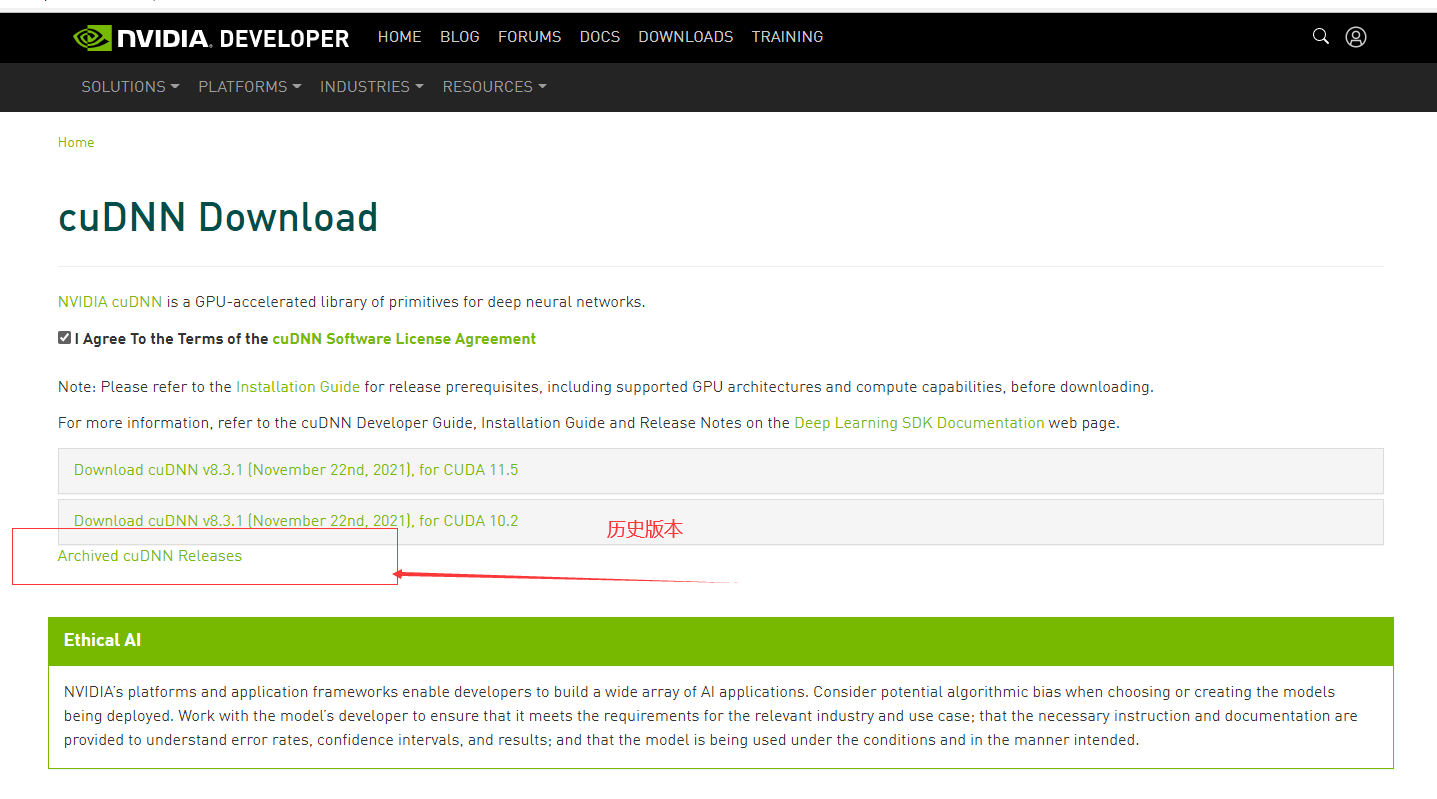
选择 Archived cuDNN Release去下载 CUDNN历史版本。因为前面说了我们想要下载的 tensorflow-gpu 2.3对应的 CUDNN版本为7.6
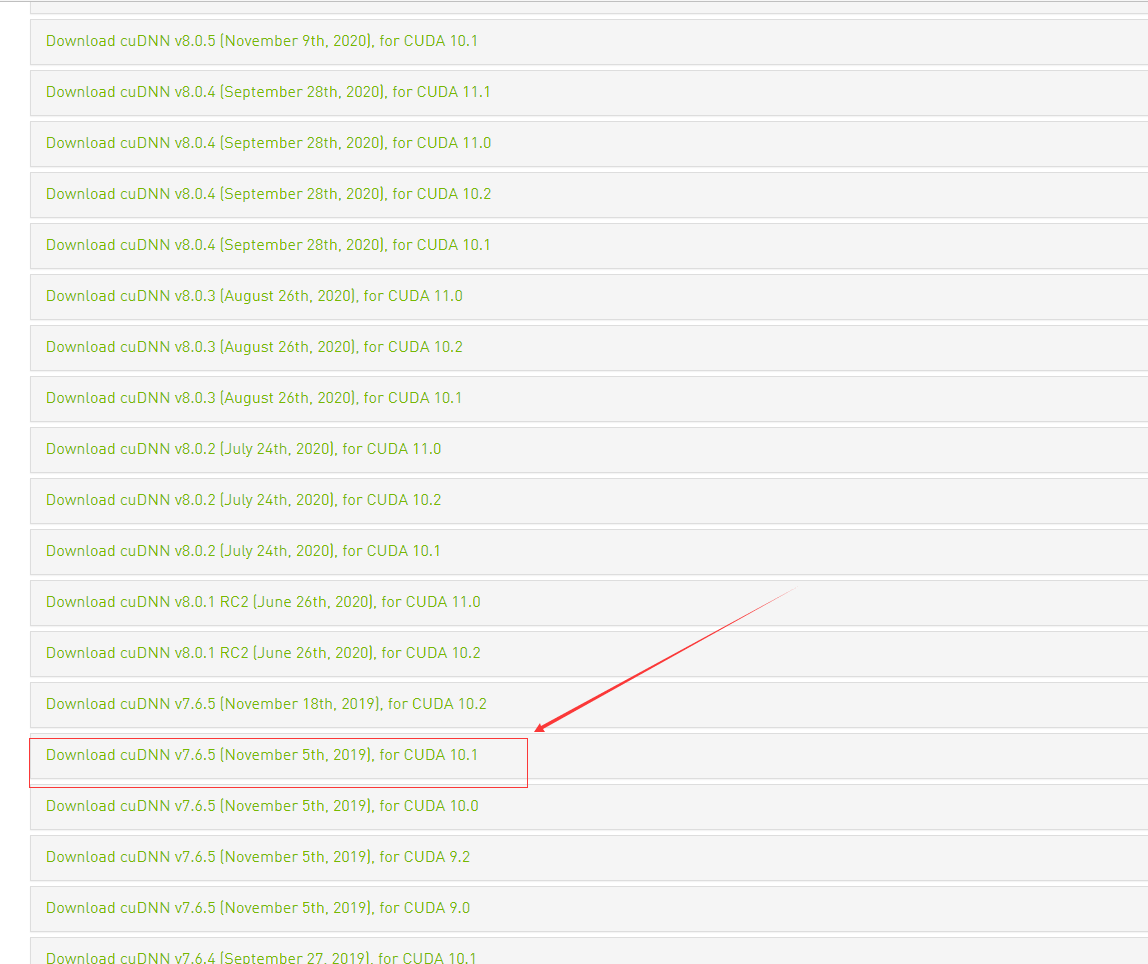
我选择的是用 deb方式安装的

; 3.1安装CUDNN
$  sudo dpkg -i libcudnn7_7.6.5.32-1+cuda10.1_amd64.deb
Selecting previously unselected package libcudnn7.

(Reading database ... 266986 files and directories currently installed.)
Preparing to unpack libcudnn7_7.6.5.32-1+cuda10.1_amd64.deb ...

Unpacking libcudnn7 (7.6.5.32-1+cuda10.1) ...

Setting up libcudnn7 (7.6.5.32-1+cuda10.1) ...

Processing triggers for libc-bin (2.27-3ubuntu1.4) ...

$ sudo dpkg -i libcudnn7-dev_7.6.5.32-1+cuda10.1_amd64.deb
Selecting previously unselected package libcudnn7-dev.

(Reading database ... 267056 files and directories currently installed.)
Preparing to unpack libcudnn7-dev_7.6.5.32-1+cuda10.1_amd64.deb ...

Unpacking libcudnn7-dev (7.6.5.32-1+cuda10.1) ...

Setting up libcudnn7-dev (7.6.5.32-1+cuda10.1) ...

update-alternatives: using /usr/include/x86_64-linux-gnu/cudnn_v7.h to provide /usr/include/cudnn.h (libcudnn) in auto mode
$ sudo dpkg -i libcudnn7-doc_7.6.5.32-1+cuda10.1_amd64.deb
(Reading database ... 267062 files and directories currently installed.)
Preparing to unpack libcudnn7-doc_7.6.5.32-1+cuda10.1_amd64.deb ...

Unpacking libcudnn7-doc (7.6.5.32-1+cuda10.1) over (7.6.5.32-1+cuda10.1) ...

Setting up libcudnn7-doc (7.6.5.32-1+cuda10.1) ...
3.2 测试安装是否成功
$  cp -r /usr/src/cudnn_samples_v7/ $HOME
$ cd $HOME/cudnn_samples_v7/mnistCUDNN
$ make clean && make
$ ./mnistCUDNN
cudnnGetVersion() : 7605 , CUDNN_VERSION from cudnn.h : 7605 (7.6.5)
Host compiler version : GCC 7.5.0
There are 1 CUDA capable devices on your machine :
device 0 : sms 68  Capabilities 7.5, SmClock 1545.0 Mhz, MemSize (Mb) 11019, MemClock 7000.0 Mhz, Ecc=0, boardGroupID=0
Using device 0

Testing single precision
Loading image data/one_28x28.pgm
Performing forward propagation ...

Testing cudnnGetConvolutionForwardAlgorithm ...

Fastest algorithm is Algo 0
Testing cudnnFindConvolutionForwardAlgorithm ...

^^^^ CUDNN_STATUS_SUCCESS for Algo 1: 0.030304 time requiring 3464 memory
^^^^ CUDNN_STATUS_SUCCESS for Algo 0: 0.035424 time requiring 0 memory
^^^^ CUDNN_STATUS_SUCCESS for Algo 5: 0.044032 time requiring 203008 memory
^^^^ CUDNN_STATUS_SUCCESS for Algo 2: 0.044192 time requiring 57600 memory
^^^^ CUDNN_STATUS_SUCCESS for Algo 7: 0.069472 time requiring 2057744 memory
Resulting weights from Softmax:
0.0000000 0.9999399 0.0000000 0.0000000 0.0000561 0.0000000 0.0000012 0.0000017 0.0000010 0.0000000
Loading image data/three_28x28.pgm
Performing forward propagation ...

Resulting weights from Softmax:
0.0000000 0.0000000 0.0000000 0.9999288 0.0000000 0.0000711 0.0000000 0.0000000 0.0000000 0.0000000
Loading image data/five_28x28.pgm
Performing forward propagation ...

Resulting weights from Softmax:
0.0000000 0.0000008 0.0000000 0.0000002 0.0000000 0.9999820 0.0000154 0.0000000 0.0000012 0.0000006

Result of classification: 1 3 5

Test passed!

Testing half precision (math in single precision)
Loading image data/one_28x28.pgm
Performing forward propagation ...

Testing cudnnGetConvolutionForwardAlgorithm ...

Fastest algorithm is Algo 0
Testing cudnnFindConvolutionForwardAlgorithm ...

^^^^ CUDNN_STATUS_SUCCESS for Algo 0: 0.010240 time requiring 0 memory
^^^^ CUDNN_STATUS_SUCCESS for Algo 1: 0.022496 time requiring 3464 memory
^^^^ CUDNN_STATUS_SUCCESS for Algo 2: 0.030304 time requiring 28800 memory
^^^^ CUDNN_STATUS_SUCCESS for Algo 7: 0.044704 time requiring 2057744 memory
^^^^ CUDNN_STATUS_SUCCESS for Algo 5: 0.052928 time requiring 203008 memory
Resulting weights from Softmax:
0.0000001 1.0000000 0.0000001 0.0000000 0.0000563 0.0000001 0.0000012 0.0000017 0.0000010 0.0000001
Loading image data/three_28x28.pgm
Performing forward propagation ...

Resulting weights from Softmax:
0.0000000 0.0000000 0.0000000 1.0000000 0.0000000 0.0000714 0.0000000 0.0000000 0.0000000 0.0000000
Loading image data/five_28x28.pgm
Performing forward propagation ...

Resulting weights from Softmax:
0.0000000 0.0000008 0.0000000 0.0000002 0.0000000 1.0000000 0.0000154 0.0000000 0.0000012 0.0000006

Result of classification: 1 3 5

Test passed!
四安装 tensorflow-gpu
$ sudo apt-get install python3

$ sudo apt-get install python3-pip

$ pip3 install --upgrade pip

$ sudo mkdir ~/.pip
$ cd ~/.pip
$ sudo vim pip.conf
[global]
index-url = http://mirrors.aliyun.com/pypi/simple
[install]
trusted-host=mirrors.aliyun.com

$ pip3 install tensorflow-gpu==2.3.2

ERROR: pip's dependency resolver does not currently take into account all the packages that are installed. This behaviour is the source of the following dependency conflicts.

launchpadlib 1.10.6 requires testresources, which is not installed.

Successfully installed absl-py-1.0.0 astunparse-1.6.3 cachetools-4.2.4 charset-normalizer-2.0.9 dataclasses-0.8 gast-0.3.3 google-auth-2.3.3 google-auth-oauthlib-0.4.6 google-pasta-0.2.0 grpcio-1.43.0 h5py-2.10.0 importlib-metadata-4.8.3 keras-preprocessing-1.1.2 markdown-3.3.6 numpy-1.18.5 oauthlib-3.1.1 opt-einsum-3.3.0 protobuf-3.19.1 pyasn1-0.4.8 pyasn1-modules-0.2.8 requests-2.26.0 requests-oauthlib-1.3.0 rsa-4.8 setuptools-59.6.0 six-1.16.0 tensorboard-2.7.0 tensorboard-data-server-0.6.1 tensorboard-plugin-wit-1.8.0 tensorflow-estimator-2.3.0 tensorflow-gpu-2.3.2 termcolor-1.1.0 typing-extensions-4.0.1 werkzeug-2.0.2 wrapt-1.13.3 zipp-3.6.0
五.最终测试
>>> import tensorflow as tf
2021-12-22 14:49:15.608668: I tensorflow/stream_executor/platform/default/dso_loader.cc:48] Successfully opened dynamic library libcudart.so.10.1
>>> print(tf.__version__)
2.3.2
>>>
至此,本文结束,希望能帮助大家成功入门!
Original: https://blog.csdn.net/qq_34988341/article/details/122081583
Author: 永远在路上啊
Title: ubuntu 18.04 安装CUDA + CUDNN + tensorflow-gpu
原创文章受到原创版权保护。转载请注明出处:https://www.johngo689.com/509588/
转载文章受原作者版权保护。转载请注明原作者出处!