

1. 数据建模
通常在做项目的过程中,在items.py中进行数据建模
1.1 为什么建模
- 定义item即提前规划好哪些字段需要抓,防止手误,因为定义好之后,在运行过程中,系统会自动检查
- 配合注释一起可以清晰的知道要抓取哪些字段,没有定义的字段不能抓取,在目标字段少的时候可以使用字典代替
- 使用scrapy的一些特定组件需要Item做支持,如scrapy的ImagesPipeline管道类,百度搜索了解更多
1.2 如何建模
在items.py文件中定义要提取的字段:
class MyspiderItem(scrapy.Item):
    name = scrapy.Field()   # 讲师的名字
    title = scrapy.Field()  # 讲师的职称
    desc = scrapy.Field()   # 讲师的介绍
代码单独测试:
Define here the models for your scraped items
#
See documentation in:
https://docs.scrapy.org/en/latest/topics/items.html
import scrapy
class MyspiderItem(scrapy.Item):
# define the fields for your item here like:
# 讲师名字
name = scrapy.Field()
# 头衔
title = scrapy.Field()
# 详细描述
desc = scrapy.Field()
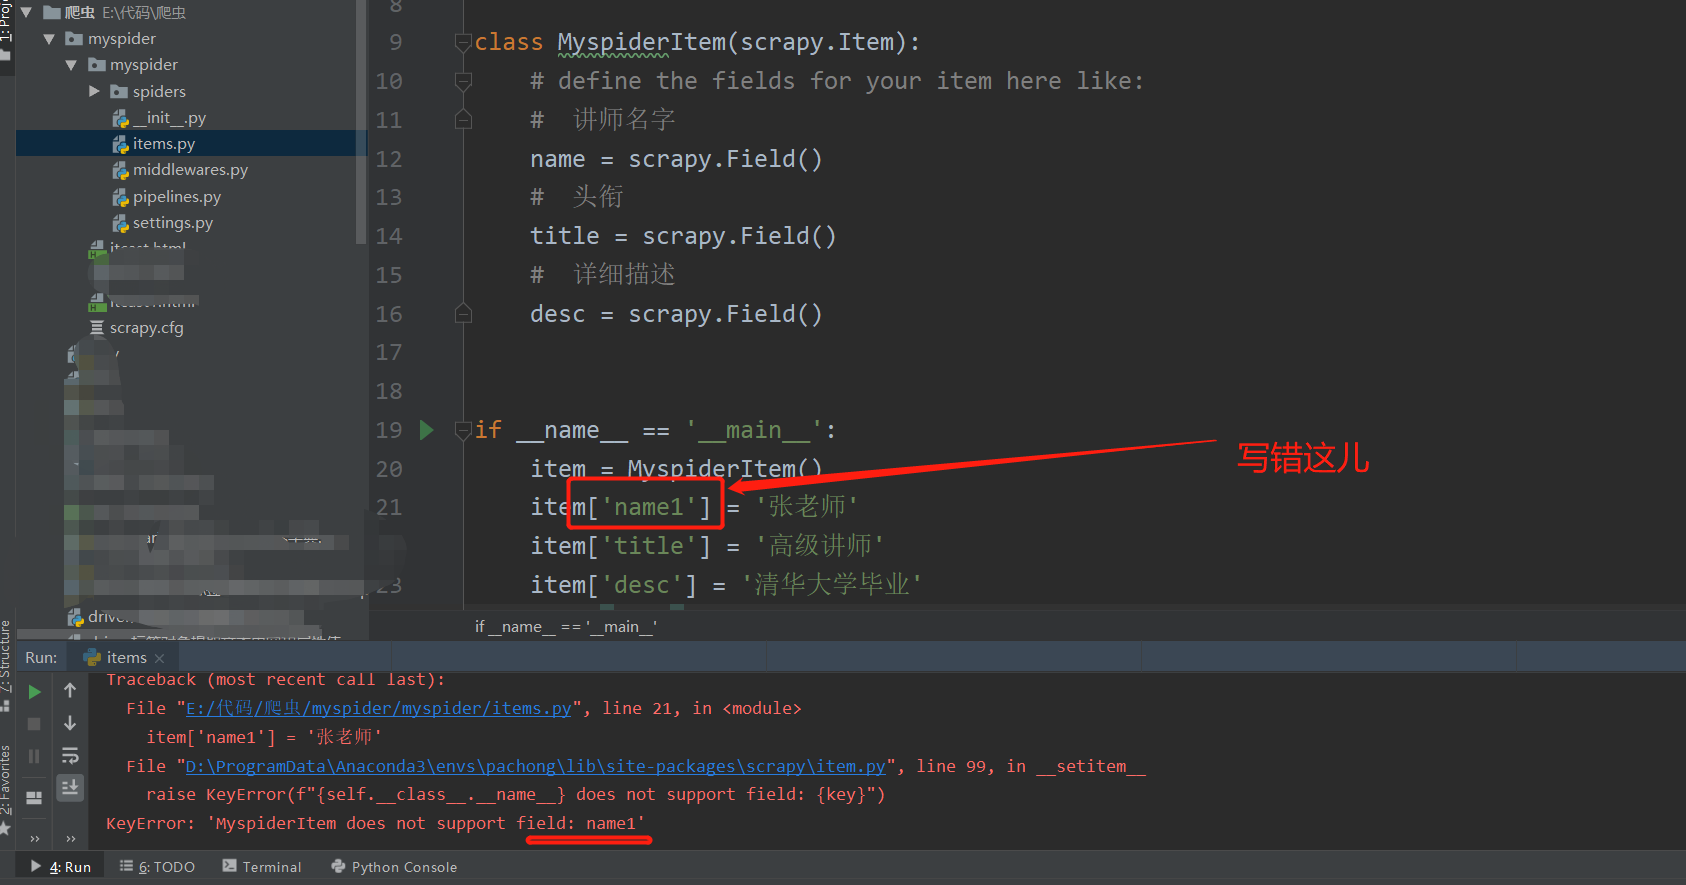
if __name__ == '__main__':
item = MyspiderItem()
item['name'] = '张老师'
item['title'] = '高级讲师'
item['desc'] = '清华大学毕业'
print(item)
运行效果:


1.3 如何使用模板类
模板类定义以后需要在爬虫中导入并且实例化,之后的使用方法和使用字典相同
job.py:
from myspider.items import MyspiderItem   # 导入Item,注意路径

    def parse(self, response)

        item = MyspiderItem() # 实例化后可直接使用

        item['name'] = node.xpath('./h3/text()').extract_first()
        item['title'] = node.xpath('./h4/text()').extract_first()
        item['desc'] = node.xpath('./p/text()').extract_first()

        print(item)
示例代码:
import scrapy
from myspider.items import MyspiderItem

class ItcastSpider(scrapy.Spider):
    name = 'itcast'
    #  2.检查域名
    allowed_domains = ['itcast.cn']
    # start_urls = ['http://itcast.cn/']
    #  1.修改起始url
    start_urls = ['http://www.itcast.cn/channel/teacher.shtml#ajavaee']

    #  3.在parse方法中实现爬取逻辑
    #  response是上面的url响应的结果
    def parse(self, response):
        # with open('itcast1.html', 'wb') as f:
        #     f.write(response.body)
        #  获取所有老师的节点
        node_list = response.xpath('//div[@class="li_txt"]')
        print(len(node_list))

        #  遍历教师节点
        for node in node_list:
            # temp = {}
            item = MyspiderItem()  #  实例化后可以直接使用

            #  xpath方法返回的是选择器对象列表,extract()用于从选择器对象中提取数据
            item['name'] = node.xpath('./h3/text()').extract_first()
            item['title'] = node.xpath('./h4/text()')[0].extract()
            item['desc'] = node.xpath('./p/text()')[0].extract()

            #  xpath结果为只含有一个值的列表,可以使用extract_first(),如果为多个值则使用extract()
            # print(temp)
            yield item
注意:
- from myspider.items import MyspiderItem这一行代码中 注意item的正确导入路径,忽略pycharm标记的错误
- python中的导入路径要诀:从哪里开始运行,就从哪里开始导入
把上面代码补充完整后,运行代码后会出现下面的错误:
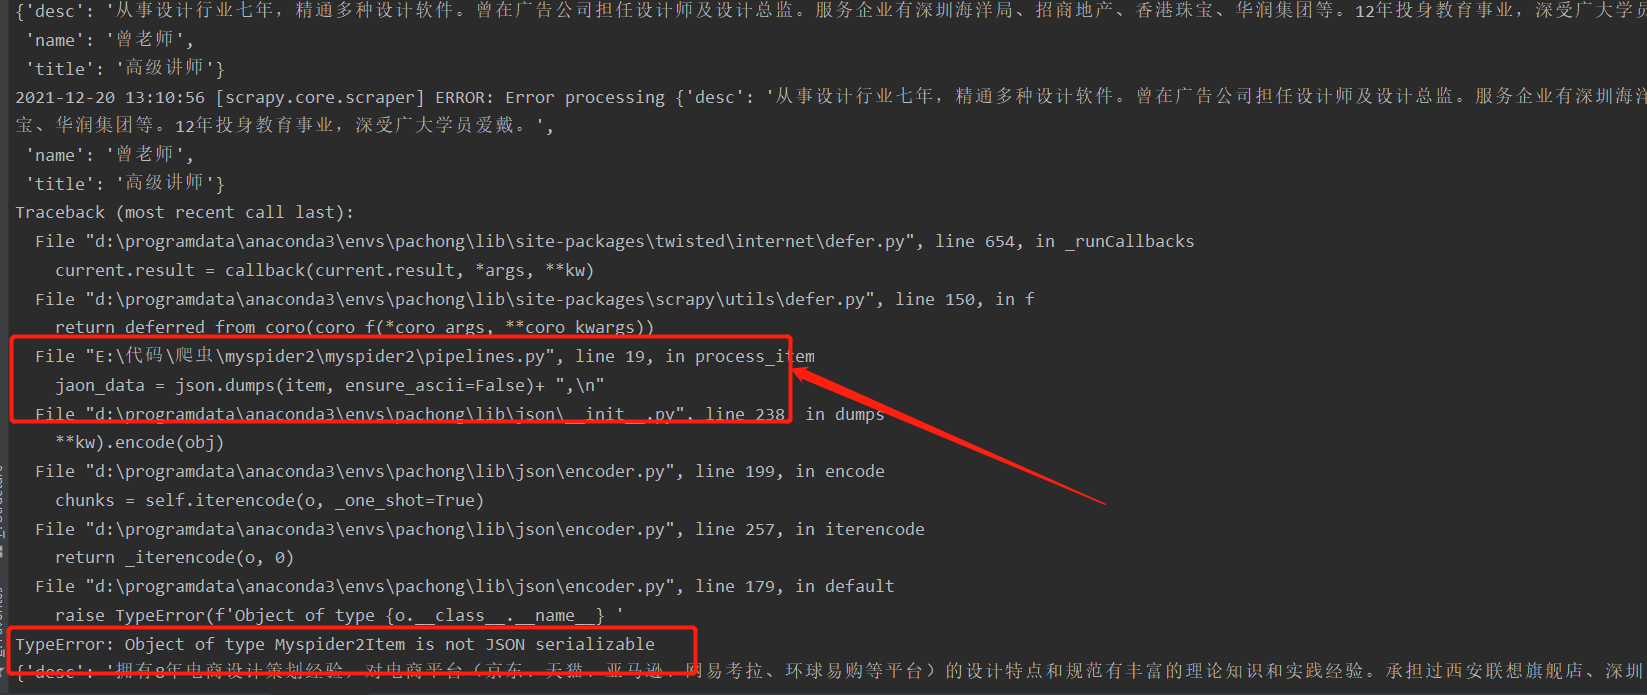
将输入的item转化为字典格式就好了
示例代码:
Define your item pipelines here
#
Don't forget to add your pipeline to the ITEM_PIPELINES setting
See: https://docs.scrapy.org/en/latest/topics/item-pipeline.html
useful for handling different item types with a single interface
from itemadapter import ItemAdapter
import json
class Myspider2Pipeline:
# 爬虫文件中提取数据的方法每yield一次item,就会运行一次
def __init__(self):
self.file = open('itcast2.json', 'w', encoding='UTF-8')
# 该方法为固定名称函数
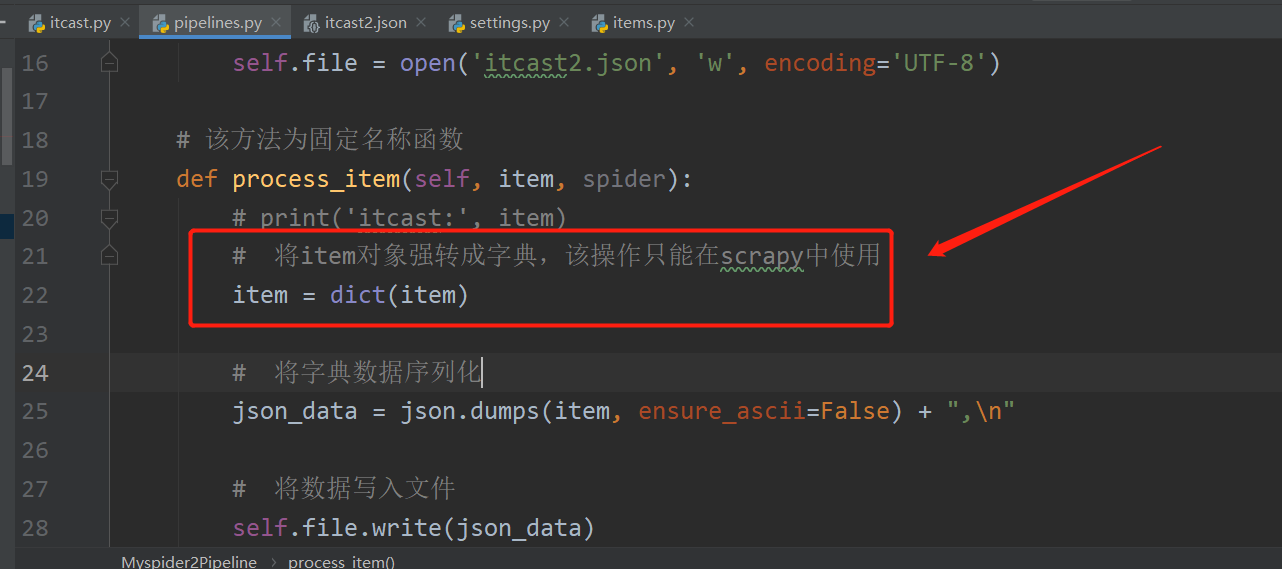
def process_item(self, item, spider):
# print('itcast:', item)
# 将item对象强转成字典,该操作只能在scrapy中使用
item = dict(item)
# 将字典数据序列化
json_data = json.dumps(item, ensure_ascii=False) + ",\n"
# 将数据写入文件
self.file.write(json_data)
# 默认使用完管道之后需要将数据返回给引擎
return item
def __del__(self):
self.file.close()
1.4 开发流程总结
- 创建项目
scrapy startproject 项目名 - 明确目标
在items.py文件中进行建模 - 创建爬虫
3.1 创建爬虫
scrapy genspider 爬虫名 允许的域
3.2 完成爬虫
 修改start_urls
 检查修改allowed_domains
 编写解析方法
- 保存数据
在pipelines.py文件中定义对数据处理的管道
在settings.py文件中注册启用管道
2. 翻页请求的思路
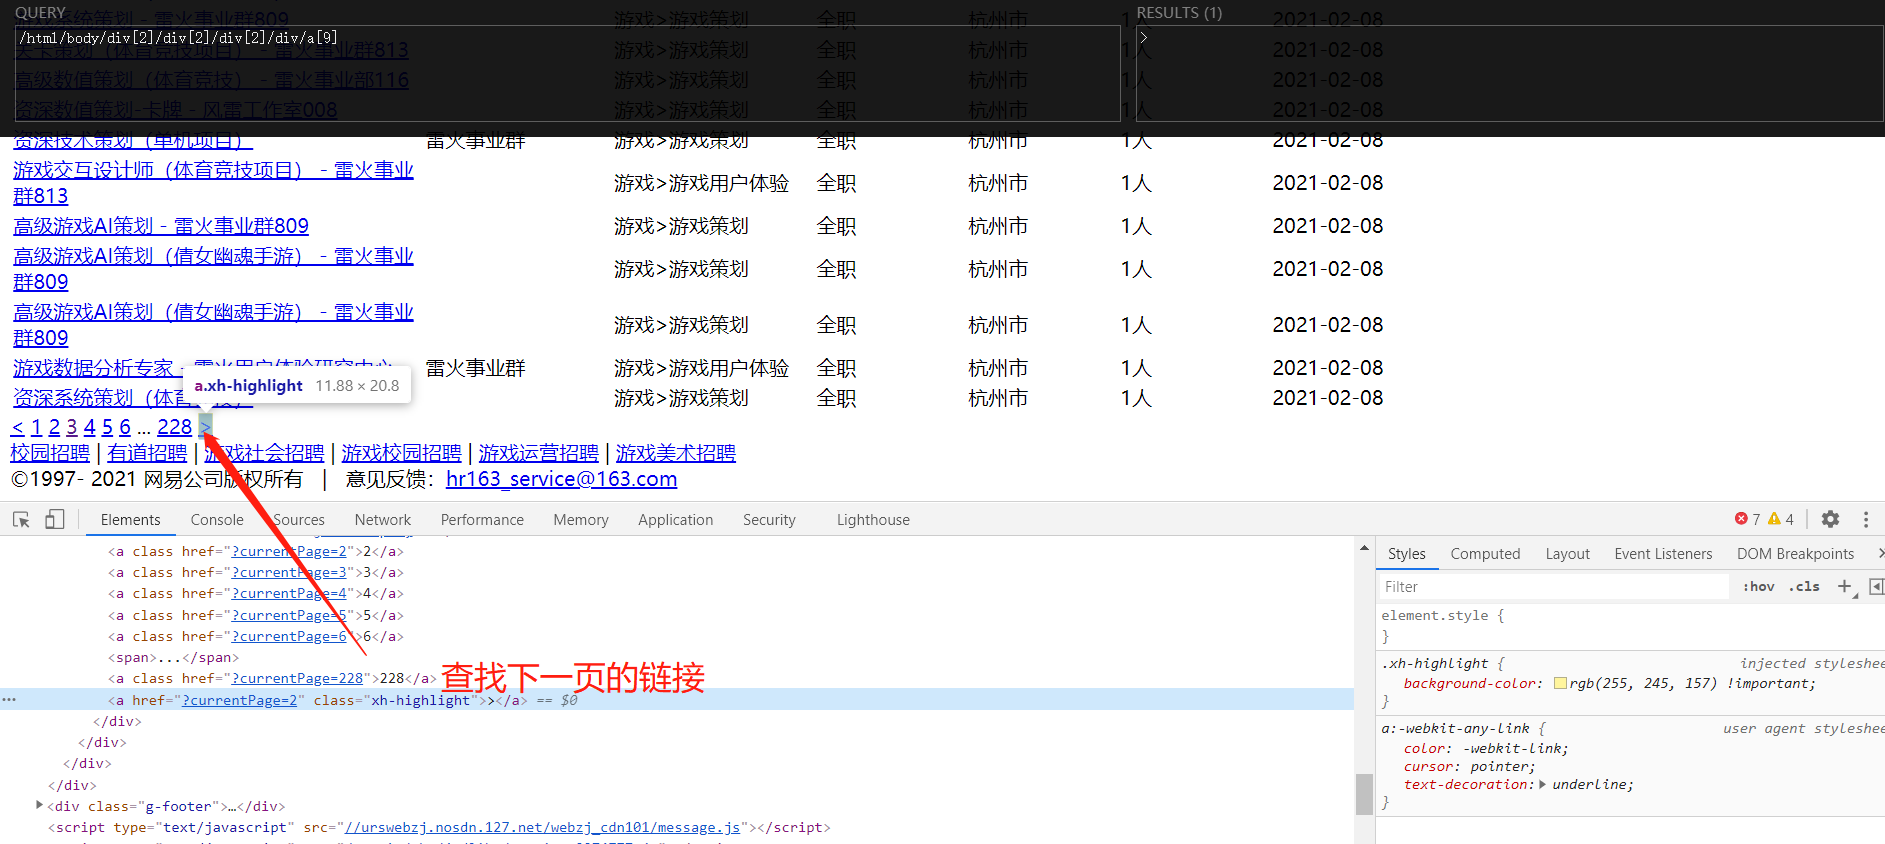
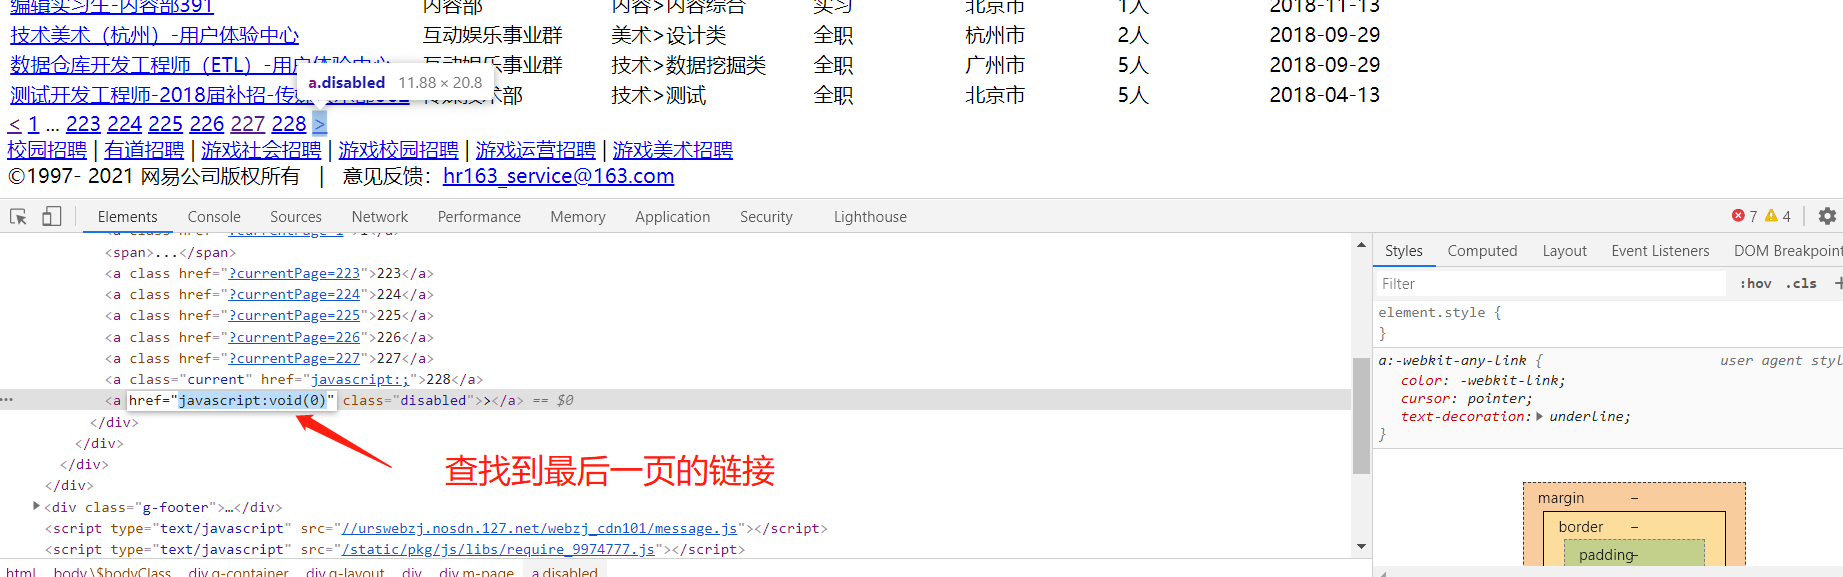
对于要提取如下图中所有页面上的数据该怎么办?

回顾requests模块是如何实现翻页请求的:
- 找到下一页的URL地址
- 调用requests.get(url)
scrapy实现翻页的思路:
- 找到下一页的url地址
- 构造url地址的请求对象,传递给引擎
3. 构造Request对象,并发送请求
3.1 实现方法
- 确定url地址
- 构造请求,scrapy.Request(url,callback)
- callback:指定解析函数名称,表示该请求返回的响应使用哪一个函数进行解析
- 把请求交给引擎:yield scrapy.Request(url,callback)
3.2 网易招聘爬虫
通过爬取网易招聘的页面的招聘信息,学习如何实现翻页请求
地址:职位搜索
思路分析:
- 获取首页的数据
- 寻找下一页的地址,进行翻页,获取数据
注意:
- 可以在settings中设置ROBOTS协议
False表示忽略网站的robots.txt协议,默认为True
ROBOTSTXT_OBEY = False
- 可以在settings中设置User-Agent:
scrapy发送的每一个请求的默认UA都是设置的这个User-Agent
USER_AGENT = 'Mozilla/5.0 (Macintosh; Intel Mac OS X 10_12_5) AppleWebKit/537.36 (KHTML, like Gecko) Chrome/59.0.3071.115 Safari/537.36'
3.3 代码实现
在爬虫文件的parse方法中:
......

    # 提取下一页的href
    next_url = response.xpath('//a[contains(text(),">")]/@href').extract_first()

    # 判断是否是最后一页
    if next_url != 'javascript:void(0)':

        # 构造完整url
        url = 'https://hr.163.com/position/list.do' + next_url

        # 构造scrapy.Request对象,并yield给引擎
        # 利用callback参数指定该Request对象之后获取的响应用哪个函数进行解析
        yield scrapy.Request(url, callback=self.parse)
......
3.4 scrapy.Request的更多参数
scrapy.Request(url[,callback,method="GET",headers,body,cookies,meta,dont_filter=False])
参数解释
- 中括号里的参数为可选参数
- callback:表示当前的url的响应交给哪个函数去处理
- meta:实现数据在不同的解析函数中传递,meta默认带有部分数据,比如下载延迟,请求深度等【用于解析方法之间的数据传递,常用在一条数据分散在不同结构的页面中的情况】
- dont_filter:默认为False,会过滤请求的url地址,即请求过的url地址不会继续被请求,对需要重复请求的url地址可以把它设置为Ture,比如贴吧的翻页请求,页面的数据总是在变化; start_urls中的地址会被反复请求,否则程序不会启动
- method:指定POST或GET请求
- headers:接收一个字典,其中不包括cookies
- cookies:接收一个字典,专门放置cookies
- body:接收json字符串,为POST的数据,发送payload_post请求时使用,下面博文会继续介绍post请求
示例代码:
items.py:
Define here the models for your scraped items
#
See documentation in:
https://docs.scrapy.org/en/latest/topics/items.html

import scrapy

class WangyiItem(scrapy.Item):
    # define the fields for your item here like:
    name = scrapy.Field()
    link = scrapy.Field()
    depart = scrapy.Field()
    category = scrapy.Field()
    type = scrapy.Field()
    address = scrapy.Field()
    num = scrapy.Field()
    date = scrapy.Field()
job.py:(创建的爬虫任务)
import scrapy
from wangyi.items import WangyiItem

class JobSpider(scrapy.Spider):
    name = 'job'
    allowed_domains = ['163.com']
    start_urls = ['https://hr.163.com/position/list.do']

    def parse(self, response):
        #  提取数据
        print(response.url)

        #  获取所有的职位节点列表
        node_list = response.xpath('//*[@class="position-tb"]/tbody/tr')
        print(len(node_list))

        #  遍历节点列表
        for num, node in enumerate(node_list):
            #  设置过滤条件,将目标节点获取出来
            if num % 2 == 0:
                item = WangyiItem()
                item['name'] = node.xpath('./td[1]/a/text()').extract_first()
                #  response.urljoin()用于拼接相对路径的url,可以理解成自动补全
                item['link'] = response.urljoin(node.xpath('./td[1]/a/@href').extract_first())
                item['depart'] = node.xpath('./td[2]/text()').extract_first()
                item['category'] = node.xpath('./td[3]/text()').extract_first()
                item['type'] = node.xpath('./td[4]/text()').extract_first()
                item['address'] = node.xpath('./td[5]/text()').extract_first()
                item['num'] = node.xpath('./td[6]/text()').extract_first().strip()
                item['date'] = node.xpath('./td[7]/text()').extract_first()
                # print(item)
                yield item

        #  模拟翻页
        part_url = response.xpath('/html/body/div[2]/div[2]/div[2]/div/a[last()]/@href').extract_first()
        print(part_url)
        #  判断中止条件
        if part_url != 'javascript:void(0)':
            next_url = response.urljoin(part_url)
            #  构建请求对象,并且返回给引擎
            yield scrapy.Request(
                url=next_url,
                callback=self.parse  #  这儿若不写也是默认用parse方法来解析的
            )
pipelinses.py:
Define your item pipelines here
#
Don't forget to add your pipeline to the ITEM_PIPELINES setting
See: https://docs.scrapy.org/en/latest/topics/item-pipeline.html

useful for handling different item types with a single interface
from itemadapter import ItemAdapter
import json

class WangyiPipeline:

    def __init__(self):
        self.file = open('wangyi.json', 'w')

    def process_item(self, item, spider):
        item = dict(item)

        str_data = json.dumps(item, ensure_ascii=False) + ',\n'
        self.file.write(str_data)
        return item

    def __del__(self):
        self.file.close()
思路提示:
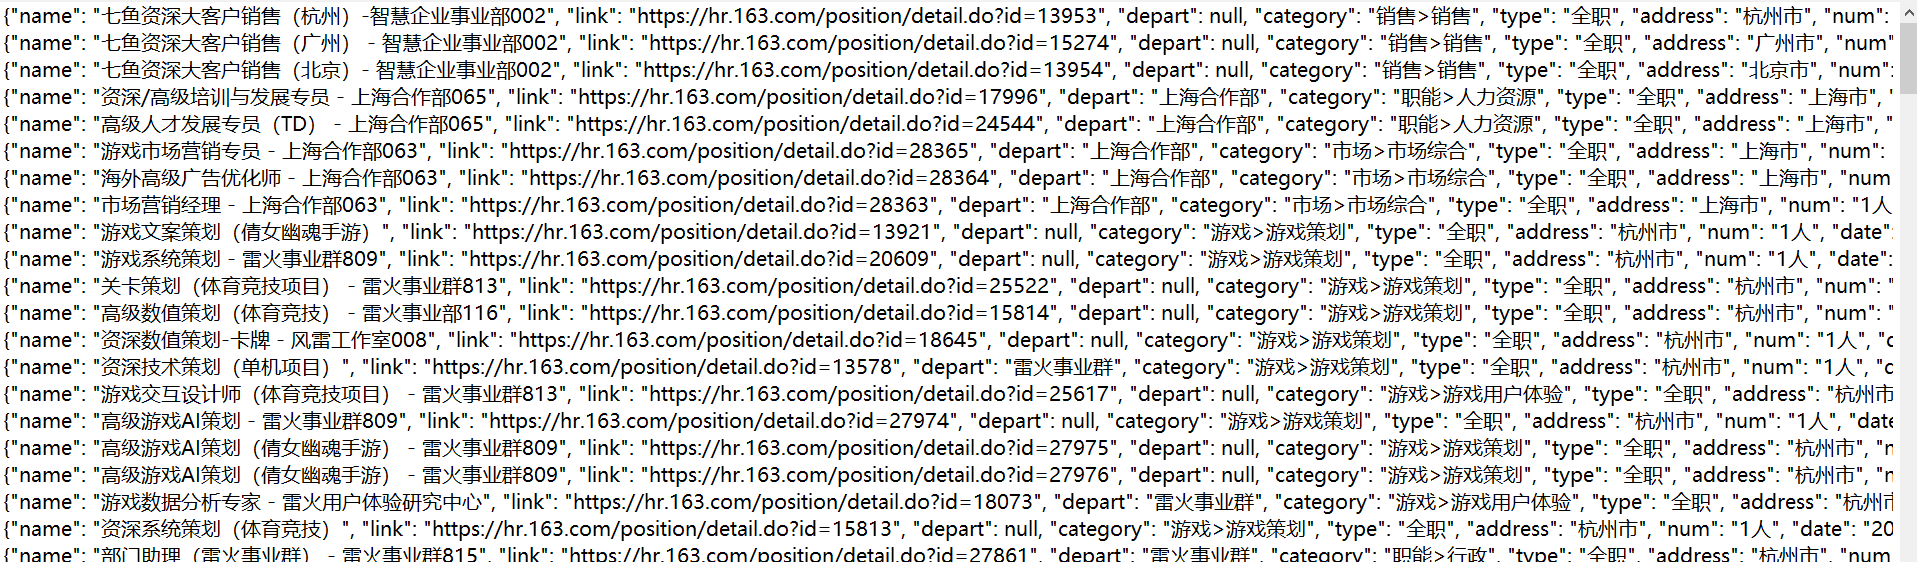
爬取效果:
meta的作用:meta可以实现数据在不同的解析函数中的传递
在爬虫文件的parse方法中,提取详情页增加之前callback指定的parse_detail函数:
def parse(self,response):
    ...

    yield scrapy.Request(detail_url, callback=self.parse_detail,meta={"item":item})
...

def parse_detail(self,response):
    #获取之前传入的item
    item = resposne.meta["item"]
特别注意
- meta参数是一个字典
- meta字典中有一个固定的键
proxy,表示代理ip,关于代理ip的使用将在scrapy的下载中间件中进行介绍
示例代码:
job.py:
import scrapy
from wangyi.items import WangyiItem

class JobSpider(scrapy.Spider):
    name = 'job'
    allowed_domains = ['163.com']
    start_urls = ['https://hr.163.com/position/list.do']

    def parse(self, response):
        #  提取数据
        print(response.url)

        #  获取所有的职位节点列表
        node_list = response.xpath('//*[@class="position-tb"]/tbody/tr')
        print(len(node_list))

        #  遍历节点列表
        for num, node in enumerate(node_list):
            #  设置过滤条件,将目标节点获取出来
            if num % 2 == 0:
                item = WangyiItem()
                item['name'] = node.xpath('./td[1]/a/text()').extract_first()
                #  response.urljoin()用于拼接相对路径的url,可以理解成自动补全
                item['link'] = response.urljoin(node.xpath('./td[1]/a/@href').extract_first())
                item['depart'] = node.xpath('./td[2]/text()').extract_first()
                item['category'] = node.xpath('./td[3]/text()').extract_first()
                item['type'] = node.xpath('./td[4]/text()').extract_first()
                item['address'] = node.xpath('./td[5]/text()').extract_first()
                item['num'] = node.xpath('./td[6]/text()').extract_first().strip()
                item['date'] = node.xpath('./td[7]/text()').extract_first()
                # print(item)
                # yield item
                #  构建详情页面的请求
                yield scrapy.Request(
                    url=item['link'],
                    callback=self.parse_detail,
                    meta={'item': item}
                )

        #  模拟翻页
        part_url = response.xpath('/html/body/div[2]/div[2]/div[2]/div/a[last()]/@href').extract_first()
        print(part_url)
        #  判断中止条件
        if part_url != 'javascript:void(0)':
            next_url = response.urljoin(part_url)
            #  构建请求对象,并且返回给引擎
            yield scrapy.Request(
                url=next_url,
                callback=self.parse  #  这儿若不写也是默认用parse方法来解析的
            )

    def parse_detail(self, response):
        #  将meta传参获取
        item = response.meta['item']

        #  提取剩余字段数据
        item['duty'] = response.xpath('/html/body/div[2]/div[2]/div[1]/div/div/div[2]/div[1]/div/text()').extract()
        item['require'] = response.xpath('/html/body/div[2]/div[2]/div[1]/div/div/div[2]/div[2]/div/text()').extract()
        # print(item)
        #  返回给引擎
        yield item
items.py:
Define here the models for your scraped items
#
See documentation in:
https://docs.scrapy.org/en/latest/topics/items.html

import scrapy

class WangyiItem(scrapy.Item):
    # define the fields for your item here like:
    name = scrapy.Field()
    link = scrapy.Field()
    depart = scrapy.Field()
    category = scrapy.Field()
    type = scrapy.Field()
    address = scrapy.Field()
    num = scrapy.Field()
    date = scrapy.Field()

    duty = scrapy.Field()
    require = scrapy.Field()
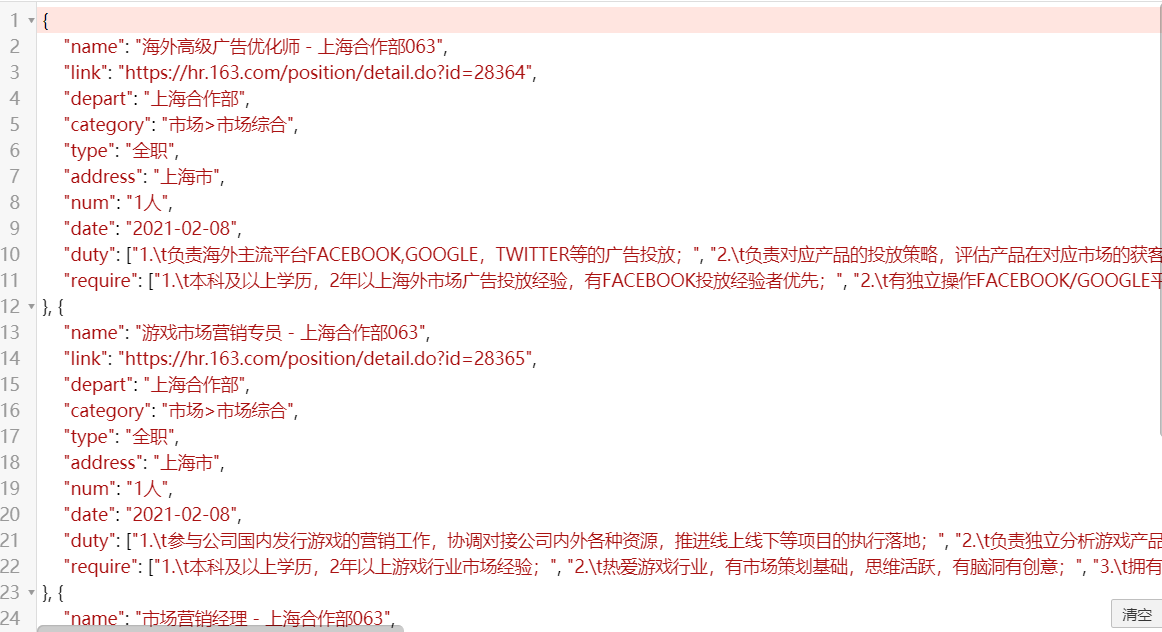
运行效果:

json数据解析:
总结:
- 完善并使用Item数据类:
- 在items.py中完善要爬取的字段
- 在爬虫文件中先导入Item
- 实力化Item对象后,像字典一样直接使用
- 构造Request对象,并发送请求:
- 导入scrapy.Request类
- 在解析函数中提取url
- yield scrapy.Request(url, callback=self.parse_detail, meta={})
- 利用meta参数在不同的解析函数中传递数据:
- 通过前一个解析函数 yield scrapy.Request(url, callback=self.xxx, meta={}) 来传递meta
- 在self.xxx函数中 response.meta.get(‘key’, ”) 或 response.meta[‘key’] 的方式取出传递的数据
Original: https://blog.csdn.net/weixin_44799217/article/details/113768583
Author: IT之一小佬
Title: Scrapy框架items数据建模、翻页请求、requests对象请求、meta参数的使用
原创文章受到原创版权保护。转载请注明出处:https://www.johngo689.com/790615/
转载文章受原作者版权保护。转载请注明原作者出处!