


前言
- 简单灵活,容易上手;支持参数化; 测试用例的skip和xfail处理;
- 能够支持简单的单元测试和复杂的功能测试,还可以用来做selenium/appnium等自动化测试、接口自动化测试(pytest+requests);
- pytest具有很多第三方插件,并且可以自定义扩展, 比较好用的如 pytest-allure(完美html测试报告生成) pytest-xdist(多CPU分发)等;
- 可以很好的和jenkins集成;
如何运行
1.pytest将在当前目录及其子目录中运行test _ .py或 _test.py形式的所有文件。
2.以test_开头的函数,以Test开头的类,以test_开头的方法。所有包package都要有__init__.py文件。
3.Pytest可以执行unittest框架写的用例和方法
本期内容
1.安装并运行pytest
2.了解pytest灵活框架结构和灵活执行方式
3.断言
4.Pytest-fixture 是最闪亮功能!!
5.yield与final
正在努力
- 一.安装pytest
* - 运行
– - 二.pytest灵活框架结构和灵活执行方式
* - ———灵活架构
– - ———灵活执行方式
– - 第三种 不加装饰器标记也想执行不同层次的用例
- 第四种pytest -k “TestPytest or test_app_function02
- 三.简单介下断言
- 四.Pytest -fixture 是最闪亮功能!!
* - • 场景1:测试用例执行时,有的用例的数据保存在数据库中,需要先连接数据库再执行测试用例,最后停止数据库的连接。setup和teardown可以实现。fixture可以灵活命名实现。默认scope(范围)function
- • 场景2: • 不想原测试方法有任何改动,或全部都自动实现自动应用,没特例,也都不需要返回值时可以选择自动应用
- 场景3 执行前 准备测试数据,通过fixture准备
- 五.yield与final
* - 神奇的yield
– - • 场景1:
- 做两个小任务
– - 多线程并行与分布式执行
* - 多线程并发:考虑,多个CPU代价,cpu核,脚本个 数,及执行时间长短。
- pytest-allure生成报告
* - 打开下载网站
- 打开pycharm 终端运行
- 生成报告
- • 场景:希望在报告中看到测试功能,子功能或场景,测试步骤
- 报告的多样化
; 一.安装pytest
打开pycharm 打开终端 输入 pip install pytest 来安装
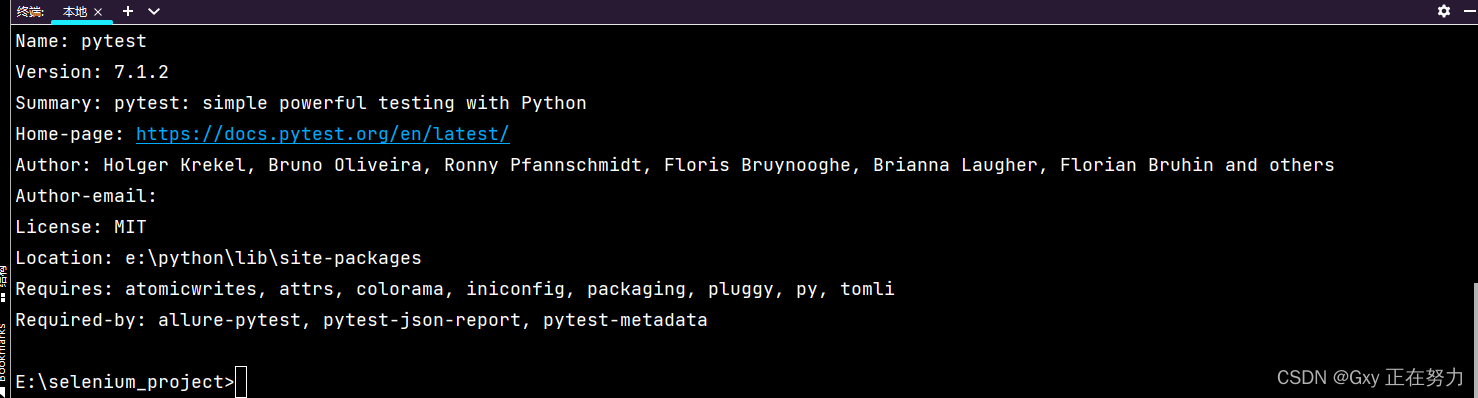
没有 自定义版本 他会安装最新版本
运行
cd 进入你要执行文件的目录
1.可以多个执行
直接终端CD进入目录 输入pytest
就可运行 全部的test测试文件
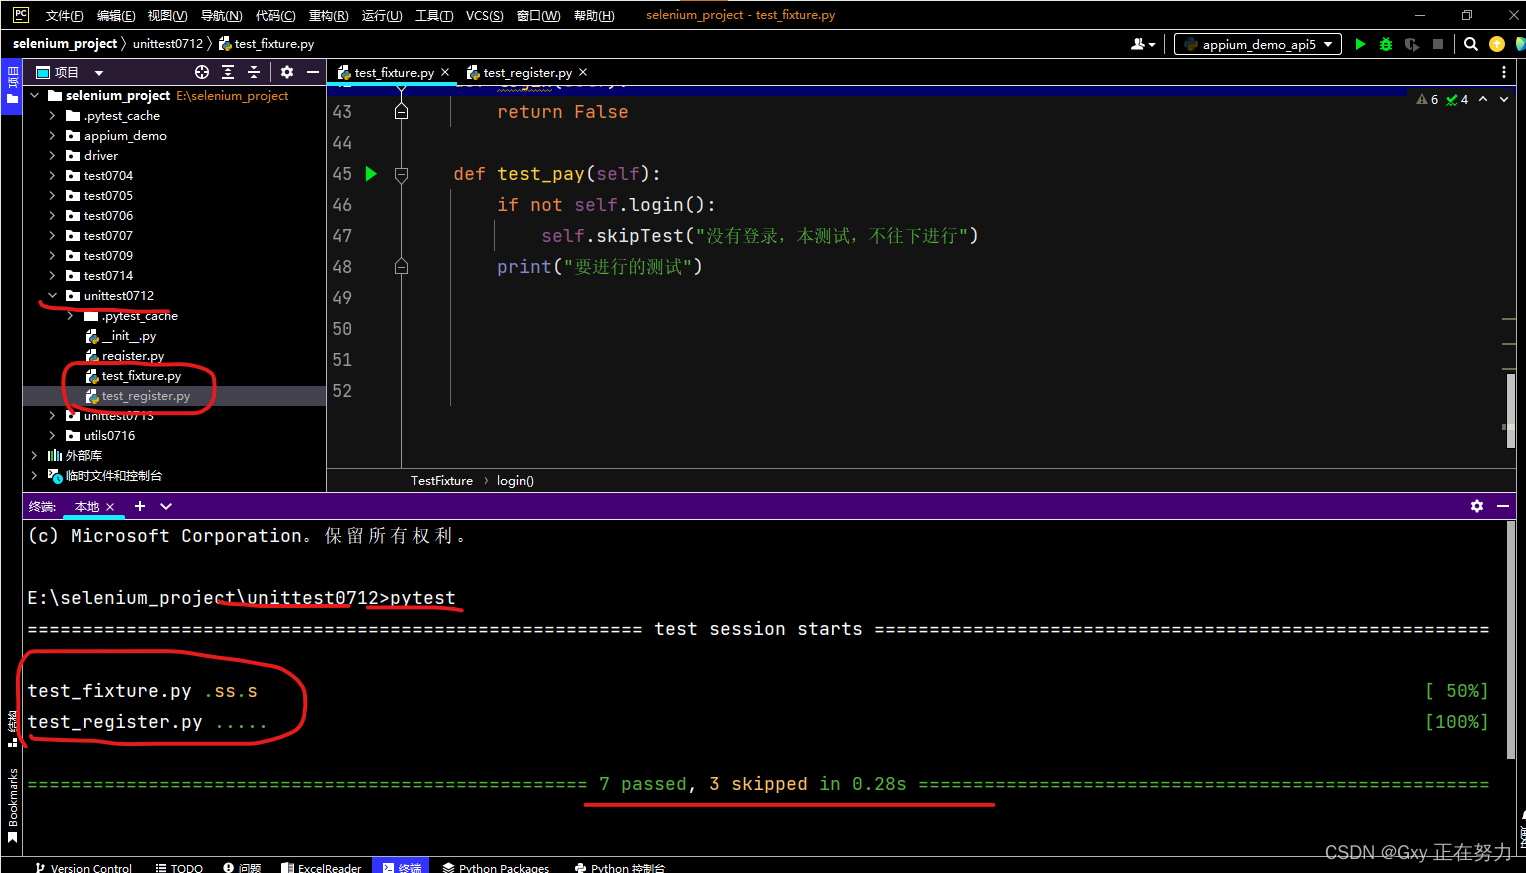
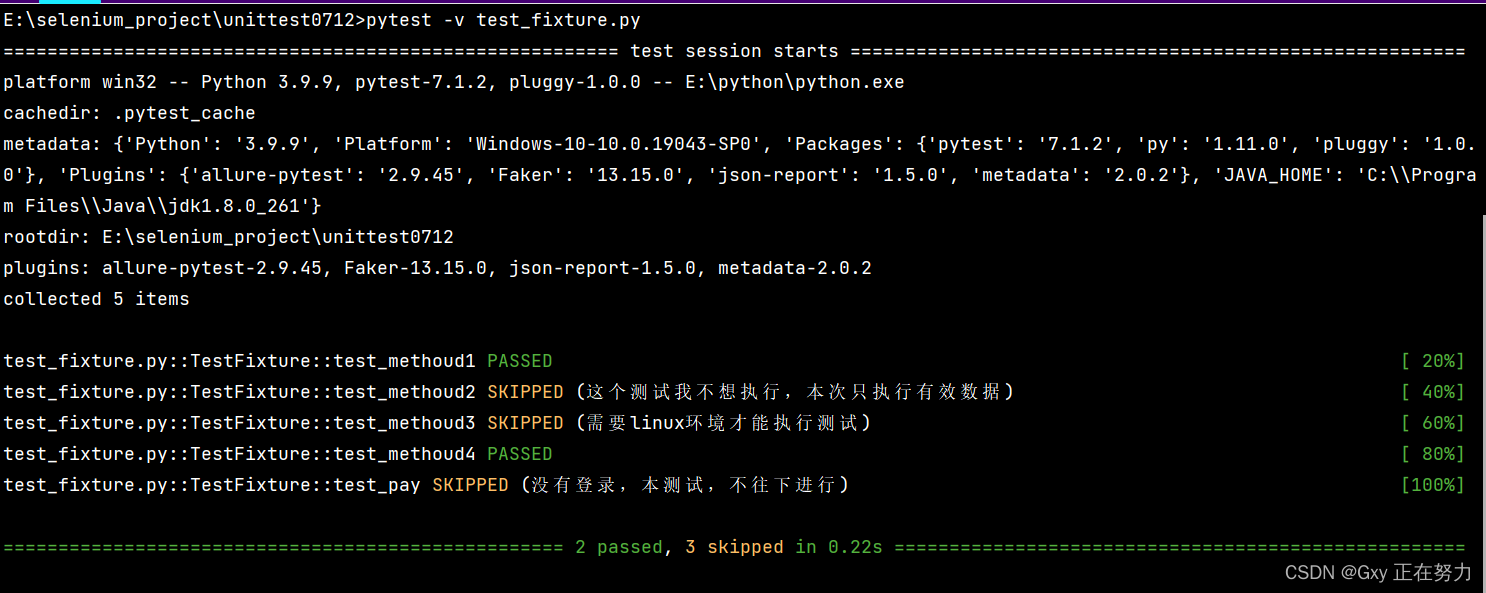
可以看到 我是再unittest目录下执行 我要执行的文件
并且可以看到已经全部执行了
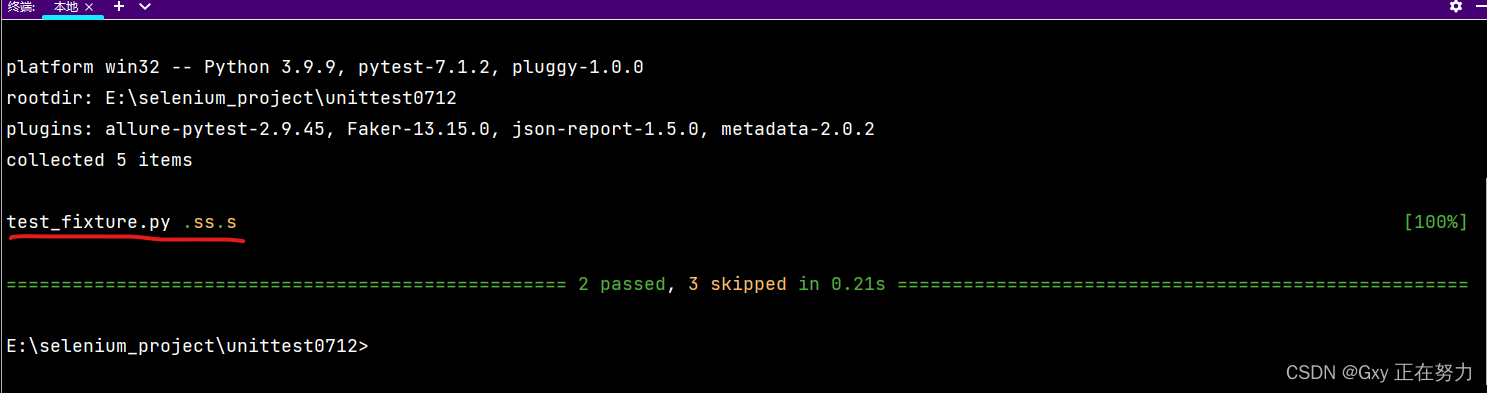
图中绿色的点 代表 执行成功 黄色的S代表 跳过
; 也可以单个执行
直接终端CD进入目录 输入pytest+文件名 执行
可以看到 只有一个文件被执行
pytest+ -v+文件名 执行 可以看到 执行的信息 错误和正确的测试信息
; pytest+ -s+文件名 执行 可以看到测试的输出

二.pytest灵活框架结构和灵活执行方式
———灵活架构
写一个简单的架构
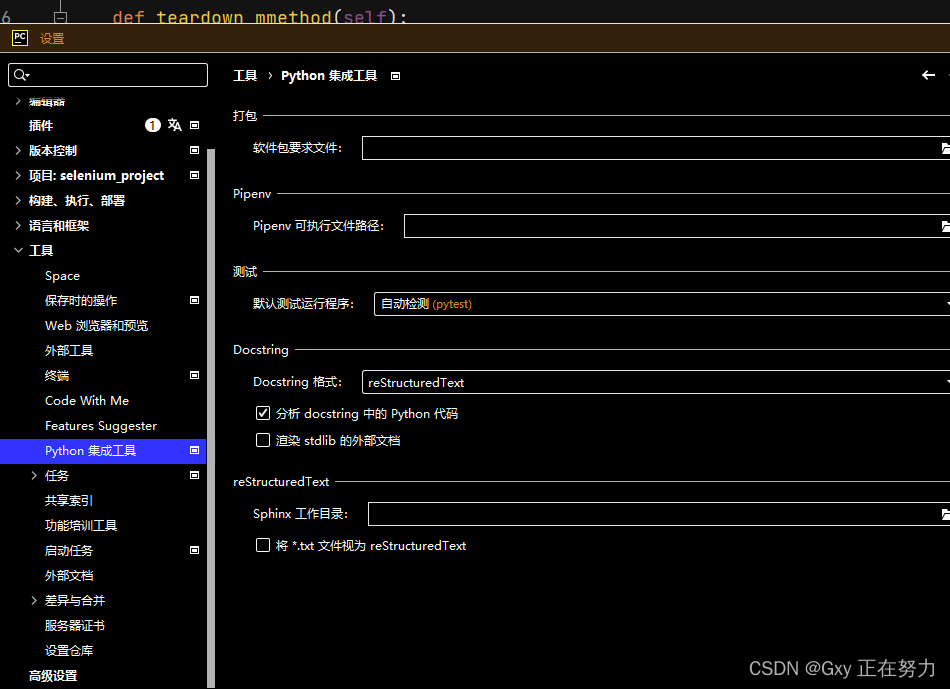
1.先更改一下执行工具
2.打开pycharm 新建一个文件 名字为 test_pytest_demo(pytest执行的文件都要命名为test)
写入架构
import pytest

def setup_module():
    print("一个文件开始只执行一次")

def setup_function():
    print("每一个函数前执行一次")

def test_web_function01():
    print("函数级不在类中web的方法")

def test_app_function01():
    print("函数级不在类中app的方法")

def teardown_function():
    print("每一个函数后执行一次")

def teardown_module():
    print("一个文件结尾只执行一次")

class TestPytest(object):
    def setup_class(self):
        print("一个类 初始化只执行一次")

    def setup_method(self):
        print("每一个方法前执行一次")

    def test_method01_win(self):
        print("在win下执行测试")

    def test_method02_linux(self):
        print("在linux下执行测试")

    def teardown_method(self):
        print("每一个方法后执行一次")

    def teardown_class(self):
        print("一个类销毁只执行一次")

if __name__ == '__main__':
    pytest.main()
右键运行这个架构 记住要类级别执行

这样 就可以看到测试成功了 pytest执行框架 是最好的
可以看到详情 简易执行
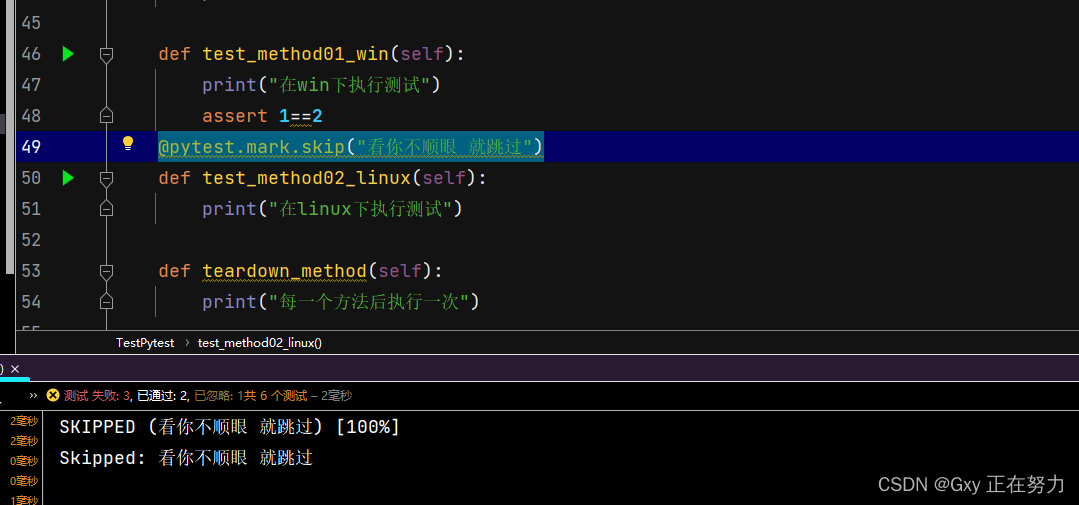
跳过
@pytest.mark.skip(“看你不顺眼 就跳过”)
直接跳过 不会执行 并且不计入失败测试
括号里为 你写的条件 这个要写在方法前
; @pytest.mark.xfail()
将注定会失败的执行标记为失败 报告里 会标记为通过
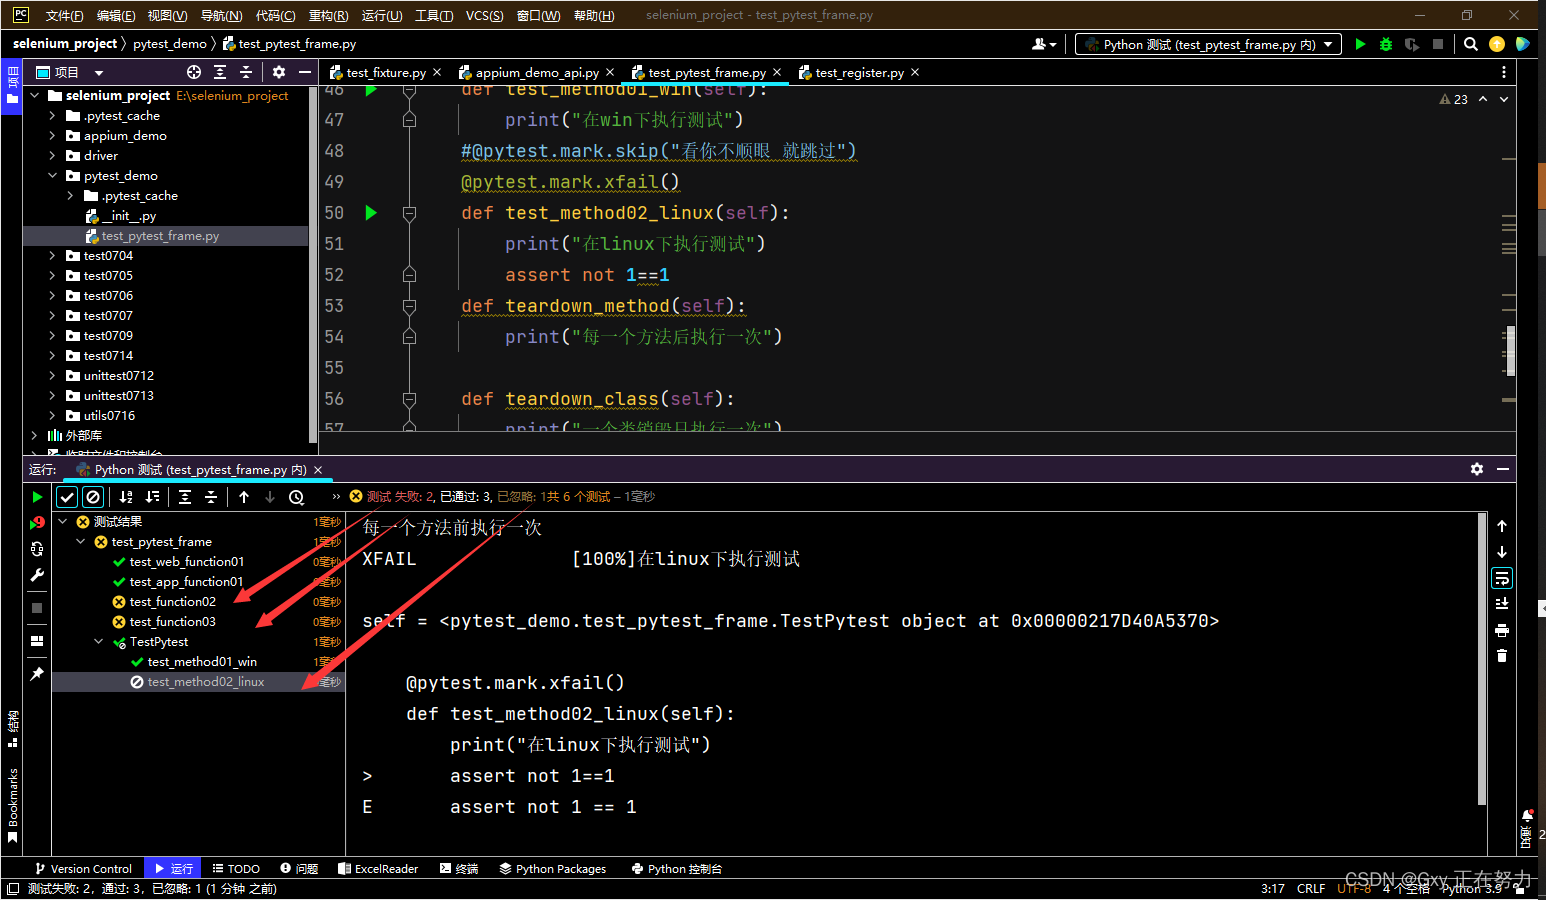
可以看到 我写了个错误的断言 但是他标记为忽略 实则是错误的执行
但是并没有记入失败
标记
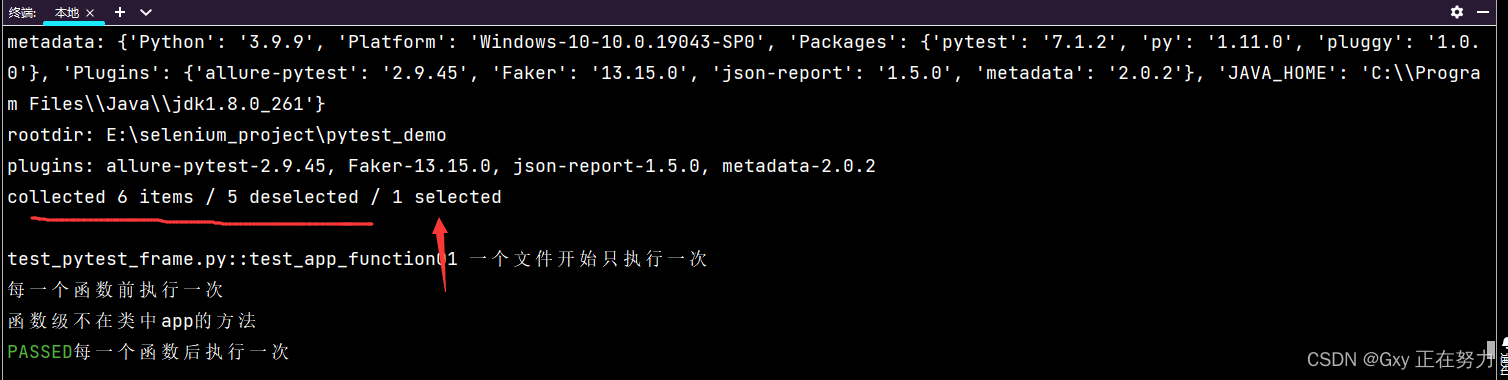
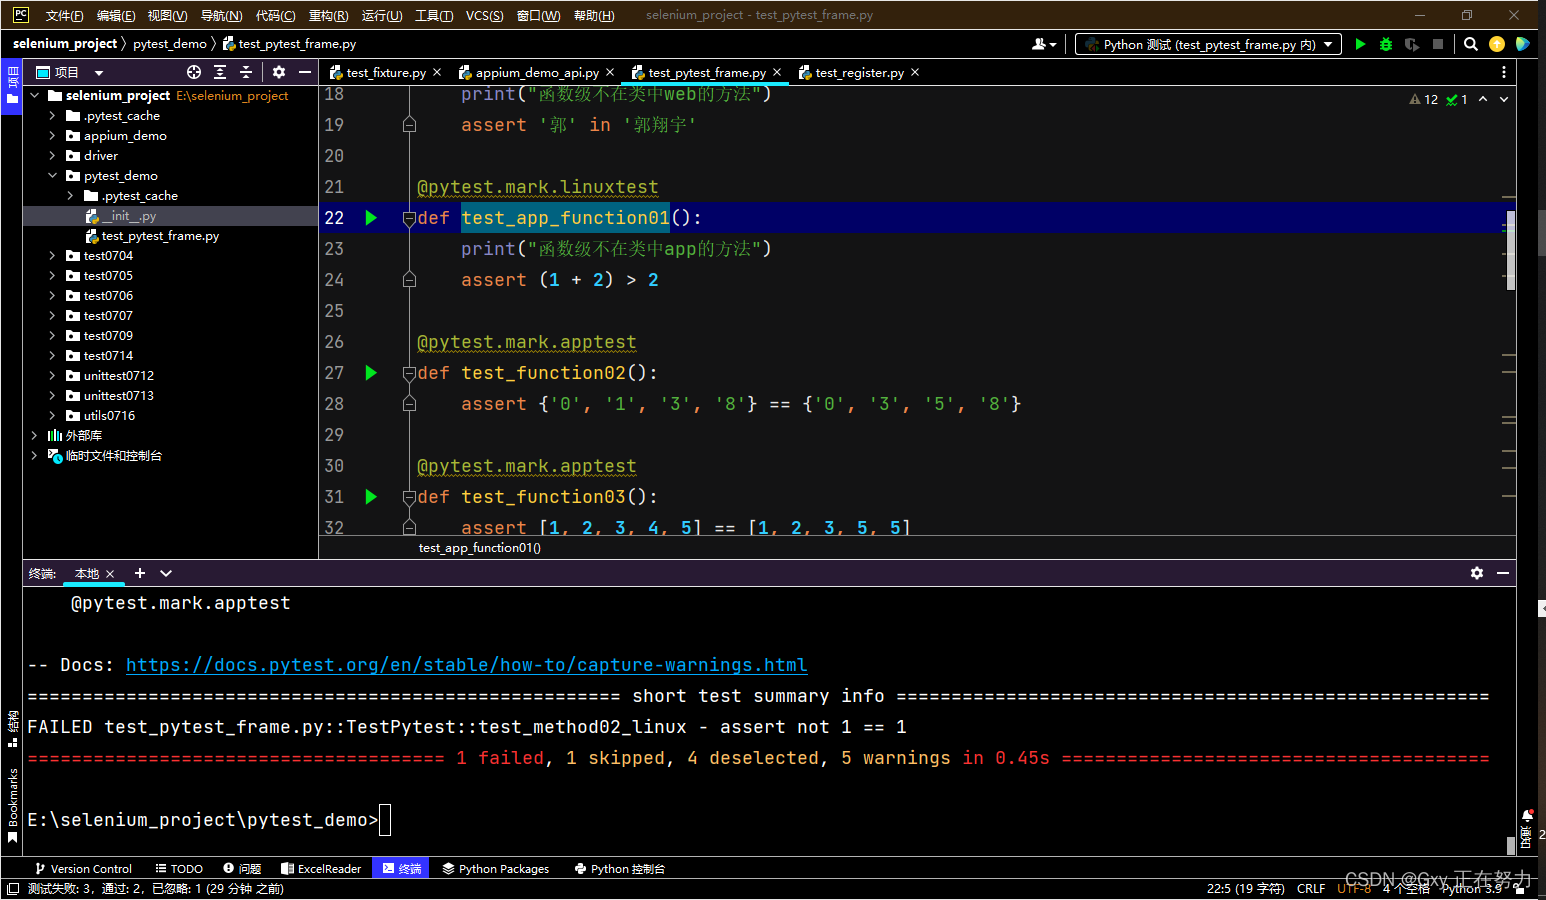
pytest -v -s -m apptest 执行用例是使用 @pytest.mark.apptest 标记的测试方法。
pytest -v -s -m “not apptest” 执行用例没有 @pytest.mark.apptest 标记的测试方法。
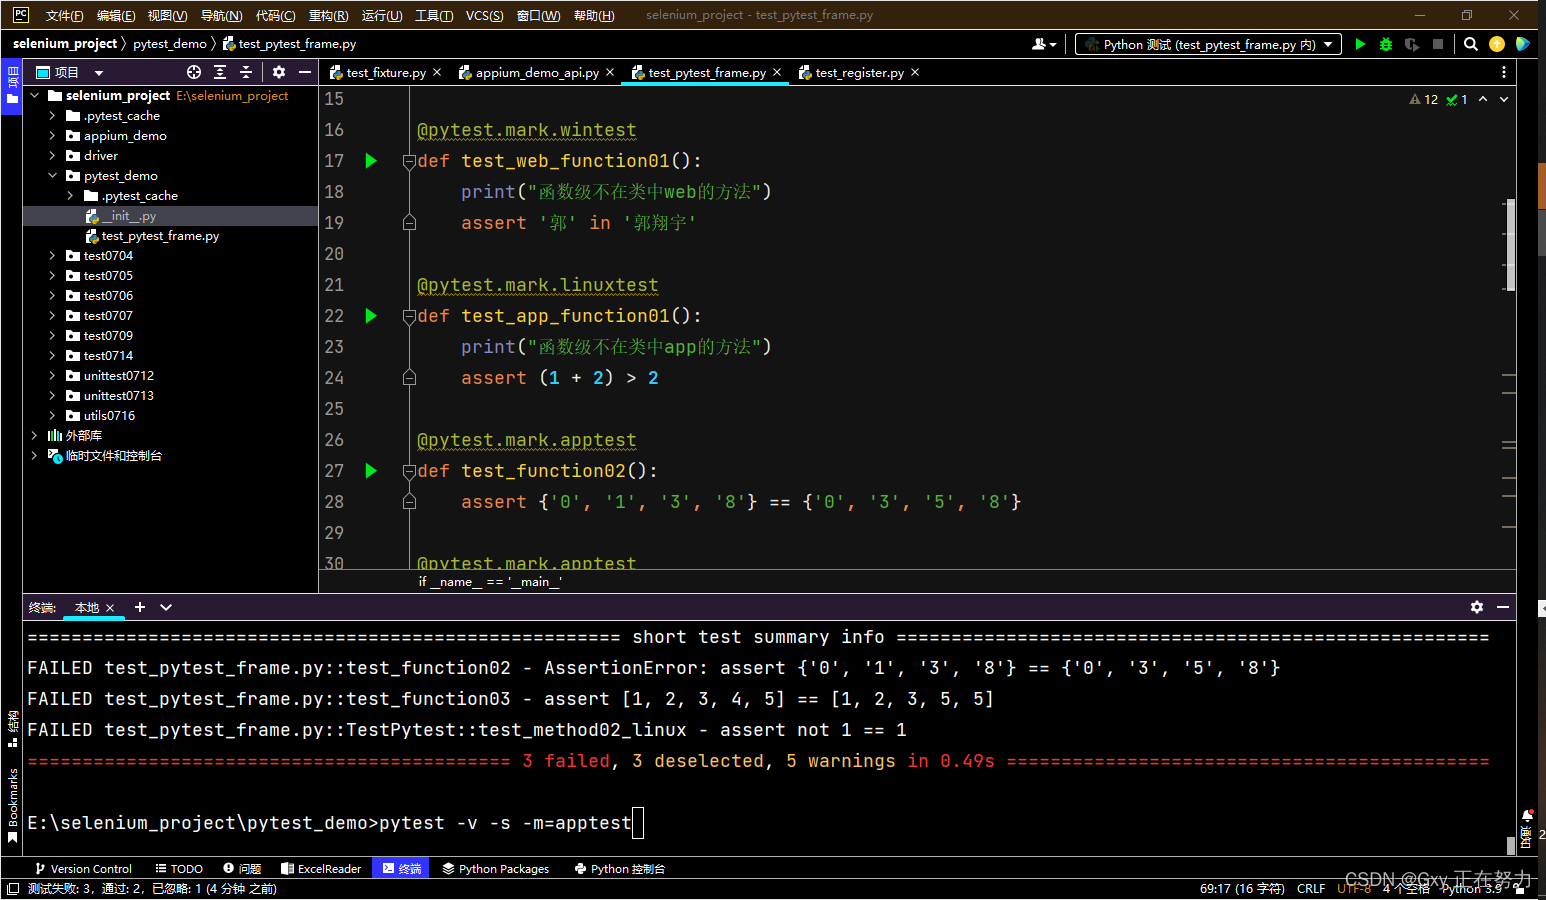
pytest -v -s -m linuxtest 执行用例是使用 @pytest.mark.linuxtest 标记的测试方法。
pytest -v -s -m “not linuxtest” 执行用例没有 @pytest.mark.linuxtest 标记的测试方法。

selected(被选择的,pytest -m linuxtest )1 selected .只有一 个 被选择上了。5 deselected 5个没有被 选择执行上。
; ———灵活执行方式
第一种方法 也就是 pycharm终端运行的方式

; 第二种方法 也就是cmd 运行

-S 可以输出每一个方法执行的结果
-v 显示信息强度 也就是 结果里面 每一步的执行过程
可以 – v -v
也可以 -v -v -v 最高强度三个-v
第三种 不加装饰器标记也想执行不同层次的用例
pytest -v -s test_pytest_frame.py::TestPytest (TestPytest这个类下面的所有方法)

; 第四种pytest -k “TestPytest or test_app_function02
•   pytest -k "TestPytest  or test_app_function02"
 执行TestPytest这个类下面的所有方法+ test_app_function02方法
三.简单介下断言
断言的使用
• 断言:支持显示最常见的子表达式的值,包括调用,属性,比较以及二元和一元运算符。
• 包含,相等,不等,大于 小于运算,assertnot 假
•    assert "h" in "hello"(判断h在hello中)
•    assert 3==4(判断3=4)
•    assert 3!=4(判断3!=4)
•    assert f() ==4 (判断f()方法返回值是否=4)
•    assert 5>6 (判断5>6为真)
•    assert not xx (判断xx不为真)
•   assert {'0', '1', '3', '8'} == {'0', '3', '5', '8'}
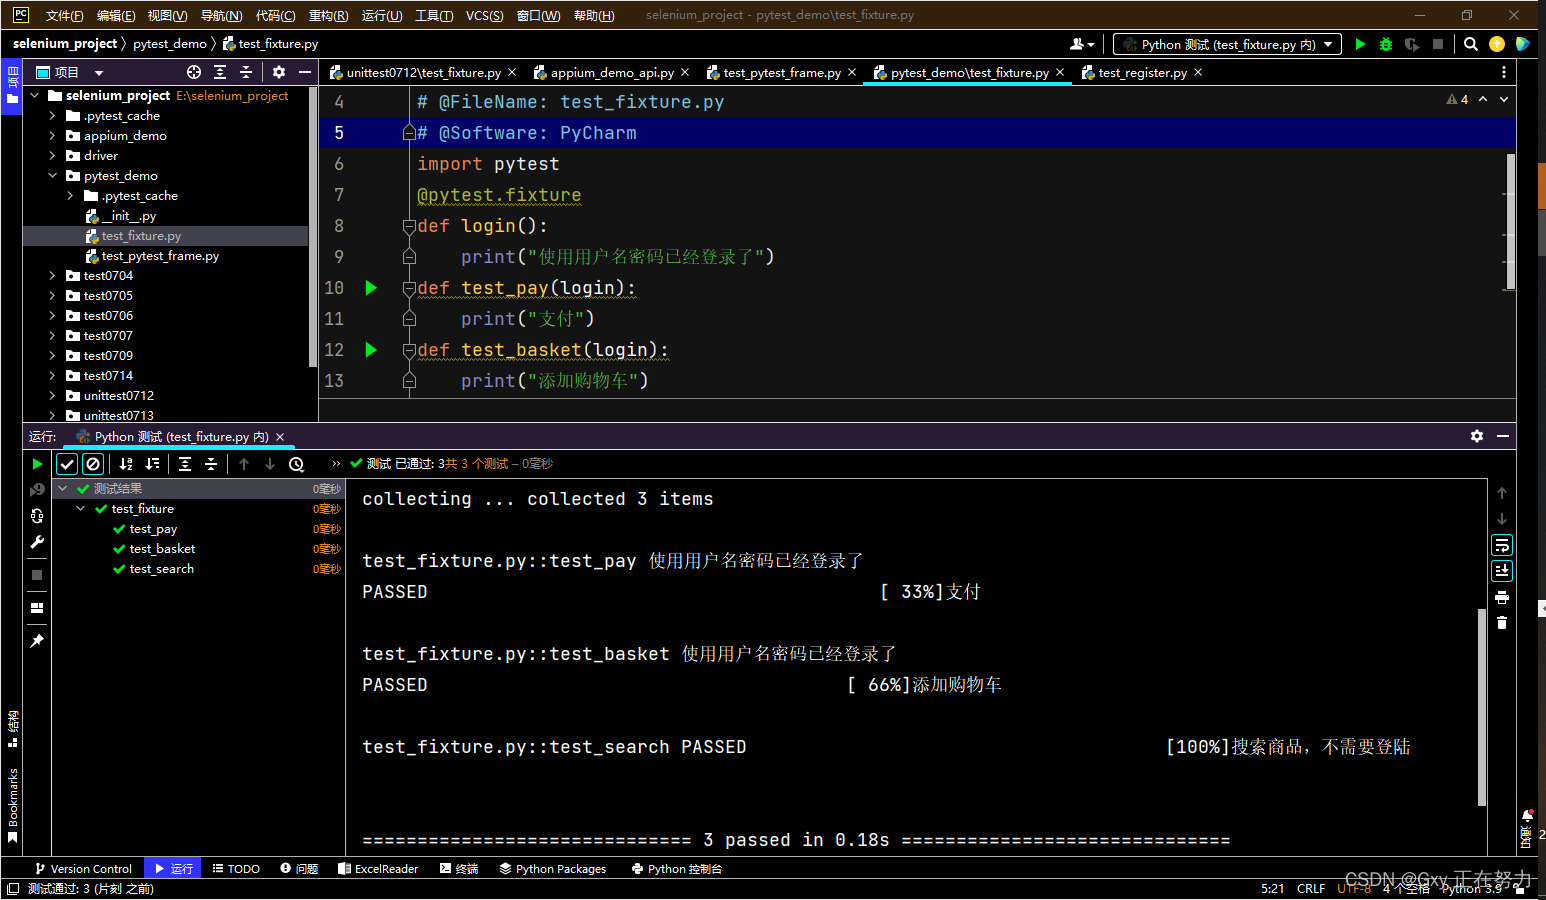
四.Pytest -fixture 是最闪亮功能!!
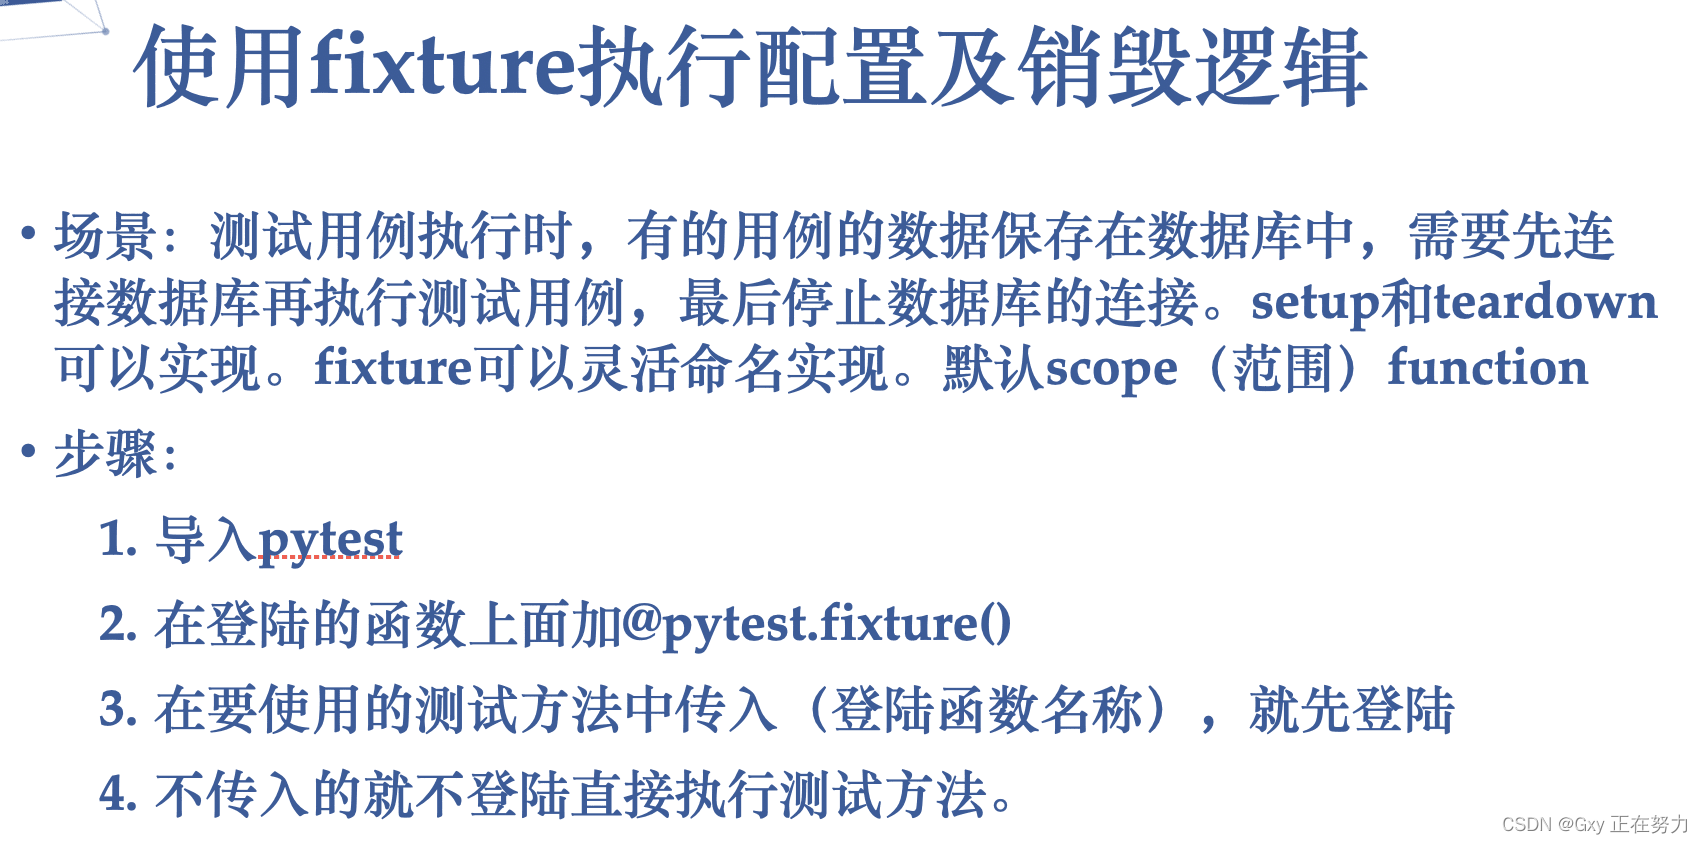
; • 场景1:测试用例执行时,有的用例的数据保存在数据库中,需要先连接数据库再执行测试用例,最后停止数据库的连接。setup和teardown可以实现。fixture可以灵活命名实现。默认scope(范围)function
• 步骤:
- 导入pytest
- 在登陆的函数上面加@pytest.fixture()
- 在要使用的测试方法中传入(登陆函数名称),就先登陆
- 不传入的就不登陆直接执行测试方法。
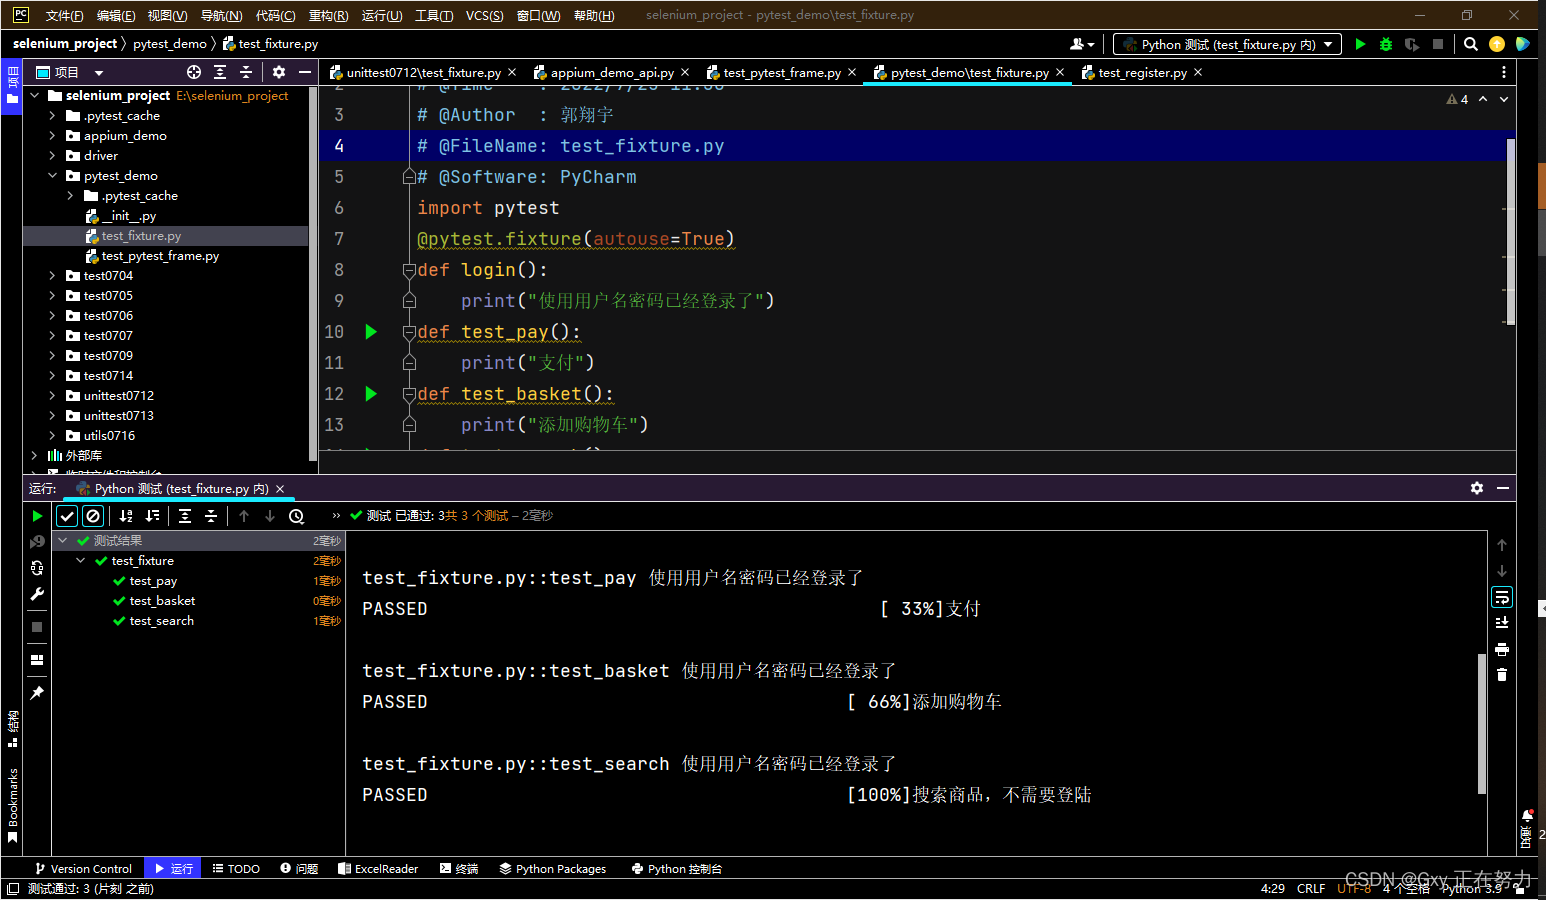
• 场景2: • 不想原测试方法有任何改动,或全部都自动实现自动应用,没特例,也都不需要返回值时可以选择自动应用
• 解决: • 使用fixture中参数autouse=True实现
• 步骤:在方法上面加@pytest.fixture(autouse=True)
自动应用 示例如下
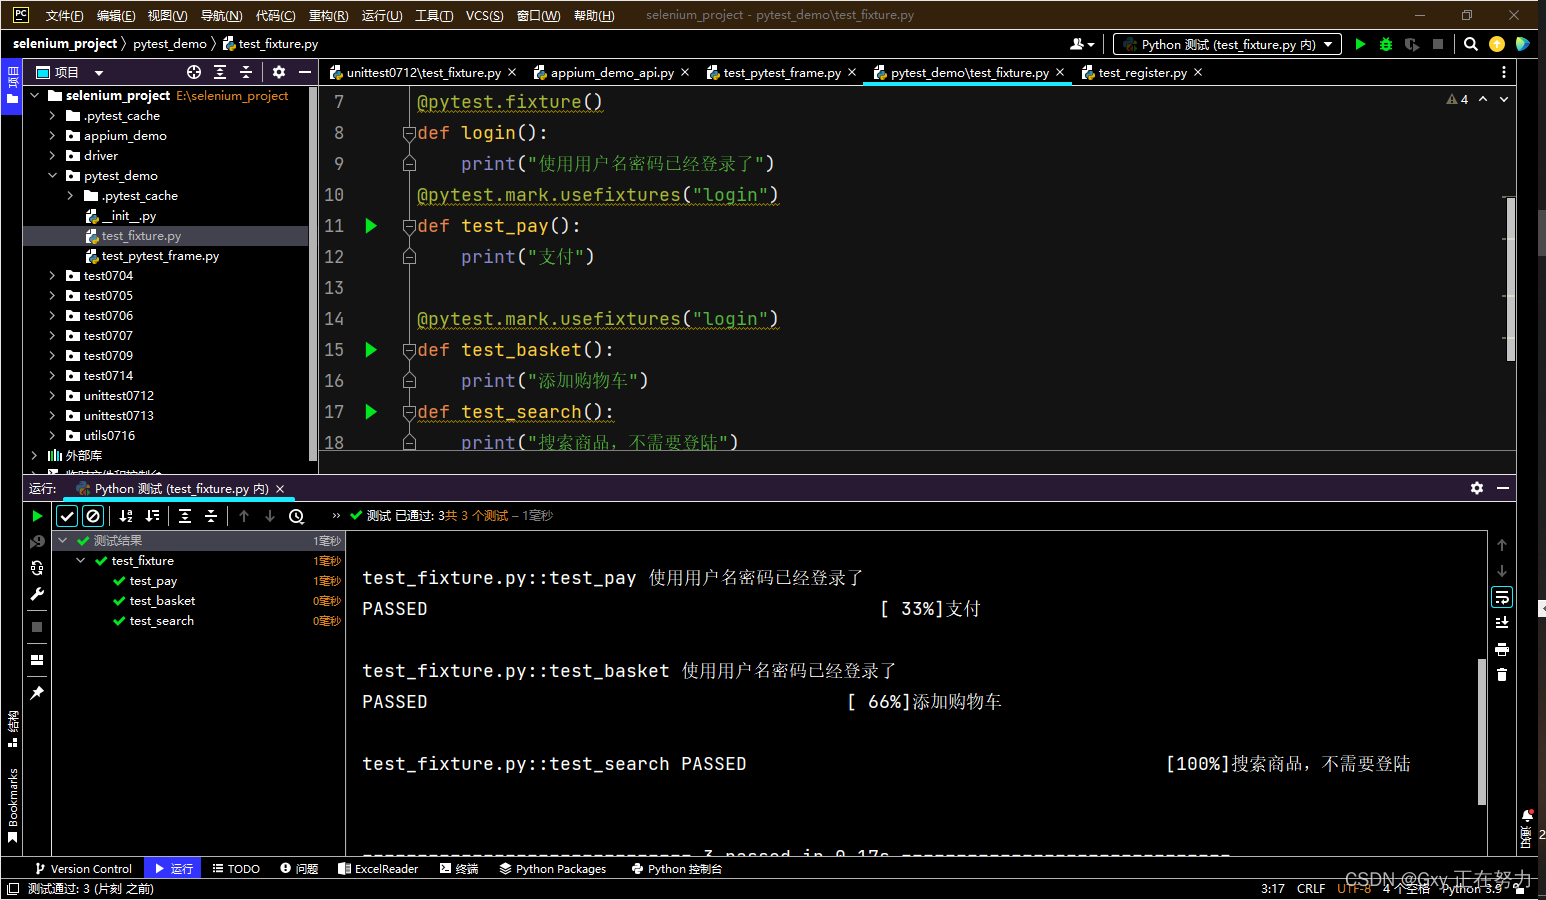
• 使用@pytest.mark.usefixtures
• 步骤:在测试方法上加@pytest.mark.usefixtures(“方法名”)
通过装饰器 示例如下
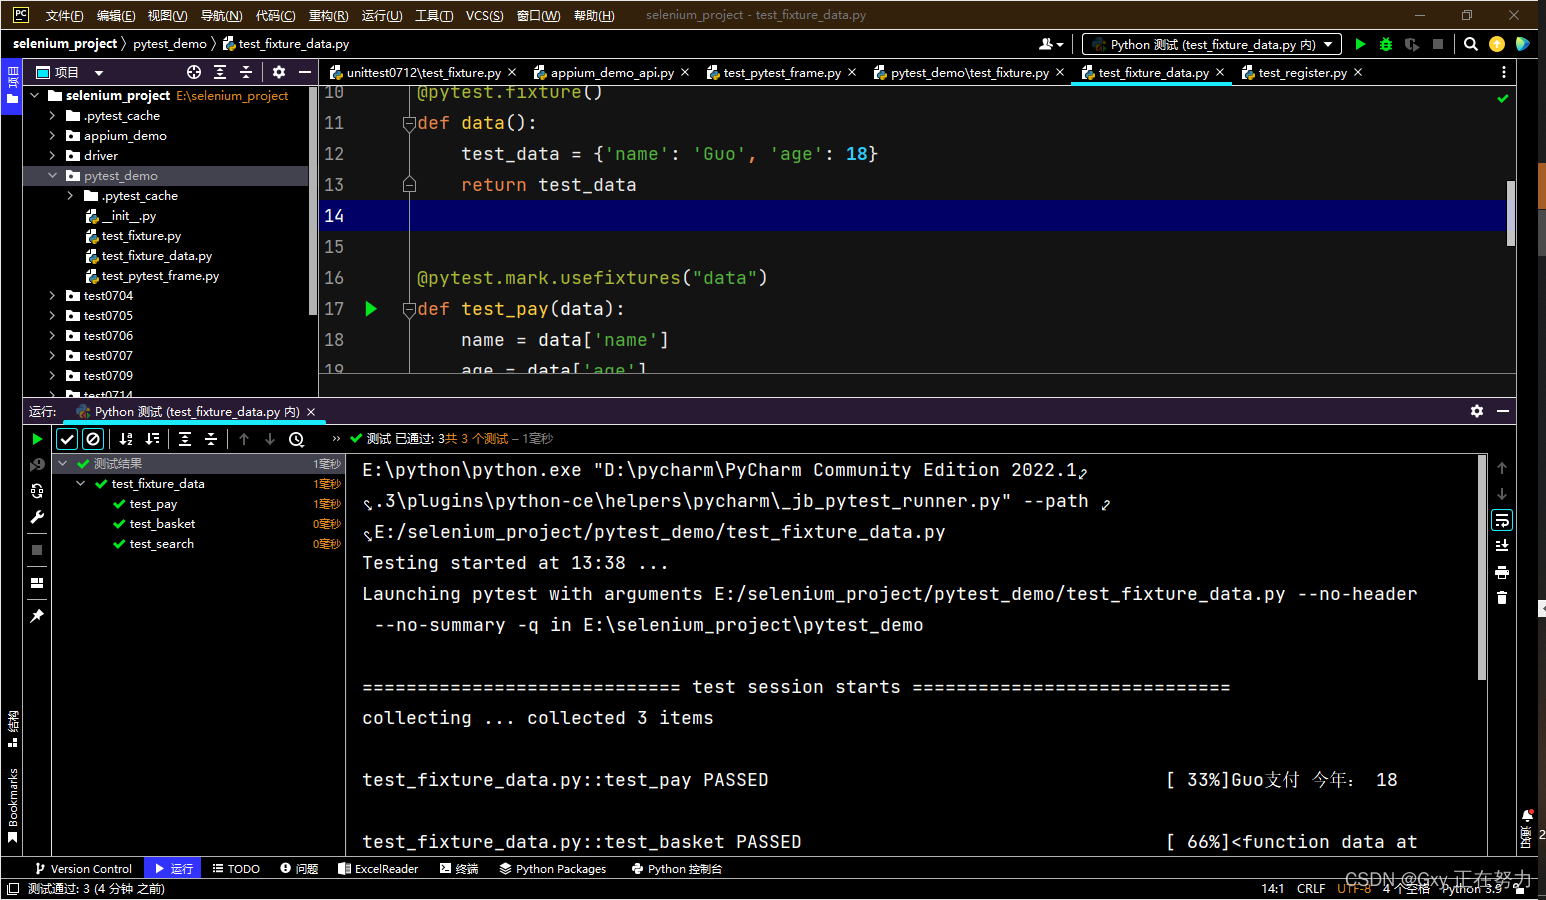
; 场景3 执行前 准备测试数据,通过fixture准备
import pytest

@pytest.fixture()
def data():
    test_data = {'name': 'Guo', 'age': 18}
    return test_data

@pytest.mark.usefixtures("data")
def test_pay(data):
    name = data['name']
    age = data['age']
    print(name + "支付", "今年:", age)

@pytest.mark.usefixtures("data")
def test_basket():
    print(data)
    print("添加购物车")

def test_search():
    print("搜索商品,不需要登陆")
五.yield与final

定义:yield , 调用一次,给你一个反馈,调用第二 次,反馈从第一次结束语句开始给你反馈
; 神奇的yield
测试用例如下:
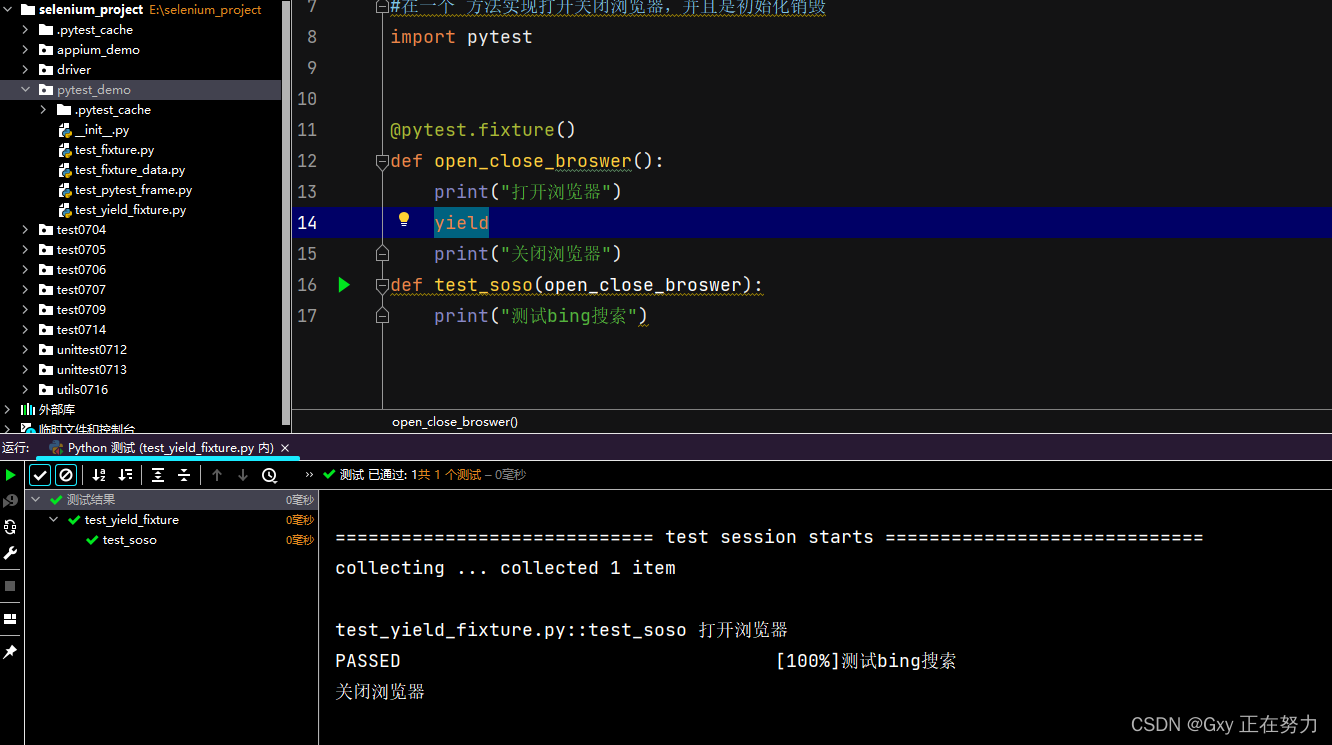
pytest运行顺序
1先运行16行的
2在16行找到的参数open_close_broswer
3找到这个参数再12行
4返回这个参数执行并带入行
5执行yield
6执行17行
717行调用12行的参数
8执行关闭浏览器
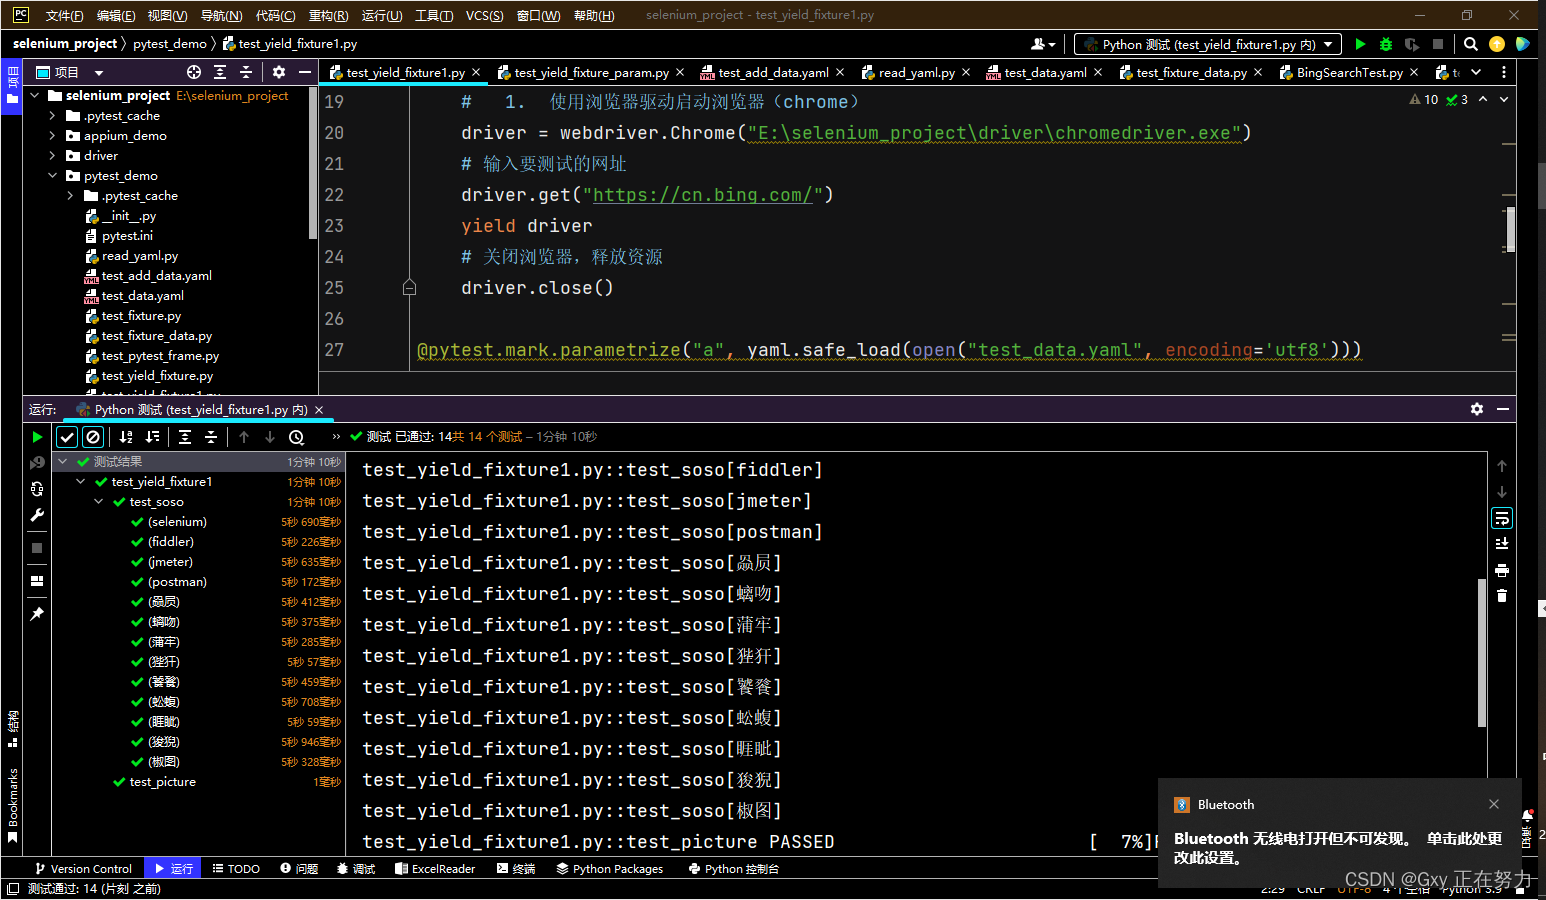
使用这 个结构,+selenium,实现bing_sous效果
1.打开浏览器是两个测试方法依赖,要在初 始 化实现。 使用yield 返回driver 。
import time

import pytest

from selenium import webdriver

from selenium.webdriver.common.by import By

@pytest.fixture()
def open_close_broswer():

    driver = webdriver.Chrome("E:\selenium_project\driver\chromedriver.exe")

    driver.get("https://cn.bing.com/")
    yield driver

    driver.close()
def test_soso(open_close_broswer):

    search_elementl = open_close_broswer.find_element(By.ID, "sb_form_q")

    search_elementl.clear()

    search_elementl.send_keys("selenium")

    open_close_broswer.find_element(By.ID, "search_icon").click()

    assert "selenium" in open_close_broswer.page_source
    time.sleep(2)
def test_picture(open_close_broswer):
    print("点击图片,搜索图片")
运行后新的问题出现了
你发现打开两次浏览器 ,能 否只 打开一次 ,需要类级文件级初始化,不是 方法级的。
可以的 只需要加一个 @pytest.fixture(scope="module")
让他只执行一次
后面在调用 他不执行
• 场景1:
• 测试离不开数据,为了数据灵活一般,数据都是通过参数传的
• 解决:fixture通过固定参数request传递;
• 步骤: • 在fixture中增加@pytest.fixture(params=[1, 2, 3, ‘linda’]) • 在方法参数写request
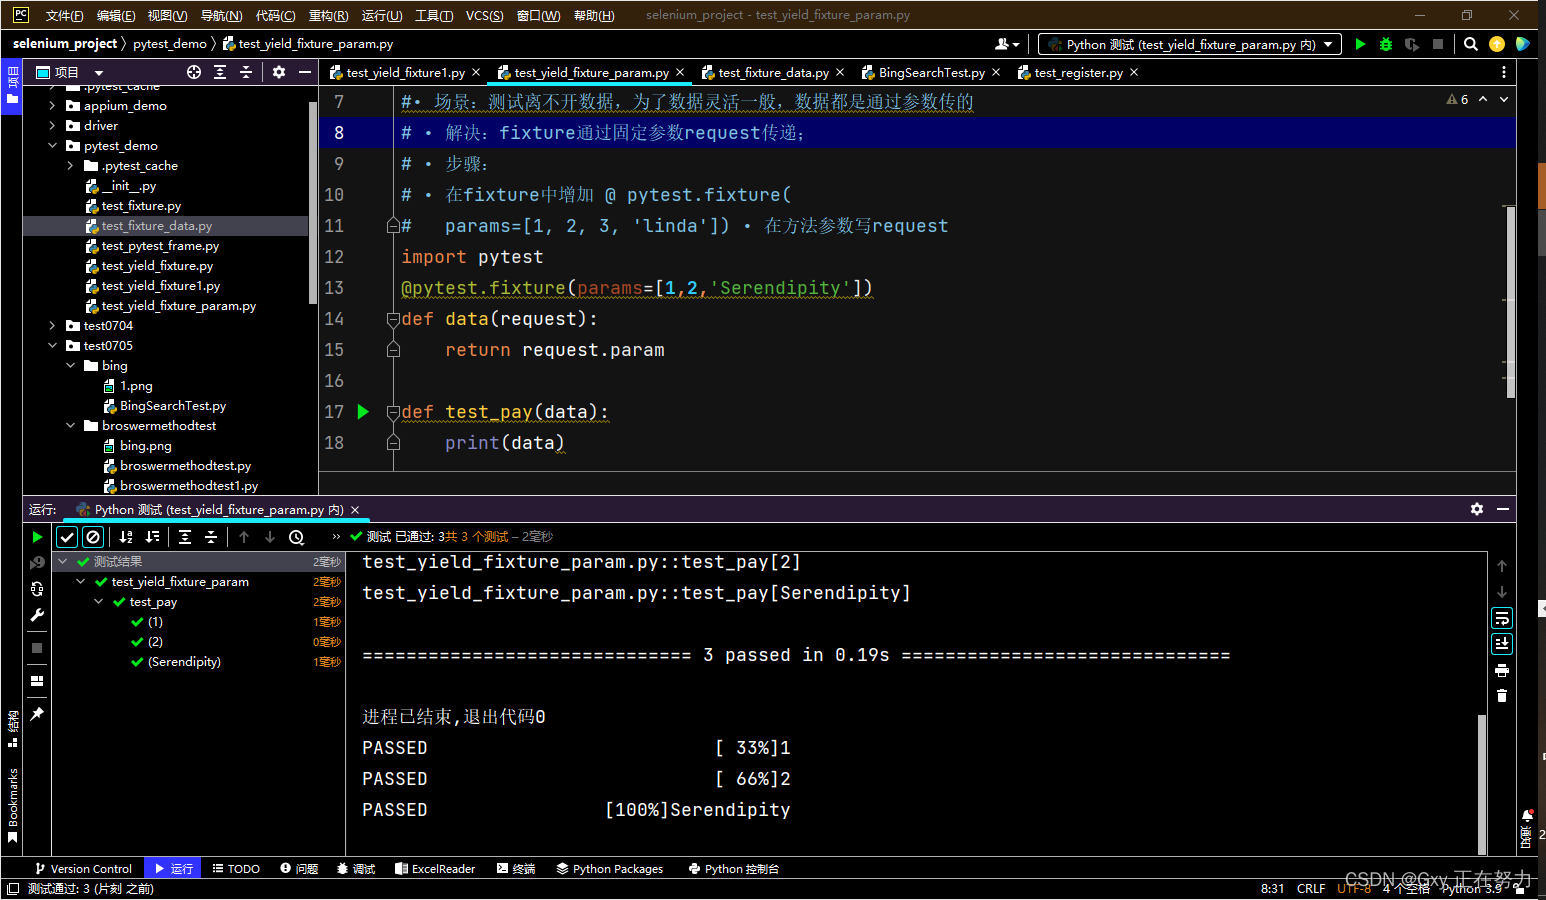
可以看到 执行了三次
; 做两个小任务
任务一:把加法数据从文件中传。尝试
fixture—-初 始化 依赖 -unittest–setup pytest.mark.paramilize—参数化数据 ddt
1.新建一个yaml 文件test_add_data.yaml 写入列表
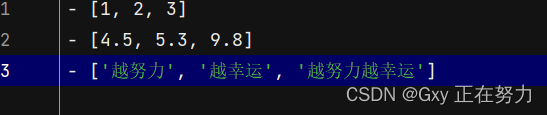
这里要记住yaml文件格式-空格XXX就行
可以新建一个python文件 看看能不能把他读出来

是可以读出来的 encoding=’utf8’代表 中文字符输出
接下来进行下一步使用参数化 输出
@pytest.mark.parametrize("num1,num2,result",yaml.safe_load(open("test_add_data.yaml",encoding='utf8')))
def test_add_yaml(num1, num2, result):
    assert num1 + num2 == result
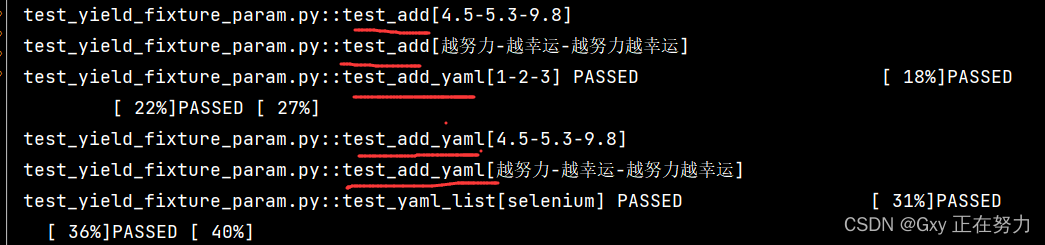
输出成功拉
任务二:将bing搜索改成参数化数据驱动(pytest–,yaml)
import time

import pytest
import yaml

from selenium import webdriver

from selenium.webdriver.common.by import By

@pytest.fixture(scope="module")
def open_close_broswer():

    driver = webdriver.Chrome("E:\selenium_project\driver\chromedriver.exe")

    driver.get("https://cn.bing.com/")
    yield driver

    driver.close()

@pytest.mark.parametrize("a", yaml.safe_load(open("test_data.yaml", encoding='utf8')))
def test_soso(open_close_broswer,a):
    open_close_broswer.get("https://cn.bing.com/")
    time.sleep(2)

    search_elementl = open_close_broswer.find_element(By.ID, "sb_form_q")

    search_elementl.clear()

    search_elementl.send_keys(a)

    open_close_broswer.find_element(By.ID, "search_icon").click()

    assert "a" in open_close_broswer.page_source
    time.sleep(2)
def test_picture(open_close_broswer):
    print("点击图片,搜索图片")
driver.get(“https://cn.bing.com/”)
加这个是因为 你每次搜索完是新的网页 你需要回到原来的网页 重新搜索
也可以把上面的浏览器驱动
driver = webdriver.Chrome("E:\selenium_project\driver\chromedriver.exe")
换成这个
par_path = os.path.abspath('..')
    driver_path = par_path + r"\driver\chromedriver.exe"
    driver = webdriver.Chrome(executable_path=driver_path)
yaml 大家随便写 只要记住格式为
-空格XXX
即可
多线程并行与分布式执行
多线程并发:考虑,多个CPU代价,cpu核,脚本个 数,及执行时间长短。
●场景:测试用例1000条,-个用例执行1钟,- –
个测试人员执行需要1000分钟。通常我们会用人力成本换取时间成本,加几个人一-起执行,时间就会缩短。如果10人一起执行只需要100分钟,这就是一一种并行测试,分布式场景。
●解决: pytest分 布式执行插件: pytest-xdist, 多个CPU或主机执行
●前提:用例之间都是独立的,没有先后顺序,随机都能执行,可复运行不影响其他用例。
●安装: Pip3 install pytest-xdist
●多个CPU并行执行用例,直接加-n 3是并行数量: pytest -n 3 ●在多个终端下一起执行
●注意:只有超过秒级以上并发才显示效果,并且不只一个方法 ●https://pypi.org/project/pytest xdist/
第一步 在终端安装pytest-xdist
pip install pytest-xdist
在终端进入你要运行的文件目录
输入指令pytest -n 3

运行结果为

; pytest-allure生成报告
打开下载网站
链接: allure
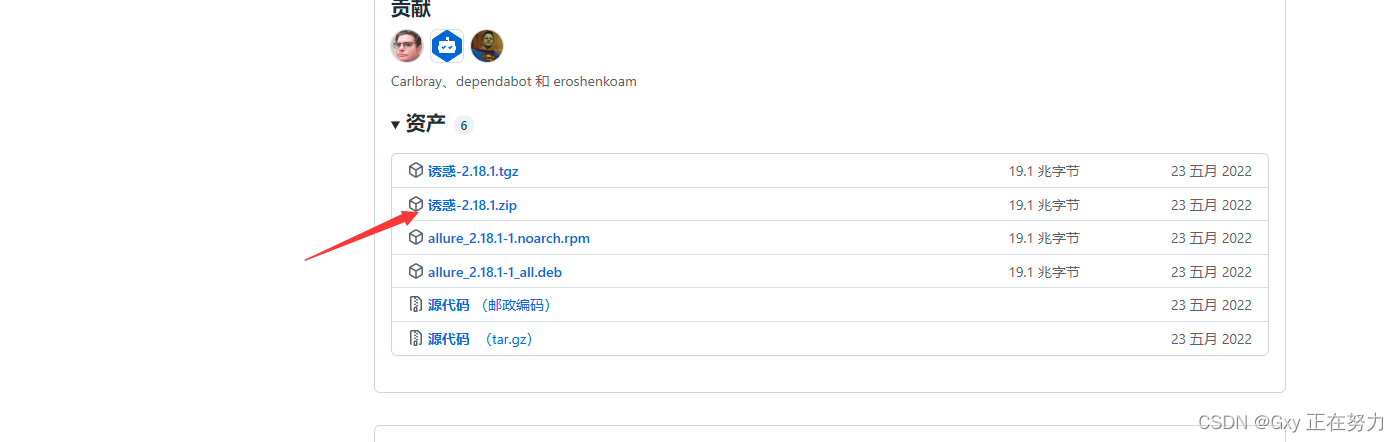
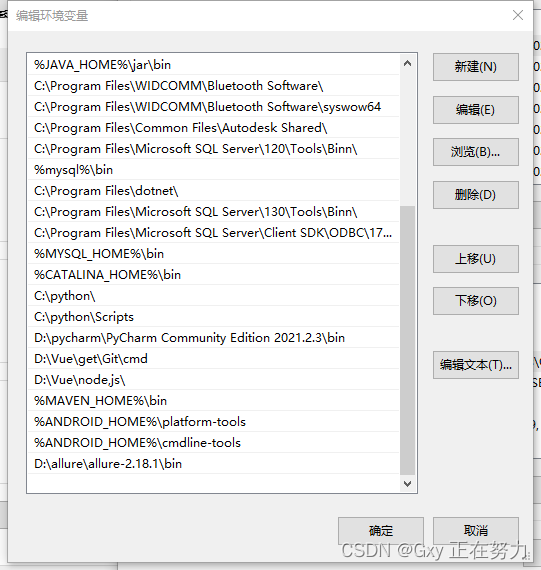
下载zip包,解压,进入bin目录运行,把bin目录加入path路径
; 打开pycharm 终端运行
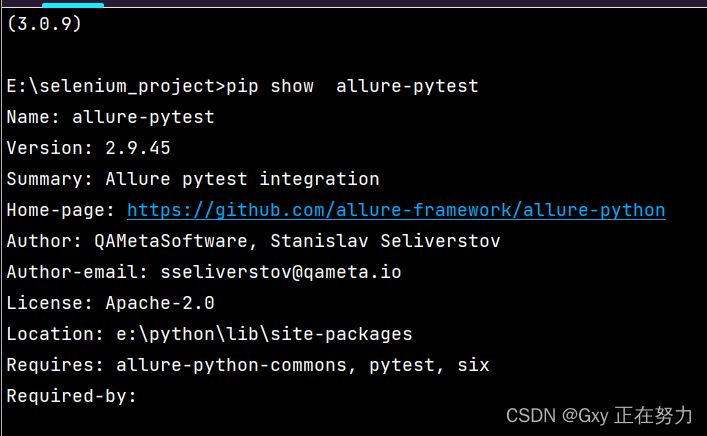
pip install allure-pytest
安装一下 allure
在测试执行期间收集结果 pytest -s –q –alluredir=./result/ 测试完成后查看实际报告, 在线看报告。allure serve ./result/
cd 到你的测试文件目录下 执行 pytest -v -s –alluredir=./result 来收集你的测试数据
生成报告
同样在终端(你的测试文件目录下)
allure serve ./result

这样我们的报告就生成成功了
; • 场景:希望在报告中看到测试功能,子功能或场景,测试步骤
•    解决:@Feature,story,step
•    步骤:
1.  Import allure
2.  功能上加@allure.feature(‘功能名称’)
3.  子功能上加@allure.story(‘子功能名称’)
4.  步骤上加@allure.step(‘步骤细节’)
在方法上加@allure.feature(“模块名”),,
如果模块下还有小功能小分支 @allure.feature(“模块名-评论”)
@allure.story(“功能名-添加”) def test_me():
pass
@allure.feature(“模块名-评论”)
@allure.story(“功能名-编辑评论”) def test_me():
pass @allure.feature(“模块名-评论”)
@allure.story(“功能名-查看评论”)
import pytest
import allure
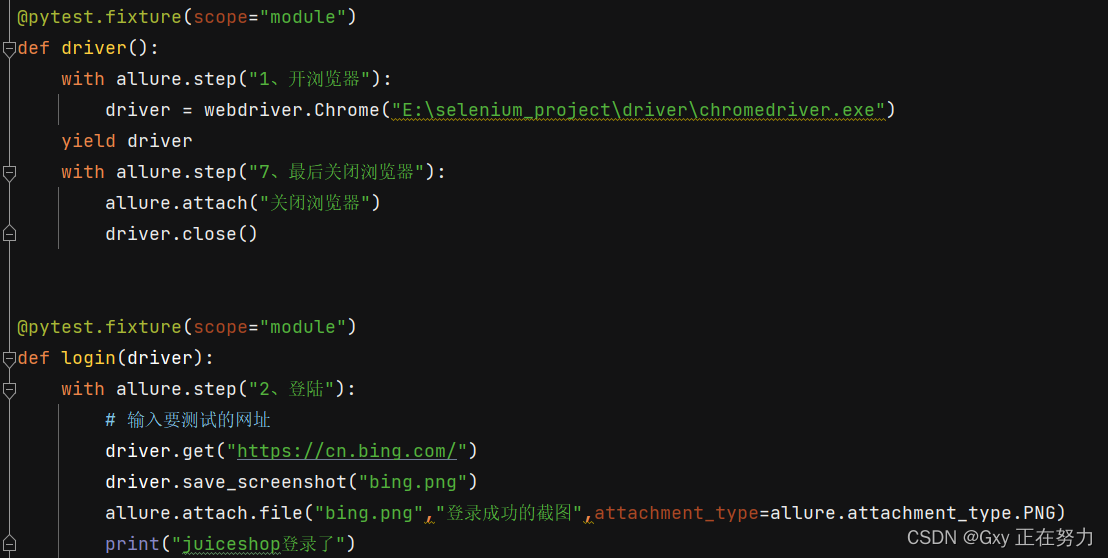
@pytest.fixture(scope="module")
def driver():
with allure.step("1、开浏览器"):
print("打开浏览器")
yield driver
with allure.step("7、最后关闭浏览器"):
print("关闭浏览器")
@pytest.fixture(scope="module")
def login(driver):
with allure.step("2、登陆"):
print("juiceshop登陆了")
@allure.feature("反馈")
@allure.story("匿名")
@pytest.mark.parametrize("fk",["sdjfflsd","蝴蝶"])
def test_anno_repains(driver,fk):
with allure.step("3、匿名反馈"):
print("匿名反馈"+fk)
@allure.feature("购物车")
@pytest.mark.usefixtures("login")
def test_basket():
print("购物车")
@allure.feature("支付")
@pytest.mark.usefixtures("login")
def test_pay():
print("支付")
@allure.feature("反馈")
@allure.story("实名")
@pytest.mark.usefixtures("login")
def test_login_repains():
print("登陆后反馈")
可以看到报告中出现子级别
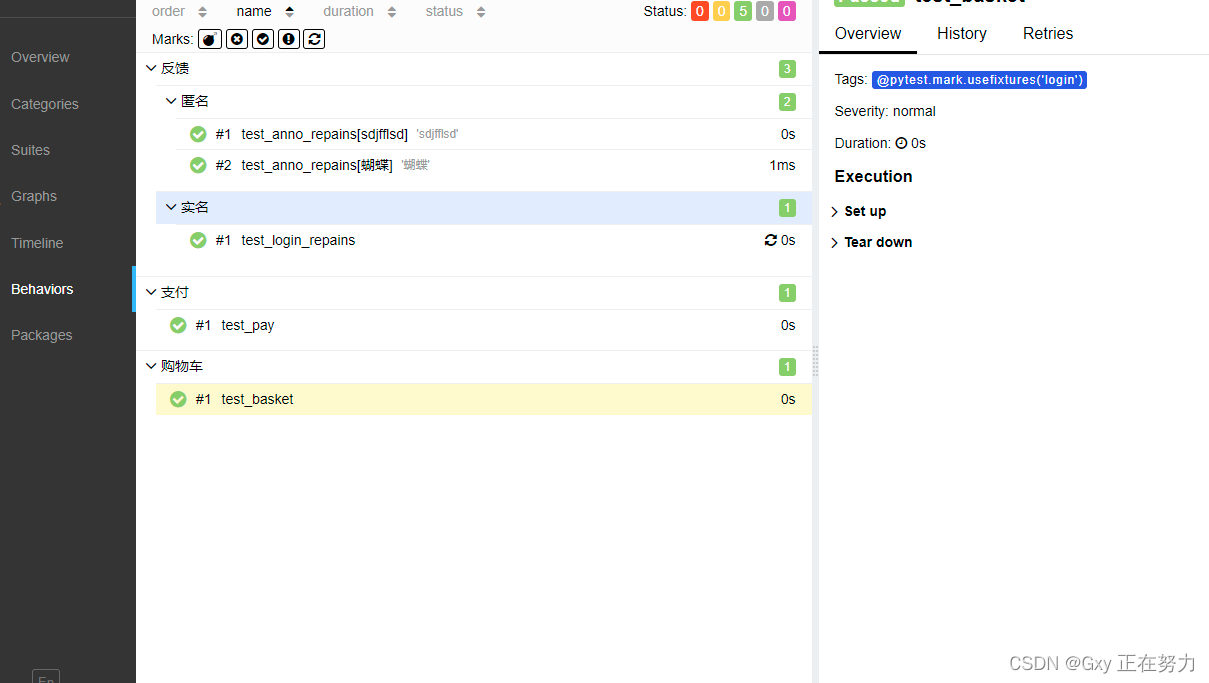
这样的报告 看着非常简洁 并附有说服力
报告的多样化
•    附加图片:
•    allure.attach.file(source, name, attachment_type, extension):
•    allure.attach.file("./result/b.png", attachment_type=allure.attachment_type.PNG
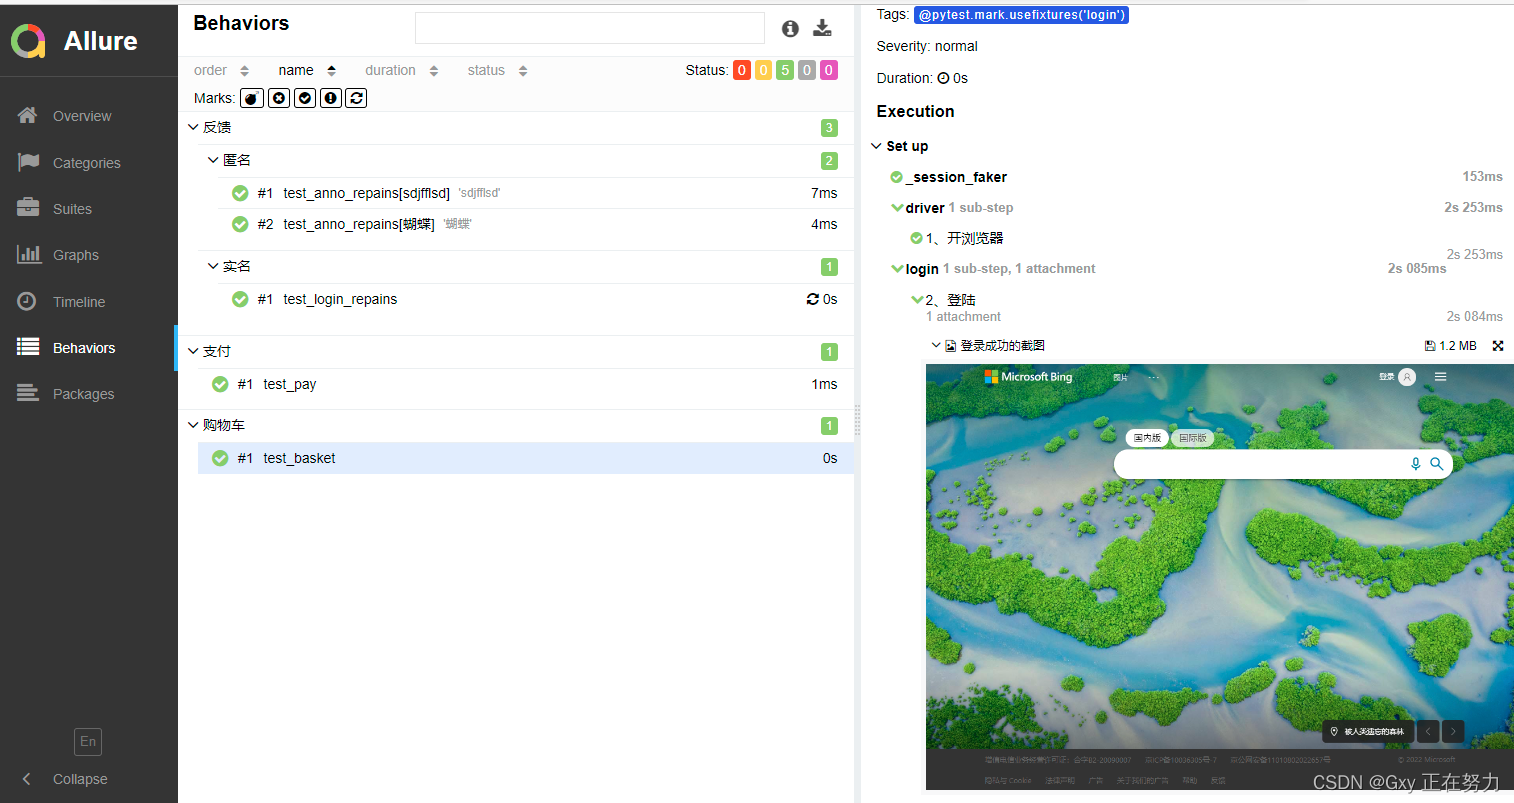
可以看到报告里生成了图片
•    @allure.attach(‘具体文本信息’)
•    @allure.link,@allure.issue并 @allure.testcase描述
• @allure.description;@allure.title;
   import allure

@allure.feature("测试数字相等")
def test_01():
    allure.attach("整数相等")
    allure.attach.file("test_data.yaml", "数据", attachment_type=allure.attachment_type.YAML)
    assert 1 == 1

@allure.feature("测试字典相等")
def test_02():
    allure.attach("字典相等")
    assert {"name": "linda"} == {'name': 'linda'}
    allure.attach.file("bing.png","我喜欢",attachment_type=allure.attachment_type.PNG)

@allure.description("这个是要测试的点,包括功能测试。。。")
@allure.title("功能中安全测试")
@allure.link("http://114.116.97.187:3333/DVWA", "渗透测试用例")
@allure.issue("http://114.116.87.187:1081/zentao/user-login-L3plbnRhby8=.html", "bug地址")
@allure.testcase("http://114.116.87.187:1081/zentao/user-login-L3plbnRhby8=.html", "功能测试用例")
def test_03():
    print("描述详细")
运行如下

可以看到里面的输入了文字 还有我们的title 还有描述都出来了
Original: https://blog.csdn.net/m0_53543997/article/details/125930846
Author: Gxy 正在努力
Title: pytest最好的测试框架
原创文章受到原创版权保护。转载请注明出处:https://www.johngo689.com/776392/
转载文章受原作者版权保护。转载请注明原作者出处!