

参考文献:
神经网络学习小记录52——Pytorch搭建孪生神经网络(Siamese network)比较图片相似性_Bubbliiiing的博客-CSDN博客_神经网络图片相似性
Python – 深度学习系列2-人脸比对 Siamese_yukai08008的博客-CSDN博客
1.孪生网络
孪生神经网络(Siamese network)即”连体的神经网络”,
神经网络的”连体”是通过共享权值来实现的,如图所示。
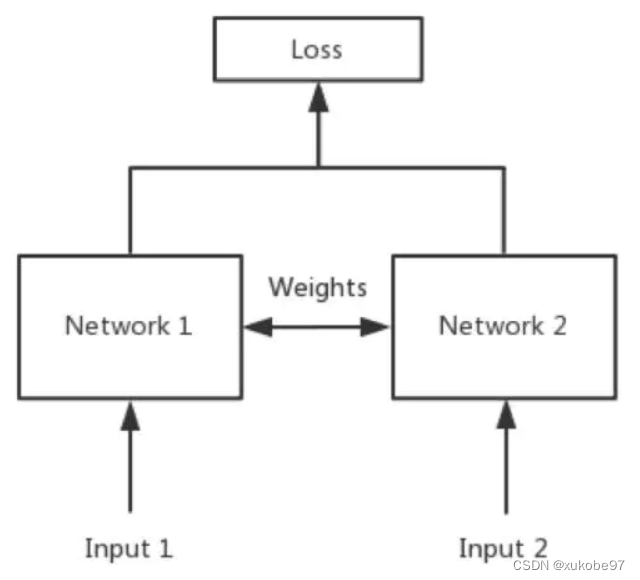

孪生神经网络有两个输入(Input1 and Input2),利用特征提取网络将输入映射到新的空间,形成输入在新的空间中的表示。然后对得到的两个输出进行相减,得到新的输出,并进行全连接层分类,最后输出一个向量,再通过Sigmoid函数将其转化到0-1之间,该值即为两个输入的相似度。
2.孪生网络
(1)特征提取部分
本孪生网络采用vgg16的features作为特征提取网络,提取完后将两个向量展平,便于相减得到新的向量并进行全连接层分类。
代码实现:
vgg16 = models.vgg16(pretrained=True)
获取VGG16的特征提取层
vgg = vgg16.features

class SiameseNetwork(nn.Module):
    def __init__(self, input_shape):
        super(SiameseNetwork, self).__init__()

        self.vgg = vgg

    def forward_once(self, x):
        output = self.vgg(x)
        output = torch.flatten(output, 1)

    def forward(self, input1, input2):
        output1 = self.forward_once(input1)
        output2 = self.forward_once(input2)
这里最好不要将features的权重冻结,因为这样不能很好提取我们所需图片的特征,泛化能力也不好。
(2)全连接层
将得到的两个输出(output1和output2)进行相减,得到output,并对output进行全连接层,注意:其展平长度需通过计算得出,最后通过三个全连接层得到一个输出通道,并采取Sigmoid将其范围控制在0到1之间。(由于我们使用的损失函数是BCEWithLogitsLoss,即进行损失计算前会对预测值进行Sigmoid,因此在这里我们就不加Sigmoid)
代码实现:
def get_img_output_length(width, height):
    def get_output_length(input_length):
        # input_length += 6
        filter_sizes = [2, 2, 2, 2, 2]
        padding = [0, 0, 0, 0, 0]
        stride = 2
        for i in range(5):
            input_length = (input_length + 2 * padding[i] - filter_sizes[i]) // stride + 1
        return input_length

    return get_output_length(width) * get_output_length(height)

class SiameseNetwork(nn.Module):
    def __init__(self, input_shape):
        super(SiameseNetwork, self).__init__()

        flat_shape = 512 * get_img_output_length(input_shape[1], input_shape[0])
        # flat_shape = 1000
        self.fc = nn.Sequential(
            nn.Linear(flat_shape, 512),
            nn.ReLU(inplace=True),

            nn.Linear(512, 256),
            nn.ReLU(inplace=True),

            nn.Linear(256, 1))

    def forward(self, input1, input2):

        output = output1 - output2
        output = self.fc(output)
        # output = nn.Sigmoid(output)
        return output
3.标签的生成
对于相似的图片,我们标签为1;对于不同的图片,我们将标签设置为0
代码实现:
class SiameseNetworkDataset(Dataset):

    def __init__(self, imageFolderDataset, transform=None, should_invert=True):
        self.imageFolderDataset = imageFolderDataset
        self.transform = transform
        self.should_invert = should_invert

    def __getitem__(self, index):
        img0_tuple = random.choice(self.imageFolderDataset.imgs)
        # we need to make sure approx 50% of images are in the same class
        should_get_same_class = random.randint(0, 1)
        if should_get_same_class:
            while True:
                # keep looping till the same class image is found
                img1_tuple = random.choice(self.imageFolderDataset.imgs)
                if img0_tuple[1] == img1_tuple[1]:
                    break
        else:
            while True:
                # keep looping till a different class image is found

                img1_tuple = random.choice(self.imageFolderDataset.imgs)
                if img0_tuple[1] != img1_tuple[1]:
                    break

        img0 = Image.open(img0_tuple[0])
        img1 = Image.open(img1_tuple[0])
        img0 = img0.convert("RGB")
        img1 = img1.convert("RGB")

        if self.should_invert:
            img0 = PIL.ImageOps.invert(img0)
            img1 = PIL.ImageOps.invert(img1)

        if self.transform is not None:
            img0 = self.transform(img0)
            img1 = self.transform(img1)

        return img0, img1, torch.from_numpy(np.array([int(img1_tuple[1] == img0_tuple[1])], dtype=np.float32))

    def __len__(self):
        return len(self.imageFolderDataset.imgs)
4.损失函数和优化器
criterion = torch.nn.BCEWithLogitsLoss()
optimizer = torch.optim.Adam(net.parameters(), 0.001, betas=(0.9, 0.999))
5.训练过程
(1)参数设置:
training_dir = r"D:\Siamese_for_Face\data\faces\training"
train_batch_size = 16
train_number_epochs = 200
input_shape = [224, 224]
(2)数据集加载
transform = transforms.Compose([transforms.Resize((224, 224)),
                                transforms.ToTensor()])
folder_dataset = dset.ImageFolder(root=training_dir)
siamese_dataset = SiameseNetworkDataset(imageFolderDataset=folder_dataset,
                                        transform=transform,
                                        should_invert=False)
train_dataloader = DataLoader(siamese_dataset,
                              shuffle=True,
                              num_workers=0,
                              batch_size=train_batch_size)
(3)网络的加载并移到GPU训练
net = SiameseNetwork(input_shape)
device = torch.device("cuda:0" if torch.cuda.is_available() else "cpu")
net.to(device)
(4)训练循环
counter = []
loss_history = []
iteration_number = 0

if __name__ == '__main__':

    for epoch in range(0, train_number_epochs):
        for i, data in enumerate(train_dataloader, 0):
            img0, img1, label = data
            img0, img1, label = img0.to(device), img1.to(device), label.to(device)
            optimizer.zero_grad()
            output = net(img0, img1)
            loss_contrastive = criterion(output, label)
            loss_contrastive.backward()
            optimizer.step()
            if i % 10 == 0:
                print("Epoch number {}\n Current loss {}\n".format(epoch, loss_contrastive.item()))
                iteration_number += 10
                counter.append(iteration_number)
                loss_history.append(loss_contrastive.item())
    plt.plot(counter, loss_history)
    plt.show()
    torch.save(net.state_dict(), 'weights/vgg.pkl')
6.测试过程
(1)展示图片
def imshow(img, text=None, should_save=False):
    npimg = img.numpy()
    plt.axis("off")
    if text:
        plt.text(75, 8, text, style='italic', fontweight='bold',
                 bbox={'facecolor': 'white', 'alpha': 0.8, 'pad': 10})
    plt.imshow(np.transpose(npimg, (1, 2, 0)))
    plt.show()
(2)参数设置
testing_dir = r"D:\Siamese_for_Face\data\faces\testing"
input_shape = [224, 224]
(3)加载数据集
testing_dir = r"D:\Siamese_for_Face\data\faces\testing"
input_shape = [224, 224]

transform = transforms.Compose([transforms.Resize((224, 224)),
                                transforms.ToTensor()])
folder_dataset_test = dset.ImageFolder(testing_dir)
siamese_dataset = SiameseNetworkDataset(imageFolderDataset=folder_dataset_test,
                                        transform=transform,
                                        should_invert=False)
test_dataloader = DataLoader(siamese_dataset, num_workers=0, batch_size=1, shuffle=True)
(4)加载网络和训练过的权重
net = SiameseNetwork(input_shape)
device = torch.device("cuda:0" if torch.cuda.is_available() else "cpu")
net.to(device)
net.load_state_dict(torch.load(r'D:\Siamese_for_Face\weights\vgg.pkl'))
(5)测试过程
if __name__ == '__main__':

    dataiter = iter(test_dataloader)
    x0, _, _ = next(dataiter)

    for i in range(10):
        _, x1, label2 = next(dataiter)
        x0, x1, label2 = x0.to(device), x1.to(device), label2.to(device)
        concatenated = torch.cat((x0, x1), 0)
        # output1, output2 = net(Variable(x0), Variable(x1))
        output = net(Variable(x0), Variable(x1))[0]
        output = torch.nn.Sigmoid()(output)
        # euclidean_distance = F.pairwise_distance(output1, output2)
        imshow(torchvision.utils.make_grid(concatenated).cpu(),
               'similarity: {:.2f}'.format(output.item()))
7.网络的效果
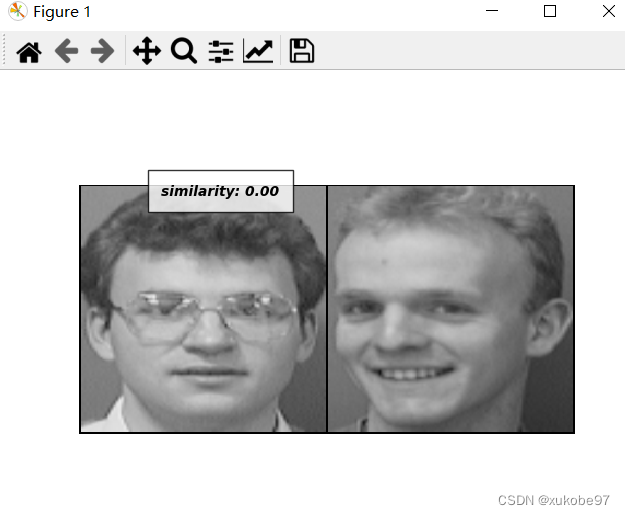
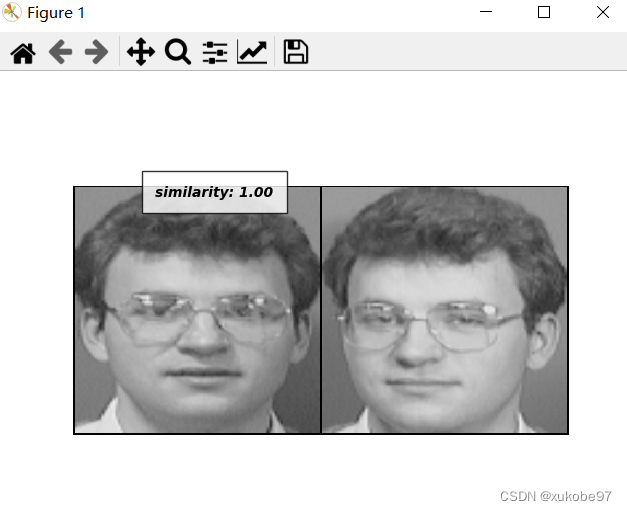
这里我是设置了0.0005的学习率和400个epochs
感觉最后训练的效果很好,说明vgg16网络的features的特征提取能力很强大,这里要注意的是,不要设置太大的学习率,因为我们这是迁移学习,主要是利用vgg16特征提取的权重,设置太大的学习会将原本训练好的vgg16的权重扭曲太多。
8.代码
(1)gitee
Siamese_for_Face.zip · xuxuxuxu/xuxuxuxu – 码云 – 开源中国 (gitee.com)
(2)github
xuxuxuxu/Siamese_for_Face.zip at main · xuxuxuxuxuxu97/xuxuxuxu (github.com)
Original: https://blog.csdn.net/weixin_52950958/article/details/126226752
Author: xukobe97
Title: pytorch搭建孪生网络比较人脸相似性
原创文章受到原创版权保护。转载请注明出处:https://www.johngo689.com/716615/
转载文章受原作者版权保护。转载请注明原作者出处!