

【参考:【循环神经网络】5分钟搞懂RNN,3D动画深入浅出_哔哩哔哩_bilibili】
【参考:RNN的Excel实现_哔哩哔哩_bilibili】
参数理解
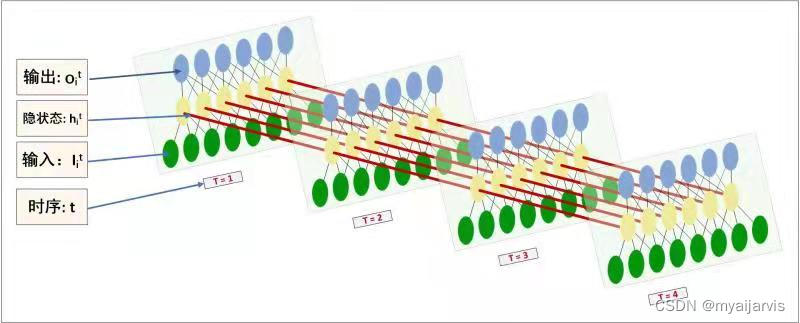

上面这张图最能表明RNN的运行原理
【参考:pytorch中RNN参数的详细解释_lwgkzl的博客-CSDN博客】
自己的笔记 【参考:【PyTorch深度学习实践 | 刘二大人】B站视频教程笔记_myaijarvis的博客-CSDN博客】
【参考:Pytorch实现RNN,LSTM和GRU超详细代码参数解析_adczsw的博客-CSDN博客】
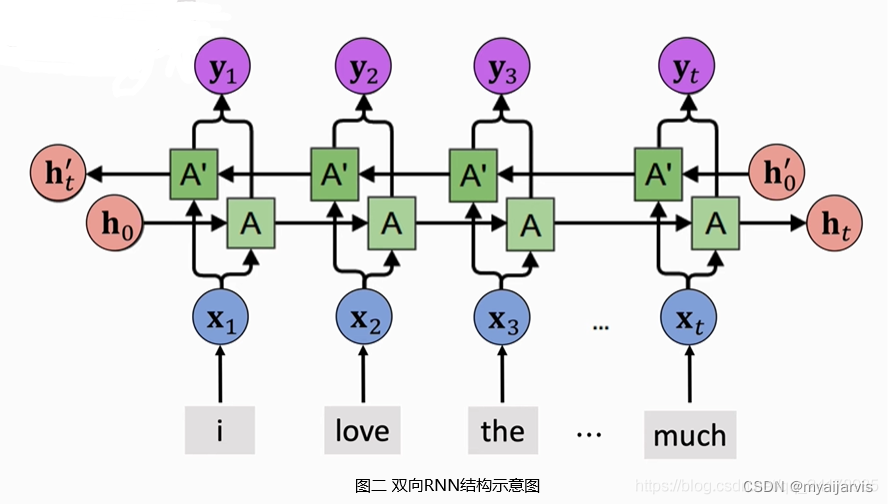
; 多层、双向RNN

; 手动实现
【参考:Pytorch中RNN入门思想及实现_瞳瞳瞳呀的博客-CSDN博客】
【参考:【Pytorch官方教程】从零开始自己搭建RNN1 – 字母级RNN的分类任务_iteapoy的博客-CSDN博客】
官方文档:https://pytorch.org/docs/stable/generated/torch.nn.RNN.html#torch.nn.RNN
RNN源码:https://pytorch.org/docs/stable/_modules/torch/nn/modules/rnn.html#RNN
【参考:RNN原理及逐行实现_哔哩哔哩_bilibili】
【参考:29 – RNN的原理、API讲解及其逐行代码实现_取个名字真难呐的博客-CSDN博客】

【参考:深度学习/RNN手动实现 · myaijarvis/AI – 码云 – 开源中国】
; 单向单层
def custom_rnn_function(input, h_prev, w_ih, w_hh, b_ih, b_hh):
"""

    h_t = tanh(w_{ih}*x_t+b_{ih}+w_{hh}*h_{t-1}+b_{hh})
    x_t is the input at time t

    :param input: input(batch_size,seq_len,input_size)
    :param h_prev: previous hidden h_prev (batch_size,hidden_size)
    # 本来应该是(1,batch_size,hidden_size) 这里为了简便传递参数和下面的计算 因为很多时候传递的参数都是二维

    :param w_ih: weight w_ih (hidden_size,input_size)
    :param w_hh: weight w_hh (hidden_size,hidden_size)
    :param b_ih: bias b_ih (hidden_size)
    :param b_hh: bias b_hh (hidden_size)
    :return: output ,h_n

"""

    batch_size, seq_len, input_size = input.shape

    hidden_size, input_size = w_ih.shape

    output = torch.zeros(batch_size, seq_len, hidden_size)

    for t in range(seq_len):

        x_t = input[:, t, :].unsqueeze(2)

        w_ih_batch = w_ih.unsqueeze(0).tile(batch_size, 1, 1)

        w_hh_batch = w_hh.unsqueeze(0).tile(batch_size, 1, 1)

        w_ih_times_x = torch.bmm(w_ih_batch, x_t).squeeze(-1)

        w_hh_times_h = torch.bmm(w_hh_batch, h_prev.unsqueeze(2)).squeeze(-1)

        h_prev = torch.tanh(w_ih_times_x + b_ih + w_hh_times_h + b_hh)

        output[:, t, :] = h_prev

    return output, h_prev.unsqueeze(0)
双向单层
def bi_custom_rnn_function(input,
                           h_prev,
                           w_ih, w_hh, b_ih, b_hh,
                           w_ih_reverse, w_hh_reverse, b_ih_reverse, b_hh_reverse):

    batch_size, seq_len, input_size = input.shape
    hidden_size, input_size = w_ih.shape

    output = torch.zeros(batch_size, seq_len, hidden_size * 2)

    forward_output = custom_rnn_function(input,
                                         h_prev[0, :, :],
                                         w_ih, w_hh, b_ih, b_hh)[0]

    backward_output = custom_rnn_function(torch.flip(input, [1]),
                                          h_prev[1, :, :],
                                          w_ih_reverse, w_hh_reverse, b_ih_reverse, b_hh_reverse)[0]

    output[:, :, :hidden_size] = forward_output

    output[:, :, hidden_size:] = torch.flip(backward_output, [1])

    return output, torch.cat([forward_output[:, -1, :].unsqueeze(0), backward_output[:, -1, :].unsqueeze(0)], dim=0)
单向多层
def custom_numlayers_rnn_function(input,h_prev,num_layers,
                                  w_ih_0, w_hh_0,
                                  w_ih_i, w_hh_i,
                                  b_ih, b_hh):

    h_prev_temp = torch.tensor(h_prev)
    output, h_prev_temp[0, :, :] = custom_rnn_function(input,
                                                       h_prev[0, :, :],
                                                       w_ih_0, w_hh_0,
                                                       b_ih[0, :], b_hh[0, :])

    for i in range(1, num_layers):

        output, h_prev_temp[i, :, :] = custom_rnn_function(output,
                                                           h_prev[i, :, :],
                                                           w_ih_i[i - 1, :, :], w_hh_i[i - 1, :, :],
                                                           b_ih[i, :], b_hh[i, :],)

    return output, h_prev_temp
双向多层
def bi_custom_numlayers_rnn_function(input,
                                     h_prev,
                                     num_layers,
                                     w_ih_0, w_hh_0,
                                     w_ih_i, w_hh_i,
                                     b_ih, b_hh,
                                     w_ih_0_reverse, w_hh_0_reverse,
                                     w_ih_i_reverse, w_hh_i_reverse,
                                     b_ih_reverse, b_hh_reverse):

    h_prev_temp = torch.tensor(h_prev)
    output, h_prev_temp[0:2, :, :] = bi_custom_rnn_function(input,
                                                            h_prev[0:2, :, :],
                                                            w_ih_0, w_hh_0, b_ih[0, :], b_hh[0, :],
                                                            w_ih_0_reverse, w_hh_0_reverse, b_ih_reverse[0, :],
                                                            b_hh_reverse[0, :])

    for i in range(1, num_layers):

        output, h_prev_temp[i*2:i*2+2, :, :] = bi_custom_rnn_function(output,
                                                                    h_prev[i:i + 2, :, :],
                                                                    w_ih_i[i - 1, :, :], w_hh_i[i - 1, :, :],

                                                                    b_ih[i, :], b_hh[i, :],
                                                                    w_ih_i_reverse[i - 1, :, :],
                                                                    w_hh_i_reverse[i - 1, :, :],
                                                                    b_ih_reverse[i, :],
                                                                    b_hh_reverse[i, :])

    return output, h_prev_temp
自定义模型权重参数
上面使用的都是RNN API模型的权重参数,我想自己初始化,看看怎样能达到和Pytorch一样的结果
更新待定
Original: https://blog.csdn.net/Jruo911/article/details/124484921
Author: myaijarvis
Title: 【NLP】RNN理解(Pytorch实现)
原创文章受到原创版权保护。转载请注明出处:https://www.johngo689.com/709035/
转载文章受原作者版权保护。转载请注明原作者出处!