

5.2.1 用jieba库实现中文分词
- 要从中文文本中提取高频词汇,需要使用中文分词(Chinese Word Segmentation)技术。分词是指将一个文本序列切分成一个个单独的词。我们知道,在英文的行文中,单词之间以空格作为分隔符,而中文的词语之间没有一个形式上的分解符,因此,中文分词比英文分词要复杂一些。在Python中,可以利用jieba库来快速完成中文分词。
1.jieba 库的安装与基本用法
import jieba
word = jieba.cut('我爱北京天安门')
for i in word:
    print(i)
注意:用cut()函数分词得到的word不是一个列表,而是一个迭代器。所谓迭代器其实和列表很相似,可以把它理解成一个”隐身的列表”。但是迭代器里的元素要通过for循环语句来访问,所以第3行代码和第4行代码不能改写成print(word)。
2.读取文本内容并进行分词
- 下面先来讲解如何从文本文件中读取内容并进行分词,代码如下:
import jieba
report = open('信托行业报告.txt','r').read()
words = jieba.cut(report)
for word in words:
    print(word)
3.按指定长度提取分词后的词
- 这里以提取长度大于等于4个字的词为例进行讲解,代码如下:
import jieba
report = open('信托行业报告.txt','r').read()
words = jieba.cut(report)
report_words = []
for word in words:
    if len(word) >= 4:
        report_words.append(word)
print(report_words)
4.统计高频词汇
- 统计高频词汇并不复杂,用collections库中的Counter()函数就可以完成,代码如下:
import jieba
report = open('信托行业报告.txt','r').read()
words = jieba.cut(report)
report_words = []
for word in words:
    if len(word) >= 4:
        report_words.append(word)

from collections import Counter
result = Counter(report_words)
print(result)
- 这样便可以打印输出每个词的出现次数。如果只想看出现次数排名前50位的词,可以用most_common()函数来完成,将上述第10行代码改写成如下代码:
import jieba
report = open('信托行业报告.txt','r').read()
words = jieba.cut(report)
report_words = []

for word in words:
    if len(word) >= 4:
        report_words.append(word)

from collections import Counter
result = Counter(report_words).most_common(50)
print(result)
- 将result打印输出,结果如下图所示。可以看到,里面的一些高频词还是能体现整个行业的某些情况的。例如,最近几年行业年度报告里频繁提到”信息技术”与”人工智能”这类词,那么它们也的确体现了行业的未来发展趋势。


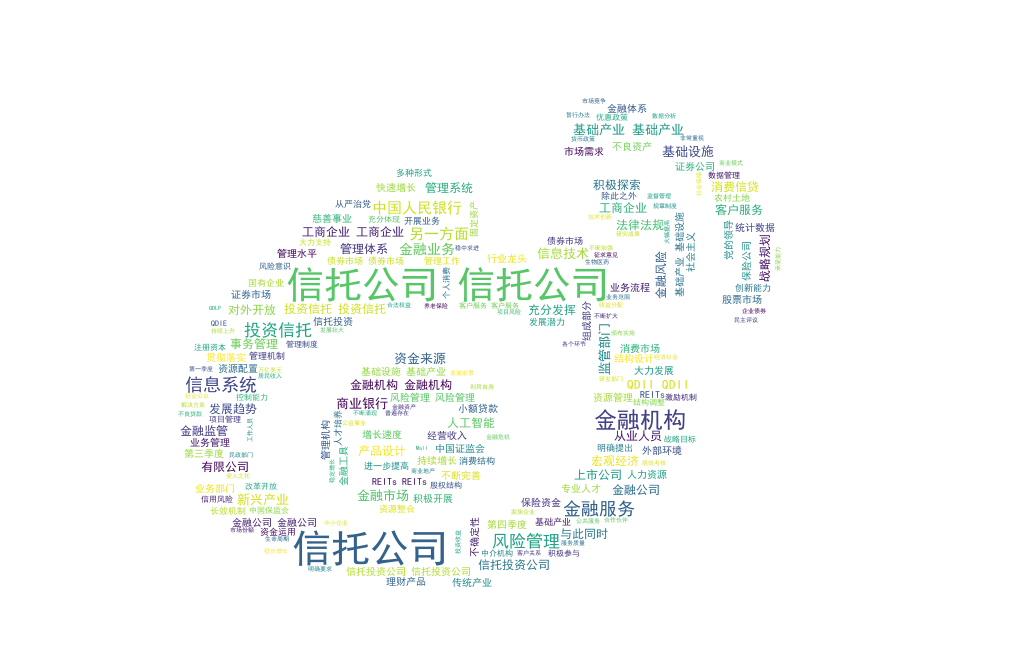
5.2.2 用wordcloud库绘制词云图
1.wordcloud库的基本用法
- 以前面做了长度筛选的分词结果report_words为例讲解wordcloud库的基本用法,代码如下:
- 如果wordcloud安装失败,可参考python中安装wordcloud的方法
import jieba
report = open('信托行业报告.txt','r').read()
words = jieba.cut(report)

report_words = []
for word in words:
    if len(word) >= 4:
        report_words.append(word)

from collections import Counter
result = Counter(report_words).most_common(50)

from wordcloud import WordCloud
content = ' '.join(report_words)
wc = WordCloud(font_path='simhei.ttf',
               background_color='white',
                width=1000,
                height=600,
                 ).generate(content)
wc.to_file('词云图.png')

2.绘制特定形状的词云图
- 我们还可以将词云图绘制成特定的形状。首先导入相关库,代码如下:
from PIL import Image
from numpy as np
from wordcloud import WordCloud
- 第一行代码导入用于处理图片的PIL库。第二行导入用于处理数据的NumPy库,在本书作者编写的《Python金融大数据挖掘与分析全流程详解》的第6章就有该库的详细了解。
- 导入相关库后,就可以绘制指定形状的词云图了,代码如下:
import jieba
report = open('信托行业报告.txt','r').read()
words = jieba.cut(report)

report_words = []
for word in words:
    if len(word) >= 4:
        report_words.append(word)

from collections import Counter
result = Counter(report_words).most_common(50)

from PIL import Image
import numpy as np
from wordcloud import WordCloud
background_pic = '微博.jpg'
images = Image.open(background_pic)
maskImages = np.array(images)
content = ' '.join(report_words)
wc = WordCloud(font_path='simhei.ttf',
               background_color='white',
                width=1000,
                height=600,
               mask = maskImages
                 ).generate(content)
wc.to_file('词云图+自定义形状.png')
- 如何省略了第30行代码,那么得到的图形就和第一个词云图是一样的。
- 最终生成的词云图的颜色还是默认颜色(具体的颜色效果请读者自行运行代码后查看)。
3.绘制特定颜色的词云图
- 接下来讲解如何在特定形状的基础上,按特定颜色绘制词云图。首先导入相关库,代码如下:
from wordcloud import WordCloud,ImageColorGenerator
from imageio import imread
- 第一行代码除了从wordcloud库中导入WordCloud模块,还导入了ImageColorGenerator模块,用于获取颜色;第2行代码导入imageio库中的imread模块,用于读取图像。
- 然后在绘制特定词云图的代码后面加上如下代码:
import jieba
report = open('信托行业报告.txt','r').read()
words = jieba.cut(report)

report_words = []
for word in words:
    if len(word) >= 4:
        report_words.append(word)

from collections import Counter
result = Counter(report_words).most_common(50)

from PIL import Image
import numpy as np
from wordcloud import WordCloud
background_pic = '微博.jpg'
images = Image.open(background_pic)
maskImages = np.array(images)
content = ' '.join(report_words)
wc = WordCloud(font_path='simhei.ttf',
               background_color='white',
                width=1000,
                height=600,
               mask = maskImages
                 ).generate(content)

from wordcloud import WordCloud,ImageColorGenerator
from imageio import imread
back_color = imread(background_pic)
image_colors = ImageColorGenerator(back_color)
wc.recolor(color_func=image_colors)
wc.to_file('词云图+自定义形状+颜色.png')

- 最终生成的词云图,可以看到除了形状是新浪微博徽标的轮廓,词的颜色也是新浪微博徽标的特定颜色(具体的颜色效果读者自行运行代码后查看)。
5.2.3案例实战:新浪微博词云图绘制
- 下面基于3.6节从新浪微博爬取的内容,结合本节学习的知识绘制词云图。
requests获取网页源代码失败
import requests
headers = {'user-agent': 'Mozilla/5.0 (Windows NT 10.0; Win64; x64) AppleWebKit/537.36 (KHTML, like Gecko) Chrome/100.0.4896.60 Safari/537.36'}

url = 'https://s.weibo.com/weibo?q=阿里巴巴'
res = requests.get(url, headers=headers).text
print(res)
爬取并汇总每条微博的内容
import time
from selenium import webdriver

def get_browser():
    options = webdriver.ChromeOptions()
    options.add_experimental_option('excludeSwitches', ['enable-automation'])
    options.add_argument("--disable-blink-features=AutomationControlled")
    driver = webdriver.Chrome(options=options)

    driver.execute_cdp_cmd("Page.addScriptToEvaluateOnNewDocument", {
        "source": """
                        Object.defineProperty(navigator, 'webdriver', {
                          get: () => undefined
                        })
"""
    })
    return driver

url = 'https://s.weibo.com/weibo?q=阿里巴巴'
browser = get_browser()
browser.get(url)
time.sleep(6)
data = browser.page_source

import re
p_source = '
source = re.findall(p_source,data)
p_title = '(.*?)'
title = re.findall(p_title,data,re.S)

title_all = ''
for i in range(len(title)):
    title[i] = title[i].strip()
    title[i] = re.sub('','',title[i])
    title[i] = re.sub('[\u200b]','',title[i])
    title[i] = re.sub('(.*?)','',title[i])
    title[i] = re.sub(' ','',title[i])
    title_all = title_all + title[i]
    print(str(i + 1) + '.' + title[i] + '-' + source[i])
接着进行过分词
words = jieba.cut(title_all)

report_words = []
for word in words:
    if len(word) == 2:
        report_words.append(word)

result = Counter(report_words).most_common(50)
绘制词云图
import time
from selenium import webdriver

def get_browser():
    options = webdriver.ChromeOptions()
    options.add_experimental_option('excludeSwitches', ['enable-automation'])
    options.add_argument("--disable-blink-features=AutomationControlled")
    driver = webdriver.Chrome(options=options)

    driver.execute_cdp_cmd("Page.addScriptToEvaluateOnNewDocument", {
        "source": """
                        Object.defineProperty(navigator, 'webdriver', {
                          get: () => undefined
                        })
"""
    })
    return driver

url = 'https://s.weibo.com/weibo?q=阿里巴巴'
browser = get_browser()
browser.get(url)
time.sleep(6)
data = browser.page_source

import re
p_source = '
source = re.findall(p_source,data)
p_title = '(.*?)'
title = re.findall(p_title,data,re.S)

title_all = ''
for i in range(len(title)):
    title[i] = title[i].strip()
    title[i] = re.sub('','',title[i])
    title[i] = re.sub('[\u200b]','',title[i])
    title[i] = re.sub('(.*?)','',title[i])
    title[i] = re.sub(' ','',title[i])
    title_all = title_all + title[i]
    print(str(i + 1) + '.' + title[i] + '-' + source[i])

import jieba
words = jieba.cut(title_all)

report_words = []
for word in words:
    if len(word) == 2:
        report_words.append(word)

from collections import Counter
result = Counter(report_words).most_common(50)

from PIL import Image
import numpy as np
from wordcloud import WordCloud
background_pic = '微博.jpg'
images = Image.open(background_pic)
maskImages = np.array(images)

content = ' '.join(report_words)
wc = WordCloud(font_path='simhei.ttf',
               background_color='white',
                width=1000,
                height=600,
               mask = maskImages
                 ).generate(content)

from wordcloud import WordCloud,ImageColorGenerator
from imageio import imread
back_color = imread(background_pic)
image_colors = ImageColorGenerator(back_color)
wc.recolor(color_func=image_colors)
wc.to_file('微博内容词云图.png')

Original: https://blog.csdn.net/Triumph19/article/details/123937138
Author: Triumph19
Title: 5.2 数据可视化分析——词云图绘制
原创文章受到原创版权保护。转载请注明出处:https://www.johngo689.com/673360/
转载文章受原作者版权保护。转载请注明原作者出处!