

Nginx服务的搭建与配置
一、关闭防火墙并安装epel源
1、关闭selinux
①修改selinux的配置文件
[root@localhost ~]# vim /etc/selinux/config
SELINUX= disabled
②关闭selinux
[root@localhost ~]# setenforce 0
2、关闭防火墙
[root@localhost ~]# systemctl stop firewalld
[root@localhost ~]# systemctl disable firewalld
3、安装epel.repo源
[root@localhost ~]# yum -y install epel-release.noarch
[root@localhost ~]# cd /etc/yum.repos.d/
二、Nginx源码包安装
1、网站:https:
2、下载:wget https:
三、 设置nginx安装源[如同安装阿里云源配置一样]
1、安装官方提供的Centos安装nginx源
[root@www www]# rpm -Uvh https://nginx.org/packages/centos/7/noarch/RPMS/nginx-release-centos-7-0.el7.ngx.noarch.rpm
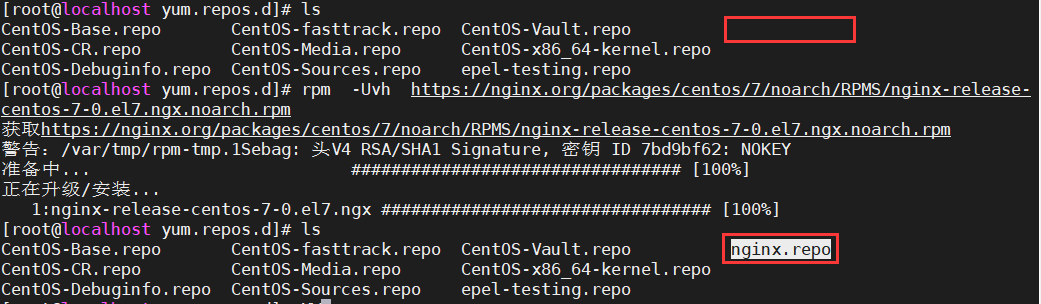

2、或者手动添加nginx安装源
[root@www www]# vim /etc/yum.repos.d/nginx.repo
[nginx]
name=nginx repo
baseurl=http://nginx.org/packages/centos/7/$basearch/
gpgche=0
enabled=1
3、安装Nginx
通过yum search nginx看看是否已经添加源成功。如果成功则执行下列命令安装Nginx。
[root@www yum.repos.d]# yum -y install nginx
4、Nginx的 配置
①Nginx的主配置文件
[root@www ~]# vim /etc/nginx/ nginx.conf
②Nginx配置支持PHP
在 /etc/nginx/conf.d目录下存放着多个配置文件,这些配置项会在Nginx运行时加载到主配置项目中(类似虚拟机)。Nginx是通过php-fpm来通讯的,所以需要监听 9000端口。
③ 在这个目录下生成一个自己的配置文件例如admin.conf,并进行添加php配置属性信息
[root@www nginx]# vim /etc/nginx/conf.d/admin.conf
server {
listen 80;#端口
server_name www.test.com admin.test.com;#域名
root /var/www/card/public;#网站根目录
index index.php index.html index.htm;
location / {
if (!-e $request_filename) {
rewrite ^(.*)$ /index.php?s=/$1 last;#主要配置隐藏url中index.php
break;
}
}
location ~ .php$ {
root /var/www/card/public;
fastcgi_pass 127.0.0.1:9000;
fastcgi_index index.php;
fastcgi_param SCRIPT_FILENAME $document_root$fastcgi_script_name;
include fastcgi_params;
}
}
④安装php-fpm并修改用户组和用户名
[root@www nginx]#yum -y install php-fpm#安装php-fpm
[root@www nginx]#vim /etc/php-fpm.d/www.conf#修改php-fpm配置文件,用户和用户组默认是apache,改成nginx
; RPM: apache Choosed to be able to access some dir as httpd
user = nginx
; RPM: Keep a group allowed to write in log dir.
group = nginx
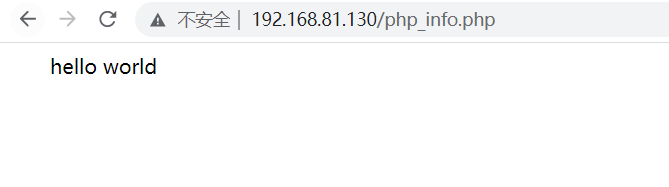
⑤创建php网站根目录和PHP访问页面
[root@www www]# mkdir -p card/public
[root@www www]# vim /var/www/card/public /php_info.php
hello world”;?>
⑥重启php-fpm
[root@www var]# systemctl restart php-fpm #启动 php-fpm
[root@www var]# lsof -i :9000 #php-fpm端口是否正常启动
COMMAND PID USER FD TYPE DEVICE SIZE/OFF NODE NAME
php-fpm 55916 root 6u IPv4 2089492 0t0 TCP localhost:cslistener (LISTEN)
php-fpm 55921 nginx 0u IPv4 2089492 0t0 TCP localhost:cslistener (LISTEN)
php-fpm 55922 nginx 0u IPv4 2089492 0t0 TCP localhost:cslistener (LISTEN)
php-fpm 55923 nginx 0u IPv4 2089492 0t0 TCP localhost:cslistener (LISTEN)
php-fpm 55924 nginx 0u IPv4 2089492 0t0 TCP localhost:cslistener (LISTEN)
php-fpm 55925 nginx 0u IPv4 2089492 0t0 TCP localhost:cslistener (LISTEN)
⑦浏览器访问PHP页面
四、Nginx配置反向代理(用户给用户访问的地址,红色为反向代理的主要配置),后面补充完
[root@localhost conf.d]# vim /etc/nginx/conf.d/ default.conf
upstream test{
server 192.168.81.130:8080 weight=1;#这里的IP是后端服务器IP地址,权重1
server 192.168.81.131:8080 weight=1;
}
server {
listen 80;
server_name www.test.com;
access_log /var/log/nginx/host.access.log main;
location / {
proxy_pass http://test;#这里可直接写IP地址进行配置,如果需要配置负载均衡,可以只有http://test 和 upstream名称一样
以下是一些反向代理的配置,可删除
index index.html index.htm;
proxy_redirect off;
proxy_set_header Host $host; #指定请求服务器域名和端口号
}
error_page 404 /404.html;
redirect server error pages to the static page /50x.html
error_page 500 502 503 504 /50x.html;
location = /50x.html {
root /usr/share/nginx/html;
}
proxy the PHP scripts to Apache listening on 127.0.0.1:80
location ~ .php$ {
proxy_pass http://127.0.0.1;
}
pass the PHP scripts to FastCGI server listening on 127.0.0.1:9000
location ~ .php$ {
root html;
fastcgi_pass 127.0.0.1:9000;
fastcgi_index index.php;
fastcgi_param SCRIPT_FILENAME /scripts$fastcgi_script_name;
include fastcgi_params;
}
deny access to .htaccess files, if Apache’s document root
concurs with nginx’s one
location ~ /.ht {
deny all;
}
}
Original: https://www.cnblogs.com/blue-wlZ/p/16289219.html
Author: 孤立一点
Title: Nginx服务的搭建与配置
原创文章受到原创版权保护。转载请注明出处:https://www.johngo689.com/582888/
转载文章受原作者版权保护。转载请注明原作者出处!