

ROS1代码向ROS2移植
- 前言
- 安装ros2 foxy
- 配置vscode
- ros2基本操作
* - 创建工作空间
- 添加工作空间环境变量
- 创建ros2功能包
- 安装第三方功能包
- 节点相关指令
- 功能包内相关文件注解
* - cmakelist.txt文件注解
- package.xml文件注解
- ros1代码向ros2移植技巧
前言
由于ros2的种种优点,特别是通信和节点去中心化的优点,我们团队决定将我们的代码从ros1移植到ros2,我们选择的ros2版本为foxy,ubuntu环境为20.04,现在记录以下移植大概过程。本博客内容将不定期更新。
这里列举一些ros2的学习教程:
鱼香ros B站教学视频.
安装ros2 foxy
可以使用鱼香ros一键配置ros环境,配置前记得将系统的源设置为国内源(清华源、中科大、阿里云等),鱼香ros一键安装ros2.
安装完后可以用小乌龟测试一下安装效果:
ros2 run turtlesim turtlesim_node
ros2 run turtlesim turtle_teleop_key


配置vscode
这里就不将怎么安装vscode了,正常下载安装即可。使用vscode的目的只是为了写代码时可以有提示,更方便,不使用vscode也可以。
配置vscode主要包括安装插件,主要安装以下插件:
python;c/c++:对应编程语言解释器
Chinese (Simplified) (简体中文) Language Pack for Visual Studio Code:汉化插件
ros:ros1插件
这里不推荐安装ros2插件,不太好用。
ros2基本操作
创建工作空间
mkdir -p ~/my_workspace/src
cd ~/my_workspace
colcon build
用上面的三句话就可以初始化一个工作空间,在ros2中,没有了catkin功能包。ros2的编译工具是colcon,但安装ros2时默认是不安装colcon的,因此要安装colcon:
sudo apt-get install python3-colcon-common-extensions
只编译一个功能包:
colcon build --packages-select easy_planner
添加工作空间环境变量
和ros1不同,ros2添加环境变量是用下面的命令:
cd ~/my_workspace
source install/setup.bash
创建ros2功能包
创建功能包用以下命令:
ros2 pkg create <功能包名> --build-type {cmake,ament_cmake,ament_python} --dependencies <依赖名>
安装第三方功能包
sudo apt install ros-[版本]-[功能包名]
这里的版本用系统当前环境变量ros版本代替,功能包名就是要安装的功能包的名字,比如我想安装ros2版本foxy的gazebo-ros功能包,则用下面的语句:
sudo apt install ros-foxy-gazebo-ros
节点相关指令
ros2 node list
功能包内相关文件注解
cmakelist.txt文件注解
先通过注释的方式解释一下功能包cmakelist.txt文件里的代码功能。
cmake_minimum_required(VERSION 3.5)
project(easy_planner)

Default to C99
if(NOT CMAKE_C_STANDARD)
  set(CMAKE_C_STANDARD 99)
endif()

Default to C++14
if(NOT CMAKE_CXX_STANDARD)
  set(CMAKE_CXX_STANDARD 14)
endif()

if(CMAKE_COMPILER_IS_GNUCXX OR CMAKE_CXX_COMPILER_ID MATCHES "Clang")
  add_compile_options(-Wall -Wextra -Wpedantic)
endif()

find dependencies
find_package(ament_cmake REQUIRED)
find_package(rclcpp REQUIRED)
find_package(std_msgs REQUIRED)
find_package(geometry_msgs REQUIRED)
find_package(nav_msgs REQUIRED)
find_package(tf2 REQUIRED)
find_package(tf2_ros REQUIRED)

if(BUILD_TESTING)
  find_package(ament_lint_auto REQUIRED)
  # the following line skips the linter which checks for copyrights
  # uncomment the line when a copyright and license is not present in all source files
  #set(ament_cmake_copyright_FOUND TRUE)
  # the following line skips cpplint (only works in a git repo)
  # uncomment the line when this package is not in a git repo
  #set(ament_cmake_cpplint_FOUND TRUE)
  ament_lint_auto_find_test_dependencies()
endif()

include_directories(
  include
)

add_executable(easy_planner1 src/easy_planner.cpp src/DStarPlanner.cpp)
ament_target_dependencies(easy_planner1 rclcpp std_msgs geometry_msgs nav_msgs tf2 tf2_ros)

add_executable(easy_planner2 src/easy_planner1.cpp src/DStarPlanner.cpp)
ament_target_dependencies(easy_planner2 rclcpp std_msgs geometry_msgs nav_msgs tf2 tf2_ros)

install(TARGETS
  easy_planner1
  DESTINATION lib/${PROJECT_NAME})

install(TARGETS
  easy_planner2
  DESTINATION lib/${PROJECT_NAME})

ament_package()
package.xml文件注解
再通过注释的方式讲一下package.xml文件的代码功能:
<?xml version="1.0"?>
<package format="2">
  <name>ugvc_planner</name>
  <version>0.0.0</version>
  <description>The ugvc_planner package</description>

  <!-- One maintainer tag required, multiple allowed, one person per tag -->
  <!-- Example:  -->
  <!-- <maintainer email="jane.doe@example.com">Jane Doe</maintainer> -->
  <maintainer email="u5@todo.todo">u5</maintainer>

  <!-- One license tag required, multiple allowed, one license per tag -->
  <!-- Commonly used license strings: -->
  <!--   BSD, MIT, Boost Software License, GPLv2, GPLv3, LGPLv2.1, LGPLv3 -->
  <license>TODO</license>

  <!-- Url tags are optional, but multiple are allowed, one per tag -->
  <!-- Optional attribute type can be: website, bugtracker, or repository -->
  <!-- Example: -->
  <!-- <url type="website">http://wiki.ros.org/ugvc_localplanner</url> -->

  <!-- Author tags are optional, multiple are allowed, one per tag -->
  <!-- Authors do not have to be maintainers, but could be -->
  <!-- Example: -->
  <!-- <author email="jane.doe@example.com">Jane Doe</author> -->

  <!-- The *depend tags are used to specify dependencies -->
  <!-- Dependencies can be catkin packages or system dependencies -->
  <!-- Examples: -->
  <!-- Use depend as a shortcut for packages that are both build and exec dependencies -->
  <!--   <depend>roscpp</depend> -->
  <!--   Note that this is equivalent to the following: -->
  <!--   <build_depend>roscpp</build_depend> -->
  <!--   <exec_depend>roscpp</exec_depend> -->
  <!-- Use build_depend for packages you need at compile time: -->
  <!--   <build_depend>message_generation</build_depend> -->
  <!-- Use build_export_depend for packages you need in order to build against this package: -->
  <!--   <build_export_depend>message_generation</build_export_depend> -->
  <!-- Use buildtool_depend for build tool packages: -->
  <!--   <buildtool_depend>catkin</buildtool_depend> -->
  <!-- Use exec_depend for packages you need at runtime: -->
  <!--   <exec_depend>message_runtime</exec_depend> -->
  <!-- Use test_depend for packages you need only for testing: -->
  <!--   <test_depend>gtest</test_depend> -->
  <!-- Use doc_depend for packages you need only for building documentation: -->
  <!--   <doc_depend>doxygen</doc_depend> -->
  <buildtool_depend>catkin</buildtool_depend>
  <depend>roscpp</depend>
  <depend>std_msgs</depend>
  <depend>geometry_msgs</depend>
  <depend>nav_msgs</depend>
  <depend>tf</depend>

  <!-- The export tag contains other, unspecified, tags -->
  <export>
    <!-- Other tools can request additional information be placed here -->

  </export>
</package>
ros1代码向ros2移植技巧
下面我将通过我的移植经验向大家展示移植过程中的经验。
1、首先是现在ros2中文教程比较少,英文论坛里的内容也没有很多。很多ros2的中文教程都是英文直译而来,如果能看懂英文教程还是尽量区看英文教程: ros2官方文档.
2、有些功能我们如果没有找到对应教程,可以采用以下方法解决,这里举TF的例子。
在ros2中,TF的有些函数用法和ros1不太一样,比如下面的语句:
       tf::StampedTransform transformB2O;
       try
       {
           plistener.waitForTransform("/odom", "/base_link",
           ros::Time::now(), ros::Duration(10.0));
           plistener.lookupTransform("/odom", "/base_link",
           ros::Time(0), transformB2O);
       }
       catch(tf::TransformException &ex)
       {
           ROS_ERROR("%s",ex.what());
           ros::Duration(1.0).sleep();
           continue;
       }
这个语句就是用来订阅odom坐标系和base_link坐标系的TF的,但参考ros2官方教程,例程中只用了下面的语句:
        geometry_msgs::msg::TransformStamped transformStamped;

        try {
          transformStamped = tf_buffer_->lookupTransform(
            toFrameRel, fromFrameRel,
            tf2::TimePointZero);
        } catch (tf2::TransformException & ex) {
          RCLCPP_INFO(
            this->get_logger(), "Could not transform %s to %s: %s",
            toFrameRel.c_str(), fromFrameRel.c_str(), ex.what());
          return;
        }
没有了waitForTransform函数。我试了一下,将这段代码替换原来的ros1的代码,发现终端总是会报下面的错误:
[turtle_tf2_listener_debug-4] [INFO] [1630223454.942322623] [listener_debug]: Could not transform odom to base_link: "odom" passed to lookupTransform argument target_frame does not exist
意思就是没收到odom到base_link的坐标转换,这就让我很迷惑,后面我又用了官方教程给的tf debug的教程:tf_debug,用
ros2 run tf2_ros tf2_echo odom base_link
终端显示可以有数据输出,即odom到base_link的转换是存在的。

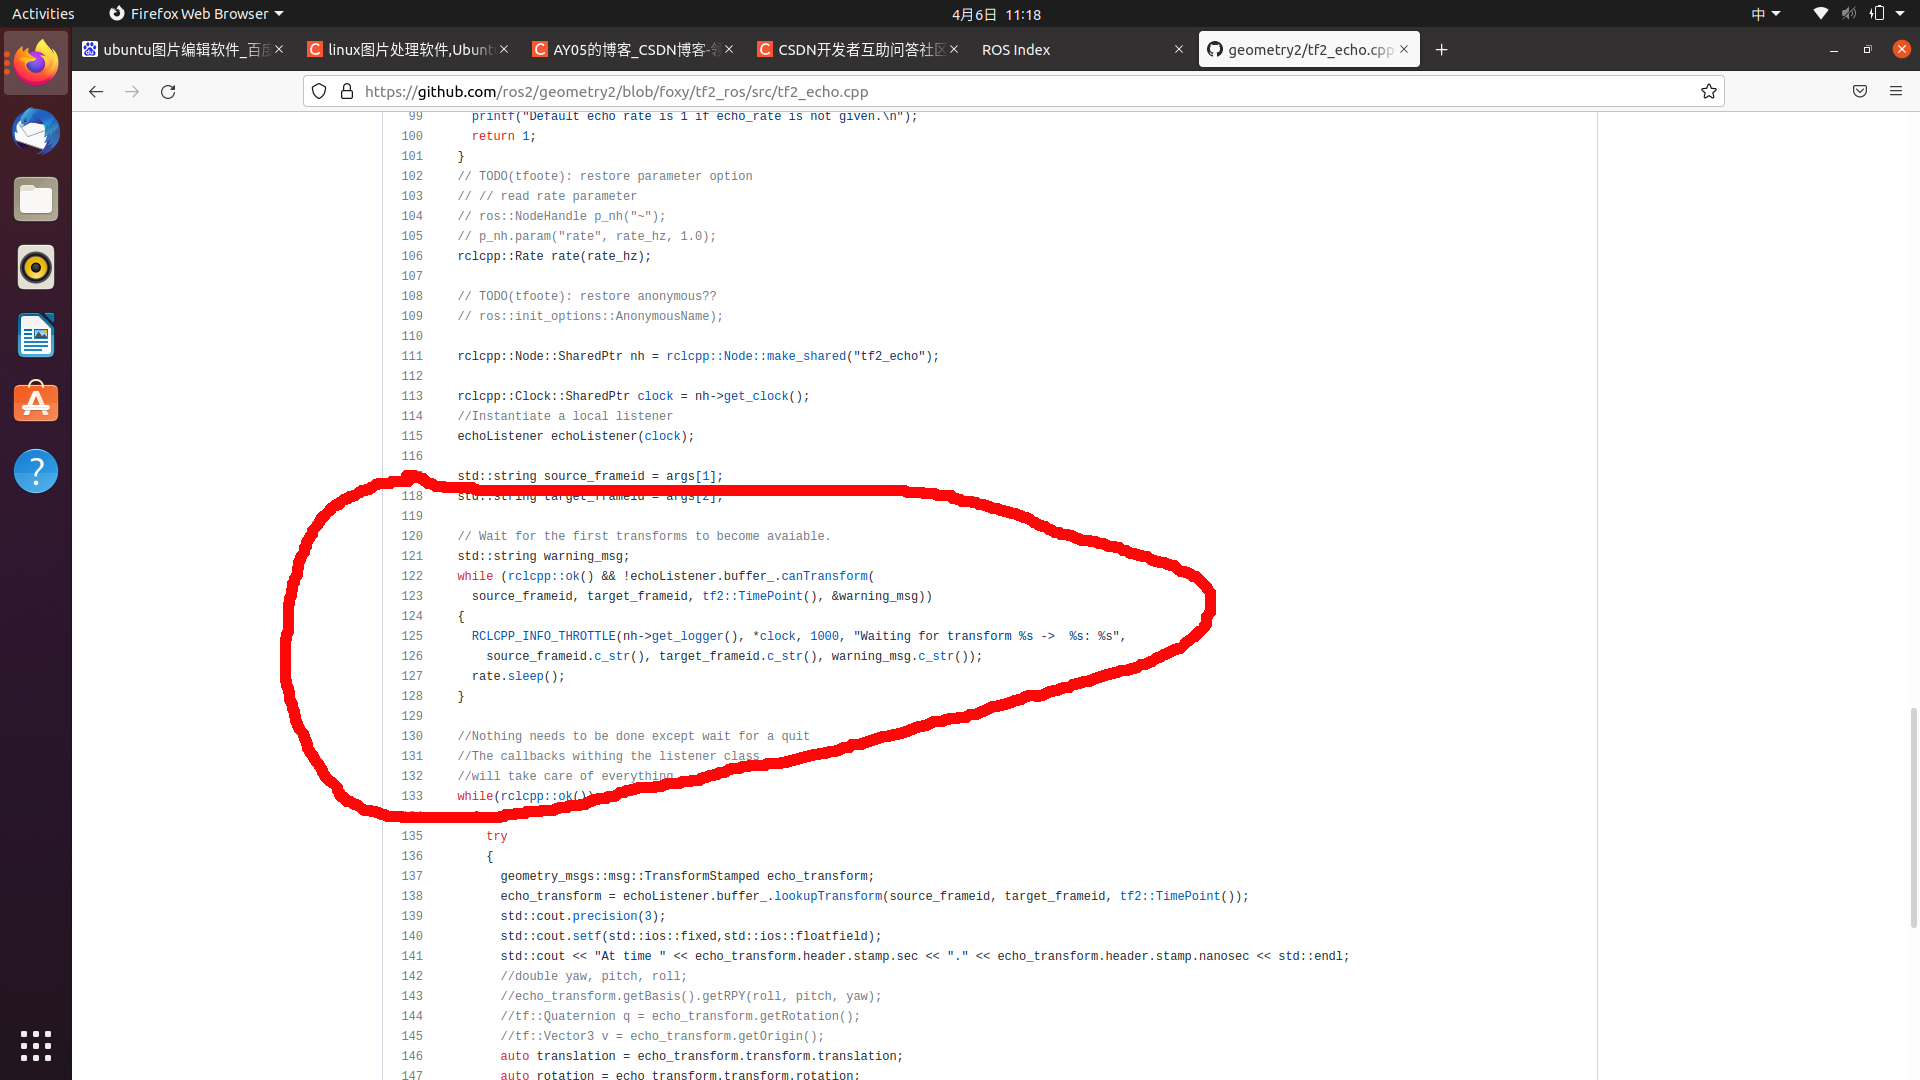
我找了好久,终于在一个论坛里找到了答案,原来是因为接受时间序不对。但找到了问题怎么解决呢。我想到了一个办法,既然tf2_ros功能包的tf2_echo工具可以接收TF,那就看一下tf2_echo的源码是怎么写的,学习一下就行了。
于是我就去找到了它的源码,寻找过程如下:
先进入ros wiki中,找到packages并进入:
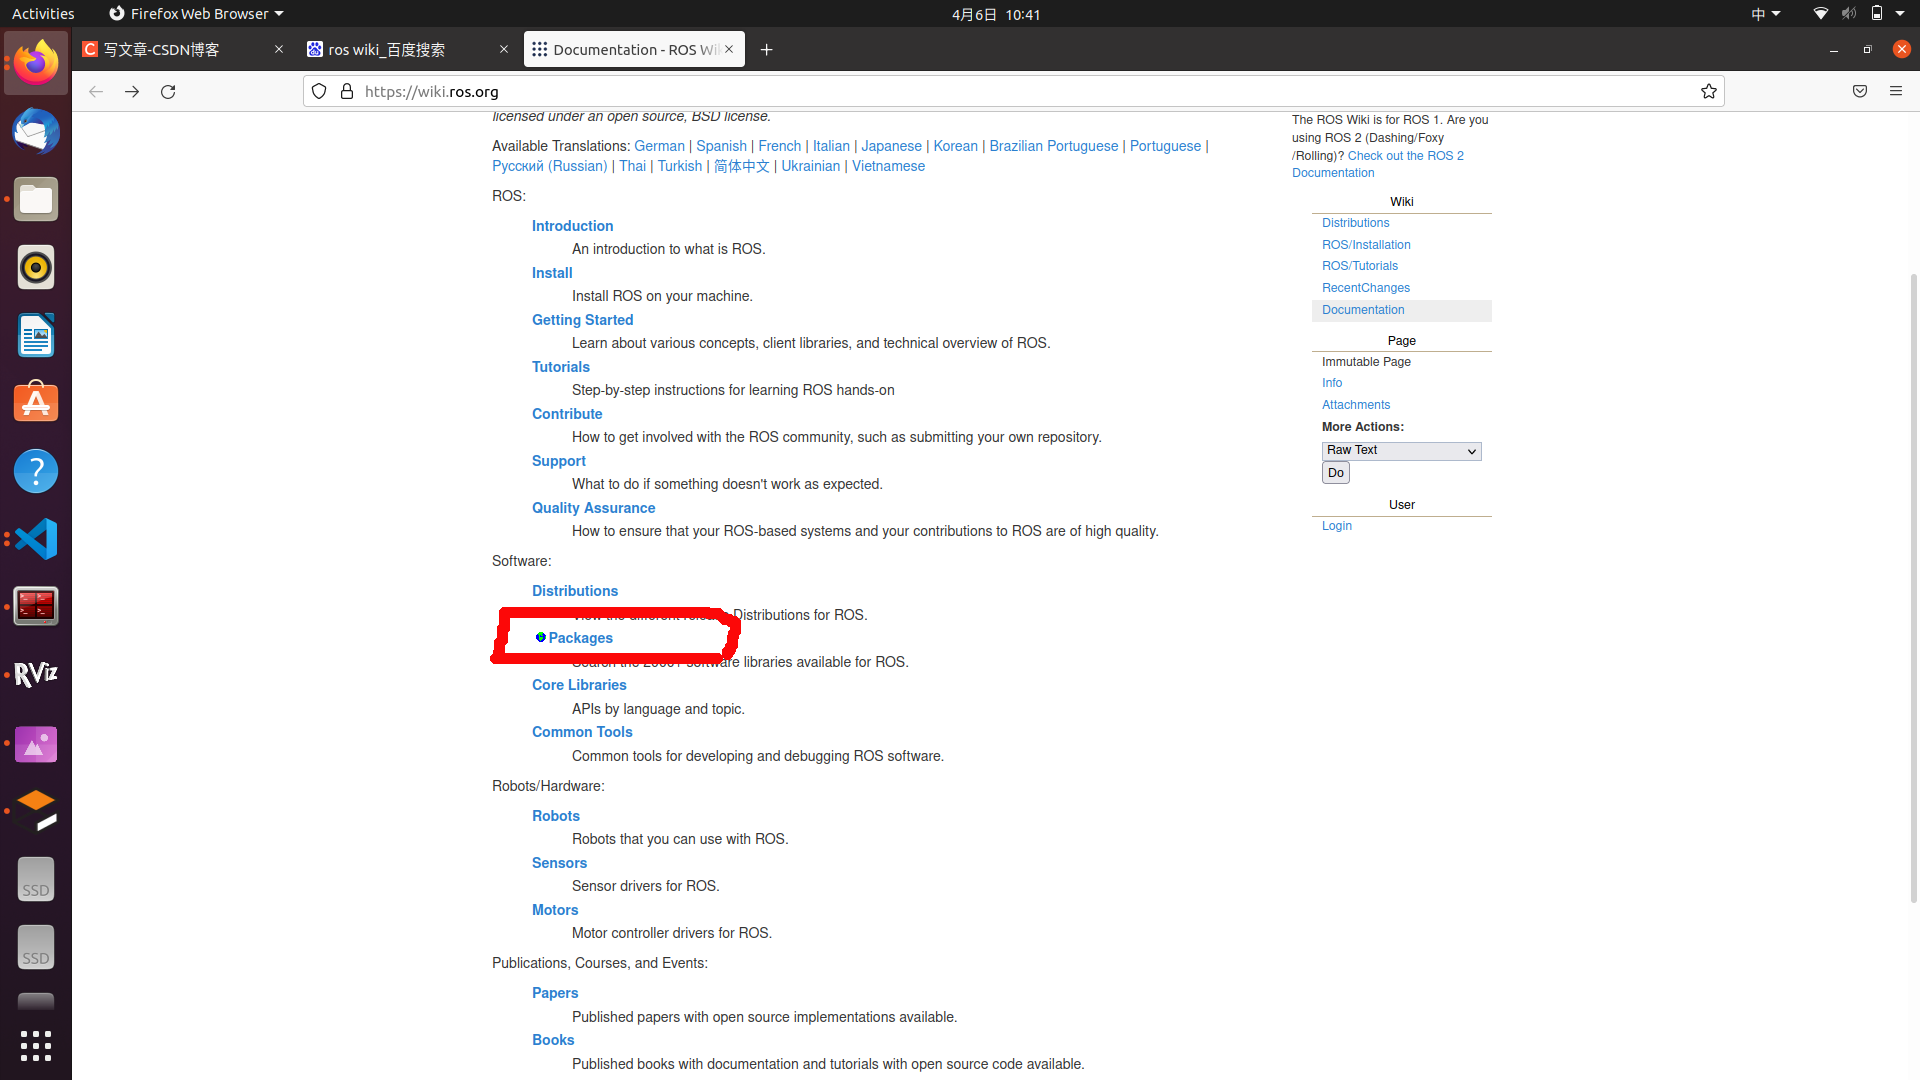
再在红线上的区域选择foxy,就可以找到foxy版本下的所有功能包,


上面是第二个经验。
Original: https://blog.csdn.net/weixin_44001261/article/details/123970088
Author: 落霞孤鹜,秋水长天
Title: ROS1代码向ROS2移植
原创文章受到原创版权保护。转载请注明出处:https://www.johngo689.com/559594/
转载文章受原作者版权保护。转载请注明原作者出处!