

实验要求:
1、数据集:
a) 训练数据集:”实验图像”—”训练集”目录下,包含”0″,”1″,…, “9”共10个子目录,每一个子目录下包含对应的数字图像。对于每一个数字,有20张64×64的训练图像。
b)测试数据集:”实验图像”—”测试集”目录下,包含”0″,”1″,…, “9”共10个子目录,每一个子目录下包含对应的数字图像。对于每一个数字,有5张64×64的测试图像。
2、基本要求:两个数字(6’,’9’)的识别,即给定一幅包含单个数字(’6’或者’9’)的64×64图像,程序自动识别出其中的数字。
3、附加要求:十个数字(’0’,’1’,…, ‘9’)的识别,即给定一幅包含单个数字(’0’,’1’, …, 或者’9’)的64×64图像,程序自动识别出其中的数字。
实验分析:
对于两个数字(6’,’9’)的识别:
首先读入图片,将其01二值化,原理为,计算像素点RGB的和,如果和大于300,判定为空白区域,置为0,否则置为1。


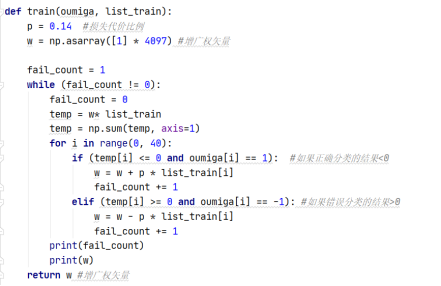
感知器算法:

ρ自行取值,在本次实验中我取0.14效果最好。
接下来进行测试集测试,测试函数代码实现如下

在p为0.14的情况下得到的结果如下:

即对6、9二分类,在p为0.14的情况下得到的增光权向量,对测试集分类正确率为100%。在二分类实验中,因为正确率可达到100%,故没有对图片进行预处理。
附加要求:十个数字(’0’,’1’,…, ‘9’)的识别,即给定一幅包含单个数字(’0’,’1’, …, 或者’9’)的64×64图像,程序自动识别出其中的数字。
实现如下:
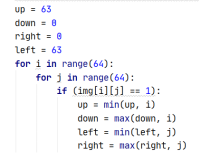
首先,对读入的图片进行预处理,进行图像分割。
整个过程分两部,左右分割和上下分割。基本思想是,找到四个点,即连接成四条直线,使四条直线最小包含数字。下列代码为找到最左和最右的列号,以及最上最下的列号。
由于学识浅薄,所以预处理比较粗糙。
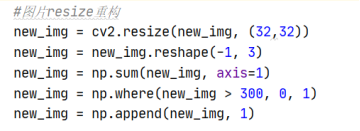
之后利用OpenCV的resize将选出的包围的像素点,重构成32*32的图片,完成预处理。
多分类的三种方法,我采用的方法为:
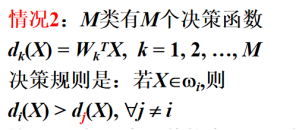
原因是,该方法将M个分类仅仅分为M个分类,没有不确定区等其他情况。
训练主要代码如下,基本过程类似于二分类。:

test测试代码如下:
用每个增光权向量×测试集,找到结果最大的w的下标,判断是否分类正确。
多分类结果:
在p选择为0.01的情况下:

在手动选择的若干p值中,最优正确率即为96%。
如果不进行图片的预处理,正确率在60%左右,正确率很低,所以想到了图片分割重构。
实验代码:
二分类:
import numpy as np
from matplotlib import pyplot as plt
import cv2
def test(oumiga, list_test, w):
fail_count = 0
temp = w * list_test
temp = np.sum(temp, axis=1)
for i in range(0, len(list_test)):
if ((oumiga[i] == 1 and temp[i] <= 0) or (oumiga[i]="=" -1 and temp[i]>= 0)):
fail_count += 1
print('错误的数量为:' + str(fail_count) + ' 正确率为:' + str(int((1 - (fail_count / len(list_test))) * 100)) + '%')
def train(oumiga, list_train):
p = 0.14 #损失代价比例
w = np.asarray([1] * 4097) #增广权矢量
fail_count = 1
while (fail_count != 0):
fail_count = 0
temp = w * list_train
temp = np.sum(temp, axis=1)
for i in range(0, 40):
if (temp[i] <= 0 and oumiga[i]="=" 1): #如果是6并且小于0 w="w" + p * list_train[i] fail_count elif (temp[i]>= 0 and oumiga[i] == -1): #如果是9并且大于0
w = w - p * list_train[i]
fail_count += 1
print(fail_count)
print('增广权矢量w为:')
print(w)
return w #增广权矢量
if __name__ == "__main__":
PATH = 'C:/Users/lishu/Desktop/code/PatternRecognition/experience3/'
list_img = []
for j in [6,9]:
for i in range(1,21):
img = cv2.imread(PATH + 'train/' + str(j) + '/' + str(j) + '-' + str(i) + '.png')
#把图片01两值化
temp = np.asarray(img)
temp = temp.reshape(-1, 3)
temp = np.sum(temp, axis=1)
temp = np.where(temp > 300, 0, 1) #RGB和大于300,判定为空白区域,置为0,否则为1
temp = np.append(temp,1)
list_img.append(temp.tolist())
#第二类乘-1处理
# temp_list1 = [[1] * 4096] * 20
# temp_list2 = [[-1] * 4096] * 20
# temp_list1 = [[1]] * 20
# temp_list2 = [[-1]] * 20
# temp_fen = temp_list1 + temp_list2
# temp_fen = np.asarray(temp_fen).reshape(40,-1)
#
#
list_img = np.asarray(list_img)
# temp = temp_fen * list_img
oumiga = [1] * 20 + [-1] * 20 #存储对应训练集所属的类
w = train(oumiga,list_img) #得到增广权矢量
#测试集测试
list_test = []
for j in [6,9]:
for i in range(1,6):
img = cv2.imread(PATH + 'test/' + str(j) + '/' + str(j) + '-' + str(i) + '.png')
temp = np.asarray(img)
temp = temp.reshape(-1, 3)
temp = np.sum(temp, axis=1)
temp = np.where(temp > 300, 0, 1)
temp = np.append(temp,1)
list_test.append(temp.tolist())
list_test = np.asarray(list_test)
oumiga_test = [1]*5 + [-1]*5
test(oumiga_test,list_test,w)
list_img = np.asarray(list_img)</=></=>
多分类:
import numpy as np
from matplotlib import pyplot as plt
import cv2
def test(oumiga, list_test, w):
fail_count = 0
for i in range(0, len(list_test)):
temp = w * list_test[i]
temp = np.sum(temp, axis=1)
max_index = temp.argmax()
if max_index != oumiga[i]:
fail_count += 1
print('错误的数量为:' + str(fail_count) + ' 正确率为:' + str(int((1 - (fail_count / len(list_test))) * 100)) + '%')
def train(oumiga, list_train):
p = 0.01 #损失代价比例
w = np.asarray([[1] * 1025] * 10) #增广权矢量
w = w.astype(float)
fail_count = 1
count = 0
while (fail_count != 0):
count += 1
fail_count = 0
for j in range(0,10):
temp = w[j]* list_train
temp = np.sum(temp, axis=1)
for i in range(0, 20*10):
if (oumiga[i] == j and temp[i] <= 0): #如果正确分类的结果<0 w[j]="w[j]" + p * list_train[i] fail_count elif(oumiga[i] !="j" and temp[i]>= 0): #如果错误分类的结果>0
w[j] = w[j] - p * list_train[i]
fail_count += 1
print(fail_count)
print(w)
print('迭代的次数为:' + str(count))
return w
def preprocess(img):
img = img.reshape(64,64)
#分别存储图片上下左右对应的有可用点的行和列
up = 63
down = 0
right = 0
left = 63
for i in range(64):
for j in range(64):
if (img[i][j] == 1):
up = min(up, i)
down = max(down, i)
left = min(left, j)
right = max(right, j)
#重构预处理
new_img = []
for i in range(up, down+1):
temp = []
for j in range(left, right+1):
if (img[i][j] == 0):
temp.append([255,255,255])
else:
temp.append([0,0,0])
new_img.append(temp)
#把图片两值化
new_img = np.asarray(new_img).astype("uint8")
#图片resize重构
new_img = cv2.resize(new_img, (32,32))
new_img = new_img.reshape(-1, 3)
new_img = np.sum(new_img, axis=1)
new_img = np.where(new_img > 300, 0, 1)
new_img = np.append(new_img, 1)
return new_img
# cv2.imwrite('C:/Users/lishu/Desktop/code/PatternRecognition/experience3/img.png', new_img, [int(cv2.IMWRITE_JPEG_QUALITY), 100])
if __name__ == "__main__":
PATH = 'C:/Users/lishu/Desktop/code/PatternRecognition/experience3/'
list_img = []
for j in [x for x in range(0,10)]:
for i in range(1,21):
img = cv2.imread(PATH + 'train/' + str(j) + '/' + str(j) + '-' + str(i) + '.png')
# 把图片01两值化
temp = np.asarray(img)
temp = temp.reshape(-1, 3)
temp = np.sum(temp, axis=1)
temp = np.where(temp > 300, 0, 1)
# 预处理 去除多余空白,重构图片
temp = preprocess(temp)
list_img.append(temp.tolist())
list_img = np.asarray(list_img)
oumiga = [] #存储对应训练集所属的类
for x in range(0,10):
oumiga = oumiga + [x] * 20
w = train(oumiga,list_img) #得到增广权矢量
#测试集测试
list_test = []
for j in [x for x in range(0,10)]:
for i in range(1,6):
img = cv2.imread(PATH + 'test/' + str(j) + '/' + str(j) + '-' + str(i) + '.png')
temp = np.asarray(img)
temp = temp.reshape(-1, 3)
temp = np.sum(temp, axis=1)
temp = np.where(temp > 300, 0, 1)
temp = preprocess(temp) # 预处理
list_test.append(temp.tolist())
list_test = np.asarray(list_test)
oumiga_test = []
for x in range(0,10):
oumiga_test = oumiga_test + [x] * 5
test(oumiga_test,list_test,w)
</=>
需要实验图片或者有疑问的的小伙伴可以联系我。
Original: https://blog.csdn.net/weixin_46087822/article/details/122285224
Author: 斑马还没睡着
Title: 模式识别导论(实验三) 基于感知器算法的数字识别
原创文章受到原创版权保护。转载请注明出处:https://www.johngo689.com/550550/
转载文章受原作者版权保护。转载请注明原作者出处!