

由于上级的工作安排,从今年5月开始,每天都要做一些服务器信息检查。
[En]
Due to the work arrangement of the superior, it is necessary to do some server information inspection every day since May this year.
当对方接手时,完全是通过手拍指令和手动录音来实现的。
[En]
When the other party takes over, it is completely realized by hand-tapping instructions and manual recording.
在熟悉了一段时间后,我优化了流程和记录方法(仍然是手动的)
[En]
After being familiar with it for some time, I optimized the process and recording method (still manual)
后来听说Y哥那边在部署总行提供的新的监控系统,基本可以替代巡检;
我只是打算坚持下去,停止研究自动检测,等待监控上线。
[En]
I just intend to stick to it, stop studying automatic inspection, and wait for the monitoring to come online.
等来等去就等了4个月。。。。。
新的监控无法正式上线,很多告警非常复杂,项目组一直在做优化过滤。
[En]
The new monitoring can not be officially launched, many alarms are very complicated, and the project team has been doing optimization and filtering.
还好这4个月一直不太忙,每天花点时间巡检好像也没什么;
我在第三季度的最后一个月突然变得忙碌起来。
[En]
I suddenly got busy in the last month of the third quarter.
决定不再等了。研究一下剧本。
[En]
Decided not to wait. Study the script.
本文用来记录和组织服务器自动化检查的实施过程。
[En]
This essay is used to record and organize the implementation process of automated server inspection.
自动化巡检系统大致分为几个部分:
1. 常规服务器巡检脚本;
2. 定制服务器巡检脚本;
3. 脚本的下发;
4. 巡检信息的统一收集;
5. 巡检信息每日自动发送到邮箱。
先上一张结构图:
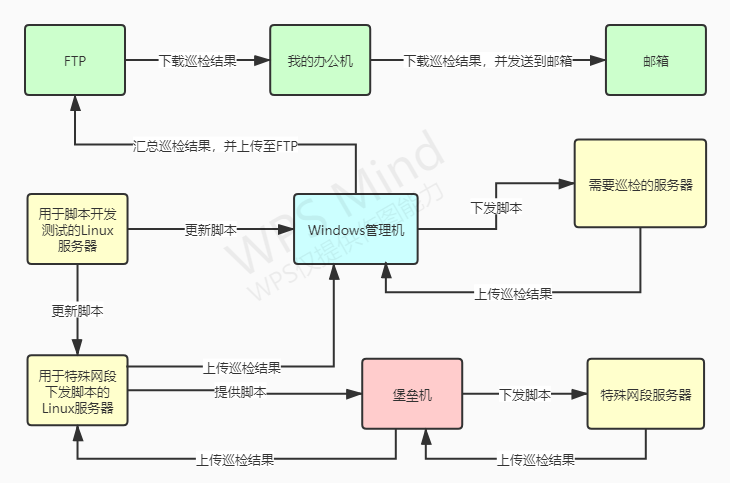

第一次做这种多服务器互相发送文件的系统真的是经验不足。
[En]
The system that does this kind of multi-server sending files to each other for the first time is really inexperienced.
最一开始应该先考虑 网络结构,因为图中的Windows管理机并不能和特殊网段服务器通信,导致后面加入特殊网段后,不得不用堡垒机下发脚本和收集结果,导致结构很混乱,不过还好,特殊网段服务器不算多;
如果堡垒机器一开始就被用作分发和收藏的核心,整体结构就会清晰得多。
[En]
If the bastion machine had been used as the core of distribution and collection in the first place, the overall structure would have been much clearer.
1. 常规服务器巡检脚本
常规服务器巡检脚本是在一台Linux服务器上编写、测试,再上传到Windows管理机的。需要巡检的服务器每天定时去提供SFTP服务的Windows管理机上下载脚本,方便后续 脚本更新,实现此功能的脚本(getshell.sh)如下:
#!/bin/bash
----- 从SFTP下载巡检脚本 -----

sftpip=XX.XXX.XX.XXX
user=XXXXXXX
downDir=/patrol/shell

----- 随机延时约0-30s后下载 -----

sleeptime=expr $RANDOM / 1000
sleep $sleeptime

sftp $user@$sftpip << EOF
cd $downDir
lcd /root/patrol
get patrol.sh
bye
EOF
SFTP脚本无法像FTP一样直接在脚本中写入密码, 需要先将访问者的公钥提供给SFTP服务端,生成公钥的方法我参考的是http://bbs.chinaunix.net/thread-508290-1-1.html
在Windows管理机上我使用的是FreeSSHD提供的SFTP服务,把公钥放在软件配置中指定的位置就可以了。
因为涉及到的服务器比较多,好几十条公钥,所以合成公钥是用bat脚本实现的:
@echo off
dir
copy *.pub result.pub
echo DONE
pause
脚本中添加了一个 随机延时功能,原因是一开始同步操作多个服务器进行SFTP访问时,出现了超过SFTP最大连接数的现象。因为每个服务器访问SFTP的时间很短,因此随机延时0-30s就够了。其中 $RANDOM是系统自带的随机数变量。
写好脚本后在服务器的crontab中添加了一行定时任务,每天7点执行getshell.sh:
0 7 * * * /bin/bash /root/patrol/getshell.sh > /dev/null 2>&1
后面的 > /dev/null 2>&1是不写定时任务日志的意思,因为功能比较简单,感觉没必要写日志。crontab的写法参考的是菜鸟教程:https://www.runoob.com/w3cnote/linux-crontab-tasks.html
下面就是 巡检脚本(patrol.sh)的主体了:
#!/bin/bash
PATH=/sbin:/usr/sbin:/usr/local/sbin:/root/bin:/usr/local/bin:/usr/bin:/bin:/usr/bin/X11:/usr/games
----- 巡检脚本 V2.0 -----

----- 定义变量:上传SFTP地址、用户名、密码、路径 -----

cd /root/patrol
sftpip=XX.XXX.XX.XXX
user=XXXXXXX
remoteDir=/patrol/upload

----- 定义变量:本机信息、巡检参数、时间参数 -----

localip=ifconfig | grep 'XX.XXX.XX' | grep Bcast | awk '{print $2}' |awk -F: '{print $2}'
loadavg=top -b -n 1 | grep 'load average' | awk '{print $11 $12 $13 $14 $15}'
cpuid=top -b -n 1 | grep %Cpu | awk '{print $8 $9}'
diskfree=df -h | awk '{print $5}'
memtotal=free -l | grep Mem | awk '{print $2}'
memocp=free -l | grep buffers/cache | awk '{print $3}'
memratio=expr $memocp \* 100 / $memtotal

if [ $memratio -ge 80 ]
then
    memwarn=内存过高!!!
else
    memwarn=内存正常
fi

date=$(date "+%Y%m%d")
filename=$date"_"$localip.txt

----- 主程序 -----

echo -e $date-----$localip-----$loadavg-----$cpuid-----$diskfree-----$memratio-----$memwarn >$filename

----- 随机延时约0-30s后上传SFTP -----

sleeptime=expr $RANDOM / 1000
sleep $sleeptime

sftp $user@$sftpip << EOF
cd $remoteDir
put $filename
bye
EOF

rm $filename
整个脚本中,比较难的就是各个巡检项变量的定义,从上到下依次是 本机IP、平均负载、CPU空闲、逻辑卷占用、内存总量、内存占用、内存占比,一共七项。shell中复杂变量的定义需要用 ··框起来,就是键盘上1左边的点;
其中 grep ‘XXX’是为了抓取需要的行, awk ‘{print $X}’是为了抓取这一行内需要的位置, memratio这一项中的 expr ‘XXX’是为了用上面的 memtotal和 memocp两个变量计算内存占比,然后加了一个内存是否过高的判断;
主程序只有一行,就是把各个变量echo到一个文件中,文件以当天的日期_服务器IP.txt命名。 echo -e的目的是激活转义字符。
后面还是添加了延时和SFTP上传,上传后删除掉了服务器上的文件,防止时间长了占用太多服务器磁盘。
写完上述内容后,手动运行patrol.sh就可以实现功能了,但是添加了crontab定时任务后发现不生效:
30 7 * * * /bin/bash /root/patrol/patrol.sh > /dev/null 2>&1
一开始认为是crontab写得有问题,后来发现是没有在脚本中添加 环境变量,即开头的 PATH这一行,参考的是:https://www.cnblogs.com/huskiesir/p/9970291.html
因为脚本中使用了很多变量,所以系统提示的所有环境变量都会被抛出。
[En]
Because there are many variables used in the script, all the environment variables prompted by the system are simply thrown in.
当前检查脚本的输出如下:
[En]
The output of the current inspection script is as follows:
20211014-----XX.XXX.XX.XX-----average:0.18,0.11,0.09-----63.6id,-----Use% 1% 1% 10% 0% 17% 51% 59% 1% 9% 1% 33% 38% 27% 10% 5% 1% 0%-----24-----内存正常
只对内存的状态做一个简单的判断,在后续的优化过程中,我们打算判断每一项的状态,这样查看检查结果就更方便了,尤其是逻辑卷占据了这一块,现在看起来很头疼。然而,这比每天点击很多服务器进行手动检查要好得多。
[En]
Only a simple judgment is made on the state of the memory, and in the process of subsequent optimization, we intend to judge the status of each item, so it is more convenient to see the inspection results, especially the logical volume occupies this piece, which now looks like a headache. However, this is much better than clicking on a lot of servers to inspect manually every day.
2. 定制服务器巡检脚本
除了每台服务器都需要的常规项巡检,某些服务器还需要针对某个服务或者某些定时生成的文件进行巡检,实现起来其实就是一些特殊变量的定义,最后还是全部echo到一个txt中统一收集,下面一一进行列举:
① 查看进程
custom_patrol=ps -ef | grep XXX | grep XXX
没什么好说的,就是看一些进程在不在,输出结果就是 ps -ef的某一行。
② 查看文件
custom_patrol=ls -l /某路径 | grep 文件关键字
也没啥好说的,就是看一些文件在不在,grep后面可以跟一些日期变量啥的,可以抓取文件名中有日期的文件。一开始我还不知道脚本中不能用ll这个命令,查了一下才知道ll就是ls -l的缩写。。。
③ 查看consul服务数
custom_patrol=/某路径/consul catalog services | wc -l
查看consul微服务的个数,后面的 | wc -l 是计数的意思,不加的话会列出服务的列表。
④ telnet端口
telnet本来是一个很简单的指令:
telnet XX.XXX.XX.XXX 某端口
但是用脚本实现起来就要稍微复杂一点了,因为telnet本身是类似于FTP、SSH、SFTP这类让系统进入某个客户端的指令。在脚本中,进去容易,出来就得靠EOF了,所以实现起来是这样的:
custom_patrol=telnet XX.XXX.XX.XXX 某端口 << EOF
exit
EOF
没错EOF就是为了多加一个 exit让系统退出来。。。这样的话就把telnet的情况定义成了变量,实现了端口检测。
⑤ Redis数据库状态检测
custom_patrol=redis-cli -c -p 某端口 -h XX.XXX.XX.XXX -a '密码' << EOF
cluster nodes
ping
exit
EOF
</code></pre>
<p>同样用到了EOF格式,cluster nodes是为了检查主从节点,ping是为了pong,exit是为了退出。</p>
<p><strong>⑥ Oracle数据库表空间占用查询</strong></p>
<pre><code>custom_patrol= - oracle -c "sqlplus 用户名/密码 << EOF
select round(sum(bytes)/1024/1024/1024,2)||'G' from user_segments where TABLESPACE_NAME = '表名';
exitEOFexit" | grep -E 'G|M' | grep -v Mining
</code></pre>
<p>公司内的要求是Oracle数据库只能用oracle用户来启动,因此这个变量的声明首先要 <strong>切换到oracle用户</strong>,在 <strong>su - oracle</strong>后加 <strong>-c "指令"</strong>添加切换用户后的指令,sqlplus的指令同样用EOF格式。</p>
<p>因为进入sqlplus后会显示一大堆东西,因此加了两个grep来缩小一下范围,一个是 <strong>-E显示含有G或者M的行</strong>,一个 <strong>-v是不显示含有Mining的行</strong>。</p>
<p><strong>⑦ 文件下载测试</strong></p>
<p>这个功能一开始是想把下载信息定义成变量,然后echo这个变量来显示下载是否成功,后来感觉这样操作太麻烦了,直接下载这个文件,然后用 <strong>ls -l</strong>检测文件是否存在(或是否为当天下载)即可。</p>
<pre><code>curl -o download_test.zip http://XX.XXX.XX.XXX:某端口/路径/文件名\&name=n.zip
custom_patrol= -lh | grep download_test.zip`
curl下载这行我一直没跑出来,后来是让开发小伙伴RCM帮忙改的,现在也没太搞懂,有空再研究下。。。
目前用到的一些需要定制的巡检基本就是这些。在echo某个多行变量到txt的时候,打开txt发现写入的时候忽略了换行,参考https://blog.csdn.net/jxfgh/article/details/6757488在echo后加了一个while循环,实现了换行:
echo -e "$XXX" > result.txt | while read i
do
    echo $i
done
3. 脚本的下发和 4. 巡检信息的统一收集都已经在 1. 常规服务器巡检脚本的脚本中实现了,不再赘述。
5. 巡检信息每日自动发送到邮箱
每天每台服务器的巡检信息上传到Windows管理机后,需要进行汇总、上传FTP、归档这几个动作,通过bat脚本实现:
@echo off
copy nul all.tx
for %%a in (*.txt) do type %%a >>all.tx && echo. >> all.tx
ren all.tx *.txt
ren all.txt %date:~0,4%%date:~5,2%%date:~8,2%.tmp
del *.txt
ren %date:~0,4%%date:~5,2%%date:~8,2%.tmp %date:~0,4%%date:~5,2%%date:~8,2%.txt
ftp -i -s:"upload"
move %date:~0,4%%date:~5,2%%date:~8,2%.txt D:\FTPhome\patrol\history_data
del %date:~0,4%%date:~5,2%%date:~8,2%.txt
其中ftp命令文件upload:
open XX.XX.XX.XX
用户名
密码
lcd 本地路径
cd FTP路径
binary
put *.txt
bye
上传到FTP后,下一步就是下载到办公机然后通过邮件发送了,这个功能是通过Windows任务计划程序和Python实现的,首先通过定时任务启动bat去调用两个.py:
@echo off
cd 本地路径
python ftp_download.py
python auto_email.py
move %date:~0,4%%date:~5,2%%date:~8,2%.txt 本地路径\history_data
ftp_download.py(参考:https://www.cnblogs.com/Dahlia/p/10551929.html)
#coding=utf-8
import os
import time
from ftplib import FTP  # 引入ftp模块

class MyFtp:

    ftp = FTP()

    def __init__(self,host,port=21):
        self.ftp.connect(host,port)

    def login(self,username,pwd):
        self.ftp.set_debuglevel(2)  # 打开调试级别2,显示详细信息
        self.ftp.login(username,pwd)
        print(self.ftp.welcome)

    def downloadFile(self,localpath,remotepath,filename):
        os.chdir(localpath)   # 切换工作路径到下载目录
        self.ftp.cwd(remotepath)   # 要登录的ftp目录
        self.ftp.nlst()  # 获取目录下的文件
        file_handle = open(filename,"wb").write   # 以写模式在本地打开文件
        self.ftp.retrbinary('RETR %s' % os.path.basename(filename),file_handle,blocksize=1024)  # 下载ftp文件
        # ftp.delete(filename)  # 删除ftp服务器上的文件

    def close(self):
        self.ftp.set_debuglevel(0)  # 关闭调试
        self.ftp.quit()

if __name__ == '__main__':
    ftp = MyFtp('FTP地址')
    ftp.login('用户名','密码')
    date = time.strftime("%Y%m%d", time.localtime())
    ftp.downloadFile('本地路径','FTP路径','%s.txt' % date)
    ftp.close()
auto_email.py(参考:https://www.cnblogs.com/yufeihlf/p/5726619.html)
#coding: utf-8

import time
import smtplib
from email.mime.multipart import MIMEMultipart
from email.mime.text import MIMEText
from email.mime.image import MIMEImage
from email.header import Header

#设置smtplib所需的参数
#下面的发件人,收件人是用于邮件传输的。
smtpserver = 'SMTP服务器'
username = '用户名'
password = '密码'
#成功开启IMAP/SMTP服务,在第三方客户端登录时,登录密码输入以下授权密码:
#HLSNDVBIOUQEUURU
sender = '发送者邮箱'
receiver = '接收者邮箱'
#若收件人为多个收件人
#receiver=['XXX@126.com','XXX@126.com']
date = time.strftime("%Y%m%d", time.localtime())

#subject = 'Automatic server patrol'
#通过Header对象编码的文本,包含utf-8编码信息和Base64编码信息。以下中文名测试ok
subject = '服务器巡检结果'
subject = Header(subject, 'utf-8').encode()

#构造邮件对象MIMEMultipart对象
#下面的主题,发件人,收件人,日期是显示在邮件页面上的。
msg = MIMEMultipart('mixed')
msg['Subject'] = subject
msg['From'] = '发件人'
msg['To'] = receiver
#收件人为多个收件人,通过join将列表转换为以;为间隔的字符串
#msg['To'] = ";".join(receiver)
#若无时间,就默认一般为当前时间,该值一般不设置
#msg['Date']='2012-3-16'

#构造文字内容
text = "今日巡检结果"
text_plain = MIMEText(text, 'plain', 'utf-8')
msg.attach(text_plain)

#构造图片链接
sendimagefile=open(r'D:\pythontest\testimage.png','rb').read()
image = MIMEImage(sendimagefile)
image.add_header('Content-ID','')
image["Content-Disposition"] = 'attachment; filename="testimage.png"'
msg.attach(image)

#构造html
#发送正文中的图片:由于包含未被许可的信息,网易邮箱定义为垃圾邮件,报554 DT:SPM :
html = """
#
#
#
    Hi!

       How are you?

       Here is the link you wanted.

#
#
#
"""
text_html = MIMEText(html,'html', 'utf-8')
text_html["Content-Disposition"] = 'attachment; filename="texthtml.html"'
msg.attach(text_html)

构造附件
sendfile=open('本地路径\%s.txt' % date,'rb').read()
text_att = MIMEText(sendfile, 'base64', 'utf-8')
text_att["Content-Type"] = 'application/octet-stream'
#以下附件可以重命名成aaa.txt(测试不成功)
text_att["Content-Disposition"] = 'attachment; filename="Python自动邮件附件测试.txt"'
#另一种实现方式
text_att.add_header('Content-Disposition', 'attachment', filename = "%s.txt" % date)
#以下中文测试不ok
#text_att["Content-Disposition"] = u'attachment; filename="中文附件.txt"'.decode('utf-8')
msg.attach(text_att)

#发送邮件
smtp = smtplib.SMTP()
smtp.connect(smtpserver)
#我们用set_debuglevel(1)就可以打印出和SMTP服务器交互的所有信息。
#smtp.set_debuglevel(1)
smtp.login(username, password)
smtp.sendmail(sender, receiver, msg.as_string())
smtp.quit()
对两个.py的理解比较少,基本上调试了一下能够运行以后就没有再改动了,其中还遇到了 ftplib使用报错和 计算机名为中文导致邮件发送报错两个问题,分别参考这两篇解决的:
https://blog.csdn.net/BobYuan888/article/details/82980817
https://blog.csdn.net/weixin_41278305/article/details/110943401
在 内网环境安装VSCode的离线插件参考了这两篇:
https://blog.csdn.net/l508742729/article/details/103543755
https://blog.csdn.net/sinat_36188088/article/details/105203338
至此,基本实现了服务器端检查自动化,通过邮件发送检查结果,再考虑继续优化检查脚本,增加判断语句,直接给出检查项目是否正常的结果,减少人工检查的部分。
[En]
At this point, it is basically realized to automate the server inspection and send the inspection results by e-mail, and then consider to continue to optimize the inspection script, add judgment statements, directly give the results of whether the inspection items are normal, and reduce the part of manual inspection.
Original: https://www.cnblogs.com/BTday/p/15309279.html
Author: BTday
Title: 自动化服务器巡检的实现过程
原创文章受到原创版权保护。转载请注明出处:https://www.johngo689.com/524517/
转载文章受原作者版权保护。转载请注明原作者出处!