

下载:https://bochs.sourceforge.io/
建议下载2.6.11,下文一开始安装的2.7,但运行时有无法解决的错误。但是大致安装过程一致。
linux
提前安装依赖
sudo apt-get install build-essential
sudo apt-get install xorg-dev
sudo apt-get install libgtk2.0-dev
下一步是配置它,以防所有配置
[En]
The next step is to configure it, just in case all the configurations
经评论区提醒,删去 --enable-cpp可以防止后续由于文件后缀出现的诸多问题。
./configure --with-x11 --with-wx --enable-debugger --enable-disasm --enable-all-optimizations --enable-readline --enable-long-phy-address --enable-ltdl-install --enable-idle-hack --enable-plugins --enable-a20-pin --enable-x86-64 --enable-smp --enable-cpu-level=6 --enable-large-ramfile --enable-repeat-speedups --enable-fast-function-calls --enable-handlers-chaining --enable-trace-linking --enable-configurable-msrs --enable-show-ips --enable-debugger-gui --enable-iodebug --enable-logging --enable-assert-checks --enable-fpu --enable-vmx=2 --enable-svm --enable-3dnow --enable-alignment-check --enable-monitor-mwait --enable-avx --enable-evex --enable-x86-debugger --enable-pci --enable-usb --enable-voodoo
进入root用户,之后的操作都在root下进行。
su root
开始编译
make
开始处理错误
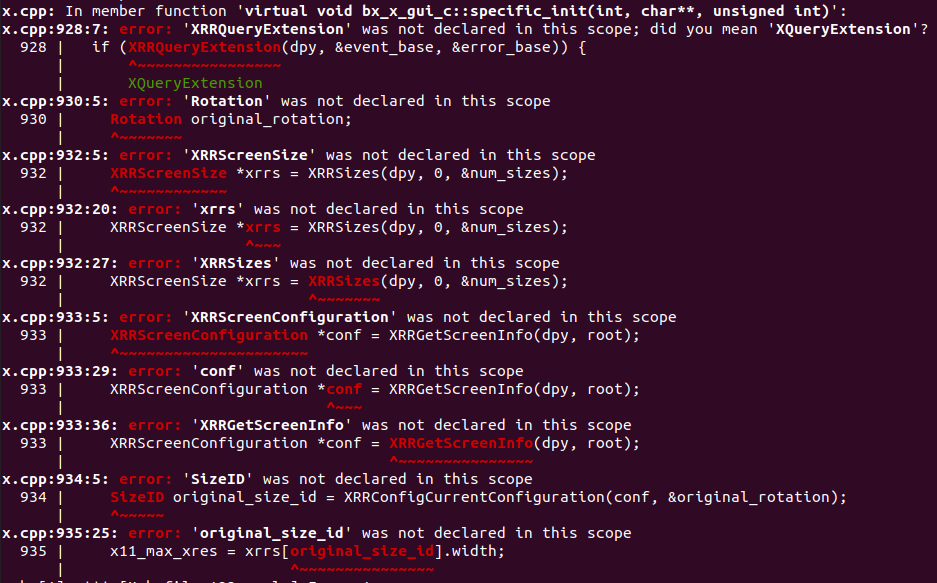
- 错误1
No rule to make target 'parser.cc' , needed by 'parser.o' Stop.


进入 bx_debug文件夹下:

你可以看到它是后缀,所以
[En]
You can see that it’s the suffix, so
cp parser.cpp parser.cc
- 错误2
config.h osdep.h cpu/decoder/decoder.h

但是,该文件确实存在于主目录中,因此
[En]
However, this file does exist in the home directory, so
"config.h"--->"../config.h"
类似的


您需要更改头文件目录。
[En]
You need to change the header file directory.
* 错误4
No rule to make target 'misc/bximage.cc', needed by 'misc/bximage.o'
cp misc/bximage.cpp misc/bximage.cc
cp iodev/hdimage/hdimage.cpp iodev/hdimage/hdimage.cc
cp iodev/hdimage/vmware3.cpp iodev/hdimage/vmware3.cc
cp iodev/hdimage/vmware4.cpp iodev/hdimage/vmware4.cc
cp iodev/hdimage/vpc-img.cpp iodev/hdimage/vpc-img.cc
cp iodev/hdimage/vbox.cpp iodev/hdimage/vbox.cc
- 错误5
error: invalid use of ‘this’ in non-member function 383 | # define BX_CPU_THIS_PTR this->修改bx_debug/dbg_main.cc
-Bit32u index = BX_ITLB_INDEX_OF(laddr);//改成下面一行
+  Bit32u index = BX_CPU(dbg_cpu)->ITLB.get_index_of(laddr);
......

-  index = BX_DTLB_INDEX_OF(laddr, 0);
+  index = BX_CPU(dbg_cpu)->DTLB.get_index_of(laddr);
之后继续 make

进行安装 make install
运行 bochs

因此删去默认的 .bochsrc中的 955行。
再次运行
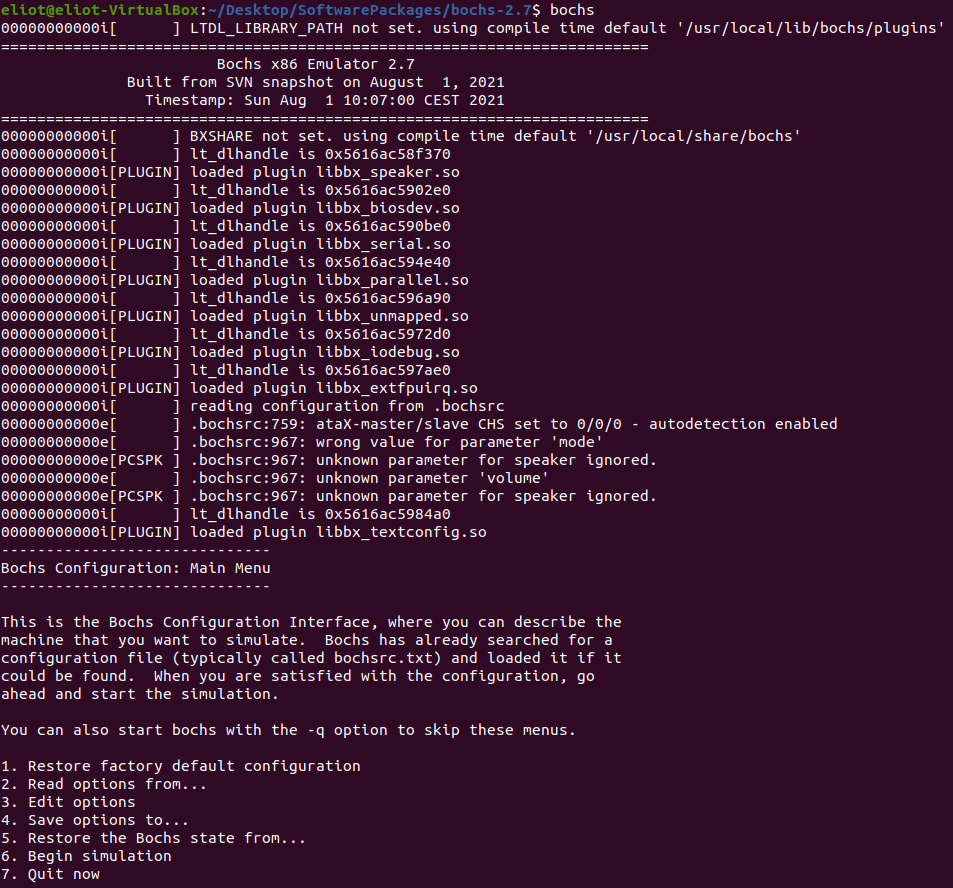
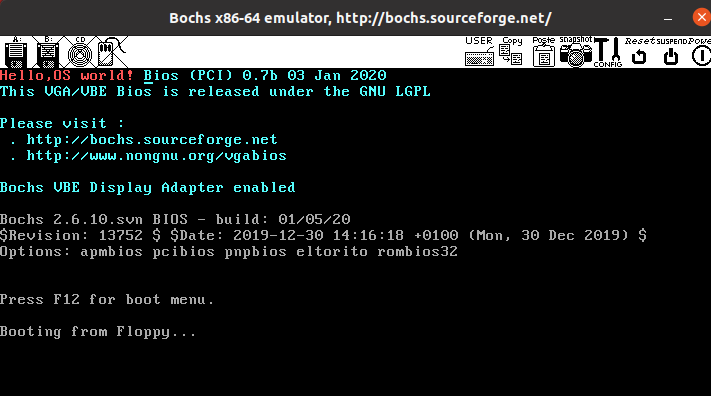
安装成功!
测试
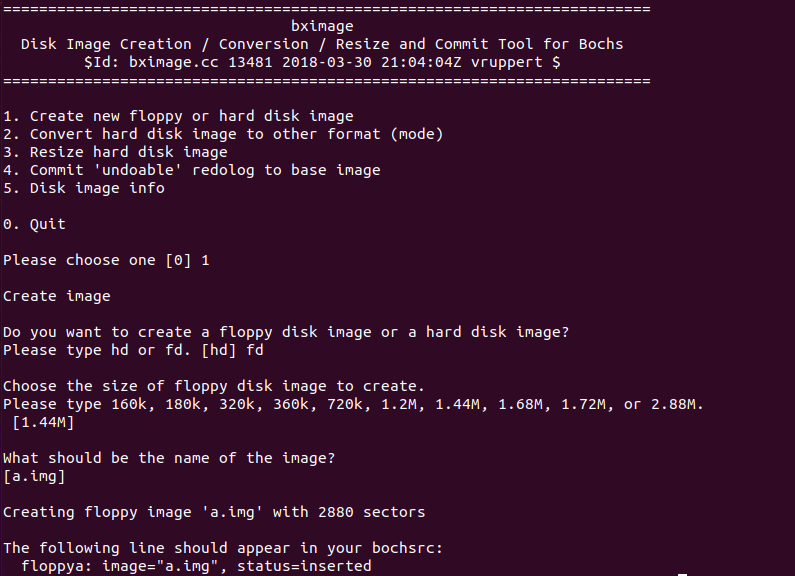
首先创建一个软盘
$ bximage
然后选择创建软盘,其余操作可以默认完成。
[En]
Then choose to create a floppy disk, and the rest can be done by default.
编写一段boot代码
org 07C00h                   ; 告诉编译器程序加载到07C00处
       mov ax, cs
       mov ds, ax
       mov es, ax
       call DispStr                    ; 调用显示字符串例程
       jmp $              ; 无限循环
DispStr:
       mov ax, BootMessage
       mov bp, ax                    ; es:bp = 串地址
       mov cx, 16                    ; cx = 串长度
       mov ax, 01301h            ; ah = 13, al = 01h
       mov bx, 000Ch              ; 页号为0(bh = 0) 黑底红字 (bl = 0Ch,高亮)
       mov dl, 0
       int 10h                          ; 10h号中断
       ret
BootMessage:  db "Hello,OS world!"
times 510-($-$$)   db   0            ; 填充剩下的空间,使生成的二进制代码恰好为512字节
dw 0xaa55
下载 nasm
$ sudo apt-get install nasm
编译写入
nasm boot.asm -o boot.bin && dd if=boot.bin of=a.img bs=512 count=1 conv=notrunc
写一个 bochs配置文件,命名为 sample_bochsrc
how much memorythe emulated machine will have
megs: 32

filename of ROMimages
romimage:file=/usr/local/share/bochs/BIOS-bochs-latest
vgaromimage:file=/usr/local/share/bochs/VGABIOS-lgpl-latest

what disk imageswill be used
floppya:1_44=a.img, status=inserted

choose the bootdisk.

boot: floppy

where do we sendlog messages?

log: bochsout.txt

disable themouse
mouse: enabled=0

enable keymapping, using Us layout as default
keyboard:keymap=/usr/local/share/bochs/keymaps/x11-pc-us.map
启动 bochs
$ bochs -f sample_bochsrc
选择 6. Begin simulation
接着按 c运行
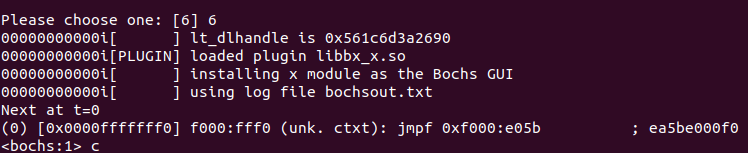
此时 bochs界面便会出现我们想要的
Original: https://www.cnblogs.com/oasisyang/p/15358137.html
Author: OasisYang
Title: bochs(2.6.11)配置安装
原创文章受到原创版权保护。转载请注明出处:https://www.johngo689.com/524491/
转载文章受原作者版权保护。转载请注明原作者出处!