

工具准备
1、VMware
2、CentOS 7 最小安装版
3、远程工具推荐使用 FinalShell
安装系统
1、打开VMware,根据自己的情况配置好虚拟机,选择系统镜像就可以安装了,可自行百度”VMware如何安装CentOS”
2、打开虚拟机后,选中 Test this media & install CentOS 7,回车进行安装


3、语言设置为 中文:简体中文
4、时间日期:根据实际情况设置即可
5、配置磁盘,使用默认配置也行
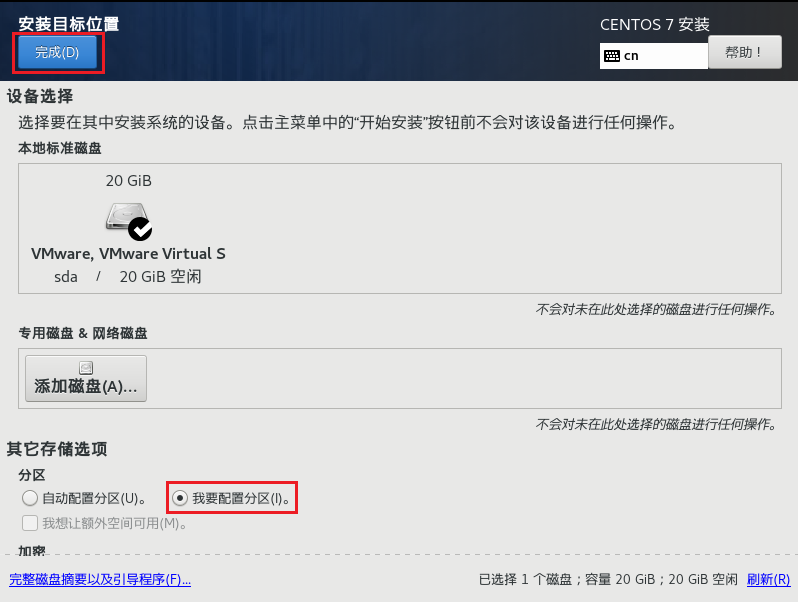
选中 我要配置分区,点击 完成,进入 手动分区
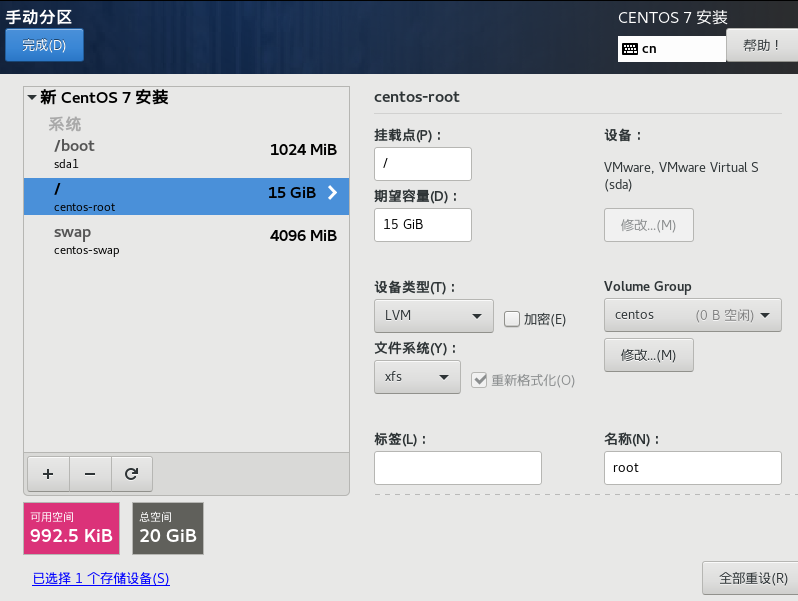
/boot:1Gswap:4G/:剩下全部
6、学习用机,可以关闭KDUMP
7、设置完成后,可以点击 开始安装,安装过程中记得设置 root用户密码
配置网络
我们需要配置3处
1、配置VMware
右上角 编辑->虚拟机网络编辑器,进入 更改设置后,选中VMnet8进行设置
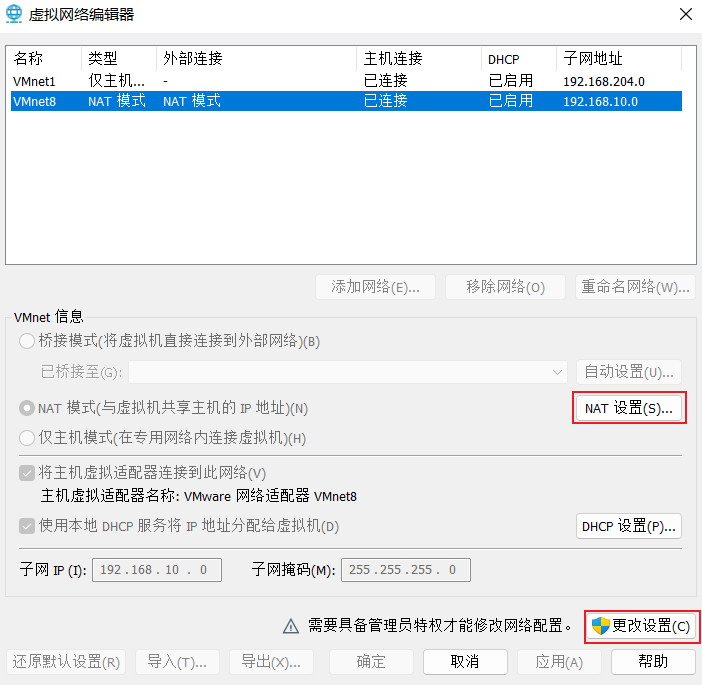
- 子网IP:
192.168.10.0 - 子网掩码:
255.255.255.0 - 在NAT设置中将网关设置为:
192.168.10.2
2、配置Windows网卡
我们打开网络连接界面:按”Win+R”,打开【运行】;输入”ncpa.cpl”,回车。
找到VMnet8,右键属性,找到”Internet 协议版本 4(TCP/IPv4)”,双击进入属性设置
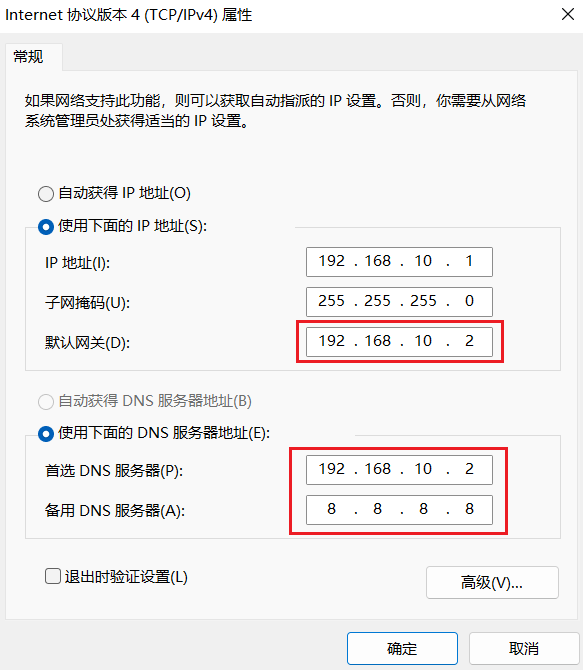
根据第一步,填写相应的位置
[En]
According to step 1, fill in the corresponding position
3、配置CentOS 7
我们以 root用户登录
vi /etc/sysconfig/network-scripts/ifcfg-ens33
将 BOOTPROTO="dynamic"更改为 BOOTPROTO="static"
在结尾处添加以下句子,注意不要犯拼写错误
[En]
Add the following sentences at the end, be careful not to make spelling mistakes
IPADDR=192.168.10.100
GATEWAY=192.168.10.2
DNS1=192.168.10.2
修改 hostname,改为 hadoop100(随意啦,你自己记得就行)
vi /etc/hostname
添加主机名和IP的映射关系(方便用主机名代替IP)
vi /etc/hosts

#我就象征性写了几个,后面用到再添加也可以
192.168.10.100 hadoop100
192.168.10.101 hadoop101
192.168.10.102 hadoop102
192.168.10.103 hadoop103
192.168.10.104 hadoop104
重启
reboot
4、测试网络
重启进入系统后,测试网络是否畅通
[En]
After rebooting and entering the system, test whether the network is unblocked
ping www.baidu.com
如果无法访问网络,请检查拼写错误。网络的畅通是必要的,解决问题后再进行下一步。
[En]
If the network is unreachable, check for spelling errors. The smooth flow of the network is necessary, solve the problem before moving on to the next step.
配置环境
1、最小系统需要安装下面的工具
net-tool工具包
yum install -y net-tools
vim编辑器
yum install -y vim
epel-release软件仓库
yum install -y epel-release
rsync:数据同步工具
yum install -y rsync
2、关闭防火墙,禁用开机自启(学习用途)
systemctl stop firewalld
systemctl disable firewalld.service
3、创建用户,并修改密码
useradd swcode
passwd swcode
4、配置用户的 root权限,否则 sudo无法执行
vim /etc/sudoers
在 %wheel 下面添加,NOPASSWD无需密码
swcode  ALL=(ALL)       NOPASSWD:ALL
:wq!强制保存即可
5、在 /opt目录下创建文件夹,并修改所属主和所属组(root下执行)
mkdir /opt/module
mkdir /opt/software

chown swcode:swcode /opt/module
chown swcode:swcode /opt/software
下面是成功的样子
drwxr-xr-x. 2 swcode swcode 6 11月 14 11:34 module
drwxr-xr-x. 2 swcode swcode 6 11月 14 11:34 software
6、卸载虚拟机自带 JDK(最小版是没有的,可以忽略这一步)
rpm -qa | grep -i java | xargs -n1 rpm -e --nodeps
rpm -qa:查询所安装的所用rpm软件包grep -i:忽略大小写xargs -n1:每次只传递一个参数rpm -e --nodeps:强制卸载软件
7、重启虚拟机
reboot
下篇文章:克隆主机并配置集群
所有文章:
搭建第一台Hadoop主机
克隆主机并配置集群
配置并启动集群/开启历史服务器和日志聚集
Original: https://www.cnblogs.com/sw-code/p/15554868.html
Author: sw-code
Title: 大数据——搭建第一台Hadoop主机
原创文章受到原创版权保护。转载请注明出处:https://www.johngo689.com/524367/
转载文章受原作者版权保护。转载请注明原作者出处!