

步骤
- 下载驱动
- 准备工作
- 进行安装
- 检查安装
下载驱动
首先,我们需要从官网下载显卡驱动。
[En]
First of all, we need to download the video card driver from the official website.
- 打开浏览器,在百度搜索框中搜索:显卡驱动 下载
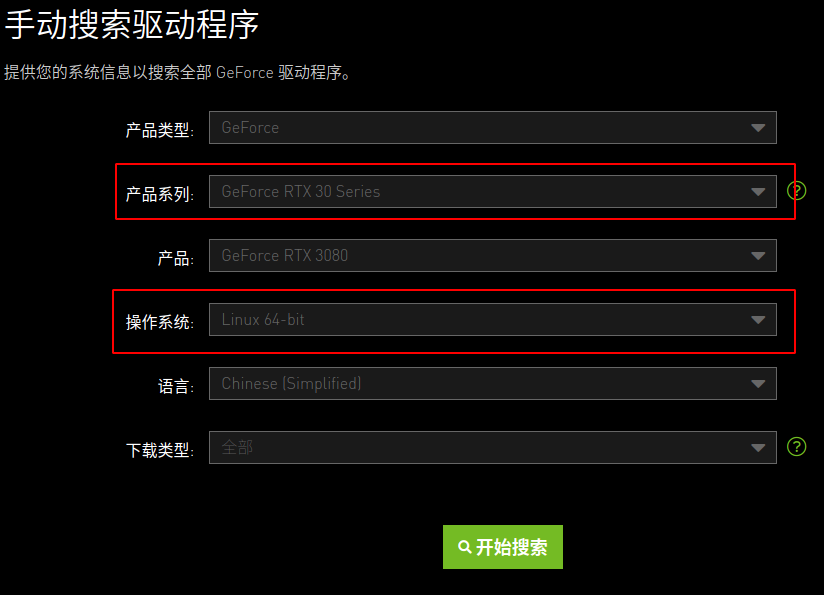
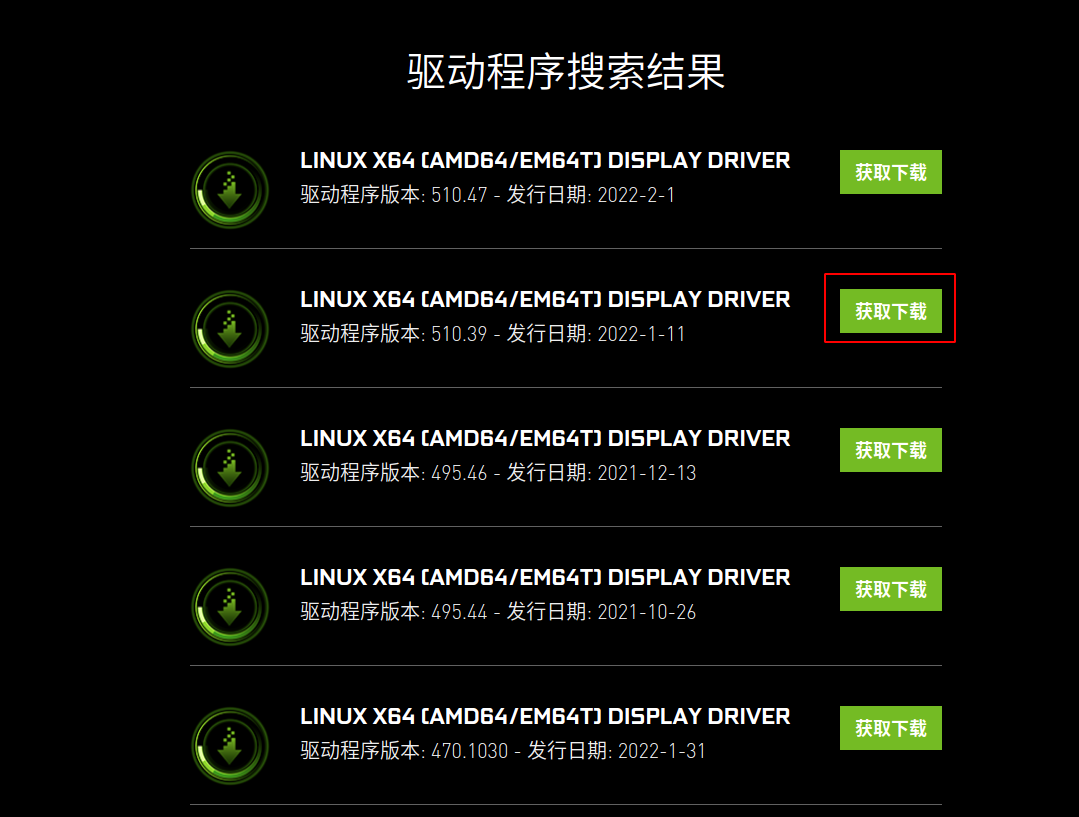
- 在 手动搜索驱动程序一栏,根据自己的显卡进行选择
- 产品系列中,Notebooks代表笔记本使用的显卡驱动,30系的选择
GeForce RTX30 Series操作系统选择Linux 64-bit,选择好之后点击 开始搜索 - 在下方驱动程序搜索结果中,选择适合自己的版本进行下载,本文选择的是 510.39
具体流程如下图所示:
[En]
The specific process is shown in the following two figures:

准备工作
这部分就不放图了,直接输入命令即可
在安装显卡驱动程序之前,我们需要做一些准备工作。
[En]
We need to do some preparatory work before installing the video card driver.
- 将Ubuntu自带的显卡驱动禁掉
- 修改驱动安装文件的权限
- 安装好所需要的的依赖
首先 打开终端
输入命令:
sudo gedit /etc/modprobe.d/blacklist.conf
在打开的 blacklist.conf文件的最后一行,我们加入以下内容:
blacklist nouveau
保存并退出该文件,这样可以将Ubuntu自带的显卡驱动禁止
接下来,我们需要使更改生效。
[En]
Next, we need to make the changes take effect.
sudo update-initramfs -u
为了便于以后的安装步骤,我们需要将下载的驱动程序修改为可执行文件
[En]
To facilitate the installation steps later, we need to modify the downloaded driver to an executable file
首先进入驱动所在的目录,我放在了 Downloads目录
cd Downloads
然后我们修改驱动的权限
sudo chmod +x ./NVIDIA-Linux-x86_64-510.39.01.run
安装显卡驱动程序需要一些依赖项
[En]
Some * dependencies needed to install the video card driver*
sudo apt-get install libprotobuf-dev libleveldb-dev libsnappy-dev libopencv-dev libhdf5-serial-dev protobuf-compiler
sudo apt-get install --no-install-recommends libboost-all-dev
sudo apt-get install libopenblas-dev liblapack-dev libatlas-base-dev
sudo apt-get install libgflags-dev libgoogle-glog-dev liblmdb-dev
重启电脑
reboot
重启之后,我们进入到输入用户名密码界面,此时我们按住 Ctrl + ALT + F2,会进入 命令行界面
如果此时出现◇乱码
解决办法:sudo gedit /etc/default/locate
将里面的LANG与LANGUAGE修改为:
LANG="en_US.UTF-8"
LANGUAGE="en_US:en"
在命令行界面中,我们需要输入用户名、密码,然后自己输入。
[En]
In the command line interface, we need to enter the user name, password and enter it ourselves.
成功登录以后,如果事先已经安装过Ubuntu自带的驱动,需要将图形化桌面关掉(若没有安装过,可省略此步骤)
sudo service lightdm stop
找到驱动程序安装文件所在的目录
[En]
Find the directory where our driver installation files are located
cd Downloads
输入命令进行安装
sudo ./NVIDIA-Linux-x86_64-510.39.01.run
安装过程
可能遇到的问题
由于显卡驱动在使用过程中也会挂机,笔者已经安装了很多次,遇到了很多情况,在这里先总结一下可能会遇到的问题,希望能给大家带来一些帮助,遇到这样问题的朋友也可以直接想办法解决!
[En]
As the graphics card driver will also hang up in the use process, the author has installed many times, encountered a lot of situations, here first summarize the problems that may be encountered, hope to bring some help to everyone, friends who encounter such problems can also directly find a way to solve them!
如果有没有提到的错误,希望大家能在评论区指出,一起交流。
[En]
If there are any mistakes that have not been mentioned, I hope you can point them out in the comments section and communicate together.
成功进入安装程序并不意味着一帆风顺,你会遇到各种各样的错误
[En]
Successful entry into the installation program does not mean plain sailing, you will encounter all kinds of errors
-
Error: the distribution-provided pre-install script failed.
-
Error: Unable to find the development tool ‘cc’ in your path.
-
Error: Unable to find the development tool ‘make’ in your path.
-
Error: The kernel module failed to load. Secure boot is enabled on this system.
-
The signed kernel module failed to load.
-
Error: Unable to load the kernel module ‘nvidia.ko’.
-
Error: An NVIDIA kernel ‘nvidia-drm’ appears to already be loaded in your kernel.
-
Error: An NVIDIA kernel module ‘nvidia-modeset’ appears to already be loaded in your kernel.
-
WARNING: Unable to find a suitable destination to install 32-bit compatibility libraries.
-
WARNING: Unable to determine the path to install the libglvnd EGL vendor library config files.
如果您报告错误,请不要担心。在正常情况下,让我们逐一解决。
[En]
Don’t worry if you report a mistake. Under normal circumstances, let’s solve it one by one.
解决方法
第一个错误,继续安装即可,这个错误只是确认你是否要安装这个驱动
第二个、第三个错误产生的原因是Ubuntu环境缺少所需要的依赖
解决:
sudo apt-get install gcc
sudo apt-get install make
第四个错误与 第五个错误产生的原因是BIOS没有关闭 Secure boot
解决:
- 重启电脑在主板信息界面,按
F2或Del进入BIOS界面 - 按
F7进入 高级设置菜单 - 在菜单栏中点击进入
启动分页 - 将 快速启动设置为
Disabled - 点击 安全启动菜单
- 操作系统类型如果是双系统依旧保持UEFI模式,如果不是双系统,设置为 其他操作系统
- 点击 密钥管理
- 点击 清除安全启动密钥,再点击确认清除
- 保存设置并退出
第六个错误,证明准备工作没有做好
- 输入命令
reboot重启电脑 - 在用户登录界面,按
Alt+Ctrl+F2进入命令行 - 输入命令:
sudo systemctl isolate multi-user.target进入无窗口界面 - 输入用户名与密码进行登录
- 输入命令:
sudo modprobe -r nvidia_drm、sudo modprobe -r nvidia_modeset - 重新进入驱动安装
- 退出无窗口界面:
sudo systemctl start graphical.target
第七个错误和 第八个错误,首先要确保关闭了Secure Boot,然后删除已经安装的显卡驱动:
sudo apt-get purge nvidia*
sudo apt-get autoremove
sudo reboot
然后转到第六个错误部分,解决准备问题。
[En]
Then go to the sixth wrong part to solve the problem of preparation.
最后两个警告,不影响安装,如果有需要,可以自己安装需要的依赖
安装时的选项
不展示图片,选择基本如下,坐好自己的座位:
[En]
Do not show the picture, the choice is basically as follows, take your own seat:
Q:The distribution-provided pre-install script failed! Are you sure you want to continue?

>>> yes
Q:Would you like to register the kernel module souces with DKMS? This will allow DKMS to automatically build a new module, if you install a different kernel later?

>>> No
Q:Would you like to sign the NVIDIA kernel module?

>>> Install without signing
Q:Nvidia's 32-bit compatibility libraries?

>>> No
Q:Would you like to run the nvidia-xconfigutility to automatically update your x configuration so that the NVIDIA x driver will be used when you restart x? Any pre-existing x confile will be backed up.

>>> Yes
检查安装情况
重启电脑之后, 打开终端,输入命令:
sudo nvidia-smi
检查显卡信息、显存使用信息、驱动版本信息是否输出成功。
[En]
Check whether the video card information, video memory usage information and driver version information have been successfully output.
如下所示:
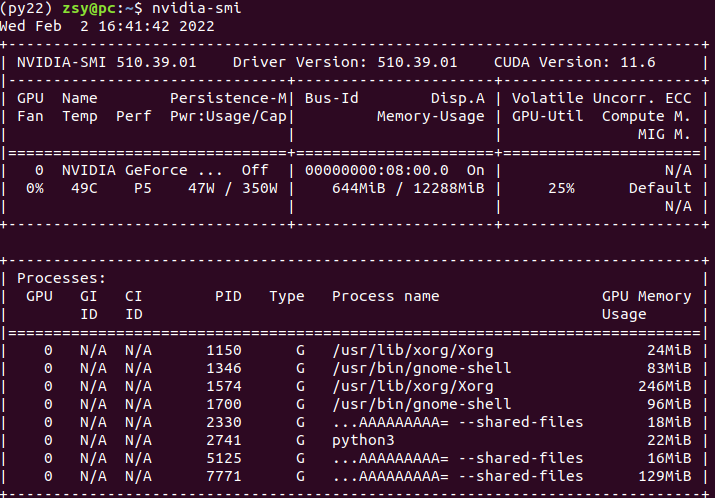
自此,显卡驱动就算 安装完成!
Original: https://www.cnblogs.com/seansheep/p/15860648.html
Author: 在青青草原上抓羊
Title: Ubuntu18.04 显卡驱动安装(解决各种疑难杂症)
原创文章受到原创版权保护。转载请注明出处:https://www.johngo689.com/524124/
转载文章受原作者版权保护。转载请注明原作者出处!