

基本过程如下图所示:

x(图片的特征值):这里使用了一个28*28=784列的数据来表示一个图片的构成,也就是说,每一个点都是这个图片的一个特征,这个其实比较好理解,因为每一个点都会对图片的样子和表达的含义有影响,只是影响的大小不同而已。
W(特征值对应的权重):这个值很重要,经过一系列训练,从而得出每一个特征对结果影响的权重,我们训练就是为了得到这个最佳权重值。
b(偏置量):为了去线性化。
y(预测的结果):单个样本被预测出来是哪个数字的概率,比如:有可能结果是[ 1.07476616 -4.54194021 2.98073649 -7.42985344 3.29253793 1.96750617 8.59438515 -6.65950203 1.68721473 -0.9658531 ],则分别表示是0,1,2,3,4,5,6,7,8,9的概率,然后会取一个最大值来作为本次预测的结果,对于这个数组来说,结果是6(8.59438515)
y_(真实结果):标签值,来自MNIST的训练集,每一个图片所对应的真实值,如1表示为:[0 1 0 0 0 0 0 0 0 0],也叫one-hot向量(用离散值表示各特征)。
MNIST (Mixed National Institute of Standards and Technology database )是一个计算机视觉数据集,也是机器学习的基准数据集,属于机器学习入门级应用数据,MNIST数据集是由Yann LeCun 等人创建,在机器学习的研究中很常用,包含70000张长28像素、宽28像素的手写图像,每张图片都只有黑白两色。
它包含如下四个部分:
(1)训练集图像:train-images-idx3-ubyte.gz (9.9MB,包含60000个样本)。
(2)训练集类标:train-labels-idx1-ubyte.gz (29KB,包含60000个类标)。
(3)测试集图像:t10k-images-idx3-ubyte.gz(1.6MB,包含10000个样本)。
(4)测试集类标:t10k-labels-idx1-ubyte.gz(5KB,包含1000个类标)。
MNIST数据集是根据两个美国NIST数据集构建的。训练集中的手写图片出自2 50 人之手,其中的50%来自高中生,其余50%来自人口调查局。测试集中的图片也是按照相同比例由高中生和人口调查局所抽选人员手写完成。
每张图片都有相应的标签,用来表示它所展现的数字。图像数据信息保存在图像文件中,标签数据信息保存在类标文件中。
数据集分成60000 行的训练集和10000 行的测试集两类。训练集分为55000行的训练数据和5000行的验证数据。训练集是一个形状为[60000 ,784]的tensor(张量),第一维度6000 用来索引图片,第二维度7 84 为2 8 *28 ,即MNIST 中图片的像素点,用于索引图片像素点。
标签一共有十种分类,0~9 ,用以表示每张图片对应的数字。图片中的数字是几,则该标签的第几维数字就是1。用one-hot编码,表示成一个十维向量,例如,([0 ,1 ,0 ,0 ,0 ,0 ,0 ,0 ,0 ,0 ])用来表示标签1,标签是一个[60000 ,10]的数字矩阵。
对MNIST可以进行可视化操作:
import matplotlib.pyplot as plt
import tensorflow as tf
from tensorflow.examples.tutorials.mnist import input_data
mnist = input_data.read_data_sets("./MNIST_data", one_hot=False)
fig, ax_big = plt.subplots()
for i in range(10):
读取十张
    x, y = mnist.test.next_batch(1)
    x = x.reshape([28, 28])
    ax = fig.add_subplot(2, 5, i + 1)
以2行5列形式展示
    ax.imshow(x, cmap=plt.cm.gray)
    ax.set_xticks([])
    ax.set_yticks([])
隐藏子图坐标轴刻度
ax_big.set_xticks([])
隐藏坐标轴刻度
ax_big.set_yticks([])
plt.show()
可视化10张MNIST灰度图片展示如下:

可能会看不懂的地方附有注释说明,代码:
import tensorflow.compat.v1 as tf
tf.disable_v2_behavior()
from tensorflow.examples.tutorials.mnist import input_data # download and extract the data set automatically
初始化参数
def weight_variable(shape):
initial = tf.truncated_normal(shape, stddev=0.1)
# shape是必选项,输出张量维度,stddev=0.1用于设置正态分布被截断前的标准差
return tf.Variable(initial)
def bias_variable(shape):
initial = tf.constant(0.1, shape=shape)
# 开始时设置为0.1
return tf.Variable(initial)
def conv2d(x, W):
return tf.nn.conv2d(x, W, strides=[1, 1, 1, 1], padding='SAME')
def max_pool_2x2(x):
return tf.nn.max_pool(x, ksize=[1, 2, 2, 1], strides=[1, 2, 2, 1], padding='SAME')
ksize为卷积核大小 padding取valid时卷积之后图像大小为N=(imgSize-ksize)/strides
x 表示输入图像,要求是一个tensor具有[batch,in_height,in_width,in_channels]这样的shape,为float32或者64
过滤器要求是一个tensor,具有[filter_height,filter_width,in_channels,out_channels]这样的shape
get the data source
mnist = input_data.read_data_sets("MNIST_data/", one_hot=True)
tf.name_scope()和tf.variable_scope()是两个作用域,
一般与两个创建/调用变量的函数tf.variable() 和tf.get_variable()搭配使用,用于变量共享
input image:pixel 28*28 = 784
with tf.name_scope('input'):
x = tf.placeholder(tf.float32, [None, 784])
y_ = tf.placeholder('float', [None, 10]) # y_ is realistic result
创建占位符是 tf 读取数据的一种方法,让python代码来提供数据
with tf.name_scope('image'):
x_image = tf.reshape(x, [-1, 28, 28, 1]) # -1表示由实际情况来定,图像数目*宽*高/28/28/1=第一维数
tf.summary.image('input_image', x_image, 8)
# 输出带图像的probuf,汇总数据的图像的的形式如下: ' tag /image/0', ' tag /image/1'...,如:input/image/0等
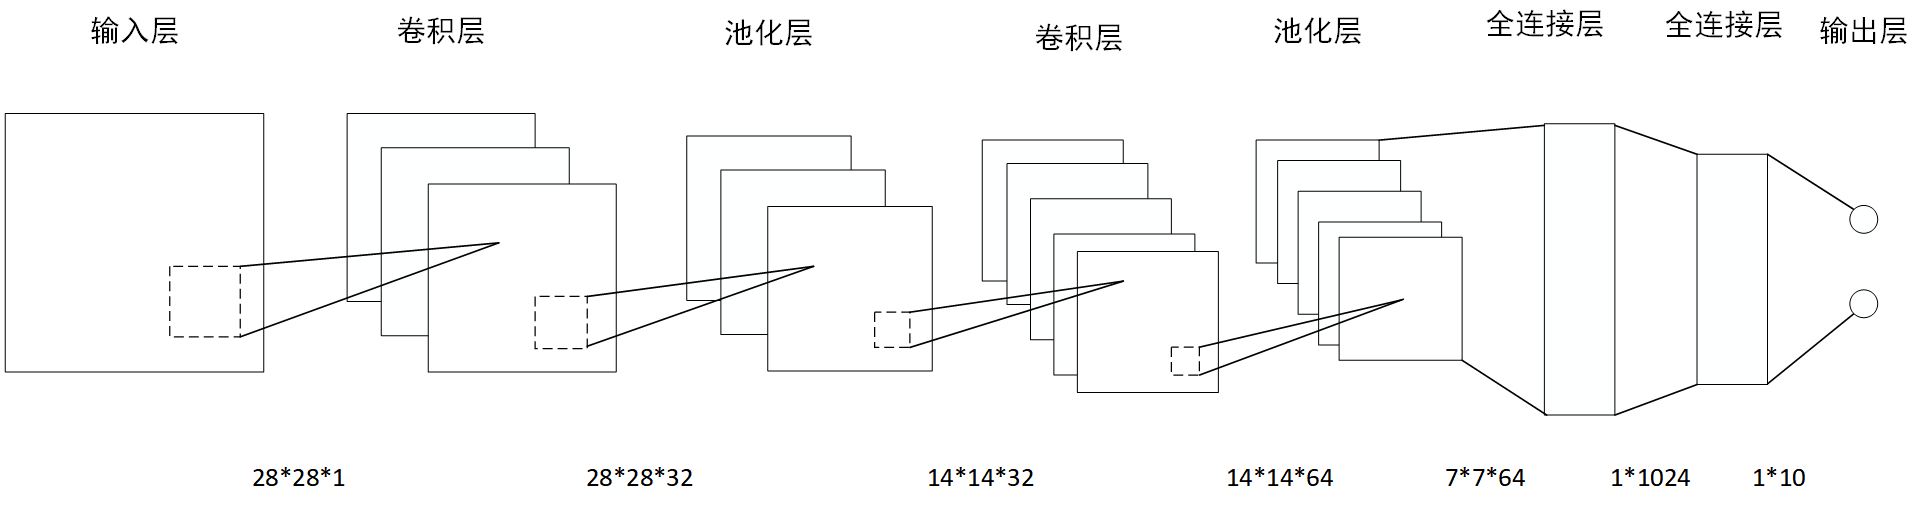
the first convolution layer
with tf.name_scope('conv_layer1'):
W_conv1 = weight_variable([5, 5, 1, 32]) # convolution kernel: 5*5*1, number of kernel: 32
b_conv1 = bias_variable([32])
h_conv1 = tf.nn.relu(conv2d(x_image, W_conv1) + b_conv1) # make convolution, output: 28*28*32
with tf.name_scope('pooling_layer'):
h_pool1 = max_pool_2x2(h_conv1) # make pooling, output: 14*14*32
the second convolution layer
with tf.name_scope('conv_layer2'):
W_conv2 = weight_variable([5, 5, 32, 64]) # convolution kernel: 5*5, depth: 32, number of kernel: 64
b_conv2 = bias_variable([64])
h_conv2 = tf.nn.relu(conv2d(h_pool1, W_conv2) + b_conv2) # output: 14*14*64
with tf.name_scope('pooling_layer'):
h_pool2 = max_pool_2x2(h_conv2) # output: 7*7*64
the first fully connected layer
with tf.name_scope('fc_layer3'):
W_fc1 = weight_variable([7 * 7 * 64, 1024])
b_fc1 = bias_variable([1024]) # size: 1*1024
h_pool2_flat = tf.reshape(h_pool2, [-1, 7*7*64])
h_fc1 = tf.nn.relu(tf.matmul(h_pool2_flat, W_fc1) + b_fc1) # output: 1*1024
dropout
with tf.name_scope('dropout'):
keep_prob = tf.placeholder(tf.float32)
h_fc1_drop = tf.nn.dropout(h_fc1, keep_prob)
the second fully connected layer
train the model: y = softmax(x * w + b)
with tf.name_scope('output_fc_layer4'):
W_fc2 = weight_variable([1024, 10])
b_fc2 = bias_variable([10]) # size: 1*10
with tf.name_scope('softmax'):
y_conv = tf.nn.softmax(tf.matmul(h_fc1_drop, W_fc2) + b_fc2) # output: 1*10
with tf.name_scope('lost'):
cross_entropy = -tf.reduce_sum(y_*tf.log(y_conv)) # 交叉熵计算损失函数
tf.summary.scalar('lost', cross_entropy)
with tf.name_scope('train'):
train_step = tf.train.AdamOptimizer(1e-4).minimize(cross_entropy)
# AdamOptimizer是tensorflow中的一种优化器,1e-4是学习率
# 为了最小化损失函数,需要用到反向传播思想,随机梯度下降算法来最小化损失函数
with tf.name_scope('accuracy'):
correct_prediction = tf.equal(tf.argmax(y_conv, 1), tf.argmax(y_, 1))
accuracy = tf.reduce_mean(tf.cast(correct_prediction, "float"))
tf.summary.scalar('accuracy', accuracy) # 显示标量信息
'''
tf.argmax(y_conv, 1) 是返回第二维(行方向)上最大值的索引,
tf.equal() 是比较两个值是否相等,返回一个 bool 值(True or False),
tf.cast() 是将bool 值转换为 1.0 or 0.0 的浮点类型,
tf.reduce_mean() 是计算平均值。
'''
merged = tf.summary.merge_all()
train_summary = tf.summary.FileWriter(r'C:\Users\12956\Anaconda3\Lib\site-packages', tf.get_default_graph())
将这里的地址路径改成tensorboard文件夹的绝对路径地址
init all variables
init = tf.global_variables_initializer()
进行初始化,之前只是定义variable
run session
with tf.Session() as sess:
sess.run(init)
# 构建一个session,在session中运行
# train data: get w and b
for i in range(2000): # train 2000 times
batch = mnist.train.next_batch(50)
# 批量给网络提供数据
result, _ = sess.run([merged, train_step], feed_dict={x: batch[0], y_: batch[1], keep_prob: 1.0})
# 在mnist数据集中,0是输入的图片,1是输入的标签,这个batch是784*10的
# train_step.run(feed_dict={x: batch[0], y_: batch[1], keep_prob: 0.5})
if i % 100 == 0:
# train_accuracy = sess.run(accuracy, feed_dict)
train_accuracy = accuracy.eval(feed_dict={x: batch[0], y_: batch[1], keep_prob: 1.0}) # no dropout
print('step %d, training accuracy %g' % (i, train_accuracy))
# result = sess.run(merged, feed_dict={x: batch[0], y_: batch[1]})
train_summary.add_summary(result, i)
train_summary.close()
print('test accuracy %g' % accuracy.eval(feed_dict={x: mnist.test.images, y_: mnist.test.labels, keep_prob: 1.0}))
Original: https://blog.csdn.net/baidu_41774120/article/details/117380864
Author: 你好,明天,,
Title: CNN算法实现手写数字识别(MNIST数据集)
原创文章受到原创版权保护。转载请注明出处:https://www.johngo689.com/521571/
转载文章受原作者版权保护。转载请注明原作者出处!