

目录
1.2 TensorFlow Object Detection API Installation
1.2.1 Downloading the TensorFlow Model Garden
1.2.2 Protobuf Installation/Compilation
1.2.4 Install the Object Detection API
- 安装
基本上参照Ref1教程中所描述的流程。
1.1 基本环境确认
因为已经安装了Anaconda, Tensorflow, GPU driver等,所以前面几步安装都跳过。
Windows10
Anaconda Python 3.8.5
Tensorflow 2.5
CUDA:11.1.96
CuDNN:?
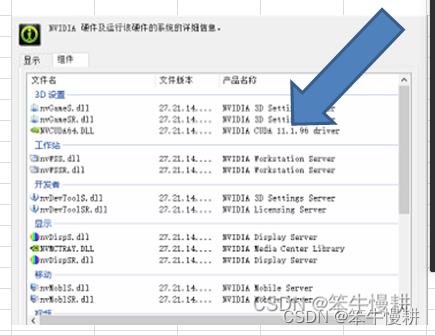
(查看显卡信息)控制面板–>硬件和声音–>NVIDIA控制面板–>帮助–>系统信息–>组件:

教程中建议创建一个虚环境用于实验,但是不是必须的。以下实验都是直接在base environment中进行的。
但是,出于环境验证的目的,本教程中提示的几个验证是通过命令执行的。
[En]
However, for the purpose of environment validation, several of the validations prompted in the tutorial are executed with commands.
>>python -c "import tensorflow as tf;print(tf.reduce_sum(tf.random.normal([1000
, 1000])))"
2022-05-02 12:07:25.589977: I tensorflow/core/platform/cpu_feature_guard.cc:151] This TensorFlow bin
ary is optimized with oneAPI Deep Neural Network Library (oneDNN) to use the following CPU instructi
ons in performance-critical operations: AVX AVX2
To enable them in other operations, rebuild TensorFlow with the appropriate compiler flags.
2022-05-02 12:07:26.059706: I tensorflow/core/common_runtime/gpu/gpu_device.cc:1525] Created device
/job:localhost/replica:0/task:0/device:GPU:0 with 2661 MB memory: -> device: 0, name: GeForce GTX 1
050 Ti, pci bus id: 0000:01:00.0, compute capability: 6.1
tf.Tensor(-120.57622, shape=(), dtype=float32)
以上信息表明Tensorflow在CPU和GPU上都能够正常工作。
1.2 TensorFlow Object Detection API Installation
1.2.1 Downloading the TensorFlow Model Garden
从GitHub – tensorflow/models下载zip包(当然也可以用git clone的方式)并且在名为TensorFlow(教程上这么说,不过不是说非得这个名字吧)的目录下解压缩后并将models_master更名为models(这个是必须的)。
1.2.2 Protobuf Installation/Compilation
从Releases · protocolbuffers/protobuf · GitHub下载protoc-3.20.1-win64.zip(当前时刻的win64最新版本)解压后放在…\GoogleProtobuf目录下(这个目录名和上面的Tensorflow目录名一样应该都不是必然的)
将
打开一个新的Terminal(注意,每次系统环境发生变化时要新开Terminal才能生效,类似于Linux中source一下脚本),进入到TensorFlow/models/research/目录中并执行以下命令: :
>>protoc object_detection/protos/*.proto --python_out=.
1.2.3 COCO API installation
在命令行上执行以下两个命令:
[En]
Execute the following two commands on the command line:
    pip install cython
    pip install git+https://github.com/philferriere/cocoapi.git#subdirectory=PythonAPI
根据教程说明,要求机器上安装了Visual C++ 2015 build tools,如果没有的话需要先安装。当然如果运行以上两条命令没有报错就说明不需要care它了。
Note(这个暂时还管不上,先mark一下,后面再来理会)
-
The default metrics are based on those used in Pascal VOC evaluation.
-
To use the COCO object detection metrics add metrics_set: “coco_detection_metrics” to the eval_config message in the config file.
-
To use the COCO instance segmentation metrics add metrics_set: “coco_mask_metrics” to the eval_config message in the config file.
1.2.4 Install the Object Detection API
进入到Tensorflow\models\research目录运行以下命令:
    cp object_detection/packages/tf2/setup.py .
    python -m pip install --use-feature=2020-resolver .
第一次运行(以上第2条命令)报告信息如下:
WARNING: –use-feature=2020-resolver no longer has any effect, since it is now the default dependenc
y resolver in pip. This will become an error in pip 21.0.
Processing f:\dl\tensorflow\models\research
Preparing metadata (setup.py) … done
Collecting avro-python3
Downloading avro-python3-1.10.2.tar.gz (38 kB)
Preparing metadata (setup.py) … done
ERROR: Could not find a version that satisfies the requirement apache-beam (from object-detection) (
from versions: none)
ERROR: No matching distribution found for apache-beam
与教程中所提示的错误也不一样。。。教程中给出的以下指示似乎也没有什么信息,”have a look at … and rerun”,看一下然后再重跑?看一下前面的描述能改变什么?
This is caused because installation of the
pycocotoolspackage has failed. To fix this have a look at the COCO API installation section and rerun the above commands.
Anyway,反正也不知道该咋办,直接就重新运行了一下,这次不一样了。上次出错的apache_beam包相关错误不再报了( 有随机性?)。但是最后报了另外一个错误
WARNING: –use-feature=2020-resolver no longer has any effect, since it is now the default dependenc
y resolver in pip. This will become an error in pip 21.0.
Processing f:\dl\tensorflow\models\research
Preparing metadata (setup.py) … done
Collecting avro-python3
Using cached avro-python3-1.10.2.tar.gz (38 kB)
Preparing metadata (setup.py) … done
Collecting apache-beam
Downloading apache_beam-2.38.0-cp38-cp38-win_amd64.whl (4.1 MB)
。。。。。。
Attempting uninstall: tensorboard
Found existing installation: tensorboard 2.5.0
Uninstalling tensorboard-2.5.0:
Successfully uninstalled tensorboard-2.5.0
ERROR: Could not install packages due to an OSError: [WinError 5] 拒绝访问。: ‘C:\Users\chenxy\Ap
pData\Local\Temp\pip-uninstall-nkq8pny7\tensorboard.exe’
Consider using the --user option or check the permissions.
第3次运行(将–use-feature=2020-resolver选项去掉,并加上–user选项)
python -m pip install --user .
这一次它结束了(正常结束)。
[En]
This time it came to an end (normal end).
1.2.5 Test your Installation
执行以下命令以测试安装是否正确。
[En]
Execute the following command to test that the installation is correct.
From within TensorFlow/models/research/
>> python object_detection/builders/model_builder_tf2_test.py
。。。。。。
[ RUN ] ModelBuilderTF2Test.test_unknown_ssd_feature_extractor
INFO:tensorflow:time(main.ModelBuilderTF2Test.test_unknown_ssd_feature_extractor): 0.0s
I0501 23:19:44.044327 3280 test_util.py:2373] time(main.ModelBuilderTF2Test.test_unknown_ssd_fe
ature_extractor): 0.0s
[ OK ] ModelBuilderTF2Test.test_unknown_ssd_feature_extractorOriginal: https://blog.csdn.net/chenxy_bwave/article/details/124538938
Author: 笨牛慢耕
Title: TensorFlow2 Object Detection API安装及运行实验记录
原创文章受到原创版权保护。转载请注明出处:https://www.johngo689.com/514138/
转载文章受原作者版权保护。转载请注明原作者出处!