

文章目录
- 前言
- 一、Yolov3 和 Yolov3-tiny
- 1.网络结构
*
– - 二、配置训练参数
* - 1.目标检测数据集
- 2.设置anchor box 和classes
- 三、 配置训练过程
- 四、模型预测
- 总结
- 更新进度
前言
上一篇文章 神奇的目标检测 已经介绍了目标检测的基础啦。目标检测呢,就是在图片中定位出目标的位置,把它”框”出来就好了。本篇文章使用Yolov3 和Yolov3-tiny,以训练VOC2007和口罩检测为例。教大家如何快速的搭建自己的目标检测平台。下面是资源链接:
内容链接VOC2007 数据集
链接
戴口罩数据集
链接
权重文件
链接
提取码:y32mgithub项目地址
链接
完整的项目地址(包括所有文件)
[En]
Full project address (including all files)
提取码 jmpl
; 一、Yolov3 和 Yolov3-tiny
2018 年,推出了Yolov3,相比于Yolov2 最主要的改进又一下几点:
1. 加深了网络,使用Darknet53,提升了模型得检测能力。
2.使用了FPN结构(空间金字塔结构),能增强不同大小目标的检测能力。
3.使用了focal loss,解决了样本不均和分类难得问题。
对于tiny版本来说,只使用了简单的44层卷积用作普通的特征提取,只有两个输出的yolo head (Yolov3有3个yolo head)每个网格点使用两3个anchor boxes(和Yolov3一样)。所以tiny版本检测速度是很快的哦~。
优点:检测速度快,背景误检率低,泛化性强
缺点:召回率低,定位精度较差,对于靠近或遮挡的目标,小目标检测能力弱,容易出现漏检。
1.网络结构
网络结构包含许多基本模块。我们首先实现这些基本块,然后像构建块一样组装它们。我已经在代码注释中写下了每个块的用途。
[En]
The network structure contains many basic blocks. We first implement these basic blocks, and then assemble them like building blocks. I have written down the purpose of each block in the code comments.
@wraps(Conv2D)
def DarknetConv2D(*args, **kwargs):
    """Wrapper to set Darknet parameters for Convolution2D."""

    darknet_conv_kwargs = {'kernel_regularizer': l2(5e-4)}
    darknet_conv_kwargs['padding'] = 'valid' if kwargs.get('strides')==(2,2) else 'same'
    darknet_conv_kwargs.update(kwargs)
    return Conv2D(*args, **darknet_conv_kwargs)

def DarknetConv2D_BN_Leaky(*args, **kwargs):

    """Darknet Convolution2D followed by BatchNormalization and LeakyReLU."""
    no_bias_kwargs = {'use_bias': False}
    no_bias_kwargs.update(kwargs)
    return compose(
        DarknetConv2D(*args, **no_bias_kwargs),
        BatchNormalization(),
        LeakyReLU(alpha=0.1))

def resblock_body(x, num_filters, num_blocks):
    '''A series of resblocks starting with a downsampling Convolution2D'''

    x = ZeroPadding2D(((1,0),(1,0)))(x)
    x = DarknetConv2D_BN_Leaky(num_filters, (3,3), strides=(2,2))(x)
    for i in range(num_blocks):
        y = compose(
                DarknetConv2D_BN_Leaky(num_filters//2, (1,1)),
                DarknetConv2D_BN_Leaky(num_filters, (3,3)))(x)
        x = Add()([x,y])
    return x

def darknet_body(x):
    '''Darknent body having 52 Convolution2D layers'''

    x = DarknetConv2D_BN_Leaky(32, (3,3))(x)
    x = resblock_body(x, 64, 1)
    x = resblock_body(x, 128, 2)
    x = resblock_body(x, 256, 8)
    x = resblock_body(x, 512, 8)
    x = resblock_body(x, 1024, 4)
    return x

def make_last_layers(x, num_filters, out_filters):
    '''6 Conv2D_BN_Leaky layers followed by a Conv2D_linear layer'''

    x = compose(
            DarknetConv2D_BN_Leaky(num_filters, (1,1)),
            DarknetConv2D_BN_Leaky(num_filters*2, (3,3)),
            DarknetConv2D_BN_Leaky(num_filters, (1,1)),
            DarknetConv2D_BN_Leaky(num_filters*2, (3,3)),
            DarknetConv2D_BN_Leaky(num_filters, (1,1)))(x)
    y = compose(
            DarknetConv2D_BN_Leaky(num_filters*2, (3,3)),
            DarknetConv2D(out_filters, (1,1)))(x)
    return x, y
yolov3-tiny
tiny 版本网络结构比较简单,我们先来看一个图:
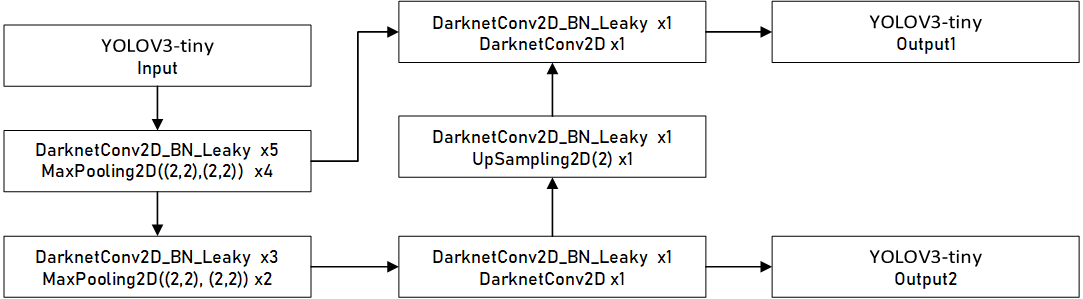

网络中有普通的卷积核和池化,网络很浅,网络的计算过程用箭头表示。网络很简单吗?
[En]
There are ordinary convolution cores and pooling in the network, and the network is very shallow, and the calculation process of the network is shown by the arrow. Is the network very simple?
接下来,我们来看看代码是如何实现的。
[En]
Let’s next look at how the code is implemented.
def tiny_yolo_body(inputs, num_anchors, num_classes):

    '''Create Tiny YOLO_v3 model CNN body in keras.'''
    x1 = compose(
            DarknetConv2D_BN_Leaky(16, (3,3)),
            MaxPooling2D(pool_size=(2,2), strides=(2,2), padding='same'),
            DarknetConv2D_BN_Leaky(32, (3,3)),
            MaxPooling2D(pool_size=(2,2), strides=(2,2), padding='same'),
            DarknetConv2D_BN_Leaky(64, (3,3)),
            MaxPooling2D(pool_size=(2,2), strides=(2,2), padding='same'),
            DarknetConv2D_BN_Leaky(128, (3,3)),
            MaxPooling2D(pool_size=(2,2), strides=(2,2), padding='same'),
            DarknetConv2D_BN_Leaky(256, (3,3)))(inputs)
    x2 = compose(
            MaxPooling2D(pool_size=(2,2), strides=(2,2), padding='same'),
            DarknetConv2D_BN_Leaky(512, (3,3)),
            MaxPooling2D(pool_size=(2,2), strides=(1,1), padding='same'),
            DarknetConv2D_BN_Leaky(1024, (3,3)),
            DarknetConv2D_BN_Leaky(256, (1,1)))(x1)
    y1 = compose(
            DarknetConv2D_BN_Leaky(512, (3,3)),
            DarknetConv2D(num_anchors*(num_classes+5), (1,1)))(x2)

    x2 = compose(
            DarknetConv2D_BN_Leaky(128, (1,1)),
            UpSampling2D(2))(x2)
    y2 = compose(
            Concatenate(),
            DarknetConv2D_BN_Leaky(256, (3,3)),
            DarknetConv2D(num_anchors*(num_classes+5), (1,1)))([x2,x1])

    return Model(inputs, [y1,y2])
DarknetConv2D DarknetConv2D_BN_Leaky 是使用二维卷积定义的块,可以去代码里查看,很好理解的。
yolov3
yolov3使用了残差结构和FPN, 网络较深,结构复杂,我们先来看一下他的整体网络结构:
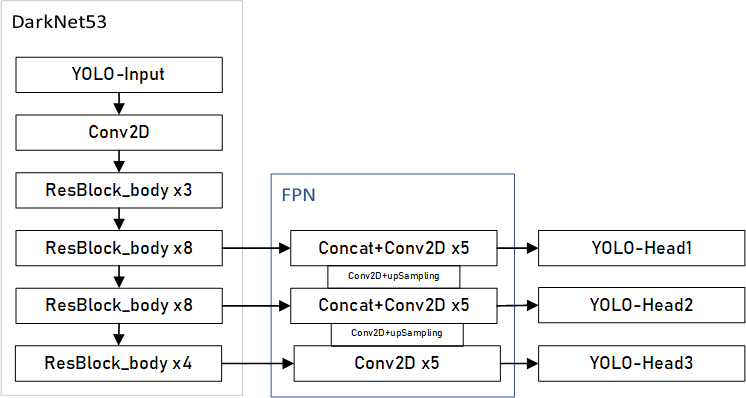
这里使用的FPN(Feature Pyramid Network) 特征金字塔如下图所示:
在目标检测中,往往会包含不用大小的目标,多层卷积后,小目标的语义丢失比较严重,使用FPN 能有效的利用多层特征信息 加强浅层小目标的特征新信息,提升网络的检测能力。
def yolo_body(inputs, num_anchors, num_classes):
    """Create YOLO_V3 model CNN body in Keras."""

    darknet = Model(inputs, darknet_body(inputs))
    x, y1 = make_last_layers(darknet.output, 512, num_anchors*(num_classes+5))

    x = compose(
            DarknetConv2D_BN_Leaky(256, (1,1)),
            UpSampling2D(2))(x)
    x = Concatenate()([x,darknet.layers[152].output])
    x, y2 = make_last_layers(x, 256, num_anchors*(num_classes+5))

    x = compose(
            DarknetConv2D_BN_Leaky(128, (1,1)),
            UpSampling2D(2))(x)
    x = Concatenate()([x,darknet.layers[92].output])
    x, y3 = make_last_layers(x, 128, num_anchors*(num_classes+5))

    return Model(inputs, [y1,y2,y3])
代码中的 make_last_layers 是产生YOLO的输出层,对于参数 :
num_anchors*(num_classes+5)
yolo3 每个网格点有3个anchor boxes,num_achors=3 ,每个anchor box都要预测所有的类别,假设我们使用的是coco数据集有80类别,num_classes=80, 5代表框的p(框中有目标的概率),x_offset、y_offset、h和w 4个值。yolo head 中的输出维度就为 [batch_size,w,h,3x(4+1+80)]。 如下图所示:
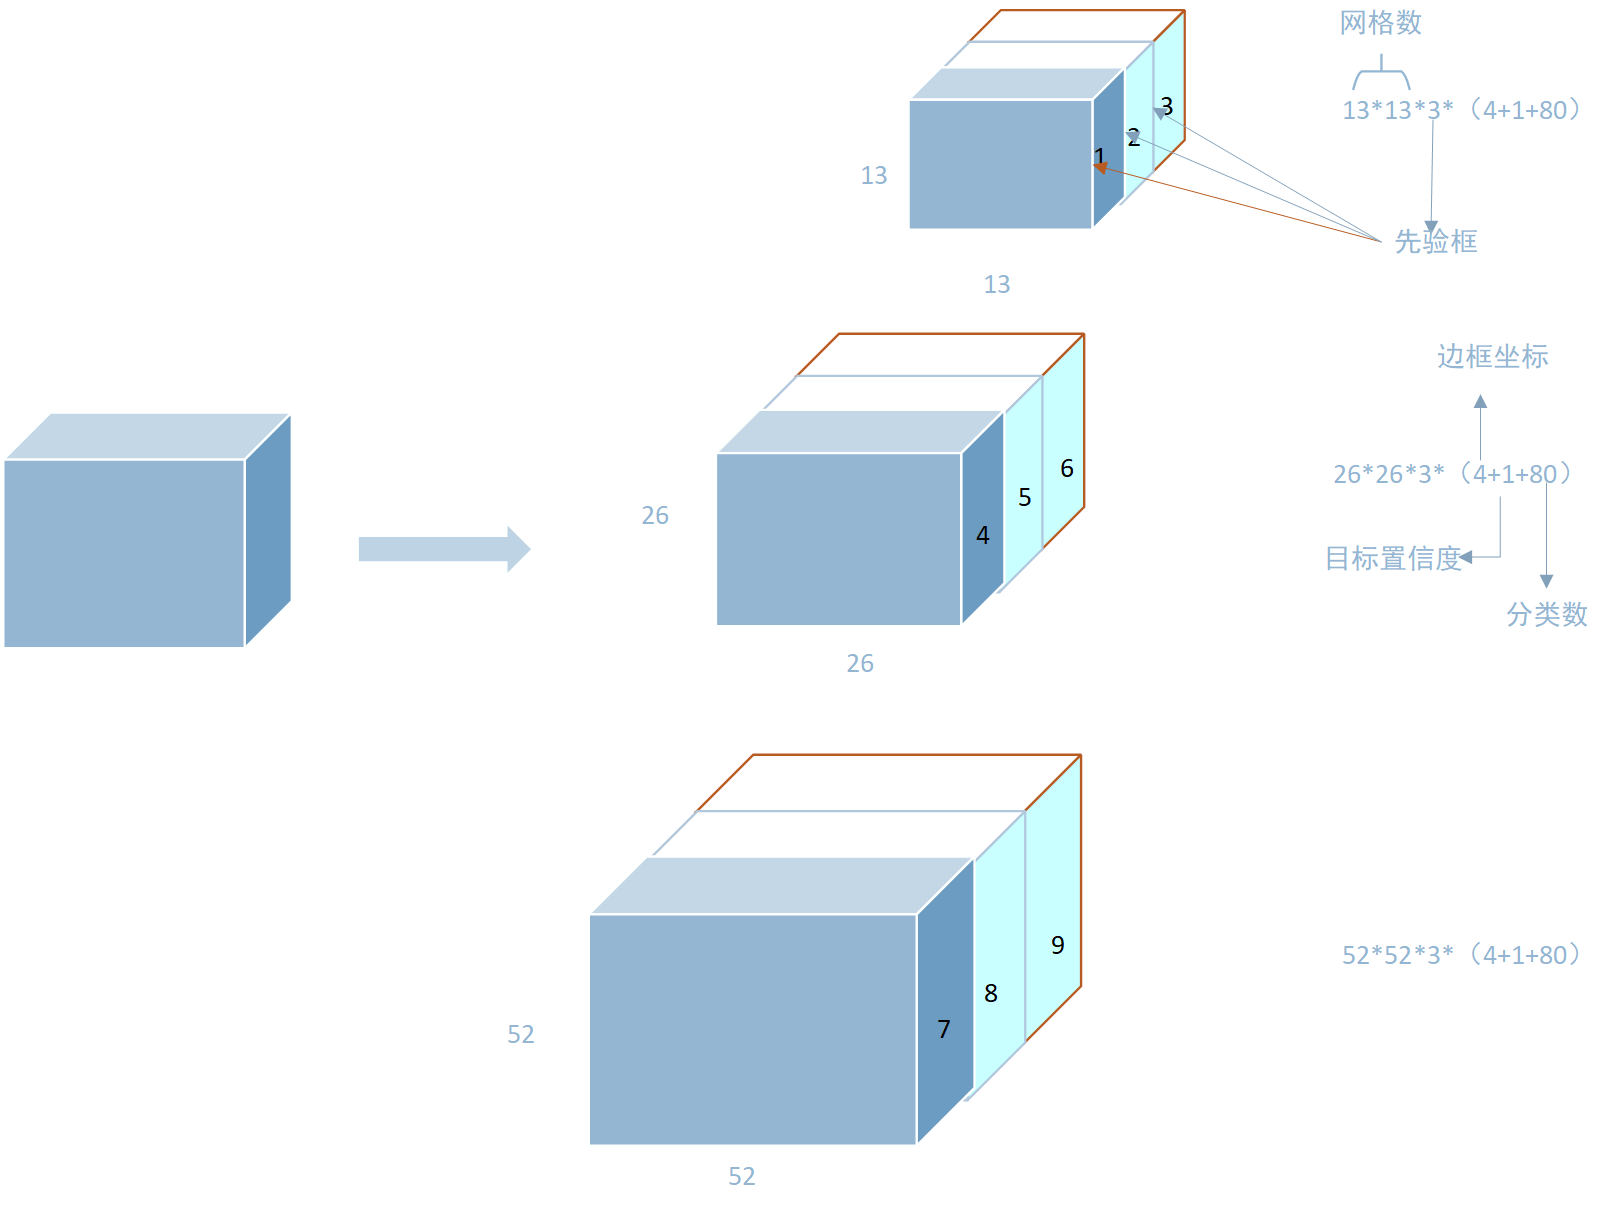
大家都会说Yolo会将图片划分为13×13,26×26, 52×52 的网格,但不是直接的物理划分,而是用这样的卷积层来表示。将每一个网格点的参数,藏在卷积特征层中,来表示物体的位置信息和类别。
网格131326265252
感受野*
大 (大目标)中 (中目标)小 (小目标)
先验框 coco
)116×90,156×198,373x32630x61,62×45,59x11910x13,16×30,33×23
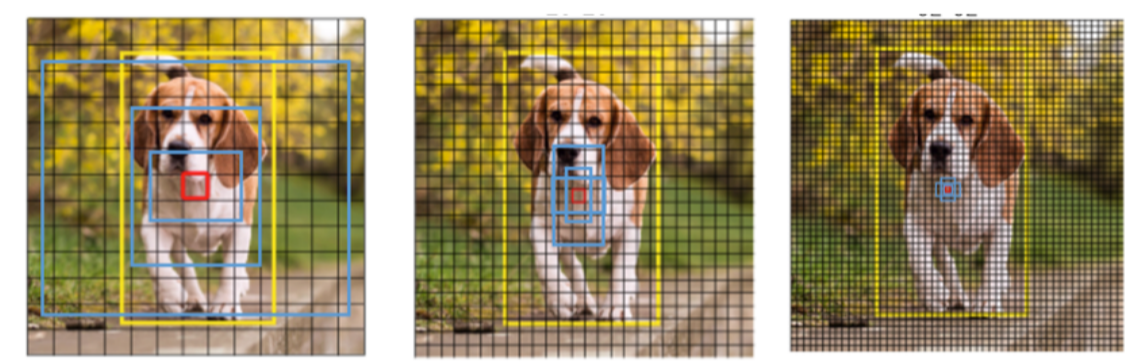
上图中 黄色表示真实框, 红色表示目标中心点所在的网格。蓝色表示所设置的anchor boxes,分别检测大中小三种目标。不仅仅是以红色网格点为中心有先验框,会以每个网格点为中心都会有三个这样的先验证框。 预测框数 == 网格数*锚框数。也就是总共有32x32x3+26x26x3+52x52x3个锚框。所以Yolo算法是对图片使用了”人海战术”。
框的回归
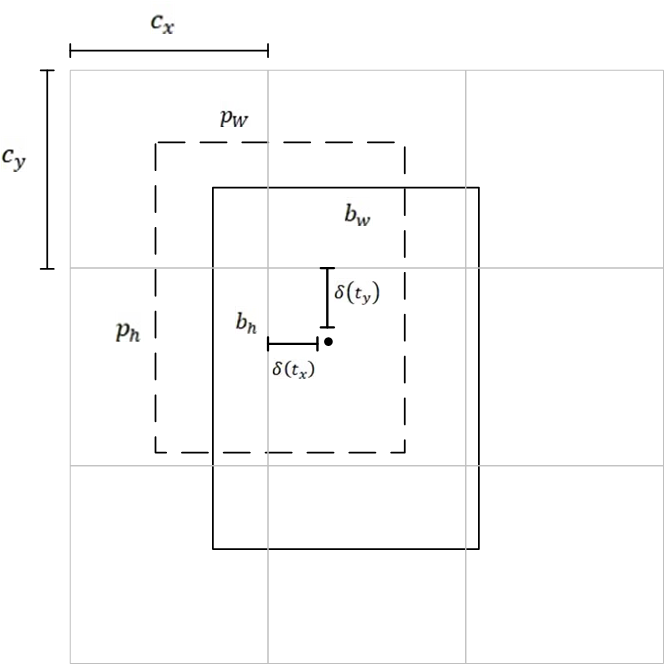
首先我们要明白,特征图(也就是Yolo head)表示预测框的信息:
1.坐标信息:t x , t y , t w , t h t_x,t_y,t_w,t_h t x ,t y ,t w ,t h
2.坐标置信度(有无目标):P o b j P_obj P o b j
3.分类:p c p_c p c
上图中锚框为长宽[Pw,Ph],中心点为[cx,cy],预测框为[bw,bh],现在我们需要把锚框向真实框靠近需要进行两步.
第一步:中心点偏移。
其中,δ 为sigmoid 函数,bx,by为预测框中心点坐标。
第二步:宽高拉伸
这样就得到了框的长宽。我们就能还原出这样一个真实物体的框啦。
这样,特征地图的信息就会恢复到真实的帧,而我们在训练过程中训练的就是可以偏移锚帧的信息。
[En]
In this way, the information of the feature map will be restored to the real frame, and what we train during training is the information that can offset the anchor frame.
为什么要用sigmoid 函数 和exp指数呢?。因为在中心点偏移时,我们希望中心点只在它所在的网格里偏移,所以需要将其转化为0~1之间。sigmoid激活函数正好做了这件事。 宽高拉伸是因为我们宽和高的取值都是正的,那么exp函数的值域正好为0~正无穷。
; 二、配置训练参数
1.目标检测数据集
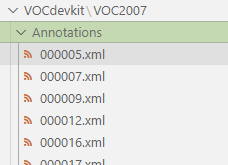
以VOC 2007 数据集为例,首先来看一下文件树:
─VOC2007
    ├─Annotations
    │   └─000005.xml
    │   └─000006.xml
    │   └─xxxx.xml
    ├─ImageSets
    │  └─Main
    └─JPEGImages
    │   └─000005.jpg
    │   └─000006.jpg
    │   └─xxxx.jpg
每一个xml 包含同名jpg 中目标的位置以及类别,在训练时,首先要将数据 通过 voc_annotation.py 转换到记事本中,方便训练时读取。记事本形式如下:
VOC2007/JPEGImages/000005.jpg(图片路径)98,267,194,383(框的位置) ,1(框中目标的类别)
VOC2007/JPEGImages/000006.jpg(图片路径)99,205,198,318(框的位置) ,1(框中目标的类别)
这样的数据是无法直接和YOLO的输出进行计算的,那么我们还需要将,这种数据编码成和yolo head 的格式一样,才能去计算loss,反向传播调整参数
通过如下函数将y_ture,转换成和y_predict 一样的形式:
def preprocess_true_boxes(true_boxes, input_shape, anchors, num_classes):
    '''Preprocess true boxes to training input format
    Parameters
    ----------
        true_boxes: array, shape=(m, T, 5)
        Absolute x_min, y_min, x_max, y_max, class_id relative to input_shape.

    input_shape: array-like, hw, multiples of 32
    anchors: array, shape=(N, 2), wh
    num_classes: integer
    Returns
    -------
    y_true: list of array, shape like yolo_outputs, xywh are reletive value

    '''
    assert (true_boxes[..., 4]<num_classes).all(), 'class id must be less than num_classes'
    num_layers = len(anchors)//3
    anchor_mask = [[6,7,8], [3,4,5], [0,1,2]] if num_layers==3 else [[3,4,5], [1,2,3]]

    true_boxes = np.array(true_boxes, dtype='float32')
    input_shape = np.array(input_shape, dtype='int32')
    boxes_xy = (true_boxes[..., 0:2] + true_boxes[..., 2:4]) // 2
    boxes_wh = true_boxes[..., 2:4] - true_boxes[..., 0:2]
    true_boxes[..., 0:2] = boxes_xy/input_shape[::-1]
    true_boxes[..., 2:4] = boxes_wh/input_shape[::-1]

    m = true_boxes.shape[0]
    grid_shapes = [input_shape//{0:32, 1:16, 2:8}[l] for l in range(num_layers)]
    y_true = [np.zeros((m,grid_shapes[l][0],grid_shapes[l][1],len(anchor_mask[l]),5+num_classes),
        dtype='float32') for l in range(num_layers)]

    anchors = np.expand_dims(anchors, 0)
    anchor_maxes = anchors / 2.

    anchor_mins = -anchor_maxes
    valid_mask = boxes_wh[..., 0]>0

    for b in range(m):

        wh = boxes_wh[b, valid_mask[b]]
        if len(wh)==0: continue

        wh = np.expand_dims(wh, -2)
        box_maxes = wh / 2.

        box_mins = -box_maxes

        intersect_mins = np.maximum(box_mins, anchor_mins)
        intersect_maxes = np.minimum(box_maxes, anchor_maxes)
        intersect_wh = np.maximum(intersect_maxes - intersect_mins, 0.)
        intersect_area = intersect_wh[..., 0] * intersect_wh[..., 1]
        box_area = wh[..., 0] * wh[..., 1]
        anchor_area = anchors[..., 0] * anchors[..., 1]
        iou = intersect_area / (box_area + anchor_area - intersect_area)

        best_anchor = np.argmax(iou, axis=-1)

        for t, n in enumerate(best_anchor):
            for l in range(num_layers):
                if n in anchor_mask[l]:
                    i = np.floor(true_boxes[b,t,0]*grid_shapes[l][1]).astype('int32')
                    j = np.floor(true_boxes[b,t,1]*grid_shapes[l][0]).astype('int32')
                    k = anchor_mask[l].index(n)
                    c = true_boxes[b,t, 4].astype('int32')
                    y_true[l][b, j, i, k, 0:4] = true_boxes[b,t, 0:4]
                    y_true[l][b, j, i, k, 4] = 1
                    y_true[l][b, j, i, k, 5+c] = 1

    return y_true
数据集放置如下图所示:
2.设置anchor box 和classes
Yolo 中的anchor boxes 是通过数据集中框的大小通过 kmeans聚类而来,yolov3 有三个输出,每个网格预测3个,所以 Kmeans中的K设置9,如果是tiny版本的话,就设置为6。代码如下:
import numpy as np
"""
Kmeans 聚类算法, 根据 数据集中的xml 文件 聚类出是和目标的anchor boxes
"""
class YOLO_Kmeans:

    def __init__(self, cluster_number, filename):
        self.cluster_number = cluster_number
        self.filename =filename

    def iou(self, boxes, clusters):
        n = boxes.shape[0]
        k = self.cluster_number

        box_area = boxes[:, 0] * boxes[:, 1]
        box_area = box_area.repeat(k)
        box_area = np.reshape(box_area, (n, k))

        cluster_area = clusters[:, 0] * clusters[:, 1]
        cluster_area = np.tile(cluster_area, [1, n])
        cluster_area = np.reshape(cluster_area, (n, k))

        box_w_matrix = np.reshape(boxes[:, 0].repeat(k), (n, k))
        cluster_w_matrix = np.reshape(np.tile(clusters[:, 0], (1, n)), (n, k))
        min_w_matrix = np.minimum(cluster_w_matrix, box_w_matrix)

        box_h_matrix = np.reshape(boxes[:, 1].repeat(k), (n, k))
        cluster_h_matrix = np.reshape(np.tile(clusters[:, 1], (1, n)), (n, k))
        min_h_matrix = np.minimum(cluster_h_matrix, box_h_matrix)
        inter_area = np.multiply(min_w_matrix, min_h_matrix)

        result = inter_area / (box_area + cluster_area - inter_area)
        return result

    def avg_iou(self, boxes, clusters):
        accuracy = np.mean([np.max(self.iou(boxes, clusters), axis=1)])
        return accuracy

    def kmeans(self, boxes, k, dist=np.median):
        box_number = boxes.shape[0]
        distances = np.empty((box_number, k))
        last_nearest = np.zeros((box_number,))
        np.random.seed()
        clusters = boxes[np.random.choice(
            box_number, k, replace=False)]
        while True:

            distances = 1 - self.iou(boxes, clusters)

            current_nearest = np.argmin(distances, axis=1)
            if (last_nearest == current_nearest).all():
                break
            for cluster in range(k):
                clusters[cluster] = dist(
                    boxes[current_nearest == cluster], axis=0)

            last_nearest = current_nearest

        return clusters

    def result2txt(self, data):
        f = open("yolo_anchors1.txt", 'w')
        row = np.shape(data)[0]
        for i in range(row):
            if i == 0:
                x_y = "%d,%d" % (data[i][0], data[i][1])
            else:
                x_y = ", %d,%d" % (data[i][0], data[i][1])
            f.write(x_y)
        f.close()

    def txt2boxes(self):
        f = open(self.filename, 'r')
        dataSet = []
        for line in f:
            infos = line.split(" ")
            length = len(infos)
            for i in range(1, length):
                width = int(infos[i].split(",")[2]) - \
                    int(infos[i].split(",")[0])
                height = int(infos[i].split(",")[3]) - \
                    int(infos[i].split(",")[1])
                dataSet.append([width, height])
        result = np.array(dataSet)
        f.close()
        return result

    def txt2clusters(self):
        all_boxes = self.txt2boxes()
        result = self.kmeans(all_boxes, k=self.cluster_number)
        result = result[np.lexsort(result.T[0, None])]
        self.result2txt(result)
        print("K anchors:\n {}".format(result))
        print("Accuracy: {:.2f}%".format(
            self.avg_iou(all_boxes, result) * 100))

if __name__ == "__main__":
    cluster_number =9
    filename = r"2007_train.txt"
    kmeans = YOLO_Kmeans(cluster_number, filename)
    kmeans.txt2clusters()
当然也可以使用yolo中默认的achor box的大小。
classes.txt 是声明 你目标中所有的类别,以戴口罩数据集为例
without_mask
with_mask
mask_weared_incorrect
文本中书写的类别要和你xml 文件中所写类别保持一致,才能正确索引。
三、 配置训练过程
培训过程中需要配置的是之前的数据准备。只需输入模型即可。
[En]
What needs to be configured in the training process is the previous data preparation. Just enter the model.
训练过错内存溢出,记得吧batch_size 改小一点,yolo完整版的话一般设置为8比较好
代码:
def train():

    train_annotation_path = r"2007_train.txt"
    val_annotation_path = r"2007_val.txt"

    anchors_path = r"model_data\mask_anchor.txt"
    classes_path = r"model_data\mask_classes.txt"
    log_dir = "logs/tiny_log/"
    weights_dir = "weights/"
    class_names = get_classes(classes_path)
    num_classes = len(class_names)
    anchors = get_anchors(anchors_path)

    input_shape = (416, 416)

    model = create_tiny_model(
        input_shape=input_shape,
        anchors=anchors,
        num_classes=num_classes,
        freeze_body=2,
        weights_path="model_data\yolov3-tiny.h5",
    )
    ''''
     # yolo v3 的完整版本 ,
    model = create_model(
        input_shape=input_shape,
        anchors=anchors,
        num_classes=num_classes,
        # freeze_body=0,
        weights_path="model_data\yolov3.h5",
    )
    '''
    print(len(model.layers))
    logging = TensorBoard(log_dir=log_dir)
    checkpoint = ModelCheckpoint(
        weights_dir + "ep{epoch:03d}-loss{loss:.3f}-val_loss{val_loss:.3f}.h5",
        monitor="val_loss",
        save_weights_only=True,
        save_best_only=True,
        period=3,
    )
    reduce_lr = ReduceLROnPlateau(monitor="val_loss", factor=0.1, patience=3, verbose=1)
    early_stopping = EarlyStopping(
        monitor="val_loss", min_delta=0, patience=10, verbose=1
    )

    with open(train_annotation_path) as f:
        train_lines = f.readlines()
    with open(val_annotation_path) as f:
        val_lines = f.readlines()
    num_train = len(train_lines)
    num_val = len(val_lines)

    Freeze_Train = True

    if Freeze_Train:
        batch_size = 32
        model.compile(
            optimizer=Adam(1e-3),
            loss={
            "yolo_loss": lambda y_true, y_pred: y_pred}
        )
        print("Train on {} samples, val on {} samples, with batch size {}.".format(num_train, num_val, batch_size))
        model.fit(
            data_generator_wrapper(train_lines,batch_size,input_shape,anchors,num_classes),
            steps_per_epoch=max(1,num_train//batch_size),
            validation_data=data_generator_wrapper(val_lines,batch_size,input_shape,anchors,num_classes),
            validation_steps=max(1,num_val//batch_size),
            epochs=50,
            initial_epoch=0,
            callbacks=[logging,checkpoint]
        )
        model.save_weights(weights_dir+'trained_weights_stage_1.h5')

    if True:
        for i in range(len(model.layers)): model.layers[i].trainable = True
        model.compile(optimizer=Adam(lr=1e-4), loss={'yolo_loss': lambda y_true, y_pred: y_pred})
        print('Unfreeze all of the layers.')

        batch_size = 32
        print('Train on {} samples, val on {} samples, with batch size {}.'.format(num_train, num_val, batch_size))
        model.fit_generator(data_generator_wrapper(train_lines, batch_size, input_shape, anchors, num_classes),
            steps_per_epoch=max(1, num_train//batch_size),
            validation_data=data_generator_wrapper(val_lines, batch_size, input_shape, anchors, num_classes),
            validation_steps=max(1, num_val//batch_size),
            epochs=100,
            initial_epoch=50,
            callbacks=[logging, checkpoint, reduce_lr, early_stopping])
        model.save_weights(log_dir + 'trained_weights_final.h5')

if __name__=='__main__':
    train()
以上就是培训过程中的培训内容。
[En]
The above is the training process, during training.
注意:
使用model 时,tiny 和YOLOv3 achor 不一样,一个是6 类 一个是9类 ,记得更换。
tips:训练过错先冻结一部分层去训练,这样训练比较快,当损失稳定之后,使用更小的学习率去,趋势模型收敛更好。
训练结果如下:
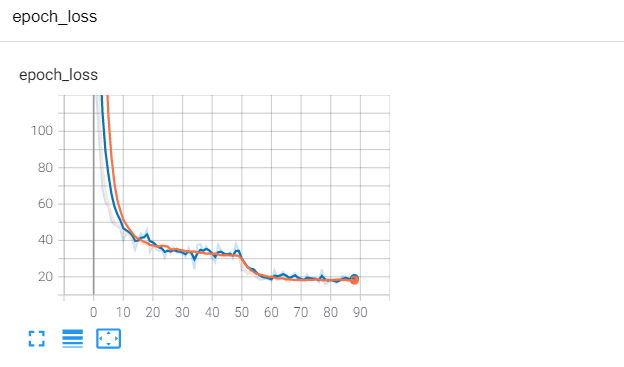
由此可见,衔接效果相当不错。
[En]
It can be seen that the convergence effect is quite good.
四、模型预测
模型预测,将图片输入到保存的模型当中,如果输出一个跟yolo head 一样的维度,很显然这个时候我们是无法获图片的类别还有框的,那么需要通过解码,拿到我们有用的数据。这个工作在项目中的yolo.py 中实现。
_defaults = {

        "model_path": r"logs\yolov3_log\trained_weights_final.h5",
        "anchors_path": "model_data\mask_anchor.txt",
        "classes_path": "model_data\mask_classes.txt",
        "score": 0.3,
        "iou": 0.3,
        "model_image_size": (416, 416),
        "gpu_num": 1,
    }
模型预测完整代码:
import time

import cv2
import numpy as np
import tensorflow as tf
from PIL import Image
from yolo import YOLO,detect_video
import os
from tqdm import tqdm
def predict():

    yolo=YOLO()
    predict_model='dir_predict'

    video_path= 0
    video_save_path=""

    dir_img_input='img/'
    dir_save_path='out_img/'
    if predict_model=='img':
        while(True):
            img=input('Input image filename:')
            try:
                image=Image.open(img)
            except:
                print('Open Image Error! Please Try Again')
                continue
            else:
                out_image=yolo.detect_image(image)
                out_image.show()
    elif predict_model=='video':
        detect_video(yolo,video_path,video_save_path)

    elif predict_model=='dir_predict':

        imgs=os.listdir(dir_img_input)
        for img_name in tqdm(imgs):
             if img_name.lower().endswith(('.bmp', '.dib', '.png', '.jpg', '.jpeg', '.pbm', '.pgm', '.ppm', '.tif', '.tiff')):
                image_path  = os.path.join(dir_img_input, img_name)
                image       = Image.open(image_path)
                r_image     = yolo.detect_image(image)
                if not os.path.exists(dir_save_path):
                    os.makedirs(dir_save_path)
                r_image.save(os.path.join(dir_save_path, img_name))
    else:
           raise AssertionError("Please specify the correct mode: 'img', 'video', 'dir_predict'.")
if __name__=='__main__':
    predict()
用法写在评论里。支持视频和图片文件夹
[En]
The usage is written in the comments. Video and picture folders are supported
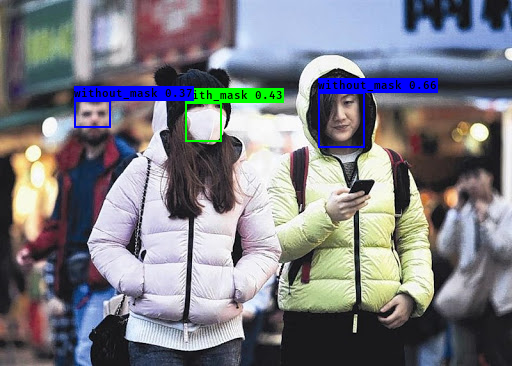
检测结果:
总结
实际上,目标检测网络的结构类似于图像分类,但对于数据读取过程,编解码过程更为复杂。我对这个过程不是很了解,所以我不在这里解释了。
[En]
In fact, the structure of the target detection network is similar to that of image classification, but for the data reading process, the encoding and decoding process is more complex. I don’t know much about this process, so I won’t explain it here.
目标检测训练难度大,数据标注麻烦。稍后可能会有一段视频教您如何配置它。所有的代码和资源都会被上传,写代码不容易,欢迎点赞~
[En]
Target detection training is difficult and data labeling is troublesome. There may be a video later to teach you how to configure it. All codes and resources will be uploaded, it is not easy to write code, welcome to like ~
更新进度
2022/1/15日。重置了YOLOV3 Anchor 框的设置理论讲解。接下来完成anchor boxes 框是如何回归及loss 计算过程。
2022/2/5日。添加了anchor boxes 和预测框之间的计算过程。
2022/2/14日,更改冗余错误,接下来会去重置代码。
Original: https://blog.csdn.net/qq_38676487/article/details/120443059
Author: 不想写代码
Title: Yolov3 和 Yolov3-tiny目标检测算法理论与实现(TensorFlow2)
原创文章受到原创版权保护。转载请注明出处:https://www.johngo689.com/509348/
转载文章受原作者版权保护。转载请注明原作者出处!