

文章目录
- 0 背景与结果
- 1 准备知识
- 2 tensorflow进行人脸识别(AlexNet、视频/图像)
- 3 pytorch进行人脸识别(fasterrcnn,图片)
- 4 dlib库(face_recognition)进行人脸识别
- 5 百度人脸搜索
- 6 项目源代码
- 参考文章
0 背景与结果
在上篇文章中,我们装了人脸识别的环境,这里我们使用安装的框架和库进行实际项目练习。
本文的前两个模型是在线摘录和总结的,本文末尾所附的所有模型代码都可以运行。因为专业不是这个方向,但这个功能需要在项目中使用,所以我经过几天的简单学习后写下了这篇文章。如果这篇文章有什么错误,我希望老板能指出。该模型可用于图片和视频的人脸验证。
[En]
The first two models of this article are excerpted and summarized online, and all the model code attached at the end of the article can be run. Because the major is not in this direction, but this function needs to be used in the project, I wrote this article after a few days of brief study. If there is anything wrong in the article, I hope the boss will point it out. The model can be used for face verification of pictures and videos.
下面附带识别结果:


; 1 准备知识
做人脸识别有四部,人脸检测(face detection)、人脸校对(face alignment)、人脸表征(face verification)、人脸鉴别(face identification)。
- 人脸检测 :提取图像中的人脸区域;
- 人脸对齐:根据人脸的特征点将倾斜或侧脸对齐;
- 人脸表征:将人脸图像的像素值转换成紧凑且可判别的特征向量或模版;
- 人脸匹配:对比两个人脸特征向量的相似度,进而判断是否是同一个人。
2 tensorflow进行人脸识别(AlexNet、视频/图像)
项目代码参考于此,源代码使用 sklearn、 keras等库。后经过此博文改写,本文又进行一些小修改,让程序可以运行。
模型特点:
- 人脸检测 : 使用opencv的人脸识别分类器
haarcascade_frontalface_alt2.xml(基于Haar特征)来检测人脸; - 人脸对齐:未进行人脸对齐,仅进行把人脸图像调整尺寸为正方形(防止缩放失真),然后把图像缩放成
64 x 64作为后面训练的数据集; - 人脸表征:使用CNN卷积神经网络(三个卷积层、一个全连接层、一个输出层,AlexNet【2012 ImageNet竞赛冠军】)来训练输入的数据集,并存储为已知人脸数据库;
- 人脸匹配:载入已知的人脸数据库,使用opencv人脸分类器识别出人脸后,再把图像像素调整缩放后,使用tensorflow的方法
sess.run进行模型预测。
模型的关键代码:
人脸检测
PATH_CLASSFIER_CV2_FRONTALFACE_ALT2 = "/Users/mac/PycharmProjects/tensorflowTest/src/haarcascade_frontalface_alt2.xml"

classfier = cv2.CascadeClassifier(PATH_CLASSFIER_CV2_FRONTALFACE_ALT2)

face_rects = classfier.detectMultiScale(grey, scaleFactor=1.2, minNeighbors=3, minSize=(32, 32))

t, b, r, l = face_rects[0]
CNN模型:
x_data = tf.placeholder(tf.float32, [None, SIZE, SIZE, 3])

y_data = tf.placeholder(tf.float32, [None, None])

keep_prob_5 = tf.placeholder(tf.float32)
keep_prob_75 = tf.placeholder(tf.float32)

def weightVariable(shape):
    '''定义Weight变量,输入shape,返回变量的参数。其中我们使用了tf.random_normal产生随机变量来进行初始化'''
    init = tf.random_normal(shape, stddev=0.01)

    return tf.Variable(init)

def biasVariable(shape):
    ''' 定义biase变量,输入shape,返回变量的一些参数。'''
    init = tf.random_normal(shape)

    return tf.Variable(init)

def conv2d(x, W):
    '''
    定义卷积操作。tf.nn.conv2d函数是Tensorflow里面的二维的卷积函数,x是图片的所有参数,W是卷积层的权重,然后定义步长strides=[1,1,1,1]值。strides[0]和strides[3]的两个1是默认值,意思是不对样本个数和channel进行卷积,中间两个1代表padding是在x方向运动一步,y方向运动一步,padding采用的方式实"SAME"就是0填充。
    '''
    return tf.nn.conv2d(x, W, strides=[1, 1, 1, 1], padding='SAME')

def maxPool(x):
    '''定义池化操作。为了得到更多的图片信息,卷积时我们选择的是一次一步,也就是strides[1]=strides[2]=1,这样得到的图片尺寸没有变化,而我们希望压缩一下图片也就是参数能少一些从而减少系统的复杂度,因此我们采用pooling来稀疏化参数,也就是卷积神经网络中所谓的下采样层。'''
    return tf.nn.max_pool(x, ksize=[1, 2, 2, 1], strides=[1, 2, 2, 1], padding='SAME')

def dropout(x, keep):
    '''为了防止过拟合的问题,可以加一个dropout的处理。'''
    return tf.nn.dropout(x, keep)

def cnnLayer(classnum):
    '''创建卷积层'''

    W1 = weightVariable([3, 3, 3, 32])
    b1 = biasVariable([32])
    conv1 = tf.nn.relu(conv2d(x_data, W1) + b1)
    pool1 = maxPool(conv1)

    drop1 = dropout(pool1, keep_prob_5)

    W2 = weightVariable([3, 3, 32, 64])
    b2 = biasVariable([64])
    conv2 = tf.nn.relu(conv2d(drop1, W2) + b2)
    pool2 = maxPool(conv2)
    drop2 = dropout(pool2, keep_prob_5)

    W3 = weightVariable([3, 3, 64, 64])
    b3 = biasVariable([64])
    conv3 = tf.nn.relu(conv2d(drop2, W3) + b3)
    pool3 = maxPool(conv3)
    drop3 = dropout(pool3, keep_prob_5)

    Wf = weightVariable([8*16*32, 512])
    bf = biasVariable([512])
    drop3_flat = tf.reshape(drop3, [-1, 8*16*32])
    dense = tf.nn.relu(tf.matmul(drop3_flat, Wf) + bf)
    dropf = dropout(dense, keep_prob_75)

    Wout = weightVariable([512, classnum])
    bout = weightVariable([classnum])
    resMat = tf.matmul(dropf, Wout)

    out = tf.add(tf.nn.softmax(resMat), bout)

    print(f'tf.matmul(dropf, Wout):{tf.sigmoid(tf.matmul(dropf, Wout))}')
    return out
填充图片,以便轻松缩放图片而不失真:
[En]
Fill the picture to make it easy to zoom the picture without distortion:
def resizeImage(image, height, width):
    '''
    按照指定图像大小调整尺寸
    判断图片是不是正方形,如果不是,则增加短边的长度使之变成正方形;
    这样再调用cv2.resize()函数就可以实现等比例缩放了;
    因为我们指定缩放的比例就是64 x 64,只有缩放之前图像为正方形才能确保图像不失真。
    '''

    top, bottom, left, right = (0, 0, 0, 0)

    h, w, _ = image.shape

    longest_edge = max(h, w)

    if h < longest_edge:
        dh = longest_edge - h
        top = dh // 2
        bottom = dh - top
    elif w < longest_edge:
        dw = longest_edge - w
        left = dw // 2
        right = dw - left
    else:
        pass

    print(top, bottom, left, right)

    constant = cv2.copyMakeBorder(image, top, bottom, left, right, cv2.BORDER_CONSTANT, value=RESIZE_FILL_COLOR)

    return cv2.resize(constant, (height, width))
模型改进点:
- 1,使用opencv自带的人脸识别分类器识别人脸准确性;
- 2,模型使用的比较基础的CNN模型( AlexNet),后期提升效果可以更换为其他CNN模型,如
VGGNet、ResNet,如果应用于移动设备可以使用轻量级CNN模型,如MobileNet,SqueezeNet,ShuffleNet等。
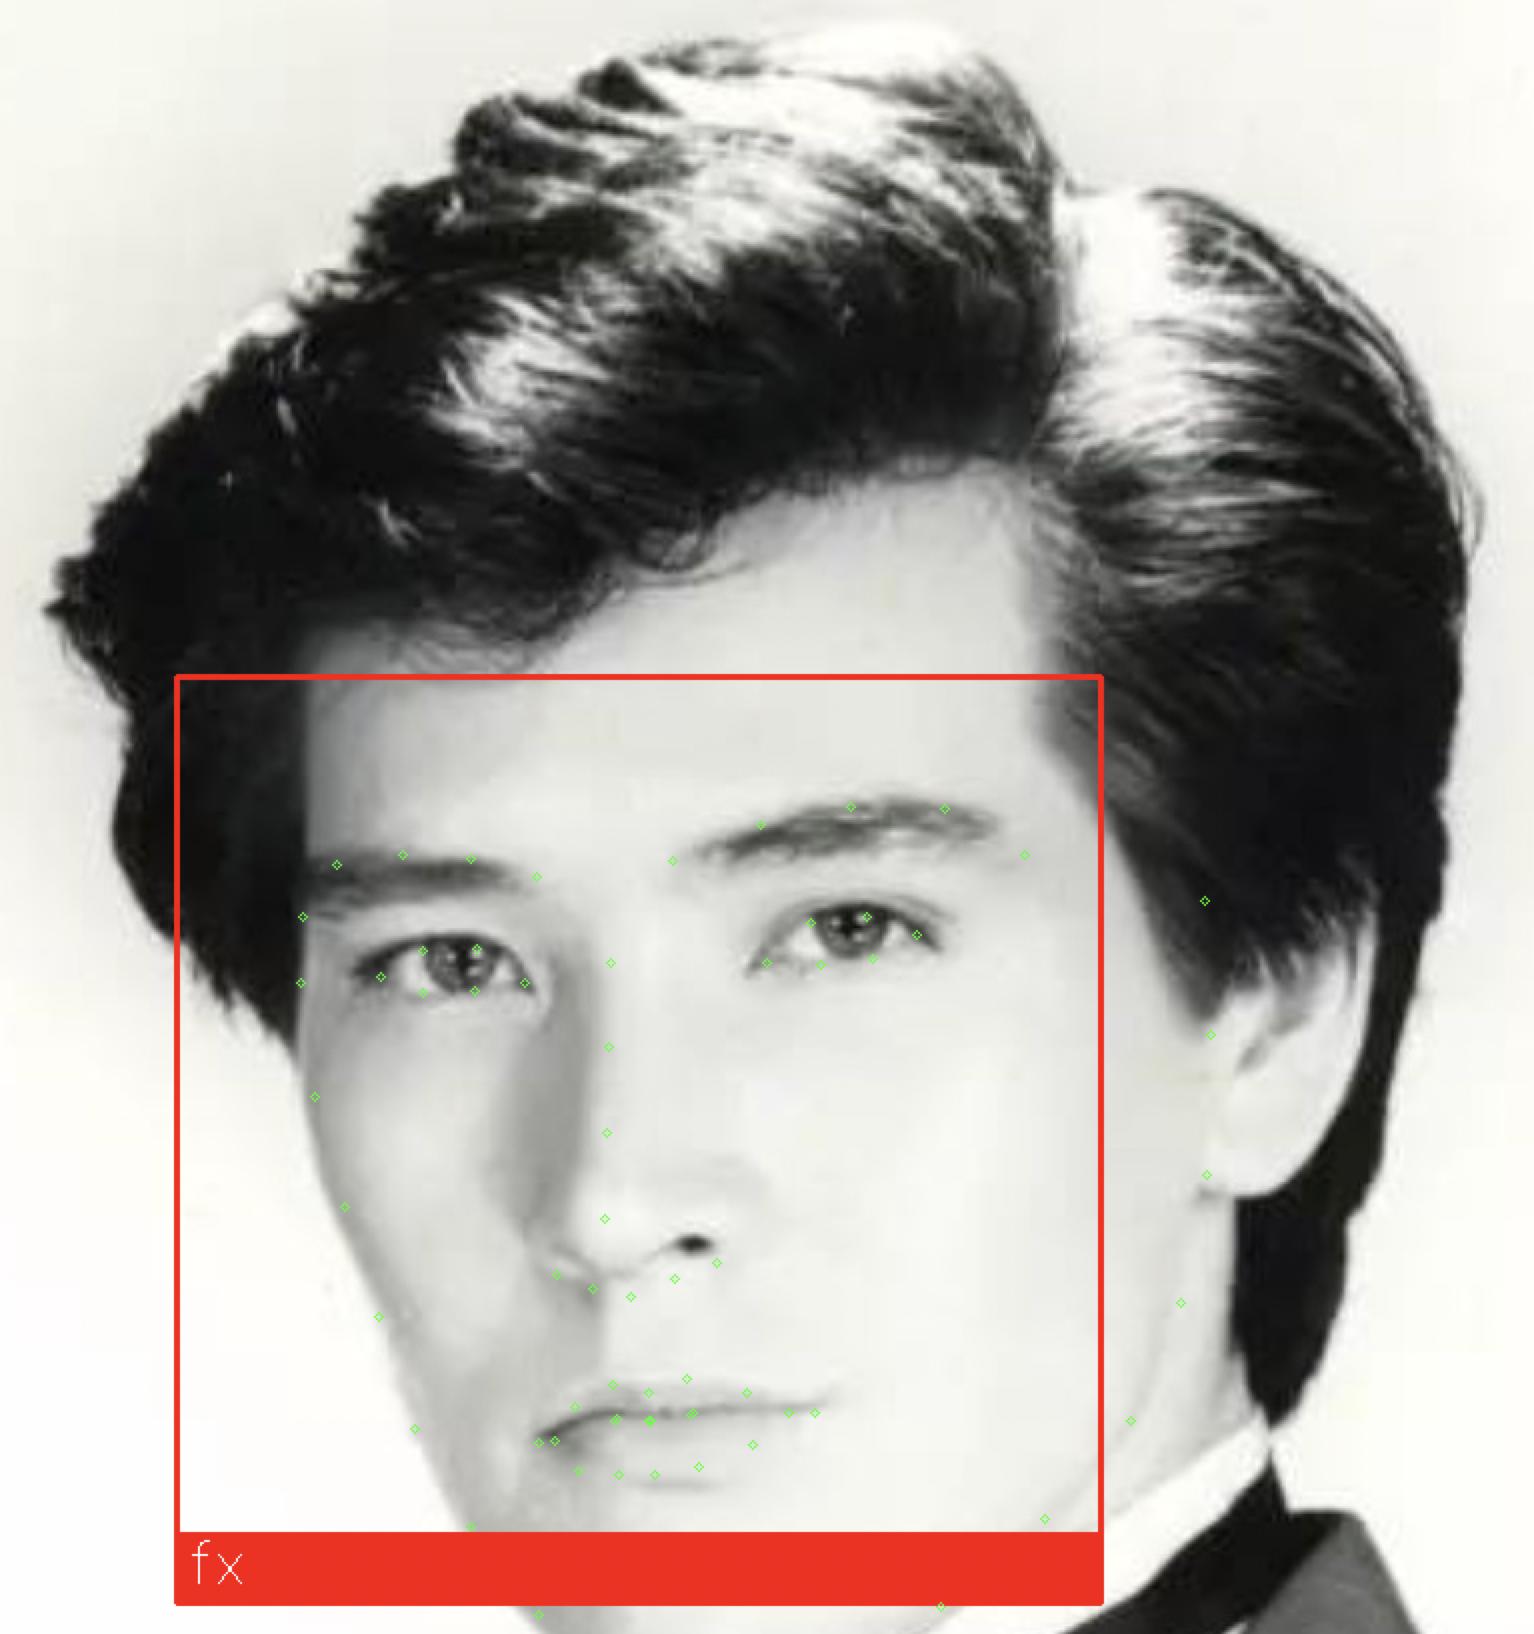
3 pytorch进行人脸识别(fasterrcnn,图片)
源代码参考自此博客,博主文章写了一系列机器学习的文章,内容很详细,非常建议详细学习一下。
模型特点:
- 人脸检测 :使用训练过的
fasterrcnn模型进行的人脸识别; - 人脸对齐:未进行人脸对齐;
- 人脸表征: 根据已知的人脸图片生成人脸编码库;
- 人脸匹配:载入已知的人脸数据库,使用
fasterrcnn模型识别出人脸后,使用 人脸认证模型来对计算出来的未知人脸和已知人脸库中人脸编码的欧几里德距离 (Euclidean Distance)或者余弦相似度 (Cosine Similarity)来判断是否是同一个人。
没有直接使用编码距离是否小于阈值来确定它是否是同一个人,因为这个阈值通常很难定义。
[En]
There is no direct use of whether the coding distance is less than a threshold to determine whether it is the same person, because this threshold is generally difficult to define.
人脸认证模型:模型只有一层线性模型,它会给编码中的每个指标乘以一个系数,然后加上偏移值,再交给 Sigmoid 转换到 0 ~ 1 之间的值,0 代表不是同一个人,1 代表是同一个人。
关键代码:
人脸认证模型:
class FaceRecognitionModel(nn.Module):
    """人脸识别模型,计算用于寻找最接近人脸的编码 (基于 ResNet 的变种)"""

    EmbeddedSize = 32

    ExclusiveMargin = 0.2

    def __init__(self):
        super().__init__()

        self.resnet = torchvision.models.resnet18(num_classes=256)

        if USE_GRAYSCALE:
            self.resnet.conv1 = nn.Conv2d(1, 64, kernel_size=7, stride=2, padding=3, bias=False)

        self.encode_model = nn.Sequential(
            nn.ReLU(inplace=True),
            nn.Linear(256, 128),
            nn.ReLU(inplace=True),
            nn.Linear(128, FaceRecognitionModel.EmbeddedSize))

    def forward(self, x):
        tmp = self.resnet(x)
        y = self.encode_model(tmp)
        return y

    @staticmethod
    def loss_function(predicted):
        """损失计算器"""
        losses = []
        verify_positive = torch.ones(1).to(device)
        verify_negative = torch.zeros(NEGATIVE_SAMPLES).to(device)
        for index in range(0, predicted.shape[0], 2 + NEGATIVE_SAMPLES):
            a = predicted[index]
            b = predicted[index+1]
            c = predicted[index+2:index+2+NEGATIVE_SAMPLES]

            diff_positive = (a - b).pow(2).sum()
            diff_negative = (a - c).pow(2).sum(dim=1)

            loss = nn.functional.relu(
                diff_positive - diff_negative + FaceRecognitionModel.ExclusiveMargin).sum()
            losses.append(loss)
        loss_total = torch.stack(losses).mean()
        return loss_total

    @staticmethod
    def calc_accuracy(predicted):
        """正确率计算器"""
        total_count = 0
        correct_count = 0
        for index in range(0, predicted.shape[0], 2 + NEGATIVE_SAMPLES):
            a = predicted[index]
            b = predicted[index+1]
            c = predicted[index+2:index+2+NEGATIVE_SAMPLES]

            diff_positive = (a - b).pow(2).sum()
            diff_negative = (a - c).pow(2).sum(dim=1)
            if (diff_positive < diff_negative).sum() == diff_negative.shape[0]:
                correct_count += 1
            total_count += 1
        return correct_count / total_count

class FaceVerificationModel(nn.Module):
    """人脸认证模型,判断是否同一个人,参数是编码相差值的平方"""

    VerifyThreshold = 0.5

    def __init__(self):
        super().__init__()

        self.verify_model = nn.Sequential(
            nn.Linear(FaceRecognitionModel.EmbeddedSize, 1),
            nn.Sigmoid())

    def forward(self, x):

        y = self.verify_model(x)
        return y.view(-1)

    @staticmethod
    def loss_function(predicted):
        """损失计算器"""

        positive_indexes = []
        negative_indexes = []
        for index in list(range(0, predicted.shape[0], 1+NEGATIVE_SAMPLES)):
            positive_indexes.append(index)
            negative_indexes += list(range(index+1, index+1+NEGATIVE_SAMPLES))
        positive_loss = nn.functional.mse_loss(
            predicted[positive_indexes], torch.ones(len(positive_indexes)).to(device))
        negative_loss = nn.functional.mse_loss(
            predicted[negative_indexes], torch.zeros(len(negative_indexes)).to(device))
        return (positive_loss + negative_loss) / 2

    @staticmethod
    def calc_accuracy(predicted):
        """正确率计算器"""
        positive_correct = 0
        positive_total = 0
        negative_correct = 0
        negative_total = 0
        for index in range(0, predicted.shape[0], 1+NEGATIVE_SAMPLES):
            positive_correct += (predicted[index] >=
                                 FaceVerificationModel.VerifyThreshold).sum().item()
            negative_correct += (predicted[index+1:index+1+NEGATIVE_SAMPLES] <
                                 FaceVerificationModel.VerifyThreshold).sum().item()
            positive_total += 1
            negative_total += NEGATIVE_SAMPLES

        return (positive_correct / positive_total + negative_correct / negative_total) / 2
fasterrcnn模型比较长,这里只放一下部分代码:
class MyModel(nn.Module):
    """Faster-RCNN (基于 ResNet 的变种)"""
    Anchors = None
    AnchorSpan = 16
    AnchorScales = (1, 2, 4, 6, 8)
    AnchorAspects = ((1, 1),)
    AnchorBoxes = len(AnchorScales) * len(AnchorAspects)

    def __init__(self):
        super().__init__()

        self.previous_channels_out = 4
        self.rpn_resnet = nn.Sequential(
            nn.Conv2d(3, self.previous_channels_out, kernel_size=3, stride=1, padding=1, bias=False),
            nn.BatchNorm2d(self.previous_channels_out),
            nn.ReLU(inplace=True),
            self._make_layer(BasicBlock, channels_out=8, num_blocks=2, stride=1),
            self._make_layer(BasicBlock, channels_out=16, num_blocks=2, stride=2),
            self._make_layer(BasicBlock, channels_out=32, num_blocks=2, stride=2),
            self._make_layer(BasicBlock, channels_out=64, num_blocks=2, stride=2),
            self._make_layer(BasicBlock, channels_out=128, num_blocks=2, stride=2))
        self.previous_channels_out = 4
        self.cls_resnet = nn.Sequential(
            nn.Conv2d(3, self.previous_channels_out, kernel_size=3, stride=1, padding=1, bias=False),
            nn.BatchNorm2d(self.previous_channels_out),
            nn.ReLU(inplace=True),
            self._make_layer(BasicBlock, channels_out=8, num_blocks=2, stride=1),
            self._make_layer(BasicBlock, channels_out=16, num_blocks=2, stride=2),
            self._make_layer(BasicBlock, channels_out=32, num_blocks=2, stride=2),
            self._make_layer(BasicBlock, channels_out=64, num_blocks=2, stride=2),
            self._make_layer(BasicBlock, channels_out=128, num_blocks=2, stride=2))
        self.features_channels = 128

        self.rpn_labels_model = nn.Sequential(
            nn.Linear(self.features_channels, self.features_channels),
            nn.ReLU(inplace=True),
            nn.Dropout(0.1),
            nn.Linear(self.features_channels, MyModel.AnchorBoxes*2))

        self.rpn_offsets_model = nn.Sequential(
            nn.Linear(self.features_channels, self.features_channels),
            nn.ReLU(inplace=True),
            nn.Dropout(0.1),
            nn.Linear(self.features_channels, MyModel.AnchorBoxes*4))

        self.rpn_score_threshold = 0.9

        self.rpn_max_candidates = 32

        self.pooling_size = 16

        self.cls_labels_model = nn.Sequential(
            nn.Linear(self.features_channels * (self.pooling_size ** 2), self.features_channels),
            nn.ReLU(inplace=True),
            nn.Dropout(0.1),
            nn.Linear(self.features_channels, len(CLASSES)))

        self.cls_offsets_model = nn.Sequential(
            nn.Linear(self.features_channels * (self.pooling_size ** 2), self.features_channels*4),
            nn.ReLU(inplace=True),
            nn.Dropout(0.1),
            nn.Linear(self.features_channels*4, len(CLASSES)*4))

    def _make_layer(self, block_type, channels_out, num_blocks, stride):
        """创建 resnet 使用的层"""
        blocks = []

        blocks.append(block_type(self.previous_channels_out, channels_out, stride))
        self.previous_channels_out = channels_out * block_type.expansion

        for _ in range(num_blocks-1):
            blocks.append(block_type(self.previous_channels_out, self.previous_channels_out, 1))
            self.previous_channels_out *= block_type.expansion
        return nn.Sequential(*blocks)
模型改进点:
- 用于人脸特征提取的特征点较少(左眼、右眼、鼻尖、左右嘴角),导致后期人脸检测率较低。
[En]
there are few feature points for facial feature extraction (left, right eye, tip of nose, left and right corner of mouth), resulting in low face detection rate in the later stage.*
- 未进行人脸对齐。
4 dlib库(face_recognition)进行人脸识别
dlib是C++编写的一个跨平台机器学习开源库。而 face_recognition是一个封装了 dlib的人脸识别库。
模型特点:
- 人脸检测 :进行人脸检测使用的网络架构是基于ResNet-34但是层数更少,过滤器数量减少了一半(在超过300万张图像上训练的);
- 人脸对齐:找到人脸68个特征点后,通过图像的几何变换(仿射、旋转、缩放),使各个特征点对齐(将眼睛、嘴等部位移到相同位置);
- 人脸表征:把检测出来的人脸进行编码并存储;
- 人脸匹配:通过设定某个阈值(严格度,严格度越小,面部识别系统越严格),计算欧几里得距离是否小于阈值,来判定脸部编码是否属于同一个人。
关键代码:
使用模型API进行人脸载入、编码、识别:
    img = cv2.imread(img_path)
    img_rgb = img[:, :, ::-1]

    unknown_img = face_recognition.load_image_file(comparison_img_path)

    face_loc = face_recognition.face_locations(unknown_img, number_of_times_to_upsample=1, model="hog")

    face_marks = face_recognition.face_landmarks(img_rgb)

    faces_encodings = face_recognition.face_encodings(unknown_img, num_jitters=NUM_JITTERS_INDEX)

    face_recognition.compare_faces([coding], faces_encodings, tolerance=TOLERANCE_INDEX)

    X.append(face_recognition.face_encodings(image, known_face_locations=face_bounding_boxes)[0])
    y.append(class_dir)
    n_neighbors = int(round(math.sqrt(len(X))))

    knn_clf = neighbors.KNeighborsClassifier(n_neighbors=n_neighbors, algorithm=knn_algo, weights='distance')
    knn_clf.fit(X, y)

    closest_distances = knn_clf.kneighbors(faces_encodings, n_neighbors=1)
    are_matches = [closest_distances[0][i][0]  distance_threshold for i in range(len(X_face_locations))]
摄像头捕捉模版:
def cameraCatchComparison(known_img_model_file_path):
"""
    使用摄像头进行人脸识别,速度比较慢(慢3-5s)
    :param known_img_model_file_path: 已知模型的人脸识别
    :return: 无
"""

    CAMERA_IDX = 0

    cap = cv2.VideoCapture(CAMERA_IDX)
    while True:

        if cap.isOpened() == False:
            break
        ok, frame = cap.read()

        rgb_frame = frame[:, :, ::-1]

        if not ok:
            break

        img = cv2.resize(rgb_frame, (0, 0), fx=0.25, fy=0.25)

        predictions = predict(img, model_path="trained_knn_model.clf")

        frame = show_prediction_labels_on_image(frame, predictions, deal_pattern='video')

        cv2.imshow('Face Recognition Video', frame)

        if cv2.waitKey(1) & 0xFF == ord('q'):
            break

    cap.release()
    cv2.destroyAllWindows()
如果想自己训练人脸识别的模型,可以查看dlib的API接口,dlib 训练网络模型的示例。由于 face_recognition使用的人脸训练图片为上百万张,如果自己想要重新训练人脸识别模型,需要建立一个包含来自许多不同地方的上千万按个人分组的个人数据集,否则无法重新训练模型。添加几千张自己的图像并没有真正的帮助。
模型目前存在的问题:
- 由于模型训练的数据集大部分来自于欧洲,导致亚洲人识别率不是很高更多详细内容
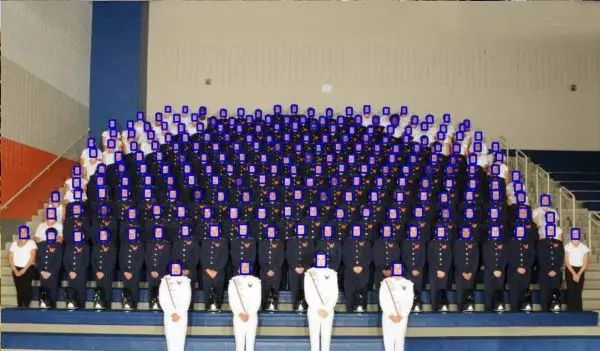
5 百度人脸搜索
百度有现成的人脸搜索,相应的API文档。百度人脸搜索使用的技术是PyramidBox人脸检测算法,训练人脸识别时,不仅使用人脸的信息,还是用人脸旁边的背景信息来辅助人脸检测,在模糊,变形,部分的小人脸的情况下,效果不错。下面是图片使用 PyramidBox算法识别的效果。
; 6 项目源代码
码云地址,欢迎大家star。
参考文章
人脸识别原理(以GitHub项目face_recognition为例)
Original: https://blog.csdn.net/qq_33375598/article/details/124102284
Author: 繁星蓝雨
Title: 人脸验证(图片/视频) tensorflow、pytorch框架、dlib库(face_recognition)和opencv库————附带详细步骤和代码,可实际运行
原创文章受到原创版权保护。转载请注明出处:https://www.johngo689.com/497436/
转载文章受原作者版权保护。转载请注明原作者出处!