

参考教材:人工智能导论(第4版) 王万良 高等教育出版社
实验环境:Python3.6 + Tensor flow 1.12
人工智能导论实验导航
实验一:斑马问题 https://blog.csdn.net/weixin_46291251/article/details/122246347
实验二:图像恢复 https://blog.csdn.net/weixin_46291251/article/details/122561220
实验三:花卉识别 https://blog.csdn.net/weixin_46291251/article/details/122561505
实验四:手写体生成 https://blog.csdn.net/weixin_46291251/article/details/122576478
实验源码: xxx
3.1实验介绍
3.1.1实验背景
深度学习是人工智能的核心技术。本章主要对深度学习中涉及的全连接神经网络、卷积神经网络和对抗神经网络进行了实验研究。
[En]
Deep learning is the core technology of artificial intelligence. this chapter mainly focuses on the experiments of fully connected neural network, convolutional neural network and countermeasure neural network involved in deep learning.
卷积神经网络(Convolutional Neural Networks, CNN)是一类包含卷积计算且具有深度结构的前馈神经网络(Feedforward Neural Networks),是深度学习(deep learning)的代表算法之一 。卷积神经网络具有表征学习(representation learning)能力,能够按其阶层结构对输入信息进行平移不变分类(shift-invariant classification)
3.1.2实验目的
本章实验的主要目的是掌握深度学习相关基础知识点,了解深度学习相关基础知识,经典全连接神经网络、卷积神经网络和对抗神经网络。掌握不同神经网络架构的设计原理,熟悉使用Tensorflow 2.1深度学习框架实现深度学习实验的一般流程。
3.1.3实验简介

在本实验中,基于卷积神经网络的花卉识别实验不同于传统的图像分类方法。卷积神经网络不需要人工提取特征,可以根据输入图像自动学习包含丰富语义信息的特征。得到更全面的花卉图像特征描述,能够很好地表达图像中不同类型的信息。
[En]
In this experiment, the flower recognition experiment based on convolution neural network is different from the traditional image classification method. Convolution neural network does not need to extract features manually, and can automatically learn the features containing rich semantic information according to the input image. get a more comprehensive description of flower image features, which can well express different types of information in the image.
3.2概要设计
在本实验中,以用户在客户端选择的花卉图像作为输入,运行花卉识别模型,将识别结果作为输出结果实时返回并显示给用户。
[En]
In this experiment, the flower image selected by the user in the client is used as input, the flower recognition model is run, and the recognition result is returned in real time as the output result and displayed to the user.
3.2.1功能结构
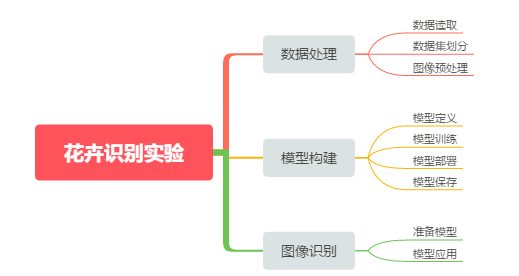
花卉识别实验的总体设计如下图所示。实验分为三个主要的子实验:数据处理、模型构建和图像识别。
[En]
The overall design of the flower recognition experiment is shown in the following figure. The experiment can be divided into three main sub-experiments: data processing, model construction and image recognition.
数据处理子实验包括两个部分:数据集分割和图像预处理。
[En]
The data processing sub-experiment includes two parts: data set partition and image preprocessing.
建模子实验主要包括模型定义、模型训练和模型部署三个部分。
[En]
The model building sub-experiment mainly includes three parts: model definition, model training and model deployment.
3.2.2体系结构
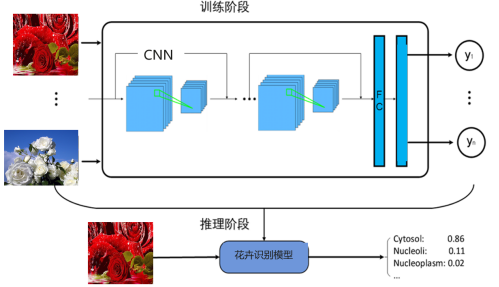
根据架构,整个实验的架构可以分为三个部分,即模型训练、模型保存和模型推理,如图5-3所示。每一层的侧重点都不同。
[En]
According to the architecture, the architecture of the whole experiment can be divided into three parts, namely model training, model preservation and model reasoning, as shown in figure 5-3. The focus of each layer is different.
训练层运行在安装有tensorflow框架的服务器,最好配置计算加速卡。
PUSH故障运行在开发环境中,可以支持卷积神经网络的加速。
[En]
The push fault runs in the development environment and can support the acceleration of convolution neural network.
表示层运行在客户端应用程序中,可以完成图像的选择,并实时显示推理层的计算结果。
[En]
The presentation layer runs in the client application, which can complete the image selection and display the calculation results of the inference layer in real time.
各层之间存在单向依赖关系。由训练层提供推送故障所需的网络模型,并根据需要进行必要的格式转换或加速重构。因此,需要通过推力断层来计算要在显示层中显示的元数据。
[En]
There is an one-way dependency relationship between each layer. The network model required by the push fault is provided by the training layer, and the necessary format conversion or accelerated reconstruction is carried out according to the need. Accordingly, the metadata to be displayed in the display layer needs to be calculated by the thrust fault.
; 3.3详细设计
3.3.1导入实验环境
步骤 1导入相应的模块
skimage包主要用于图像数据的处理,在该实验当中, io模块主要用于图像数据的读取(imread)和输出(imshow)操作,transform模块主要用于改变图像的大小(resize函数);
glob包主要用于查找符合特定规则的文件路径名,跟使用windows下的文件搜索相似;
os模块主要用于处理文件和目录,比如:获取当前目录下文件,删除制定文件,改变目录,查看文件大小等;
tensorflow是目前业界最流行的深度学习框架之一,在图像,语音,文本,目标检测等领域都有深入的应用,也是该实验的核心,主要用于定义占位符,定义变量,创建卷积神经网络模型;numpy是一个基于python的科学计算包,在该实验中主要用来处理数值运算;
time模块主要用于处理时间系列的数据,在该实验主要用于返回当前时间戳,计算脚本每个epoch运行所需要的时间。
import glob
import os
import cv2
import  tensorflow as tf
from tensorflow.keras import layers, optimizers, datasets, Sequential
import numpy as np
import matplotlib.pyplot as plt
from sklearn.model_selection import train_test_split
步骤 2设置初始化环境
path = './flower_photos/'

w = 100
h = 100
c = 3

types = 0
flower = {0: 'bee', 1: 'blackberry', 2: 'blanket', 3: 'bougainvillea', 4: 'bromelia', 5: 'foxglove'}
3.3.2数据准备
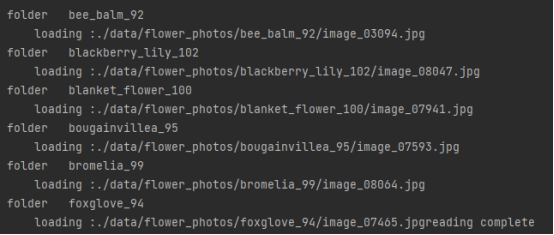
这里通过os.listdir判断给定目录下的是文件还是文件夹,如果是文件夹,那么就进入读取其中的所有文件,这些图像对应的标签就是他们所属的文件夹的编号,遍历完所有子文件夹(这里不限制文件夹数目,可以动态的识别出文件夹)之后便完成了数据集的读取,函数返回读取到的所有图片和图片对应的标签。
def read_img(path):
    global types
    global flower
    imgs = []
    labels = []
    if not os.path.isdir(path):
        print("路径不正确")
        exit(0)

    for s in os.listdir(path):
        print("\nfolder  ", s)
        f_label = s.split("_")[-1]
        flower[types] = s.split("_")[0]

        s = path + s + "/"
        if not os.path.isdir(s):
            continue

        types += 1

        for im in os.listdir(s):
            im = s + im
            print('\r\tloading :%s' % (im), end="")
            img = io.imread(im)
            img = transform.resize(img, (w, h))
            imgs.append(img)

            labels.append(types - 1)

    return np.asarray(imgs, np.float32), np.asarray(labels, np.int32)
3.3.3构建花卉识别模型
CNN训练模型
模型尺寸分析:褶积层全部填0,因此在褶积层长度和宽度保持不变后,只有深度加深。所有池化的层都不会弥补0,因此池化的层的长度和宽度会减小,而深度保持不变。
[En]
Model size analysis: the convolution layer is all filled with 0, so after the convolution layer length and width remain unchanged, only the depth is deepened. All the pooled layers do not make up for 0, so the length and width of the pooled layer are reduced, and the depth remains the same.
模型尺寸变化:100×100×3->100×100×32->50×50×32->50×50×64->25×25×64->25×25×128->12×12×128->12×12×128->6×6×128
本文的CNN模型比较简单,后续完全可以通过增大模型复杂度或者改参数调试以及对图像进行预处理来提高准确率。
网络模型的各部分如下所示:
[En]
The parts of the network model are listed below:
这里首先用tf.getvariable创建新的tensorflow变量并用tf.tf.constant_initializer
和tf.constant_initializer初始化为(stddev=0.1)和(0.0)
然后用 tf.nn.conv2d创建2维卷积层步长参数为[1,1,1,1],卷积方式为’SAME’
然后用线性整流函数relu进行处理
   with tf.variable_scope('layer1-conv1'):
        conv1_weights =             tf.get_variable("weight",[5,5,3,32],initializer=tf.truncated_normal_initializer(stddev=0.1))
        conv1_biases = tf.get_variable("bias", [32], initializer=tf.constant_initializer(0.0))
        conv1 = tf.nn.conv2d(input_tensor, conv1_weights, strides=[1, 1, 1, 1], padding='SAME')
        relu1 = tf.nn.relu(tf.nn.bias_add(conv1, conv1_biases))
下面类似:
with tf.variable_scope('layer11-fc3'):
        fc3_weights = tf.get_variable("weight", [512, 5],
                                      initializer=tf.truncated_normal_initializer(stddev=0.1))
        if regularizer != None: tf.add_to_collection('losses', regularizer(fc3_weights))
        fc3_biases = tf.get_variable("bias", [5], initializer=tf.constant_initializer(0.1))
        logit = tf.matmul(fc2, fc3_weights) + fc3_biases
下面是池化操作:利用tf.nn.max_pool完成,池化窗口大小为[1,2,2,1],填充方式为VALID表示不填充,窗口在每一个维度上滑动的步长为[1,2,2,1]
with tf.name_scope("layer4-pool2"):
        pool2 = tf.nn.max_pool(relu2, ksize=[1, 2, 2, 1], strides=[1, 2, 2, 1], padding='VALID')
3.3.4训练并保存模型
以下是一些培训模型的代码:
[En]
The following is the code for some of the training models:
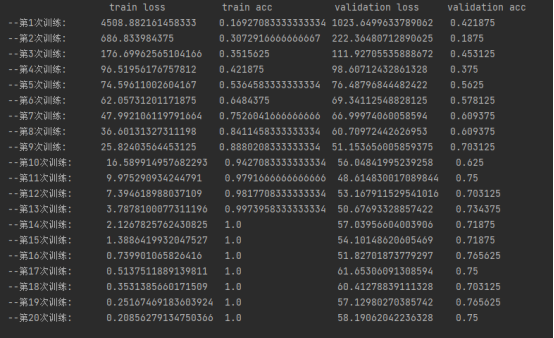
训练过程中输出每一次训练的train loss 、train acc、val loss、val acc用于分析训练的效果。
def train():
......

    for epoch in range(n_epoch):
        start_time = time.time()

        train_loss, train_acc, n_batch = 0, 0, 0
        for x_train_a, y_train_a in minibatches(x_train, y_train, batch_size, shuffle=True):
            _, err, ac = sess.run([train_op, loss, acc], feed_dict={x: x_train_a, y_: y_train_a})
            train_loss += err
            train_acc += ac
            n_batch += 1
        print("--第"+str(epoch + 1)+"次训练:".ljust(10, " "), end="")
        print(str((np.sum(train_loss)) / n_batch).ljust(20, " "), (str(np.sum(train_acc) / n_batch)).ljust(20, " "), end="")

        val_loss, val_acc, n_batch = 0, 0, 0
        for x_val_a, y_val_a in minibatches(x_val, y_val, batch_size, shuffle=False):
            err, ac = sess.run([loss, acc], feed_dict={x: x_val_a, y_: y_val_a})
            val_loss += err
            val_acc += ac
            n_batch += 1
        print(str((np.sum(val_loss) / n_batch)).ljust(20, " "), str((np.sum(val_acc) / n_batch)).ljust(20, " "))
3.3.5识别花卉
首先创建用于读取测试的花卉图片的函数,该函数读取测试文件夹中的所有图片并以np.array的形式返回。
def get_test_img(path):
    imgs = []
    cv_data = []
    for im in os.listdir(path):
        im = path + im
        print('\rrecognizing :%s' % (im), end="")
        img = io.imread(im)
        img = transform.resize(img, (w, h))
        imgs.append(img)
        cv_data.append(cv2.imread(im))
    return np.asarray(imgs), cv_data
然后,可以使用通过上述训练获得的鉴别器来确定给定图像的标签。然后你可以根据你得到的标签输出花的名字。
[En]
The discriminator obtained by the above training can then be used to determine the label of the given image. Then you can output the name of the flower according to the tag you get.
def recog():
    path = './data/TestImages/'
    model_path = "./model/"

    data, cv_datas = get_test_img(path)
    with tf.Session() as sess:
        saver = tf.train.import_meta_graph(model_path + 'model.ckpt.meta')
        saver.restore(sess, tf.train.latest_checkpoint(model_path))

        graph = tf.get_default_graph()
        x = graph.get_tensor_by_name("x:0")
        feed_dict = {x: data}

        logits = graph.get_tensor_by_name("logits_eval:0")
        classification_result = sess.run(logits, feed_dict)

        print(classification_result)

        print(tf.argmax(classification_result, 1).eval())

        output = tf.argmax(classification_result, 1).eval()
        for i in range(len(output)):
            print("第", i + 1, "朵花预测: label:", output[i], "\t", flower[output[i]])
            font = cv2.FONT_HERSHEY_SIMPLEX
            img = cv_datas[i]
            cv2.putText(img, flower[output[i]], (20, 20), font, 1, (0, 0, 0), 1)
由于有六张图片要识别,所以它们被排列在两行三列的图片中。
[En]
Since there are six pictures to be identified, they are arranged in a two-row and three-column picture.
使用pyplot的subplot即可实现,遍历所有图片并分别将图片放第i个位置处。
        pyplot.subplot(2, 3, 1 + i)
        pyplot.axis('off')
        pyplot.title(flower[output[i]])
        pyplot.imshow(img, cmap='gray_r')
pyplot.savefig('res.png')
pyplot.show()
3.4运行测试
然后开始训练,这里输出:训练集的损失值、训练集的准确度、测试集的损失值、测试集的准确度,通过观察数值变化可以得出:
[En]
Then start the training, here output: the loss value of the training set, the accuracy of the training set, the loss value of the test set, the accuracy of the test set, we can find out by observing the numerical changes:
train loss不断减小
Train acc不断增大直至为1并稳定为1
Val loss 大体上不断减小,但后半部分稍有波动
Val acc 大体上不断增大,但后半部分稍有波动
以上情况表明,该网络正在学习并处于良好状态。
[En]
The above shows that the network is learning and in good condition.

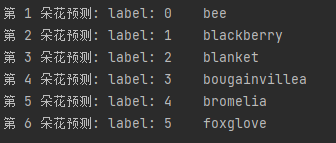
然后输出识别出的花卉对应的标签和名称:
[En]
Then output the corresponding label and name of the identified flower:
第1朵花预测: Label: 0 bee
第2朵花预测: Label: 1 bLackberry
第3朵花预测: Label: 2 bLanket
第4朵花预测: Label: 3 bougainvillea
第5朵花预测: Label: 4 bromelia
第6朵花预测: Label: 5 foxgLove
然后将图片和姓名显示在图片中,以便于观察。
[En]
Then the picture and name are displayed in a picture for easy observation.

Original: https://blog.csdn.net/weixin_46291251/article/details/122561505
Author: Cheney822
Title: 花卉识别(tensorflow)
原创文章受到原创版权保护。转载请注明出处:https://www.johngo689.com/497336/
转载文章受原作者版权保护。转载请注明原作者出处!