

目录
*
– 一、首先下载、安装
– 二、配置
–
+
* (一)、安装Android插件
* (二)、选择安装插件
* (三)、获取jar文件、并配置到项目中
* (四)、在代码中启动SQLiteStudioService
* (五)、运行SQLiteStudio添加数据库
– 三、从源码分析、到解决找不到数据库问题
–
+
* (一)、首先看看SQLiteStudioRemote.jar中有哪些代码
* (二)、代码分析
* (三)、总结
一、首先下载、安装
官方下载地址:https://sqlitestudio.pl/
绿色软件,解压直接使用。
二、配置
(一)、安装Android插件
点击 tools -> Open configuration dialog 见图2-1


[图2-1]
; (二)、选择安装插件

[图2-2]
(三)、获取jar文件、并配置到项目中
1、点击tools -> Get Android connector JAR file 如图2-3

[图2-3]
2、得到SQLiteStudioRemote.jar文件,配置到自己的Android项目中。见图2-3-1,图2-3-2

[图2-3-1]

[图2-3-2]
; (四)、在代码中启动SQLiteStudioService
SQLiteStudioService.instance().start(this)
(五)、运行SQLiteStudio添加数据库
1、如图2-5-1 点击左上角添加数据库按钮

[图2-5-1]
2、会看到如图2-5-2 的对话框,数据库类型选择Android SQlite

[图2-5-2]
3、点击Android database URL 右边的文件夹按钮 如图2-5-3
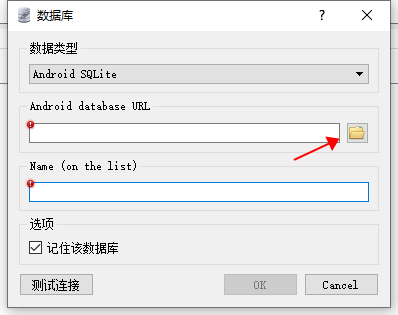
[图2-5-3]
4、会看到如图2-5-4的对话框,可以看到最低端的选项框已经识别到了数据库,不过无法点击”OK”按钮

[图2-5-4]
不知道是软件bug还是出于什么考虑,不能点击的原因是在于Database的选项列表必须要大于1,大于1了才能允许点击”ok按钮”

[图2-5-5]
5、点击最底部Batabase选项 绿色的”+”号按钮,随便命名一个数据库名称点击”OK”创建就可以了,如图2-5-6、2-5-7

[图2-5-6]

[图2-5-7]
6、接着点击”OK”就可以了,我们就可以正常查看和操作数据库了

[图2-5-8]

[图2-5-9]
; 三、从源码分析、到解决找不到数据库问题
我们在使用的时候可能会遇到找不到数据库的情况,原因可能是因为数据库路径不对,SQLiteStudioService这块代码默认找的是app包名下的databases目录:/data/data/xxx.xxx.xxx/databases,如果我们的项目代码中有自定义存储路径,那么SqliteStudio肯定是识别不到,如果不想更改自己数据库的路径,那就需要分析看看源码,从源码上去修改读取路径
(一)、首先看看SQLiteStudioRemote.jar中有哪些代码

可以看出代码并不多。主要原理是app启动Service、Service通过Socket通信与SQLiteStudio进行通信。
; (二)、代码分析
先从代码入口看起
SQLiteStudioService.instance().start(this)
启动代码就一句话,所以从SQLiteStudioService看起。

[图3-2-1]
从图3-2-1可以看到SQLiteStudioService是继承Service。这个Service又实现实现了一个单例的方法
  public static SQLiteStudioService instance() {
        if (staticInstance == null) {
            staticInstance = new SQLiteStudioService();
        }

        return staticInstance;
    }
然后再看看start方法如下代码:
    public void start(Context context) {
        if (!this.running) {
            this.listener = new SQLiteStudioListener(context);
            this.listener.setPort(this.port);
            this.listener.setPassword(this.password);
            this.listener.setIpBlackList(this.ipBlackList);
            this.listener.setIpWhiteList(this.ipWhiteList);
            this.listenerThread = new Thread(this.listener);
            this.listenerThread.start();
            this.running = true;
            Log.d(Utils.LOG_TAG, "Started instance on port " + this.port);
        }
    }
从代码中可以理解到start()方法主要是启动了一个线程。SQLiteStudioListener应该是一个实现了Runnable接口的类,新建了一个线程去执行。所以我们接下来就看SQLiteStudioListener类做了什么。(ps:这个代码就很迷,明明是继承了Service,并没有以一个service的启动流程去使用。还要自己去调start。实际上就是当一个单例的辅助类来使用了。)
public class SQLiteStudioListener implements Runnable, ClientJobContainer {

...省略
    public void run() {
        if (this.init()) {
            Log.d(Utils.LOG_TAG, "Listening for clients...");

            while(this.isRunning()) {
                try {
                    Socket clientSocket = this.serverSocket.accept();
                    ClientHandler clientHandler = new ClientHandler(clientSocket, this.context, this, this.authService);
                    this.clientJobs.add(clientHandler);
                    this.threadPool.execute(clientHandler);
                } catch (IOException var3) {
                }
            }

            Log.d(Utils.LOG_TAG, "Listener thread finished.");
        }
    }

    private boolean init() {
        try {
            this.serverSocket = new ServerSocket(this.port, 5);
            this.serverSocket.setSoTimeout(1000);
        } catch (IOException var2) {
            Log.e(Utils.LOG_TAG, "Error while opening listening socket: " + var2.getMessage(), var2);
            return false;
        }

        this.jobsQueue = new LinkedBlockingDeque(1);
        this.clientJobs = new CopyOnWriteArrayList();
        this.threadPool = new ThreadPoolExecutor(20, 20, 10L, TimeUnit.SECONDS, this.jobsQueue);
        this.authService = new AuthServiceImpl(this.password, this.ipBlackList, this.ipWhiteList);
        return true;
    }
...省略
}
主要就看run方法和init方法,从代码上去看run方法主要是去初始化,并返回是否已初始化成功,接着看看init方法都做了些什么,创建了一个Socket服务端serverSocket,存放客户端的数组clientJobs,线程池threadPool,authService是验证身份使用(因为可以设置安全密码)。
然后接着看run方法,就是while循环等待客户端连接,得到socket对象后,又创建了ClientHandler。而this.threadPool.execute(clientHandler);不难看出,是线程池执行一个Runnable对象,所以ClientHandler也是实现了Runnable接口的类。所以接下我们需要看ClientHandler做了什么。
public class ClientHandler implements Runnable {
... 省略
    public void run() {

        String ip = this.clientSocket.getInetAddress().getHostAddress();
        Log.d(Utils.LOG_TAG, "New client from " + ip);
        if (!this.authService.isIpAllowed(ip)) {

            Log.e(Utils.LOG_TAG, "Client's IP address not allowed: " + ip + ", disconnecting.");
            this.cleanUp();
        } else if (!this.init()) {

            Log.e(Utils.LOG_TAG, "Could not initialize handler for the client.");
            this.cleanUp();
        } else {

            while(this.isRunning() && !this.denyAccess) {
                this.readClientChannel();
            }

            this.cleanUp();
            Log.d(Utils.LOG_TAG, "Disconnected client " + ip);
        }
    }
}
ClientHandler的代码得从run方法看起。第一步:获取ip,第二步:判断是否允许连接,第三步:初始化并判断是否初始化成功,第四步:开启循环接受消息。
所以我们主要看看第三步中得init()做了什么?
    private boolean init() {
        try {
            this.inputStream = this.clientSocket.getInputStream();
            this.outputStream = this.clientSocket.getOutputStream();
        } catch (IOException var2) {
            return false;
        }

        this.dataInputStream = new DataInputStream(this.inputStream);
        return true;
    }
init()主要是创建了读写得I\O接口,然后我再看一下readClientChannel()方法做了什么。
    private void readClientChannel() {
        if (!this.clientSocket.isConnected()) {

            this.close();
        } else {
            try {

                switch(this.currentState) {
                case READING_SIZE:
                    this.dataInputStream.readFully(this.sizeBuffer);
                    break;
                case READING_DATA:
                    this.dataInputStream.readFully(this.dataBuffer);
                }
            } catch (EOFException var4) {
                this.close();
                return;
            } catch (IOException var5) {
                Log.e(Utils.LOG_TAG, "Error while reading input from client: " + var5.getMessage(), var5);
                this.sendError(ClientHandler.Error.ERROR_READING_FROM_CLIENT);
                return;
            }

            switch(this.currentState) {
            case READING_SIZE:
                int size = ByteBuffer.wrap(this.sizeBuffer).order(ByteOrder.LITTLE_ENDIAN).getInt();
                if (size > 10485760) {
                    Log.e(Utils.LOG_TAG, "Error while reading input from client: maximum size exceeded: " + size);
                    this.sendError(ClientHandler.Error.ERROR_READING_FROM_CLIENT);
                    return;
                }

                this.currentState = ClientHandler.State.READING_DATA;
                this.dataBuffer = new byte[size];
                break;
            case READING_DATA:
                String str = null;

                try {

                    str = new String(this.dataBuffer, "UTF-8");
                } catch (UnsupportedEncodingException var3) {
                    Log.e(Utils.LOG_TAG, "Error while reading data from client: " + var3.getMessage(), var3);
                    this.sendError(ClientHandler.Error.ERROR_READING_FROM_CLIENT);
                    return;
                }

                this.handleRequest(str);
                this.currentState = ClientHandler.State.READING_SIZE;
            }

        }
    }
从上面的一大长串代码中,找到关键代码this.handleRequest(str);这里是最终处理消息的代码。我们接下来看看handleRequest()做了什么
    private void handleRequest(String data) {
        JSONObject json;
        try {

            json = new JSONObject(data);
        } catch (JSONException var7) {
            this.sendError(ClientHandler.Error.INVALID_FORMAT);
            return;
        }

        HashMap<String, Object> map = (HashMap)JsonConverter.fromJsonValue(json);
        if (!this.authorized) {
            this.authorize(map);
        } else if (!map.containsKey("cmd")) {
            this.sendError(ClientHandler.Error.NO_COMMAND_SPECIFIED);
        } else {
            ClientHandler.Command cmd;
            try {

                cmd = ClientHandler.Command.valueOf("" + map.get("cmd"));
            } catch (IllegalArgumentException var6) {
                this.sendError(ClientHandler.Error.UNKNOWN_COMMAND);
                return;
            }

            switch(cmd) {
            case LIST:

                this.send("list", this.dbService.getDbList());
                break;
            case QUERY:

                this.execAndRespond(map.get("db"), "" + map.get("query"));
                break;
            case DELETE_DB:

                this.deleteDbAndRespond(map.get("db"));
            }

        }
    }
从代码中可以看出,SQLiteStudio的通讯内容是json字符串,以指令的形式执行查询任务。SQLiteStudio如何得知我们app内的数据库,从上面的代码中就可以看出关键代码”this.dbService.getDbList()”。我们看一下this.dbService.getDbList()都做了什么事情。
    public List<String> getDbList() {
        List<String> filteredList = new ArrayList();
        String[] var2 = this.context.databaseList();
        int var3 = var2.length;

        for(int var4 = 0; var4 < var3; ++var4) {
            String dbFile = var2[var4];
            if (!dbFile.endsWith("-journal")) {
                filteredList.add(dbFile);
            }
        }

        return filteredList;
    }
现在一目了然了,SQLiteStudio就是从this.context.databaseList()获取到数据库的。所以我们接下来就只需要修改SQLiteStudioDbService中的getDbList方法,返回自己的数据库路径即可。
(三)、总结
只需要修改SQLiteStudioDbService类中的getDbList方法,返回自己的数据库路径即可。
Original: https://blog.csdn.net/gkhbaby/article/details/120923416
Author: 古baby
Title: SQLiteStudio工具实时操作Android应用中数据库内容(从源码分析找不到数据库问题)
原创文章受到原创版权保护。转载请注明出处:https://www.johngo689.com/816215/
转载文章受原作者版权保护。转载请注明原作者出处!