

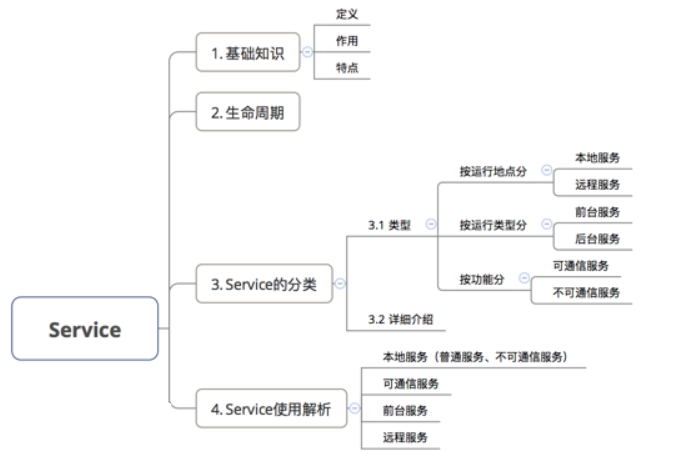
目录
- 一、结构
- 二、简介
- 三、生命周期
* - 3.1生命周期常用方法
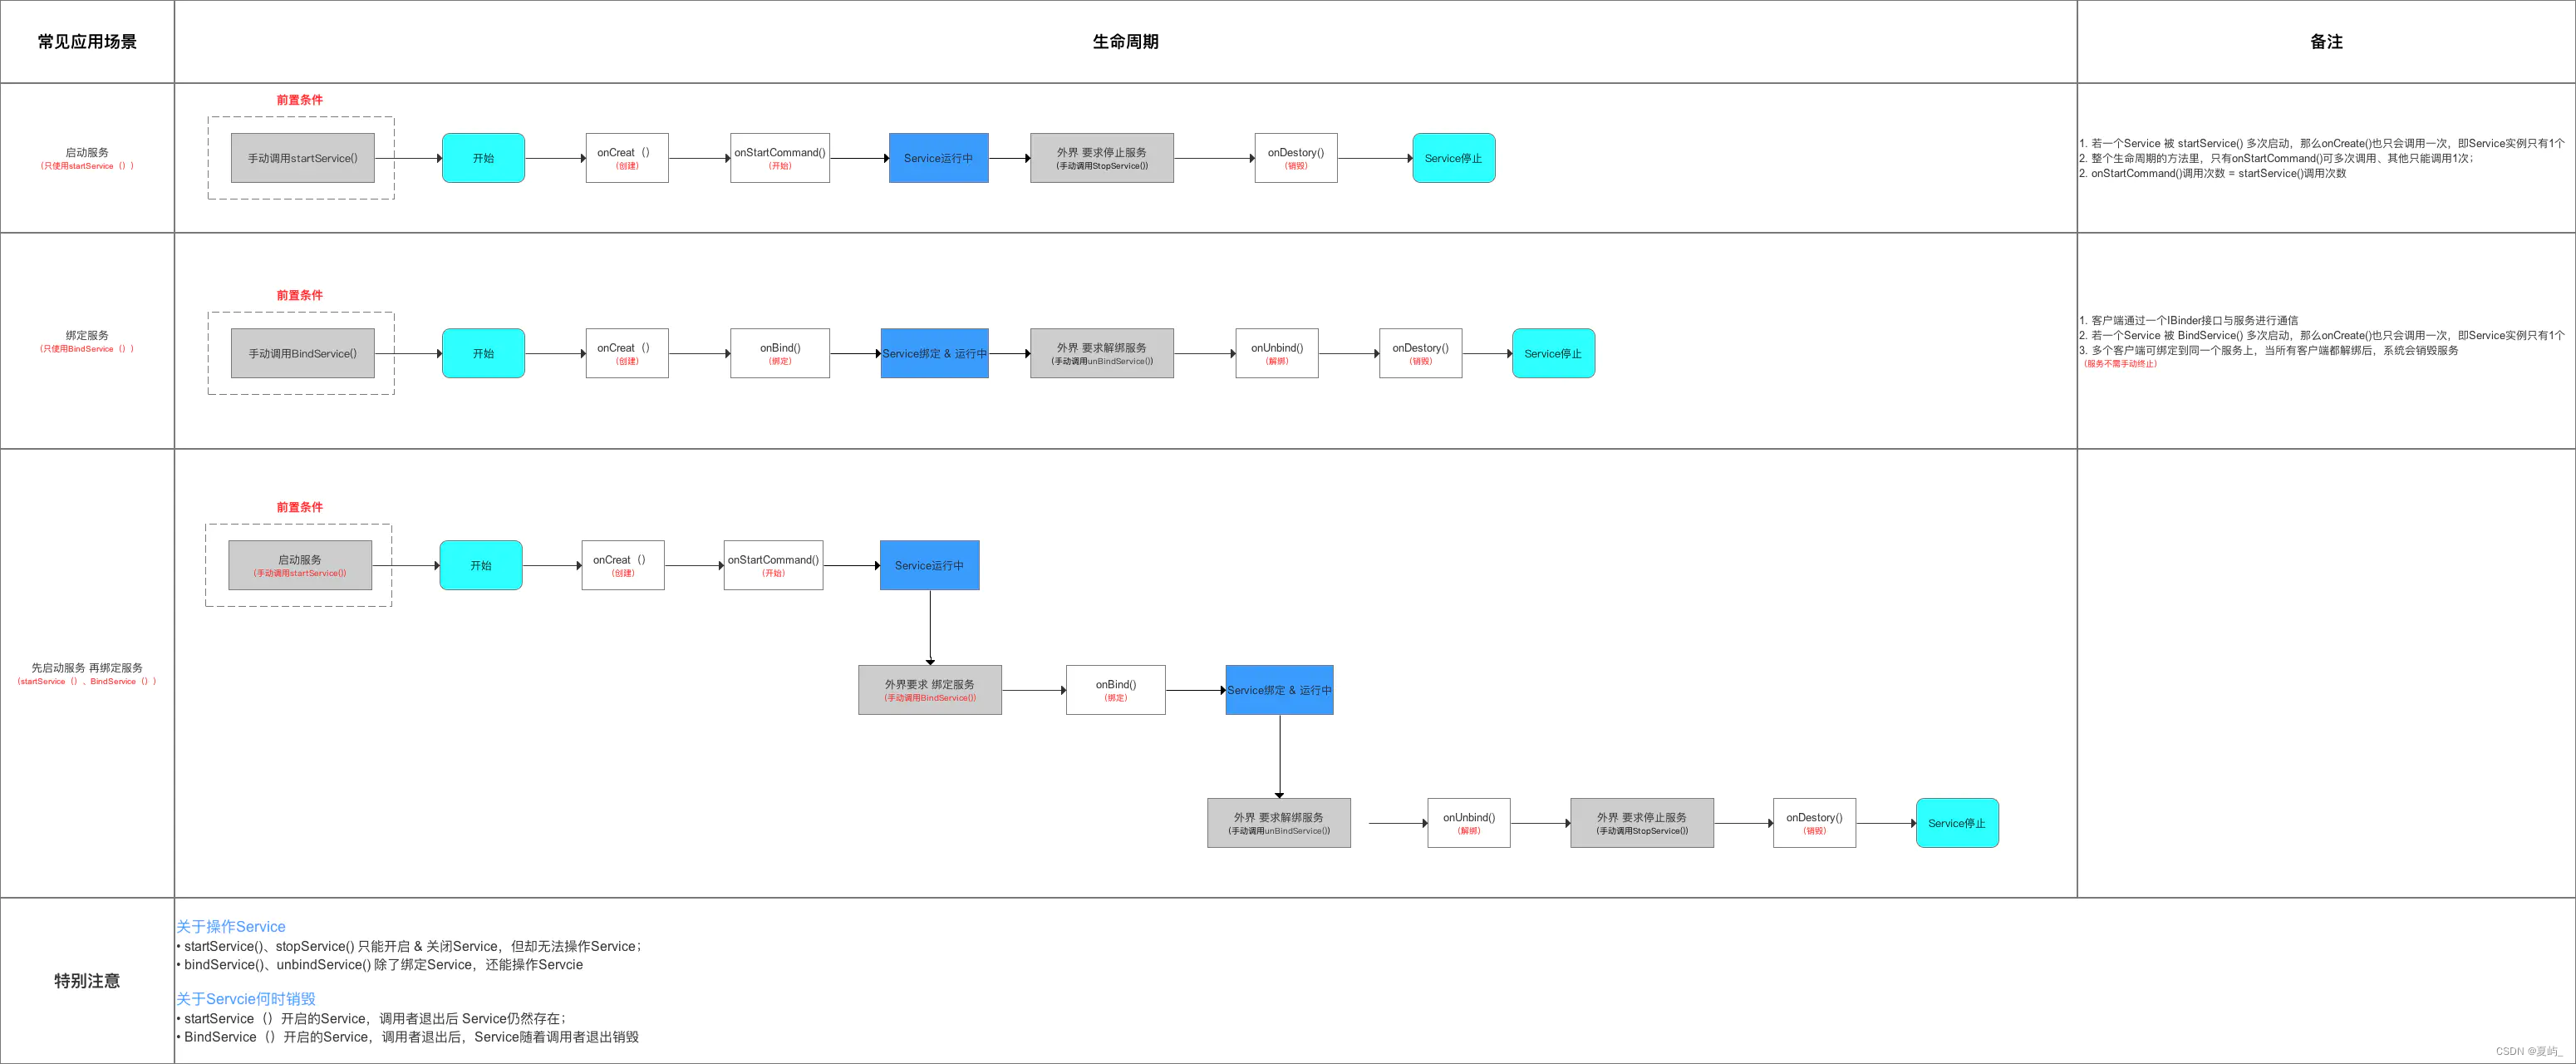
- 3.2常见的生命周期使用
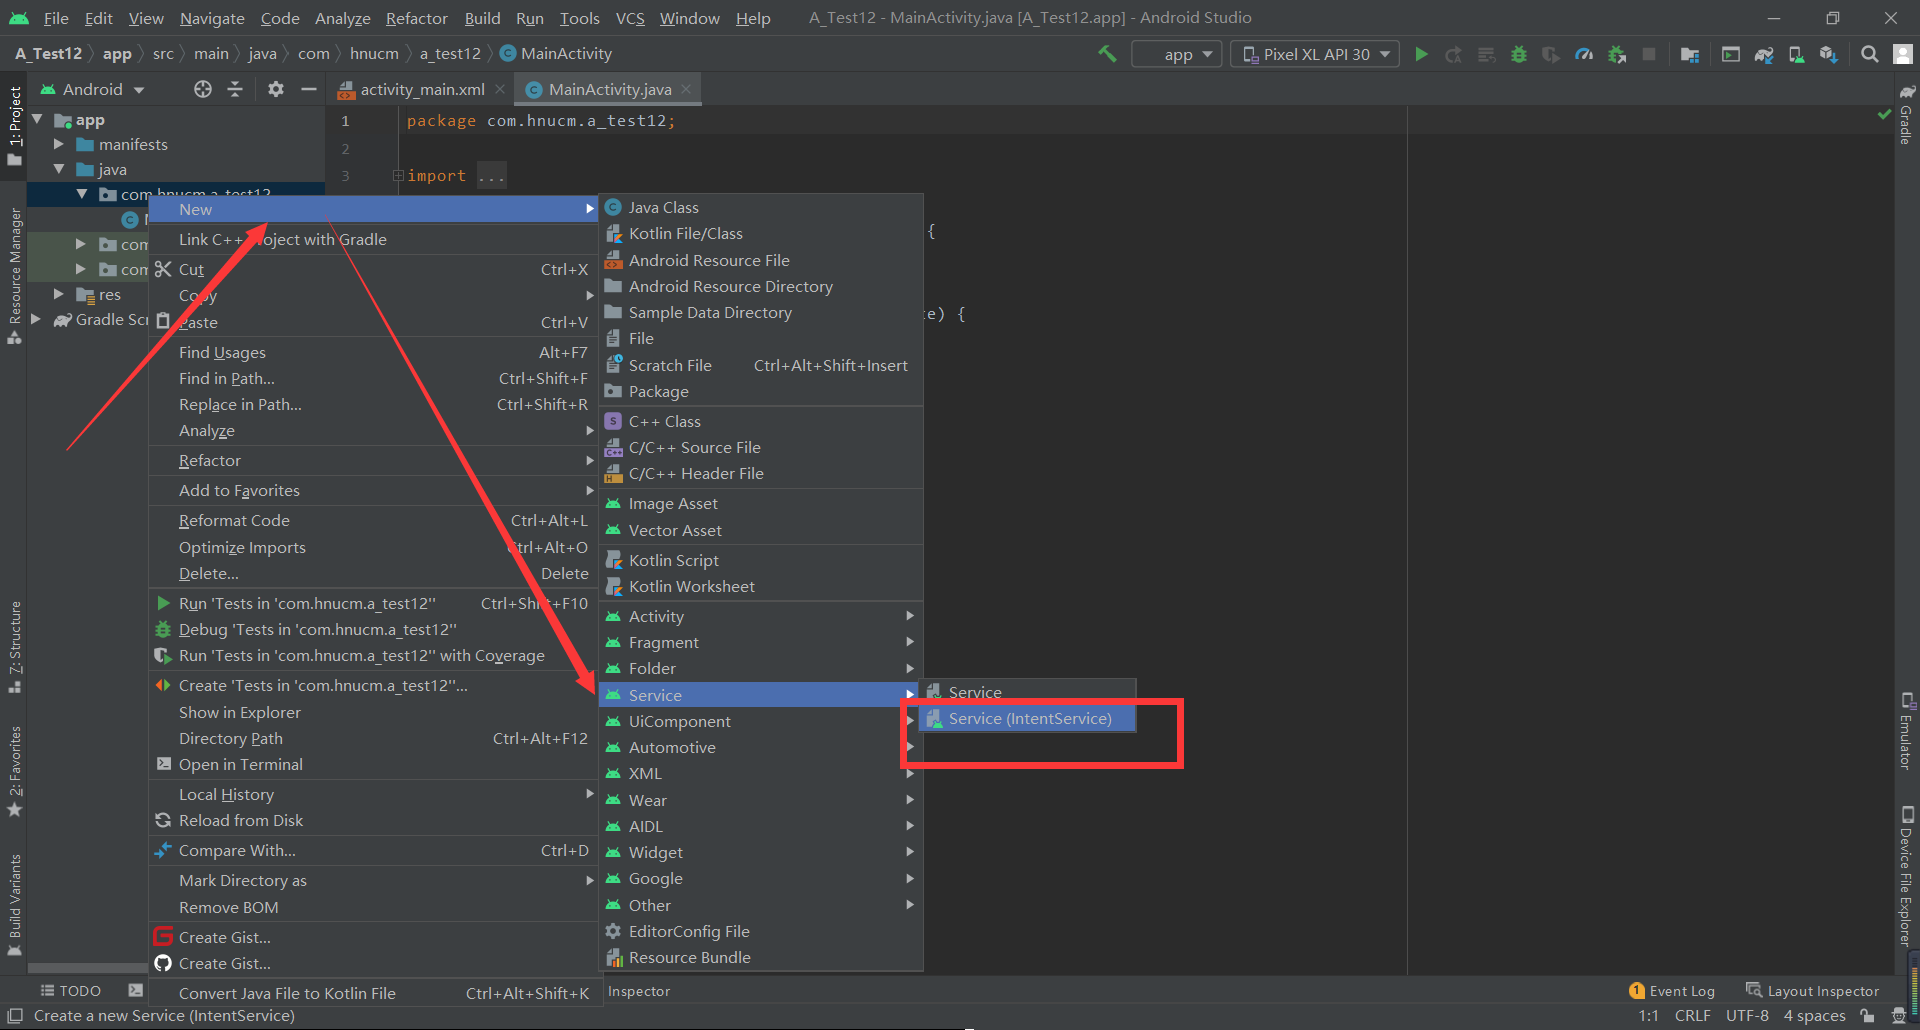
- 四、Service分类
* - 4.1具体分类
- 4.2详细介绍
- 4.3service和thread区别
- 五、使用方法
* - 5.1本地Service
- 5.2可通信的服务Service
- 六、Service怎么保活
一、结构

; 二、简介
- 定义:服务,是Android四大组件之一, 属于计算型组件
- 作用:提供 需在后台长期运行的服务
如:复杂计算、音乐播放、下载等
- 特点:无用户界面、在后台运行、生命周期长
三、生命周期
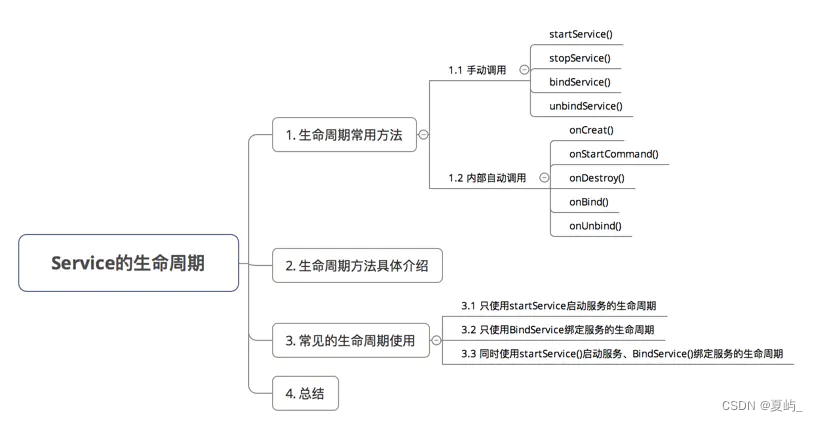
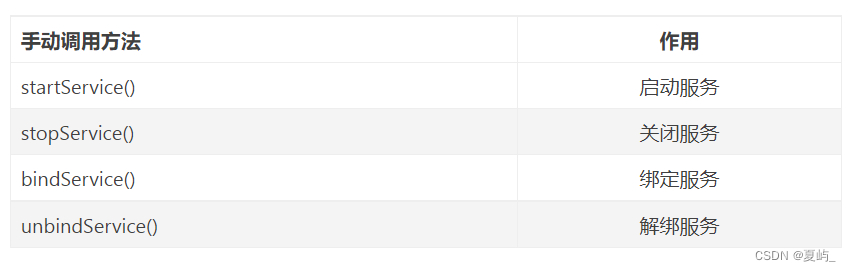
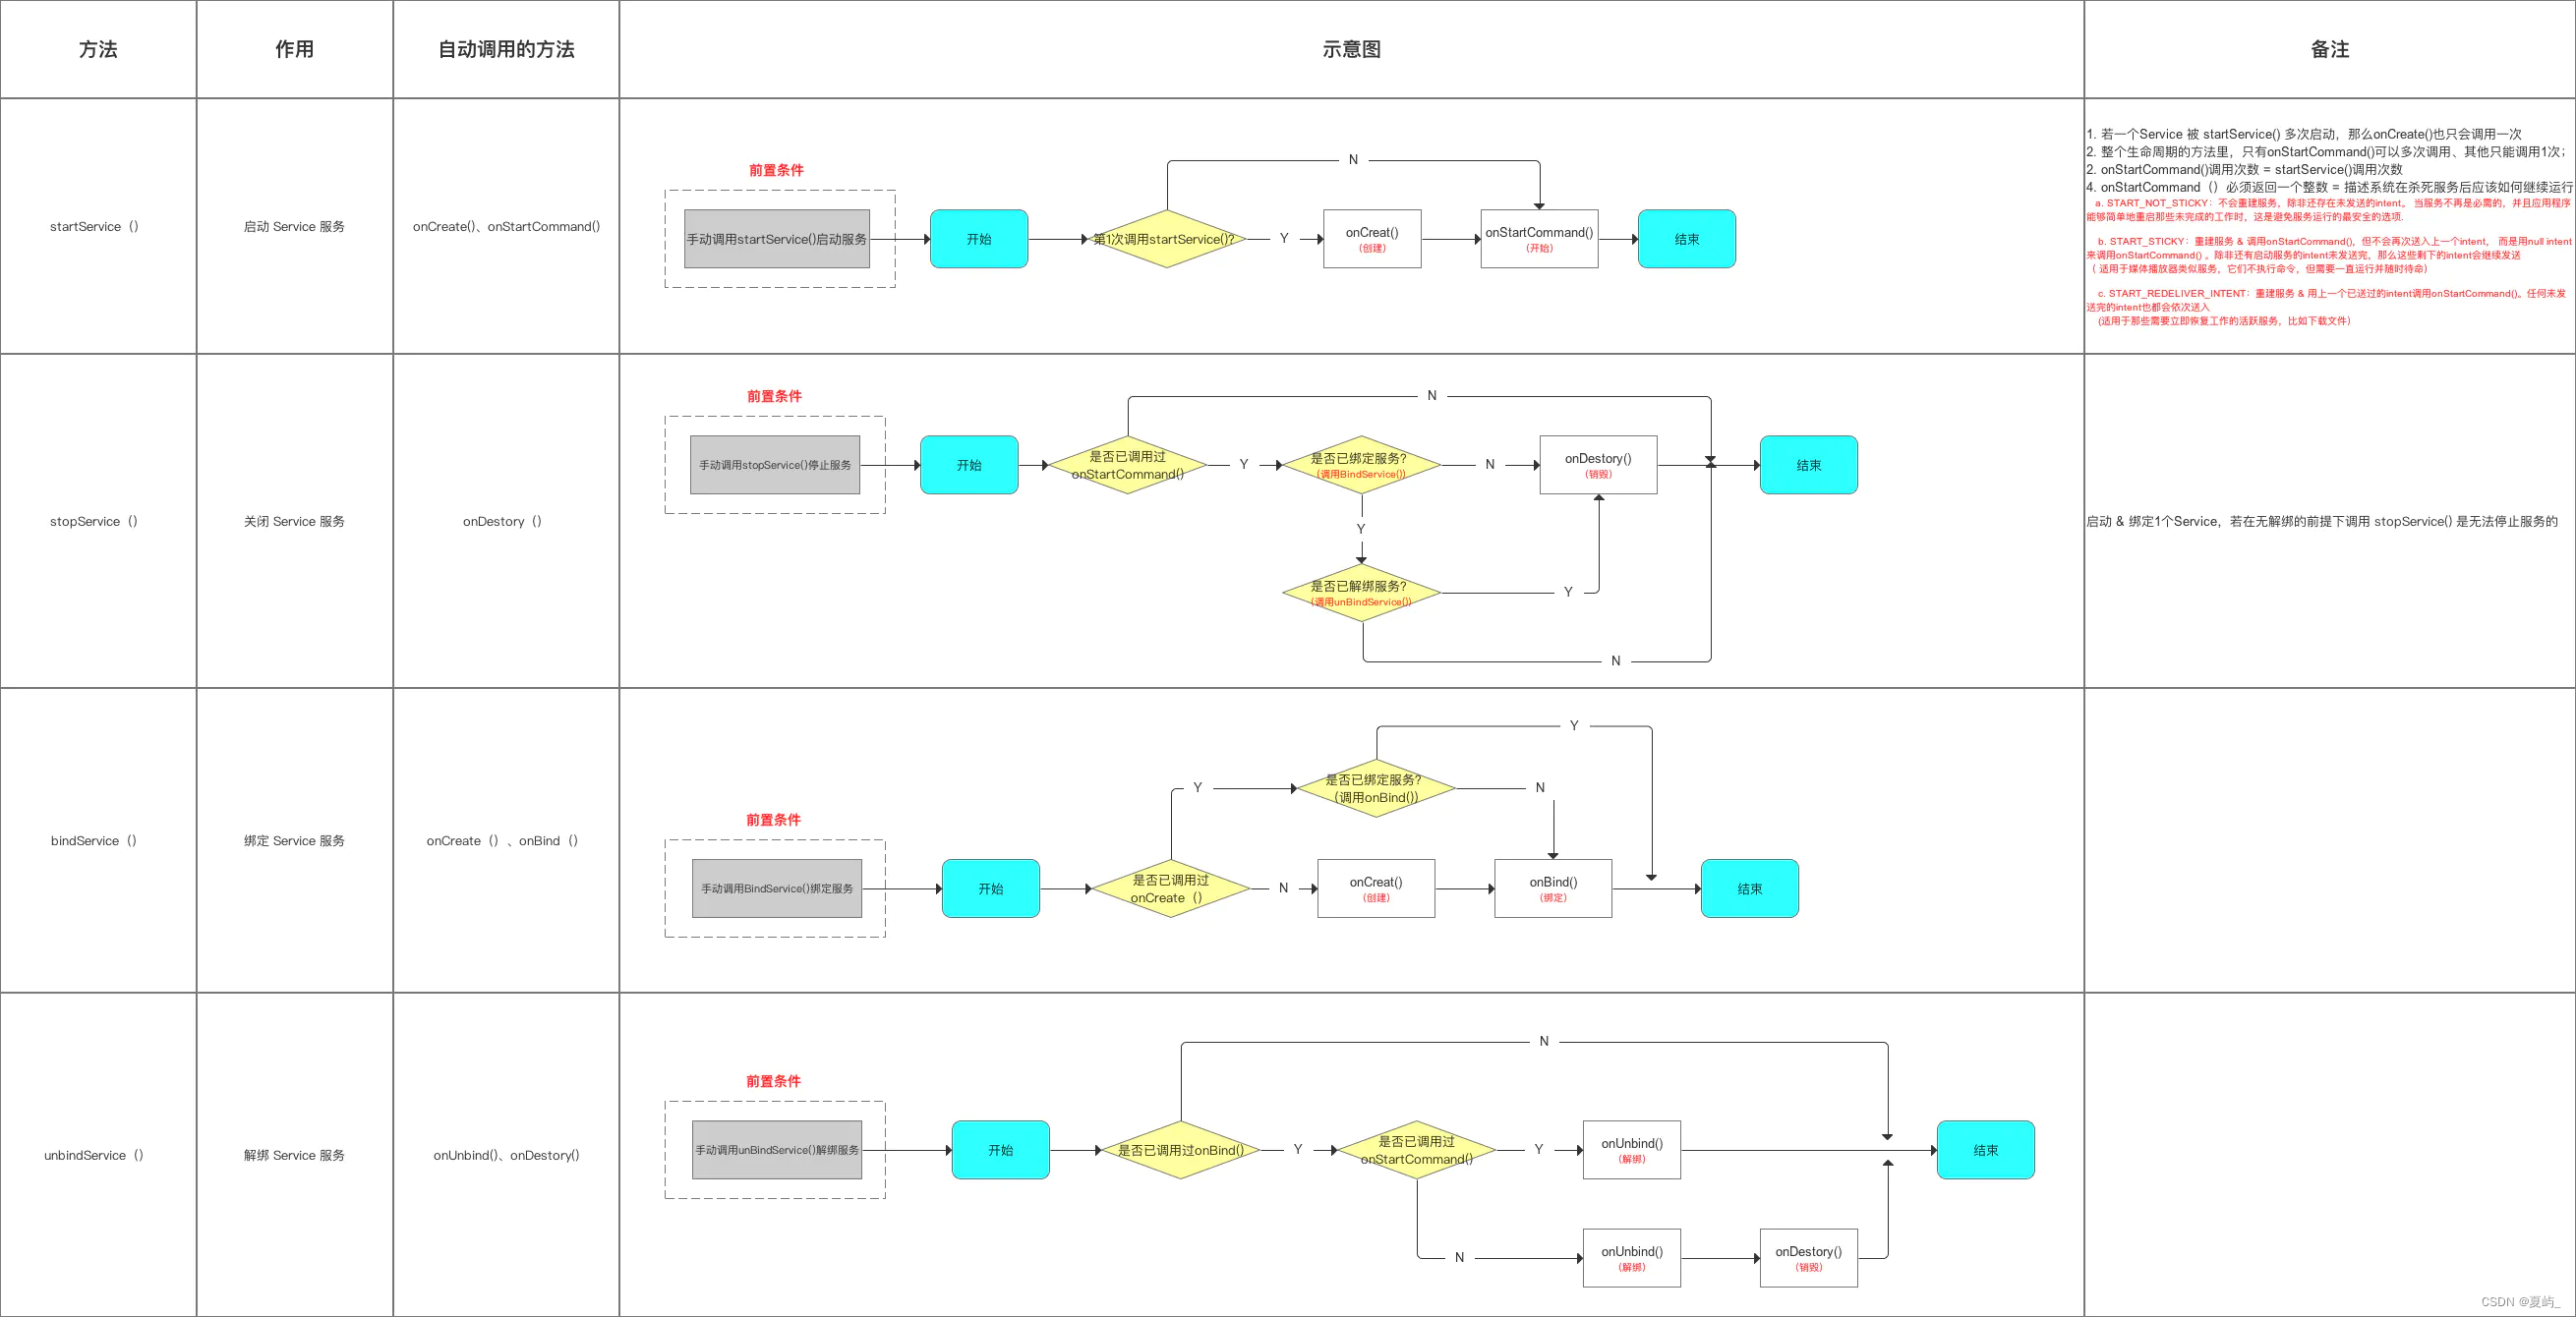
; 3.1生命周期常用方法
- 官方说明图

- 4个手动调用的方法
- 5个自动调用的方法

3.2常见的生命周期使用
; 四、Service分类
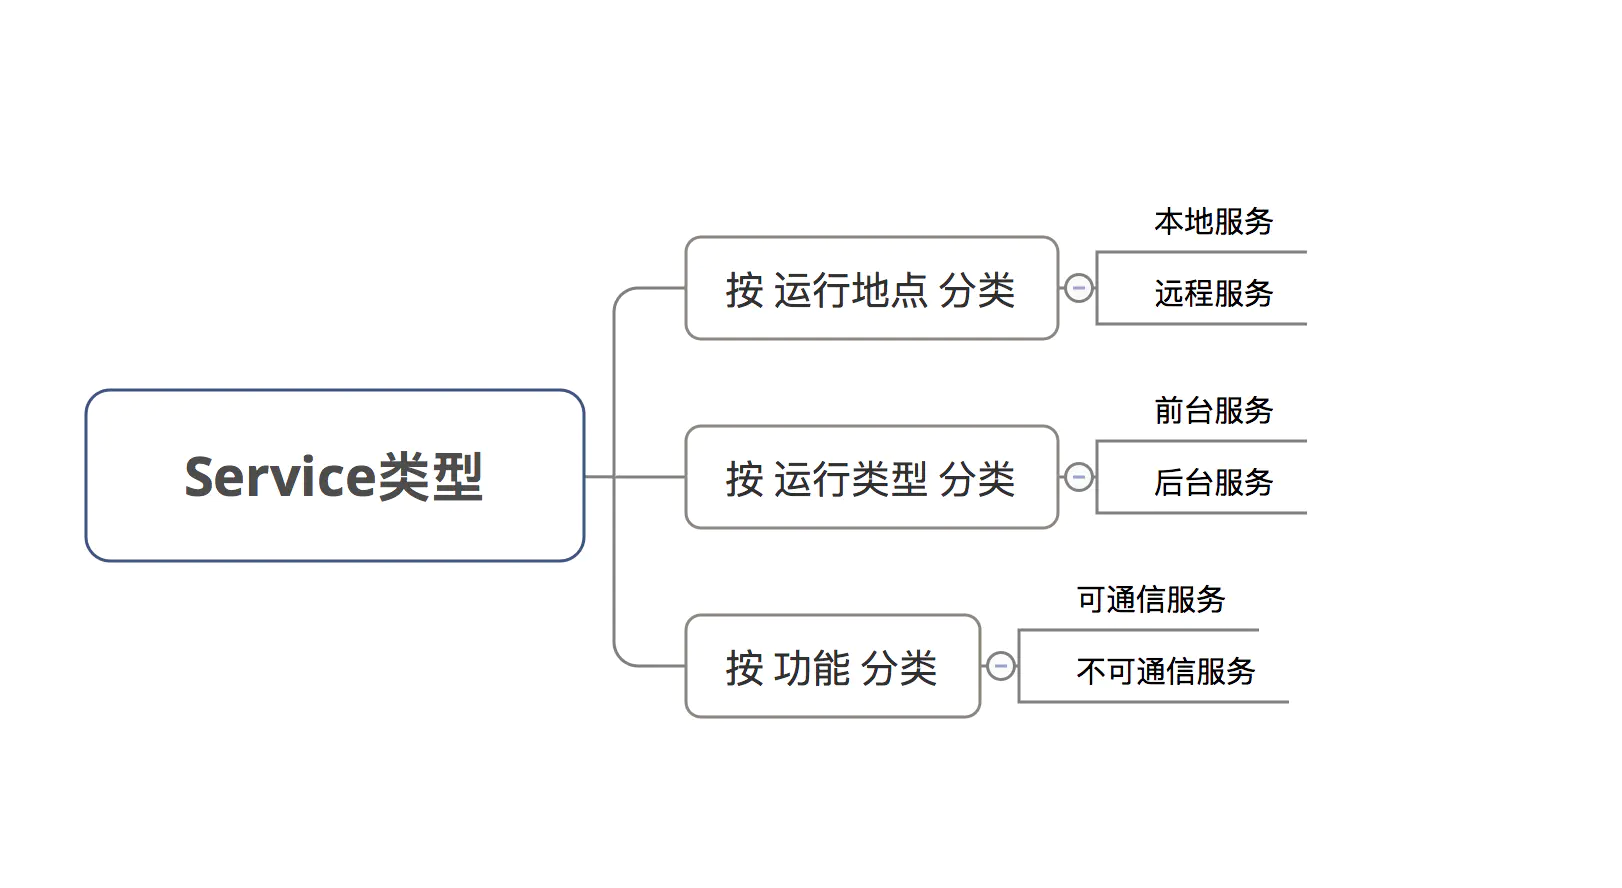
Service可按照运行地点、运行类型 、功能进行分类,具体如下:
4.1具体分类
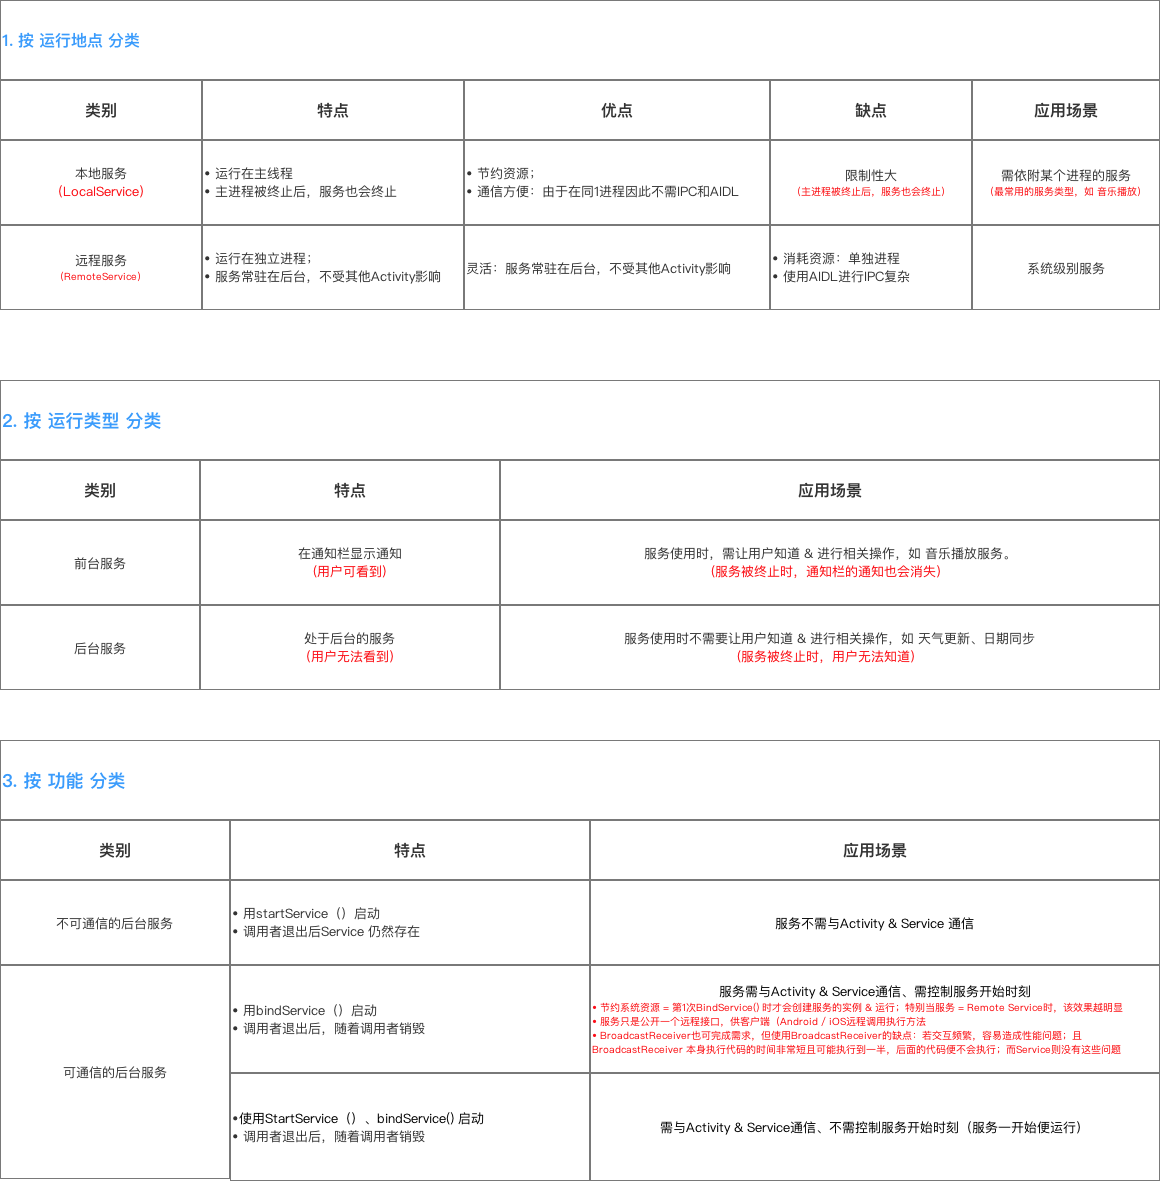
; 4.2详细介绍
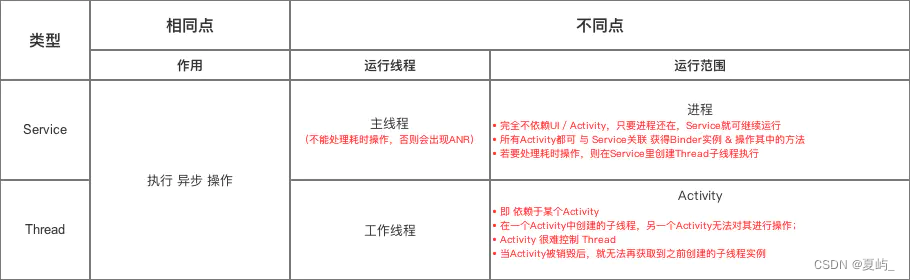
4.3service和thread区别
- 结论:Service 与 Thread 无任何关系
- 之所以有不少人会把它们联系起来,主要因为Service的后台概念
后台:后台任务运行完全不依赖UI,即使Activity被销毁 / 程序被关闭,只要进程还在,后台任务就可继续运行
关于二者的异同,具体如下图:
; 五、使用方法
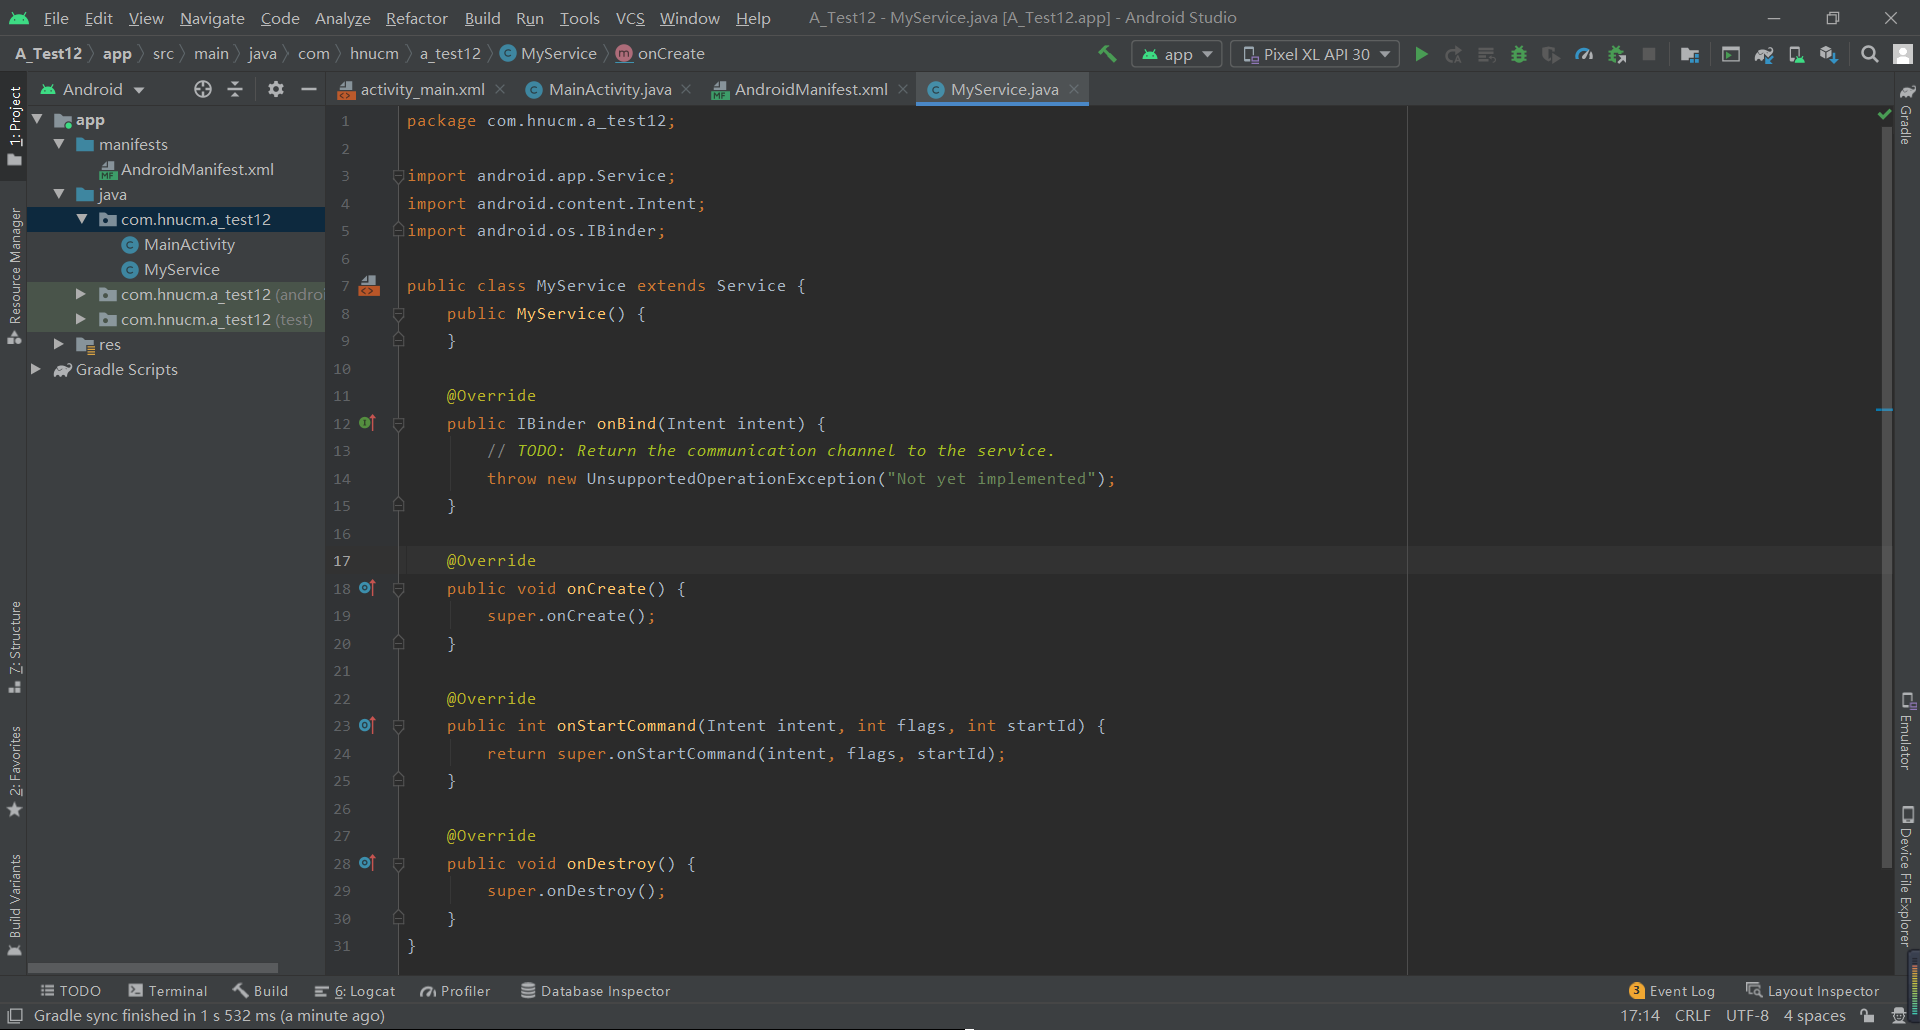
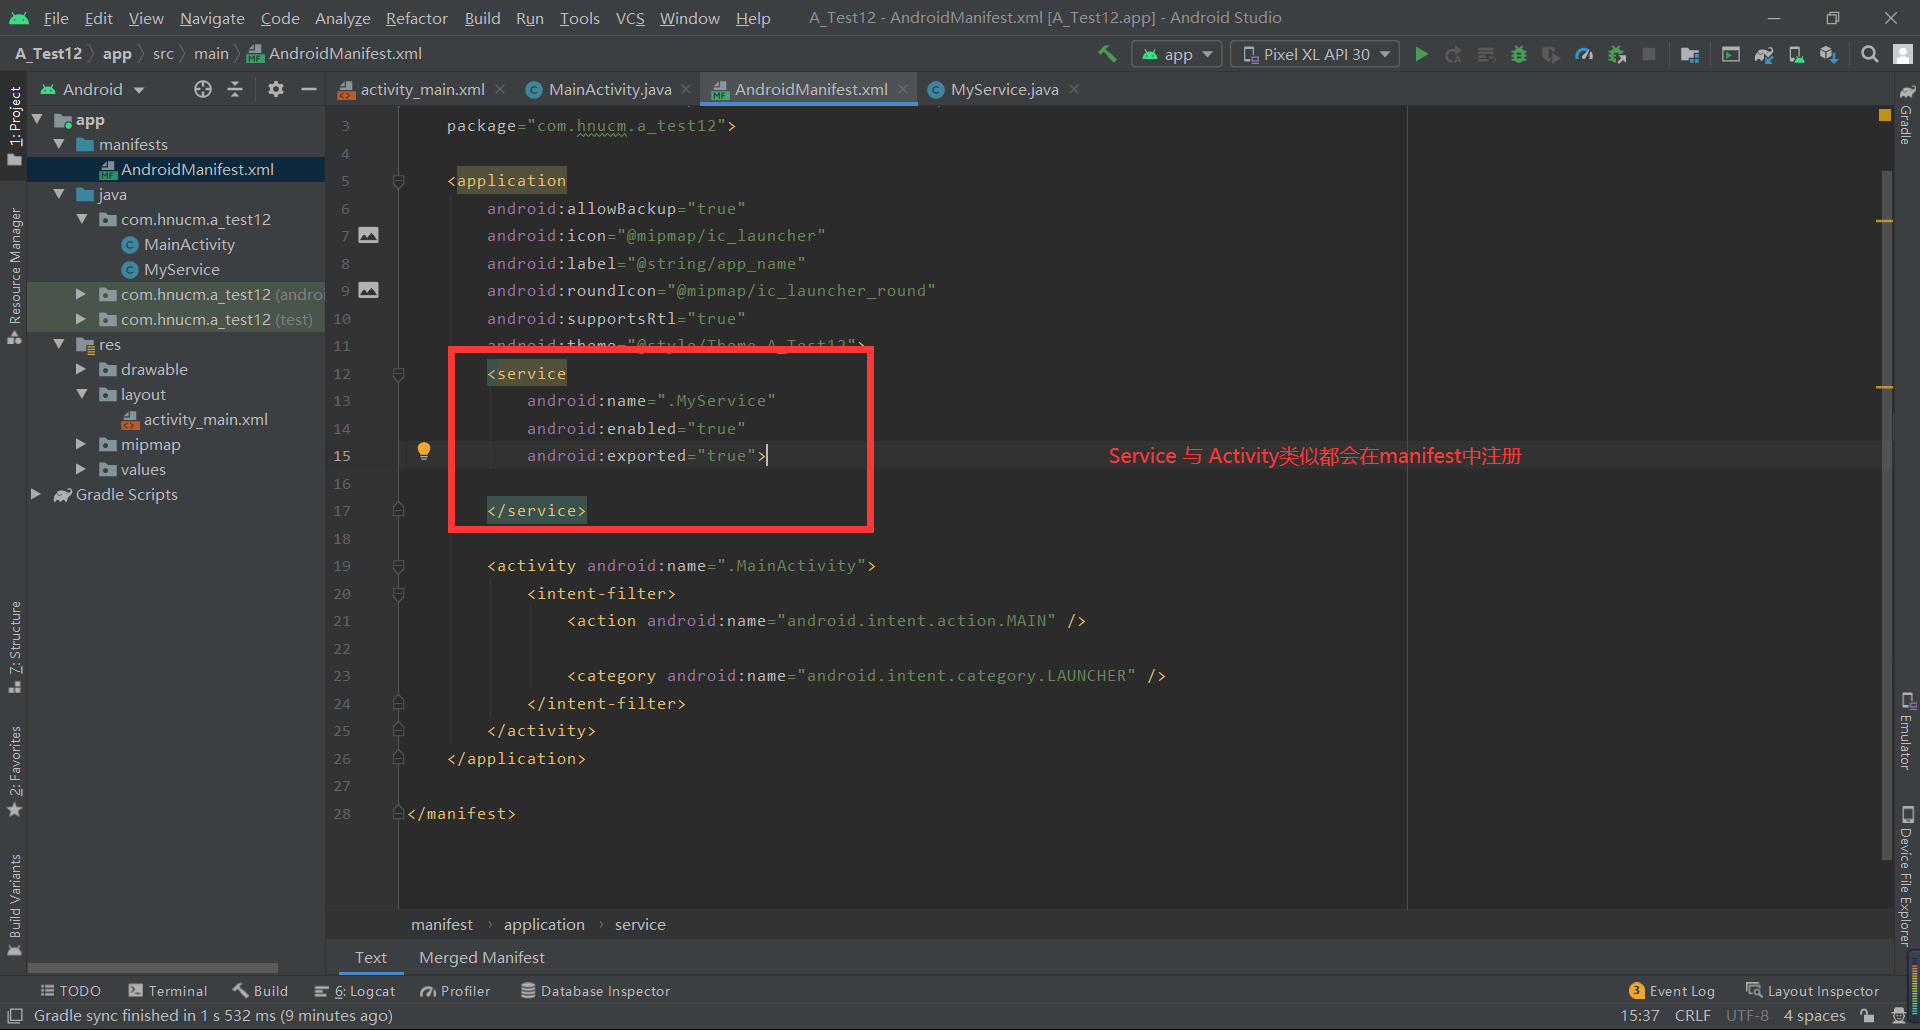
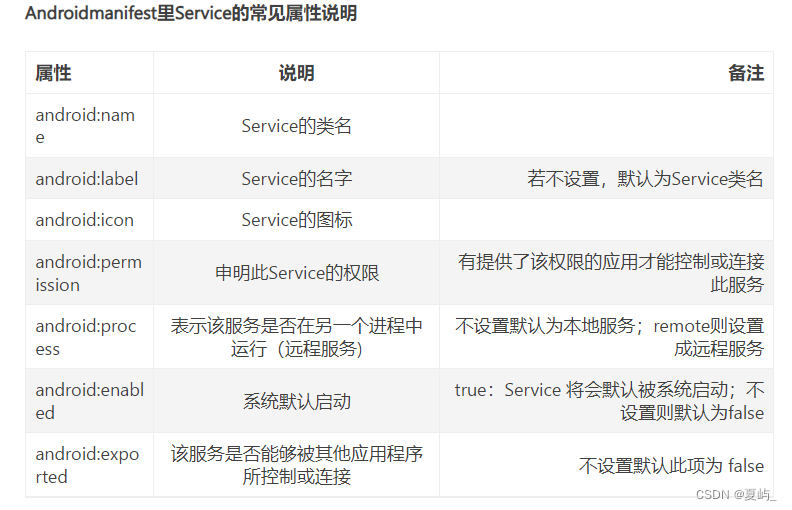
5.1本地Service
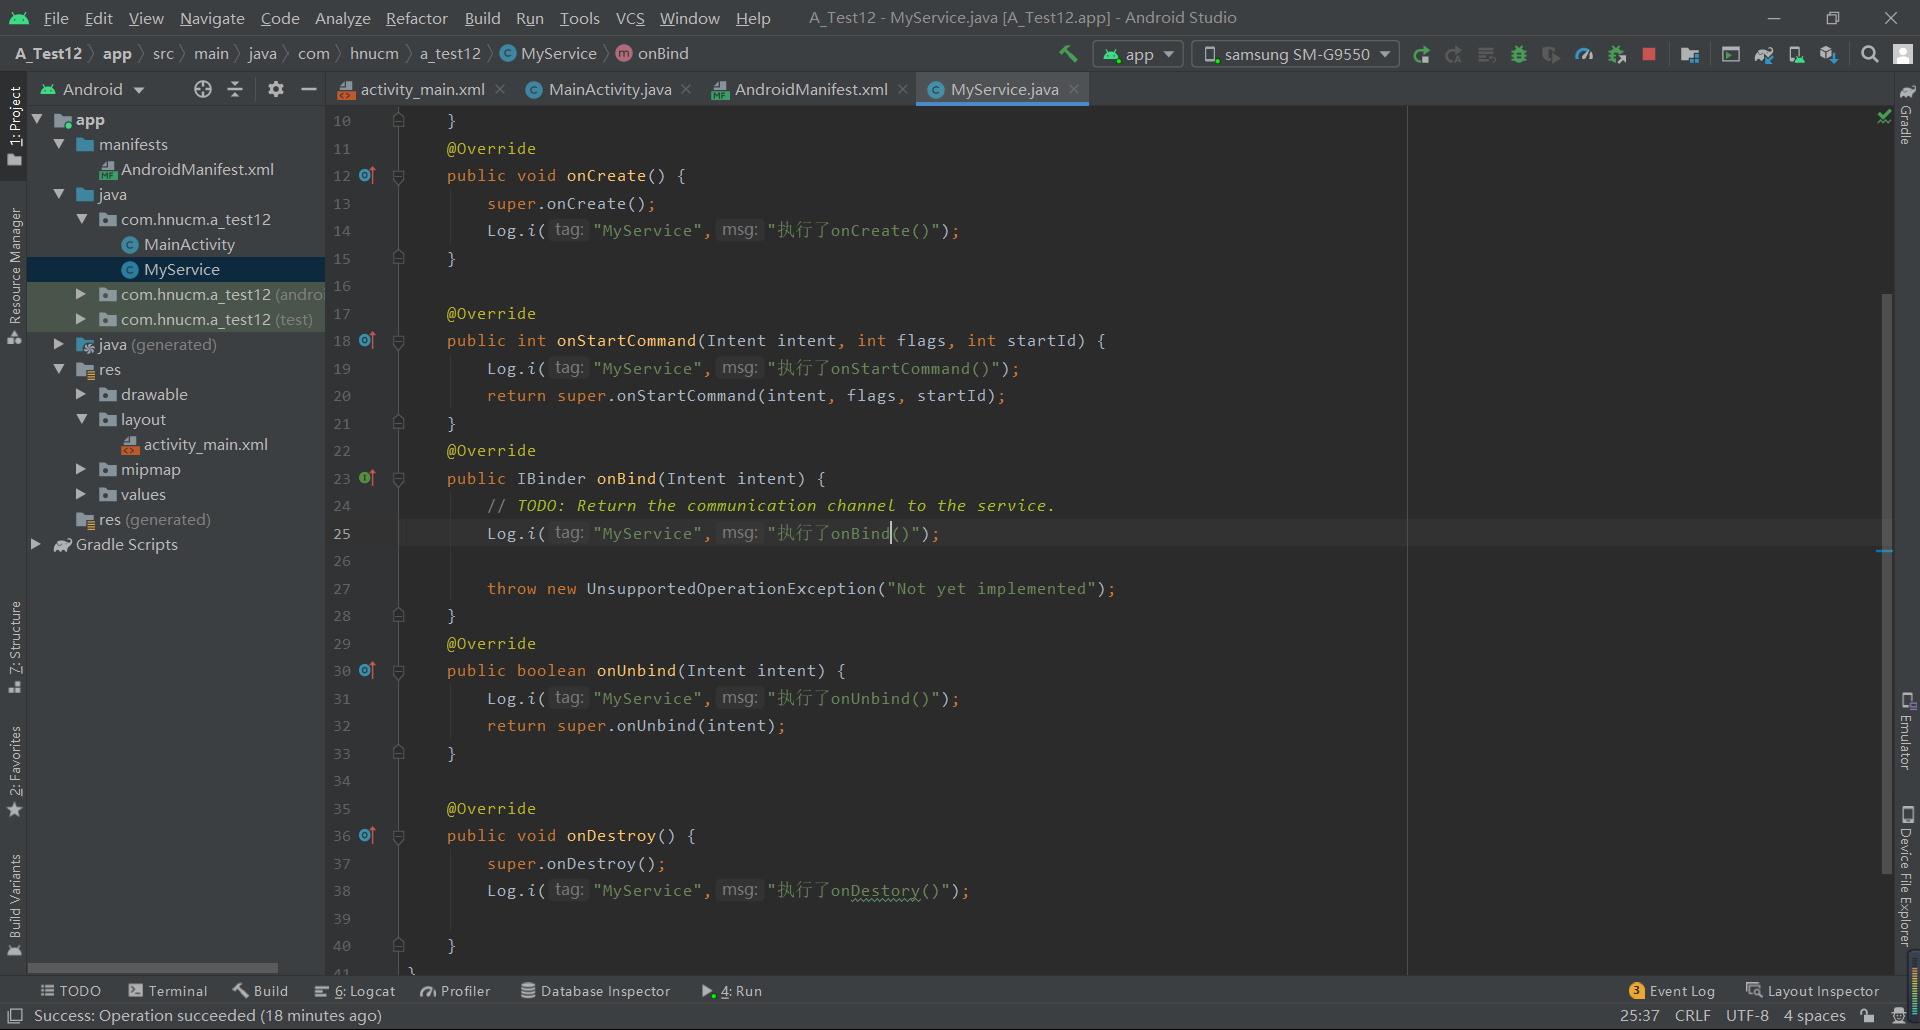
1.创建service
2.需重写父类的onCreate()、onStartCommand()、onDestroy()和onBind()
3.在主布局文件设置两个Button分别用于启动和停止Service
activity_main.xml
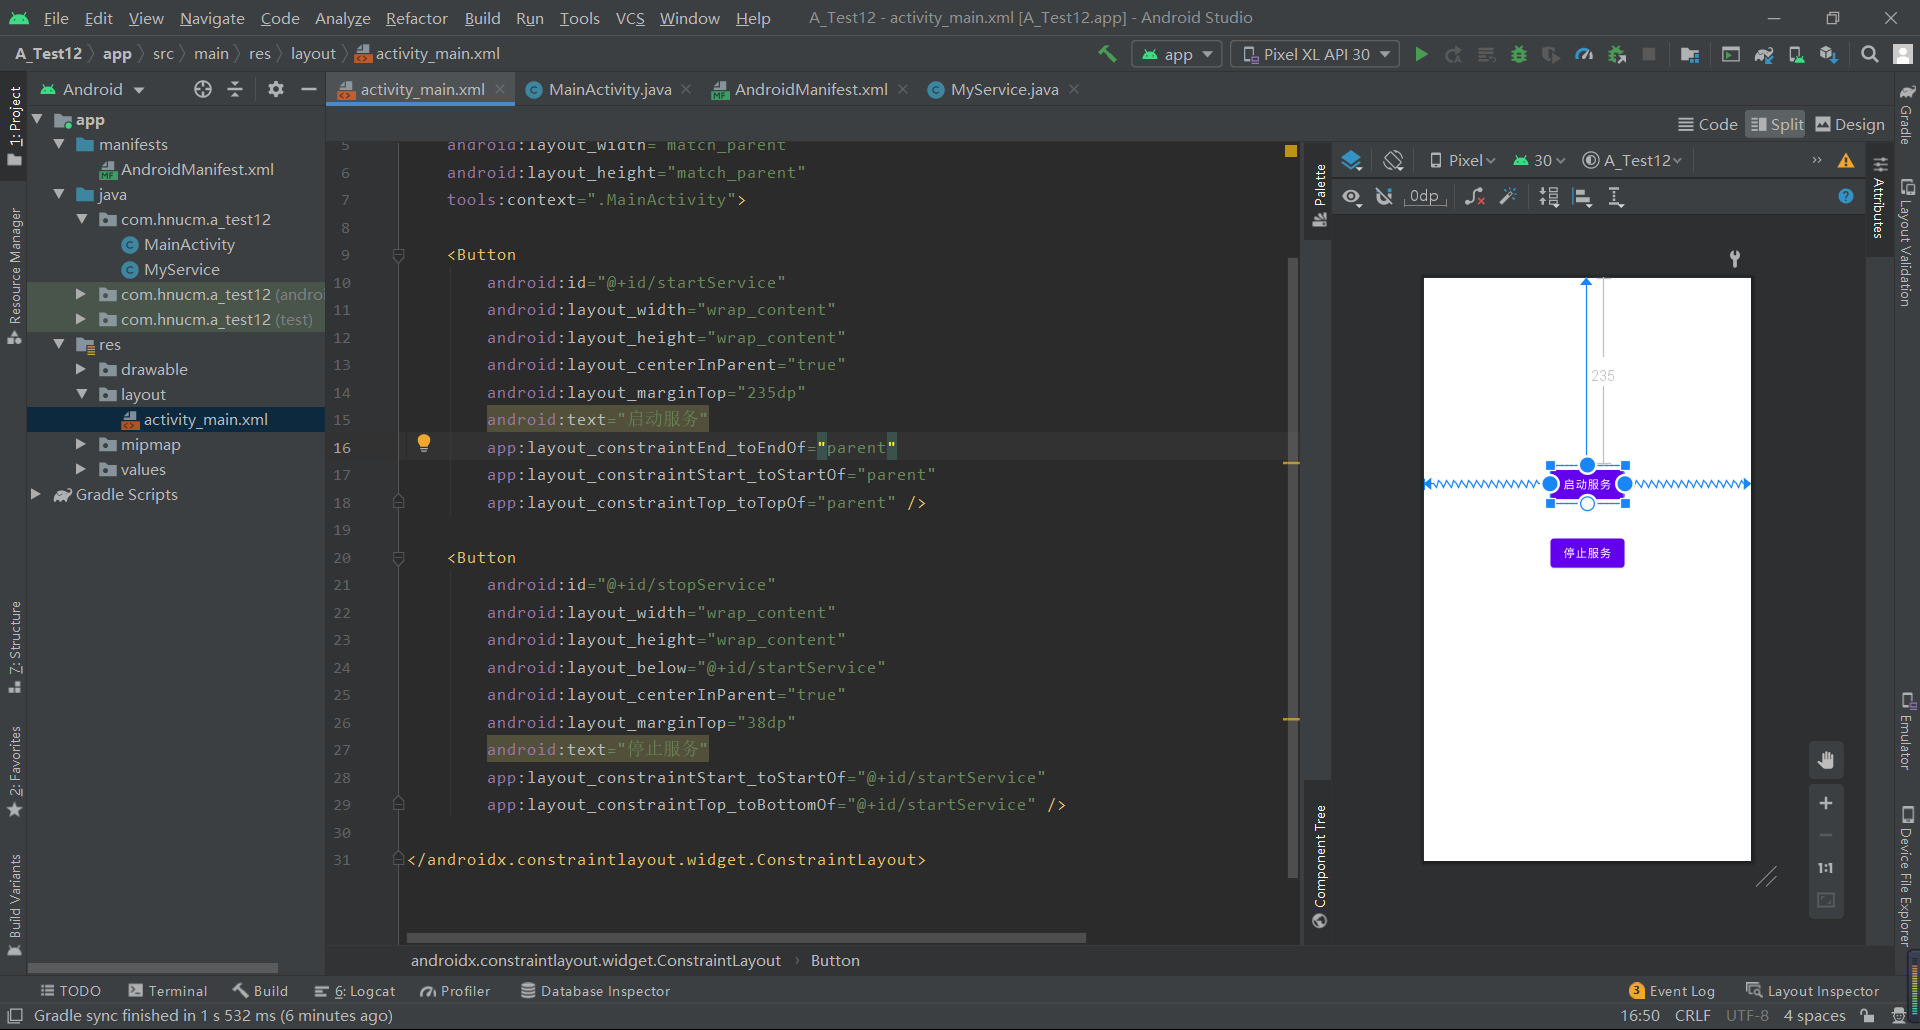
核心代码:
<?xml version="1.0" encoding="utf-8"?>
<androidx.constraintlayout.widget.constraintlayout xmlns:android="http://schemas.android.com/apk/res/android" xmlns:app="http://schemas.android.com/apk/res-auto" xmlns:tools="http://schemas.android.com/tools" android:layout_width="match_parent" android:layout_height="match_parent" tools:context=".MainActivity">
<button android:id="@+id/startService" android:layout_width="wrap_content" android:layout_height="wrap_content" android:layout_centerinparent="true" android:layout_margintop="235dp" android:text="启动服务" app:layout_constraintend_toendof="parent" app:layout_constraintstart_tostartof="parent" app:layout_constrainttop_totopof="parent">
</button><button android:id="@+id/stopService" android:layout_width="wrap_content" android:layout_height="wrap_content" android:layout_below="@+id/startService" android:layout_centerinparent="true" android:layout_margintop="38dp" android:text="停止服务" app:layout_constraintstart_tostartof="@+id/startService" app:layout_constrainttop_tobottomof="@+id/startService">
</button></androidx.constraintlayout.widget.constraintlayout>
4.编写Activity逻辑代码
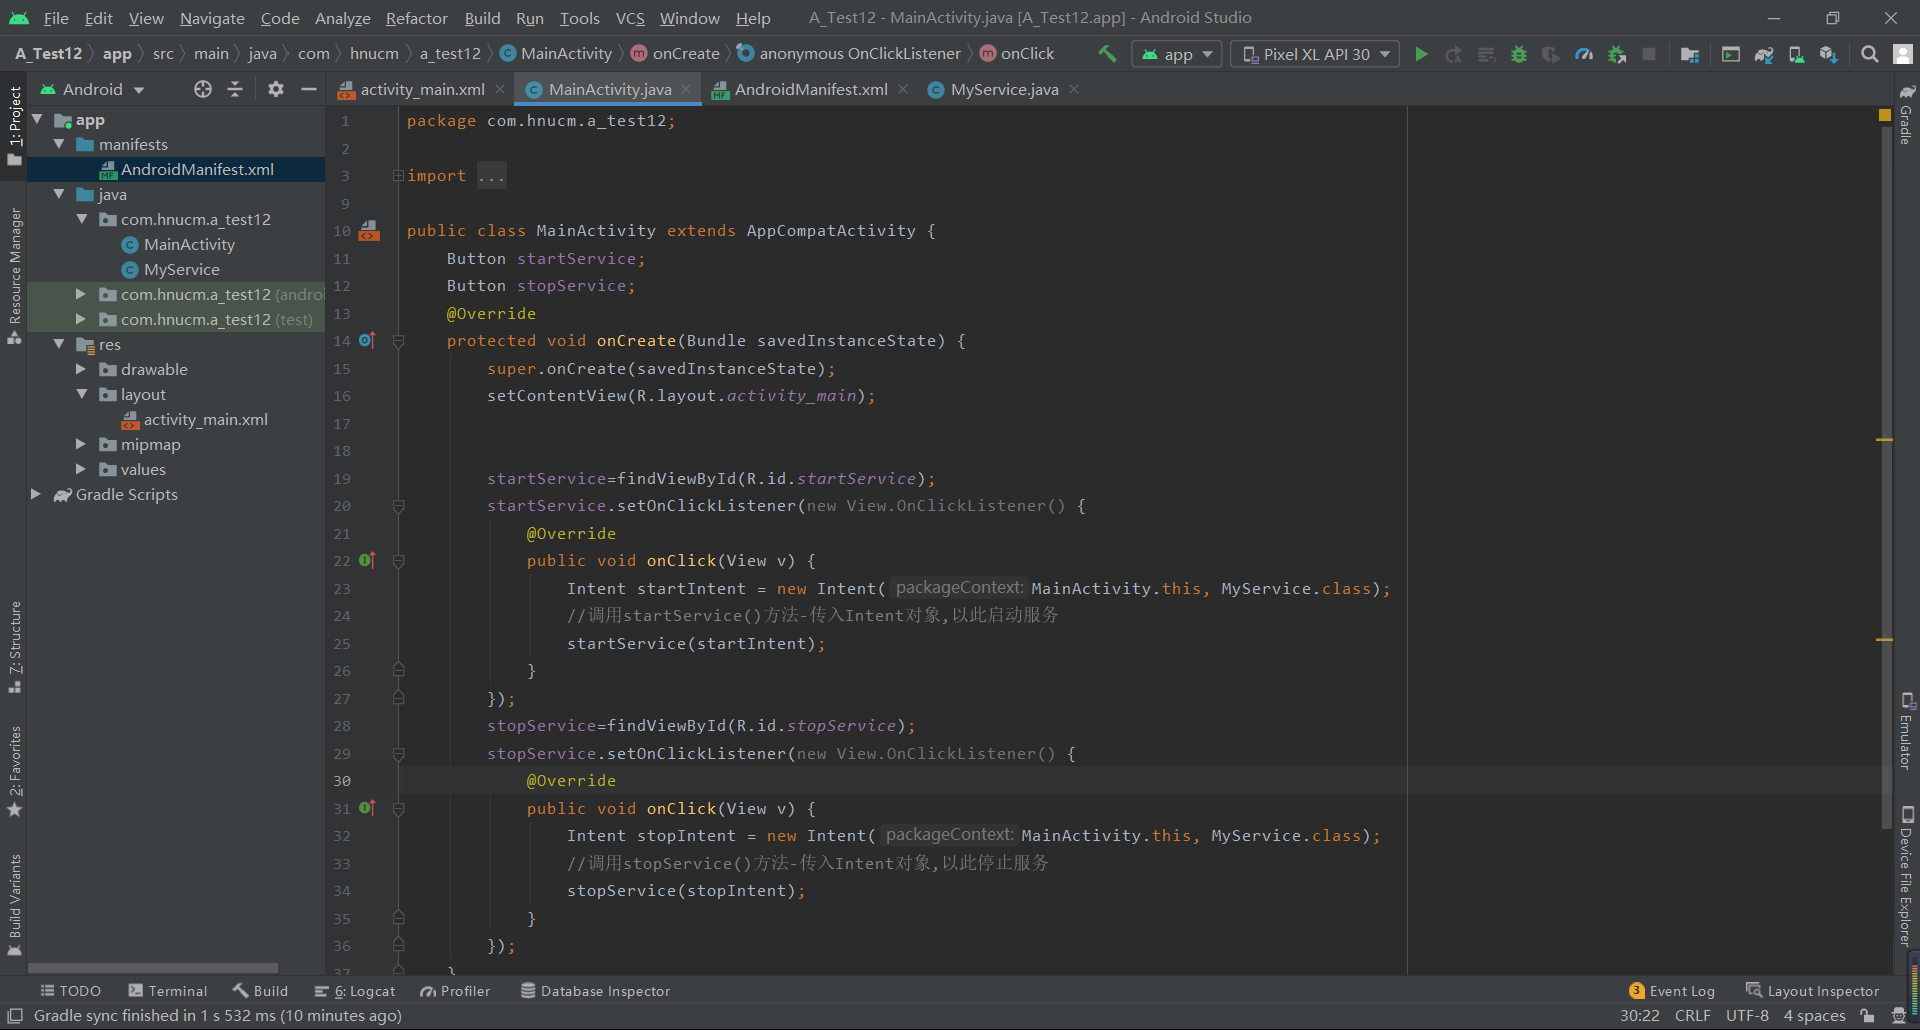
核心代码:
public class MainActivity extends AppCompatActivity {
    Button startService;
    Button stopService;
    @Override
    protected void onCreate(Bundle savedInstanceState) {
        super.onCreate(savedInstanceState);
        setContentView(R.layout.activity_main);

        startService=findViewById(R.id.startService);
        startService.setOnClickListener(new View.OnClickListener() {
            @Override
            public void onClick(View v) {
                Intent startIntent = new Intent(MainActivity.this, MyService.class);
                //调用startService()方法-传入Intent对象,以此启动服务
                startService(startIntent);
            }
        });
        stopService=findViewById(R.id.stopService);
        stopService.setOnClickListener(new View.OnClickListener() {
            @Override
            public void onClick(View v) {
                Intent stopIntent = new Intent(MainActivity.this, MyService.class);
                //调用stopService()方法-传入Intent对象,以此停止服务
                stopService(stopIntent);
            }
        });
    }
}
补充:
5.运行结果

ps:成功打印了日志,也可以看到我们的界面没有任何的变化
5.2可通信的服务Service
- 上面介绍的Service是最基础的,但只能单机使用,即无法与Activity通信
所以这种方式启动服务只适用于启动以后不需要关闭的一些操作,如果我们需要在启动服务以后,改变其中某种操作的状态,就需要用到service的第二种启动方式 - 接下来将在上面的基础用法上,增设”与Activity通信”的功能,即使用绑定Service服务(Binder类、bindService()、onBind()、unbindService()、onUnbind())
1.重写方法
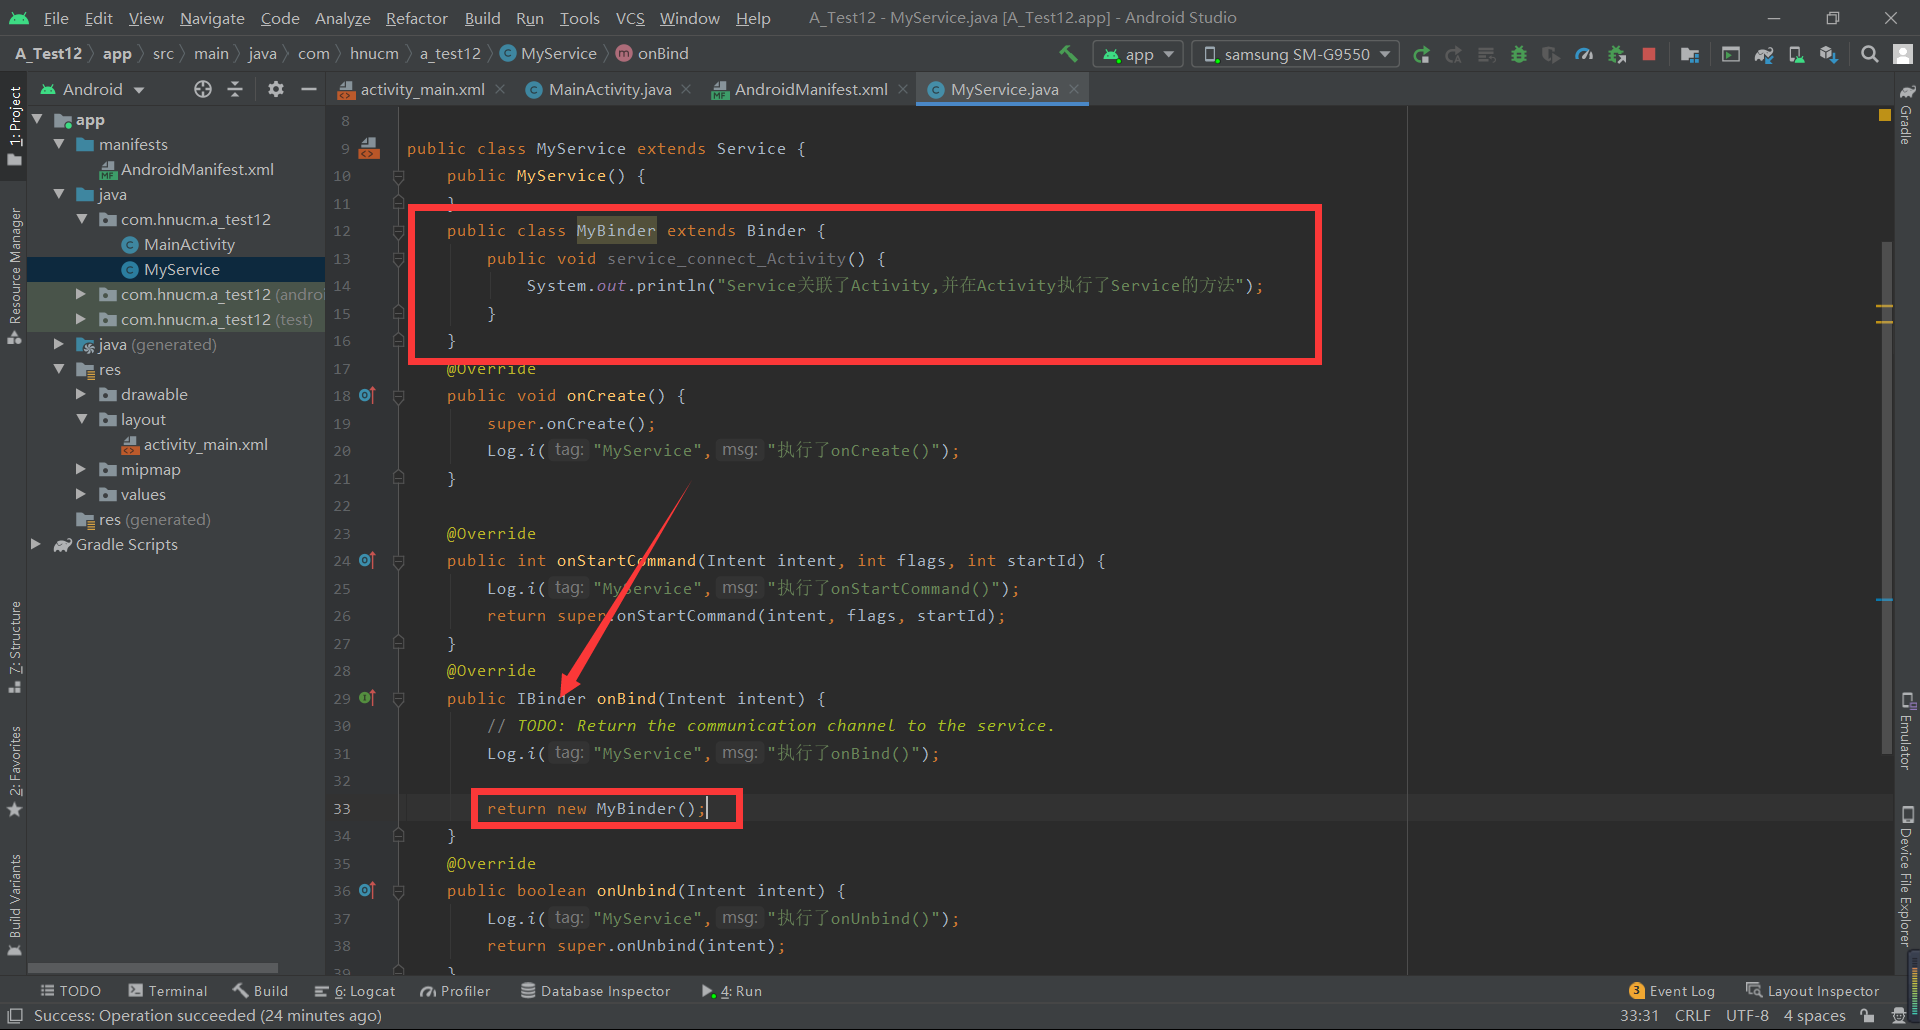
2.我们再看到 MyService中 这个onBind方法,我们用第二种方法启动服务,一定会回调这个onBind方法,系统就会强制我们返回一个IBinder对象,然后通过activity拿到引用
3.重写MyBinder方法
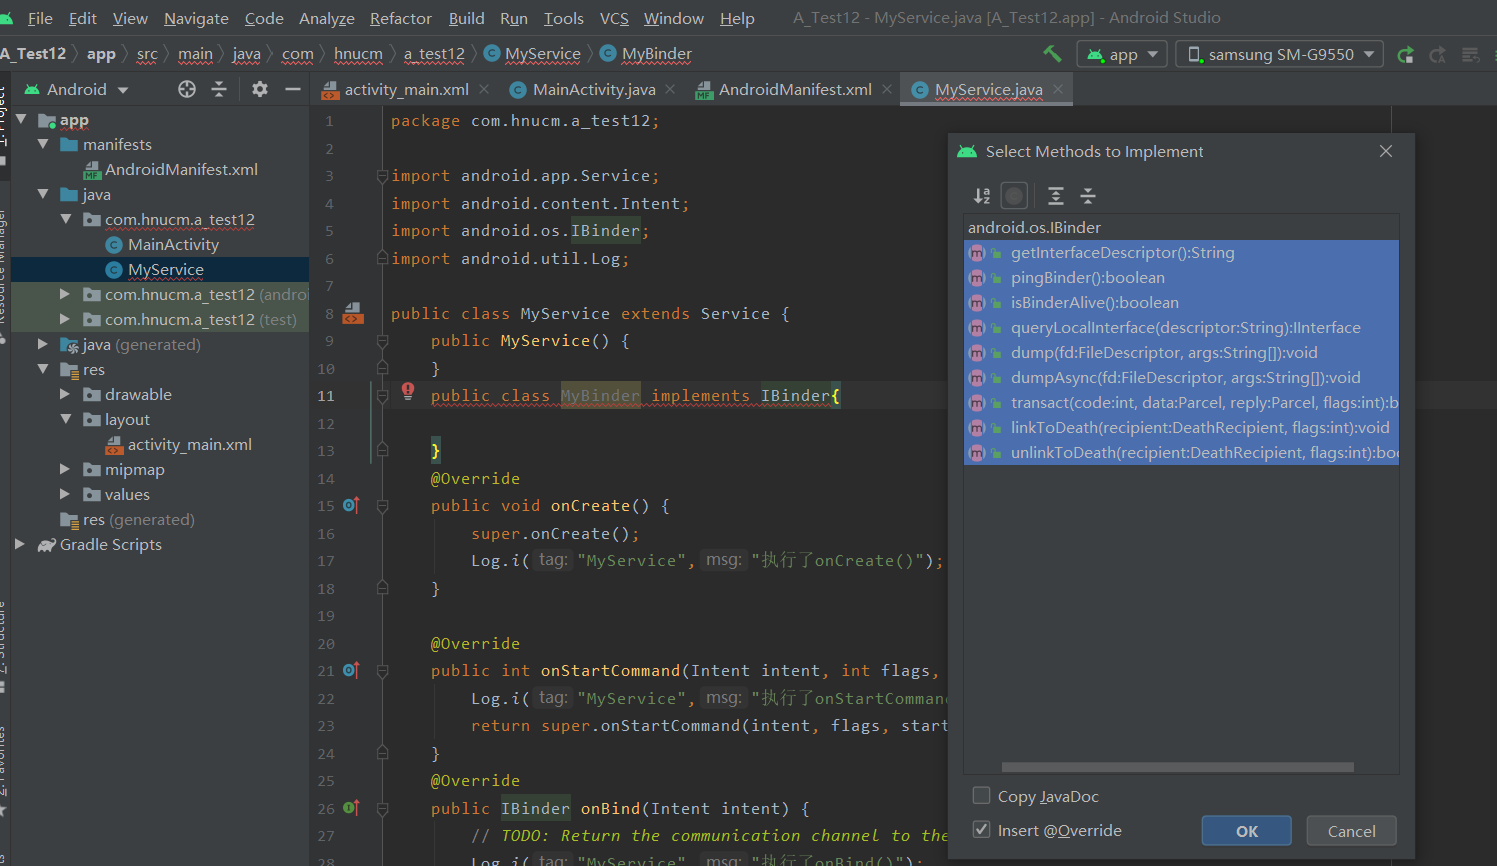
(因为IBinder接口需要重写九个方法,所以我们找一个已经实现IBinder接口的方法继承—->Binder已经实现了IBinder接口)
4.在主布局文件再设置两个Button分别用于绑定和解绑Service
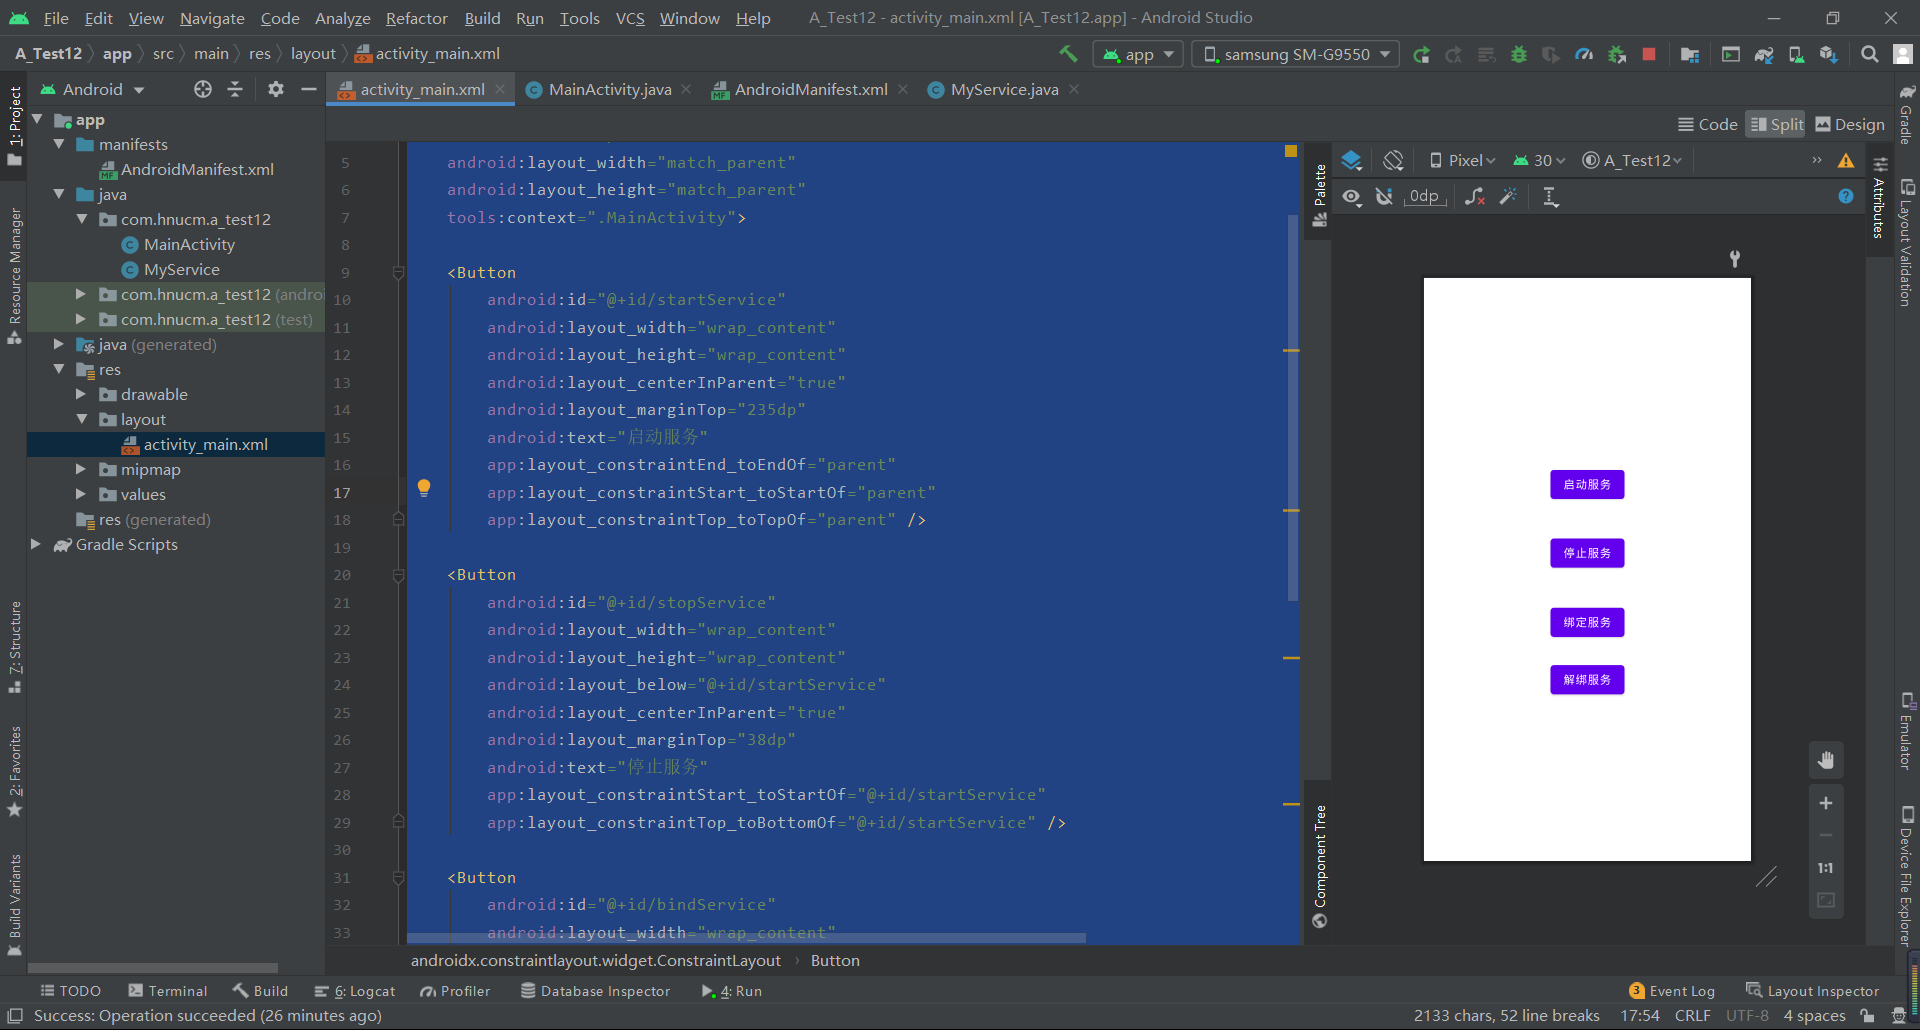
核心代码:
<?xml version="1.0" encoding="utf-8"?>
<androidx.constraintlayout.widget.constraintlayout xmlns:android="http://schemas.android.com/apk/res/android" xmlns:app="http://schemas.android.com/apk/res-auto" xmlns:tools="http://schemas.android.com/tools" android:layout_width="match_parent" android:layout_height="match_parent" tools:context=".MainActivity">
<button android:id="@+id/startService" android:layout_width="wrap_content" android:layout_height="wrap_content" android:layout_centerinparent="true" android:layout_margintop="235dp" android:text="启动服务" app:layout_constraintend_toendof="parent" app:layout_constraintstart_tostartof="parent" app:layout_constrainttop_totopof="parent">
</button><button android:id="@+id/stopService" android:layout_width="wrap_content" android:layout_height="wrap_content" android:layout_below="@+id/startService" android:layout_centerinparent="true" android:layout_margintop="38dp" android:text="停止服务" app:layout_constraintstart_tostartof="@+id/startService" app:layout_constrainttop_tobottomof="@+id/startService">
</button><button android:id="@+id/bindService" android:layout_width="wrap_content" android:layout_height="wrap_content" android:layout_below="@id/stopService" android:layout_centerinparent="true" android:layout_margintop="39dp" android:text="绑定服务" app:layout_constraintstart_tostartof="@+id/stopService" app:layout_constrainttop_tobottomof="@+id/stopService">
</button><button android:id="@+id/unbindService" android:layout_width="wrap_content" android:layout_height="wrap_content" android:layout_below="@id/bindService" android:layout_centerinparent="true" android:layout_margintop="24dp" android:text="解绑服务" app:layout_constraintstart_tostartof="@+id/bindService" app:layout_constrainttop_tobottomof="@+id/bindService">
</button></androidx.constraintlayout.widget.constraintlayout>
在Activity通过调用MyBinder类中的public方法来实现Activity与Service的联系
即实现了Activity指挥Service干什么Service就去干什么的功能
5.创建一个MyServiceConnection内部类并且实现两种方法
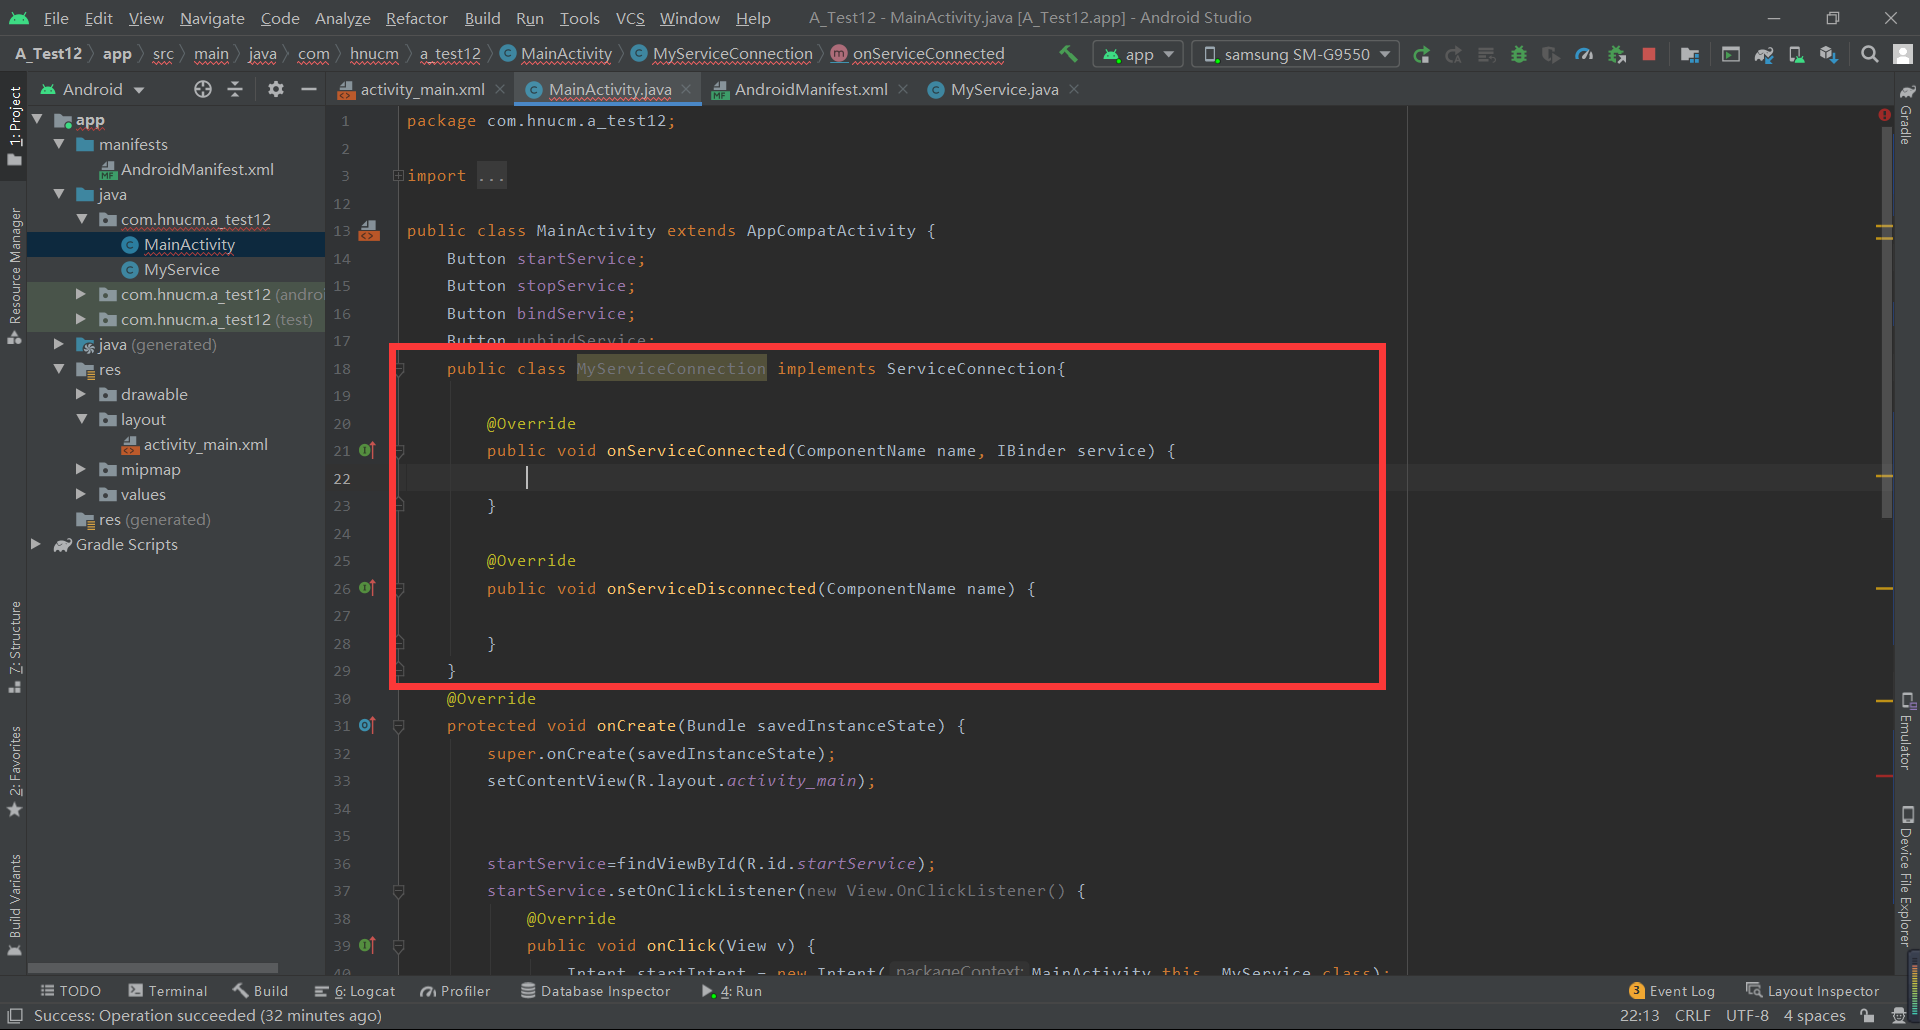
6.Activity代码
package com.hnucm.a_test12;

import androidx.appcompat.app.AppCompatActivity;

import android.content.ComponentName;
import android.content.Intent;
import android.content.ServiceConnection;
import android.os.Bundle;
import android.os.IBinder;
import android.view.View;
import android.widget.Button;

public class MainActivity extends AppCompatActivity {
    Button startService;
    Button stopService;
    Button bindService;
    Button unbindService;

    MyService.MyBinder myBinder;
    ServiceConnection connection=new MyServiceConnection();
    public class MyServiceConnection implements ServiceConnection{

        @Override
        public void onServiceConnected(ComponentName name, IBinder service) {
            myBinder = (MyService.MyBinder) service;
            //在Activity调用Service类的方法
            myBinder.service_connect_Activity();
        }

        @Override
        public void onServiceDisconnected(ComponentName name) {

        }
    }
    @Override
    protected void onCreate(Bundle savedInstanceState) {
        super.onCreate(savedInstanceState);
        setContentView(R.layout.activity_main);

        startService=findViewById(R.id.startService);
        startService.setOnClickListener(new View.OnClickListener() {
            @Override
            public void onClick(View v) {
                Intent startIntent = new Intent(MainActivity.this, MyService.class);
                //调用startService()方法-传入Intent对象,以此启动服务
                startService(startIntent);
            }
        });
        stopService=findViewById(R.id.stopService);
        stopService.setOnClickListener(new View.OnClickListener() {
            @Override
            public void onClick(View v) {
                Intent stopIntent = new Intent(MainActivity.this, MyService.class);
                //调用stopService()方法-传入Intent对象,以此停止服务
                stopService(stopIntent);
            }
        });
        bindService=findViewById(R.id.bindService);
        bindService.setOnClickListener(new View.OnClickListener() {
            @Override
            public void onClick(View v) {
                //构建绑定服务的Intent对象
                Intent bindIntent = new Intent(MainActivity.this, MyService.class);
                //调用bindService()方法,以此停止服务
                bindService(bindIntent,connection,BIND_AUTO_CREATE);
                //参数说明
                //第一个参数:Intent对象
                //第二个参数:上面创建的Serviceconnection实例
                //第三个参数:标志位
                //这里传入BIND_AUTO_CREATE表示在Activity和Service建立关联后自动创建Service
                //这会使得MyService中的onCreate()方法得到执行,但onStartCommand()方法不会执行
            }
        });
        unbindService=findViewById(R.id.unbindService);
        unbindService.setOnClickListener(new View.OnClickListener() {
            @Override
            public void onClick(View v) {
                unbindService(connection);
            }
        });
    }
}
7.运行结果

总结:在activity里面,有些与ui无关的操作,我们可以把它放到service里面来进行,或者是一些需要在后台长期运行的服务,都可以放到service里面来进行,service有两种启动方式,如果对service里面的操作不需要进一步修改,就可以用第一种方法,也比较简单,如果需要进一步改变操作的状态,就需要用到第二种方法 ,然后我们通过service里面的onBind方法,返回的IBinder接口 ,我们拿到接口以后,就可以对它进行操作,但是接口本身里面是没有任何操作的,我们需要通过他的一个实现类,也就是上面的MyBinder,我们把需要控制的地方写到中间类MyBinder中,通过这个类来进行操作。
六、Service怎么保活
1.onStartCommand方法,返回START_STICKY
onStartCommand方法,返回START_STICKY 在运行onStartCommand后service进程被杀死后,那将保留在开始状态,但不会保留那些传入的intent。不久后service就会再次尝试重新创建,因为保留在开始状态,在创建 service后将保证调用onstartCommand。如果没有传递任何开始命令给service,那获取到的Intent为null。手动返回START_STICKY,亲测当service因内存不足被kill,当内存又有的时候,service又被重新创建,但是不能保证任何情况下都被重建,比如进程被干掉了….
2.提升Service优先级
在AndroidManifest.xml文件中对于intent-filter可以通过android:priority = “1000”这个属性设置最高优先级,1000是最高值,如果数字越小则优先级越低,同时适用于广播。
3.提升Service进程优先级
Android中将进程分成6个等级,由高到低分别是:前台进程、可视进程、次要服务进程、后台进程、内容供应节点以及空进程。当系统进程空间紧张时,会按照优先级自动进行进程回收。可以使用startForeground()将服务设置为前台进程。
4.在onDestory中重启Service
直接在onDestroy()里startService或service +broadcast 方式,就是当service走ondestory的时候,发送一个自定义的广播,当收到广播的时候,重新启动service。
Original: https://blog.csdn.net/qq_48435252/article/details/123563776
Author: 夏屿_
Title: Android-Service知识详解
原创文章受到原创版权保护。转载请注明出处:https://www.johngo689.com/815592/
转载文章受原作者版权保护。转载请注明原作者出处!