

回顾tf.keras搭建神经网络八股的六步法
import
train,test
Sequential/Class
model.compile
model.fit
model.summary
本文内容概述
- 自制数据集,解决本领域的应用
- 数据增强,扩充数据集
- 断点续训,存取模型
- 参数提取,把参数存入文本
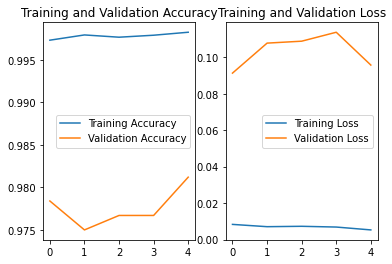
- acc/loss可视化,查看训练效果
-
应用:给图识物品
- 数据增强
- 断点续训,存取模型
- 参数提取,把参数存入文本
- acc/loss查看训练效果
- 应用:绘图识别物品
- 前向传播应用
实现自制数据集
所需素材下载地址
通过上面的地址你将会得到一个压缩包,解压后会得到两个文本文件,里面写的是图片名和对应的标签,还有两个文件夹,里面是对应的图片。
一般拿到本地数据集,要先观察它的结构。以 mnist_train_jpg_60000.txt为例,里面的内容分为两列。第一列是图片名(value[0]),第二列是对应的标签(value[1])
value[0]这一列用于索引到每一张图片
value[1]这一列就是每张图片对应的标签
我们只需要把图片1灰度值数据拼接到图片列表,把标签数据拼接到标签列表。
顺序一致就可以了。
函数代码如下
def generateds(path,txt):
    f = open(txt,"r") # 以只读形式打开txt文件
    contents = f.readlines() # 读取文件所有行
    f.close()
    x,y_ = [],[]
    for content in contents: # 逐行取出进行处理
        value = content.split() # 以空格进行分开
        img_path = path + value[0] # 图片所在路径+图片名称,形成完整路径(图片索引)
        img = Image.open(img_path) # 打开图片(读入图片)
        img = np.array(img.convert('L')) # 图片变为8位宽度的灰度值,并格式化为np的array格式
        img = img / 255 # 数据归一化
        x.append(img) # 归一化后的图片数据
        y_.append(value[1]) # 图片对应标签
        print("[Loding]:"+content) # 打印状态提示
    x = np.array(x)
    y_ = np.array(y_)
    y_ = y_astype(np.int64)
    return x,y_
完整代码如下
import tensorflow as tf
from PIL import Image
import numpy as np
import os

train_path = './mnist_image_label/mnist_train_jpg_60000/'
train_txt = './mnist_image_label/mnist_train_jpg_60000.txt'
x_train_savepath = './mnist_image_label/mnist_x_train.npy'
y_train_savepath = './mnist_image_label/mnist_y_train.npy'

test_path = './mnist_image_label/mnist_test_jpg_10000/'
test_txt = './mnist_image_label/mnist_test_jpg_10000.txt'
x_test_savepath = './mnist_image_label/mnist_x_test.npy'
y_test_savepath = './mnist_image_label/mnist_y_test.npy'

def generateds(path, txt):
    f = open(txt, 'r')  # 以只读形式打开txt文件
    contents = f.readlines()  # 读取文件中所有行
    f.close()  # 关闭txt文件
    x, y_ = [], []  # 建立空列表
    for content in contents:  # 逐行取出
        value = content.split()  # 以空格分开,图片路径为value[0] , 标签为value[1] , 存入列表
        img_path = path + value[0]  # 拼出图片路径和文件名
        img = Image.open(img_path)  # 读入图片
        img = np.array(img.convert('L'))  # 图片变为8位宽灰度值的np.array格式
        img = img / 255.  # 数据归一化 (实现预处理)
        x.append(img)  # 归一化后的数据,贴到列表x
        y_.append(value[1])  # 标签贴到列表y_
        print('loading : ' + content)  # 打印状态提示

    x = np.array(x)  # 变为np.array格式
    y_ = np.array(y_)  # 变为np.array格式
    y_ = y_.astype(np.int64)  # 变为64位整型
    return x, y_  # 返回输入特征x,返回标签y_

if os.path.exists(x_train_savepath) and os.path.exists(y_train_savepath) and os.path.exists(
        x_test_savepath) and os.path.exists(y_test_savepath):
    print('-------------Load Datasets-----------------')
    x_train_save = np.load(x_train_savepath)
    y_train = np.load(y_train_savepath)
    x_test_save = np.load(x_test_savepath)
    y_test = np.load(y_test_savepath)
    x_train = np.reshape(x_train_save, (len(x_train_save), 28, 28))
    x_test = np.reshape(x_test_save, (len(x_test_save), 28, 28))
else:
    print('-------------Generate Datasets-----------------')
    x_train, y_train = generateds(train_path, train_txt)
    x_test, y_test = generateds(test_path, test_txt)

    print('-------------Save Datasets-----------------')
    x_train_save = np.reshape(x_train, (len(x_train), -1))
    x_test_save = np.reshape(x_test, (len(x_test), -1))
    np.save(x_train_savepath, x_train_save)
    np.save(y_train_savepath, y_train)
    np.save(x_test_savepath, x_test_save)
    np.save(y_test_savepath, y_test)

model = tf.keras.models.Sequential([
    tf.keras.layers.Flatten(),
    tf.keras.layers.Dense(128, activation='relu'),
    tf.keras.layers.Dense(10, activation='softmax')
])

model.compile(optimizer='adam',
              loss=tf.keras.losses.SparseCategoricalCrossentropy(from_logits=False),
              metrics=['sparse_categorical_accuracy'])

model.fit(x_train, y_train, batch_size=32, epochs=5, validation_data=(x_test, y_test), validation_freq=1)
model.summary()
Epoch 1/5
1875/1875 [==============================] - 1s 724us/step - loss: 0.0140 - sparse_categorical_accuracy: 0.9956 - val_loss: 0.0826 - val_sparse_categorical_accuracy: 0.9782
Epoch 2/5
1875/1875 [==============================] - 1s 717us/step - loss: 0.0114 - sparse_categorical_accuracy: 0.9965 - val_loss: 0.0823 - val_sparse_categorical_accuracy: 0.9797
Epoch 3/5
1875/1875 [==============================] - 1s 692us/step - loss: 0.0102 - sparse_categorical_accuracy: 0.9968 - val_loss: 0.1080 - val_sparse_categorical_accuracy: 0.9724
Epoch 4/5
1875/1875 [==============================] - 1s 629us/step - loss: 0.0098 - sparse_categorical_accuracy: 0.9969 - val_loss: 0.0959 - val_sparse_categorical_accuracy: 0.9772
Epoch 5/5
1875/1875 [==============================] - 2s 817us/step - loss: 0.0073 - sparse_categorical_accuracy: 0.9980 - val_loss: 0.0931 - val_sparse_categorical_accuracy: 0.9768
Model: "sequential_8"
_________________________________________________________________
Layer (type)                 Output Shape              Param #
=================================================================
flatten_8 (Flatten)          (None, 784)               0
_________________________________________________________________
dense_16 (Dense)             (None, 128)               100480
_________________________________________________________________
dense_17 (Dense)             (None, 10)                1290
=================================================================
Total params: 101,770
Trainable params: 101,770
Non-trainable params: 0
_________________________________________________________________
观察上面的运行结果,这是第二次运行的运行结果,因此第一行有”————-load the model—————–“也就是加载了模型。
如果是初次运行,是没有这个加载的。
参数提取,把参数存入文本
提取可训练参数 model.trainable_variables 返回模型中可训练的参数
但是中间会有很多数据被省略号替换掉,如果不想省略,使用下面方法:
设置print输出格式 np.set_printoptions(threshold=超过多少省略显示)
np.set_printoptions(threshold=np.inf) # np.inf表示无限大
阈值设置为np.inf的时候表示打印过程中不使用省略号,所有内容都打印
print(model.trainable_variables)
file = open("./weights.txt","w)
for v in model.trainable_variables:
   file.write(str(v.name)+'\n')
   file.write(str(v.shaoe)+'\n')
   file.write(str(v.numpy())+'\n')
file.close()
完整示例代码如下:
import tensorflow as tf
import os
import numpy as np
np.set_printoptions(threshold=np.inf) # 设置打印选项,打印所有内容
mnist = tf.keras.datasets.mnist
(x_train, y_train), (x_test, y_test) = mnist.load_data()
x_train, x_test = x_train / 255.0, x_test / 255.0
model = tf.keras.models.Sequential([
    tf.keras.layers.Flatten(),
    tf.keras.layers.Dense(128, activation='relu'),
    tf.keras.layers.Dense(10, activation='softmax')
])
model.compile(optimizer='adam',
              loss=tf.keras.losses.SparseCategoricalCrossentropy(from_logits=False),
              metrics=['sparse_categorical_accuracy'])
checkpoint_save_path = "./checkpoint/mnist.ckpt"
if os.path.exists(checkpoint_save_path + '.index'):
    print('-------------load the model-----------------')
    model.load_weights(checkpoint_save_path)
cp_callback = tf.keras.callbacks.ModelCheckpoint(filepath=checkpoint_save_path,
                                                 save_weights_only=True,
                                                 save_best_only=True)
history = model.fit(x_train, y_train, batch_size=32, epochs=5, validation_data=(x_test, y_test), validation_freq=1,
                    callbacks=[cp_callback])
model.summary()
print(model.trainable_variables)
file = open('./weights.txt', 'w')
for v in model.trainable_variables:
    file.write(str(v.name) + '\n')
    file.write(str(v.shape) + '\n')
    file.write(str(v.numpy()) + '\n')
file.close()
Epoch 1/5
1875/1875 [==============================] - 2s 885us/step - loss: 0.0083 - sparse_categorical_accuracy: 0.9973 - val_loss: 0.0913 - val_sparse_categorical_accuracy: 0.9784
Epoch 2/5
1875/1875 [==============================] - 1s 702us/step - loss: 0.0071 - sparse_categorical_accuracy: 0.9979 - val_loss: 0.1077 - val_sparse_categorical_accuracy: 0.9750
Epoch 3/5
1875/1875 [==============================] - 1s 744us/step - loss: 0.0073 - sparse_categorical_accuracy: 0.9977 - val_loss: 0.1088 - val_sparse_categorical_accuracy: 0.9767
Epoch 4/5
1875/1875 [==============================] - 1s 670us/step - loss: 0.0069 - sparse_categorical_accuracy: 0.9979 - val_loss: 0.1137 - val_sparse_categorical_accuracy: 0.9767
Epoch 5/5
1875/1875 [==============================] - 1s 648us/step - loss: 0.0053 - sparse_categorical_accuracy: 0.9982 - val_loss: 0.0957 - val_sparse_categorical_accuracy: 0.9812
Model: "sequential"
_________________________________________________________________
Layer (type)                 Output Shape              Param #
=================================================================
flatten (Flatten)            (None, 784)               0
_________________________________________________________________
dense (Dense)                (None, 128)               100480
_________________________________________________________________
dense_1 (Dense)              (None, 10)                1290
=================================================================
Total params: 101,770
Trainable params: 101,770
Non-trainable params: 0
_________________________________________________________________
[<tf.variable 'dense kernel:0' shape="(784," 128) dtype="float32," numpy="array([[" 6.34127036e-02, -6.07048757e-02, -3.69162932e-02, -2.35030539e-02, -4.45458330e-02, 9.12127644e-03, -7.12393969e-03, -6.19574562e-02, -4.10414599e-02, 1.05893835e-02, 4.71158400e-02, 6.22039065e-02, -2.25204565e-02, 2.21468955e-02, 8.29327106e-03, -1.73857883e-02, -7.67347813e-02, -6.99169040e-02, 中间内容太多了,我手动删除了。 [ 3.02872092e-01, -1.38949528e-01, 7.92332441e-02, 1.07746780e-01, -7.89502144e-01, 1.55102983e-01, 3.94402325e-01, -4.48481888e-01, 2.13906527e-01, -1.44557402e-01]],>, <tf.variable 'dense_1 bias:0' shape="(10,)" dtype="float32," numpy="array([-0.19332801," -0.24441427, -0.0466181 , -0.1777947 0.07523793, 0.01075818, 0.06531369, -0.24331087, 0.5179139 0.04818732],>]
</tf.variable></tf.variable>

应用:绘图识别物品
前向传播应用
predict(输入特征,batch_size = 整数) 返回前向传播计算结果
通过这个函数实现前向传播视图应用,仅需三步
- 复现模型(用Sequential搭建网络):
model = tf.keras.models.Sequential([ tf.keras.layers.Flatten(), tf.keras.layers.Dense(128,activation="relu"), tf.keras.layers.Dense(10,activation="softmax") ]) - 加载参数:
model.load_weights(model_save_Path) - 预测结果:
result = model.predict(x_predict)
from PIL import Image
import numpy as np
import tensorflow as tf

model_save_path = './checkpoint/mnist.ckpt'

model = tf.keras.models.Sequential([
    tf.keras.layers.Flatten(),
    tf.keras.layers.Dense(128, activation='relu'),
    tf.keras.layers.Dense(10, activation='softmax')])

model.load_weights(model_save_path)

preNum = int(input("input the number of test pictures:"))

for i in range(preNum):
    image_path = input("the path of test picture:")
    img = Image.open(image_path)
    img = img.resize((28, 28), Image.ANTIALIAS)
使用上面这句出现提示:DeprecationWarning: ANTIALIAS is deprecated and will be removed in Pillow 10 (2023-07-01). Use Resampling.LANCZOS instead.

    img = img.resize((28, 28), Image.Resampling.LANCZOS )
    img_arr = np.array(img.convert('L'))

    img_arr = 255 - img_arr

    img_arr = img_arr / 255.0
    print("img_arr:",img_arr.shape)
    x_predict = img_arr[tf.newaxis, ...]
    print("x_predict:",x_predict.shape)
    result = model.predict(x_predict)

    pred = tf.argmax(result, axis=1)

    print('\n')
    tf.print(pred)
input the number of test pictures:1
the path of test picture:test0.jpg
img_arr: (28, 28)
x_predict: (1, 28, 28)
WARNING:tensorflow:7 out of the last 8 calls to <function model.make_predict_function.<locals>.predict_function at 0x000001814776D678> triggered tf.function retracing. Tracing is expensive and the excessive number of tracings could be due to (1) creating @tf.function repeatedly in a loop, (2) passing tensors with different shapes, (3) passing Python objects instead of tensors. For (1), please define your @tf.function outside of the loop. For (2), @tf.function has experimental_relax_shapes=True option that relaxes argument shapes that can avoid unnecessary retracing. For (3), please refer to https://www.tensorflow.org/tutorials/customization/performance#python_or_tensor_args and https://www.tensorflow.org/api_docs/python/tf/function for  more details.

</function>
[5]
Original: https://www.cnblogs.com/mllt/p/sjwlbgkz.html
Author: 萌狼蓝天
Title: 【人工智能】神经网络八股扩展
原创文章受到原创版权保护。转载请注明出处:https://www.johngo689.com/806591/
转载文章受原作者版权保护。转载请注明原作者出处!