

ssh用普通用户连接被控端
配置主机清单 (/etc/hosts域名解析为前提)
[root@workstation ansible]# cat hosts
servera
serverb
[root@workstation ansible]# pwd
/etc/ansible
[root@workstation ansible]#
建立免密
[root@workstation ansible]# ssh-keygen
使被控端创建用户
[root@workstation ansible]# ansible all -m shell -a 'useradd ansible' -k
SSH password:
servera | CHANGED | rc=0 >>

serverb | CHANGED | rc=0 >>

[root@workstation ansible]# ansible all -m shell -a 'echo redhat | passwd --stdin ansible' -k
SSH password:
serverb | CHANGED | rc=0 >>
Changing password for user ansible.

passwd: all authentication tokens updated successfully.

servera | CHANGED | rc=0 >>
Changing password for user ansible.

passwd: all authentication tokens updated successfully.
配置与ansible用户的免密
[root@workstation ansible]# ssh-copy-id ansible@servera
/usr/bin/ssh-copy-id: INFO: Source of key(s) to be installed: "/root/.ssh/id_rsa.pub"
/usr/bin/ssh-copy-id: INFO: attempting to log in with the new key(s), to filter out any that are already installed
/usr/bin/ssh-copy-id: INFO: 1 key(s) remain to be installed -- if you are prompted now it is to install the new keys
ansible@servera's password:

Number of key(s) added: 1

Now try logging into the machine, with:   "ssh 'ansible@servera'"
and check to make sure that only the key(s) you wanted were added.

[root@workstation ansible]# ssh-copy-id ansible@serverb
/usr/bin/ssh-copy-id: INFO: Source of key(s) to be installed: "/root/.ssh/id_rsa.pub"
/usr/bin/ssh-copy-id: INFO: attempting to log in with the new key(s), to filter out any that are already installed
/usr/bin/ssh-copy-id: INFO: 1 key(s) remain to be installed -- if you are prompted now it is to install the new keys
ansible@serverb's password:

Number of key(s) added: 1

Now try logging into the machine, with:   "ssh 'ansible@serverb'"
and check to make sure that only the key(s) you wanted were added.

[root@workstation ansible]#

[root@workstation ansible]# ansible all -m shell -a 'pwd' -k -u ansible
SSH password:
servera | CHANGED | rc=0 >>
/home/ansible
serverb | CHANGED | rc=0 >>
/home/ansible
[root@workstation ansible]#
默认改为ansible用户连接


[root@workstation ansible]# ansible all -m shell -a 'pwd'
servera | CHANGED | rc=0 >>
/home/ansible
serverb | CHANGED | rc=0 >>
/home/ansible
[root@workstation ansible]#
设置被控端提权
[root@workstation ansible]# ansible all -m shell -a 'echo ansible ALL=\(ALL\) NOPASSWD: ALL > /etc/sudoers.d/ansible' -u root -k
SSH password:
servera | CHANGED | rc=0 >>

serverb | CHANGED | rc=0 >>
ansible这边并没有提权
[root@workstation ansible]# ansible all -m shell -a 'id'
servera | CHANGED | rc=0 >>
uid=1001(ansible) gid=1001(ansible) groups=1001(ansible) context=unconfined_u:unconfined_r:unconfined_t:s0-s0:c0.c1023
serverb | CHANGED | rc=0 >>
uid=1000(ansible) gid=1000(ansible) groups=1000(ansible) context=unconfined_u:unconfined_r:unconfined_t:s0-s0:c0.c1023
[root@workstation ansible]#
修改配置文件

成功提权
[root@workstation ansible]# ansible all -m shell -a 'id'
servera | CHANGED | rc=0 >>
uid=0(root) gid=0(root) groups=0(root) context=unconfined_u:unconfined_r:unconfined_t:s0-s0:c0.c1023
serverb | CHANGED | rc=0 >>
uid=0(root) gid=0(root) groups=0(root) context=unconfined_u:unconfined_r:unconfined_t:s0-s0:c0.c1023
[root@workstation ansible]#

[root@workstation ansible]# ansible all -m shell -a 'pwd'
servera | CHANGED | rc=0 >>
/home/ansible
serverb | CHANGED | rc=0 >>
/home/ansible
[root@workstation ansible]#
定义inventory
列出当前选择的主机
[root@workstation ansible]# ansible servera --list-hosts
hosts (1):
servera
[root@workstation ansible]# ansible servera,serverb --list-hosts
hosts (2):
servera
serverb
[root@workstation ansible]# ansible httpd,mysql --list-hosts
hosts (3):
servera
serverb
abc
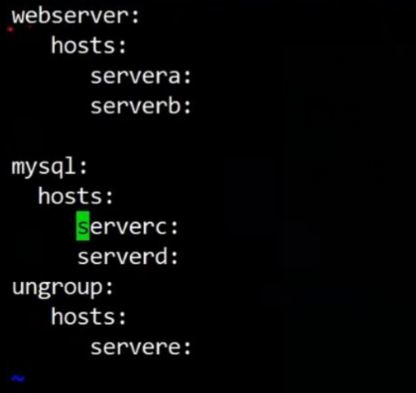
[root@workstation ansible]# cat hosts
[httpd]
servera
serverb
[mysql]
abc
[root@workstation ansible]#
这里hosts为ini格式和那个yum差不多
不想加入组的用户得写在第一排。
[root@workstation ansible]# ansible ungrouped --list-hosts
hosts (1):
servere
[root@workstation ansible]# head -n3 hosts
servere
[httpd]
servera
[root@workstation ansible]#
servere不属于任何组
组包含组
[root@workstation ansible]# vi hosts
[root@workstation ansible]# ansible web --list-hosts
hosts (3):
    servera
    serverb
    abc
[root@workstation ansible]# cat hosts
servere
[httpd]
servera
serverb

[mysql]
abc

[web:children]
httpd
mysql    #那么这里就只能写组,不可以写主机
[root@workstation ansible]#

[web:children]
httpd
mysql
[web]
fox        #这样才可以添加fox主机
ansible选择了两边主机,ansible会自动去重。
支持通配符
组和主机都通配
[root@workstation ansible]# ansible 'server*' --list-hosts
hosts (3):
    servere
    servera
    serverb
[root@workstation ansible]#
hosts也可以连续定义

[root@workstation ansible]# ansible 'server*,!*server1' --list-hosts
hosts (14):
    server2
    server3
    server4
    server5
    server6
    server7
    server8
    server9
    server10
    server11
    server12
    servere
    servera
    serverb
[root@workstation ansible]#
唯独不要server1
[root@workstation ansible]# ansible 'httpd,&mysql' --list-hosts
hosts (1):
    server10
[root@workstation ansible]# cat hosts
server[1:12]

servere
[httpd]
servera
serverb
server10
[mysql]
abc
server10
[web:children]
httpd
mysql
[root@workstation ansible]#
既属于web又属于httpd
boston,londor,&prod,!lb
在boston与londor同时也在prod但是去除lb
正则表达式

有s或h字母 尾巴为example.com的
没带^就不是开头为s或h
另外指定新的主机清单。读新的hosts
[root@workstation ansible]# echo  servera  > file
[root@workstation ansible]# ansible servera -i file --list-hosts
  hosts (1):
    servera
[root@workstation ansible]#
有关ansible常用参数
-m 指定模块
-a 指定模块参数
-u 指定被控端的连接用户2
-k 密码验证,不指定就是秘钥验证
-i 指定主机清单 ansible servera -i file –list-hosts
–list-hosts 列出所选的主机
yaml格式定义主机清单

比较完整的yaml写法
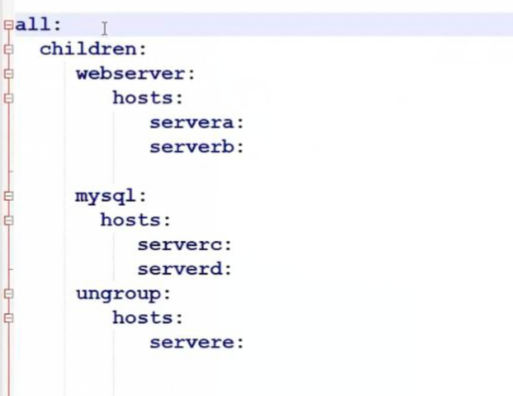
ini格式转换yaml

yaml语法对程序更友好
配置文件
默认配置文件位置
[root@workstation ansible]# pwd
/etc/ansible
[root@workstation ansible]# ls
ansible.cfg  file  file.yaml  hosts  roles
[root@workstation ansible]#

配置文件有优先级读取顺序
ANSIBLE_CONFIG = /tmp/ansible.cfg
当前目录下的ansible.cfg  ./
家目录   ~/.ansible.cfg
/etc/ansible/ansible.cfg

更改运行主机清单的路径

ansible.cfg的参数
inventory      = ./hosts
#library        = /usr/share/my_modules/
#module_utils   = /usr/share/my_module_utils/
#remote_tmp     = ~/.ansible/tmp
#local_tmp      = ~/.ansible/tmp
#plugin_filters_cfg = /etc/ansible/plugin_filters.yml
#forks          = 5
inventory      = ./hosts
#library        = /usr/share/my_modules/
#module_utils   = /usr/share/my_module_utils/
#remote_tmp     = ~/.ansible/tmp   被控端路径  py的临时运行目录的位置
#local_tmp      = ~/.ansible/tmp   主控端临时存储目录
#plugin_filters_cfg = /etc/ansible/plugin_filters.yml
#forks          = 5       并发数  一次性连5台,再连5台
#poll_interval  = 15      探测任务执行如何  每15秒探测
#ask_pass      = True    密码验证   -k 默认false
#remote_port    = 22    被控端,端口号
remote_user = ansible    远程主机用什么连
[privilege_escalation]
become=True          要提权
become_method=sudo
become_user=root     提权用户
become_ask_pass=False   不问提权密码
#host_key_checking = False     自动接受公钥  (好用)

log_path=/var/log/ansible.log   普通用户得改这个路径
普通用户写不了var/log
module_name = command  不指定模块默认为command模块
ad-hoc指令

搜索模块时搜索builtin 内置模块
shell模块
优点:功能强大
缺点:无法保证幂等性
ansible servera -m shell -a ‘命令’
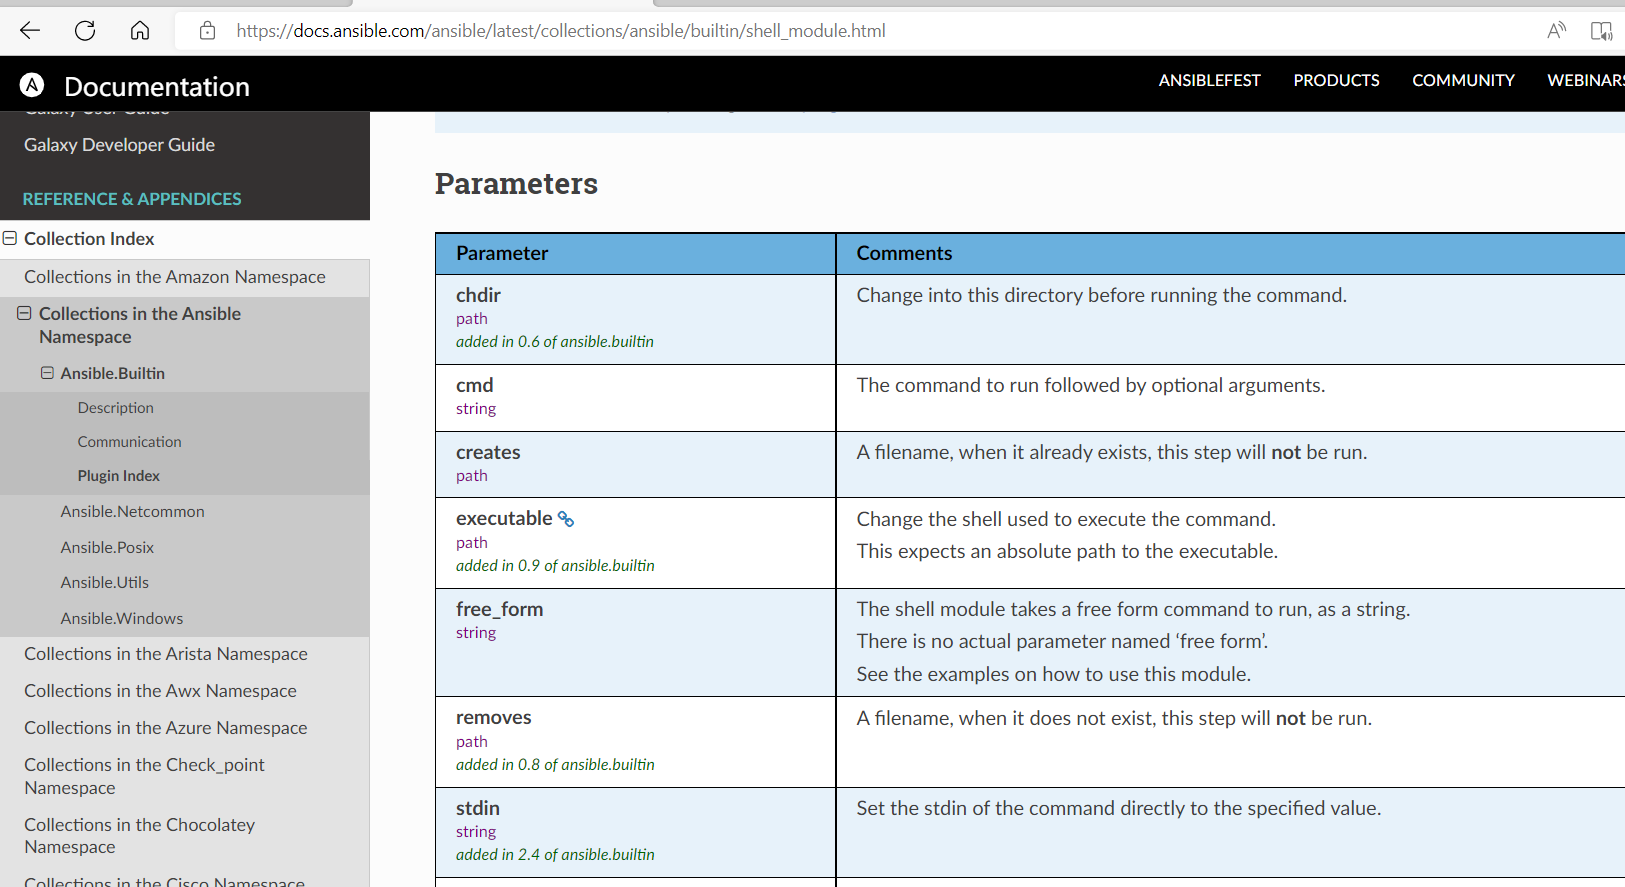
来自官方文档的教诲(狗头)
[root@workstation maosible]# ansible  servera -m shell -a 'chdir=/tmp pwd'
servera | CHANGED | rc=0 >>
/tmp
[root@workstation maosible]#

[root@workstation maosible]# ansible  servera -m shell -a 'creates=/tmp/file pwd'
servera | SUCCESS | rc=0 >>
skipped, since /tmp/file exists
[root@workstation maosible]#
文件存在,则不执行pwd

removes相反
command模块为默认模块
ansible servera -a ‘pwd’
command不允许 > < | 之类。 他会当成字符串
raw模块就是被削弱的shell
script模块
让脚本在被控端执行
这个脚本可以不需要执行权限,因为他会被解析成py文件,被控端通过执行py文件执行脚本
其他常用模块
authorized_keys 分发公钥
[root@workstation .ssh]# ansible-galaxy collection install ansible.posix -vvv
ansible-galaxy 2.9.11
config file = /etc/ansible/ansible.cfg
configured module search path = ['/root/.ansible/plugins/modules', '/usr/share/ansible/plugins/modules']
ansible python module location = /usr/lib/python3.6/site-packages/ansible
executable location = /usr/bin/ansible-galaxy
python version = 3.6.8 (default, Mar 18 2021, 08:58:41) [GCC 8.4.1 20200928 (Red Hat 8.4.1-1)]
Using /etc/ansible/ansible.cfg as config file
Process install dependency map
Opened /root/.ansible/galaxy_token
Processing requirement collection 'ansible.posix'
Collection 'ansible.posix' obtained from server default https://galaxy.ansible.com/api/
Starting collection install process
Installing 'ansible.posix:1.4.0' to '/root/.ansible/collections/ansible_collections/ansible/posix'
Downloading https://galaxy.ansible.com/download/ansible-posix-1.4.0.tar.gz to /root/.ansible/tmp/ansible-local-5179_oikgerz/tmpqxvizmuo
2.9没有此内置模块
那么使用galaxy从网上下载
通过官方文档发现名字为ansible.posix.authorized_key

[root@workstation modules]# ansible all -m ansible.posix.authorized_key -a 'user=root key="ssh-rsa AAAAB3NzaC1yc2EAAAADAQABAAABgQCkQdrj0fMPRQiC7f+1I4N23k/OdwAqt0ONpNDmChbD/ehrJ5lrEspinVtolwBdR5lKnhnWpb9iC29QlR4epd0EdLrId1wRwZ1pMteZuAwR7IlfCCzzSo2ND6gBl1KSIPV4aZhigspFC1JyGAuoB4HIjeZ9NI6w1XP+U/hoGNLjKZtEhPK+H5ijXpb9pVMPvCa0uLYta0qqIMSpIkLlNFUQ1hNd4g4b+aj2y+BzBG/+kYS/7+vDuiBw0GoZ18zmY0ueQjeafg00RNLM/qU90soo29T9tRPc67PozFw20RB8z4LH8Iwe3jzOzGEOWFQ0frJyOg8CgOwDoqMTk4oNjwx4HEOSjv9SsaWYQGZxOkJ5iVZ3MLQt1MkEzhJjibCTMIDlQQ+Dj16hFTMRmM7EXc4AHq1gwURqRv96e0pvmC7RIAFWiPd9IvSSmt4HJB/qGmQjCmvvy84FAGddbEiYGOH2YShzoppBVpxQEsCbHxvZQXJbpwb0uAvn22Pxd5AsH6M= root@workstation" state=present'
参考文档:https://docs.ansible.com/ansible/latest/collections/ansible/posix/authorized_key_module.html
可是2.9拥有authorized_key
[root@workstation modules]# ansible all -m authorized_key -a 'user=root key="ssh-rsa AAAAB3NzaC1yc2EAAAADAQABAAABgQCkQdrj0fMPRQiC7f+1I4N23k/OdwAqt0ONpNDmChbD/ehrJ5lrEspinVtolwBdR5lKnhnWpb9iC29QlR4epd0EdLrId1wRwZ1pMteZuAwR7IlfCCzzSo2ND6gBl1KSIPV4aZhigspFC1JyGAuoB4HIjeZ9NI6w1XP+U/hoGNLjKZtEhPK+H5ijXpb9pVMPvCa0uLYta0qqIMSpIkLlNFUQ1hNd4g4b+aj2y+BzBG/+kYS/7+vDuiBw0GoZ18zmY0ueQjeafg00RNLM/qU90soo29T9tRPc67PozFw20RB8z4LH8Iwe3jzOzGEOWFQ0frJyOg8CgOwDoqMTk4oNjwx4HEOSjv9SsaWYQGZxOkJ5iVZ3MLQt1MkEzhJjibCTMIDlQQ+Dj16hFTMRmM7EXc4AHq1gwURqRv96e0pvmC7RIAFWiPd9IvSSmt4HJB/qGmQjCmvvy84FAGddbEiYGOH2YShzoppBVpxQEsCbHxvZQXJbpwb0uAvn22Pxd5AsH6M= root@workstation" state=present'
所以没必要去下载ansible.posix.authorized_key
但是可以显示出参考文档的重要性
那么遇到问题,可以直接去寻找官方的英文文档,会更有效率。
以下为转载
https://cloud.tencent.com/developer/news/327468
ansible原理
Ansible 是一个模型驱动的配置管理器,支持多节点发布、远程任务执行。默认使用 SSH 进行远程连接。无需在被管理节点上安装附加软件,可使用各种编程语言进行扩展。
一、Ansible基本架构

上图为ansible的基本架构,从上图可以了解到其由以下部分组成:
核心:ansible
核心模块(Core Modules):这些都是ansible自带的模块
扩展模块(Custom Modules):如果核心模块不足以完成某种功能,可以添加扩展模块
插件(Plugins):完成模块功能的补充
剧本(Playbooks):ansible的任务配置文件,将多个任务定义在剧本中,由ansible自动执行
连接插件(Connectior Plugins):ansible基于连接插件连接到各个主机上,虽然ansible是使用ssh连接到各个主机的,但是它还支持其他的连接方法,所以需要有连接插件
主机群(Host Inventory):定义ansible管理的主机
二、Ansible工作原理
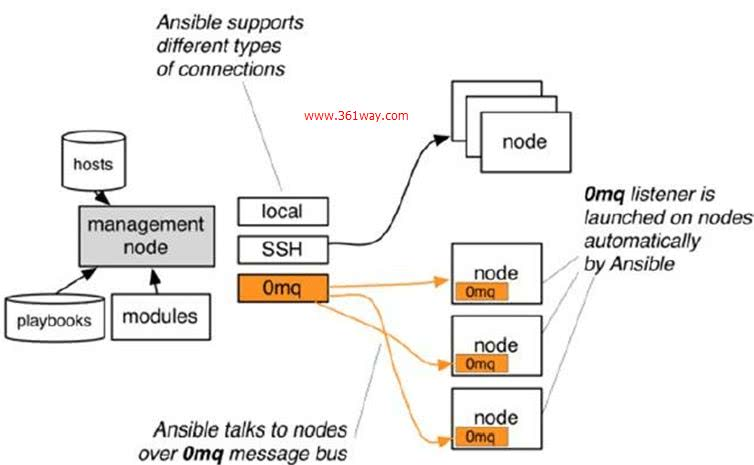

以上是从网上找到的两张ansible工作原理图,两张图基本都是在架构图的基本上进行的拓展。从上面的图上可以了解到:
1、管理端支持local 、ssh、zeromq 三种方式连接被管理端,默认使用基于ssh的连接---这部分对应基本架构图中的连接模块;
2、可以按应用类型等方式进行Host Inventory(主机群)分类,管理节点通过各类模块实现相应的操作---单个模块,单条命令的批量执行,我们可以称之为ad-hoc;
3、管理节点可以通过playbooks 实现多个task的集合实现一类功能,如web服务的安装部署、数据库服务器的批量备份等。playbooks我们可以简单的理解为,系统通过组合多条ad-hoc操作的配置文件 。
控制执行顺序,优化,事实变量
正常情况下,playbook从上到下依次执行
有role先执行role就算role在任务最下面

- name: import roles
  include_role:            #import_role也可以
     name: httpd
这样的话就是从上往下

pre_task跑在role之前

- name: install httpd
  hosts: webservers

  tasks:
  - name: install httpd......

    yum:
      name: httpd
      state: present
    notify: debug yum
    changed_when: true

  handlers:
  - name: debug yum1
    debug:
      msg: "I am handler for  tasks.."
    listen: debug yum

  - name: debug yum2
    debug:
      msg: "I am handler for  tasks......................"
    listen: debug yum

4~ 在Playbook中,你可以通过Order关键字来定义执行任务的主机的先后顺序
forks = 1 并发为1
小于并发时,才会有先后顺序
order: inventory
默认情况下为inventory.

reverse_inventory
sorted
reverse_sorted
shuffle

5~ 优化执行速度
执行剧本时,剧本写好,禁止事实变量收集(get_fact)
Gethering Facts收集事实变量
提升forks并发,默认值为5  (controller cpu性能好可以加大)
ansible-playbook  -f  8
可以这样指定并发,也可以更改配置文件ansible.cfg
模块处理
yum装包不使用循环loop,会更快
不用循环就是一次性装5个包,循环你得一个个来
拷贝目录
copy模块拷贝那些文件数量多且小的时候,会很慢
使用synchronize会更快(rync)
synchronize:
   src: files
   dest: /root/files
ssh连接
无论多少个剧本执行,和对方建立连接时,只会共用一个通道
当我剧本完成后,我和被控节点的连接(ssh)不会立即断开,会有60秒的通道持续时间
这是默认值 Controlpersist=60s
lsof -i:22 可以查看22端口
这个值是可以通过配置来发生变化的
[ssh_connection]
ssh_args = -o ControlMaster=auto -o ControlPersist = 60s
下次执行ansible时候会用这个未断开的通道
建立通道需要开销,tcp的三次握手什么的
回调插件
callback_whitelist=timer,profile_tasks,profile_roles,cgroup_perf_recap
可以看到执行后的时间,这三个看时间的参数一起,会更详细
cgroup_perf_recap这个回调插件可以看每个任务占用多少cpu和内存
单独使用这个插件则没用,得设置cgroup,并且添加两行
[callback_cgroup_perf_recap]
control_group=ansible_profile
cgroup收集的是controller的信息
设置cgroup
[root@workstation AppStream]# cgcreate -a student:student -t student:student -g cpuacct,memory,pids:ansible_profile

6~ 事实变量
gathering = explicit/implicit 默认值为:implict
implict: 默认情况下,是收集事实变量的。你的Play想要关闭事实收集就需要在play中
gather_facts: False
不收集事实变量你就不能调用他
explicit:默认不是收集事实变量,想收集,就需要在play中定义gather_facts: True
tower可以缓存事实变量,以提高获取事实变量的速度
在playbook里标记tags
always 标签只要运行playbook指定tags那么always一定会跑(尽管tags不匹配)
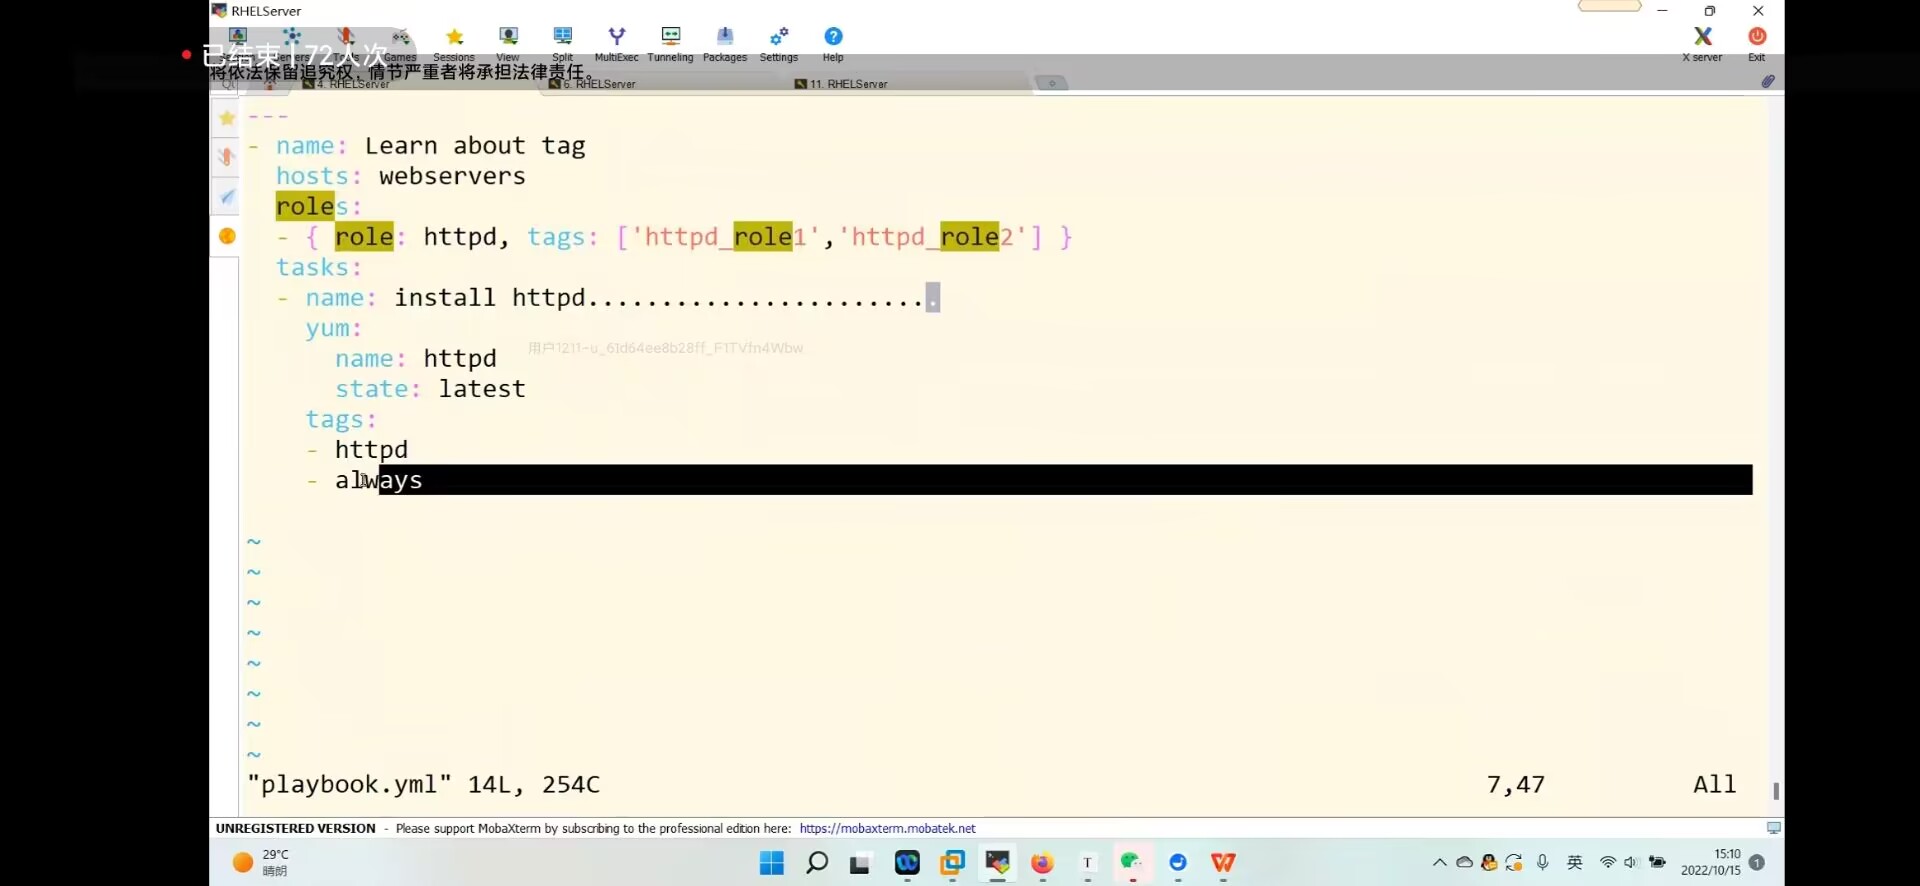
这个role被打上了两个tags,指定这两个其中一个role都会执行

除非–skip-tags always 跳过这个标签
never playbook运行时,不带任何–tags则never标签永远不会执行
tags可以帮助我们对任务进行’打标签’的操作,当任务存在标签以后,我们就可以在执行playbook时,借助标签,指定执行哪些任务,或者指定不执行哪些任务。在实际的使用中,我们应该让tags的值能够见名知义。
当指定标签后,只有标签对应的任务会被执行,其他任务都不会被执行
判断变量类型
1> 判定变量的类型
通过type_debug插件,来判定变量的类型
• Strings (a sequence of characters)
• Numbers (a numeric value)
• Booleans (true/false values)
• Dates (ISO-8601 calendar date)
• Null (sets the variable to undefined the variable)
• Lists or Arrays (a sorted collection of values)
• Dictionaries (a collection of key-value pairs)

[student@workstation ansible]$ cat 4.yml
- name: ddd
  hosts: webservers
  vars:
    username: kevin

    user_list1:
    - user11,user22,user33
    - { username: "kevin" , password: "redhat" }
    - user3

    user_list2: [ ["user22","user33","user44"] ,"user4","user5"]

    user_info1:
      username: kevin
      password: redhat
      shell_type: bash
      uid: 5000

    user_info2: {"username":["user1","user2","user3","user4","user5"],"password":{"redhat":"redhat2"}}

    user_num: 1
    check: 0
    time1: 2022-10-15T16:43:52+08:00
    time2: 2022-10-15
    time3: 2022-10-15 16:44:49
    user_name: null

  tasks:
  - name: debug var type
    debug:
      msg: "{{ user_list1 | type_debug }}"

Original: https://www.cnblogs.com/supermao12/p/16646066.html
Author: supermao12
Title: ansible 002 连接被控端 inventory ansible.cfg ansible-adhoc ansible原理 控制执行顺序,优化,事实变量 tags 变量类型
原创文章受到原创版权保护。转载请注明出处:https://www.johngo689.com/803642/
转载文章受原作者版权保护。转载请注明原作者出处!