

一直以来对缓存都是一知半解,从没有正经的接触并使用一次,今天腾出时间研究一下缓存技术,开发环境为 OpenJDK17与 SpringBoot2.7.5
源代码下载地址:https://hanzhe.lanzoue.com/iK4AF0hjl3lc
SpringCache基础概念
接口介绍
首先看看SpringCache中提供的两个主要接口,第一个是 CacheManager缓存管理器接口,在接口名的位置按 F4(IDEA Eclipse快捷键)可查看接口的实现,其中最底下的 ConcurrentMapCacheManager就是缓存管理器默认实现,在不进行任何配置的情况下直接使用缓存默认使用的就是基于Map集合的缓存
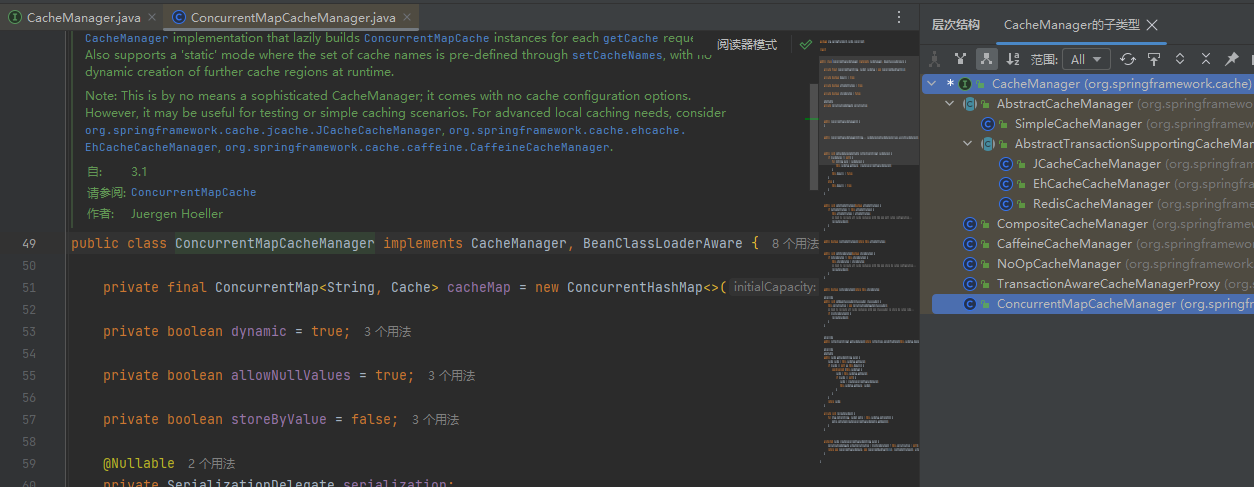

在 ConcurrentMapCacheManager实现类中可以看到,该实现类主要维护Map类型的 cacheMap属性,Value为 Cache类型的接口,点进该接口可以发现他同样有基于Map的实现类 ConcurrentMapCache,开启Debug调试后简单测试了一下,代码走到了这个位置也确定了使用的就是该类
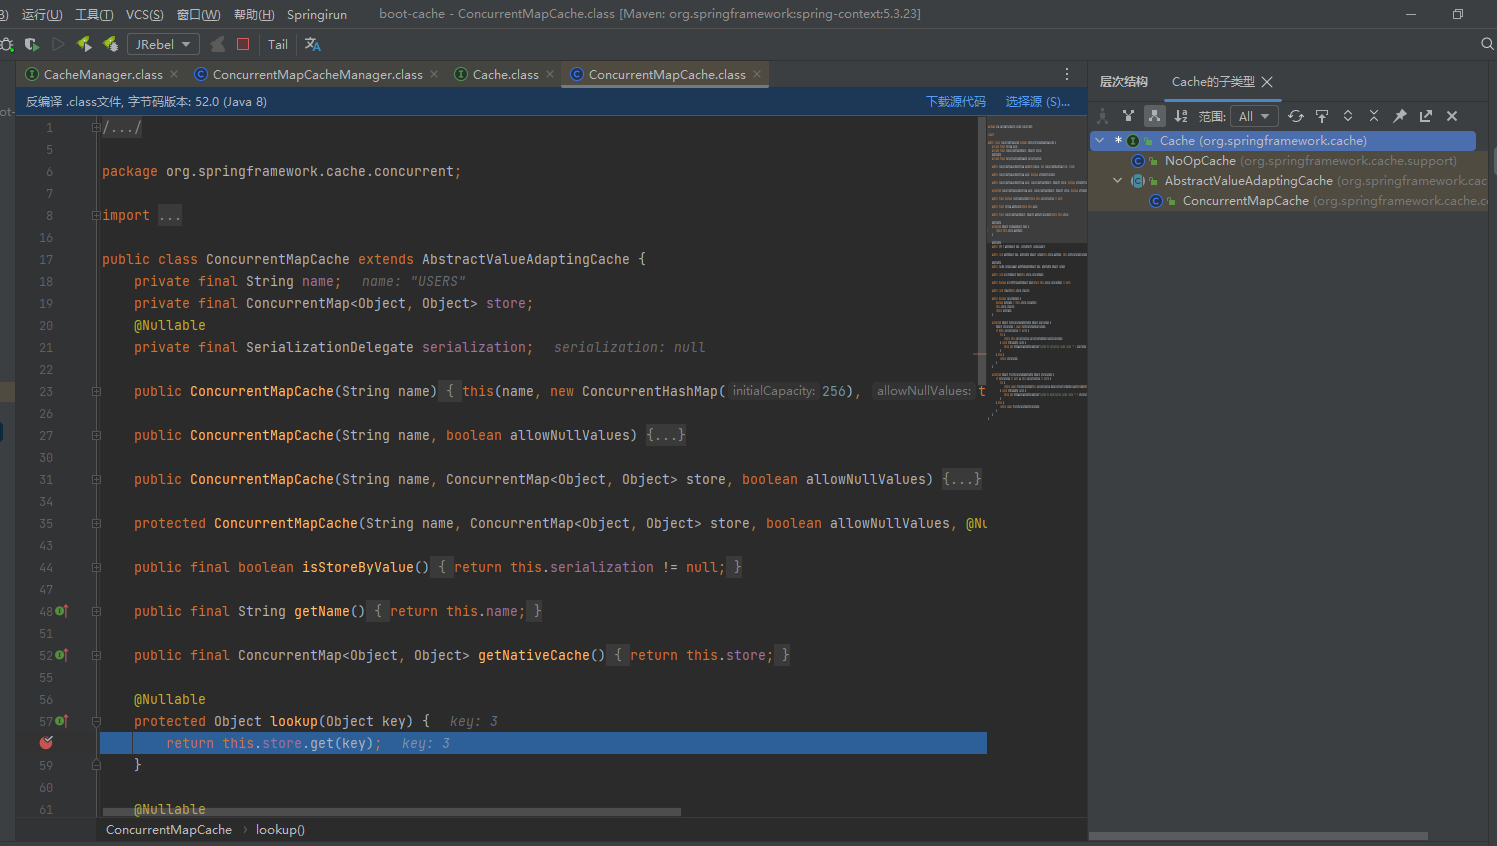
Cache接口就是就是第二个要了解的接口,梳理一下, CacheManager为缓存管理器并且管理着 Cache对象,而被管理的 Cache提供了操作缓存数据的方法
注解介绍
上面介绍了SpringCache中两个接口,这里来了解一下缓存需要的注解,开发中最常用的就是基于注解的缓存
名称 解释 @Cacheable 将方法的返回结果进行缓存,后续方法被调用直接返回缓存中的数据不执行方法,适合查询 @CachePut 将方法的返回结果进行缓存,无论缓存中是否有数据都会执行方法并缓存结果,适合更新 @CacheEvict 删除缓存中的数据 @Caching 组合使用缓存注解 @CacheConfig 统一配置本类的缓存注解的属性 @EnableCaching 用于启动类或者缓存配置类,表示该项目开启缓存功能
前三个注解用于对缓存数据进行增删改查操作, @Caching注解的作用就是将前三个注解组合使用,适用于有关联关系的缓存数据, @CacheConfig则是针对本类中的缓存做一些通用的配置
使用SpringCache
在写这篇文章之前也参考过一些其他博主的文章,好多文章都要求引用 spring-boot-starter-cache启动器,但据我测试不引用该启动器也可以实现缓存功能,相关的类和注解在 spring-context包中就已经存在了,我不太清楚为什么他们要引用 spring-boot-starter-cache,如果您懂的话麻烦在评论区指点下
编写测试环境
项目添加的依赖
        org.springframework.boot
        spring-boot-starter-web

        cn.hutool
        hutool-all
        5.8.10

        org.projectlombok
        lombok
实体类
@Data
@NoArgsConstructor
@AllArgsConstructor
public class UserEntity implements Serializable {

    @Serial
    private static final long serialVersionUID = 1L;

    private Integer id;
    private String name;

}
Mapper 并没有查询数据库,而是模拟出来的假数据
@Repository
public class UserMapper {

    public final List users = CollUtil.newArrayList();

    @PostConstruct
    public void init() {
        users.add(new UserEntity(1, "用户" + 1));
        users.add(new UserEntity(2, "用户" + 2));
        users.add(new UserEntity(3, "用户" + 3));
        users.add(new UserEntity(4, "用户" + 4));
    }

    public List list() {
        return this.users;
    }

    public UserEntity getOne(Integer id) {
        return this.users.stream()
                .filter(user -> NumberUtil.equals(user.getId(), id))
                .findFirst()
                .orElse(null);
    }

    public void update(UserEntity entity) {
        this.delete(entity.getId());
        users.add(entity);
    }

    public void delete(Integer id) {
        UserEntity entity = this.getOne(id);
        if (ObjectUtil.isNotNull(entity)) {
            users.remove(entity);
        }
    }

}
Service
@Slf4j
@Service
public class UserService {

    @Autowired
    private UserMapper mapper;

    public List selectList() {
        List list = mapper.list();
        log.info("list:{}", list.size());
        return list;
    }

    public UserEntity getOne(Integer id) {
        log.info("getOne:{}", id);
        return mapper.getOne(id);
    }

    public UserEntity update(UserEntity entity) {
        log.info("update:{}", entity);
        mapper.update(entity);
        return entity;
    }

    public void delete(Integer id) {
        log.info("delete:{}", id);
        mapper.delete(id);
    }

    public void clear() {}

}
Controller
@RestController
@RequestMapping("/user")
public class UserController {

    @Autowired
    private UserService service;

    @GetMapping("selectList")
    public Object selectList() {
        return success(service.selectList());
    }

    @GetMapping("getOne")
    public Object getOne(Integer id) {
        return success(service.getOne(id));
    }

    @GetMapping("update")
    public Object update(UserEntity entity) {
        service.update(entity);
        return success();
    }

    @GetMapping("delete")
    public Object delete(Integer id) {
        service.delete(id);
        return success();
    }

    @GetMapping("clear")
    public Object clear() {
        service.clear();
        return success();
    }

    /* ---------工具方法 --------- */

    public Map success(Object obj) {
        Map result = success();
        result.put("data", obj);
        return result;
    }

    public Map success() {
        Map result = MapUtil.newHashMap();
        result.put("code", 200);
        result.put("msg", "success");
        return result;
    }

}
最后在启动类使用 @EnableCache 注解启用缓存
@EnableCaching
@SpringBootApplication
public class BootCacheApplication {
    public static void main(String[] args) {
        SpringApplication.run(BootCacheApplication.class, args);
    }
}
测试环境的编写到此位置,可以试着请求一下接口看看是否搭建成功,以及控制台中是否有对应的日志打印

使用注解缓存
注解缓存主要是@Cacheable、@CachePut、@CacheEvict这三种,且参数都基本相同,用过一次的参数基本就不重复说了,接下来测试在Service层中添加缓存注解
@Cacheable
该注解适用于查询方法,将查询返回的结果放到缓存中,下次接收到请求直接返回缓存中的数据,先将注解按照下面的写法加到代码中,然后调用看看效果
// @Cacheable(cacheNames = "USERS", key = "#root.methodName")
@Cacheable(cacheNames = "USERS", key = "'selectList'")
public List selectList() { ... }

// @Cacheable(cacheNames = "USERS", key = "#id")
@Cacheable(cacheNames = "USERS", key = "#root.args[0]")
public UserEntity getOne(Integer id) { ... }
注解加上后反复请求这两个接口,可以发现相同的请求Service日志只打印了一次,因为数据已经添加到缓存不会在执行Service代码了

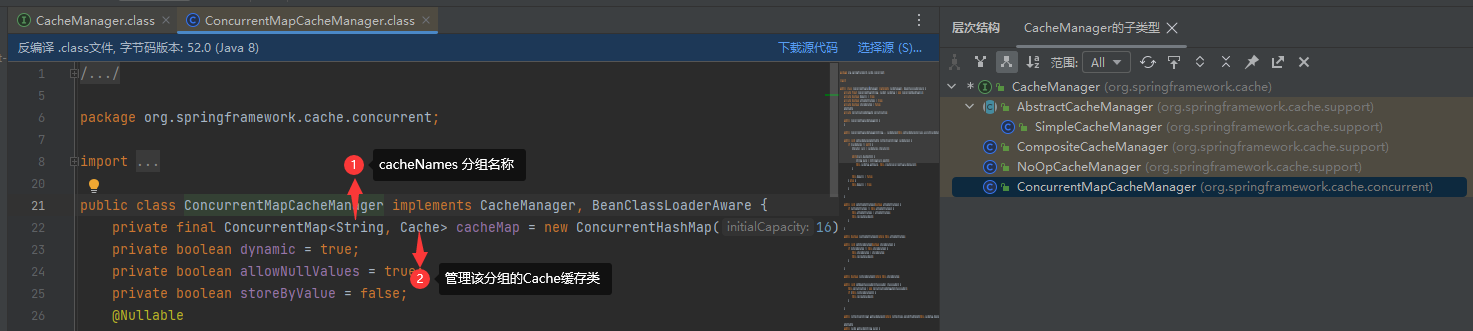
cacheNames
现在来看一下@Cacheable注解中的参数,首先来看 cacheNames,该参数可以理解为一个组,cacheNames相同的缓存会放到同一个Cache对象中进行管理,例如USERS中只维护与用户相关的缓存,DEPTS中只维护部门相关的缓存,就是 ConcurrentMapCacheManager中cacheMap的结构
key与SpEL表达式
第二个参数 key代表的是缓存数据在该组中的唯一标识,通过观察Cache对象可以看出来
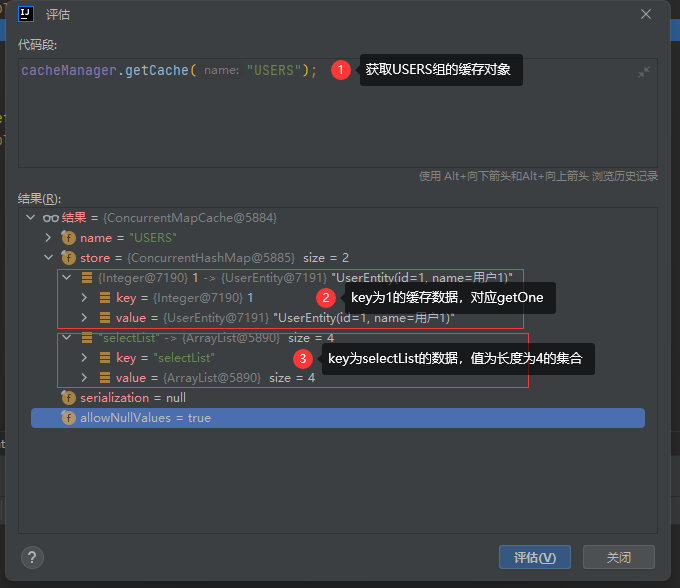
需要注意的是key的参数需要使用 SpEL表达式,如果想直接使用字符串作为key的话需要用单引号括起来
-
root.methodName:获取方法名
-
id:获取参数列表中的id属性
-
root.args[0]:获取参数列表中第一个参数
-
result:返回结果对象
- 更多用法详见官方文档
condition
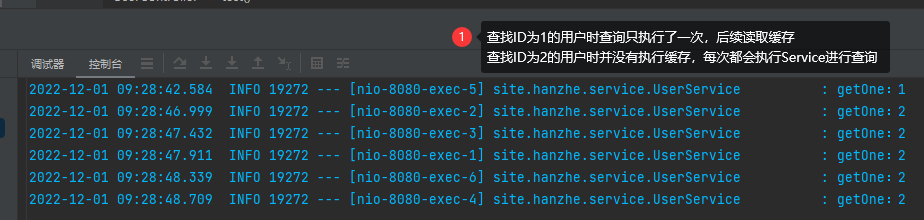
除了上面用到的两个参数之外,这里在介绍一个bool类型参数 condition,该参数的作用是做条件判断,只有判断结果为true注解才会生效,现在修改一下Service中的注解,添加condition条件
/**
 * 只有ID为1时才进行缓存,其他数据直接执行Service代码
 */
@Cacheable(cacheNames = "USERS", key = "#root.args[0]", condition = "#id == 1")
public UserEntity getOne(Integer id) { ... }
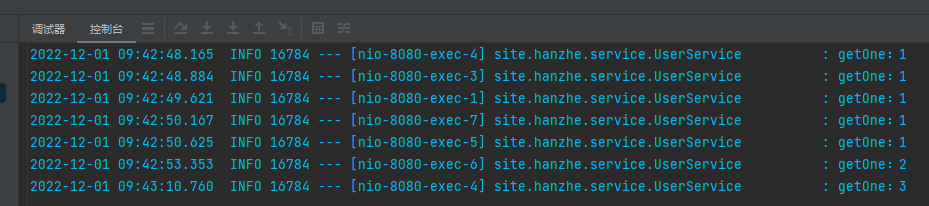
unless
condition的作用是只有判断结果为true结果才生效,同时有个与他相对的 unless注解,判断结果为true时注解失效
/**
 * 只有ID为1时不执行缓存,每次都会执行Service代码
 * 其他数据正常缓存
 */
@Cacheable(cacheNames = "USERS", key = "#root.args[0]", unless = "#id == 1")
public UserEntity getOne(Integer id) { ... }
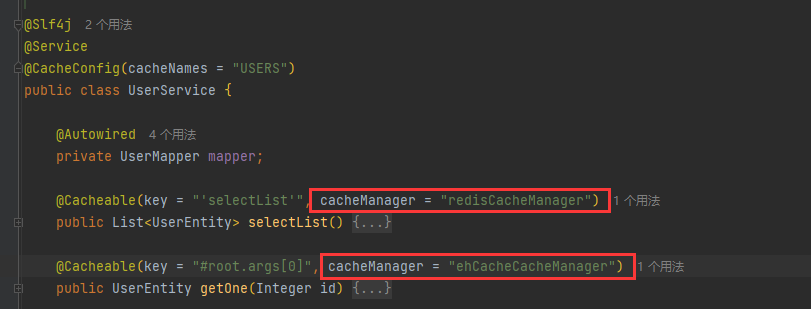
cacheManager
当系统中配置了多个缓存实现的时候,可以在注解中传入缓存管理器的bean名称来指定该缓存使用哪个实现,如下图所示,这里就不演示了
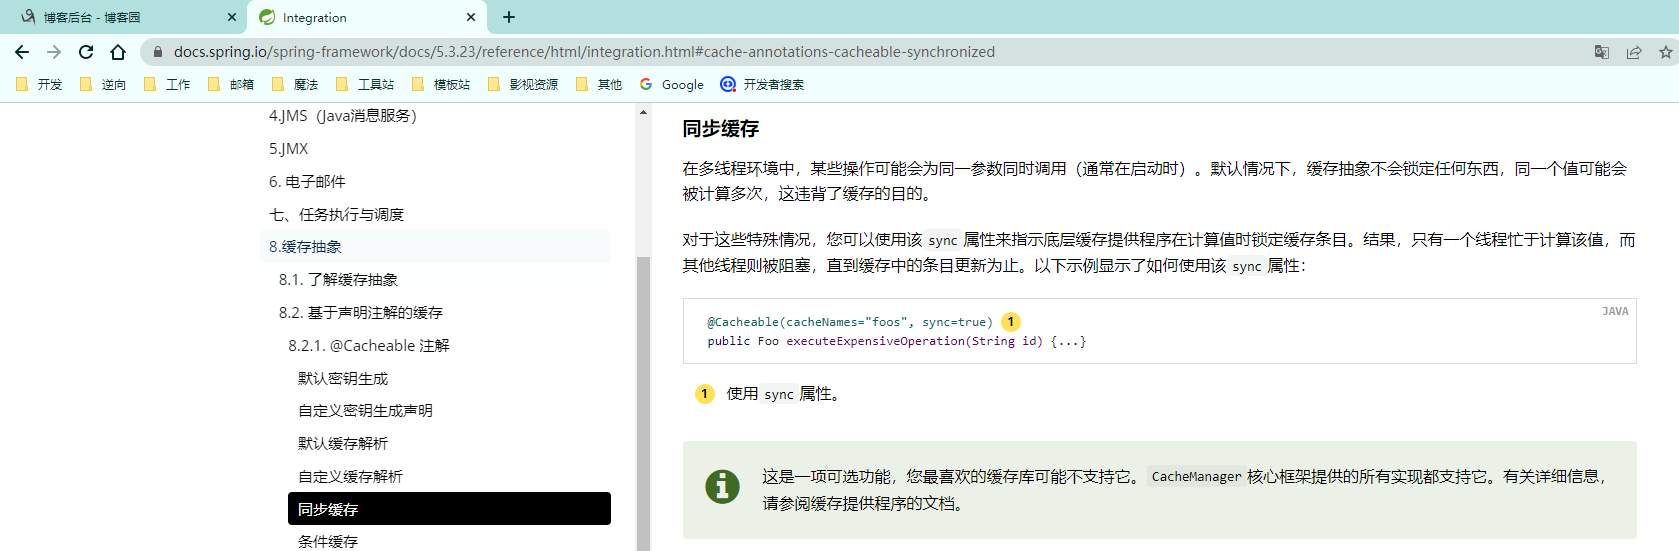
sync 了解即可
在多线程的情况下缓存数据可能会被重复操作多次,如果缓存数据比较敏感可以使用 sycn属性将缓存数据设置为多线程安全,不过一般很少有人会将敏感数据存放到缓存中,所以sync默认为关闭状态,也很少会有人开启他,而且需要注意的是并不是所有缓存实现类都可以实现该功能,目前可以肯定的是 Spring官方给出的所有CacheMapper实现类都支持这个属性,属性并不常用图省事儿这里也就不演示了
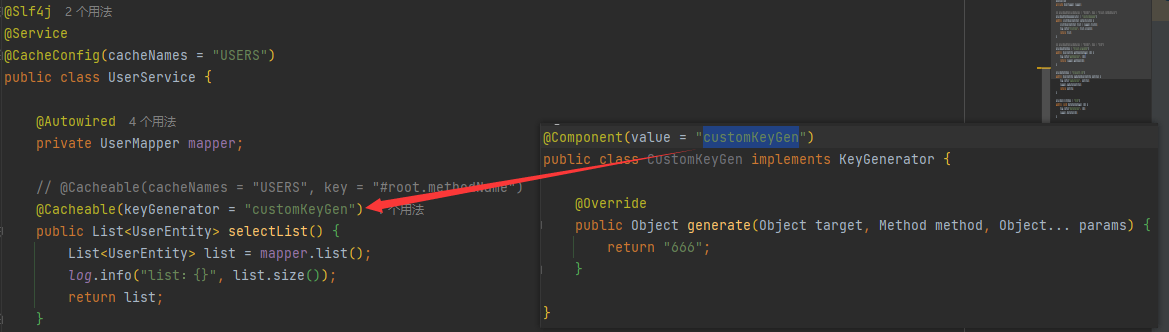
keyGenerator 了解即可
修改缓存key的生成规则,在注解中使用 keyGenerator参数后就不能在使用 key,缓存key的生成规则由keyGenerator来决定,如果想对某个接口使用自定义规则key,需要向ioc容器中注入SimpleKeyGenerator类型的bean,然后将bean的名称传入 keyGenerator即可,如下图所示,这里就不演示了
@CachePut
在使用该注解之前先来做一个小测试,将getOne注解上的condition和unless条件清除,读取ID为1的用户数据,然后修改该用户的数据,修改过后在读取一次该用户的数据,看看效果如何

可以发现虽然我修改了ID为1的用户数据,但是查询该数据时返回的仍是旧数据,这时就需要使用@CachePut注解更新缓存数据,该注解会用方法的返回结果更新掉缓存中的旧数据
/**
 * 在getOne中缓存数据的key为#root.args[0],代表的是参数列表中第一位,也就是用户ID
 * 那么在update方法中用来更新缓存数据的也应该是用户ID,也就是返回结果中的id: #result.id
 */
@CachePut(cacheNames = "USERS", key = "#result.id")
public UserEntity update(UserEntity entity) { ... }
@CacheEvict
@CacheEvict注解的作用就是删除缓存中的旧数据,通过参数key来指定删除的是哪一条,同时该注解还有 allEntries参数,在不使用key的情况下设置allEntries为true可以清空该cacheNames下所有缓存
@CacheEvict(cacheNames = "USERS", key = "#id")
public void delete(Integer id) { ... }

@CacheEvict(cacheNames = "USERS", allEntries = true)
public void clear() {}
这里可以自行调用测试并查看日志打印情况,我就不上传截图了
@Caching
该注解的作用是组合其他注解使用,例如删除了该用户后,还需要删除该用户的登录信息,就可以使用到该注解
@Caching(evict= {
        @CacheEvict(cacheNames = "USERS", key = "#id"),
        @CacheEvict(cacheNames = "TOKENS", key = "#id")
})
public void delete(Integer id) { ... }
@CacheConfig
@CacheConfig可以针对当前类的所有缓存注解进行统一配置,例如之前在每个注解上都使用了cacheNames属性,在使用了@CacheConfig注解后只需要在该类上标注cacheNames那么类中的注解就可以省去该参数了
@Slf4j
@Service
@CacheConfig(cacheNames = "USERS")
public class UserService {

    @Autowired
    private UserMapper mapper;

    @Cacheable(key = "'selectList'")
    public List selectList() { ... }

    @Cacheable(key = "#root.args[0]")
    public UserEntity getOne(Integer id) { ... }

    @CachePut(key = "#result.id")
    public UserEntity update(UserEntity entity) { ... }

    @Caching(evict= {
            @CacheEvict(key = "#id"),
            @CacheEvict(cacheNames = "TOKENS", key = "#id")
    })
    public void delete(Integer id) { ... }

    @CacheEvict(allEntries = true)
    public void clear() {}

}
使用编程式缓存
编程式缓存,指在代码中操作缓存数据,之前提到过SpringCache中有提供Cache接口,我们通过代码操作缓存靠的就是这个接口,直接在Controller里演示一下
@RestController
@RequestMapping("/user")
public class UserController {

    @Autowired
    private CacheManager cacheManager;

    @GetMapping("/test")
    public Object test() {
        // 通过cacheManager获取维护用户缓存的Cache对象
        Cache cache = cacheManager.getCache("USERS");
        // 向缓存中添加数据
        cache.put(8, new UserEntity(8, "用户8"));
        cache.put(9, new UserEntity(9, "用户9"));
        // 打印测试
        System.out.println(cache.get(8, UserEntity.class));
        System.out.println(cache.get(9, UserEntity.class));
        // 移除其中一个缓存数据
        cache.evict(8);
        // 打印测试
        System.out.println(cache.get(8, UserEntity.class));
        System.out.println(cache.get(9, UserEntity.class));
        // 清空缓存数据
        cache.clear();
        // 打印测试
        System.out.println(cache.get(8, UserEntity.class));
        System.out.println(cache.get(9, UserEntity.class));

        return success();
    }

    // 省略多余代码 .....

}
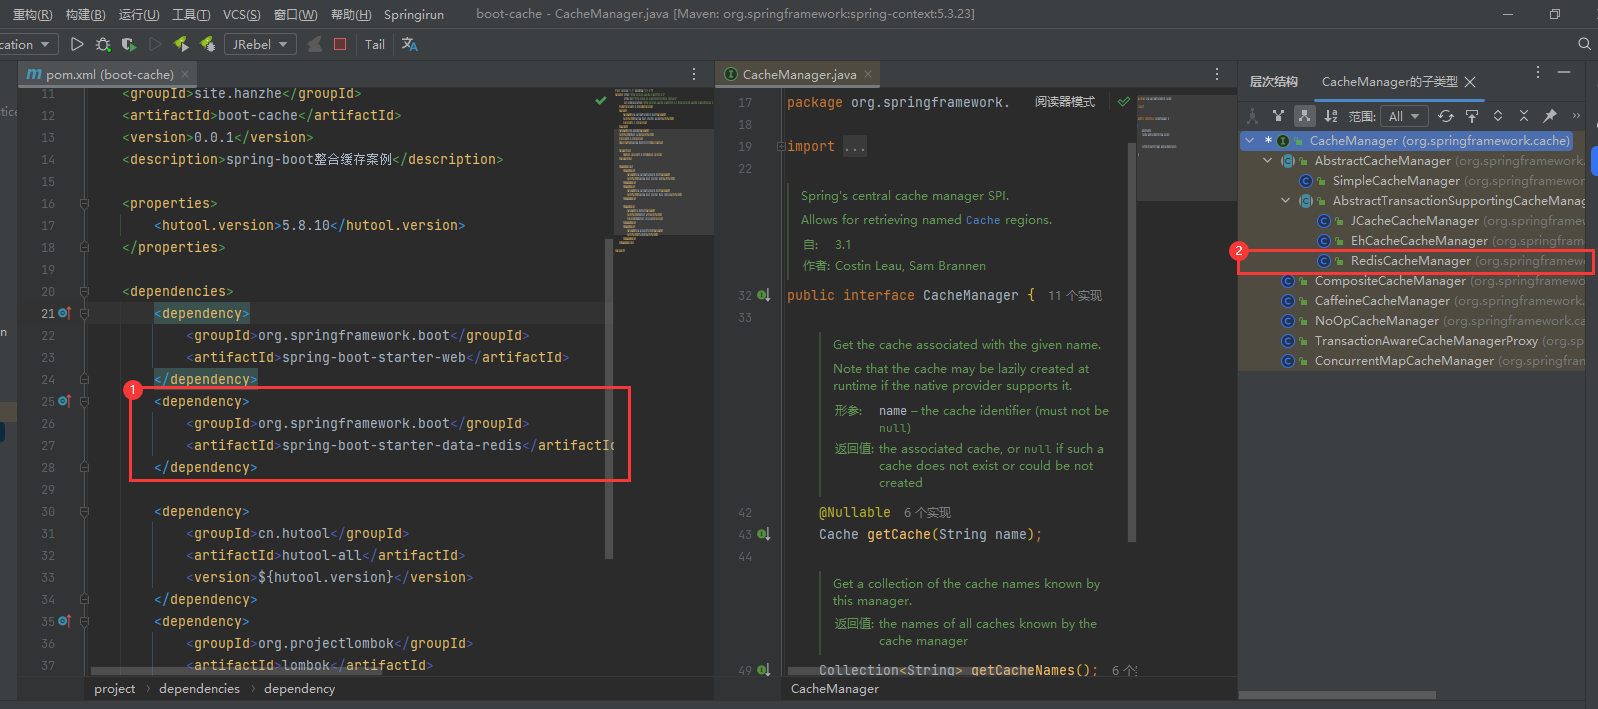
整合Redis为缓存实现
整合Redis需要引用Redis的场景启动器
    org.springframework.boot
    spring-boot-starter-data-redis
添加Redis场景启动器后刷新Maven依赖,然后在回过头来看CacheManager接口的实现类,会发现多了基于Redis的缓存实现
之后在配置文件中添加Redis的连接信息,重启项目就可以请求接口进行测试了
spring:
  redis:
    host: 192.168.1.34
    port: 6379
    password: redis
    database: 1
修改配置文件
我们可以通过配置文件来对缓存进行一些设置,找到缓存的自动配置类 CacheAutoConfiguration可以看到类中启用了 CacheProperties
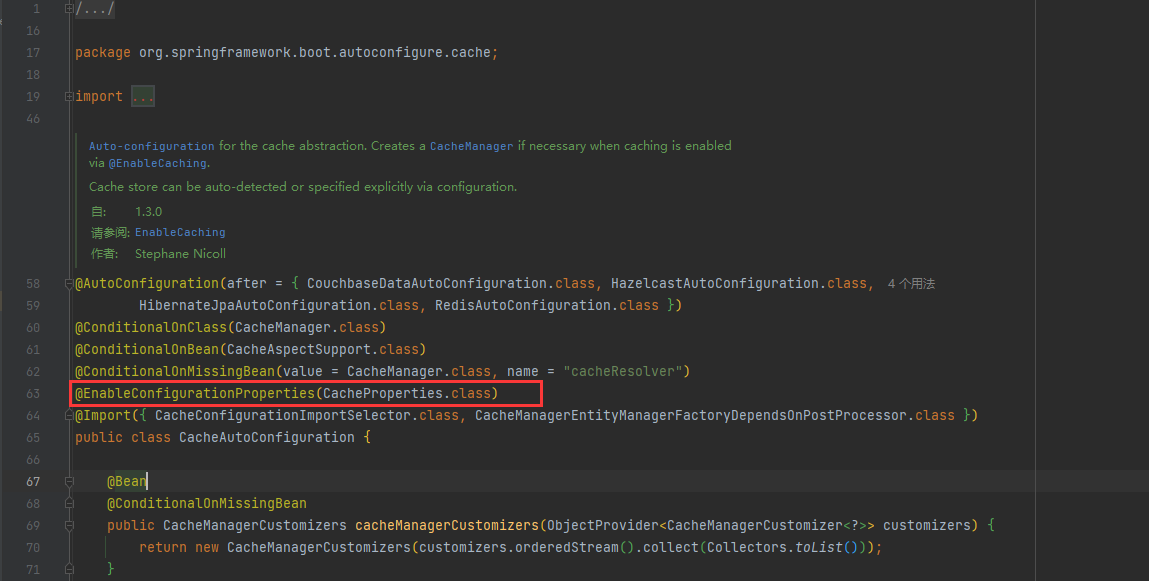
在 CacheProperties类可以知道配置文件中可以设置哪些属性,例如指定使用Redis作为缓存实现,不过当我们引入Redis场景启动器后,缓存的默认实现已经被设置为Redis,所以这个设置也可以忽略
spring:
  cache:
    type: redis
指定cacheNames集
在缓存注解中使用的 cacheNames的作用是对缓存数据进行分组,当缓存中没有这个组的时候会自动创建这个组,同时该属性可以在配置文件中设置,不过需要注意的是一旦在配置文件中指定cacheNames,那么缓存注解将不再提供自动创建的功能,使用不存在的cacheNames会报错
spring:
  cache:
    type: redis
    cache-names:
      - USERS
      - DEPTS
      - ...
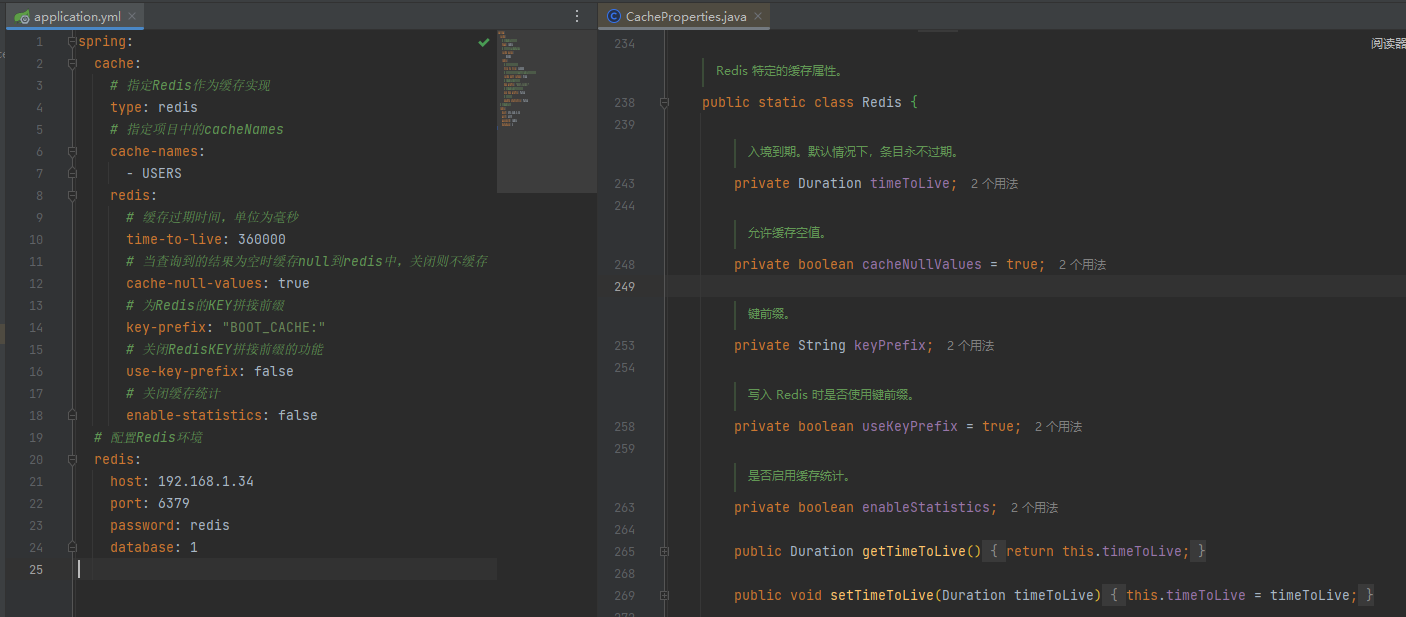
Redis配置项
配置项一个个介绍比较麻烦,这里直接将Redis的配置项列出来,配置项对应 CacheProperties.redis属性
spring:
  cache:
    # 指定Redis作为缓存实现
    type: redis
    # 指定项目中的cacheNames
    cache-names:
      - USERS
    redis:
      # 缓存过期时间为10分钟,单位为毫秒
      time-to-live: 600000
      # 是否允许缓存空数据,当查询到的结果为空时缓存空数据到redis中
      cache-null-values: true
      # 为Redis的KEY拼接前缀
      key-prefix: "BOOT_CACHE:"
      # 是否拼接KEY前缀
      use-key-prefix: true
      # 是否开启缓存统计
      enable-statistics: false
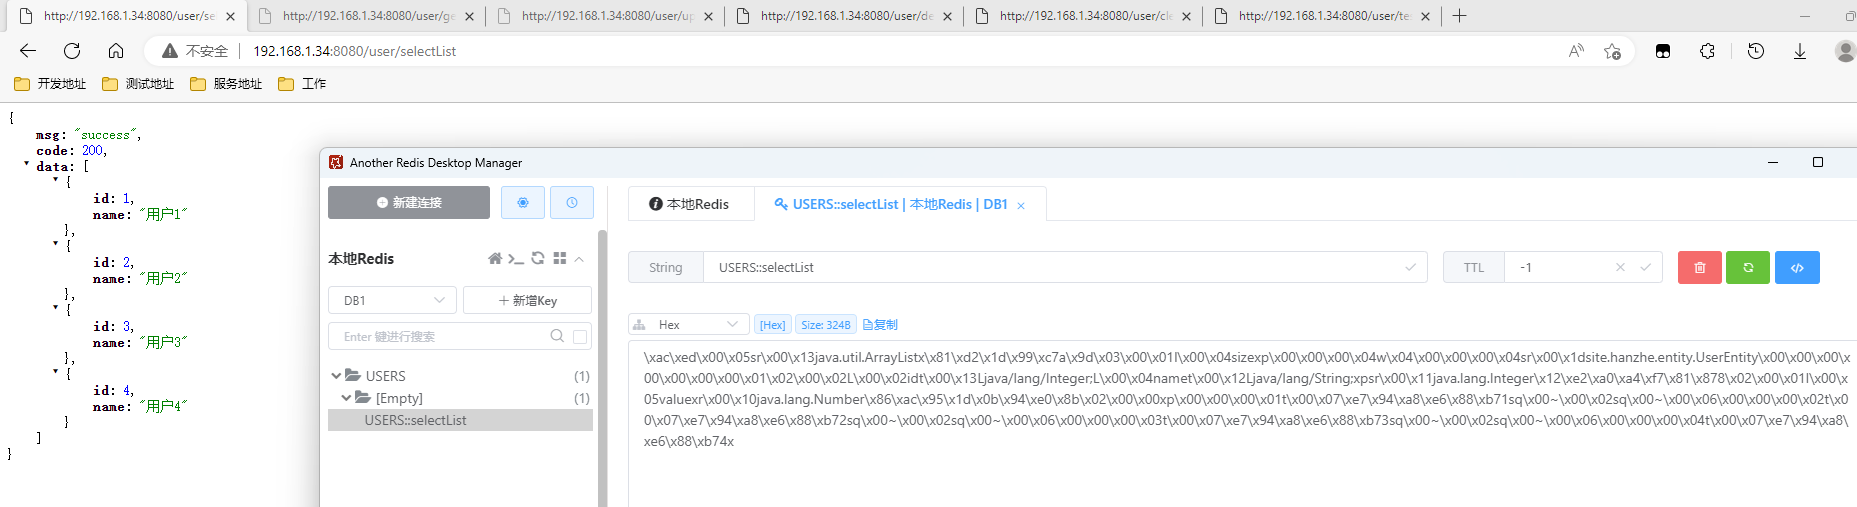
修改Redis缓存为JSON
缓存功能已经实现,但是根据之前的测试来看,存到Redis中的数据是一堆乱码不利于查看和维护,这里修改下Redis缓存的序列化
源码分析
源码分析部分比较枯燥,可跳过
在缓存的自动配置类 CacheAutoConfiguration中可以看到使用 @Import注解引用了 CacheConfigurationImportSelector类,该类实现了 ImportSelector接口,可以动态的向ioc容器中注入指定的bean
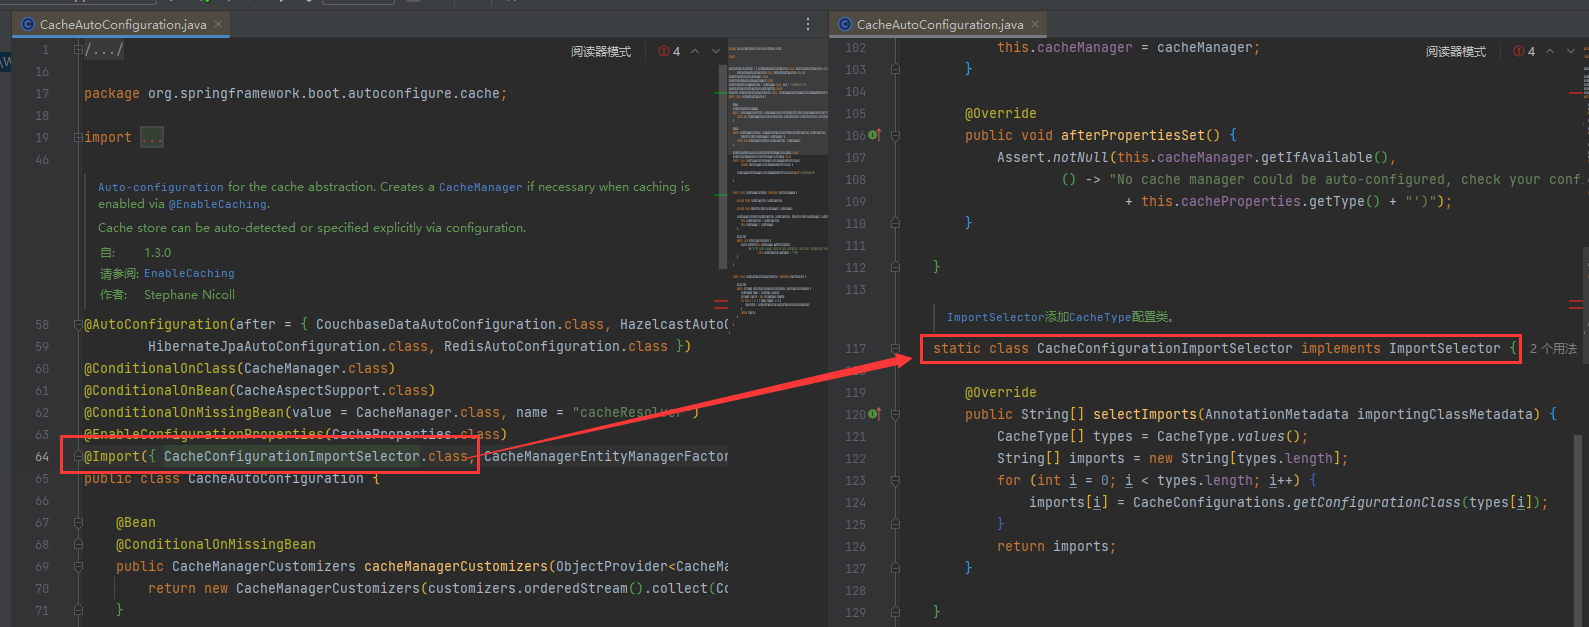
而在 CacheConfigurationImportSelector类中遍历了CacheType枚举,这个CacheType正对应着一开始在配置文件中所写的 spring.cache.type=redis,在代码结束的位置也看到了Redis的缓存配置类 RedisCacheConfiguration
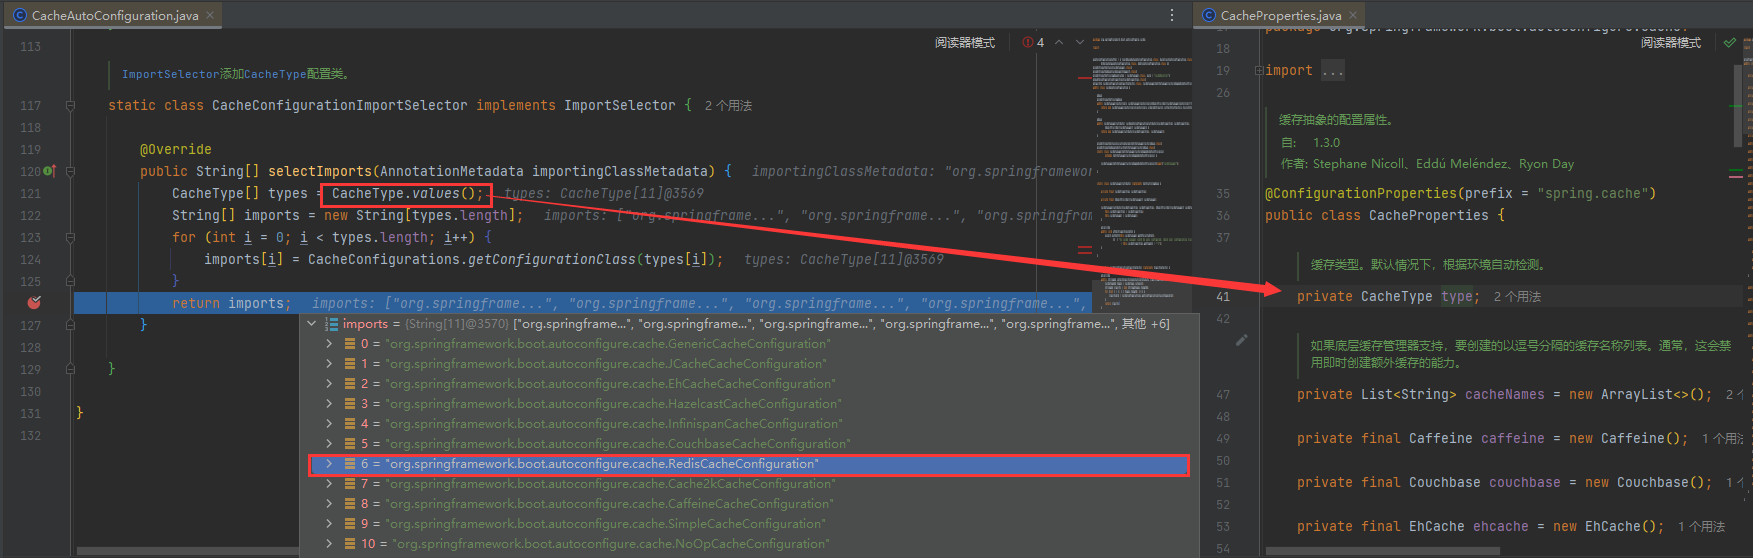
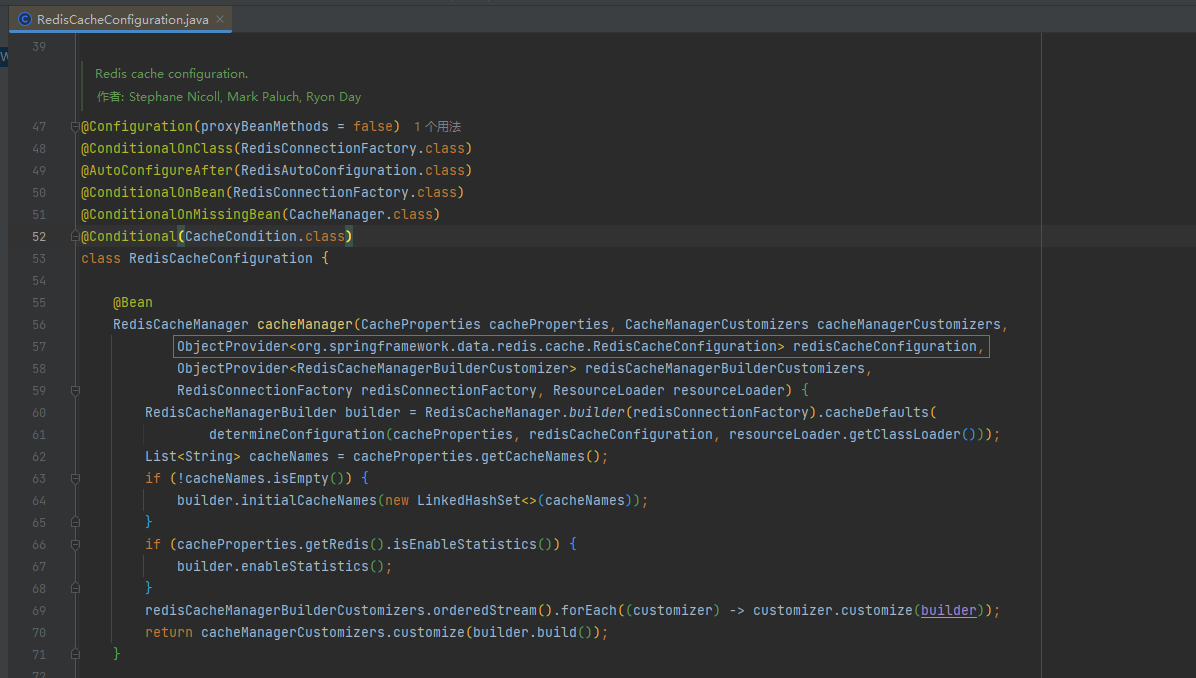
这里挑重点直接看 RedisCacheConfiguration配置类,在该配置类中使用@Bean向ioc容器中添加了CacheManager的实现,被Bean标注的方法参数列表默认都是可以在ioc容器中找到的,而这个参数列表中包含 RedisCacheConfiguration
需要注意当前所在的位置是 autoconfigure.cache包,而参数列表中的RedisCacheConfiguration类是 data.redis.cache包下的,这是两个不同的类
这里顺着该对象往下看调用,先是调用了 determineConfiguration,而后调用了 createConfiguration,在 createConfiguration可以看出 Redis默认使用的是JDK的序列化实现
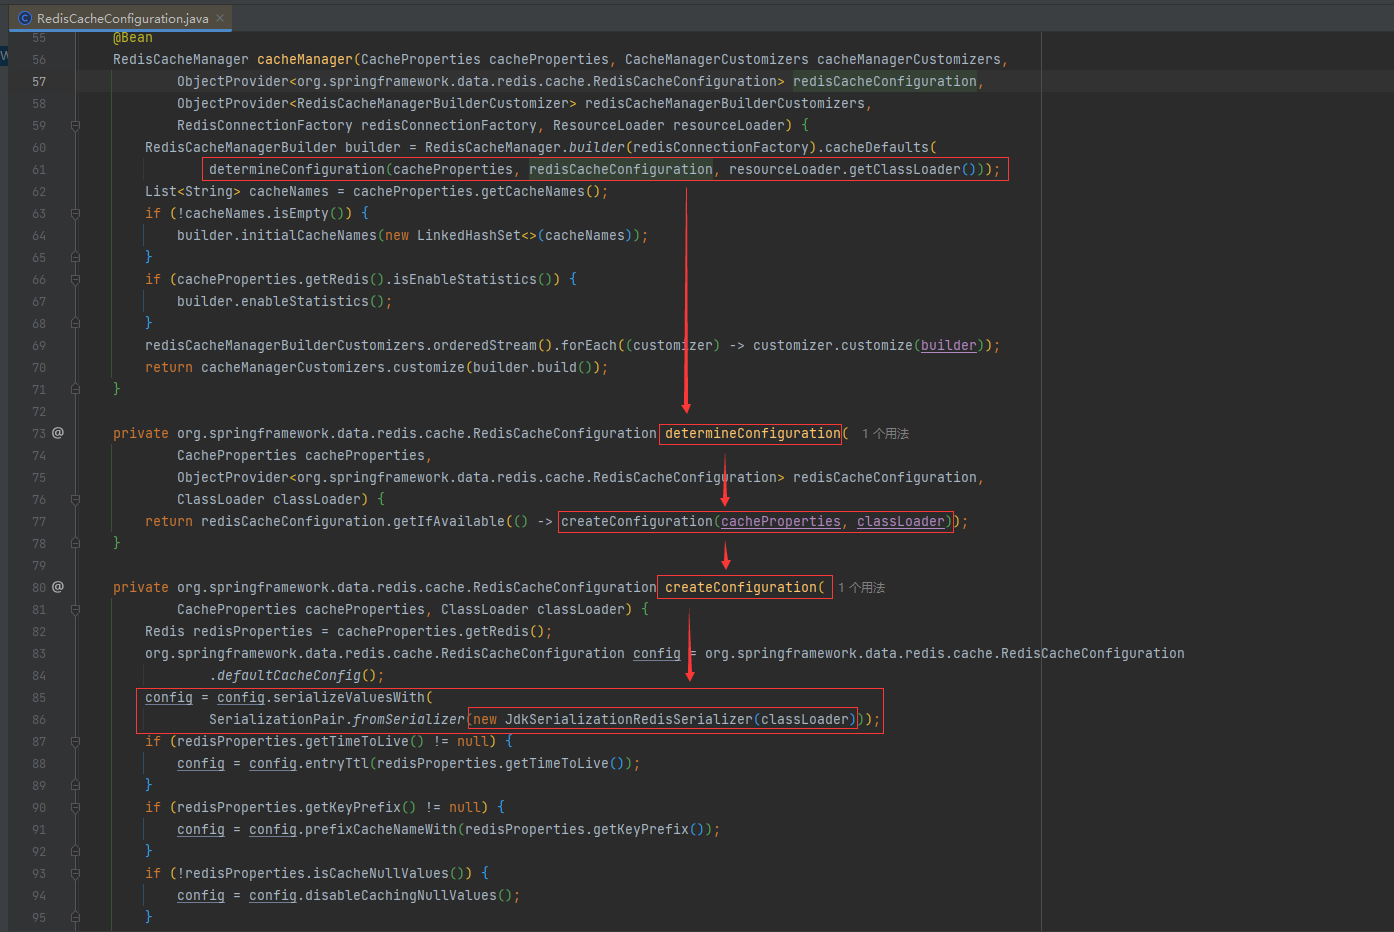
回过头来看一眼,参数列表中好像并不是RedisCacheConfiguration对象,而是RedisCacheConfiguration类型的 ObjectProvider对象,这里解释一下 ObjectProvider是对象提供者,他会优先取ioc容器中该类型的Bean,如果没有就使用自己的对象,具体可以看 determineConfiguration方法

这样一来思路就理清了,只要使用好 ObjectProvider的特点,自己向IOC容器中提供一个 RedisCacheConfiguration对象就可以覆盖掉原本的配置了
功能实现代码
先创建个Redis缓存配置类,编写一个@Bean的方法返回 RedisCacheConfiguration对象,为了防止配置文件中的配置项失效,这里直接将上面的 createConfiguration方法体复制过来,将 CacheProperties放到参数列表中,他会自己去ioc容器中取,另一个参数是JDK序列化用到的,这里用不上就不拿过来了
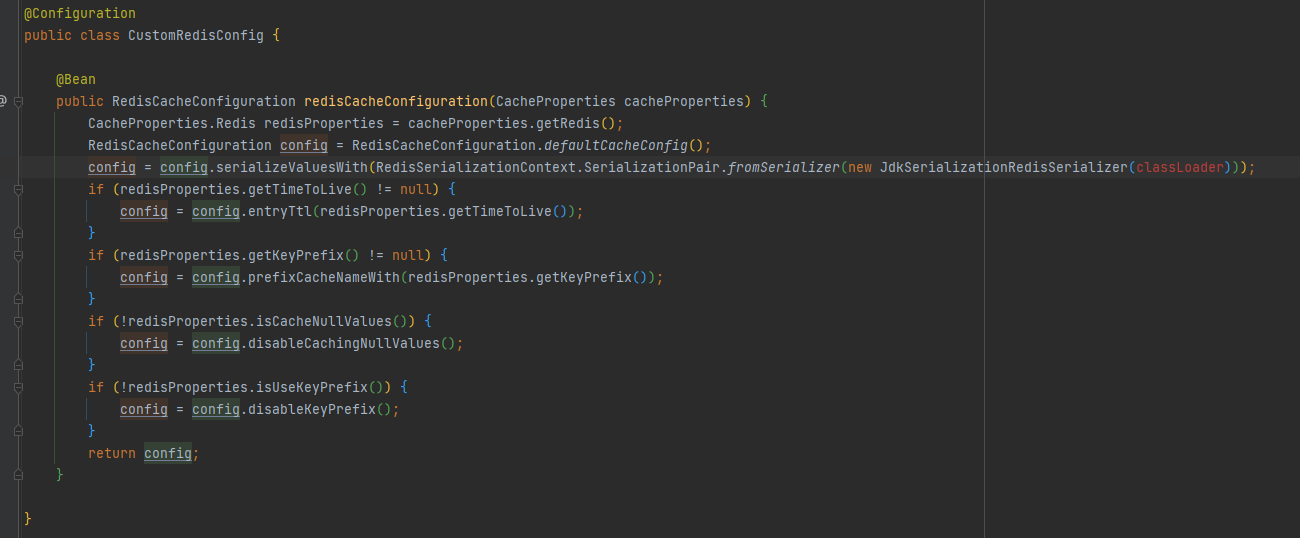
然后将代码中的JDK序列化删掉,通过 Ctrl + P(IDEA Eclipse快捷键)可以看到他需要 RedisSerializer类型的序列化对象

点开这个接口查看他的实现类,发现Redis提供了两个JSON序列化对象
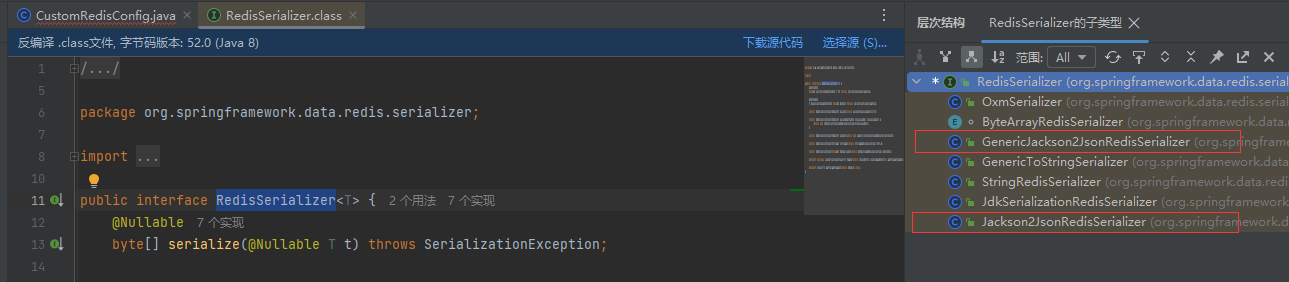
下面的是带有泛型的序列化器,这里推荐通用的 GenericJackson2JsonRedisSerializer,该类有空参构造直接new对象即可,替换掉JDK序列化
@Configuration
public class CustomRedisConfig {

    @Bean
    public RedisCacheConfiguration redisCacheConfiguration(CacheProperties cacheProperties) {
        // 获取Properties中Redis的配置信息
        CacheProperties.Redis redisProperties = cacheProperties.getRedis();
        // 获取RedisCacheConfiguration的默认配置对象
        RedisCacheConfiguration config = RedisCacheConfiguration.defaultCacheConfig();
        // 指定序列化器为GenericJackson2JsonRedisSerializer
        config = config.serializeValuesWith(RedisSerializationContext.SerializationPair.fromSerializer(new GenericJackson2JsonRedisSerializer()));
        // 过期时间设置
        if (redisProperties.getTimeToLive() != null) {
            config = config.entryTtl(redisProperties.getTimeToLive());
        }
        // KEY前缀配置
        if (redisProperties.getKeyPrefix() != null) {
            config = config.prefixCacheNameWith(redisProperties.getKeyPrefix());
        }
        // 缓存空值配置
        if (!redisProperties.isCacheNullValues()) {
            config = config.disableCachingNullValues();
        }
        // 是否启用前缀
        if (!redisProperties.isUseKeyPrefix()) {
            config = config.disableKeyPrefix();
        }
        return config;
    }

}
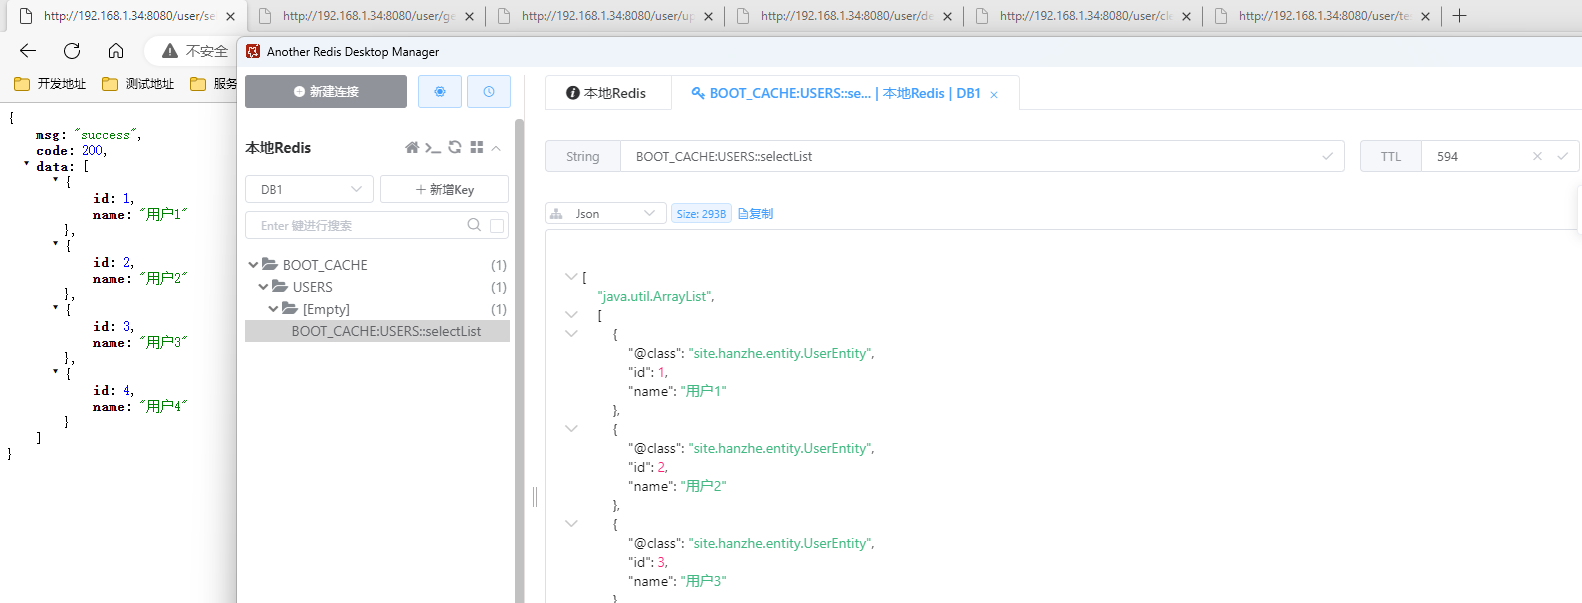
这样一来JSON序列化功能就完成了,可以重启检查一下效果,由于反序列化的需要,JSON的每个对象中都添加了class信息
修改前缀生成规则
Redis的KEY一般用 :来区分层级,这是个约定俗成的习惯,我使用的Redis可视化工具也会基于 :将key放在不同文件夹下进行分组展示,可是RedisCache生成的KEY中间有个双冒号,导致可视化界面中有一层文件夹是空的,强迫症表示难以接受,这个问题必须解决
前缀的生成靠的是 CacheKeyPrefix,点开这个类会发现他将双冒号直接写死在代码中了,我们需要自定义接口去继承他,复制并修改他的代码,然后代替他
public interface CustomKeyPrefix extends CacheKeyPrefix {

    String SEPARATOR = ":";

    String compute(String cacheName);

    static CustomKeyPrefix simple() {
        return (name) -> name + SEPARATOR;
    }

    static CustomKeyPrefix prefixed(String prefix) {
        Assert.notNull(prefix, "Prefix must not be null!");
        return (name) -> prefix + name + SEPARATOR;
    }

}
回到刚刚创建的Redis缓存配置类中,
@Configuration
public class CustomRedisConfig {

    @Bean
    public RedisCacheConfiguration redisCacheConfiguration(CacheProperties cacheProperties) {
        // 获取Properties中Redis的配置信息
        CacheProperties.Redis redisProperties = cacheProperties.getRedis();
        // 获取RedisCacheConfiguration的默认配置对象
        RedisCacheConfiguration config = RedisCacheConfiguration.defaultCacheConfig();
        // 指定序列化器为GenericJackson2JsonRedisSerializer
        config = config.serializeValuesWith(RedisSerializationContext.SerializationPair.fromSerializer(new GenericJackson2JsonRedisSerializer()));
        // 过期时间设置
        if (redisProperties.getTimeToLive() != null) {
            config = config.entryTtl(redisProperties.getTimeToLive());
        }
        // 替换前缀生成器(有前缀和无前缀)
        config = config.computePrefixWith(CustomKeyPrefix.simple());
        if (redisProperties.getKeyPrefix() != null) {
            config = config.computePrefixWith(CustomKeyPrefix.prefixed(redisProperties.getKeyPrefix()));
        }
        // 缓存空值配置
        if (!redisProperties.isCacheNullValues()) {
            config = config.disableCachingNullValues();
        }
        // 是否启用前缀
        if (!redisProperties.isUseKeyPrefix()) {
            config = config.disableKeyPrefix();
        }
        return config;
    }

}
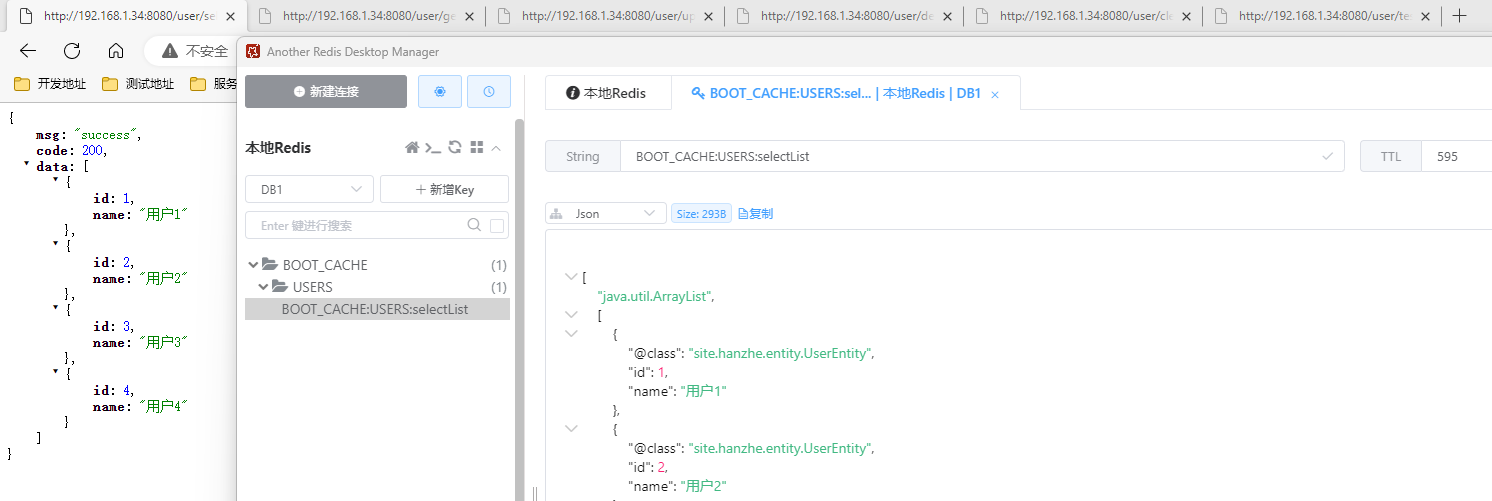
问题解决,可以重启后检查一下效果,非常滴完美
Original: https://www.cnblogs.com/hanzhe/p/16935954.html
Author: Java小学生丶
Title: Springboot 整合 SpringCache 使用 Redis 作为缓存
原创文章受到原创版权保护。转载请注明出处:https://www.johngo689.com/797398/
转载文章受原作者版权保护。转载请注明原作者出处!