

目录
下面这些是我突发奇想想做来玩玩,就在github上下载了人脸识别的代码(网址下面有附上),用了之后突然想试试照片的识别效果,发现照片也会被识别成我,就查阅了相关资料,一般都是通过活体检测(比如眨眼、转头之类的),想通过算法实现实时视频检测,区分真人和照片。
一、准备工作
开发环境:windows10+pycharm2022.1.3+python+3.9
1.1 需要的库
opencv-python==4.5.5.64
numpy==1.23.3
dlib==19.24.0
pandas=1.5.0
枕头=9.2.0
dlib库安装方法:
进入虚拟环境后输入:
anaconda search -t conda dlib
conda install -c https://conda.anaconda.org/conda-forge dlib
1.2准备需要的文件和图片
下载文件:shape_predictor_68_face_landmarks.dat.bz2,解压后存在data文件夹,该模型可以识别人脸68个关键点。网址中还含有5关键点模型文件。
准备人脸照片,存于img文件夹。
1.3 测试程序
-*- coding = utf-8 -*-
@Time : 2022/9/20 9:11
@Author : 李昊芸
@file : dlib_t.py
@Software : PyCharm

import cv2
import dlib

path = "img/lhy_1.jpeg"
img = cv2.imread(path)
gray = cv2.cvtColor(img, cv2.COLOR_BGR2GRAY)

#人脸分类器
detector = dlib.get_frontal_face_detector()
获取人脸检测器
predictor = dlib.shape_predictor(
    ".\\data\\shape_predictor_68_face_landmarks.dat"
)

dets = detector(gray, 1)
for face in dets:
    shape = predictor(img, face)  # 寻找人脸的68个标定点
    # 遍历所有点,打印出其坐标,并圈出来
    for pt in shape.parts():
        pt_pos = (pt.x, pt.y)
        cv2.circle(img, pt_pos, 2, (0, 255, 0), 1)
    cv2.imshow("image", img)

cv2.waitKey(0)
cv2.destroyAllWindows()
68关键点分类器识别结果:


多人识别效果:

二、人脸识别开发
原github地址:https://github.com/coneypo/Dlib_face_recognition_from_camera
2.1 录入自己的人脸信息
get_faces_from_camera.py
Copyright (C) 2018-2021 coneypo
SPDX-License-Identifier: MIT

Author:   coneypo
Blog:     http://www.cnblogs.com/AdaminXie
GitHub:   https://github.com/coneypo/Dlib_face_recognition_from_camera
Mail:     coneypo@foxmail.com

进行人脸录入 / Face register

import dlib
import numpy as np
import cv2
import os
import shutil
import time
import logging

Dlib 正向人脸检测器 / Use frontal face detector of Dlib
detector = dlib.get_frontal_face_detector()

class Face_Register:
    def __init__(self):
        self.path_photos_from_camera = "data/data_faces_from_camera/"
        self.font = cv2.FONT_ITALIC

        self.existing_faces_cnt = 0         # 已录入的人脸计数器 / cnt for counting saved faces
        self.ss_cnt = 0                     # 录入 personX 人脸时图片计数器 / cnt for screen shots
        self.current_frame_faces_cnt = 0    # 录入人脸计数器 / cnt for counting faces in current frame

        self.save_flag = 1                  # 之后用来控制是否保存图像的 flag / The flag to control if save
        self.press_n_flag = 0               # 之后用来检查是否先按 'n' 再按 's' / The flag to check if press 'n' before 's'

        # FPS
        self.frame_time = 0
        self.frame_start_time = 0
        self.fps = 0
        self.fps_show = 0
        self.start_time = time.time()

    # 新建保存人脸图像文件和数据 CSV 文件夹 / Mkdir for saving photos and csv
    def pre_work_mkdir(self):
        # 新建文件夹 / Create folders to save face images and csv
        if os.path.isdir(self.path_photos_from_camera):
            pass
        else:
            os.mkdir(self.path_photos_from_camera)

    # 删除之前存的人脸数据文件夹 / Delete old face folders
    def pre_work_del_old_face_folders(self):
        # 删除之前存的人脸数据文件夹, 删除 "/data_faces_from_camera/person_x/"...

        folders_rd = os.listdir(self.path_photos_from_camera)
        for i in range(len(folders_rd)):
            shutil.rmtree(self.path_photos_from_camera+folders_rd[i])
        if os.path.isfile("data/features_all.csv"):
            os.remove("data/features_all.csv")

    # 如果有之前录入的人脸, 在之前 person_x 的序号按照 person_x+1 开始录入 / Start from person_x+1
    def check_existing_faces_cnt(self):
        if os.listdir("data/data_faces_from_camera/"):
            # 获取已录入的最后一个人脸序号 / Get the order of latest person
            person_list = os.listdir("data/data_faces_from_camera/")
            person_num_list = []
            for person in person_list:
                person_num_list.append(int(person.split('_')[-1]))
            self.existing_faces_cnt = max(person_num_list)

        # 如果第一次存储或者没有之前录入的人脸, 按照 person_1 开始录入 / Start from person_1
        else:
            self.existing_faces_cnt = 0

    # 更新 FPS / Update FPS of Video stream
    def update_fps(self):
        now = time.time()
        # 每秒刷新 fps / Refresh fps per second
        if str(self.start_time).split(".")[0] != str(now).split(".")[0]:
            self.fps_show = self.fps
        self.start_time = now
        self.frame_time = now - self.frame_start_time
        self.fps = 1.0 / self.frame_time
        self.frame_start_time = now

    # 生成的 cv2 window 上面添加说明文字 / PutText on cv2 window
    def draw_note(self, img_rd):
        # 添加说明 / Add some notes
        cv2.putText(img_rd, "Face Register", (20, 40), self.font, 1, (255, 255, 255), 1, cv2.LINE_AA)
        cv2.putText(img_rd, "FPS:   " + str(self.fps_show.__round__(2)), (20, 100), self.font, 0.8, (0, 255, 0), 1,
                    cv2.LINE_AA)
        cv2.putText(img_rd, "Faces: " + str(self.current_frame_faces_cnt), (20, 140), self.font, 0.8, (0, 255, 0), 1, cv2.LINE_AA)
        cv2.putText(img_rd, "N: Create face folder", (20, 350), self.font, 0.8, (255, 255, 255), 1, cv2.LINE_AA)
        cv2.putText(img_rd, "S: Save current face", (20, 400), self.font, 0.8, (255, 255, 255), 1, cv2.LINE_AA)
        cv2.putText(img_rd, "Q: Quit", (20, 450), self.font, 0.8, (255, 255, 255), 1, cv2.LINE_AA)

    # 获取人脸 / Main process of face detection and saving
    def process(self, stream):
        # 1. 新建储存人脸图像文件目录 / Create folders to save photos
        self.pre_work_mkdir()

        # 2. 删除 "/data/data_faces_from_camera" 中已有人脸图像文件
        # / Uncomment if want to delete the saved faces and start from person_1
        # if os.path.isdir(self.path_photos_from_camera):
        #     self.pre_work_del_old_face_folders()

        # 3. 检查 "/data/data_faces_from_camera" 中已有人脸文件
        self.check_existing_faces_cnt()

        while stream.isOpened():
            flag, img_rd = stream.read()        # Get camera video stream
            kk = cv2.waitKey(1)
            faces = detector(img_rd, 0)         # Use Dlib face detector

            # 4. 按下 'n' 新建存储人脸的文件夹 / Press 'n' to create the folders for saving faces
            if kk == ord('n'):
                self.existing_faces_cnt += 1
                current_face_dir = self.path_photos_from_camera + "person_" + str(self.existing_faces_cnt)
                os.makedirs(current_face_dir)
                logging.info("\n%-40s %s", "新建的人脸文件夹 / Create folders:", current_face_dir)

                self.ss_cnt = 0                 # 将人脸计数器清零 / Clear the cnt of screen shots
                self.press_n_flag = 1           # 已经按下 'n' / Pressed 'n' already

            # 5. 检测到人脸 / Face detected
            if len(faces) != 0:
                # 矩形框 / Show the ROI of faces
                for k, d in enumerate(faces):
                    # 计算矩形框大小 / Compute the size of rectangle box
                    height = (d.bottom() - d.top())
                    width = (d.right() - d.left())
                    hh = int(height/2)
                    ww = int(width/2)

                    # 6. 判断人脸矩形框是否超出 480x640 / If the size of ROI > 480x640
                    if (d.right()+ww) > 640 or (d.bottom()+hh > 480) or (d.left()-ww < 0) or (d.top()-hh < 0):
                        cv2.putText(img_rd, "OUT OF RANGE", (20, 300), self.font, 0.8, (0, 0, 255), 1, cv2.LINE_AA)
                        color_rectangle = (0, 0, 255)
                        save_flag = 0
                        if kk == ord('s'):
                            logging.warning("请调整位置 / Please adjust your position")
                    else:
                        color_rectangle = (255, 255, 255)
                        save_flag = 1

                    cv2.rectangle(img_rd,
                                  tuple([d.left() - ww, d.top() - hh]),
                                  tuple([d.right() + ww, d.bottom() + hh]),
                                  color_rectangle, 2)

                    # 7. 根据人脸大小生成空的图像 / Create blank image according to the size of face detected
                    img_blank = np.zeros((int(height*2), width*2, 3), np.uint8)

                    if save_flag:
                        # 8. 按下 's' 保存摄像头中的人脸到本地 / Press 's' to save faces into local images
                        if kk == ord('s'):
                            # 检查有没有先按'n'新建文件夹 / Check if you have pressed 'n'
                            if self.press_n_flag:
                                self.ss_cnt += 1
                                for ii in range(height*2):
                                    for jj in range(width*2):
                                        img_blank[ii][jj] = img_rd[d.top()-hh + ii][d.left()-ww + jj]
                                cv2.imwrite(current_face_dir + "/img_face_" + str(self.ss_cnt) + ".jpg", img_blank)
                                logging.info("%-40s %s/img_face_%s.jpg", "写入本地 / Save into:",
                                             str(current_face_dir), str(self.ss_cnt))
                            else:
                                logging.warning("请先按 'N' 来建文件夹, 按 'S' / Please press 'N' and press 'S'")

            self.current_frame_faces_cnt = len(faces)

            # 9. 生成的窗口添加说明文字 / Add note on cv2 window
            self.draw_note(img_rd)

            # 10. 按下 'q' 键退出 / Press 'q' to exit
            if kk == ord('q'):
                break

            # 11. Update FPS
            self.update_fps()

            cv2.namedWindow("camera", 1)
            cv2.imshow("camera", img_rd)

    def run(self):
        # cap = cv2.VideoCapture("video.mp4")   # Get video stream from video file
        cap = cv2.VideoCapture(0)               # Get video stream from camera
        self.process(cap)

        cap.release()
        cv2.destroyAllWindows()

def main():
    logging.basicConfig(level=logging.INFO)
    Face_Register_con = Face_Register()
    Face_Register_con.run()

if __name__ == '__main__':
    main()
2.2 提取录入的人脸特征
features_extraction_to_csv.py
Copyright (C) 2018-2021 coneypo
SPDX-License-Identifier: MIT

Author:   coneypo
Blog:     http://www.cnblogs.com/AdaminXie
GitHub:   https://github.com/coneypo/Dlib_face_recognition_from_camera
Mail:     coneypo@foxmail.com

从人脸图像文件中提取人脸特征存入 "features_all.csv" / Extract features from images and save into "features_all.csv"

import os
import dlib
import csv
import numpy as np
import logging
import cv2

要读取人脸图像文件的路径 / Path of cropped faces
path_images_from_camera = "data/data_faces_from_camera/"

Dlib 正向人脸检测器 / Use frontal face detector of Dlib
detector = dlib.get_frontal_face_detector()

Dlib 人脸 landmark 特征点检测器 / Get face landmarks
predictor = dlib.shape_predictor('data/data_dlib/shape_predictor_68_face_landmarks.dat')

Dlib Resnet 人脸识别模型,提取 128D 的特征矢量 / Use Dlib resnet50 model to get 128D face descriptor
face_reco_model = dlib.face_recognition_model_v1("data/data_dlib/dlib_face_recognition_resnet_model_v1.dat")

返回单张图像的 128D 特征 / Return 128D features for single image
Input:    path_img
Output:   face_descriptor
def return_128d_features(path_img):
    img_rd = cv2.imread(path_img)
    faces = detector(img_rd, 1)

    logging.info("%-40s %-20s", "检测到人脸的图像 / Image with faces detected:", path_img)

    # 因为有可能截下来的人脸再去检测,检测不出来人脸了, 所以要确保是 检测到人脸的人脸图像拿去算特征
    # For photos of faces saved, we need to make sure that we can detect faces from the cropped images
    if len(faces) != 0:
        shape = predictor(img_rd, faces[0])
        face_descriptor = face_reco_model.compute_face_descriptor(img_rd, shape)
    else:
        face_descriptor = 0
        logging.warning("no face")
    return face_descriptor

返回 personX 的 128D 特征均值 / Return the mean value of 128D face descriptor for person X
Input:    path_face_personX
Output:   features_mean_personX
def return_features_mean_personX(path_face_personX):
    features_list_personX = []
    photos_list = os.listdir(path_face_personX)
    if photos_list:
        for i in range(len(photos_list)):
            # 调用 return_128d_features() 得到 128D 特征 / Get 128D features for single image of personX
            logging.info("%-40s %-20s", "正在读的人脸图像 / Reading image:", path_face_personX + "/" + photos_list[i])
            features_128d = return_128d_features(path_face_personX + "/" + photos_list[i])
            # 遇到没有检测出人脸的图片跳过 / Jump if no face detected from image
            if features_128d == 0:
                i += 1
            else:
                features_list_personX.append(features_128d)
    else:
        logging.warning("文件夹内图像文件为空 / Warning: No images in%s/", path_face_personX)

    # 计算 128D 特征的均值 / Compute the mean
    # personX 的 N 张图像 x 128D -> 1 x 128D
    if features_list_personX:
        features_mean_personX = np.array(features_list_personX, dtype=object).mean(axis=0)
    else:
        features_mean_personX = np.zeros(128, dtype=object, order='C')
    return features_mean_personX

def main():
    logging.basicConfig(level=logging.INFO)
    # 获取已录入的最后一个人脸序号 / Get the order of latest person
    person_list = os.listdir("data/data_faces_from_camera/")
    person_list.sort()

    with open("data/features_all.csv", "w", newline="") as csvfile:
        writer = csv.writer(csvfile)
        for person in person_list:
            # Get the mean/average features of face/personX, it will be a list with a length of 128D
            logging.info("%sperson_%s", path_images_from_camera, person)
            features_mean_personX = return_features_mean_personX(path_images_from_camera + person)

            if len(person.split('_', 2)) == 2:
                # "person_x"
                person_name = person
            else:
                # "person_x_tom"
                person_name = person.split('_', 2)[-1]
            features_mean_personX = np.insert(features_mean_personX, 0, person_name, axis=0)
            # features_mean_personX will be 129D, person name + 128 features
            writer.writerow(features_mean_personX)
            logging.info('\n')
        logging.info("所有录入人脸数据存入 / Save all the features of faces registered into: data/features_all.csv")

if __name__ == '__main__':
    main()
2.3 实时捕获人脸并进行识别
face_reco_from_camera.py
Copyright (C) 2018-2021 coneypo
SPDX-License-Identifier: MIT

Author:   coneypo
Blog:     http://www.cnblogs.com/AdaminXie
GitHub:   https://github.com/coneypo/Dlib_face_recognition_from_camera
Mail:     coneypo@foxmail.com

摄像头实时人脸识别 / Real-time face detection and recognition

import dlib
import numpy as np
import cv2
import pandas as pd
import os
import time
import logging
from PIL import Image, ImageDraw, ImageFont

Dlib 正向人脸检测器 / Use frontal face detector of Dlib
detector = dlib.get_frontal_face_detector()

Dlib 人脸 landmark 特征点检测器 / Get face landmarks
predictor = dlib.shape_predictor('data/data_dlib/shape_predictor_68_face_landmarks.dat')

Dlib Resnet 人脸识别模型,提取 128D 的特征矢量 / Use Dlib resnet50 model to get 128D face descriptor
face_reco_model = dlib.face_recognition_model_v1("data/data_dlib/dlib_face_recognition_resnet_model_v1.dat")

class Face_Recognizer:
    def __init__(self):
        self.face_feature_known_list = []                # 用来存放所有录入人脸特征的数组 / Save the features of faces in database
        self.face_name_known_list = []                   # 存储录入人脸名字 / Save the name of faces in database

        self.current_frame_face_cnt = 0                     # 存储当前摄像头中捕获到的人脸数 / Counter for faces in current frame
        self.current_frame_face_feature_list = []           # 存储当前摄像头中捕获到的人脸特征 / Features of faces in current frame
        self.current_frame_face_name_list = []              # 存储当前摄像头中捕获到的所有人脸的名字 / Names of faces in current frame
        self.current_frame_face_name_position_list = []     # 存储当前摄像头中捕获到的所有人脸的名字坐标 / Positions of faces in current frame

        # Update FPS
        self.fps = 0                    # FPS of current frame
        self.fps_show = 0               # FPS per second
        self.frame_start_time = 0
        self.frame_cnt = 0
        self.start_time = time.time()

        self.font = cv2.FONT_ITALIC
        self.font_chinese = ImageFont.truetype("simsun.ttc", 30)

    # 从 "features_all.csv" 读取录入人脸特征 / Read known faces from "features_all.csv"
    def get_face_database(self):
        if os.path.exists("data/features_all.csv"):
            path_features_known_csv = "data/features_all.csv"
            csv_rd = pd.read_csv(path_features_known_csv, header=None)
            for i in range(csv_rd.shape[0]):
                features_someone_arr = []
                self.face_name_known_list.append(csv_rd.iloc[i][0])
                for j in range(1, 129):
                    if csv_rd.iloc[i][j] == '':
                        features_someone_arr.append('0')
                    else:
                        features_someone_arr.append(csv_rd.iloc[i][j])
                self.face_feature_known_list.append(features_someone_arr)
            logging.info("Faces in Database:%d", len(self.face_feature_known_list))
            return 1
        else:
            logging.warning("'features_all.csv' not found!")
            logging.warning("Please run 'get_faces_from_camera.py' "
                            "and 'features_extraction_to_csv.py' before 'face_reco_from_camera.py'")
            return 0

    # 计算两个128D向量间的欧式距离 / Compute the e-distance between two 128D features
    @staticmethod
    def return_euclidean_distance(feature_1, feature_2):
        feature_1 = np.array(feature_1)
        feature_2 = np.array(feature_2)
        dist = np.sqrt(np.sum(np.square(feature_1 - feature_2)))
        return dist

    # 更新 FPS / Update FPS of Video stream
    def update_fps(self):
        now = time.time()
        # 每秒刷新 fps / Refresh fps per second
        if str(self.start_time).split(".")[0] != str(now).split(".")[0]:
            self.fps_show = self.fps
        self.start_time = now
        self.frame_time = now - self.frame_start_time
        self.fps = 1.0 / self.frame_time
        self.frame_start_time = now

    # 生成的 cv2 window 上面添加说明文字 / PutText on cv2 window
    def draw_note(self, img_rd):
        cv2.putText(img_rd, "Face Recognizer", (20, 40), self.font, 1, (255, 255, 255), 1, cv2.LINE_AA)
        cv2.putText(img_rd, "Frame:  " + str(self.frame_cnt), (20, 100), self.font, 0.8, (0, 255, 0), 1,
                    cv2.LINE_AA)
        cv2.putText(img_rd, "FPS:    " + str(self.fps_show.__round__(2)), (20, 130), self.font, 0.8, (0, 255, 0), 1,
                    cv2.LINE_AA)
        cv2.putText(img_rd, "Faces:  " + str(self.current_frame_face_cnt), (20, 160), self.font, 0.8, (0, 255, 0), 1,
                    cv2.LINE_AA)
        cv2.putText(img_rd, "Q: Quit", (20, 450), self.font, 0.8, (255, 255, 255), 1, cv2.LINE_AA)

    def draw_name(self, img_rd):
        # 在人脸框下面写人脸名字 / Write names under rectangle
        img = Image.fromarray(cv2.cvtColor(img_rd, cv2.COLOR_BGR2RGB))
        draw = ImageDraw.Draw(img)
        for i in range(self.current_frame_face_cnt):
            # cv2.putText(img_rd, self.current_frame_face_name_list[i], self.current_frame_face_name_position_list[i], self.font, 0.8, (0, 255, 255), 1, cv2.LINE_AA)
            draw.text(xy=self.current_frame_face_name_position_list[i], text=self.current_frame_face_name_list[i], font=self.font_chinese,
                  fill=(255, 255, 0))
            img_rd = cv2.cvtColor(np.array(img), cv2.COLOR_RGB2BGR)
        return img_rd

    # 修改显示人名 / Show names in chinese
    def show_chinese_name(self):
        # Default known name: person_1, person_2, person_3
        if self.current_frame_face_cnt >= 1:
            # 修改录入的人脸姓名 / Modify names in face_name_known_list to chinese name
            self.face_name_known_list[0] = '张三'.encode('utf-8').decode()
            # self.face_name_known_list[1] = '张四'.encode('utf-8').decode()

    # 处理获取的视频流,进行人脸识别 / Face detection and recognition from input video stream
    def process(self, stream):
        # 1. 读取存放所有人脸特征的 csv / Read known faces from "features.all.csv"
        if self.get_face_database():
            while stream.isOpened():
                self.frame_cnt += 1
                logging.debug("Frame %d starts", self.frame_cnt)
                flag, img_rd = stream.read()
                faces = detector(img_rd, 0)
                kk = cv2.waitKey(1)
                # 按下 q 键退出 / Press 'q' to quit
                if kk == ord('q'):
                    break
                else:
                    self.draw_note(img_rd)
                    self.current_frame_face_feature_list = []
                    self.current_frame_face_cnt = 0
                    self.current_frame_face_name_position_list = []
                    self.current_frame_face_name_list = []

                    # 2. 检测到人脸 / Face detected in current frame
                    if len(faces) != 0:
                        # 3. 获取当前捕获到的图像的所有人脸的特征 / Compute the face descriptors for faces in current frame
                        for i in range(len(faces)):
                            shape = predictor(img_rd, faces[i])
                            self.current_frame_face_feature_list.append(face_reco_model.compute_face_descriptor(img_rd, shape))
                        # 4. 遍历捕获到的图像中所有的人脸 / Traversal all the faces in the database
                        for k in range(len(faces)):
                            logging.debug("For face %d in camera:", k+1)
                            # 先默认所有人不认识,是 unknown / Set the default names of faces with "unknown"
                            self.current_frame_face_name_list.append("unknown")

                            # 每个捕获人脸的名字坐标 / Positions of faces captured
                            self.current_frame_face_name_position_list.append(tuple(
                                [faces[k].left(), int(faces[k].bottom() + (faces[k].bottom() - faces[k].top()) / 4)]))

                            # 5. 对于某张人脸,遍历所有存储的人脸特征
                            # For every faces detected, compare the faces in the database
                            current_frame_e_distance_list = []
                            for i in range(len(self.face_feature_known_list)):
                                # 如果 person_X 数据不为空
                                if str(self.face_feature_known_list[i][0]) != '0.0':
                                    e_distance_tmp = self.return_euclidean_distance(self.current_frame_face_feature_list[k],
                                                                                    self.face_feature_known_list[i])
                                    logging.debug("  With person %s, the e-distance is %f", str(i + 1), e_distance_tmp)
                                    current_frame_e_distance_list.append(e_distance_tmp)
                                else:
                                    # 空数据 person_X
                                    current_frame_e_distance_list.append(999999999)
                            # 6. 寻找出最小的欧式距离匹配 / Find the one with minimum e-distance
                            similar_person_num = current_frame_e_distance_list.index(min(current_frame_e_distance_list))
                            logging.debug("Minimum e-distance with %s: %f", self.face_name_known_list[similar_person_num], min(current_frame_e_distance_list))

                            if min(current_frame_e_distance_list) < 0.4:
                                self.current_frame_face_name_list[k] = self.face_name_known_list[similar_person_num]
                                logging.debug("Face recognition result: %s", self.face_name_known_list[similar_person_num])
                            else:
                                logging.debug("Face recognition result: Unknown person")
                            logging.debug("\n")

                            # 矩形框 / Draw rectangle
                            for kk, d in enumerate(faces):
                                # 绘制矩形框
                                cv2.rectangle(img_rd, tuple([d.left(), d.top()]), tuple([d.right(), d.bottom()]),
                                              (255, 255, 255), 2)

                        self.current_frame_face_cnt = len(faces)

                        # 7. 在这里更改显示的人名 / Modify name if needed
                        # self.show_chinese_name()

                        # 8. 写名字 / Draw name
                        img_with_name = self.draw_name(img_rd)

                    else:
                        img_with_name = img_rd

                logging.debug("Faces in camera now: %s", self.current_frame_face_name_list)

                cv2.imshow("camera", img_with_name)

                # 9. 更新 FPS / Update stream FPS
                self.update_fps()
                logging.debug("Frame ends\n\n")

    # OpenCV 调用摄像头并进行 process
    def run(self):
        # cap = cv2.VideoCapture("video.mp4")  # Get video stream from video file
        cap = cv2.VideoCapture(0)              # Get video stream from camera
        cap.set(3, 480)                        # 640x480
        self.process(cap)

        cap.release()
        cv2.destroyAllWindows()

def main():
    # logging.basicConfig(level=logging.DEBUG) # Set log level to 'logging.DEBUG' to print debug info of every frame
    logging.basicConfig(level=logging.INFO)
    Face_Recognizer_con = Face_Recognizer()
    Face_Recognizer_con.run()

if __name__ == '__main__':
    main()
识别结果(我和我的无美颜照片):

(自己的脸,马赛克一下)
可以看出, 识别效果还是很不错的。
三、活体检测
3.1 眨眼检测
经过查询资料,得到广为人使用的一个指标:眼睛纵横比(EAR)
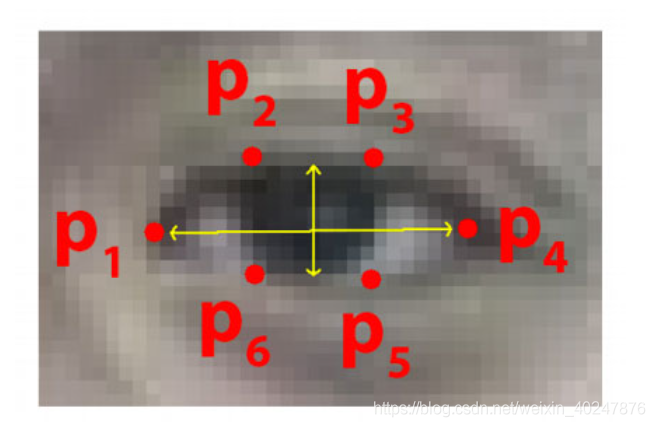
分别得到两只眼睛的纵横比并取平均值,作为眨眼的指标,经过多次测试后,选取0.3作为阈值。
在连续检测到两次EAR小于阈值,即眼睛一睁一闭时,我们将记录为一次眨眼。
代码如下,实验结果如图:

from scipy.spatial import distance as dist
from imutils.video import VideoStream
from imutils import face_utils
import imutils
import time
import dlib
import cv2

def EAR(eye):
    # 计算眼睛的两组垂直关键点之间的欧式距离
    A = dist.euclidean(eye[1], eye[5])      # 1,5是一组垂直关键点
    B = dist.euclidean(eye[2], eye[4])      # 2,4是一组
    # 计算眼睛的一组水平关键点之间的欧式距离
    C = dist.euclidean(eye[0], eye[3])      # 0,3是一组水平关键点

    return (A + B) / (2.0 * C)

def main():

    EAR_THRESH = 0.3        # 眨眼阈值
    EYE_close = 2       # 闭眼次数阈值

    # 初始化眨眼帧计数器和总眨眼次数
    count_eye = 0
    total = 0
    detector = dlib.get_frontal_face_detector()
    predictor = dlib.shape_predictor('shape_predictor_68_face_landmarks.dat')

    # 左右眼的索引
    (lStart, lEnd) = face_utils.FACIAL_LANDMARKS_IDXS["left_eye"]
    (rStart, rEnd) = face_utils.FACIAL_LANDMARKS_IDXS["right_eye"]

    vs = VideoStream(src=0).start()
    time.sleep(1.0)

    while True:

        frame = vs.read()
        frame = imutils.resize(frame, width=600)
        gray = cv2.cvtColor(frame, cv2.COLOR_BGR2GRAY)

        # 在灰度框中检测人脸
        rects = detector(gray, 0)

        # 进入循环
        for rect in rects:
            shape = predictor(gray, rect)
            shape = face_utils.shape_to_np(shape)

            # 提取左眼和右眼坐标,然后使用该坐标计算两只眼睛的眼睛纵横比
            leftEye = shape[lStart:lEnd]
            rightEye = shape[rStart:rEnd]
            ear = EAR(leftEye) + EAR(rightEye) / 2.0
            # 判断眼睛纵横比是否低于眨眼阈值
            if ear < EAR_THRESH:
                count_eye += 1
            else:
                # 检测到一次闭眼
                if count_eye >= EYE_close:
                    total += 1
                count_eye = 0

            # 画出画框上眨眼的总次数以及计算出的帧的眼睛纵横比
            cv2.putText(frame, "Blinks: {}".format(total), (10, 30),
                cv2.FONT_HERSHEY_SIMPLEX, 0.7, (0, 0, 255), 2)
            cv2.putText(frame, "EAR: {:.2f}".format(ear), (300, 30),
                cv2.FONT_HERSHEY_SIMPLEX, 0.7, (0, 0, 255), 2)

        cv2.imshow("Frame", frame)
        key = cv2.waitKey(1) & 0xFF

        if key == ord("q"):
            break

    cv2.destroyAllWindows()
    vs.stop()

if __name__ == '__main__':
    main()
3.2 张嘴检测
同理,可以做张嘴检测:

from imutils.video import VideoStream
from imutils import face_utils
import imutils
import time
import dlib
import cv2
import numpy as np

def MAR(mouth):
    # 默认二范数:求特征值,然后求最大特征值得算术平方根
    A = np.linalg.norm(mouth[2] - mouth[9])  # 51, 59(人脸68个关键点)
    B = np.linalg.norm(mouth[4] - mouth[7])  # 53, 57
    C = np.linalg.norm(mouth[0] - mouth[6])  # 49, 55

    return (A + B) / (2.0 * C)

def main():

    MAR_THRESH = 0.5        # 张嘴阈值

    # 初始化
    COUNTER_MOUTH = 0
    TOTAL_MOUTH = 0
    detector = dlib.get_frontal_face_detector()
    predictor = dlib.shape_predictor('shape_predictor_68_face_landmarks.dat')

    # 嘴的索引
    (mStart, mEnd) = face_utils.FACIAL_LANDMARKS_IDXS["mouth"]

    vs = VideoStream(src=0).start()
    time.sleep(1.0)

    while True:

        frame = vs.read()
        frame = imutils.resize(frame, width=600)
        gray = cv2.cvtColor(frame, cv2.COLOR_BGR2GRAY)

        # 在灰度框中检测人脸
        rects = detector(gray, 0)

        # 进入循环
        for rect in rects:
            shape = predictor(gray, rect)
            shape = face_utils.shape_to_np(shape)

            # 提取嘴唇坐标,然后使用该坐标计算嘴唇纵横比
            Mouth = shape[mStart:mEnd]
            mar = MAR(Mouth)
            # 判断嘴唇纵横比是否高于张嘴阈值,如果是,则增加张嘴帧计数器
            if mar > MAR_THRESH:
                COUNTER_MOUTH += 1

            else:
                # 如果张嘴帧计数器不等于0,则增加张嘴的总次数
                if COUNTER_MOUTH >= 2:
                    TOTAL_MOUTH += 1
                COUNTER_MOUTH = 0

            cv2.putText(frame, "Mouth is open: {}".format(TOTAL_MOUTH), (10, 60),
                        cv2.FONT_HERSHEY_SIMPLEX, 0.7, (0, 0, 255), 2)
            cv2.putText(frame, "MAR: {:.2f}".format(mar), (300, 60),
                        cv2.FONT_HERSHEY_SIMPLEX, 0.7, (0, 0, 255), 2)

        cv2.imshow("Frame", frame)
        key = cv2.waitKey(1) & 0xFF

        if key == ord("q"):
            break

    cv2.destroyAllWindows()
    vs.stop()

if __name__ == '__main__':
    main()
3.3 摇头检测
在手机很多App如支付宝中,摇头也属于非常常见的活体检测手段,此项采用鼻子到左右脸的欧氏距离变化,判断是否摇头。

代码如下:
from scipy.spatial import distance as dist
from imutils.video import VideoStream
from imutils import face_utils
import imutils
import time
import dlib
import cv2

def nose_jaw_distance(nose, jaw):
    # 计算鼻子上一点"27"到左右脸边界的欧式距离
    face_left1 = dist.euclidean(nose[0], jaw[0])        # 27, 0
    face_right1 = dist.euclidean(nose[0], jaw[16])      # 27, 16
    # 计算鼻子上一点"30"到左右脸边界的欧式距离
    face_left2 = dist.euclidean(nose[3], jaw[2])        # 30, 2
    face_right2 = dist.euclidean(nose[3], jaw[14])      # 30, 14
    # 创建元组,用以保存4个欧式距离值
    face_distance = (face_left1, face_right1, face_left2, face_right2)

    return face_distance

def main():
    # 初始化眨眼帧计数器和总眨眼次数
    distance_left = 0
    distance_right = 0
    TOTAL_FACE = 0
    detector = dlib.get_frontal_face_detector()
    predictor = dlib.shape_predictor('shape_predictor_68_face_landmarks.dat')

    (nStart, nEnd) = face_utils.FACIAL_LANDMARKS_IDXS["nose"]
    (jStart, jEnd) = face_utils.FACIAL_LANDMARKS_IDXS['jaw']

    vs = VideoStream(src=0).start()
    time.sleep(1.0)

    while True:

        frame = vs.read()
        frame = imutils.resize(frame, width=600)
        gray = cv2.cvtColor(frame, cv2.COLOR_BGR2GRAY)

        # 在灰度框中检测人脸
        rects = detector(gray, 0)

        # 进入循环
        for rect in rects:
            shape = predictor(gray, rect)
            shape = face_utils.shape_to_np(shape)

            # 提取鼻子和下巴的坐标,然后使用该坐标计算鼻子到左右脸边界的欧式距离
            nose = shape[nStart:nEnd]
            jaw = shape[jStart:jEnd]
            NOSE_JAW_Distance = nose_jaw_distance(nose, jaw)
            # 移植鼻子到左右脸边界的欧式距离
            face_left1 = NOSE_JAW_Distance[0]
            face_right1 = NOSE_JAW_Distance[1]
            face_left2 = NOSE_JAW_Distance[2]
            face_right2 = NOSE_JAW_Distance[3]

            # 根据鼻子到左右脸边界的欧式距离,判断是否摇头
            # 左脸大于右脸
            if face_left1 >= face_right1 + 2 and face_left2 >= face_right2 + 2:
                distance_left += 1
            # 右脸大于左脸
            if face_right1 >= face_left1 + 2 and face_right2 >= face_left2 + 2:
                distance_right += 1
            # 左脸大于右脸,并且右脸大于左脸,判定摇头
            if distance_left != 0 and distance_right != 0:
                TOTAL_FACE += 1
                distance_right = 0
                distance_left = 0

            # 画出摇头次数
            cv2.putText(frame, "shake one's head: {}".format(TOTAL_FACE), (10, 90),
                        cv2.FONT_HERSHEY_SIMPLEX, 0.7, (0, 0, 255), 2)

        cv2.imshow("Frame", frame)
        key = cv2.waitKey(1) & 0xFF

        if key == ord("q"):
            break

    cv2.destroyAllWindows()
    vs.stop()

if __name__ == '__main__':
    main()
Original: https://blog.csdn.net/qq_54875519/article/details/126945563
Author: 南笙ღ
Title: 通过Dlib和opencv实现人脸识别和活体检测
原创文章受到原创版权保护。转载请注明出处:https://www.johngo689.com/794354/
转载文章受原作者版权保护。转载请注明原作者出处!