

Alex在2012年提出的alexnet网络结构模型引爆了神经网络的应用热潮,并赢得了2012届图像识别大赛的冠军,使得CNN成为在图像分类上的核心算法模型。


该网络的亮点在于:
(1)首次使用了GPU进行网络加速训练。
(2)使用了ReLU激活函数,而不是传统的Sigmoid激活函数以及Tanh激活函数。
(3)使用了LRN局部响应归一化。
(4)在全连接层的前两层中使用了Droupout随机失活神经元操作,以减少过拟合。
模型组成
- 输入层
- 5个卷积层
- 3个全链接层
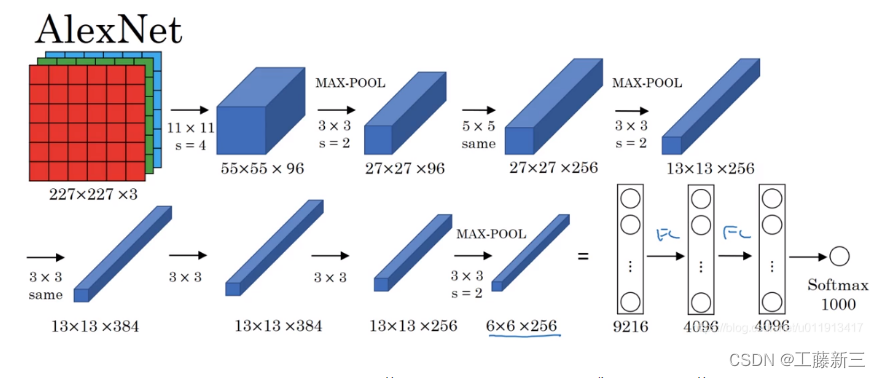
第1层:卷积层(卷积、池化)
Conv1
输入:input_size = [224, 224, 3]
卷积层:
kernels = 48 * 2 = 96 组卷积核
kernel_size = 11
padding = [1, 2] (左上围加半圈0,右下围加2倍的半圈0)
stride = 4
输出:output_size = [55, 55, 96]
Maxpool1
- 输入:input_size = [55, 55, 96]
- 池化层:(只改变尺寸,不改变深度channel)
- kernel_size = 3
- padding = 0
- stride = 2
- 输出:output_size = [27, 27, 96]
Conv2
- 输出:output_size = [27, 27, 256]
Maxpool2
- 输出:output_size = [13, 13, 256]
Conv3
- 输出:output_size = [13, 13, 384]
Conv4
- 输出:output_size = [13, 13, 384]
Conv5
- 输出:output_size = [13, 13, 256]
Maxpool3
- 输出:output_size = [6, 6, 256]
FC1、FC2、FC3
Maxpool3 → (66256) → FC1 → 4096 → FC2 → 4096 → FC3 → 1000
代码:
1. model.py
import torch.nn as nn
import torch

class AlexNet(nn.Module):
    def __init__(self, num_classes=1000, init_weights=False):
        super(AlexNet, self).__init__()
        # 用nn.Sequential()将网络打包成一个模块,精简代码
        self.features = nn.Sequential(   # 卷积层提取图像特征
            nn.Conv2d(3, 48, kernel_size=11, stride=4, padding=2),  # input[3, 224, 224]  output[48, 55, 55]
            nn.ReLU(inplace=True),                                  # 直接修改覆盖原值,节省运算内存
            nn.MaxPool2d(kernel_size=3, stride=2),                  # output[48, 27, 27]
            nn.Conv2d(48, 128, kernel_size=5, padding=2),           # output[128, 27, 27]
            nn.ReLU(inplace=True),
            nn.MaxPool2d(kernel_size=3, stride=2),                  # output[128, 13, 13]
            nn.Conv2d(128, 192, kernel_size=3, padding=1),          # output[192, 13, 13]
            nn.ReLU(inplace=True),
            nn.Conv2d(192, 192, kernel_size=3, padding=1),          # output[192, 13, 13]
            nn.ReLU(inplace=True),
            nn.Conv2d(192, 128, kernel_size=3, padding=1),          # output[128, 13, 13]
            nn.ReLU(inplace=True),
            nn.MaxPool2d(kernel_size=3, stride=2),                  # output[128, 6, 6]
        )
        self.classifier = nn.Sequential(   # 全连接层对图像分类
            nn.Dropout(p=0.5),             # Dropout 随机失活神经元,默认比例为0.5
            nn.Linear(128 * 6 * 6, 2048),
            nn.ReLU(inplace=True),
            nn.Dropout(p=0.5),
            nn.Linear(2048, 2048),
            nn.ReLU(inplace=True),
            nn.Linear(2048, num_classes),
        )
        if init_weights:
            self._initialize_weights()

    # 前向传播过程
    def forward(self, x):
        x = self.features(x)
        x = torch.flatten(x, start_dim=1)   # 展平后再传入全连接层
        x = self.classifier(x)
        return x

    # 网络权重初始化,实际上 pytorch 在构建网络时会自动初始化权重
    def _initialize_weights(self):
        for m in self.modules():
            if isinstance(m, nn.Conv2d):                            # 若是卷积层
                nn.init.kaiming_normal_(m.weight, mode='fan_out',   # 用(何)kaiming_normal_法初始化权重
                                        nonlinearity='relu')
                if m.bias is not None:
                    nn.init.constant_(m.bias, 0)                    # 初始化偏重为0
            elif isinstance(m, nn.Linear):            # 若是全连接层
                nn.init.normal_(m.weight, 0, 0.01)    # 正态分布初始化
                nn.init.constant_(m.bias, 0)          # 初始化偏重为0
2. train.py
import os
import sys
import json

import torch
import torch.nn as nn
from torchvision import transforms, datasets, utils
import matplotlib.pyplot as plt
import numpy as np
import torch.optim as optim
from tqdm import tqdm

from model import AlexNet

def main():
    device = torch.device("cuda:0" if torch.cuda.is_available() else "cpu")
    print("using {} device.".format(device))

    data_transform = {
        "train": transforms.Compose([transforms.RandomResizedCrop(224),
                                     transforms.RandomHorizontalFlip(),
                                     transforms.ToTensor(),
                                     transforms.Normalize((0.5, 0.5, 0.5), (0.5, 0.5, 0.5))]),
        "val": transforms.Compose([transforms.Resize((224, 224)),  # cannot 224, must (224, 224)
                                   transforms.ToTensor(),
                                   transforms.Normalize((0.5, 0.5, 0.5), (0.5, 0.5, 0.5))])}

    data_root = os.path.abspath(os.path.join(os.getcwd(), "../.."))  # get data root path
    image_path = os.path.join(data_root, "data_set", "flower_data")  # flower data set path
    assert os.path.exists(image_path), "{} path does not exist.".format(image_path)
    train_dataset = datasets.ImageFolder(root=os.path.join(image_path, "train"),
                                         transform=data_transform["train"])
    train_num = len(train_dataset)

    # {'daisy':0, 'dandelion':1, 'roses':2, 'sunflower':3, 'tulips':4}
    flower_list = train_dataset.class_to_idx
    cla_dict = dict((val, key) for key, val in flower_list.items())
    # write dict into json file
    json_str = json.dumps(cla_dict, indent=4)
    with open('class_indices.json', 'w') as json_file:
        json_file.write(json_str)

    batch_size = 32
    nw = min([os.cpu_count(), batch_size if batch_size > 1 else 0, 8])  # number of workers
    print('Using {} dataloader workers every process'.format(nw))

    train_loader = torch.utils.data.DataLoader(train_dataset,
                                               batch_size=batch_size, shuffle=True,
                                               num_workers=nw)

    validate_dataset = datasets.ImageFolder(root=os.path.join(image_path, "val"),
                                            transform=data_transform["val"])
    val_num = len(validate_dataset)
    validate_loader = torch.utils.data.DataLoader(validate_dataset,
                                                  batch_size=4, shuffle=False,
                                                  num_workers=nw)

    print("using {} images for training, {} images for validation.".format(train_num,
                                                                           val_num))
    # test_data_iter = iter(validate_loader)
    # test_image, test_label = test_data_iter.next()
    #
    # def imshow(img):
    #     img = img / 2 + 0.5  # unnormalize
    #     npimg = img.numpy()
    #     plt.imshow(np.transpose(npimg, (1, 2, 0)))
    #     plt.show()
    #
    # print(' '.join('%5s' % cla_dict[test_label[j].item()] for j in range(4)))
    # imshow(utils.make_grid(test_image))

    net = AlexNet(num_classes=5, init_weights=True)

    net.to(device)
    loss_function = nn.CrossEntropyLoss()
    # pata = list(net.parameters())
    optimizer = optim.Adam(net.parameters(), lr=0.0002)

    epochs = 10
    save_path = './AlexNet.pth'
    best_acc = 0.0
    train_steps = len(train_loader)
    for epoch in range(epochs):
        # train
        net.train()
        running_loss = 0.0
        train_bar = tqdm(train_loader, file=sys.stdout)
        for step, data in enumerate(train_bar):
            images, labels = data
            optimizer.zero_grad()
            outputs = net(images.to(device))
            loss = loss_function(outputs, labels.to(device))
            loss.backward()
            optimizer.step()

            # print statistics
            running_loss += loss.item()

            train_bar.desc = "train epoch[{}/{}] loss:{:.3f}".format(epoch + 1,
                                                                     epochs,
                                                                     loss)

        # validate
        net.eval()
        acc = 0.0  # accumulate accurate number / epoch
        with torch.no_grad():
            val_bar = tqdm(validate_loader, file=sys.stdout)
            for val_data in val_bar:
                val_images, val_labels = val_data
                outputs = net(val_images.to(device))
                predict_y = torch.max(outputs, dim=1)[1]
                acc += torch.eq(predict_y, val_labels.to(device)).sum().item()

        val_accurate = acc / val_num
        print('[epoch %d] train_loss: %.3f  val_accuracy: %.3f' %
              (epoch + 1, running_loss / train_steps, val_accurate))

        if val_accurate > best_acc:
            best_acc = val_accurate
            torch.save(net.state_dict(), save_path)

    print('Finished Training')

if __name__ == '__main__':
    main()
3. predict.py
import torch
from model import AlexNet
from PIL import Image
from torchvision import transforms
import matplotlib.pyplot as plt
import json

预处理
data_transform = transforms.Compose(
    [transforms.Resize((224, 224)),
     transforms.ToTensor(),
     transforms.Normalize((0.5, 0.5, 0.5), (0.5, 0.5, 0.5))])

load image
img = Image.open("rose.jpg")
plt.imshow(img)
[N, C, H, W]
img = data_transform(img)
expand batch dimension
img = torch.unsqueeze(img, dim=0)

read class_indict
try:
    json_file = open('./class_indices.json', 'r')
    class_indict = json.load(json_file)
except Exception as e:
    print(e)
    exit(-1)

create model
model = AlexNet(num_classes=5)
load model weights
model_weight_path = "./AlexNet.pth"
model.load_state_dict(torch.load(model_weight_path))

关闭 Dropout
model.eval()
with torch.no_grad():
    # predict class
    output = torch.squeeze(model(img))     # 将输出压缩,即压缩掉 batch 这个维度
    predict = torch.softmax(output, dim=0)
    predict_cla = torch.argmax(predict).numpy()
print(class_indict[str(predict_cla)], predict[predict_cla].item())
plt.show()
Original: https://blog.csdn.net/weixin_42457110/article/details/124980914
Author: 工藤新三
Title: AlexNet模型及代码详解
原创文章受到原创版权保护。转载请注明出处:https://www.johngo689.com/785626/
转载文章受原作者版权保护。转载请注明原作者出处!