

python有很多不错的测试框架,比如RobotFramework,Unitest,这里要介绍一下pytest。可以参考,pytest文档
因为文档介绍比较多,这里使用简单的几篇帖子引导快速入门并灵活使用。
1 安装和执行
通过安装和一个简单的实例先入为主,体验一下如何使用。
pip3 install pytest
安装之后在在\python37\lib\site-packages目录下安装对应的pytest包,使用的时候直接引入import pytest即可。
2 用例
"""文件名:test_001.py"""
def fun(inputNum)->int:
    return inputNum+1
def test_001():
    assert fun(2)==3
def test_002():
    assert fun(2)==4
在命令行执行:pytest test_001.py


python脚本以test _或者_test命名后,执行对应的pytest 文件名.py即可执行
说明:测试文件后边的字母代表含义汇总:
- .:绿色表示执行通过
- F :Fali失败
- E:Error错误
- s:Skip跳过
- X:Xpass预期失败但是成功
- xfail:有切失败执行失败
3 pytest入门知识
3.1 命名规范
pytest中,命名要求:
- 文件/包需要以test_开头或者_test结尾
- 类名必须以Test开头,且不含__init__方法
- 方法/或者函数,必须以test_开头
3.2识别断言
pytest中断言判断使用assert,主要有以下几种断言
assert flag
assert not flag
assert subset in set
assert a == b
assert a != b
3.3 pytest使用命令
1.重试
有时候可能因为环境等问题导致用例执行失败,此时考虑到重复执行,此时可以使用命令
pip install pytest-rerunfailures

pytest test.py --reruns 3
2.测试报告
既然是介绍基本的知识,这里对于测试报告先使用html,如果深入了解后,可以使用allure展示测试报告,这里先介绍下html
pip install pytest-html
pytest test_001.py --html=./testreport.html


3.指定执行顺序
python的执行是从上到下依次执行,有时候需要做一些混沌测试,这个时候最好是可以 顺序随机执行测试用例。
pip install pytest-randomly
具体使用方法可参考pytest-randomly
4.并发执行
python因为GIL的原因导致无法实现正在的多线程并发,因此可以根据其中的某些特性实现”并发请求”,从而减缓了大量请求的的sleep时间。主要有多线程(线程池),多进程,异步IO等。pytest中也有两种方式实现并发请求。
pip install pytest-xdist
pip install pytest-parallel
如果需要做多进程的并发,只能使用linux系统或者是mac。如果是多线程可以在windows上
–workers (optional)  * :多进程运行需要加此参数,  *是进程数。默认为1。
–tests-per-worker (optional)  * :多线程运行, *是每个worker运行的最大并发线程数。默认为1
pytest test.py --workers 3:3个进程运行
pytest test.py --tests-per-worker 4:4个线程运行
pytest test.py --workers 2 --tests-per-worker 4:2个进程并行,且每个进程最多4个线程运行,即总共最多8个线程运行。
5.出错后操作
常稳测试用例或者批量跑测试用例的时候,一般不希望其中一个用例执行失败后就结束整个自动化的运行过程。但是有时候确实有些特殊情况,需要在一遇到失败就就理解终止运行。
pip install pytest-instafail
6.集成报告
集成jenkins的junit报告: 不用安装pytest已经集成了
使用命令:pytest --junitxml=path
此时则执行完用例后,在本地目录生成testreport.html的测试报告,和xmlreport.xml的junit格式报告在jenkins中可调用展示。
7. 数据准备
数据准备比如执行case前需要给某个case准备好传递的参数数据。介绍参数之前,先说说测试的基本过程,一般可以分为4个步骤
- Arrange 安排或者说布局,执行测试所需要的设置和初始化
- Act 采取测试所需的行动
- Assert 验证测试结果
- Cleanup 环境恢复
那pytest中的fixture几乎可以干了上面的124的工作。可参考fixture
fixture 无参
import pytest
def fun():
    return "hello world"

@pytest.fixture()
def inty():
    return "connect to "+fun()

class TestCase():

    def test_open_baidu(self, inty):
        print("============{}".format(inty))
注意:pytest.fixture()装饰器定义的对象名inty必须和方法调用的参数名inty一致
fixture有参
最常用的场景是,测试登录,比如给一个账户和ID,或者账户和密码,需要遍历各种类型测试其正确性
@pytest.fixture(params=[
{key11:value1,key12:value2} ,
{key21:value21,key22:value22}
]
)
import pytest
@pytest.fixture(params=[{'userID':'00001','username':'jack'},
                        {'userID':'00002','username':'mike'}])
def getdata(request):

    print("request.param======",request.param)
    return request.param
class TestCase():
    def test_case1(self, getdata):
        print("第1个用例输出:{}".format(getdata))
    def test_case2(self, getdata):
        print("第2个用例输出:{}".format(getdata))
注意:pytest.fixture(参数)传递参数时,在get属性中时,只能设置get方法的参数为request

这里可以看到每个用例执行了两次,第一次是执行第一个参数,第二次是验证第二个参数。
根据这样的例子,如果在测试中需要处理很多重复测试数据时,则这些数据就可以传入params里(可以另外写个方法读取txt/excel等文件测试数据值,以多字典列表形式返回所有测试数据),类似于unittest的DDT数据驱动方法。然后就会逐一去带入testcase里执行了
测试用例中某个方法前加指定的参数
测试过程中,建一个一个.py文件验证一个场景,这样是最为方便的(比如方便维护,方便其他teamer审阅功能等),但是有时候需要在某些方法前给其加上独有的参数
import pytest
class TestCase():
    @pytest.mark.parametrize("getdataA",
                        [{'userID':'00001','username':'jack'},
                        {'userID':'00002','username':'mike'}])
    def test_case1(self, getdataA):
        print("第1个用例输出:{}".format(getdataA))
    @pytest.mark.parametrize("getdataB",
                        [{'userID':'00003','username':'tina'},
                        {'userID':'00004','username':'book'}])
    def test_case2(self, getdataB):
        print("第2个用例输出:{}".format(getdataB))
输出测试报告:

那结合上面fixture中有参数的场景和本节中给某个函数指定参数的场景
import pytest
@pytest.fixture(params=[{'userID':'00001','username':'jack'},
{'userID':'00002','username':'mike'}])
def getdata(request):
print("request.param======",request.param)
return request.param
class TestCase():
def test_case1(self, getdata):
print("第1个用例输出:{}".format(getdata))
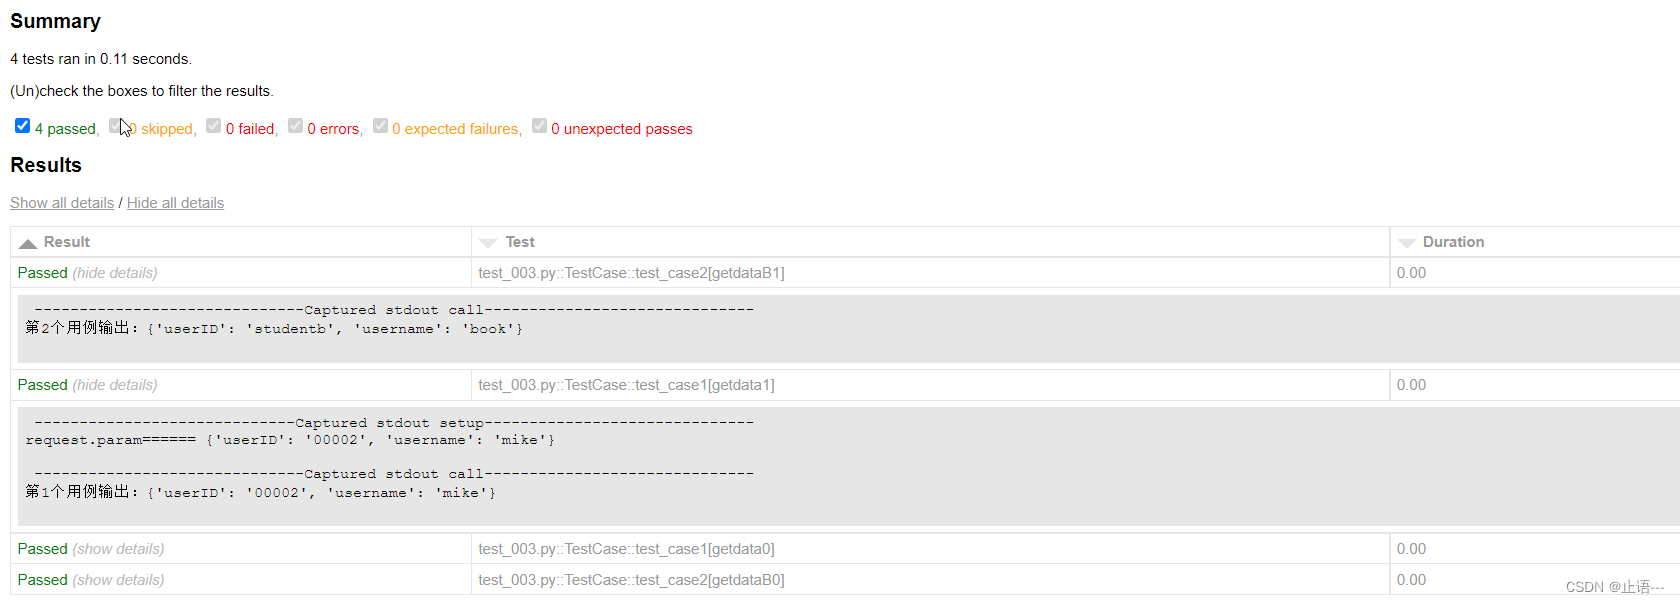
@pytest.mark.parametrize("getdataB",
[{'userID':'studenta','username':'tina'},
{'userID':'studentb','username':'book'}])
def test_case2(self, getdataB):
print("第2个用例输出:{}".format(getdataB))
输出测试报告:
既然在fixture有参章节中提到了使用外部数据作为入参进行传递,那么这里就跟着介绍一下
测试用例中方法前直接调用外部文件实现数据驱动
import pytest,csv
def getCsvContents(csvFileUrl):
    '''把csv格式文件转换为字典列表方法'''
    with open(csvFileUrl,'r') as csv_f:
        reader = csv.reader(csv_f)
        fieldnames = next(reader)
        csv_reader = csv.DictReader(csv_f,fieldnames=fieldnames)
        kwList=[]
        for row in csv_reader:
            d = {}
            for k, v in row.items():
                d[k] = v
            kwList.append(d)
    return kwList
class TestCase():
    @pytest.mark.parametrize("getdataA",getCsvContents('test.txt'))
    def test_case1(self, getdataA):
        print("第1个用例输出:{}".format(getdataA))
    @pytest.mark.parametrize("getdataB",getCsvContents('test.txt'))
    def test_case2(self, getdataB):
        print("第2个用例输出:{}".format(getdataB))
关于pytest-数据驱动,实现从数据源yaml/excel/csv/json获取数据实现测试,可以参考pytest-数据驱动
3.4 pytest命令操作
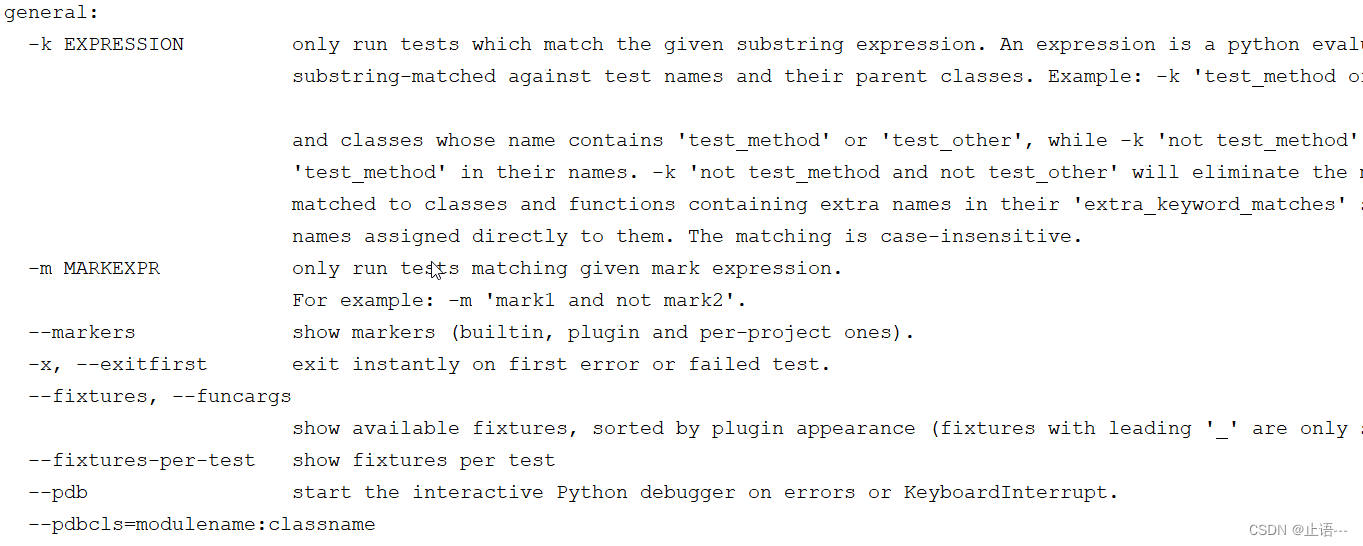
接着介绍一下pytest各种命令大全.可以使用pytest –help
pytest --help
执行全部文件

pytest pytestExercise
运行pytestExercise文件所在目录的下所有case,即运行pytestExercise下所有test_ _.py、__test.py文件中以Test开头的类(注意:此类没有__init__函数),下的以test开头的方法。
指定某个文件下的所有case
这种场景在前面的示例中已经多次使用
pytest test_003.py
运行包含关键词的类或方法
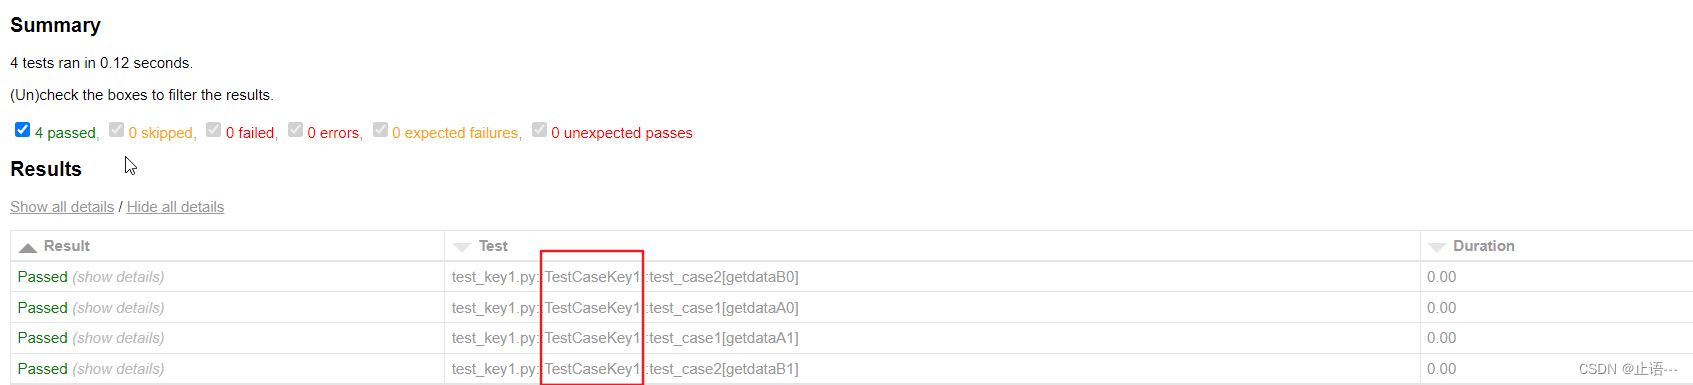
在pytestExercise目录下有很多练习的test_*.py文件,同时在test_key1.py和test_key2.py中对应的类名也是如此

这里只想运行当前目录下的test_key1.py中的TestCaseKey1这个类中的方法
pytest -k TestCaseKey1 ../pytestExercise --html=./testreport.html
那如果只想执行指定类下的指定的方法,比如这里只想执行TestCaseKey1类下的包含case11的case
import pytest
class TestCaseKey1():
    @pytest.mark.parametrize("getdataA",
                        [{'userID':'00001','username':'jack'},
                        {'userID':'00002','username':'mike'}])
    def test_case11(self, getdataA):
        print("第1个用例输出:{}".format(getdataA))
    @pytest.mark.parametrize("getdataB",
                        [{'userID':'00003','username':'tina'},
                        {'userID':'00004','username':'book'}])
    def test_case2(self, getdataB):
        print("第2个用例输出:{}".format(getdataB))
pytest -k "TestCaseKey1 and case11" ../pytestExercise --html=./testreport.html
同理如果想执行TestCaseKey1类中不包含case11的其他方法,则
pytest -k "TestCaseKey1 and not case11" ../pytestExercise --html=./testreport.html
使用作用域来指定执行范围
在很多语言中,比如C++中可以使用using namespace 来指定不同的作用域下的变量或者方法,同理在pytest中也可以通过 ::来指定执行范围.
pytest -k TestCaseKey1::case11 ../pytestExercise --html=./testreport.html
执行mark标记的类/方法
测试用例用,比如测试接口,有有效值测试,和无效值测试。一般有效值返回200和response,无效值或返回400类错误,这样对测试用例进行区分,可以将无效值标记为异常测试errorcase
import pytest
class TestInterface:
    @pytest.mark.errorcase
    def test_code(self):
        assert 400==200,"响应码不相等"

    def test_response(self):
        assert "id" in "ids"
pytest test_code.py -m errorcase --html=./testreport.html

说到mark的,比如测试过程中,测试介入执行之前需要先执行P0级别的冒烟测试用例,常稳自动化一般比如需要执行P0和P1级别的用例,可以通过指定用例的级别import pytest
class TestInterface:
@pytest.mark.P0
def test_P0Case(self):
assert 0==0
@pytest.mark.P1
def test_P0Case(self):
    assert 1==1,"两个数相等"

@pytest.mark.P2
def test_P0Case(self):
    assert 2==2
执行P0和P1级别的测试用例
在这里插入代码片
那如果是不执行某个mark的case,则使用 -m “not P0″,比如不执行P0级别的测试用例。同时mark还可以指定跳过某个case.比如”打桩”,测试过程中,已经完成了某个场景的用例设计,但是开发分模块交付的,此时可以跳过当前的场景验证.
@pytest.mark.skip
def test_case14(self):
assert 11==3,"两个数不相等"
重复执行失败的测试用例
这个场景前文已经介绍过
pytest test_0011.py --reruns 3 --reruns-delay 5

执行示例:
pytest ..\pytestExercise --reruns 3 --reruns-delay 4
生成jenkins集成后可用的junit测试报告文件
pytest test_demo1.py --junitxml=junitxml.xml
pytest ..\pytestExercise --reruns 3 --reruns-delay 4 --html="testreport.html" --junitxml="junitxmlreport.xml"
运行到失败就停止执行
pytest -X test_001.py
pytest --maxfail=2 test_001.py
结合上面的命令,这个给一个比较全面的命令功能。执行test_001.py中类名为TestCase且用例名标记为P0和P1,如果失败就重复运行2次等待3秒再继续,最后生成report.html报告
pytest -v test_001.py -k TestCase -m "P0 or P1" --reruns 2 --reruns-delay 3 --html=./report.html
如果说道Arrange功能仅限于此,似乎不能体现出pytest的强大,除了上面的功能,pytest也可以unitest风格。如设置环境准备工作,set_up
4 pytest测试用例前后置
前置、后置处理所有方法归纳如下:
模块预处理:setup_module teardown_module
类预处理: setup_class teardown_class
函数预处理:setup_function teardown_function
方法预处理:setup_method teardown_method
用例预处理:setup teardown
备注:pytest包会识别这些方法名
这里说明下,可以粗暴的认为类中类中的func 为方法,类外的func为函数。
pytest test_006.py --html=./testreport.html

输出测试报告:

模块的环境预置,在执行执行模块的时候首先会进行set_module。接着进入到测试方法之前,会设置set_founction。因此环境预置/回收:
set_module -> set_function -> case -> teardown_function -> teardown_module
那实际python case编写的过程往往会为了方便边界划分,使用类进行编写case。对于有类的pytest文件呢,结合函数和带有类的测试用例
import pytest
def setup_module():
    print("\n 这里是setup_module")
def teardown_module():
    print("这里是teardown_module")

def setup_function():
    print("这里是setup_function")
def teardown_function():
    print("这里是teardown_function")

def test_case1():
    print("这里是test_case1")
def test_case2():
    print("这里是test_case2")

class Testclass():
    def setup_class(self):
        print("这里是setup_class")
    def teardown_class(self):
        print("这里是teardown_class")

    def setup(self):
        print("这里是setup")
    def teardown(self):
        print("这里是teardown")
    def setup_method(self):
        print("这里是setup_method")
    def teardown_method(self):
        print("这里是teardown_method")
    def test_ClassCase1(self):
        print("这里是test_testClassCase1")
    def test_ClassCase2(self):
        print("这里是test_testClassCase1")

if __name__=="__main__":
    pytest.main(["-s", "test_demo7.py"])
输出测试报告

1.这几种方法全部使用优先级顺序如下:
setup_module -> setup_function -> setup_class -> setup_method -> setup -> teardown -> teardown_method -> teardown_class -> teardown_function -> teardown_module
2.其中setup_method/teardown_method 和setup/teardown 用在一起作用是一样的
3.setup_function/teardown_function是用在类以外,而setup_method/teardown_method 用在类之内
在上面的例子中我们注意到使用了pytest.main的调用方式,这个是从python中调用pytest
5 python调用pytest
python调用pytest可以参考 从python代码调用pytest。当然依然可以参考pytest –help
Original: https://blog.csdn.net/rhx_qiuzhi/article/details/124895286
Author: 止语—
Title: pytest使用(1)-基础
原创文章受到原创版权保护。转载请注明出处:https://www.johngo689.com/773144/
转载文章受原作者版权保护。转载请注明原作者出处!