

目录
官网地址:Full pytest documentation — pytest documentation
@pytest.mark.parametrize: 参数化测试函数
pytest测试发现的约定:
- 如果未指定参数,则集合从testpaths (如果已配置)或当前目录开始。 或者,命令行参数可用于目录、文件名或节点 ID 的任意组合。
- 回归到目录中,它们的匹配norecursedirs。
- 在这些中,搜索
test_*.py或*_test.py文件,按其目录测试包名称导入。 - 从这些文件中,收集测试项目:
test类外的测试函数或方法test预测试Test类中的预测试函数或方法(没有__init__方法)
pytest测试运行方式:
在模块中运行:pytest test_*.py
在目录中运行:pytest ./
节点id运行,在模块内运行指定的测试函数:pytest test_.py::test_func
根据节点id运行,指定测试类运行:pytest test_.py::TestClass
根据节点id运行,指定测试类内的测试用例:pytest test_.py::TestClass::test_func*
按照节点id运行,指定标记表达式运行:pytest -m slow (要先用@pytest.mark.slow对测试用例进行标记)
通过关键字表达式运行:pytest -k “class and notmethos” #只运行测试类内的测试用例,不会运行费类内的测试函数(将运行包含与给定 字符串表达式(不连续大小)写)匹配的名称的测试,其中可以包括使用文件名、类名和函数名作为变量的Python匹配)
从代码中调用运行: pytest.main([“-v”, “-p”, “no:sugar”, ……], plugins=[…]) #列表内写入多个参数
详细的测试输出输出
使用:pytest -r[rags]
例如:pytest -rfs # 结果中只显示测试失败的和测试跳过的用例
以下是可以使用的字符的完整列表:
f– 失败的E– 错误s– 跳过x– 失败X– xpassedp– 通过#小写P– 通过输出#大写a– 除了pPA– 全部N– 无,这可用于不显示任何内容(因为fE是默认设置)
pytest命令行参数
pytest -q test_*.py 以灯光的输出运行
--durations=10 --durations-min=1.0 # 显示耗时超过1秒的最慢的10个测试用例
pytest.ini 配置文件
配置文件位置:存储库的根目录或测试目录中
addopts=  # 命令参数
    -v  # 显示具体的测试用例结果
    -q  # 减少冗余
    -r 2
    --strict-marker # 只运行注册了的标记使用
    -s  # 简单显示测试结果
    --lf # 只运行上次测试失败的用例
    --ff  # 运行所有用例,首先运行上次失败的用例。不建议使用,会导致执行顺序错乱
    --ignore=path  # 在检索测试用例时,忽略指定的path
    -x #  在首个失败的用例执行后停止
    --maxfail N # 在第N个失败的用例执行后停止
testpaths=
    ./cases1  # 用例路径,可指定多个
    ./cases2
python_files=test_*.py  # 指定运行的文件名
python_classes = Test*  # 指定运行的类名
python_functions = test_*  # 指定运行的用例方法名
markers =
    smoke: mark smoke cases # 自定义mrak标记注册,可注册多个(@pytest.mark.smoke)
@pytest.mark.parametrize: 参数化测试函数
content of test_expectation.py
import pytest

定义两个参数变量,三组参数。此用例会执行三次每次参数值不同
@pytest.mark.parametrize("test_input,expected", [("3+5", 8), ("2+4", 6), ("6*9", 42)])
def test_eval(test_input, expected):
    assert eval(test_input) == expected
在参数化中使用标记标记
content of test_expectation.py
import pytest

@pytest.mark.parametrize(
    "test_input,expected",
    [("3+5", 8), ("2+4", 6), pytest.param("6*9", 42, marks=pytest.mark.xfail)],
)
def test_eval(test_input, expected):
    assert eval(test_input) == expected
pytest_generate_tests 允许定义自定义参数化方案或扩展
conftest.py
自定义命令行参数 --all
def pytest_addoption(parser):
    parser.addoption("--all", action="store_true", help="run all combinations")

def pytest_generate_tests(metafunc):
    if "param1" in metafunc.fixturenames:
        if metafunc.config.getoption("all"):
            end = 5
        else:
            end = 2
        # 指定参数变量名,参数值(迭代对象)
        metafunc.parametrize("param1", range(end))
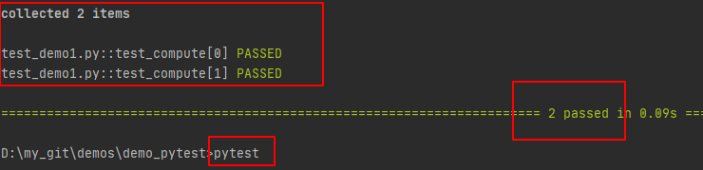
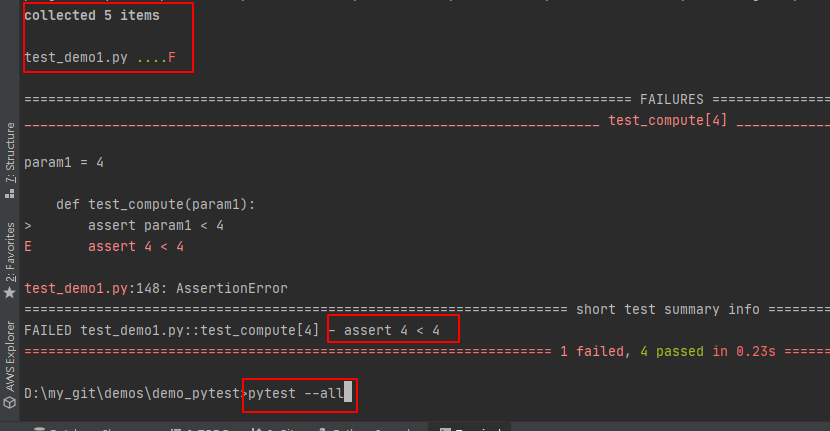
test_demo1.py
直接使用参数名
def test_compute(param1):
    assert param1 < 4
不输入参数的执行结果和输入–所有参数的执行结果对比

其他参数化
在参数化测试时使用 indirect=True参数允许在将值传递给测试之前使用接收值的fixture夹具对测试进行参数化(默认 在使用fixture和@pytest.mark.parametrize时 fixture先执行,会被@pytest.mark.parametrize覆盖)
import pytest

@pytest.fixture
def fixt(request):
    return request.param * 3  # 对参数进行二次处理

@pytest.mark.parametrize("fixt", ["a", "b"], indirect=True)  # 使用indirect=True时,将使用fixture夹具函数作为参数传递
def test_indirect(fixt):
    assert len(fixt) == 3
参数化经常使用多个参数名称。有机会 indirect 在特定参数上应用参数。可以通过将参数名称的列表或元组传递给 indirect. 在下面的示例中,有一个函数 test_indirect使用了两个设备: x和 y。这里我们给间接列表,其中包含设备的名称 x。间接参数将仅应用于此参数,并且该值 a 将传递给相应的夹具函数
import pytest

@pytest.fixture(scope="function")
def x(request):
    return request.param * 3

@pytest.fixture(scope="function")
def y(request):
    return request.param * 2

@pytest.mark.parametrize("x, y", [("a", "b")], indirect=["x"])
def test_indirect(x, y):
    assert x == "aaa"
    assert y == "b"
mrak标记
跳过:@pytest.mark.skip(reason="no way of currently testing this")
在模块级别整个跳过
import sys
import pytest

if not sys.platform.startswith("win"):
    pytest.skip("skipping windows-only tests", allow_module_level=True)
选择跳过: @pytest.mark.skipif(sys.version_info < (3, 7), reason=”requires python3.7 or higher”)
在模块之间直接共享skipif标记
content of test_mymodule.py
import mymodule

minversion = pytest.mark.skipif(
    mymodule.__versioninfo__ < (1, 1), reason="at least mymodule-1.1 required"
)

@minversion
def test_function():
    ...
您可以导入标记并在另一个测试模块中重用它:

test_myothermodule.py
from test_mymodule import minversion

@minversion  # 使用装饰器方式 重用skipif
def test_anotherfunction():
    ...
跳过一个模块内所有的测试用例,使用pytestmark作用与模块全局
test_module.py
pytestmark = pytest.mark.skipif(...)
跳过缺少的导入依赖项
您可以通过 在模块级别、测试或测试设置函数中使用pytest.importorskip跳过对丢失导入的测试。
docutils = pytest.importorskip("docutils")
如果 docutils不能在这里导入,这将导致测试的跳过结果。您还可以根据库的版本号跳过:
docutils = pytest.importorskip("docutils", minversion="0.3")
将从指定模块的 __version__属性中读取版本。
@pytest.mark.xfail:将测试功能标记为预期失败
此测试将运行,但在失败时不会报告任何回溯。相反,终端报告会将其列在”预期失败”( XFAIL) 或”意外通过”( XPASS) 部分
@pytest.mark.xfail(reason="known parser issue")
def test_function():
    ...
setup/teardown 方法
模块级别
def setup_module(module):
    """ setup any state specific to the execution of the given module."""

def teardown_module(module):
    """ teardown any state that was previously setup with a setup_module
    method.

"""

类级别
@classmethod
def setup_class(cls):
    """ setup any state specific to the execution of the given class (which
    usually contains tests).

"""

@classmethod
def teardown_class(cls):
    """ teardown any state that was previously setup with a call to
    setup_class.

"""

方法和函数级别
def setup_method(self, method):
    """ setup any state tied to the execution of the given method in a
    class.  setup_method is invoked for every test method of a class.

"""

def teardown_method(self, method):
    """ teardown any state that was previously setup with a setup_method
    call.

"""

方法和模块级别  在pytest3.0版本之后可选
def setup_function(function):
    """ setup any state tied to the execution of the given function.

    Invoked for every test function in the module.

"""

def teardown_function(function):
    """ teardown any state that was previously setup with a setup_function
    call.

"""
fixture 夹具 固定装置
运行逻辑:当 pytest 开始运行测试时,它会查看该测试函数签名中的参数,然后搜索与这些参数同名的fixture夹具函数。旦 pytest 找到它们,它就会运行这些装置,捕获它们返回的内容(如果有的话),并将这些对象作为参数传递给测试函数。
在同一个测试中也可以多次 请求夹具,并且 pytest 不会为该测试再次执行它们。(返回值被缓存)
Pytest 一次只缓存一个fixture 实例,这意味着当使用参数化fixture 时,pytest 可能会在给定范围内多次调用fixture。
import pytest

class Fruit:
    def __init__(self, name):
        self.name = name

    def __eq__(self, other):
        return self.name == other.name

@pytest.fixture  # 装饰函数
def my_fruit():
    return Fruit("apple")

@pytest.fixture  # 装饰函数, fixture夹具还可以使用其他fixture函数
def fruit_basket(my_fruit):
    return [Fruit("banana"), my_fruit]

@pytest.fixture(autouse=True)  # autouser=True 参数为True时,pytest将自动请求该函数,即使测试用例没有请求它,也会收到影响。
def append_first(fruit_basket):
    return fruit_basket.append(first_entry)

def test_my_fruit_in_basket(my_fruit, fruit_basket):  # 将fixtrue夹具函数名作为测试用例函数的参数调用,可以调用多个
    assert my_fruit in fruit_basket
Fixtures 在首次被测试请求时创建,并根据它们的 scope参数可选值:
function:默认范围,在测试结束时销毁夹具。class:夹具在类中最后一个测试的拆卸期间被销毁。module:在模块中最后一个测试的拆卸期间,夹具被销毁。package:在拆解包中的最后一个测试期间,夹具被销毁。session:夹具在测试会话结束时被销毁。
运行优先级:autouse > session > package > module > class > function
相同顺序的fixture基于依赖执行:当一个夹具请求另一个夹具时,首先执行另一个夹具
import pytest

@pytest.fixture
def fixt(request):  # 使用fixture的request
    marker = request.node.get_closest_marker("fixt_data")  # mark标记的名称
    if marker is None:
        # Handle missing marker in some way...

        data = None
    else:
        data = marker.args[0]

    # Do something with the data
    return data

@pytest.mark.fixt_data(42)  # mark标记名称fixt_data 参数为42
def test_fixt(fixt):  # 将被fixture装饰的名为fixt函数作为参数传递到测试用例函数内
    assert fixt == 42  # 使用函数内获取的被mark标记的参数
“工厂即夹具”模式可以帮助在单个测试中多次需要夹具结果的情况。夹具不是直接返回数据,而是返回一个生成数据的函数。然后可以在测试中多次调用此函数
工厂夹具
@pytest.fixture
def make_customer_record():
    def _make_customer_record(name):
        return {"name": name, "orders": []}

    return _make_customer_record

def test_customer_records(make_customer_record):
    customer_1 = make_customer_record("Lisa")
    customer_2 = make_customer_record("Mike")
    customer_3 = make_customer_record("Meredith")
参数化fixture
content of conftest.py
import pytest
import smtplib

@pytest.fixture(scope="module", params=["smtp.gmail.com", "mail.python.org"])  # params定义参数列表
def smtp_connection(request):  # 使用特殊rquest对象调用参数
    smtp_connection = smtplib.SMTP(request.param, 587, timeout=5)  # 使用特殊rquest.param对象调用参数
    yield smtp_connection
    print("finalizing {}".format(smtp_connection))
    smtp_connection.close()
此参数化fixture装饰的函数被测试用例函数使用时,测试用例函数将根据参数列表长度运行指定次数
在参数化fixture内使用mark标记
content of test_fixture_marks.py
import pytest

@pytest.fixture(params=[0, 1, pytest.param(2, marks=pytest.mark.skip)])  # 在参数内使用mark标记.

def data_set(request):
    return request.param

此测试用例函数将在第三次运行时跳过
def test_data(data_set):
    pass
在类和模块中使用固定装置 usefixtures
有时测试函数不需要直接访问夹具对象。将夹具的创建分离到一个 conftest.py 文件中,并通过 usefixtures标记声明它在测试模块中的使用:
content of conftest.py
在类和模块中使用固定装置usefixtures

import os
import shutil
import tempfile

import pytest

@pytest.fixture
def cleandir():
    old_cwd = os.getcwd()
    newpath = tempfile.mkdtemp()
    os.chdir(newpath)
    yield
    os.chdir(old_cwd)
    shutil.rmtree(newpath)
content of test_setenv.py
通过usefixtures标记声明它在测试模块中的使用:

import os
import pytest

由于usefixtures标记,每个测试方法的执行都会执行cleandir夹具
@pytest.mark.usefixtures("cleandir")
class TestDirectoryInit:
    def test_cwd_starts_empty(self):
        assert os.listdir(os.getcwd()) == []
        with open("myfile", "w") as f:
            f.write("hello")

    def test_cwd_again_starts_empty(self):
        assert os.listdir(os.getcwd()) == []
您可以使用以下命令在测试模块级别指定夹具使用pytestmark:
pytestmark = pytest.mark.usefixtures("cleandir")
也可以将项目中所有测试所需的夹具放入 ini 文件中:
content of pytest.ini
[pytest]
usefixtures = cleandir
fixture销毁
方式一、使用yield
pytest 中的 Fixtures 提供了一个非常有用的拆卸系统,它允许我们定义每个 Fixtures 在其自身之后进行清理所需的特定步骤
使用 yield代替reture。这样fixture函数将运行 yield之后,最终将运行 yield之后的代码
一旦 pytest 计算出夹具的线性顺序,它将运行每个夹具直到它返回或产生,然后继续执行列表中的下一个夹具以执行相同的操作。
测试完成后,pytest 将返回到fixtures 列表,但以 相反的顺序,获取每个产生的,并在其中运行 yield语句 _之后_的代码。
import pytest

from emaillib import Email, MailAdminClient

@pytest.fixture
def mail_admin():
    return MailAdminClient()

@pytest.fixture
def sending_user(mail_admin):
    user = mail_admin.create_user()
    yield user
    admin_client.delete_user(user)  # 销毁时运行

@pytest.fixture
def receiving_user(mail_admin):
    user = mail_admin.create_user()
    yield user
    admin_client.delete_user(user)  # 销毁时运行

def test_email_received(receiving_user, email):
    email = Email(subject="Hey!", body="How's it going?")
    sending_user.send_email(_email, receiving_user)
    assert email in receiving_user.inbox
方式二、使用终结器addfinalizer
它与 pytest 将在添加终结器后运行该终结器,即使该装置在添加终结器后引发异常。因此,为了确保我们不会在不需要时运行终结器代码,我们只会在夹具完成一些我们需要拆卸的事情时添加终结器。
pytest 将在添加终结器后运行该终结器,即使该装置在添加终结器后引发异常。因此,为了确保我们不会在不需要时运行终结器代码,我们只会在夹具完成一些我们需要拆卸的事情时添加终结器。
import pytest

from emaillib import Email, MailAdminClient

@pytest.fixture
def mail_admin():
    return MailAdminClient()

@pytest.fixture
def sending_user(mail_admin):
    user = mail_admin.create_user()
    yield user
    admin_client.delete_user(user)  # 使用yield进行销毁

@pytest.fixture
def receiving_user(mail_admin, request):
    user = mail_admin.create_user()

    def delete_user():
        admin_client.delete_user(user)

    request.addfinalizer(delete_user)  # 使用终结器进行销毁
    # 在这里声明一点:如果在创建user之后要有一些操作的话,那么需要放在request.addfinnalizer()终结器方法之后,如果不这样的话,万一后续的代码报错,而终结器还没有添加,是不会执行终结器内的方法的(没有添加成功,肯定不会有teardown的效果的)。

    return user

@pytest.fixture
def email(sending_user, receiving_user, request):
    _email = Email(subject="Hey!", body="How's it going?")
    sending_user.send_email(_email, receiving_user)

    def empty_mailbox():
        receiving_user.delete_email(_email)

    request.addfinalizer(empty_mailbox)
    return _email

def test_email_received(receiving_user, email):
    assert email in receiving_user.inbox
conftest.py 文件
conftest.py文件用作为整个目录提供fixture夹具的一种方式
在conftest.py文件内的夹具,pytest将直接自动使用它们,无需导入
可以有多个包含测试的嵌套目录/包,并且每个目录都可以有 conftest.py自己的固定装置
远程调用浏览器
"""
远程启动 grid
什么时候使用:在执行兼容性测试的时候,同时执行多个机器。
安装配置:需要安装和 selenium 版本对应的 selenium-server-standalone-4.0.0-alpha-2.jar 下载地址:http://selenium-release.storage.googleapis.com/index.html
使用:先启动hub,在启动多个node, hub端执行测试代码
hub(master)启动:
     java -jar selenium-server-standalone-4.0.0-alpha-2.jar -role hub --port 4444
node(slave)启动:
     java -jar selenium-server-standalone-4.0.0-alpha-2.jar -role node --port 5001 -hub http://hub的ip:hub的端口/grid/register/
     java -jar selenium-server-standalone-4.0.0-alpha-2.jar -role node --port 5002 -hub http://hub的ip:hub的端口/grid/register/
    java -jar selenium-server-standalone-4.0.0-alpha-2.jar -role node --port 5003 -hub http://hub的ip:hub的端口/grid/register/
"""

from selenium import webdriver

def runRemoteDriver(driver):
"""
    测试代码
    :param driver:
    :return:
"""
    driver.get("http://www.baidu.com")
    print(driver.title)
    driver.quit()

配置浏览器
chrome_option = webdriver.ChromeOptions()
设置执行机注册url,启动执行机
remote_driver = webdriver.Remote(command_executor="http://localhost:5001/wd/hub", options=chrome_option)
remote_driver1 = webdriver.Remote(command_executor="http://localhost:5002/wd/hub", options=chrome_option)
remote_driver2 = webdriver.Remote(command_executor="http://localhost:5003/wd/hub", options=chrome_option)

if __name__ == '__main__':
    # 执行测试
    runRemoteDriver(remote_driver)
    runRemoteDriver(remote_driver1)
    runRemoteDriver(remote_driver2)
pytest 插件
html报告插件
安装:pip install pytest-html
使用:pytest –html=path/report.html
pytestreport报告插件
安装:pip install pytestreport
使用:pytest –pytest_report=path/report.thml
自定义测试用例执行顺序插件
安装:pip install pytest-ordering
使用:@pytestmark.run(order=) #根据订单值开始一次.到大运行
失败重跑插件
安装:pip install pytest-rerunfailures
使用:pytest –reruns N –reruns-delay M #失败的用例再执行N次,每次之间间隔M秒
改进检测输出插件
安装:pip install pytest-sugar
使用:无需处理直接使用
指定不适用此插件时: pytest -p no:sugar
多重断言插件
安装:pip install pytest-assume
使用:pytest.assume(1==1) # 可以连续使用,报错后,继续执行没有的断言
用例依赖插件
安装:pip install pytest-dependency
使用:
import pytest

@pytest.mark.dependency()  # 标记依赖用例
def test_01():
    assert False

@pytest.mark.dependency()  # 标记依赖用例
def test_02():
    assert False

@pytest.mark.dependency(depends=["test_01", "test_02"])  # 标记依赖用例test_01和test_02执行通过后,才执行此用例。
def test_03():
    print("执行测试")
应用测试插件
安装:pip install pytest-xdist
民用应用的原则:
- 用例之间是独立的,没有依赖关系,完全可以独立运行
- 例执行没有顺序要求,随机顺序可以正常执行
- 举例说明重复运行,运行结果不会影响其他用例
使用:pytest -n N # 指定使用N核(N核CPU)运行测试
Original: https://blog.csdn.net/weixin_44809381/article/details/118438911
Author: 一碗烈酒
Title: Pytest官方文档学习笔记
原创文章受到原创版权保护。转载请注明出处:https://www.johngo689.com/772983/
转载文章受原作者版权保护。转载请注明原作者出处!