

目录
- 推荐:[python自动化办公——python操作Excel、Word、PDF集合大全](https://blog.csdn.net/weixin_41261833/article/details/106028038)
- 一、环境搭建
* - 1.1 python-docx(读写Word文档的大部分操作)
– - 1.2 win32com(主要用作doc转docx格式转换用)
– - 1.3 docx-mailmerge(用作按照模板生成大量同类型文档)
– - 1.4 matplotlib(Python 最基本的绘图库)
– - 二、小试牛刀 – 工具介绍与简单使用
* - 2.1 Python-docx
– - 2.2 win32com 操作 word 和 excel
– - 三、案例
* - 3.1 Python-docx官方例程
- 3.2 市民水电费缴费通知单
- 3.3 docx&matplotlib 自动生成数据分析报告
–


这是非常好的一篇博文,出于对原作者的尊重,强烈推荐点过去看!
网址:https://blog.csdn.net/weixin_41261833/article/details/106028038
; 一、环境搭建
1.1 python-docx(读写Word文档的大部分操作)
1.1.1 官方文档
https://python-docx.readthedocs.io/en/latest/

; 1.1.2 清华源安装python-docx
我已经装过了。
pip install -i https://pypi.tuna.tsinghua.edu.cn/simple python-docx

1.1.3 导包方式
from docx import Document
from docx.shared import Inches
1.2 win32com(主要用作doc转docx格式转换用)
1.2.1 官方文档
https://docs.microsoft.com/en-us/dotnet/api/microsoft.office.interop.word?view=word-pia

; 1.2.2 清华源安装win32com
pip install -i https://pypi.tuna.tsinghua.edu.cn/simple pypiwin32

1.2.3 导包方式
import win32com
from win32com.client import Dispatch, constants
1.3 docx-mailmerge(用作按照模板生成大量同类型文档)
1.3.1 官方文档
https://pypi.org/project/docx-mailmerge/

; 1.3.2 清华源安装docx-mailmerge
pip install -i https://pypi.tuna.tsinghua.edu.cn/simple docx-mailmerge

1.3.3 导包方式
from mailmerge import MailMerge
1.4 matplotlib(Python 最基本的绘图库)
1.4.1 官方文档 V3.4.2
https://matplotlib.org/stable/tutorials/introductory/sample_plots.html

; 1.4.2 清华源安装matplotlib
pip install -i https://pypi.tuna.tsinghua.edu.cn/simple matplotlib

1.4.3 导包方式
import matplotlib.pyplot as plt
二、小试牛刀 – 工具介绍与简单使用
2.1 Python-docx
python-docx 是用于创建可修改 微软 Word 的一个 python 库,提供全套的 Word 操作,是最常用的 Word 工具
2.1.1 基本概念
- Document:是一个 Word 文档 对象,不同于 VBA 中 Worksheet 的概念,Document 是独立的,打开不同的 Word 文档,就会有不同的 Document 对象,相互之间没有影响。
- Paragraph:是段落,一个 Word 文档由多个段落组成,当在文档中输入一个回车键,就会成为新的段落,输入 shift + 回车,不会分段。
- Run 表示一个节段,每个段落由多个节段 组成,一个段落中具有相同样式的连续文本,组成一个节段,所以一个 段落对象有多个 Run 列表。
如图所示:

; 2.1.2 创建一个word文件
from docx import Document

doc = Document()

paragraph = doc.add_paragraph('Hello! I am created by python-docx.')

prior_paragraph = paragraph.insert_paragraph_before('Good day!')

doc.save(f"test.docx")

2.1.3 顺序增加段落、文字块、图片
from docx import Document

doc = Document()

doc.add_heading('标题',1)

par = doc.add_paragraph('第一个段落:')
print(par)

run_ = par.add_run('段落文字块')
print(run_)

pic_par = doc.add_picture('1.jpg')
print(pic_par)

p2 = doc.add_paragraph('第二个段落:')
p2.add_run('段落文字块')

table = doc.add_table(2,3)
print(table)

doc.save('test.docx')

2.1.4 内容修改:正则替换原有word文件中的英文引号
Python本身被设计为可扩充的。并非所有的特性和功能都集成到语言核心。Python编译器本身也可以被集成到其它需要脚本语言的程序内。因此,很多人还把"Python"作为一种"胶水语言"(glue language)使用。

修改要求:
"Python"替换为"Python"
"胶水语言"替换为 "胶水语言"
对于英文引号来说不区分前引号和后引号,怎么能保证配置到的不会是 “作为一种”?
经测试正则为:'”(?:[^”])*”‘
?::为了取消圆括号模式配置过程的缓存,即不需要遇到一个符合的就结束匹配
[^”]:表示匹配的内容不能是 “,以避免贪婪匹配,即避免匹配成 从第一个 ” 开始一直到最后一个 “结束
整体的意思是 配置两个 ” 之间的内容,且内容中不包括 “
from docx import Document
from docx.oxml.ns import qn
import re

doc = Document(r"test.docx")

restr = '"(?:[^"])*"'
for p in doc.paragraphs:

    list_results = re.findall(restr, p.text)
    for result in list_results:

        p.text = p.text.replace(result, '"' + result[1:-1] + '"')

    for run in p.runs:
        run.font.name = 'Times New Roman'
        run.font.element.rPr.rFonts.set(qn('w:eastAsia'),'宋体')

doc.save(r'test_modify.docx')

2.1.5 段落格式设置
doc.add_page_break()

for i in range(0,10):
    doc.add_heading(f'标题{i}', i)

doc.add_page_break()

par2 = doc.add_paragraph('第二个段落:麻烦给我的爱人来一杯MojIto,'
                         '我喜欢阅读她微醺时的眼眸,而我的咖啡,糖不用太多,'
                         '这世界已经因为她甜得过头,没有跟她笑容一样浓郁的雪茄,'
                         '就别浪费时间介绍收起来吧,拱廊的壁画,旧城的涂鸦,'
                         '所有色彩都因为她说不出话。')

""" Paragraph 段落格式设置 """

from docx.enum.text import WD_ALIGN_PARAGRAPH

par2.paragraph_format.alignment = WD_ALIGN_PARAGRAPH.RIGHT

print(par2.alignment)
'''
可选项有:
'LEFT', 0, 'left', 'Left-aligned'
'CENTER', 1, 'center', 'Center-aligned.'
'RIGHT', 2, 'right', 'Right-aligned.'
'JUSTIFY', 3, 'both', 'Fully justified.'
'DISTRIBUTE', 4, 'distribute', 'Paragraph characters are distrib'
            'uted to fill the entire width of the paragraph.'
'JUSTIFY_MED', 5, 'mediumKashida', 'Justified with a medium char'
            'acter compression ratio.'
'JUSTIFY_HI', 7, 'highKashida', 'Justified with a high character'
            ' compression ratio.'
'JUSTIFY_LOW', 8, 'lowKashida', 'Justified with a low character '
            'compression ratio.'
'THAI_JUSTIFY', 9, 'thaiDistribute', 'Justified according to Tha'
            'i formatting layout.'
'''

""" 段落缩进 """

from docx.shared import Inches,Pt

par2.paragraph_format.left_indent = Inches(0.5)

par2.paragraph_format.right_indent = Pt(20)

par2.paragraph_format.first_line_indent = Inches(1)

""" 行间距 """

par2.paragraph_format.line_spacing = 1.5
"当line_spacing设置为长度值时表示绝对距离,"
"设置为浮点数时表示行高的倍数"

par2.paragraph_format.space_before = Pt(5)

par2.paragraph_format.space_after = Pt(10)

""" 设置段落内部文字在遇到需分页情况时处理状态 """
par2.paragraph_format.keep_together = True
par2.paragraph_format.keep_with_next = True
par2.paragraph_format.page_break_before = True
par2.paragraph_format.widow_control = True

l_space = par2.paragraph_format.left_indent
h_space = par2.paragraph_format.first_line_indent
b_space = par2.paragraph_format.space_before
print(l_space,h_space,b_space)


2.1.6 字体格式设置
首先明确一个概念:
python-docx 模块中,paragraph 段落是一个块对象,可以理解为是一个容器。run 对象也是一个块对象,可以理解为具有相同格式的一段文字集合。
放在 word 文档中简单理解就是,一个段落包含许多文字,同一段落的文字,也可以有不同的格式。
注意:用 add_paragraph() 方法添加段落时,如果写入了文本,就直接创建了一个 run。
run_2 = doc.add_paragraph().add_run('这爱不落幕,忘了心事的国度,'
                                    '你所在之处,孤单都被征服,'
                                    '铁铸的招牌,错落着就像,'
                                    '一封封城市献给天空的情书,'
                                    '当街灯亮起,Havana漫步,'
                                    '这是世上最美丽的那双人舞。')
""" 设置字体格式 """
run_2.font.name = 'Times New Roman'

from docx.oxml.ns import qn
run_2.font.element.rPr.rFonts.set(qn('w:eastAsia'),'宋体')

run_2.font.size = Pt(14)

run_2.font.bold = True

run_2.font.italic = True

from docx.shared import RGBColor
run_2.font.color.rgb = RGBColor(255,55,55)

from  docx.enum.text import WD_COLOR_INDEX
run_2.font.highlight_color = WD_COLOR_INDEX.YELLOW
"""
背景颜色可选值有:
'AUTO', 0, 'default'
'BLACK', 1, 'black'
'BLUE', 2, 'blue'
'BRIGHT_GREEN', 4, 'green',
'DARK_BLUE', 9, 'darkBlue',
'DARK_RED', 13, 'darkRed'
'DARK_YELLOW', 14, 'darkYellow'
'GRAY_25', 16, 'lightGray'
'GRAY_50', 15, 'darkGray'
'GREEN', 11, 'darkGreen'
'PINK', 5, 'magenta'
'RED', 6, 'red'
'TEAL', 10, 'darkCyan'
'TURQUOISE', 3, 'cyan'
'VIOLET', 12, 'darkMagenta'
'WHITE', 8, 'white'
'YELLOW', 7, 'yellow'
"""

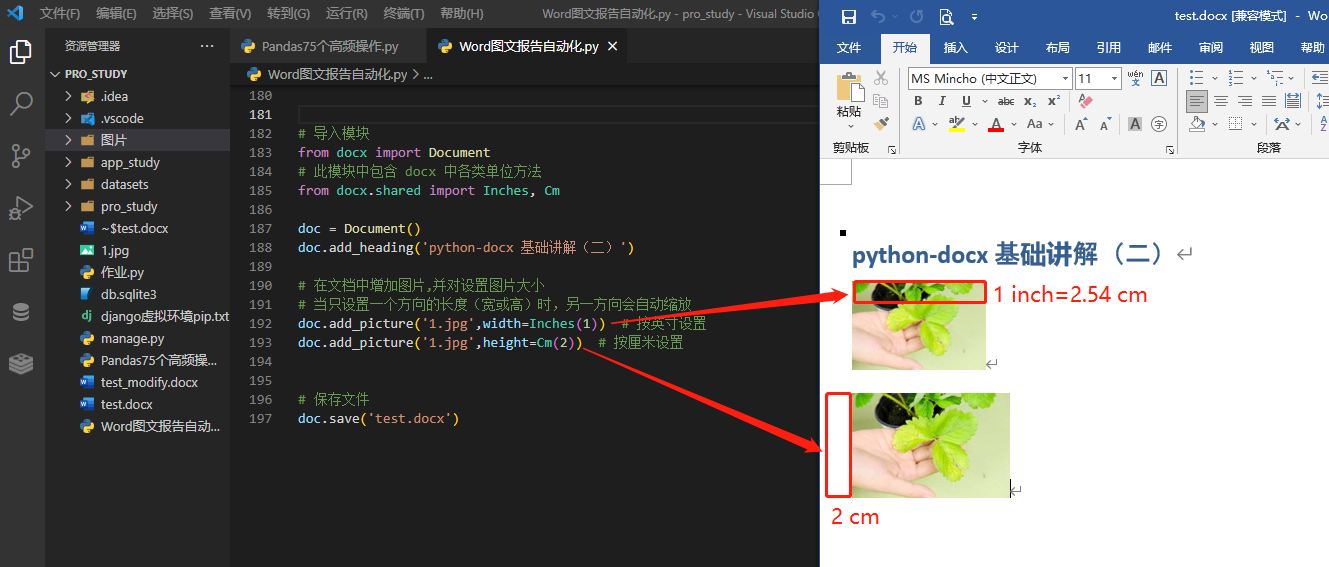
2.1.7 插入图片、设置大小
from docx import Document

from docx.shared import Inches, Cm

doc = Document()
doc.add_heading('python-docx 基础讲解(二)')

doc.add_picture('1.jpg',width=Inches(1))
doc.add_picture('1.jpg',height=Cm(2))
2.1.8 插入表格、设置表格和单元格格式
from docx import Document

from docx.shared import Inches, Cm

doc = Document()

table1 = doc.add_table(2, 3)

table1.cell(0,0).text = '0'

print(table1._cells)

for i,cell in enumerate(table1._cells):
    cell.text = str(i)

from docx.enum.style import WD_STYLE_TYPE

styles = doc.styles
for style in styles:
    if style.type == WD_STYLE_TYPE.TABLE:
        print(style)
print(f'共有 {len(styles)} 种表格样式')
"""
可设置的表格样式:
_TableStyle('Normal Table') id: 187730312
_TableStyle('Table Grid') id: 187730312
_TableStyle('Light Shading') id: 187730376
_TableStyle('Light Shading Accent 1') id: 187730312
_TableStyle('Light Shading Accent 2') id: 187730376
_TableStyle('Light Shading Accent 3') id: 187730312
_TableStyle('Light Shading Accent 4') id: 187730376
_TableStyle('Light Shading Accent 5') id: 187730312
_TableStyle('Light Shading Accent 6') id: 187730376
_TableStyle('Light List') id: 187730312
...

"""

table1.style = 'Table Grid'

table1.autofit = True

table1.add_column(Inches(3))

table1.add_row()

table1.cell(0, 3).text = '这是增加的列'
table1.cell(2, 0).text = '这是增加的行'

row0 = table1.rows[0]
print(row0)

col0 = table1.columns[0]

row0_cells = table1.row_cells(0)
print(row0_cells)

col_0_cells = table1.column_cells(0)
print(col_0_cells)

from docx.enum.table import WD_ALIGN_VERTICAL
from docx.enum.text import WD_PARAGRAPH_ALIGNMENT
table1.cell(0,0).vertical_alignment = WD_ALIGN_VERTICAL.TOP
table1.cell(0,0).paragraphs[0].alignment = WD_PARAGRAPH_ALIGNMENT.CENTER

cell_new = table1.cell(2,0).merge(table1.cell(2,1)).merge(table1.cell(2,2))

print(cell_new)

cell_new1 = table1.cell(0,3).merge(table1.cell(1,3)).merge(table1.cell(2,3))
cell_new1.vertical_alignment = WD_ALIGN_VERTICAL.CENTER
cell_new1.paragraphs[0].alignment = WD_PARAGRAPH_ALIGNMENT.CENTER

cell_par = cell_new.paragraphs[0]

from docx.enum.text import WD_ALIGN_PARAGRAPH
cell_par.paragraph_format.alignment = WD_ALIGN_PARAGRAPH.CENTER

cell_run = cell_new.paragraphs[0].runs[0]

cell_run.font.name = 'Times New Roman'
from docx.oxml.ns import qn
cell_run.font.element.rPr.rFonts.set(qn('w:eastAsia'),'黑体')

from docx.shared import RGBColor
cell_run.font.color.rgb = RGBColor(255,55,55)
最终效果

2.1.9 设置章节、页面设置、页边距、页眉、页脚
章节 也是 word 文档中一个块级元素,相较于段落块级元素它的范围应该更大一点。一般来说:一个 word 文档包含多个章节、一个章节包含多个 run 块级元素。
一个word文档被建立时至少包含一个章节:
sec = doc.sections
print(sec)
print(len(sec))

doc.add_section()
print(len(sec))

sec0 = sec[1]

from docx.enum.section import WD_ORIENT

sec0.orientation = WD_ORIENT.LANDSCAPE

sec0.page_height = Inches(15)
sec0.page_width = Inches(10)

print('页面高度',sec0.page_height)
print('页面宽度',sec0.page_width)

sec0.left_margin = Inches(1)
sec0.right_margin = Inches(1)
sec0.top_margin = Inches(2)
sec0.bottom_margin = Inches(2)

print('左边距:',sec0.left_margin)

print('右边距:',sec0.right_margin)

print('上边距:',sec0.top_margin)

print('下边距:',sec0.bottom_margin)

print('页眉边距:',sec0.header_distance)

print('页脚边距:',sec0.footer_distance)

head0 = sec0.header
font0 = sec0.footer
print(head0)

print(font0)

print(head0.is_linked_to_previous)

print(head0.paragraphs)
head0_par = head0.paragraphs[0]
head0_par.add_run('页眉')

font0_par = font0.paragraphs[0]
font0_par.add_run('页脚')
最终效果

2.1.10 获取文档章节信息
用做示例的 test03.docx 文件截图如下:

文档中有两个章节共两页(一个章节一页),一个章节的页面为 A3 ,另一个为 A4。注意:章节对象的概念虽然比段落对象大,章节对象可以设置本章节的页面大小页眉页脚等,在该章节的段落对象必须遵守该章节的设置。但是又并不存在包含关系,也就是说不能通过章节对象获取到段落信息。
doc = Document('test03.docx')

sections = doc.sections
"class Sections(Sequence):"
print(sections)

print(len(sections))

sec0 = sections[0]

print(sec0)

print('左边距:',sec0.left_margin)

print('右边距:',sec0.right_margin)

print('上边距:',sec0.top_margin)

print('下边距:',sec0.bottom_margin)

print('页眉边距:',sec0.header_distance)

print('页脚边距:',sec0.footer_distance)

print('页面方向:',sec0.orientation)

print('页面高度:',sec0.page_height)

print('页面宽度:',sec0.page_width)

head0 = sec0.header
print(head0)

head0_pars = head0.paragraphs

head0_string = ''
for par in head0_pars:
    head0_string += par.text

print(head0_string)

foot0 = sec0.footer
print(foot0)
foot0_pars = foot0.paragraphs
foot0_string = ''
for par in foot0_pars:
    foot0_string += par.text
print(foot0_string)
2.1.11 获取段落文字信息
paragraphs = doc.paragraphs
print(paragraphs)
print(len(paragraphs))

par0 = paragraphs[0]
print(par0)
par0_string = par0.text
print(par0_string)

pars_string = [par.text for par in paragraphs]
print(pars_string)
print('段落对齐方式:',par0.paragraph_format.alignment)

print('左缩进:',par0.paragraph_format.left_indent)

print('右缩进:',par0.paragraph_format.right_indent)

print('首行缩进:',par0.paragraph_format.first_line_indent)

print('行间距:',par0.paragraph_format.line_spacing)

print('段前间距:',par0.paragraph_format.space_before)

print('段后间距:',par0.paragraph_format.space_after)
2.1.12 获取文字格式信息
paragraph 对象 里还有更小的 run 对象,run 对象才包含了段落对象的文字信息。paragraph.text 方法也是通过 run 对象的方法获取到文字信息的。
def text(self):
    text = ''
    for run in self.runs:
        text += run.text
    return text

paragraphs = doc.paragraphs
print(paragraphs)
print(len(paragraphs))

par0 = paragraphs[0]

runs = par0.runs
print(runs)

run_0 = runs[0]
print(run_0.text)

print('字体名称:',run_0.font.name)

print('字体大小:',run_0.font.size)

print('是否加粗:',run_0.font.bold)

print('是否斜体:',run_0.font.italic)

print('字体颜色:',run_0.font.color.rgb)

print('字体高亮:',run_0.font.highlight_color)

print('下划线:',run_0.font.underline)

print('删除线:',run_0.font.strike)

print('双删除线:',run_0.font.double_strike)

print('下标:',run_0.font.subscript)

print('上标:',run_0.font.superscript)
2.13 获取文档中表格信息
在介绍单元格格式信息时,说过单元格内文字信息也是通过 run 对象设置,故获取文字信息也和前面获取段落文字信息类似,就不重复了。

tables = doc.tables
print(tables)

print(len(tables))

table0 = tables[0]

print(table0.style)

cells = table0._cells
print(len(cells))

cells_string = [cell.text for cell in cells]
print(cells_string)

col_num = len(table0.columns)
print(col_num)

row_num = len(table0.rows)
print(row_num)

row0 = table0.rows[0]

col0 = table0.columns[0]

'要用 row0.cells 获取行对象的 cell 才能获取其文字信息'
row0_string = [cell.text for cell in row0.cells]
print(row0_string)

col0_string = [cell.text for cell in col0.cells]
print(col0_string)
2.2 win32com 操作 word 和 excel
2.2.1 win32com 将 doc 转为 docx
import os
from win32com import client as wc

def TransDocToDocx(oldDocName,newDocxName):
    print("我是 TransDocToDocx 函数")

    word = wc.Dispatch('Word.Application')

    doc = word.Documents.Open(oldDocName)

    doc.SaveAs(newDocxName, 12)

    doc.Close()
    word.Quit()

    print("生成完毕!")

if __name__ == "__main__":

    currentPath = os.getcwd()
    print("当前路径为:",currentPath)

    docName = os.path.join(currentPath,'test.doc')
    print("docFilePath = ", docName)

    docxName = os.path.join(currentPath,'test.docx')

    TransDocToDocx(docName,docxName)

2.2.2 Win32com 操作word 插入文字、替换文字、表格插入行、保存关闭
代码运行前:

import win32com
from win32com.client import Dispatch, constants
import os
try:
    w = win32com.client.Dispatch('Word.Application')

    w.Visible = 0
    w.DisplayAlerts = 0

    doc = w.Documents.Open(os.getcwd() + r'\test.docx')

    myRange = doc.Range(0,0)
    myRange.InsertBefore('Insert by Win32Com!')

    myRange2 = doc.Range()
    myRange2.InsertAfter('\n Bye word!\n')

    i = 6
    myRange3 = doc.Range(1, i)
    myRange3.InsertAfter("\n what's up, bro?\n")

    wordSel = myRange.Select()

    w.Selection.Find.ClearFormatting()
    w.Selection.Find.Replacement.ClearFormatting()
    w.Selection.Find.Execute('glue language', False, False, False, False, False, True, 1, True, '胶水语言', 2)

    w.ActiveDocument.Sections[0].Headers[0].Range.Find.ClearFormatting()
    w.ActiveDocument.Sections[0].Headers[0].Range.Find.Replacement.ClearFormatting()
    w.ActiveDocument.Sections[0].Headers[0].Range.Find.Execute('介绍', False, False, False, False, False, True, 1, False, '简介', 2)

    doc.Tables[0].Rows[0].Cells[0].Range.Text ='123123'
    doc.Tables[0].Rows.Add()

    doc.PrintOut()

    doc.SaveAs(os.getcwd() + r'\test_modify.docx')
except Exception as e:
    print(e)
finally:
    doc.Close()
    w.Quit()
代码运行后:

2.2.3 Win32com 操作 excel 插入图片
from win32com.client import Dispatch
import win32com.client
class easyExcel:
    """A utility to make it easier to get at Excel.  Remembering
    to save the data is your problem, as is  error handling.

    Operates on one workbook at a time."""
    def __init__(self, filename=None):
        self.xlApp = win32com.client.Dispatch('Excel.Application')
        if filename:
            self.filename = filename
            self.xlBook = self.xlApp.Workbooks.Open(filename)
        else:
            self.xlBook = self.xlApp.Workbooks.Add()
            self.filename = ''
    def save(self, newfilename=None):
        if newfilename:
            self.filename = newfilename
            self.xlBook.SaveAs(newfilename)
        else:
            self.xlBook.Save()
    def close(self):
        self.xlBook.Close(SaveChanges=0)
        del self.xlApp
    def getCell(self, sheet, row, col):
        "Get value of one cell"
        sht = self.xlBook.Worksheets(sheet)
        return sht.Cells(row, col).Value
    def setCell(self, sheet, row, col, value):
        "set value of one cell"
        sht = self.xlBook.Worksheets(sheet)
        sht.Cells(row, col).Value = value
    def getRange(self, sheet, row1, col1, row2, col2):
        "return a 2d array (i.e. tuple of tuples)"
        sht = self.xlBook.Worksheets(sheet)
        return sht.Range(sht.Cells(row1, col1), sht.Cells(row2, col2)).Value
    def addPicture(self, sheet, pictureName, Left, Top, Width, Height):
        "Insert a picture in sheet"
        sht = self.xlBook.Worksheets(sheet)
        sht.Shapes.AddPicture(pictureName, 1, 1, Left, Top, Width, Height)
    def cpSheet(self, before):
        "copy sheet"
        shts = self.xlBook.Worksheets
        shts(1).Copy(None,shts(1))

if __name__ == "__main__":
    PNFILE = r'E:\env_study\pro_study\1.jpg'
    xls = easyExcel(r'E:\env_study\pro_study\test.xlsx')
    xls.addPicture('Sheet1', PNFILE, 20,20,1000,1000)
    xls.cpSheet('Sheet1')
    xls.save()
    xls.close()
最终效果:

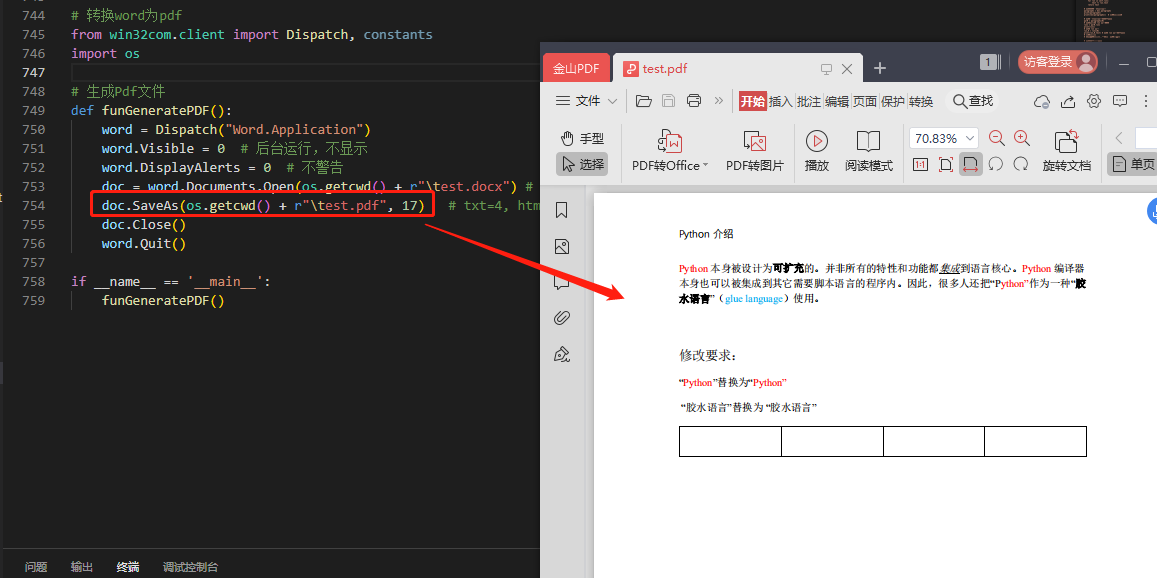
2.2.4 Win32com 转换word为pdf
from win32com.client import Dispatch, constants
import os

def funGeneratePDF():
    word = Dispatch("Word.Application")
    word.Visible = 0
    word.DisplayAlerts = 0
    doc = word.Documents.Open(os.getcwd() + r"\test.docx")
    doc.SaveAs(os.getcwd() + r"\test.pdf", 17)
    doc.Close()
    word.Quit()

if __name__ == '__main__':
    funGeneratePDF()
三、案例
3.1 Python-docx官方例程
from docx import Document
from docx.shared import Inches

document = Document()

document.add_heading('Document Title', 0)

p = document.add_paragraph('A plain paragraph having some ')
p.add_run('bold').bold = True
p.add_run(' and some ')
p.add_run('italic.').italic = True

document.add_heading('Heading, level 1', level=1)
document.add_paragraph('Intense quote', style='Intense Quote')

document.add_paragraph(
    'first item in unordered list', style='List Bullet'
)
document.add_paragraph(
    'first item in ordered list', style='List Number'
)

document.add_picture('1.jpg', width=Inches(1.25))

records = (
    (3, '101', 'Spam'),
    (7, '422', 'Eggs'),
    (4, '631', 'Spam, spam, eggs, and spam')
)

table = document.add_table(rows=1, cols=3)
hdr_cells = table.rows[0].cells
hdr_cells[0].text = 'Qty'
hdr_cells[1].text = 'Id'
hdr_cells[2].text = 'Desc'
for qty, id, desc in records:
    row_cells = table.add_row().cells
    row_cells[0].text = str(qty)
    row_cells[1].text = id
    row_cells[2].text = desc

document.add_page_break()

document.save('4.1 Python-docx官方例程.docx')

3.2 市民水电费缴费通知单
用水电气数据已经统计在一个 Excel 文件中,Excel 表格数据如下:

分析:
从需求上来看,核心功能就是要: 读取模板文件,在不改变模板文件中段落、文字格式的前提下,根据数据内容替换部分文字。
根据需要,调整的 Word 模板文件截图:

批量生成的缴费通知文件截图:


import xlrd
import docx

def get_runs(path):
    doc = docx.Document(path)
    runs_g = []

    for par_g in doc.paragraphs:
        for run_g in par_g.runs:
            runs_g.append(run_g)

    table_g = doc.tables[0]
    for cell_g in table_g._cells:
        for cell_par_g in cell_g.paragraphs:
            for cell_run_g in cell_par_g.runs:
                runs_g.append(cell_run_g)
    return doc,runs_g

excel_obj = xlrd.open_workbook('el01.xlsx')

sheet = excel_obj.sheet_by_index(0)

excel_data = sheet._cell_values

notice_data = excel_data[2:]

tags_1 = ['用户姓名','用户居住地址','通知月份',
          '上月用水','本月用水','实际用水',
          '上月用电','本月用电','实际用电',
          '上月用气','本月用气','实际用气',
          '本月水费','本月电费','本月燃气费',
          '总计费用']

for ds in notice_data:

    notice_dict = dict(zip(tags_1,ds))

    doc_t,runs_t = get_runs('test01.docx')

    for run_t in runs_t:
        if run_t.text in notice_dict.keys():
            run_t.text = str(notice_dict[run_t.text])
    doc_t.save('outpath/%s通知单.docx' % ds[0])
3.3 docx&matplotlib 自动生成数据分析报告
原始数据:

import xlrd
import matplotlib
import matplotlib.pyplot as plt
from docx import Document
from docx.shared import Inches

def GetExcelInfo():
    print("开始获取表格内容信息")

    xlsx = xlrd.open_workbook('学生成绩表格.xlsx')

    sheet = xlsx.sheet_by_index(0)

    nrows = sheet.nrows
    print("一共 ",nrows," 行数据")

    nameList = [str(sheet.cell_value(i, 1)) for i in range(1, nrows)]
    scoreList = [int(sheet.cell_value(i, 3)) for i in range(1, nrows)]

    return nameList,scoreList

def GenerateScorePic(scoreList):

    xNameList = [str(studentInfo[0]) for studentInfo in scoreList]
    yScoreList = [int(studentInfo[1]) for studentInfo in scoreList]
    print("xNameList",xNameList)
    print("yScoreList",yScoreList)

    matplotlib.rcParams['font.sans-serif'] = ['SimHei']

    plt.figure(figsize=(10,5))

    plt.bar(x=xNameList, height=yScoreList, label='学生成绩', color='steelblue', alpha=0.8)

    for x1, yy in scoreList:
        plt.text(x1, yy + 1, str(yy), ha='center', va='bottom', fontsize=16, rotation=0)

    plt.title("学生成绩柱状图")

    plt.xlabel("学生姓名")
    plt.ylabel("学生成绩")

    plt.legend()

    plt.xticks(rotation=90)

    plt.gcf().subplots_adjust(bottom=0.25)

    plt.savefig("studentScore.jpg")

    plt.show()

def GenerateScoreReport(scoreOrder,picPath):

    document = Document()

    document.add_heading('数据分析报告', 0)

    p1 = document.add_paragraph("分数排在第一的学生姓名为: ")
    p1.add_run(scoreOrder[0][0]).bold = True
    p1.add_run(" 分数为: ")
    p1.add_run(str(scoreOrder[0][1])).italic = True

    p2 = document.add_paragraph("共有: ")
    p2.add_run(str(len(scoreOrder))).bold = True
    p2.add_run(" 名学生参加了考试,学生考试的总体情况: ")

    table = document.add_table(rows=1, cols=2)
    table.style = 'Medium Grid 1 Accent 1'
    hdr_cells = table.rows[0].cells
    hdr_cells[0].text = '学生姓名'
    hdr_cells[1].text = '学生分数'
    for studentName,studentScore in scoreOrder:
        row_cells = table.add_row().cells
        row_cells[0].text = studentName
        row_cells[1].text = str(studentScore)

    document.add_picture(picPath, width=Inches(6))

    document.save('学生成绩报告.docx')

if __name__ == "__main__":

    nameList,scoreList = GetExcelInfo()

    scoreDictionary = dict(zip(nameList, scoreList))

    scoreOrder = sorted(scoreDictionary.items(), key=lambda x: x[1], reverse=True)

    GenerateScorePic(scoreOrder)

    picPath = "studentScore.jpg"
    GenerateScoreReport(scoreOrder,picPath)

    print("任务完成,报表生成完毕!")
最终结果

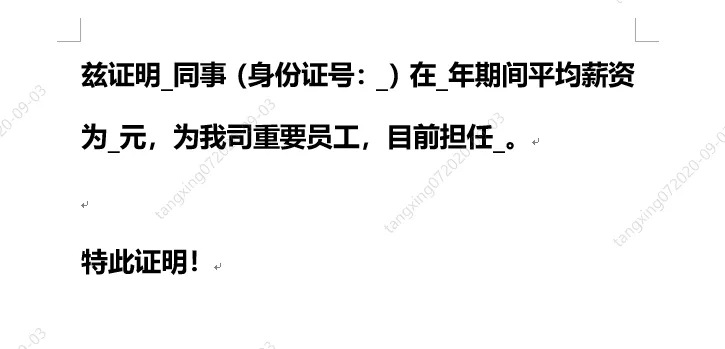
3.4 docx-mailmerge 自动生成万份劳动合同
3.4.1 创建合同模板
创建一个域
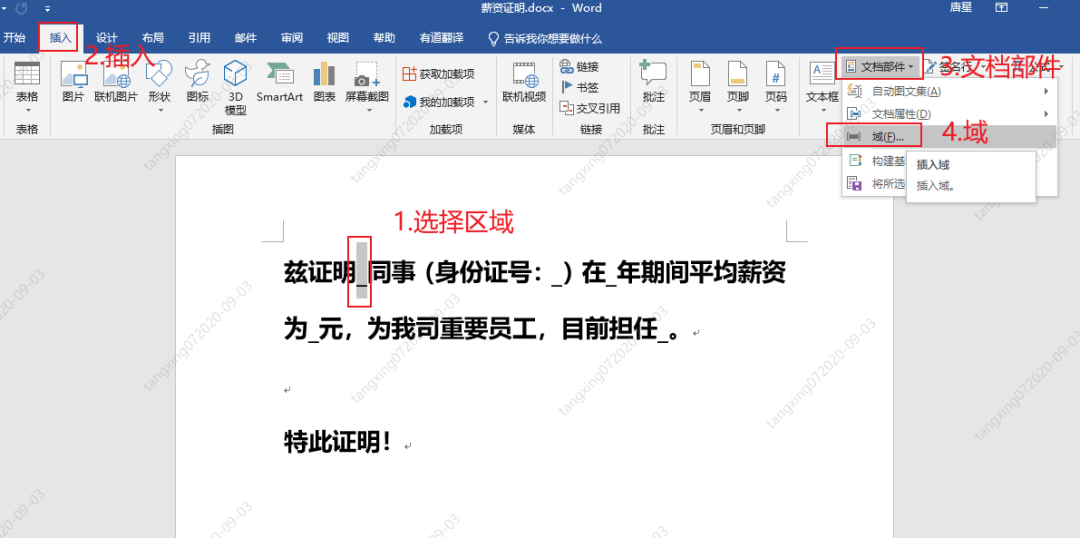
设置域名

添加一个完成

依次全部添加

from mailmerge import MailMerge
from datetime import datetime

def GenerateCertify(templateName,newName):

    document = MailMerge(templateName)

    document.merge(name='唐星',
                   id='1010101010',
                   year='2020',
                   salary='99999',
                   job='嵌入式软件开发工程师')

    document.write(newName)

if __name__ == "__main__":
    templateName = '薪资证明模板.docx'

    startTime = datetime.now()

    for i in range(10000):
        newName = f'./10000份证明/薪资证明{i}.docx'
        GenerateCertify(templateName,newName)

    endTime = datetime.now()

    allSeconds = (endTime - startTime).seconds
    print("生成10000份合同一共用时: ",str(allSeconds)," 秒")

    print("程序结束!")


Original: https://blog.csdn.net/yuetaope/article/details/119444970
Author: 岳涛@心馨电脑
Title: 【2.5万字】详解 Python-docx 自动生成word图文报告
原创文章受到原创版权保护。转载请注明出处:https://www.johngo689.com/766694/
转载文章受原作者版权保护。转载请注明原作者出处!