

目录
1、pandas 常用类
1.1 Series
Series 由一组数据以及一组与之对应的数据标签(即索引)组成。Series 对象可以视作一个NumPy 的 ndarray ,因此许多NumPy库函数可以作用于 series。
1.1.1创建 Series
Pandas Series 类似表格中的一个列(column),类似于一维数组,可以保存任何数据类型,本质上是一个 ndarray。Series 由索引(index)和列组成,函数如下:
pandas.Series( data=None, index=None, dtype=None, name=None, copy=False)
参数说明:
- data:一组数据(ndarray 类型)。
- index:数据索引标签,如果不指定,默认从 0 开始。
- dtype:数据类型,默认会自己判断。
- name:设置该 Series 名称。
- copy:拷贝数据,默认为 False。仅影响 Series 和 ndarray 数组
通过 ndarray 创建 Series
import numpy as np
import pandas as pd
print('通过 ndarray 创建的 Series 为:\n', pd.Series(np.arange(5), index=['a', 'b', 'c', 'd', 'e'], name='ndarray'))
运行结果:
通过 ndarray 创建的 Series 为:
 a    0
b    1
c    2
d    3
e    4
Name: ndarray, dtype: int32
若数据存放在 dict 中,则可以通过 dict 创建 Series,此时 dict 的键名(key)作为 Series 的索引,其值会作为 Series 的值,因此无需传入 index 参数。通过dict创建 Series 对象,代码如下:
通过 dict 创建 Series
import numpy as np
import pandas as pd
dit = {'a': 0, 'b': 1, 'c': 2, 'd': 3}
print('通过 dict 创建的 Series 为:\n', pd.Series(dit))
运行结果:
通过 dict 创建的 Series 为:
 a    0
b    1
c    2
d    3
dtype: int64
通过 list 创建 Series
import numpy as np
import pandas as pd
list1 = [1, 2, 3, 4, 5]
list2 = [10, 2, 36, 4, 25]
print('通过 list 创建的 Series 为:\n', pd.Series(list1))  # 索引为默认
print('通过 list 创建的 Series 为:\n', pd.Series(list2, index=['a', 'b', 'c', 'd', 'e'], name='list'))
运行结果:
通过 list 创建的 Series 为:
 0    1
1    2
2    3
3    4
4    5
dtype: int64
通过 list 创建的 Series 为:
 a    10
b     2
c    36
d     4
e    25
Name: list, dtype: int64
Series 常用属性及其说明 属性
说明
values以 ndarray 的格式返回 Series 对象的所有元素index返回 Series 对象的索引dtype返回 Series 对象的数据类型shape返回 Series 对象的形状nbytes返回 Series 对象的字节数ndim返回 Series 对象的维度size返回 Series 对象的个数T返回 Series 对象的转置axes返回 Series 索引列表
import numpy as np
import pandas as pd
list1 = [1, 2, 3, 4, 5]
series = pd.Series(list1, index=['a', 'b', 'c', 'd', 'e'], name='list')
print('通过 dict 创建的 Series 为:\n', series)
print('数组形式返回 Series 为:', series.values)
print('Series 的 Index 为:', series.index)
print('Series 的 形状为:', series.shape)
print('Series 的 维度为:', series.ndim)
print('Series 对象的个数为:', series.size)
print('返回 Series 索引列表为:', series.axes)
运行结果:
通过 dict 创建的 Series 为:
 a    1
b    2
c    3
d    4
e    5
Name: list, dtype: int64
数组形式返回 Series 为: [1 2 3 4 5]
Series 的 Index 为: Index(['a', 'b', 'c', 'd', 'e'], dtype='object')
Series 的 形状为: (5,)
Series 的 维度为: 1
Series 对象的个数为: 5
返回 Series 索引列表为: [Index(['a', 'b', 'c', 'd', 'e'], dtype='object')]
1.1.2 访问 Series 数据
索引和切片是 Series 最常用的操作之一,通过索引位置访问 Series 的数据与 ndarray 相同。Series 使用标签切片时,其末端时包含的,使用位置数值切片,其末端是不包含的。
import numpy as np
import pandas as pd
创建 Series
s1 = pd.Series(np.arange(1, 6))
print('通过 ndarray 创建的 Series 为:\n', s1)  # 索引为默认
print(f"s1.index为:\n{s1.index}")
print(f"s1.index强制转换为列表输出为:\n{list(s1.index)}")
通过标签取得对应的值,或进行修改
s1[2] = 100
print(s1[-1])   # 无法通过反向索引
s1[-1] = 99     # 新增一行数据
print(f"现在的Series为:\n{s1}")
print(f"s1[-1]:  {s1[-1]}")   # 标签中存在-1
运行结果:
通过 ndarray 创建的 Series 为:
 0    1
1    2
2    3
3    4
4    5
dtype: int32
s1.index为:
RangeIndex(start=0, stop=5, step=1)
s1.index强制转换为列表输出为:
[0, 1, 2, 3, 4]
现在的Series为:
 0      1
 1      2
 2    100
 3      4
 4      5
-1     99
dtype: int64
s1[-1]:  99
import numpy as np
import pandas as pd
dit = {'a': 0, 'b': 1, 'c': 2, 'd': 3}
print('通过 dict 创建的 Series 为:\n', pd.Series(dit))
通过标签取得相应的值,或进行修改
dit['s'] = 9
print(f"dit['b'] = {dit['b']}")
运行结果:
通过 dict 创建的 Series 为:
 a    0
b    1
c    2
d    3
dtype: int64
dit['b'] = 1
import numpy as np
import pandas as pd
list1 = [1, 2, 3, 4, 5]
series = pd.Series(list1, index=['a', 'b', 'c', 'd', 'e'], name='list')
print('通过 dict 创建的 Series 为:\n', series)
print(f"Series 位于第 1 位置的数据为:{series[0]}")
通过索引名称(标签)也可以访问Series 数据
print(f"Series中 Index 为 'b'的数据为:{series['b']}")
print(f"bool 类型的 Series 为:\n{series < 4}")
print(f"通过bool 数组访问Series 为:\n{series[series < 4]}")
运行结果:
通过 dict 创建的 Series 为:
 a    1
b    2
c    3
d    4
e    5
Name: list, dtype: int64
Series 位于第 1 位置的数据为:1
Series中 Index 为 'b'的数据为:2
bool 类型的 Series 为:
a     True
b     True
c     True
d    False
e    False
Name: list, dtype: bool
通过bool 数组访问Series 为:
a    1
b    2
c    3
Name: list, dtype: int64
1.1.3 更新、插入和删除
import numpy as np
import pandas as pd
list1 = [1, 2, 3, 4, 5]
series = pd.Series(list1, index=['a', 'b', 'c', 'd', 'e'], name='list')
print('通过 dict 创建的 Series 为:\n', series)
更新元素
series['b'] = 9
print(f"更新后的 Series 为:\n{series}")
在原 Series 上插入(追加)新的Series
series1 = pd.Series([4, 5], index=['f', 'g'])
追加
print(f"在 series 后插入 series1,结果为:\n{series.append(series1)}")
添加单个元素
series1['h'] = 7
print(f"插入单个数据后 series1:\n{series1}")
删除 Series 元素
series.drop('e', inplace=True)
print('删除索引 e 对应的数据后的 series 为:\n', series)
运行结果:
通过 dict 创建的 Series 为:
 a    1
b    2
c    3
d    4
e    5
Name: list, dtype: int64
更新后的 Series 为:
a    1
b    9
c    3
d    4
e    5
Name: list, dtype: int64
在 series 后插入 series1,结果为:
a    1
b    9
c    3
d    4
e    5
f    4
g    5
dtype: int64
插入单个数据后 series1:
f    4
g    5
h    7
dtype: int64
删除索引 e 对应的数据后的 series 为:
 a    1
b    9
c    3
d    4
Name: list, dtype: int64
1.2 DataFrame
DataFrame 是 pandas 基本数据结构,类似于数据库中的表。 DataFrame 既有行索引,也有列索引,它可以看作 Series 组成的 dict ,每个 Series 看作 DataFrame 的一个列。
1.2.1 创建 DataFrame
DataFrame 函数用于创建 DataFrame 对象,其基本语法格式如下:
class pandas.DataFrame(data, index, columns, dtype, copy)
DataFrame 函数常用的参数及其说明 参数名称说明data接收 ndarray、dict、list或DataFrame,表示输入数据。默认为Noneindex接收Index、ndarray,表示索引。默认为 None。columns接收Index、ndarray,表示列标签(列名)。默认为None
创建 DataFrame 的方法由很多,常见的一种是传入一个由等长 list 或 ndarray 组成的 dict。
若没有传入 columns 参数,则传入的 dict 的键会被当做列名。
使用字典创建 DataFrame 对象
import numpy as np
import pandas as pd
通过 dict 创建 DataFrame
dict1 = {'col1': [0, 1, 2, 3, 4], 'col2': [5, 6, 7, 8, 9]}
print(f"痛过 dict 创建的 DataFrame 为:\n{pd.DataFrame(dict1,index=['a', 'b', 'c', 'd', 'e'])}")
通过 list 创建 DataFrame
list2 = [[0, 5, 1], [1, 6, 5], [2, 6, 3], [8, 9, 5], [8, 3, 4]]
print(f"痛过 list 创建的 DataFrame 为:\n{pd.DataFrame(list2,index=['a', 'b', 'c', 'd', 'e'], columns=['col1', 'col2', 'col3'])}")
运行结果:
痛过 dict 创建的 DataFrame 为:
   col1  col2
a     0     5
b     1     6
c     2     7
d     3     8
e     4     9
痛过 list 创建的 DataFrame 为:
   col1  col2  col3
a     0     5     1
b     1     6     5
c     2     6     3
d     8     9     5
e     8     3     4
使用嵌套列表创建:
import numpy as np
import pandas as pd
data = [['xiaoming', 20], ['lina', 35], ['jam', 24]]
未分配列标签
df = pd.DataFrame(data)
print('使用嵌套列表创建的 DataFrame(未分配列标签) 为:\n', df)
分配列标签
df1 = pd.DataFrame(data, columns=['name', 'Age'])
print('使用嵌套列表创建的 DataFrame(分配列标签) 为:\n', df1)
运行结果:
使用嵌套列表创建的 DataFrame(未分配列标签) 为:
           0   1
0  xiaoming  20
1      lina  35
2       jam  24
使用嵌套列表创建的 DataFrame(分配列标签) 为:
        name  Age
0  xiaoming   20
1      lina   35
2       jam   24
使用列表嵌套字典创建 DataFrame 对象
import numpy as np
import pandas as pd
data = [{'a': 1, 'b': 2}, {'a': 5, 'b': 10, 'c': 20}]
df = pd.DataFrame(data, index=['first', 'second'])
如果其中某个元素值缺失,也就是字典的key无法找到对应的 value ,将使用 NaN 代替
print(f"列表嵌套字典创建 DataFrame 对象:\n{df}")
运行结果:
列表嵌套字典创建 DataFrame 对象:
        a   b     c
first   1   2   NaN
second  5  10  20.0
使用 Series 创建 DataFrame 对象
import numpy as np
import pandas as pd
data = {'one': pd.Series([1, 2, 3], index=['a', 'b', 'c']),
        'two': pd.Series([1, 2, 3, 4], index=['a', 'b', 'c', 'd'])}
df = pd.DataFrame(data)
对于 one 列而言,此处虽然显示了行索引'd',但由于没有与其对应的值,所以它的值为 NaN
print(f"通过 Series 创建 DataFrame 对象:\n{df}")
运行结果:
通过 Series 创建 DataFrame 对象:
   one  two
a  1.0    1
b  2.0    2
c  3.0    3
d  NaN    4
DataFrame 函数常用的属性及其说明 属性说明T行列转置columns返回 DataFrame 的列标签dtypes返回 DataFrame 各列的数据类型index返回行索引名shape返回 DataFrame 对象的形状size返回 DataFrame 对象包含的元素个数values以 ndarray 的格式返回 DataFrame 对象的所有元素loc通过行索引获取行数据iloc通过行号获取数据axes返回一个仅以行轴标签和列轴标签为成员的列表emptyDataFrame 中没有数据或者任意坐标轴的长度为0,则返回Truehead()返回前 n 行数据tail()返回后 n 行数据rename()rename(columns=字典),修改列名info()可以显示信息,例如行/列数,总内存使用量,每列的数据类型以及
import numpy as np
import pandas as pd
设置打印宽度,使打印数据对齐
pd.set_option('display.unicode.ambiguous_as_wide', True)
pd.set_option('display.unicode.east_asian_width', True)
df = pd.DataFrame({'city': ['上海市', '北京市', '广州市', '深圳市'], 'GDP': [13908.57, 12406.8, 9891.48, 9709.02]},
                  columns=['city', 'GDP'])
print(f"通过 dict 创建的 DataFrame 为:\n{df}")
print(f" DataFrame 的转置为:\n{df.T}")
print(f"查看行索引名为:\n{df.index}")
print(f"查看行列索引名为:\n{df.columns}")
print(f"查看 DataFrame 的形状为:\n{df.shape}")
print(f"查看 DataFrame 对象的数据为:\n{df.values}")
print(f"查看 DataFrame 指定列df['GDP']的内容为:\n{df['GDP']}")
print(f"查看 DataFrame 指定列df.GDP的内容为:\n{df.GDP}")
print(f"查看 DataFrame 行号为 2 这一行内容为:\n{df.loc[2]}")
print(f"查看 DataFrame 元素个数:\n{df.size}")
运行结果:
通过 dict 创建的 DataFrame 为:
     city       GDP
0  上海市  13908.57
1  北京市  12406.80
2  广州市   9891.48
3  深圳市   9709.02
 DataFrame 的转置为:
             0        1        2        3
city    上海市   北京市   广州市   深圳市
GDP   13908.57  12406.8  9891.48  9709.02
查看行索引名为:
RangeIndex(start=0, stop=4, step=1)
查看行列索引名为:
Index(['city', 'GDP'], dtype='object')
查看 DataFrame 的形状为:
(4, 2)
查看 DataFrame 对象的数据为:
[['上海市' 13908.57]
 ['北京市' 12406.8]
 ['广州市' 9891.48]
 ['深圳市' 9709.02]]
查看 DataFrame 指定列df['GDP']的内容为:
0    13908.57
1    12406.80
2     9891.48
3     9709.02
Name: GDP, dtype: float64
查看 DataFrame 指定列df.GDP的内容为:
0    13908.57
1    12406.80
2     9891.48
3     9709.02
Name: GDP, dtype: float64
查看 DataFrame 行号为 2 这一行内容为:
city     广州市
GDP     9891.48
Name: 2, dtype: object
查看 DataFrame 元素个数:
8
修改列标签名 rename() 和 info()函数的用法
import pandas as pd
data = {
    'Name': ['关羽', '刘备', '张飞', '曹操'],
    'Age': [28, 34, 29, 42],
    "Salary": [5000, 8000, 4500, 10000]
}
df = pd.DataFrame(data)
print(f"原始 DataFrame 为:\n{df}")
修改列标签名
df1 = df.rename(columns={'Name': 'name', 'Age': 'age'})
print(f"修改列标签名后的 DataFrame df1 为:\n{df1}")
print(f"修改列标签名后的 DataFrame df 为:\n{df}")
添加inplace参数,修改原数据
df.rename(index={1: 'row2', 2: 'row3'}, columns={'Name': 'name', 'Age': 'age'}, inplace=True)
print(f"添加inplace参数,修改原数据后的 DataFrame df 为:\n{df}")
print(f'df.info() :\n{df.info()}')
运行结果:
原始 DataFrame 为:
  Name  Age  Salary
0   关羽   28    5000
1   刘备   34    8000
2   张飞   29    4500
3   曹操   42   10000
修改列标签名后的 DataFrame df1 为:
  name  age  Salary
0   关羽   28    5000
1   刘备   34    8000
2   张飞   29    4500
3   曹操   42   10000
修改列标签名后的 DataFrame df 为:
  Name  Age  Salary
0   关羽   28    5000
1   刘备   34    8000
2   张飞   29    4500
3   曹操   42   10000
添加inplace参数,修改原数据后的 DataFrame df 为:
     name  age  Salary
0      关羽   28    5000
row2   刘备   34    8000
row3   张飞   29    4500
3      曹操   42   10000

Index: 4 entries, 0 to 3
Data columns (total 3 columns):
 #   Column  Non-Null Count  Dtype
2022-11-11
2022-04-17
2022-04-17 14:30:58
1304584626.0
1305448626.0
3.1.2 datetime 模块
datetime 模块重新封装了 time 模块,提供更多接口,提供的类有:date, time, datetime, timedelta, tzinfo
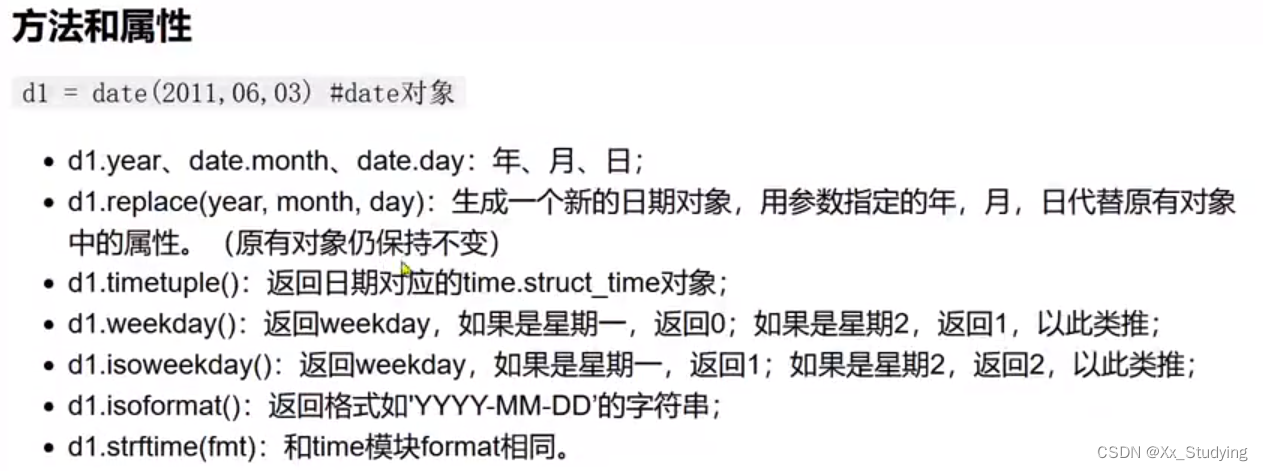
- date 类
datetime.date(year, month, day)
静态方法和字段
- date.today(): 返回一个表示当前本地日期的 date 对象
- date.fromtimestamp: 根据给定的时间戳,返回一个date 对象
from datetime import date
导入 time 模块
import time
print(f'date.today():{date.today()}')
print(f'date.fromtimestamp():{date.fromtimestamp(time.time())}')
运行结果:
date.today():2022-11-12
date.fromtimestamp():2022-11-12

from datetime import date
导入 time 模块
import time
now = date(2021, 10, 26)
print(now.year, now.month, now.day)
tomorrow = now.replace(day=1)
print(f'now:{now},当月第一天:{tomorrow}')
print(f'timetuple(): {now.timetuple()}')
print(f'weekday(): {now.weekday()}')
print(f'isoweekday(): {now.isoweekday()}')
print(f'isoformat(): {now.isoformat()}')
print(f'strftime(): {now.strftime("%Y.%m.%d")}')
运行结果:
2021 10 26
now:2021-10-26,当月第一天:2021-10-01
timetuple(): time.struct_time(tm_year=2021, tm_mon=10, tm_mday=26, tm_hour=0, tm_min=0, tm_sec=0, tm_wday=1, tm_yday=299, tm_isdst=-1)
weekday(): 1
isoweekday(): 2
isoformat(): 2021-10-26
strftime(): 2021.10.26
- datetime 类
datetime 相当于 date 和 time 结合起来
部分常用属性和方法:
// 通过datetime对象才能调用
dt.year、dt.month、dt.day:获取年、月、日;
dt.hour、dt.minute、dt.second、dt.microsecond:获取时、分、秒、微秒;

datetime.fromtimestamp():将时间戳转为一个datetime对象
dt.date():获取date对象;
dt.time():获取time对象;
dt.replace():传入指定的year或month或day或hour或minute或second或microsecond,生成一个新日期datetime对象,但不改变原有的datetime对象;
dt.timetuple():返回时间元组struct_time格式的日期;
dt.weekday():返回weekday,如果是星期一,返回0;如果是星期2,返回1,以此类推;
dt.isoweekday():返回weekday,如果是星期一,返回1;如果是星期2,返回2,以此类推;
dt.isocalendar():返回(year,week,weekday)格式的元组;
dt.isoformat():返回固定格式如'YYYY-MM-DD HH:MM:SS'的字符串
dt.strftime(format):传入任意格式符,可以输出任意格式的日期表示形式。
from datetime import datetime
导入 time 模块
import time
now = datetime.now()
print(type(now))
将datetime 转化为指定格式的字符串
print(now.strftime('%Y-%m-%d %X'))
print(now.strftime('%Y-%m-%d %H:%M'))
'2021-11-10 10:23',使用strptime 将字符串转 datetime(格式要统一)
my_str = '2021-11-10 10:23'
print(datetime.strptime(my_str, '%Y-%m-%d %H:%M'))
print(f'获取date对象:{now.date()}')
print(f'获取time对象:{now.time()}')
print(f'返回时间元组struct_time格式的日期:{now.timetuple()}')
运行结果:
2022-11-12 16:43:13
2022-11-12 16:43
2021-11-10 10:23:00
获取date对象:2022-11-12
获取time对象:16:43:13.423626
返回时间元组struct_time格式的日期:time.struct_time(tm_year=2022, tm_mon=11, tm_mday=12, tm_hour=16, tm_min=43, tm_sec=13, tm_wday=5, tm_yday=316, tm_isdst=-1)
3.1.3 timedelta 类,时间加减
使用 timedelta 可以很方便的在日期上做天 days,小时 hour,分钟,秒,毫秒,微妙的时间计算,如果要计算月份则需要另外的办法
from datetime import datetime
from datetime import timedelta
dt = datetime.now()
日期减一天
dt_1 = dt + timedelta(days=-1)  # 昨天
dt_2 = dt - timedelta(days=1)  # 昨天
dt_3 = dt + timedelta(days=1)  # 明天
print(f'今天:{dt}')
print(f'昨天:{dt_1}')
print(f'昨天:{dt_2}')
print(f'明天:{dt_3}')
明天的 datetime- 昨天的datetime
s =dt_3 - dt_1
print(f'相差的天数:{s.days}')
print(f'相差的秒数:{s.total_seconds()}')
运行结果:
今天:2022-11-12 17:05:10.986492
昨天:2022-11-11 17:05:10.986492
昨天:2022-11-11 17:05:10.986492
明天:2022-11-13 17:05:10.986492
相差的天数:2
相差的秒数:172800.0
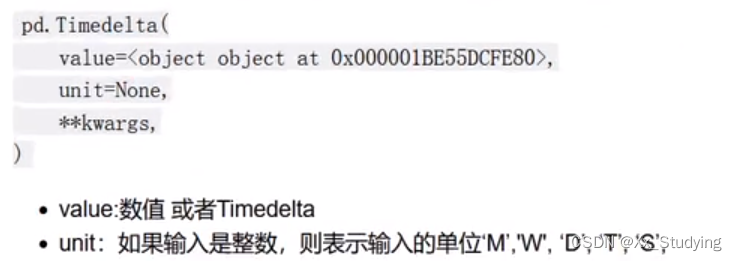
3.2 Pandas 时间 Timedelta
表示持续时间,即两个日期或时间之间的差异。
相当于 python 的datetime.timedelta ,在大多数情况下可以与之互换
import time

import pandas as pd
from datetime import datetime
from datetime import timedelta
ts = pd.Timestamp('2022-11-12 12')
print(ts)
减一天
print(f'减去一天后:{ts + pd.Timedelta(-1, "D")}')
时间间隔
td = pd.Timedelta(days=5, minutes=50, seconds=20)   # 关键字赋值
print(f'ts + td ={ts + td}')
print(f'总秒数:{td.total_seconds()}')
运行结果:
2022-11-12 12:00:00
减去一天后:2022-11-11 12:00:00
ts + td =2022-11-17 12:50:20
总秒数:435020.0
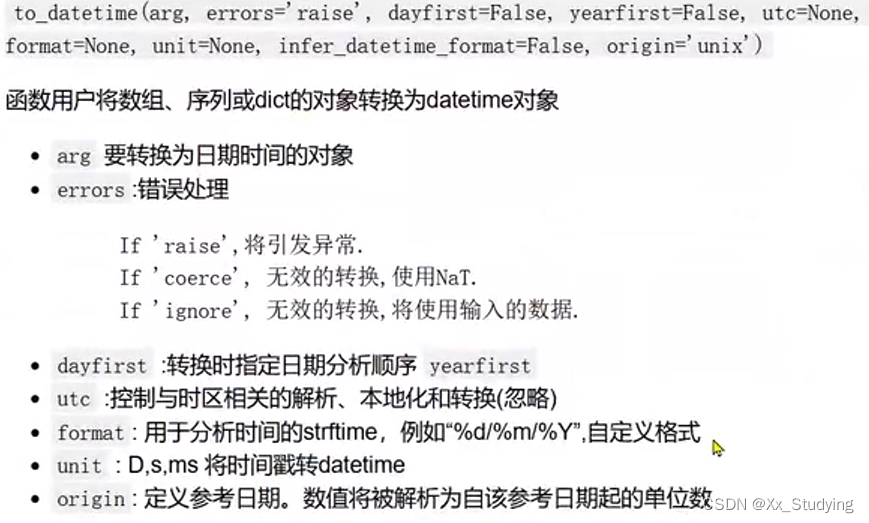
3.3 Pandas 时间转化 to_datetime
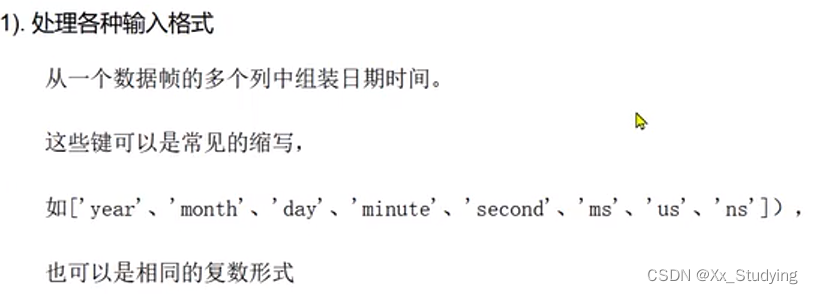
to_datetime 转换时间戳,可以通过 to_datetime 能快速将字符串转换为时间戳。当传递一个 Series 时,它会返回一个 Series(具有相同的索引),而类似列表的则转换为 DatetimeIndex
import pandas as pd
df = pd.DataFrame({'year': [2015, 2016], 'month': [2, 3], 'day': [4, 5]})
print(df)
print(f'pd.Datetime(df):\n{pd.to_datetime(df)}')
将字符串转为 datetime
print(pd.to_datetime(['11-12-2021']))
print(pd.to_datetime(['2005/11/13', "2010.12.31"]))
除了可以将文本数据转换为时间戳外,还可以将 unix 时间转换为时间戳
print(pd.to_datetime([1349720105, 1349806505, 1349892905], unit="s"))
自动识别异常
print(pd.to_datetime('210605'))
print(pd.to_datetime('210605', yearfirst=True))
配合 uint 参数,使用非unix 时间
print(pd.to_datetime([1, 2, 3], unit='D', origin=pd.Timestamp('2020-01-11')))
print(pd.to_datetime([1, 2, 3], unit='d'))
print(pd.to_datetime([1, 2, 3], unit='h', origin=pd.Timestamp('2020-01')))
print(pd.to_datetime([1, 2, 3], unit='m', origin=pd.Timestamp('2020-01')))
print(pd.to_datetime([1, 2, 3], unit='s', origin=pd.Timestamp('2020-01')))
运行结果:
   year  month  day
0  2015      2    4
1  2016      3    5
pd.Datetime(df):
0   2015-02-04
1   2016-03-05
dtype: datetime64[ns]
DatetimeIndex(['2021-11-12'], dtype='datetime64[ns]', freq=None)
DatetimeIndex(['2005-11-13', '2010-12-31'], dtype='datetime64[ns]', freq=None)
DatetimeIndex(['2012-10-08 18:15:05', '2012-10-09 18:15:05',
               '2012-10-10 18:15:05'],
              dtype='datetime64[ns]', freq=None)
2005-06-21 00:00:00
2021-06-05 00:00:00
DatetimeIndex(['2020-01-12', '2020-01-13', '2020-01-14'], dtype='datetime64[ns]', freq=None)
DatetimeIndex(['1970-01-02', '1970-01-03', '1970-01-04'], dtype='datetime64[ns]', freq=None)
DatetimeIndex(['2020-01-01 01:00:00', '2020-01-01 02:00:00',
               '2020-01-01 03:00:00'],
              dtype='datetime64[ns]', freq=None)
DatetimeIndex(['2020-01-01 00:01:00', '2020-01-01 00:02:00',
               '2020-01-01 00:03:00'],
              dtype='datetime64[ns]', freq=None)
DatetimeIndex(['2020-01-01 00:00:01', '2020-01-01 00:00:02',
               '2020-01-01 00:00:03'],
              dtype='datetime64[ns]', freq=None)
3.4 Pandas 时间序列 date_range
有时候,我们可能想要生成某个范围内的时间戳。例如,我想要生成”2018-6-26″ 这一天之后的 8 天时间戳,我们可以使用 date_range 和 bdate_range 来完成时间戳范围的生成。
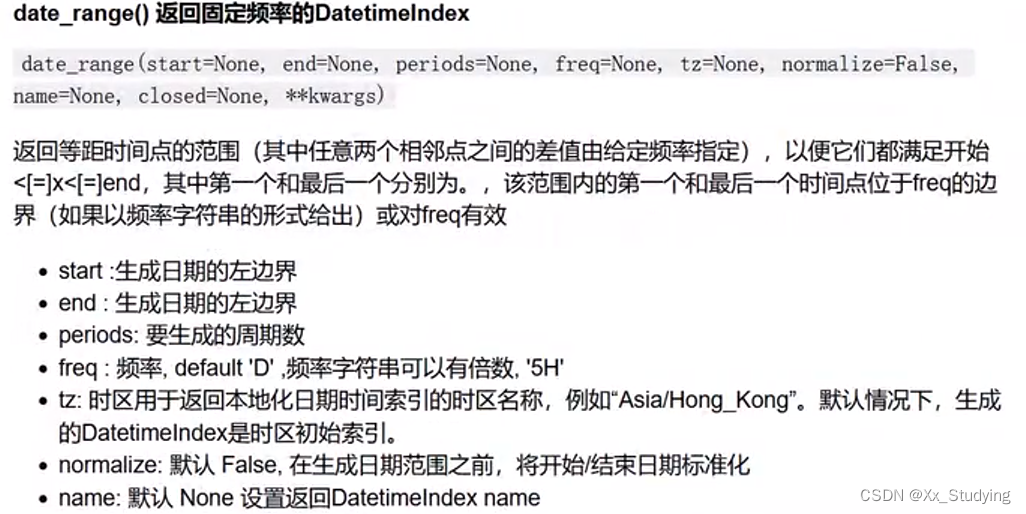
import pandas as pd
指定默认值,默认时包含开始和结束时间,默认频率使用的D(天)
print(pd.date_range(start='1/1/2021', end='1/08/2021'))
print(pd.date_range(start='2010', end='2011'))
指定开始日期,设置期间数
print(pd.date_range(start='1/1/2018', periods=8))
指定开始、结束和期间;频率自动生成(线性间隔)
print(pd.date_range(start='2018-04-24', end='2018-04-27', periods=3))
print(pd.date_range(start='2018-04-24', end='2018-04-27', periods=4))
print(pd.date_range(start='2018-04-24', periods=4))
print(pd.date_range(start='2018-04-24 15:30', periods=4, name='mypd'))
print(pd.date_range(start='2018-04-24 15:30', periods=4, name='mypd', normalize=True))
运行结果:
DatetimeIndex(['2021-01-01', '2021-01-02', '2021-01-03', '2021-01-04',
               '2021-01-05', '2021-01-06', '2021-01-07', '2021-01-08'],
              dtype='datetime64[ns]', freq='D')
DatetimeIndex(['2010-01-01', '2010-01-02', '2010-01-03', '2010-01-04',
               '2010-01-05', '2010-01-06', '2010-01-07', '2010-01-08',
               '2010-01-09', '2010-01-10',
               ...

               '2010-12-23', '2010-12-24', '2010-12-25', '2010-12-26',
               '2010-12-27', '2010-12-28', '2010-12-29', '2010-12-30',
               '2010-12-31', '2011-01-01'],
              dtype='datetime64[ns]', length=366, freq='D')
DatetimeIndex(['2018-01-01', '2018-01-02', '2018-01-03', '2018-01-04',
               '2018-01-05', '2018-01-06', '2018-01-07', '2018-01-08'],
              dtype='datetime64[ns]', freq='D')
DatetimeIndex(['2018-04-24 00:00:00', '2018-04-25 12:00:00',
               '2018-04-27 00:00:00'],
              dtype='datetime64[ns]', freq=None)
DatetimeIndex(['2018-04-24', '2018-04-25', '2018-04-26', '2018-04-27'], dtype='datetime64[ns]', freq=None)
DatetimeIndex(['2018-04-24', '2018-04-25', '2018-04-26', '2018-04-27'], dtype='datetime64[ns]', freq='D')
DatetimeIndex(['2018-04-24 15:30:00', '2018-04-25 15:30:00',
               '2018-04-26 15:30:00', '2018-04-27 15:30:00'],
              dtype='datetime64[ns]', name='mypd', freq='D')
DatetimeIndex(['2018-04-24', '2018-04-25', '2018-04-26', '2018-04-27'], dtype='datetime64[ns]', name='mypd', freq='D')
Original: https://blog.csdn.net/Xx_Studying/article/details/127453218
Author: Xx_Studying
Title: Pandas基础入门知识点总结
原创文章受到原创版权保护。转载请注明出处:https://www.johngo689.com/741090/
转载文章受原作者版权保护。转载请注明原作者出处!