

老生常谈系列之Aop–Aop的经典应用之Spring的事务实现分析(二)
前言
上一篇文章老生常谈系列之Aop–Aop的经典应用之Spring的事务实现分析(一)使用了一个简单的例子介绍了事务的使用,但是并没有进行深入的分析源码的实现,那这一篇就开始来进行源码的分析。
本文从源码级别上分析事务实现,主要分三个部分:
- Spring是如何开启事务支持的?
- Spring是如何为需要事务支持的类生成代理的?
- Spring是如何实现事务成功提交、异常回滚的?
话不多说,下面就开始这该死的分析之路吧。
Spring是如何开启事务支持的
用过Spring的都知道,Spring既可以支持 xml的配置,也可以通过注解进行配置。 xml是比较传统的做法,注解是后面提升开发效率而出现的。但是这两者殊途同归,就像无论你是开车回家还是走路回家,最后的目的地都是到家罢了。选择一个你喜欢的方式即可,这里会两个方式都介绍一下。
xml配置
上一篇文章老生常谈系列之Aop–Aop的经典应用之Spring的事务实现分析(一)用的就是xml配置,没看过的可以先看一下例子。简而言之, xml配置是经过这一句开启事务支持的。
那么这一句是怎么实现了开启事务的支持呢?熟悉Spring的朋友可以不假思索就知道, 按照Spring的尿性,肯定是有一个类来解析这个标签,然后进行一些 Bean 的注册,从而实现某一块功能。
想一下如果是你来实现,你会怎么做?多半也是先去解析一下这个 xml标签的内容是什么,然后根据这个标签去做相应的操作。Spring对 xml配置的解析也都是这样实现的,简单明了。那么是哪一个类实现了解析的功能呢?Spring对实现类的命名也是有一定的套路的, <tx:annotation-driven></tx:annotation-driven>标签的前缀是 tx,那么实现的类名就为 TxNamespaceHandler,还有例如开启Aop的支持为 <aop:aspectj-autoproxy></aop:aspectj-autoproxy>,那么实现的类名就为 AopNamespaceHandler,其他的以此类推,也是类似的。
我们先来看一下 TxNamespaceHandler的结构关系图。


可以看到 TxNamespaceHandler继承了 NamespaceHandlerSupport类,这个类提供了 registerBeanDefinitionParser()和 registerBeanDefinitionDecorator()方法来注册 BeanDefinitionParser和 BeanDefinitionDecorator来处理特定 xml元素。简单来说就是注册一下特定的 BeanDefinitionParser,这里的 BeanDefinitionParser类会被加入 NamespaceHandlerSupport的 Map<string, beandefinitionparser> parsers</string,>属性里,这些 BeanDefinitionParser会在 Ioc初始化阶段参与相应 xml的解析。
再看 NamespaceHandler接口,这个接口是用来处理自定义标签的。在Spring的世界里,只有一个默认命名空间标签,那就是 BEANS_NAMESPACE_URI,值为 http://www.springframework.org/schema/beans。那么对于Spring事务而言,命名空间是 http://www.springframework.org/schema/tx。这个命名空间对应的也就是 xml文件配置里面的这一串 xmlns。下面还有一串 schemaLocation,这是 xml校验文件的位置,具体的实现细节可以在里找到。

所以对于这个 http://www.springframework.org/schema/tx命名空间,我们的支持类就是 TxNamespaceHandler。至于命名空间是怎么和实现类关联起来的,简单说一下,Spring会把映射关系写入当前 ClassPath下的 META-INF/spring.handlers文件里,Spring初始化的时候会去加载这些文件获取映射关系, META-INF/spring.handlers的内容一般如下:
http\://www.springframework.org/schema/tx=org.springframework.transaction.config.TxNamespaceHandler
所以这里简单说明了 xml解析的映射关系是如何建立的,有点跑题了,详细分析还是见。
好了,言归正传,来看一下 TxNamespaceHandler里面初始化了什么内容。
    @Override
    public void init() {
        registerBeanDefinitionParser("advice", new TxAdviceBeanDefinitionParser());
        registerBeanDefinitionParser("annotation-driven", new AnnotationDrivenBeanDefinitionParser());
        registerBeanDefinitionParser("jta-transaction-manager", new JtaTransactionManagerBeanDefinitionParser());
    }
很显然,这里根据不同的标签注册不同的 BeanDefinitionParser,这里调用的是父类也就是上面说过的 NamespaceHandlerSupport#registerBeanDefinitionParser()方法,会将相应的 BeanDefinitionParser加入到 parser集合里。
这个 parser初始化完成后,会在 TxNamespaceHandler#parse()方法里被使用, TxNamespaceHandler#parse()会在Spring解析初始化 BeanDefinition的 BeanDefinitionParserDelegate#parseCustomElement(Element ele, @Nullable BeanDefinition containingBd)方法里的被调用。同样这部分是Ioc的知识,这里为了把思路串起来,再次提及了一下。
可以看到,通过编写xml配置文件,解析xml等一系列操作后,我们最终是使用 AnnotationDrivenBeanDefinitionParser来处理 annotation-driven标签。
来看 AnnotationDrivenBeanDefinitionParser#parser()方法,方法上的注释也说得很清楚,这个方法是用来处理 <tx:annotation-driven></tx:annotation-driven>标签的,同时如果必要的话会注册一个 AutoProxyCreator,因为如果是proxy模式的话,事务是依赖于Spring Aop代理去实现的。如果你代码的其他地方已经先于这里进行了 AutoProxyCreator的注册,那这里就没必要再注册。
    /**
     * Parses the {@code } tag. Will
     * {@link AopNamespaceUtils#registerAutoProxyCreatorIfNecessary register an AutoProxyCreator}
     * with the container as necessary.
     */
    @Override
    @Nullable
    public BeanDefinition parse(Element element, ParserContext parserContext) {
        registerTransactionalEventListenerFactory(parserContext);
        String mode = element.getAttribute("mode");
        // 如果模式为aspectj,那么这里会通过aspectj支持事务
        if ("aspectj".equals(mode)) {
            // mode="aspectj"
            registerTransactionAspect(element, parserContext);
            if (ClassUtils.isPresent("javax.transaction.Transactional", getClass().getClassLoader())) {
                registerJtaTransactionAspect(element, parserContext);
            }
        }
        else {
            // mode="proxy",默认值就是proxy
            // 如果模式为proxy,那么这里会使用Spring Aop的代理方式支持事务
            AopAutoProxyConfigurer.configureAutoProxyCreator(element, parserContext);
        }
        return null;
    }
那么 AopAutoProxyConfigurer.configureAutoProxyCreator(element, parserContext)做了什么,跟进代码查看
        public static void configureAutoProxyCreator(Element element, ParserContext parserContext) {
            AopNamespaceUtils.registerAutoProxyCreatorIfNecessary(parserContext, element);

            String txAdvisorBeanName = TransactionManagementConfigUtils.TRANSACTION_ADVISOR_BEAN_NAME;
            if (!parserContext.getRegistry().containsBeanDefinition(txAdvisorBeanName)) {
                Object eleSource = parserContext.extractSource(element);

                // Create the TransactionAttributeSource definition.
                // 创建 TransactionAttributeSource 的 bean
                RootBeanDefinition sourceDef = new RootBeanDefinition(
                        "org.springframework.transaction.annotation.AnnotationTransactionAttributeSource");
                sourceDef.setSource(eleSource);
                sourceDef.setRole(BeanDefinition.ROLE_INFRASTRUCTURE);
                // 注册 bean , 并使用 Spring 中的定义规则生成 beanName
                String sourceName = parserContext.getReaderContext().registerWithGeneratedName(sourceDef);

                // Create the TransactionInterceptor definition.
                // 创建 TransactionInterceptor 的 bean
                RootBeanDefinition interceptorDef = new RootBeanDefinition(TransactionInterceptor.class);
                interceptorDef.setSource(eleSource);
                interceptorDef.setRole(BeanDefinition.ROLE_INFRASTRUCTURE);
                registerTransactionManager(element, interceptorDef);
                interceptorDef.getPropertyValues().add("transactionAttributeSource", new RuntimeBeanReference(sourceName));
                // 注册 bean , 并使用 Spring 中的定义规则生成 beanName
                String interceptorName = parserContext.getReaderContext().registerWithGeneratedName(interceptorDef);

                // Create the TransactionAttributeSourceAdvisor definition.
                // 创建 TransactionAttributeSourceAdvisor 的 bean
                RootBeanDefinition advisorDef = new RootBeanDefinition(BeanFactoryTransactionAttributeSourceAdvisor.class);
                advisorDef.setSource(eleSource);
                advisorDef.setRole(BeanDefinition.ROLE_INFRASTRUCTURE);
                // 将 sourceName 的 bean 注入 advisorDef 的 transactionAttributeSource 属性中
                advisorDef.getPropertyValues().add("transactionAttributeSource", new RuntimeBeanReference(sourceName));
                // 将 interceptorName 的 bean 注入 advisorDef 的 adviceBeanName 属性中
                advisorDef.getPropertyValues().add("adviceBeanName", interceptorName);
                // 如果配置了 order 属性,则加入到 bean 属性中
                if (element.hasAttribute("order")) {
                    advisorDef.getPropertyValues().add("order", element.getAttribute("order"));
                }
                parserContext.getRegistry().registerBeanDefinition(txAdvisorBeanName, advisorDef);

                // 创建 CompositeComponentDefinition
                CompositeComponentDefinition compositeDef = new CompositeComponentDefinition(element.getTagName(), eleSource);
                compositeDef.addNestedComponent(new BeanComponentDefinition(sourceDef, sourceName));
                compositeDef.addNestedComponent(new BeanComponentDefinition(interceptorDef, interceptorName));
                compositeDef.addNestedComponent(new BeanComponentDefinition(advisorDef, txAdvisorBeanName));
                parserContext.registerComponent(compositeDef);
            }
        }
到这里可以看到 AopAutoProxyConfigurer.configureAutoProxyCreator(element, parserContext)注册了事务所需的核心骨架,也就是上文老生常谈系列之Aop–Aop的经典应用之Spring的事务实现分析(一)#大白话原理部分反复提到的三个核心类,分别为 BeanFactoryTransactionAttributeSourceAdvisor、 AnnotationTransactionAttributeSource以及 TransactionInterceptor。
到这里xml配置开启事务已经讲完, 简单来说就是通过一系列解析配置这三个类,把它们加入到Spring容器里,由它们实现具体的操作。那接下来简单介绍一下注解开启事务的配置,事务相对来说会简单很多,没那么繁琐。
注解配置
注解配置的代码样例也很简单,搞一个配置类注册相关的 bean,然后把所有的配置和业务类都扫描进Spring容器里。
先搞个配置类 AnnotationDrivenTransactionConfig。
/**
 * @author Codegitz
 * @date 2022/2/28
 **/
@EnableTransactionManagement
@Configuration
public class AnnotationDrivenTransactionConfig {

    @Bean
    public UserService userService(DataSource dataSource){
        UserServiceImpl userService = new UserServiceImpl();
        userService.setDataSource(dataSource);
        return userService;
    }

    @Bean
    public TransactionManager getTransactionManager(DataSource dataSource){
        return new DataSourceTransactionManager(dataSource);
    }

    @Bean
    public DataSource getDataSource(){
        BasicDataSource basicDataSource = new BasicDataSource();
        basicDataSource.setDriverClassName("com.mysql.jdbc.Driver");
        basicDataSource.setUrl("jdbc:mysql://localhost:3306/transaction");
        basicDataSource.setUsername("root");
        basicDataSource.setPassword("123456");
        basicDataSource.setInitialSize(1);
        basicDataSource.setMaxActive(300);
        basicDataSource.setMaxIdle(2);
        basicDataSource.setMinEvictableIdleTimeMillis(1);
        return basicDataSource;
    }
写个启动类 AnnotationDrivenApplication扫描所有的配置和业务类
/**
 * @author Codegitz
 * @date 2022/2/28
 **/
public class AnnotationDrivenApplication {
    public static void main(String[] args) throws Exception {
        ApplicationContext applicationContext = new AnnotationConfigApplicationContext("io.codegitz");
        UserService userService = (UserService) applicationContext.getBean("userService");
        User user = new User();
        user.setName("codegitzByAnnotation");
        user.setAge(25);
        user.setSex("man");
        // insert a record
        userService.save(user);
    }
}
通过上述的代码实现了和 xml同样的功能,可以看出,注册 bean这一步并没有什么区别,唯独多了 @EnableTransactionManagement注解,事务注解配置就是通过这一个注解启动了事务支持。
下面来分析一下注解是如何注册事务的实现骨架类的。
跟进 @EnableTransactionManagement代码,可以看到类上有个 @Import(TransactionManagementConfigurationSelector.class),这种类型的配置都是由 @Import注解里的类实现具体的逻辑。
进入 TransactionManagementConfigurationSelector源码,可以看到,这里跟 xml一样,根据不同的模式进行不同的配置支持,默认也是 proxy模式。
    /**
     * Returns {@link ProxyTransactionManagementConfiguration} or
     * {@code AspectJ(Jta)TransactionManagementConfiguration} for {@code PROXY}
     * and {@code ASPECTJ} values of {@link EnableTransactionManagement#mode()},
     * respectively.
     */
    @Override
    protected String[] selectImports(AdviceMode adviceMode) {
        // adviceMode是注解的属性,如果没有配置,默认为proxy模式
        switch (adviceMode) {
            case PROXY:
                // 如果是proxy模式,注册几个核心类事务
                return new String[] {AutoProxyRegistrar.class.getName(),
                        ProxyTransactionManagementConfiguration.class.getName()};
            case ASPECTJ:
                // 如果是aspectj模式,使用AspectJ支持事务
                return new String[] {determineTransactionAspectClass()};
            default:
                return null;
        }
    }
AutoProxyRegistrar会在Spring里没有 AutoProxyCreator类 bean的时候注册一个 AutoProxyCreator。
ProxyTransactionManagementConfiguration就会配置那三个核心类,跟进源码查看,非常简单明了。
@Configuration(proxyBeanMethods = false)
public class ProxyTransactionManagementConfiguration extends AbstractTransactionManagementConfiguration {

    @Bean(name = TransactionManagementConfigUtils.TRANSACTION_ADVISOR_BEAN_NAME)
    @Role(BeanDefinition.ROLE_INFRASTRUCTURE)
    public BeanFactoryTransactionAttributeSourceAdvisor transactionAdvisor(
            TransactionAttributeSource transactionAttributeSource,
            TransactionInterceptor transactionInterceptor) {
        // 注册BeanFactoryTransactionAttributeSourceAdvisor
        BeanFactoryTransactionAttributeSourceAdvisor advisor = new BeanFactoryTransactionAttributeSourceAdvisor();
        advisor.setTransactionAttributeSource(transactionAttributeSource);
        advisor.setAdvice(transactionInterceptor);
        if (this.enableTx != null) {
            advisor.setOrder(this.enableTx.getNumber("order"));
        }
        return advisor;
    }

    @Bean
    @Role(BeanDefinition.ROLE_INFRASTRUCTURE)
    public TransactionAttributeSource transactionAttributeSource() {
        // 注册AnnotationTransactionAttributeSource
        return new AnnotationTransactionAttributeSource();
    }

    @Bean
    @Role(BeanDefinition.ROLE_INFRASTRUCTURE)
    public TransactionInterceptor transactionInterceptor(
            TransactionAttributeSource transactionAttributeSource) {
        // 注册TransactionInterceptor
        TransactionInterceptor interceptor = new TransactionInterceptor();
        interceptor.setTransactionAttributeSource(transactionAttributeSource);
        if (this.txManager != null) {
            interceptor.setTransactionManager(this.txManager);
        }
        return interceptor;
    }

}
至此,注解配置也完成了核心类的注册,分别为 BeanFactoryTransactionAttributeSourceAdvisor、 AnnotationTransactionAttributeSource以及 TransactionInterceptor,与xml的配置是一致的,殊途同归。
那么到这里通过两种方式都已经成功开启了事务的支持,那么下面的问题就是这三个核心类是如果把事务的功能实现了的。
Spring是如何为需要事务支持的类生成代理的
在上文老生常谈系列之Aop–Aop的经典应用之Spring的事务实现分析(一)#大白话原理部分我们已经说过,Spring事务是基于Aop去实现的,那么对于事务而言 pointcut就是 Transactional注解。所以在筛选类是否需要代理的时候,Spring会对标注了 @Transactional注解进行代理。首先Spring会为标注了 Transactional注解的类构建出合适的 Advice和 Advisors,这些 Advice和 Advisors会作为 specificInterceptors传入创建代理的方法里。具体的细节可以在前面系列文章找到,分别为获取 Advice和 Advisors部分老生常谈系列之Aop–Spring Aop源码解析(一)和生成动态代理部分老生常谈系列之Aop–Spring Aop源码解析(二)。
以上是通用的Aop逻辑分析,包含了很多类型很多判断,相对来说Spring事务的实现并没有那么复杂,事务的实现没有涉及很多其他的 advice,实际上的过程会简单很多,那么现在就来分析一下Spring事务为所需的类获取拦截器的过程。
这里会采取debug的模式分析,debug可以方便展示具体的类型,更加清晰明了。代码不再贴,就是前面源码解析的代码。
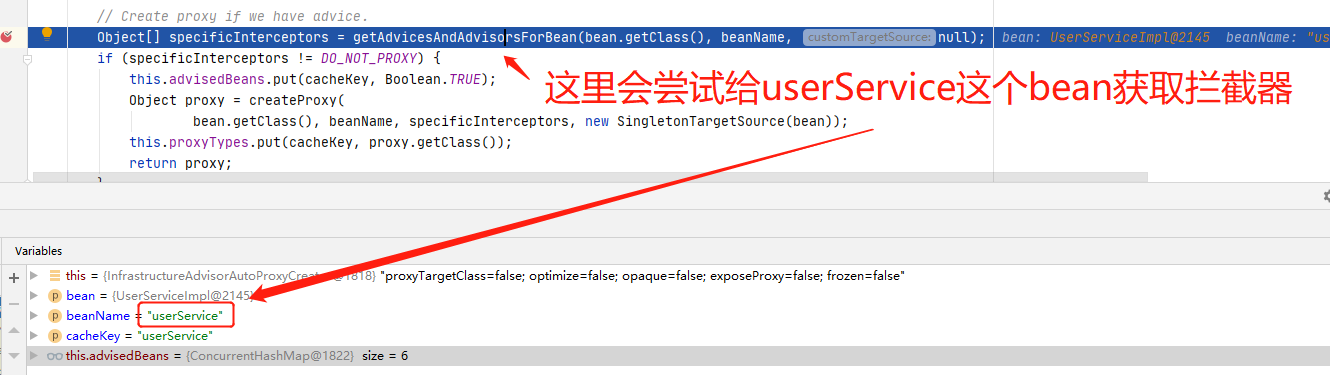
首先把断点打在合适的位置, 打在 AbstractAutoProxyCreator#wrapIfNecessary方法里的 getAdvicesAndAdvisorsForBean()那一行,无论 xml还是注解,都是一样的位置,我用的是 xml配置。
首先来到 getAdvicesAndAdvisorsForBean()方法
继续跟进来到 AbstractAdvisorAutoProxyCreator#findEligibleAdvisors()方法。
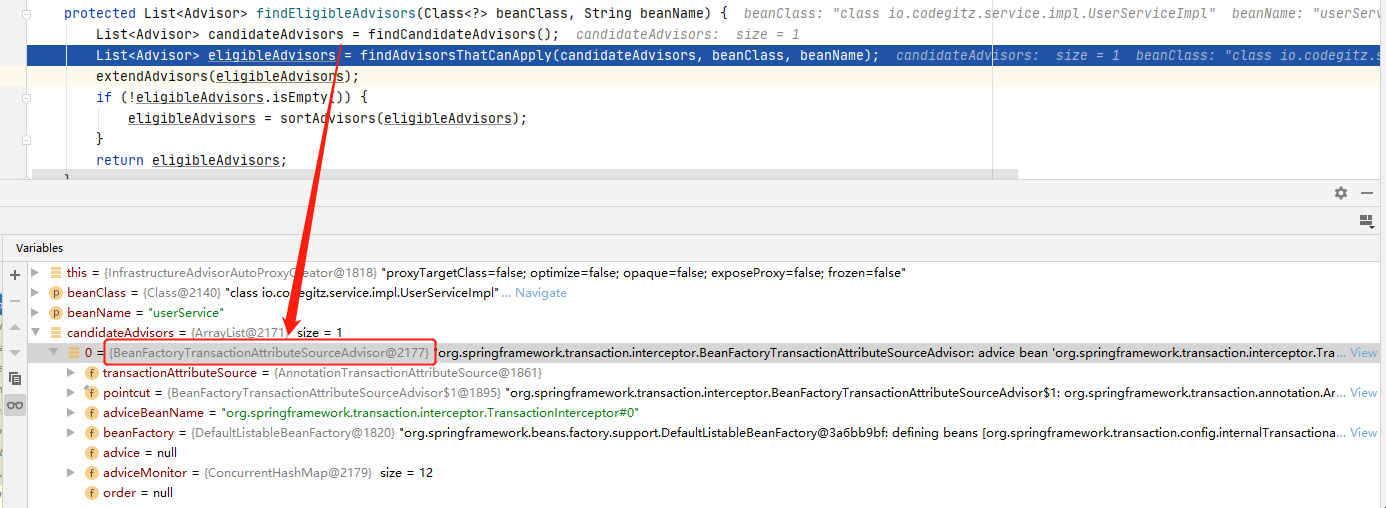
可以看到这里的 findCandidateAdvisors()会返回所有的 advisor,由于我这里没有别的Aop逻辑,所以这里只返回了一个 BeanFactoryTransactionAttributeSourceAdvisor。这玩意看着眼熟不?不眼熟?那说明你前面没认真看,这个是我们开启事务支持的时候注册进去的类。那我们一起注册进去的还有另外两个类 AnnotationTransactionAttributeSource以及 TransactionInterceptor,此时此刻,它们在哪呢?仔细看 BeanFactoryTransactionAttributeSourceAdvisor的属性,你会发现它们两个都在里面。
AnnotationTransactionAttributeSource封装了 Transactional注解上标注的属性, adviceBeanName为需要事务支持的方法执行时需要执行的拦截器,也就是我们注册进去的 TransactionInterceptor。

继续往下走,从方法名就可以知道 findAdvisorsThatCanApply()是为当前类寻找合适的 advisor,那么对于事务而言,这里匹配的标准就是类上是否标注了 Transactional注解。
跟进代码,进入到 AopUtils#canApply() 方法,由于 BeanFactoryTransactionAttributeSourceAdvisor实现了 PointcutAdvisor,这里的第二个判断就会进去,进去之后会把 BeanFactoryTransactionAttributeSourceAdvisor的 pointcut属性传入下一个 canApply()方法。

继续跟进 canApply()方法,前面一系列关于引介增强的判断都不会进入,因为事务的实现没有用到引介增强。引介增强可以理解为利用Aop实现一个接口,而不是在代码里 implements一个接口,但是两种实现了一样的功能,这种用法相对较少。
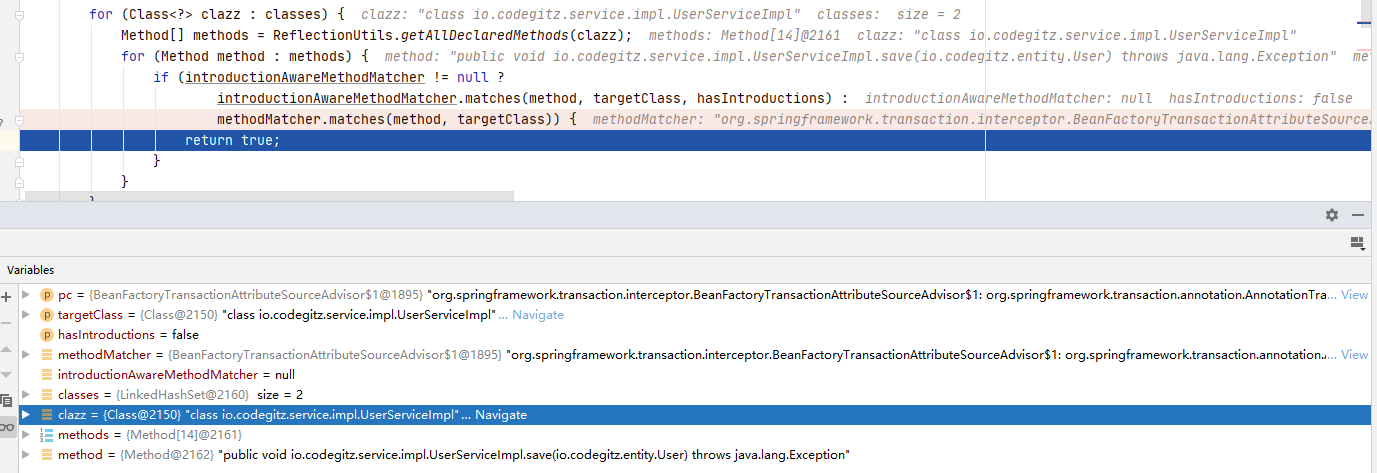
可以看到这里的逻辑会获取当前类的原始类和获取当前类的所有接口,然后逐次遍历所有方法,利用 methodMatcher.matches(method, targetClass)判断当前方法是否有事务注解。
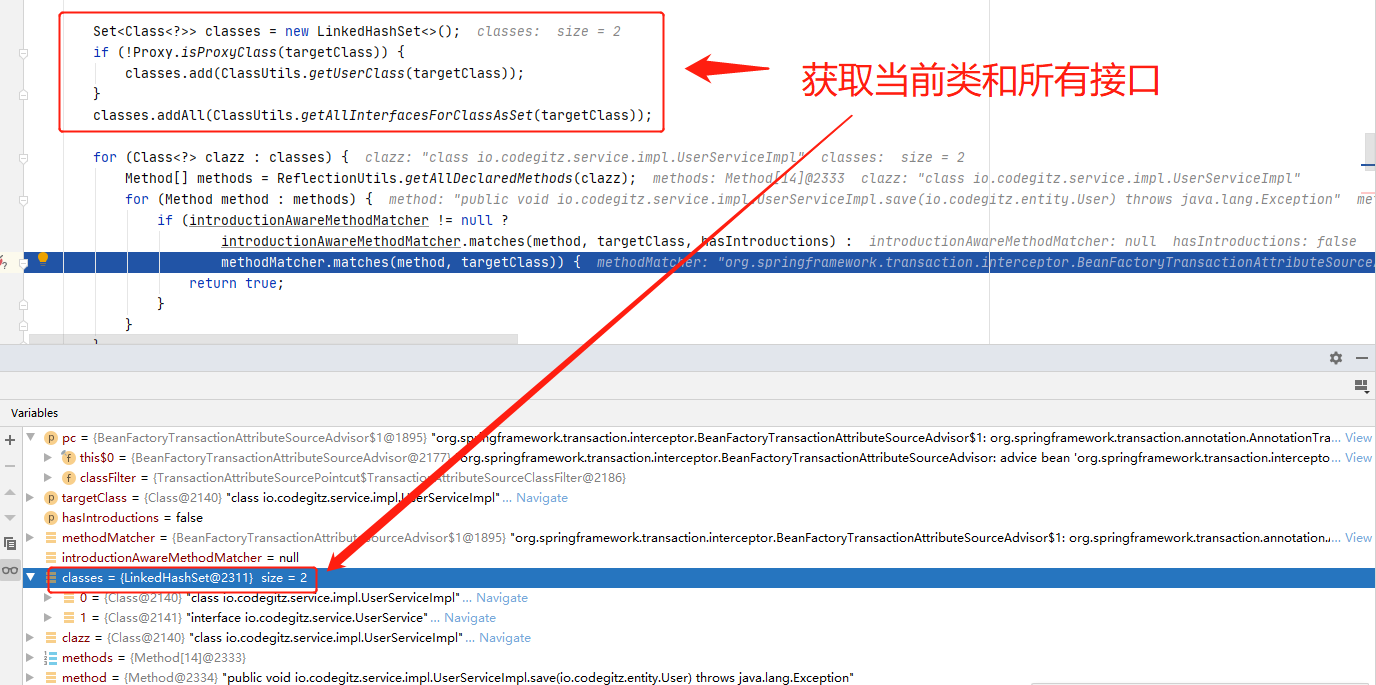
这里的 methodMatcher是 BeanFactoryTransactionAttributeSourceAdvisor的第一个属性 TransactionAttributeSource。继续跟进 methodMatcher.matches(method, targetClass)方法,会进入到 TransactionAttributeSourcePointcut#matches)方法里。这里的 getTransactionAttributeSource()会返回我们刚开始的时候注册的 AnnotationTransactionAttributeSource。
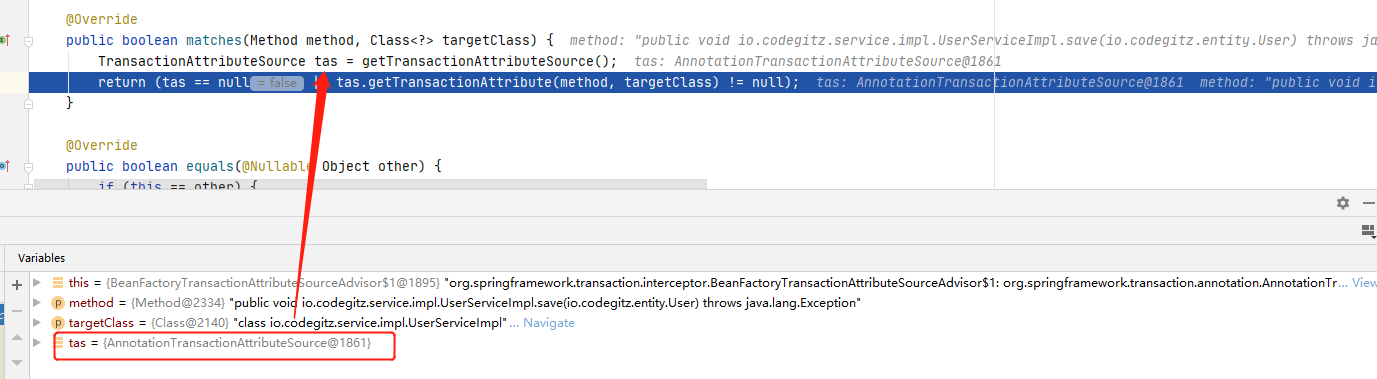
跟进 tas.getTransactionAttribute(method, targetClass)方法,会进入 AbstractFallbackTransactionAttributeSource#getTransactionAttribute方法里,这个方法首先会从缓存 attributeCache里获取是否有当前类和方法的 TransactionAttribute缓存。如果没有则需要调用 computeTransactionAttribute(method, targetClass)方法获取 TransactionAttribute。
直接进入 computeTransactionAttribute(method, targetClass)方法。这个方法比较经典,贴一下代码,跟着注释看比较清晰明了。
    protected TransactionAttribute computeTransactionAttribute(Method method, @Nullable Class targetClass) {
        // Don't allow no-public methods as required.
        if (allowPublicMethodsOnly() && !Modifier.isPublic(method.getModifiers())) {
            return null;
        }

        // The method may be on an interface, but we need attributes from the target class.
        // If the target class is null, the method will be unchanged.
        // method 代表接口中的方法, specificMethod 代表实现类中的方法
        Method specificMethod = AopUtils.getMostSpecificMethod(method, targetClass);

        // First try is the method in the target class.
        // 查看方法中是有存在事务声明
        TransactionAttribute txAttr = findTransactionAttribute(specificMethod);
        if (txAttr != null) {
            return txAttr;
        }

        // Second try is the transaction attribute on the target class.
        // 查看方法所在类中是否存在事务声明
        txAttr = findTransactionAttribute(specificMethod.getDeclaringClass());
        if (txAttr != null && ClassUtils.isUserLevelMethod(method)) {
            return txAttr;
        }

        if (specificMethod != method) {
            // Fallback is to look at the original method.
            // 到原有的接口去寻找,例如父类或者接口类的方法里
            txAttr = findTransactionAttribute(method);
            if (txAttr != null) {
                return txAttr;
            }
            // Last fallback is the class of the original method.
            // 最后到原有接口的类上寻找
            txAttr = findTransactionAttribute(method.getDeclaringClass());
            if (txAttr != null && ClassUtils.isUserLevelMethod(method)) {
                return txAttr;
            }
        }

        return null;
    }
我这里的注解是放在 userService接口上的,实现类继承了接口,也会拥有注解信息。所以会在这一句 findTransactionAttribute(specificMethod.getDeclaringClass())获取到注解属性并且返回。

最终回到 canApply()方法里的 methodMatcher.matches(method, targetClass),匹配成功,返回 true。
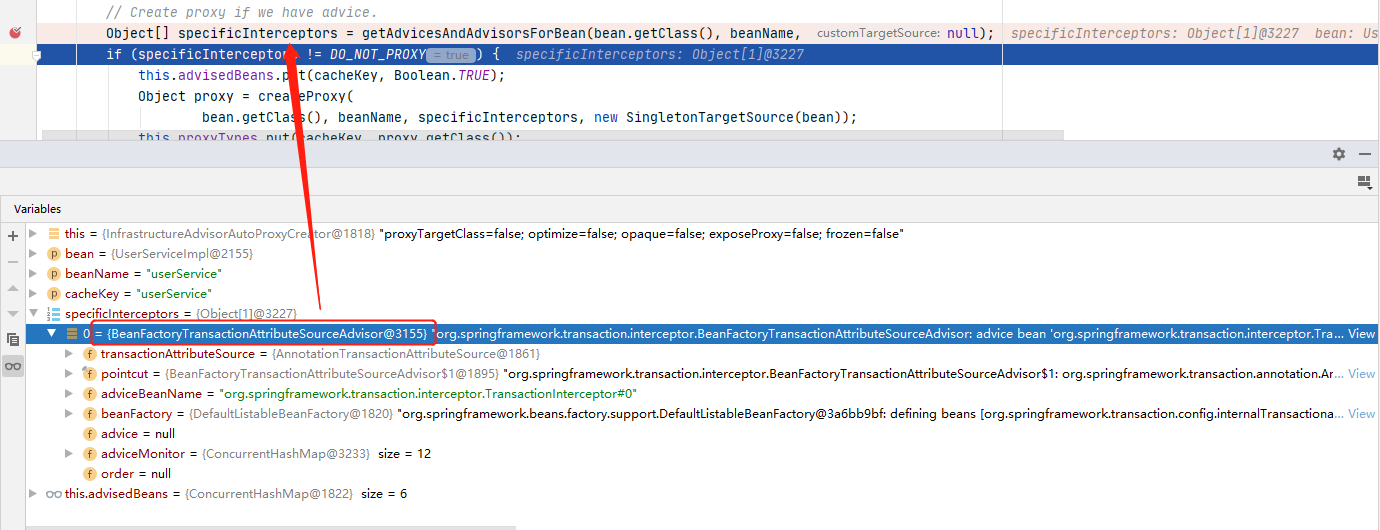
可以看到 specificInterceptors返回了 BeanFactoryTransactionAttributeSourceAdvisor,这就是我们开启事务注册的类,到这里是不是对这个类已经很眼熟了,这就是支持事务的 Bean的 advisor。
创建代理就不说了,跟普通的Aop没啥区别,可以翻翻之前的文章。代理创建完成后,我们就可以说我们是拥有了支持事务的业务代理类。
Spring是如何实现事务成功提交、异常回滚的
经过前面两节,我们首先开启了事务支持,随后我们针对性的对需要事务支持的类进行了代理,获取了具有事务能力的业务代理类。
那还剩下一个问题,这个代理类是如何执行的?
在前面Aop源码分析系列的文章中,我们知道,Aop的核心就是在调用业务方法前将其转发到拦截器上,具体来说如果是JDK动态代理就转发到 InvocationHandler#invoke()方法上。如果是CGLIB动态代理,那么就会转发到 MethodInterceptor#invoke()方法上。
从Spring是如何为需要事务支持的类生成代理的这一节我们知道,事务最终返回的 specificInterceptors是 BeanFactoryTransactionAttributeSourceAdvisor, BeanFactoryTransactionAttributeSourceAdvisor其中的 adviceBeanName是 TransactionInterceptor,Aop的逻辑会在代理类执行时调用 advisor里面的 advice,所以这里的 advice就是 TransactionInterceptor。如果没有意外,这个 TransactionInterceptor会有一个 invoke()方法,调用业务方法的时候会转发到这个方法上。
先来看个执行调用关系图。
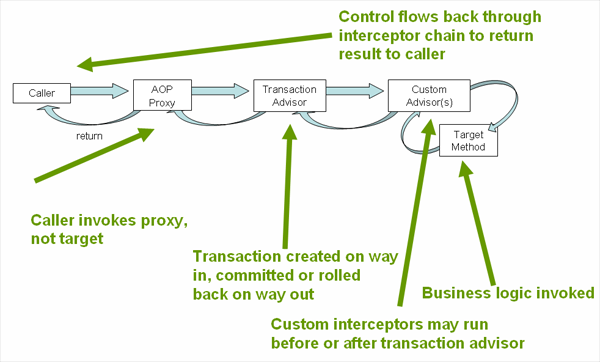
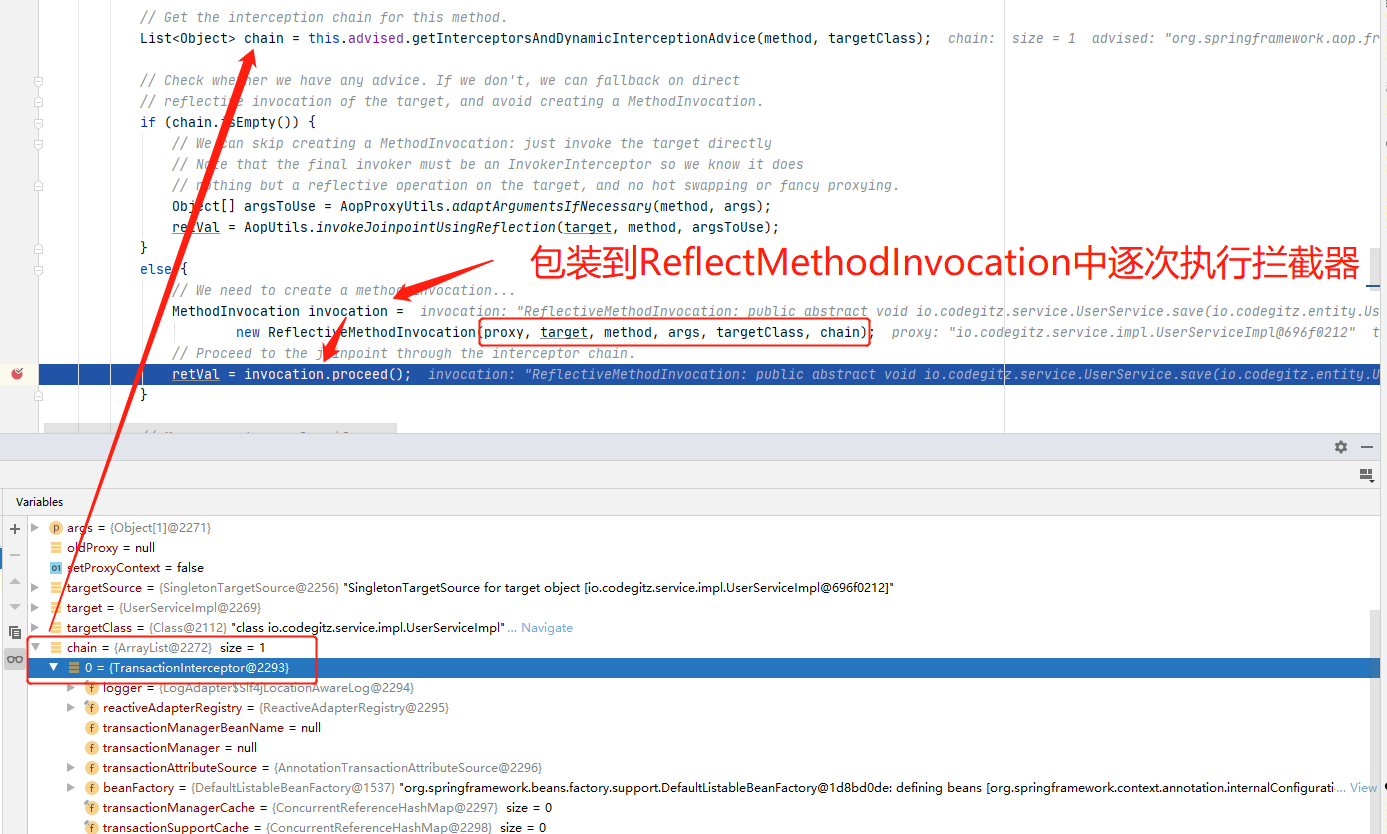
由于这里实现了接口,这里生成的是JDK动态代理,这里会进入到 JdkDynamicAopProxy#invoke()方法里,在这里获取当前类的所有 advice,这里只会获取到 TransactionInterceptor。然后所有的拦截器链会被封装到 ReflectiveMethodInvocation逐次执行。由于这里只有一个 TransactionInterceptor,那么在 invocation.proceed()方法执行的时候,会执行执行 TransactionInterceptor的 invoke()方法。
跟进 TransactionInterceptor源码,这里的具体实现委托给了父类 TransactionAspectSupport#invokeWithinTransaction()。这个方法实现了事务的所有细节操作,包括声明式事务和编程式事务处理、何时创建事务、什么情况下异常回滚以及什么时候正常提交等。这些所有细节会在下一篇中详细分析。

查看 TransactionAspectSupport#invokeWithinTransaction()源码,因为这个类细节很多,贴出了所有代码并且附上了注释,这里不再展示debug过程。
    /**
     * General delegate for around-advice-based subclasses, delegating to several other template
     * methods on this class. Able to handle {@link CallbackPreferringPlatformTransactionManager}
     * as well as regular {@link PlatformTransactionManager} implementations.
     * @param method the Method being invoked
     * @param targetClass the target class that we're invoking the method on
     * @param invocation the callback to use for proceeding with the target invocation
     * @return the return value of the method, if any
     * @throws Throwable propagated from the target invocation
     */
    @Nullable
    protected Object invokeWithinTransaction(Method method, @Nullable Class targetClass,
            final InvocationCallback invocation) throws Throwable {

        if (this.reactiveAdapterRegistry != null) {
            if (KotlinDetector.isKotlinType(method.getDeclaringClass()) && KotlinDelegate.isSuspend(method)) {
                throw new TransactionUsageException("Unsupported annotated transaction on suspending function detected: "
                        + method + ". Use TransactionalOperator.transactional extensions instead.");
            }
            ReactiveAdapter adapter = this.reactiveAdapterRegistry.getAdapter(method.getReturnType());
            if (adapter != null) {
                return new ReactiveTransactionSupport(adapter).invokeWithinTransaction(method, targetClass, invocation);
            }
        }

        // If the transaction attribute is null, the method is non-transactional.
        TransactionAttributeSource tas = getTransactionAttributeSource();
        // 获取对应事务属性
        final TransactionAttribute txAttr = (tas != null ? tas.getTransactionAttribute(method, targetClass) : null);
        // 获取 beanFactory 中的 transactionManager
        final PlatformTransactionManager tm = determineTransactionManager(txAttr);
        // 构造唯一标识 -> 类.方法 io.codegitz.UserServiceImpl.save
        final String joinpointIdentification = methodIdentification(method, targetClass, txAttr);

        // 声明式事务处理
        if (txAttr == null || !(tm instanceof CallbackPreferringPlatformTransactionManager)) {
            // Standard transaction demarcation with getTransaction and commit/rollback calls.
            // 创建TransactionInfo
            TransactionInfo txInfo = createTransactionIfNecessary(tm, txAttr, joinpointIdentification);

            Object retVal;
            try {
                // This is an around advice: Invoke the next interceptor in the chain.
                // This will normally result in a target object being invoked.
                // 这是一个 around advice:调用链中的下一个拦截器。这通常会导致调用目标对象。
                // 执行增强方法
                retVal = invocation.proceedWithInvocation();
            }
            catch (Throwable ex) {
                // target invocation exception
                // 回滚处理
                completeTransactionAfterThrowing(txInfo, ex);
                throw ex;
            }
            finally {
                cleanupTransactionInfo(txInfo);
            }

            if (vavrPresent && VavrDelegate.isVavrTry(retVal)) {
                // Set rollback-only in case of Vavr failure matching our rollback rules...
                TransactionStatus status = txInfo.getTransactionStatus();
                if (status != null && txAttr != null) {
                    retVal = VavrDelegate.evaluateTryFailure(retVal, txAttr, status);
                }
            }

            // 提交事务
            commitTransactionAfterReturning(txInfo);
            return retVal;
        }

        else {
            // 编程式事务处理
            final ThrowableHolder throwableHolder = new ThrowableHolder();

            // It's a CallbackPreferringPlatformTransactionManager: pass a TransactionCallback in.
            try {
                Object result = ((CallbackPreferringPlatformTransactionManager) tm).execute(txAttr, status -> {
                    TransactionInfo txInfo = prepareTransactionInfo(tm, txAttr, joinpointIdentification, status);
                    try {
                        Object retVal = invocation.proceedWithInvocation();
                        if (vavrPresent && VavrDelegate.isVavrTry(retVal)) {
                            // Set rollback-only in case of Vavr failure matching our rollback rules...
                            retVal = VavrDelegate.evaluateTryFailure(retVal, txAttr, status);
                        }
                        return retVal;
                    }
                    catch (Throwable ex) {
                        if (txAttr.rollbackOn(ex)) {
                            // A RuntimeException: will lead to a rollback.
                            if (ex instanceof RuntimeException) {
                                throw (RuntimeException) ex;
                            }
                            else {
                                throw new ThrowableHolderException(ex);
                            }
                        }
                        else {
                            // A normal return value: will lead to a commit.
                            throwableHolder.throwable = ex;
                            return null;
                        }
                    }
                    finally {
                        cleanupTransactionInfo(txInfo);
                    }
                });

                // Check result state: It might indicate a Throwable to rethrow.
                if (throwableHolder.throwable != null) {
                    throw throwableHolder.throwable;
                }
                return result;
            }
            catch (ThrowableHolderException ex) {
                throw ex.getCause();
            }
            catch (TransactionSystemException ex2) {
                if (throwableHolder.throwable != null) {
                    logger.error("Application exception overridden by commit exception", throwableHolder.throwable);
                    ex2.initApplicationException(throwableHolder.throwable);
                }
                throw ex2;
            }
            catch (Throwable ex2) {
                if (throwableHolder.throwable != null) {
                    logger.error("Application exception overridden by commit exception", throwableHolder.throwable);
                }
                throw ex2;
            }
        }
    }
代码虽长,但是核心的逻辑很简单,对于声明式事务而言,也就是我们 xml或者注解生效的事务使用方式,主要做了三步:
- 获取事务属性
TransactionAttribute - 根据属性创建事务或者使用原有嵌套事务
createTransactionIfNecessary() - 执行业务类方法
invocation.proceedWithInvocation() - 如果没有异常或者不是敏感的异常就提交事务
commitTransactionAfterReturning(txInfo) - 如果发生异常则进行回滚
completeTransactionAfterThrowing(txInfo, ex) - 所有操作完成后,都进行事务信息的清理
cleanupTransactionInfo(txInfo)
编程式事务也是类似的逻辑,这里不再赘述。
总的来说事务逻辑部分就以上分析的点,只不过细节很多,还需要去关注,这些所有细节会在下一篇中详细分析。
总结
这篇主要从三个问题导入
- 我们是如何开始框架的事务支持的
- 我们如何为需要事务支持的代理类获取合适的
advisor,如何创建出代理类 - 我们获取的代理类是如何执行的,代理类是如何实现了事务成功提交、异常回滚的执行框架的
从以上三点还是比较清晰地了解到本文所讨论的点,带着问题捋清楚思路去看,还是很简单的。但是最后一个点并没有详细分析,因为这里也涉及了大量的代码分析,这会留到下一篇去说,不然篇幅太长,写这累看着也累(可能根本没什么人看,哈哈)。
今天是二月的最后一天,抓着时间的尾巴,写完了这一篇。只是没想到2022年的2月都已经结束了,逝者如斯夫,不舍昼夜。
水平有限,如有错漏,还请指出。
如果有人看到这里,那在这里老话重提。 与君共勉,路漫漫其修远兮,吾将上下而求索。
Original: https://www.cnblogs.com/codegitz/p/15947659.html
Author: Codegitz
Title: 老生常谈系列之Aop–Aop的经典应用之Spring的事务实现分析(二)
原创文章受到原创版权保护。转载请注明出处:https://www.johngo689.com/714764/
转载文章受原作者版权保护。转载请注明原作者出处!