

本文主要介绍如何运用开源Yolov5模型,结合自己的数据,训练其他目标检测模型。
基础准备工作:
- anaconda
- 适用Yolov5的虚拟环境


本次用的环境:
- python==3.7
- pytorch==1.7.1
- torchvision==0.8.2
- torchaudio==0.7.0
- cudatoolkit==10.2
环境配置好后运行测试代码:
import torch

GPU
device = torch.device("cuda:0" if torch.cuda.is_available() else "cpu")

Model
model = torch.hub.load('D:/work/git-example/yolov5-master', 'yolov5s', source='local')  # or yolov5m, yolov5l, yolov5x, custom
model = model.to(device)
Images
img = './data/images/zidane.jpg'  # or file, Path, PIL, OpenCV, numpy, list

Inference
results = model(img)

Results
results.print()  # or .show(), .save(), .crop(), .pandas(), etc.
其中torch.hub.load通过source=’local’来判断是在本地还是在git上加载yolov5s.pt模型,为了避免网速问题,可以提前下载yolov5s.pt模型,放在本地yolov5-master文件夹下,然后制定source为local进行模型加载。
result.print()可以将模型中识别出的目标物类别进行输出,如果要获取到这个变量,需要修改models/common.py文件中Detections/display()方法,将类别return一下就可以获取了。
环境配好后再说训练自己的模型:
数据准备
对图片进行打标工作,这里使用labelimg,直接使用python的pip安装即可
pip install labelimg
安装成功后在终端中输入labelimg启动打标工具。
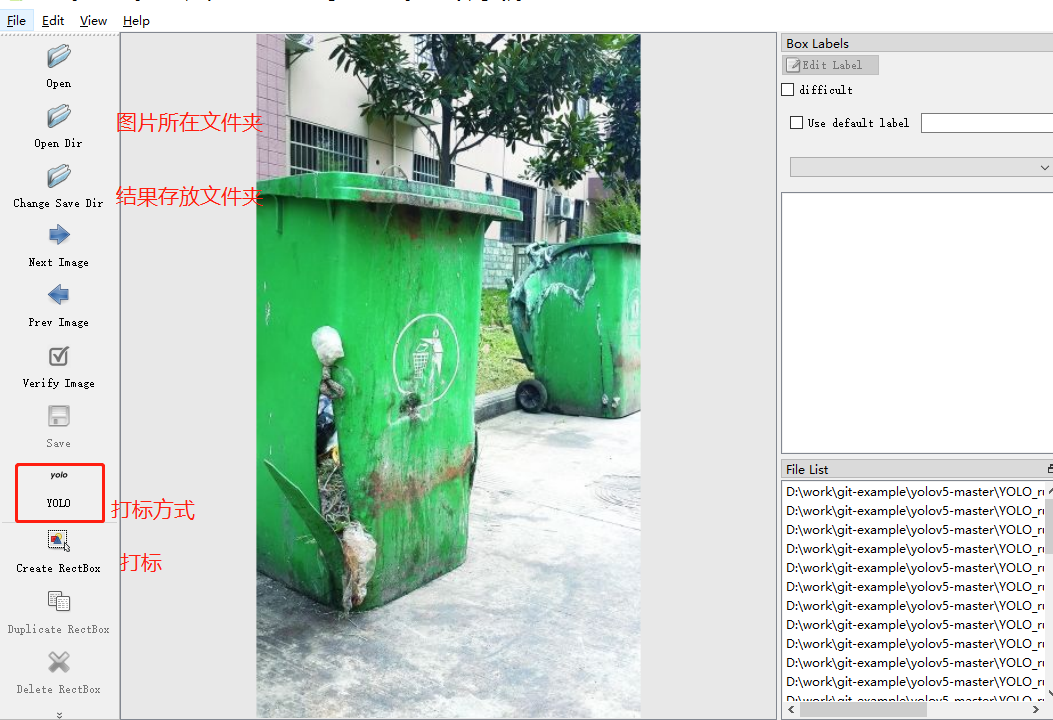
Yolo有自己要求的数据标注格式,但是我们打标的时候一般采取VOC格式,这样方便数据可以给其他模型使用,VOC到yolo格式需要经过一些转换。
voc格式如下所示,是一个xml文件
    train
    暴露垃圾_2.jpg
    D:\work\git-example\yolov5-master\YOLO_rubbish\images\train\暴露垃圾_2.jpg

        Unknown

        650
        867
        3

    0

        rubbish
        Unspecified
        0
        0

            235
            410
            408
            631
yolo格式如下所示,分别对应xmin xmax ymin ymax坐标值
0 0.503846 0.603806 0.287692 0.261822
采用如下代码对voc格式的标注进行转换
import xml.etree.ElementTree as ET
import os
from os import listdir, getcwd

sets = ['train', 'test', 'val']

classes = ["rubbish"]

def convert(size, box):
    dw = 1. / size[0]
    dh = 1. / size[1]
    x = (box[0] + box[1]) / 2.0
    y = (box[2] + box[3]) / 2.0
    w = box[1] - box[0]
    h = box[3] - box[2]
    x = x * dw
    w = w * dw
    y = y * dh
    h = h * dh
    return (x, y, w, h)

def convert_annotation(image_id):
    try:
        in_file = open('./YOLO_rubbish/labels/%s.xml' % (image_id), 'r', encoding='utf-8')
    except:
        return
    out_file = open('./YOLO_rubbish/labels-yolo2/%s.txt' % (image_id), 'w')
    tree = ET.parse(in_file)
    root = tree.getroot()
    size = root.find('size')
    w = int(size.find('width').text)
    h = int(size.find('height').text)

    for obj in root.iter('object'):
        difficult = obj.find('difficult').text
        cls = obj.find('name').text
        if cls not in classes or int(difficult) == 1:
            continue
        cls_id = classes.index(cls)
        xmlbox = obj.find('bndbox')
        b = (float(xmlbox.find('xmin').text), float(xmlbox.find('xmax').text), float(xmlbox.find('ymin').text),
             float(xmlbox.find('ymax').text))
        bb = convert((w, h), b)
        out_file.write(str(cls_id) + " " + " ".join([str(a) for a in bb]) + '\n')
每一个voc对应的xml文件调用convert_annotation方法即可完成对应yolo的转换。
代码准备
标注工作完成后,就是对代码进行修改以适应自己数据的步骤了,新建数据文件夹,文件夹结构如下所示:
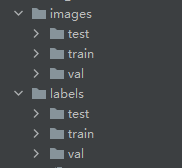
images中放训练图片,labels中放对应的标注数据(labels文件夹名字不可变,且要放在和images同级的地方,程序会自动去找,名字变了就找不到了。。。。要改这个地方就要改源码,还是遵照这个默认的规则吧。。。)
新建数据路径yaml配置文件,我这里在./data下建了一个rubbish_data.yaml文件
YOLOv5 🚀 by Ultralytics, GPL-3.0 license
COCO 2017 dataset http://cocodataset.org by Microsoft
Example usage: python train.py --data coco.yaml
parent
├── yolov5
└── datasets
└── coco ← downloads here
Train/val/test sets as 1) dir: path/to/imgs, 2) file: path/to/imgs.txt, or 3) list: [path/to/imgs1, path/to/imgs2, ..]
#path: D:/work/git-example/yolov5-master/YOLO_rubbish # dataset root dir
train: ./YOLO_rubbish/images/train # train images (relative to 'path') 118287 images
val: ./YOLO_rubbish/images/val # val images (relative to 'path') 5000 images
test: ./YOLO_rubbish/images/test # 20288 of 40670 images, submit to https://competitions.codalab.org/competitions/20794
Classes
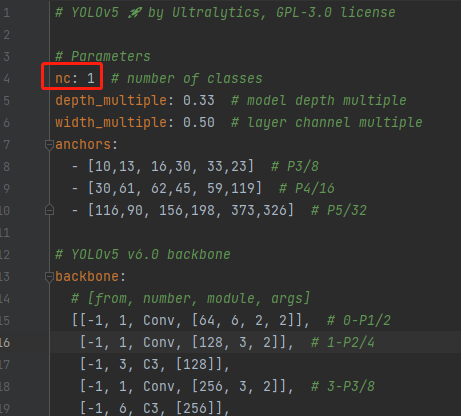
nc: 1 # number of classes
names: ['rubbish'] # class names
其中nc表示检测类别种数,names表示类别名称,train/val/test表示训练数据图片所在的路径(上面images下的路径)
新建yaml配置文件,在./models下建了个rubbish.yaml文件,文件内容复制yolo5s.yaml就行,主要修改其中的nc值
训练
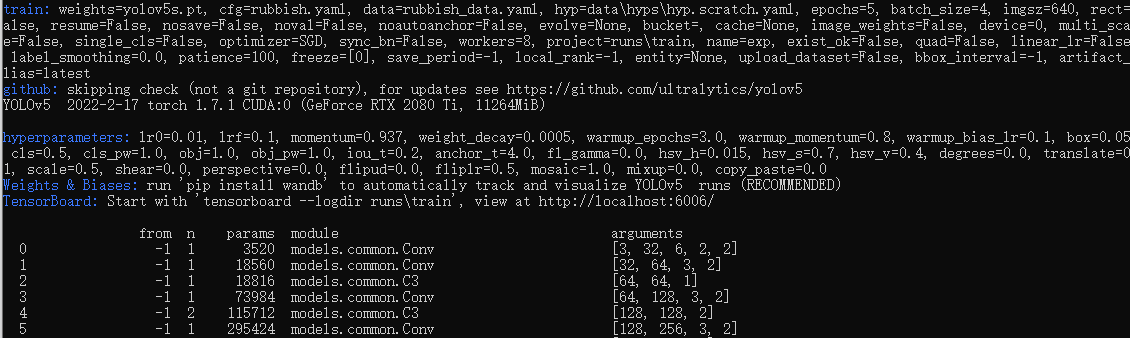
一切准备就绪,运行下面脚本开始训练
>python train.py --data rubbish_data.yaml --cfg rubbish.yaml --weights yolov5s.pt --epoch 100 --batch-size 16 --device 0
yaml文件路径均是上面新建的路径,device为0表示使用的是GPU
训练会出现很多信息,大概不报错就行
最后结果在这个文件夹下

模型应用
在./runs/train/exp中得到的模型结果包含信息很多,我们最后训练出的模型为weights下面的best.pt文件,直接加载这个模型文件即可用自己训练的模型对图片完成目标检测工作。
python detect.py --weights ./runs/train/exp/weights/best.pt --source ./YOLO_rubbish/dblj_0.jpg --device 0
Original: https://blog.csdn.net/ylclaire_01/article/details/123082666
Author: ylclaire_01
Title: 使用Yolov5训练自己的模型
原创文章受到原创版权保护。转载请注明出处:https://www.johngo689.com/710506/
转载文章受原作者版权保护。转载请注明原作者出处!