

这是一个联邦学习教程系列。
笔者在安装CUDA过程中走了很多弯路,实验室服务器又不靠谱,故还是自己电脑上搭载CUDA最方便
一切安装以conda为主,不建议用pip安装
pip添加清华镜像源
pip config set global.index-url https://pypi.tuna.tsinghua.edu.cn/simple
1.安装anaconda3,直接去官网下载最新的
为conda添加源
conda config --add channels http://mirrors.tuna.tsinghua.edu.cn/anaconda/pkgs/free/
conda config --add channels http://mirrors.tuna.tsinghua.edu.cn/anaconda/pkgs/main/
conda config --add channels http://mirrors.tuna.tsinghua.edu.cn/anaconda/cloud/pytorch/
conda config --add channels http://mirrors.tuna.tsinghua.edu.cn/anaconda/cloud/conda-forge/
conda config --set show_channel_urls yes
如果有遇见源报错就删除源
conda config --remove-key channels
2.进入anaconda3在的虚拟环境
cd /anaconda3/envs
3.创建虚拟环境
conda create -n syft python=3.7
#删除conda 里的虚拟环境
conda remove -n your_env_name --all

建议用第一个
conda install pytorch==1.4.0 torchvision==0.5.0 cpuonly -c pytorch
​
pip install torch==1.4.0+cpu torchvision==0.5.0+cpu -f https://download.pytorch.org/whl/torch_stable.html  -i   https://pypi.tuna.tsinghua.edu.cn/simple

​
#带gpu的

CUDA 9.2
conda install pytorch==1.4.0 torchvision==0.5.0 cudatoolkit=9.2 -c pytorch

CUDA 10.1
conda install pytorch==1.4.0 torchvision==0.5.0 cudatoolkit=10.1 -c pytorch
下载cuda和cudnn:
首先在英伟达控制面板-》帮助》系统信息里面查看你对应的CUDA版本

电脑上显示需要11.4.1的驱动咱们就去官网上下载CUDA11.4.1的驱动,一切以电脑需要的驱动为准,和pytorch版本无关。
安装教程参考如下:
https://blog.csdn.net/jhsignal/article/details/111401628 ![]() https://blog.csdn.net/jhsignal/article/details/111401628 ;若cuDNN官网不好下载就到清华源上下载,链接如下:
https://blog.csdn.net/jhsignal/article/details/111401628 ;若cuDNN官网不好下载就到清华源上下载,链接如下:
下面是安装syft
​pip install syft==0.2.5

​
6.下载ipykernel是为了方便jupter notebook里面搭载虚拟环境
conda install ipykernel
7.最后一步,大功告成
python -m ipykernel install --name <自己取名字可与虚拟环境名字一致>
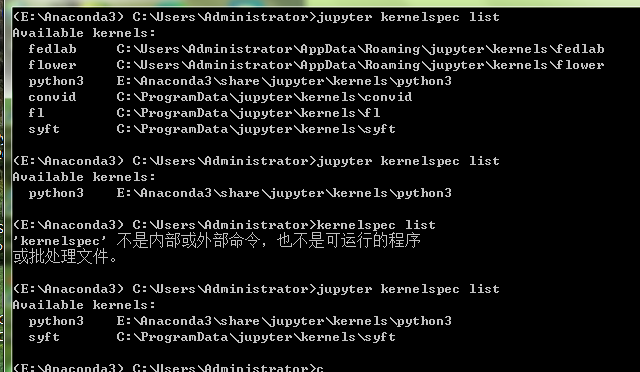
#查看创建的内核环境
jupyter kernelspec list
删除内核环境名称
jupyter kernelspec remove your-ipkernel_name
</自己取名字可与虚拟环境名字一致>
8.查看你创建了几个
jupyter kernelspec list
9.更改jupyter notebook 的默认路径

10

Original: https://blog.csdn.net/ylycrp/article/details/122460905
Author: 抹茶生活
Title: jupyter note book ipkernel 安装教程
原创文章受到原创版权保护。转载请注明出处:https://www.johngo689.com/708884/
转载文章受原作者版权保护。转载请注明原作者出处!