

可参考博客
Pytorch可视化模型任意中间层的类激活热力图(Grad-CAM)_潜行隐耀的博客-CSDN博客_pytorch热力图
Pytorch输出网络中间层特征可视化_Joker-Tong的博客-CSDN博客_输出网络中间特征图
keras可视化中间层特征_joyce_peng的博客-CSDN博客_中间层特征可视化
图像处理特征可视化方法总结(特征图、卷积核、类可视化CAM)
神经网络之特征图可视化_AI bro的博客-CSDN博客_特征图的可视化
PyTorch模型训练特征图可视化(TensorboardX) – 知乎
PyTorch下的可视化工具 – 知乎 (zhihu.com)
图像特征可视化方法总结
(1)特征图可视化
特征图可视化有两类方法,一类是直接将某一层的feature map映射到0-255的范围,变成图像。另一类是使用一个预训练的反卷积网络(反卷积、反池化)将feature map变成图像,从而达到可视化feature map的目的。
(2)卷积核可视化
卷积的过程就是特征提取的过程,每一个卷积核代表着一种特征。如果图像中某块区域与某个卷积核的结果越大,那么该区域就越”像”该卷积核。基于以上的推论,如果我们找到一张图像,能够使得这张图像对某个卷积核的输出最大,那么我们就说找到了该卷积核最感兴趣的图像。
(3)类别激活可视化(Class Activation Mapping,CAM)
CAM(Class Activation Mapping,类别激活映射图),亦称为类别热力图或显著性图。它的大小与原图一致,像素值表示原始图片的对应区域对预测输出的影响程度,值越大贡献越大。目前常用的CAM系列包括:CAM、Grad-CAM、Grad-CAM++。
(4)注意力特征可视化
与CAM类似,只不过每个特征图所占权重来自于注意力,而不是最后层的全连接,基于注意力的特征可视化方法近年有比较多的研究。
(5)一些技术工具
tensorflow框架提供了模型和特征可视化的工具tensorboard,可使用pytorch框架引入。
tfrom torch.utils.tensorboard import SummaryWriter
更多使用细节参考PyTorch模型训练特征图可视化(TensorboardX) – 知乎
github代码
- Gradient visualization with vanilla backpropagation
- Gradient visualization with guided backpropagation [1]
- Gradient visualization with saliency maps [4]
- Gradient-weighted class activation mapping [3] (Generalization of [2])
- Guided, gradient-weighted class activation mapping [3]
- Score-weighted class activation mapping [15] (Gradient-free generalization of [2])
- Element-wise gradient-weighted class activation mapping [16]
- Smooth grad [8]
- CNN filter visualization [9]
- Inverted image representations [5]
- Deep dream [10]
- Class specific image generation [4] [14]
- Grad times image [12]
- Integrated gradients [13]
- Layerwise relevance propagation [17]

下载包:
python >= 3.6

Stable release
You can install the last stable release of the package using pypi as follows:
pip install torchcam

or using conda:
conda install -c frgfm torchcam

Developer installation
Alternatively, if you wish to use the latest features of the project that haven't made their way to a release yet, you can install the package from source:
git clone https://github.com/frgfm/torch-cam.git
pip install -e torch-cam/.
使用:
CAM
Learning Deep Features for Discriminative Localization: the original CAM paper
https://arxiv.org/abs/1512.04150

from torchvision.models import resnet18
from torchcam.cams import CAM
model = resnet18(pretrained=True).eval()
cam = CAM(model, 'layer4', 'fc')
with torch.no_grad(): out = model(input_tensor)
cam(class_idx=100)

#Please note that by default, the layer at which the CAM is retrieved is set to the last non-reduced convolutional layer. If you wish to investigate a specific layer, use the target_layer argument in the constructor.

ScoreCAM
paper:Score-CAM:Score-Weighted Visual Explanations for Convolutional Neural Networks
https://arxiv.org/pdf/1910.01279.pdf

from torchvision.models import resnet18
from torchcam.cams import ScoreCAM
model = resnet18(pretrained=True).eval()
cam = ScoreCAM(model, 'layer4', 'fc')
with torch.no_grad(): out = model(input_tensor)
cam(class_idx=100)

SSCAM
paper:SS-CAM: Smoothed Score-CAM for Sharper Visual Feature Localization
https://arxiv.org/pdf/2006.14255.pdf

from torchvision.models import resnet18
from torchcam.cams import SSCAM
model = resnet18(pretrained=True).eval()
cam = SSCAM(model, 'layer4', 'fc')
with torch.no_grad(): out = model(input_tensor)
cam(class_idx=100)

ISCAM
paper:IS-CAM: Integrated Score-CAM for axiomatic-based explanations
https://arxiv.org/pdf/2010.03023.pdf

from torchvision.models import resnet18
from torchcam.cams import ISCAM
model = resnet18(pretrained=True).eval()
cam = ISCAM(model, 'layer4', 'fc')
with torch.no_grad(): out = model(input_tensor)
cam(class_idx=100)

GradCAM
paper:Grad-CAM: Visual Explanations from Deep Networks via Gradient-based Localization
https://arxiv.org/pdf/1610.02391.pdf

from torchvision.models import resnet18
from torchcam.cams import GradCAM
model = resnet18(pretrained=True).eval()
cam = GradCAM(model, 'layer4')
scores = model(input_tensor)
cam(class_idx=100, scores=scores)

Grad-CAM++
paper:Grad-CAM++: Improved Visual Explanations for Deep Convolutional Networks
https://arxiv.org/pdf/1710.11063.pdf

from torchvision.models import resnet18
from torchcam.cams import  GradCAMpp
model = resnet18(pretrained=True).eval()
cam =  GradCAMpp(model, 'layer4')
scores = model(input_tensor)
cam(class_idx=100, scores=scores)

Smooth Grad-CAM++
paper:Smooth Grad-CAM++: An Enhanced Inference Level Visualization Technique for Deep Convolutional Neural Network Models
https://arxiv.org/pdf/1908.01224.pdf

from torchvision.models import resnet18
from torchcam.cams import SmoothGradCAMpp
model = resnet18(pretrained=True).eval()
cam = SmoothGradCAMpp(model, 'layer4')
scores = model(input_tensor)
cam(class_idx=100, scores=scores)

XGradCAM
paper:Axiom-based Grad-CAM: Towards Accurate Visualization and Explanation of CNNs
https://arxiv.org/pdf/2008.02312.pdf

from torchvision.models import resnet18
from torchcam.cams import XGradCAM
model = resnet18(pretrained=True).eval()
cam = XGradCAM(model, 'layer4')
scores = model(input_tensor)
cam(class_idx=100, scores=scores)

LayerCAM
paper:LayerCAM: Exploring Hierarchical Class Activation Maps for Localization
http://mmcheng.net/mftp/Papers/21TIP_LayerCAM.pdf

from torchvision.models import resnet18
from torchcam.cams import LayerCAM
model = resnet18(pretrained=True).eval()
cam = LayerCAM(model, 'layer4')
scores = model(input_tensor)
cam(class_idx=100, scores=scores)

Retrieving the class activation map
Once your CAM extractor is set, you only need to use your model to infer on your data as usual. If any additional information is required, the extractor will get it for you automatically.

from torchvision.io.image import read_image
from torchvision.transforms.functional import normalize, resize, to_pil_image
from torchvision.models import resnet18
from torchcam.cams import SmoothGradCAMpp

model = resnet18(pretrained=True).eval()
cam_extractor = SmoothGradCAMpp(model)
Get your input
img = read_image("path/to/your/image.png")
Preprocess it for your chosen model
input_tensor = normalize(resize(img, (224, 224)) / 255., [0.485, 0.456, 0.406], [0.229, 0.224, 0.225])

Preprocess your data and feed it to the model
out = model(input_tensor.unsqueeze(0))
Retrieve the CAM by passing the class index and the model output
activation_map = cam_extractor(out.squeeze(0).argmax().item(), out)

If you want to visualize your heatmap, you only need to cast the CAM to a numpy ndarray:

import matplotlib.pyplot as plt
Visualize the raw CAM
plt.imshow(activation_map.numpy()); plt.axis('off'); plt.tight_layout(); plt.show()

Or if you wish to overlay it on your input image:

import matplotlib.pyplot as plt
from torchcam.utils import overlay_mask

Resize the CAM and overlay it
result = overlay_mask(to_pil_image(img), to_pil_image(activation_map, mode='F'), alpha=0.5)
Display it
plt.imshow(result); plt.axis('off'); plt.tight_layout(); plt.show()
可视化heatmap或者叠加原图:
Retrieving the class activation map
Once your CAM extractor is set, you only need to use your model to infer on your data as usual. If any additional information is required, the extractor will get it for you automatically.

from torchvision.io.image import read_image
from torchvision.transforms.functional import normalize, resize, to_pil_image
from torchvision.models import resnet18
from torchcam.cams import SmoothGradCAMpp

model = resnet18(pretrained=True).eval()
cam_extractor = SmoothGradCAMpp(model)
Get your input
img = read_image("path/to/your/image.png")
Preprocess it for your chosen model
input_tensor = normalize(resize(img, (224, 224)) / 255., [0.485, 0.456, 0.406], [0.229, 0.224, 0.225])

Preprocess your data and feed it to the model
out = model(input_tensor.unsqueeze(0))
Retrieve the CAM by passing the class index and the model output
activation_map = cam_extractor(out.squeeze(0).argmax().item(), out)

If you want to visualize your heatmap, you only need to cast the CAM to a numpy ndarray:

import matplotlib.pyplot as plt
Visualize the raw CAM
plt.imshow(activation_map.numpy()); plt.axis('off'); plt.tight_layout(); plt.show()

Or if you wish to overlay it on your input image:

import matplotlib.pyplot as plt
from torchcam.utils import overlay_mask
Resize the CAM and overlay it
result = overlay_mask(to_pil_image(img), to_pil_image(activation_map, mode='F'), alpha=0.5)
Display it
plt.imshow(result); plt.axis('off'); plt.tight_layout(); plt.show()
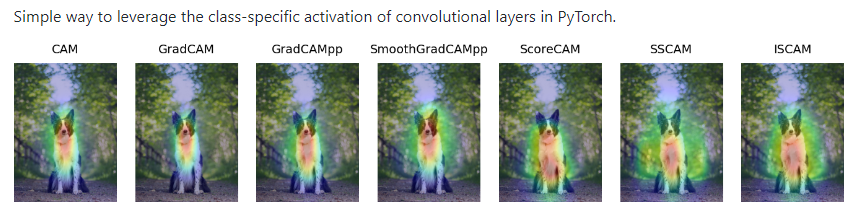
CAM Zoo:
This project is developed and maintained by the repo owner, but the implementation was based on the following research papers:
- Learning Deep Features for Discriminative Localization: the original CAM paper
-
Grad-CAM: GradCAM paper, generalizing CAM to models without global average pooling.
-
Grad-CAM++: improvement of GradCAM++ for more accurate pixel-level contribution to the activation.
-
Smooth Grad-CAM++: SmoothGrad mechanism coupled with GradCAM.
-
Score-CAM: score-weighting of class activation for better interpretability.
-
SS-CAM: SmoothGrad mechanism coupled with Score-CAM.
-
IS-CAM: integration-based variant of Score-CAM.
-
XGrad-CAM: improved version of Grad-CAM in terms of sensitivity and conservation.
-
Layer-CAM: Grad-CAM alternative leveraging pixel-wise contribution of the gradient to the activation.
Original: https://blog.csdn.net/m0_61899108/article/details/127340090
Author: m0_61899108
Title: pytorch 神经网络特征可视化
原创文章受到原创版权保护。转载请注明出处:https://www.johngo689.com/706481/
转载文章受原作者版权保护。转载请注明原作者出处!