

Realsense SDK2.0 +C++
rs-hello-realsense
rs-hello-realsense示例演示了 连接到英特尔实感设备以及通过打印到摄像头视野中心物体的距离来利用深度数据的基础知识。
假设相机已连接,您应该看到线路不断更新。X是相机视野中心物体的距离(以米为单位)。
除高级功能外,所有功能都通过单个标头提供:
#include // Include Intel RealSense Cross Platform API
接下来,我们 创建并启动实感管道。管道是控制相机枚举和流式处理的主要高级基元。
// Create a Pipeline - this serves as a top-level API for streaming and processing frames
rs2::pipeline p;

// Configure and start the pipeline
p.start();
配置管道后,我们可以循环等待新帧。
英特尔实感摄像头通常提供多个视频、动作或姿势流。
函数将阻塞,直到来自各种配置流的下一组连贯帧。 wait_for_frames
// Block program until frames arrive
rs2::frameset frames = p.wait_for_frames();
要从深度数据流中获取第一帧,您可以使用帮助程序函数: get_depth_frame
// Try to get a frame of a depth image
rs2::depth_frame depth = frames.get_depth_frame();
接下来,我们 查询默认的深度框架尺寸(这些尺寸可能因传感器而异):
// Get the depth frame's dimensions
float width = depth.get_width();
float height = depth.get_height();
要获取特定像素(帧中心)的距离,您可以使用函数: get_distance
// Query the distance from the camera to the object in the center of the image
float dist_to_center = depth.get_distance(width / 2, height / 2);
剩下的唯一事情就是打印到屏幕的结果距离:
// Print the distance
std::cout << "The camera is facing an object " << dist_to_center << " meters away \r";
rs-imshow
该示例将打开一个 OpenCV UI 窗口,并向其呈现彩色深度流:
// Query frame size (width and height)
const int w = depth.as<rs2::video_frame>().get_width();
const int h = depth.as<rs2::video_frame>().get_height();

// Create OpenCV matrix of size (w,h) from the colorized depth data
Mat image(Size(w, h), CV_8UC3, (void*)depth.get_data(), Mat::AUTO_STEP);</rs2::video_frame></rs2::video_frame>
rs-capture
将 深度和RGB数据流式传输和渲染到屏幕


除高级功能外,所有功能都通过单个标头提供:
#include // Include RealSense Cross Platform API
接下来,我们包括一个非常短的帮助器库来封装OpenGL渲染和窗口管理:
#include "example.hpp" // Include a short list of convenience functions for rendering
此标题让我们可以轻松打开一个新窗口并准备用于渲染的纹理。
纹理类旨在保存视频帧数据以进行渲染。
// Create a simple OpenGL window for rendering:
window app(1280, 720, "RealSense Capture Example");
// Declare two textures on the GPU, one for depth and one for color
texture depth_image, color_image;
深度数据通常以12位灰度提供,这对于可视化不是很有用。
为了增强可视化效果,我们提供了一个将灰度图像转换为 RGB 的 API:
// Declare depth colorizer for enhanced color visualization of depth data
rs2::colorizer color_map;
SDK API 入口点是管道类:
// Declare the RealSense pipeline, encapsulating the actual device and sensors
rs2::pipeline pipe;
// Start streaming with the default recommended configuration
pipe.start();
接下来,我们等待下一组帧,有效地阻止了程序:
rs2::frameset data = pipe.wait_for_frames(); // Wait for next set of frames from the camera
使用对象,我们找到集合中的第一个深度帧和第一个颜色帧: frameset
rs2::frame depth = color_map(data.get_depth_frame()); // Find and colorize the depth data
rs2::frame color = data.get_color_frame();            // Find the color data
最后,深度和色彩渲染由 example.hpp 中的纹理类实现。
// Render depth on to the first half of the screen and color on to the second
depth_image.render(depth, { 0,               0, app.width() / 2, app.height() });
color_image.render(color, { app.width() / 2, 0, app.width() / 2, app.height() });
rs-depth
GitHub 上的源代码 ( 代码太长了,我只能慢慢啃)
#include <librealsense2 rs.h>
#include <librealsense2 h rs_pipeline.h>
#include <librealsense2 h rs_option.h>
#include <librealsense2 h rs_frame.h>
#include "example.h"

#include <stdlib.h>
#include <stdint.h>
#include <stdio.h>

//                                     These parameters are reconfigurable                                        //

#define STREAM          RS2_STREAM_DEPTH  // rs2_stream is a types of data provided by RealSense device           //

#define FORMAT          RS2_FORMAT_Z16    // rs2_format identifies how binary data is encoded within a frame      //

#define WIDTH           640               // Defines the number of columns for each frame or zero for auto resolve//

#define HEIGHT          0                 // Defines the number of lines for each frame or zero for auto resolve  //

#define FPS             30                // Defines the rate of frames per second                                //

#define STREAM_INDEX    0                 // Defines the stream index, used for multiple streams of the same type //

#define HEIGHT_RATIO    20                // Defines the height ratio between the original frame to the new frame //

#define WIDTH_RATIO     10                // Defines the width ratio between the original frame to the new frame  //

// The number of meters represented by a single depth unit
float get_depth_unit_value(const rs2_device* const dev)
{
    rs2_error* e = 0;
    rs2_sensor_list* sensor_list = rs2_query_sensors(dev, &e);
    check_error(e);

    int num_of_sensors = rs2_get_sensors_count(sensor_list, &e);
    check_error(e);

    float depth_scale = 0;
    int is_depth_sensor_found = 0;
    int i;
    for (i = 0; i < num_of_sensors; ++i)
    {
        rs2_sensor* sensor = rs2_create_sensor(sensor_list, i, &e);
        check_error(e);

        // Check if the given sensor can be extended to depth sensor interface
        is_depth_sensor_found = rs2_is_sensor_extendable_to(sensor, RS2_EXTENSION_DEPTH_SENSOR, &e);
        check_error(e);

        if (1 == is_depth_sensor_found)
        {
            depth_scale = rs2_get_option((const rs2_options*)sensor, RS2_OPTION_DEPTH_UNITS, &e);
            check_error(e);
            rs2_delete_sensor(sensor);
            break;
        }
        rs2_delete_sensor(sensor);
    }
    rs2_delete_sensor_list(sensor_list);

    if (0 == is_depth_sensor_found)
    {
        printf("Depth sensor not found!\n");
        exit(EXIT_FAILURE);
    }

    return depth_scale;
}

int main()
{
    rs2_error* e = 0;

    // Create a context object. This object owns the handles to all connected realsense devices.

    // The returned object should be released with rs2_delete_context(...)
    rs2_context* ctx = rs2_create_context(RS2_API_VERSION, &e);
    check_error(e);

    /* Get a list of all the connected devices. */
    // The returned object should be released with rs2_delete_device_list(...)
    rs2_device_list* device_list = rs2_query_devices(ctx, &e);
    check_error(e);

    int dev_count = rs2_get_device_count(device_list, &e);
    check_error(e);
    printf("There are %d connected RealSense devices.\n", dev_count);
    if (0 == dev_count)
        return EXIT_FAILURE;

    // Get the first connected device
    // The returned object should be released with rs2_delete_device(...)
    rs2_device* dev = rs2_create_device(device_list, 0, &e);
    check_error(e);

    print_device_info(dev);

    /* Determine depth value corresponding to one meter */
    uint16_t one_meter = (uint16_t)(1.0f / get_depth_unit_value(dev));

    // Create a pipeline to configure, start and stop camera streaming
    // The returned object should be released with rs2_delete_pipeline(...)
    rs2_pipeline* pipeline =  rs2_create_pipeline(ctx, &e);
    check_error(e);

    // Create a config instance, used to specify hardware configuration
    // The retunred object should be released with rs2_delete_config(...)
    rs2_config* config = rs2_create_config(&e);
    check_error(e);

    // Request a specific configuration
    rs2_config_enable_stream(config, STREAM, STREAM_INDEX, WIDTH, HEIGHT, FORMAT, FPS, &e);
    check_error(e);

    // Start the pipeline streaming
    // The retunred object should be released with rs2_delete_pipeline_profile(...)
    rs2_pipeline_profile* pipeline_profile = rs2_pipeline_start_with_config(pipeline, config, &e);
    if (e)
    {
        printf("The connected device doesn't support depth streaming!\n");
        exit(EXIT_FAILURE);
    }

    rs2_stream_profile_list* stream_profile_list = rs2_pipeline_profile_get_streams(pipeline_profile, &e);
    if (e)
    {
        printf("Failed to create stream profile list!\n");
        exit(EXIT_FAILURE);
    }

    rs2_stream_profile* stream_profile = (rs2_stream_profile*)rs2_get_stream_profile(stream_profile_list, 0, &e);
    if (e)
    {
        printf("Failed to create stream profile!\n");
        exit(EXIT_FAILURE);
    }

    rs2_stream stream; rs2_format format; int index; int unique_id; int framerate;
    rs2_get_stream_profile_data(stream_profile, &stream, &format, &index, &unique_id, &framerate, &e);
    if (e)
    {
        printf("Failed to get stream profile data!\n");
        exit(EXIT_FAILURE);
    }

    int width; int height;
    rs2_get_video_stream_resolution(stream_profile, &width, &height, &e);
    if (e)
    {
        printf("Failed to get video stream resolution data!\n");
        exit(EXIT_FAILURE);
    }
    int rows = height / HEIGHT_RATIO;
    int row_length = width / WIDTH_RATIO;
    int display_size = (rows + 1) * (row_length + 1);
    int buffer_size = display_size * sizeof(char);

    char* buffer = calloc(display_size, sizeof(char));
    char* out = NULL;

    while (1)
    {
        // This call waits until a new composite_frame is available
        // composite_frame holds a set of frames. It is used to prevent frame drops
        // The returned object should be released with rs2_release_frame(...)
        rs2_frame* frames = rs2_pipeline_wait_for_frames(pipeline, RS2_DEFAULT_TIMEOUT, &e);
        check_error(e);

        // Returns the number of frames embedded within the composite frame
        int num_of_frames = rs2_embedded_frames_count(frames, &e);
        check_error(e);

        int i;
        for (i = 0; i < num_of_frames; ++i)
        {
            // The retunred object should be released with rs2_release_frame(...)
            rs2_frame* frame = rs2_extract_frame(frames, i, &e);
            check_error(e);

            // Check if the given frame can be extended to depth frame interface
            // Accept only depth frames and skip other frames
            if (0 == rs2_is_frame_extendable_to(frame, RS2_EXTENSION_DEPTH_FRAME, &e))
            {
                rs2_release_frame(frame);
                continue;
            }

            /* Retrieve depth data, configured as 16-bit depth values */
            const uint16_t* depth_frame_data = (const uint16_t*)(rs2_get_frame_data(frame, &e));
            check_error(e);

            /* Print a simple text-based representation of the image, by breaking it into 10x5 pixel regions and approximating the coverage of pixels within one meter */
            out = buffer;
            int x, y, i;
            int* coverage = calloc(row_length, sizeof(int));

            for (y = 0; y < height; ++y)
            {
                for (x = 0; x < width; ++x)
                {
                    // Create a depth histogram to each row
                    int coverage_index = x / WIDTH_RATIO;
                    int depth = *depth_frame_data++;
                    if (depth > 0 && depth < one_meter)
                        ++coverage[coverage_index];
                }

                if ((y % HEIGHT_RATIO) == (HEIGHT_RATIO-1))
                {
                    for (i = 0; i < (row_length); ++i)
                    {
                        static const char* pixels = " .:nhBXWW";
                        int pixel_index = (coverage[i] / (HEIGHT_RATIO * WIDTH_RATIO / sizeof(pixels)));
                        *out++ = pixels[pixel_index];
                        coverage[i] = 0;
                    }
                    *out++ = '\n';
                }
            }
            *out++ = 0;
            printf("\n%s", buffer);

            free(coverage);
            rs2_release_frame(frame);
        }

        rs2_release_frame(frames);
    }

    // Stop the pipeline streaming
    rs2_pipeline_stop(pipeline, &e);
    check_error(e);

    // Release resources
    free(buffer);
    rs2_delete_pipeline_profile(pipeline_profile);
    rs2_delete_stream_profiles_list(stream_profile_list);
    rs2_delete_stream_profile(stream_profile);
    rs2_delete_config(config);
    rs2_delete_pipeline(pipeline);
    rs2_delete_device(dev);
    rs2_delete_device_list(device_list);
    rs2_delete_context(ctx);

    return EXIT_SUCCESS;
}</stdio.h></stdint.h></stdlib.h></librealsense2></librealsense2></librealsense2></librealsense2>
rs-pointcloud
生成和可视化纹理 3D 点云
应用程序应打开一个带有点云的窗口。使用鼠标,您应该能够与点云交互、旋转、缩放和平移。

包含跨平台 API:
#include // Include RealSense Cross Platform API
接下来,我们准备了一个非常简短的帮助器库,封装了基本的OpenGL渲染和窗口管理:
#include "example.hpp" // Include short list of convenience functions for rendering
我们还包含 和 的 STL 标头。 <algorithm></algorithm> std::min std::max
接下来,我们 定义一个结构和两个帮助程序函数。 并在应用程序中处理点云的旋转,并进行显示点云所需的所有 OpenGL 调用。 state state register_glfw_callbacks draw_pointcloud
// Struct for managing rotation of pointcloud view
struct state { double yaw, pitch, last_x, last_y; bool ml; float offset_x, offset_y; texture tex; };

// Helper functions
void register_glfw_callbacks(window& app, state& app_state);
void draw_pointcloud(window& app, state& app_state, rs2::points& points);
标题让我们可以轻松打开一个新窗口并准备用于渲染的纹理。该类(在上面声明)用于与鼠标交互,借助于通过 glfw 注册的一些回调。 example.hpp state
// Create a simple OpenGL window for rendering:
window app(1280, 720, "RealSense Pointcloud Example");
// Construct an object to manage view state
state app_state = { 0, 0, 0, 0, false, 0, 0, 0 };
// register callbacks to allow manipulation of the pointcloud
register_glfw_callbacks(app, app_state);
我们将在命名空间中使用类: rs2
using namespace rs2;
作为API的一部分, 我们提供的类从深度和颜色帧计算点云和相应的纹理映射。为了确保我们始终有要显示的内容,我们还制作了一个对象来存储点云计算的结果。 pointcloud rs2::points
// Declare pointcloud object, for calculating pointclouds and texture mappings
pointcloud pc = rs2::context().create_pointcloud();
// We want the points object to be persistent so we can display the last cloud when a frame drops
rs2::points points;
该类是 SDK 功能的入口点: Pipeline
// Declare RealSense pipeline, encapsulating the actual device and sensors
pipeline pipe;
// Start streaming with default recommended configuration
pipe.start();
接下来,我们 在循环单元中等待下一组帧:
auto data = pipe.wait_for_frames(); // Wait for next set of frames from the camera
在对象上使用帮助程序函数,我们检查新的深度和颜色帧。我们将其传递给对象以用作纹理,并在类的帮助下将其提供给OpenGL。我们生成一个新的点云。 frameset pointcloud texture
// Wait for the next set of frames from the camera
auto frames = pipe.wait_for_frames();
auto depth = frames.get_depth_frame();

// Generate the pointcloud and texture mappings
points = pc.calculate(depth);

auto color = frames.get_color_frame();

// Tell pointcloud object to map to this color frame
pc.map_to(color);

// Upload the color frame to OpenGL
app_state.tex.upload(color);
最后, 我们调用来绘制点云。 draw_pointcloud
draw_pointcloud(app, app_state, points);
draw_pointcloud主要是对OpenGL的调用,但关键部分迭代点云中的所有点,如果我们有深度数据,我们将点的坐标和纹理映射坐标上传到OpenGL。
/* this segment actually prints the pointcloud */
auto vertices = points.get_vertices();              // get vertices
auto tex_coords = points.get_texture_coordinates(); // and texture coordinates
for (int i = 0; i < points.size(); i++)
{
    if (vertices[i].z)
    {
        // upload the point and texture coordinates only for points we have depth data for
        glVertex3fv(vertices[i]);
        glTexCoord2fv(tex_coords[i]);
    }
}
OpenGL.cpp
#include <iostream>

#ifdef _WIN32
    #define WIN32_LEAN_AND_MEAN 1
    #define NOMINMAX 1
    #include <windows.h>
#endif

#if defined(__APPLE__)
    #include <opengl gl.h>
    #include <opengl glu.h>
#else
    #include <gl gl.h>
    #include <gl glu.h>
#endif

#include "opencv2/core.hpp"
#include "opencv2/core/opengl.hpp"
#include "opencv2/core/cuda.hpp"
#include "opencv2/highgui.hpp"

using namespace std;
using namespace cv;
using namespace cv::cuda;

const int win_width = 800;
const int win_height = 640;

struct DrawData
{
    ogl::Arrays arr;
    ogl::Texture2D tex;
    ogl::Buffer indices;
};

void draw(void* userdata);

void draw(void* userdata)
{
    DrawData* data = static_cast<drawdata*>(userdata);

    glRotated(0.6, 0, 1, 0);

    ogl::render(data->arr, data->indices, ogl::TRIANGLES);
}

int main(int argc, char* argv[])
{
    string filename;
    if (argc < 2)
    {
        cout << "Usage: " << argv[0] << " image" << endl;
        filename = "../data/lena.jpg";
    }
    else
        filename = argv[1];

    Mat img = imread(filename);
    if (img.empty())
    {
        cerr << "Can't open image " << filename << endl;
        return -1;
    }

    namedWindow("OpenGL", WINDOW_OPENGL);
    resizeWindow("OpenGL", win_width, win_height);

    Mat_<vec2f> vertex(1, 4);
    vertex << Vec2f(-1, 1), Vec2f(-1, -1), Vec2f(1, -1), Vec2f(1, 1);

    Mat_<vec2f> texCoords(1, 4);
    texCoords << Vec2f(0, 0), Vec2f(0, 1), Vec2f(1, 1), Vec2f(1, 0);

    Mat_<int> indices(1, 6);
    indices << 0, 1, 2, 2, 3, 0;

    DrawData data;

    data.arr.setVertexArray(vertex);
    data.arr.setTexCoordArray(texCoords);
    data.indices.copyFrom(indices);
    data.tex.copyFrom(img);

    glMatrixMode(GL_PROJECTION);
    glLoadIdentity();
    gluPerspective(45.0, (double)win_width / win_height, 0.1, 100.0);

    glMatrixMode(GL_MODELVIEW);
    glLoadIdentity();
    gluLookAt(0, 0, 3, 0, 0, 0, 0, 1, 0);

    glEnable(GL_TEXTURE_2D);
    data.tex.bind();

    glTexParameteri(GL_TEXTURE_2D, GL_TEXTURE_MIN_FILTER, GL_LINEAR);
    glTexEnvi(GL_TEXTURE_2D, GL_TEXTURE_ENV_MODE, GL_REPLACE);

    glDisable(GL_CULL_FACE);

    setOpenGlDrawCallback("OpenGL", draw, &data);

    for (;;)
    {
        updateWindow("OpenGL");
        char key = (char)waitKey(40);
        if (key == 27)
            break;
    }

    setOpenGlDrawCallback("OpenGL", 0, 0);
    destroyAllWindows();

    return 0;
}
</int></vec2f></vec2f></drawdata*></gl></gl></opengl></opengl></windows.h></iostream>
Realsense SDK 2.0 +OpenCV
用于可视化深度数据的最小 OpenCV 应用程序
下面的示例将打开一个 OpenCV UI 窗口,并向其呈现 彩色深度流。The following code snippet is used to create
cv::Mat
from
 rs2::frame
// Query frame size (width and height)
const int w = depth.as<rs2::video_frame>().get_width();
const int h = depth.as<rs2::video_frame>().get_height();

// Create OpenCV matrix of size (w,h) from the colorized depth data
Mat image(Size(w, h), CV_8UC3, (void*)depth.get_data(), Mat::AUTO_STEP);</rs2::video_frame></rs2::video_frame>
GitHub上面的源代码
#include <librealsense2 rs.hpp> // Include RealSense Cross Platform API
#include <opencv2 opencv.hpp>   // Include OpenCV API

int main(int argc, char * argv[]) try
{
    // Declare depth colorizer for pretty visualization of depth data
    rs2::colorizer color_map;

    // Declare RealSense pipeline, encapsulating the actual device and sensors
    rs2::pipeline pipe;
    // Start streaming with default recommended configuration
    pipe.start();

    using namespace cv;
    const auto window_name = "Display Image";
    namedWindow(window_name, WINDOW_AUTOSIZE);

    while (waitKey(1) < 0 && getWindowProperty(window_name, WND_PROP_AUTOSIZE) >= 0)
    {
        rs2::frameset data = pipe.wait_for_frames(); // Wait for next set of frames from the camera
        rs2::frame depth = data.get_depth_frame().apply_filter(color_map);

        // Query frame size (width and height)
        const int w = depth.as<rs2::video_frame>().get_width();
        const int h = depth.as<rs2::video_frame>().get_height();

        // Create OpenCV matrix of size (w,h) from the colorized depth data
        Mat image(Size(w, h), CV_8UC3, (void*)depth.get_data(), Mat::AUTO_STEP);

        // Update the window with new data
        imshow(window_name, image);
    }

    return EXIT_SUCCESS;
}
catch (const rs2::error & e)
{
    std::cerr << "RealSense error calling " << e.get_failed_function() << "(" << e.get_failed_args() << "):\n    " << e.what() << std::endl;
    return EXIT_FAILURE;
}
catch (const std::exception& e)
{
    std::cerr << e.what() << std::endl;
    return EXIT_FAILURE;
}</rs2::video_frame></rs2::video_frame></opencv2></librealsense2>
使用GrabCut算法进行简单的背景删除
GrabCut算法
GrabCuts 示例演示了 如何使用 3D 数据增强现有的 2D 算法:GrabCut 算法通常用于交互式、用户辅助的前景提取。
该算法详细讲解的链接:(129条消息) 图像分割之(三)从Graph Cut到Grab Cut_zouxy09的专栏-CSDN博客_graphcut图像分割
简单来说,GrabCut算法就是利用了 图像中的纹理(颜色)信息和边界(反差)信息,只要少量的用户交互操作即可得到比较好的分割结果.

将用户输入替换为基于深度数据的初始猜测
获得对齐的颜色和深度
首先获取一对空间和时间同步的帧:
frameset data = pipe.wait_for_frames();
// Make sure the frameset is spatialy aligned
// (each pixel in depth image corresponds to the same pixel in the color image)
frameset aligned_set = align_to.process(data);
frame depth = aligned_set.get_depth_frame();
auto color_mat = frame_to_mat(aligned_set.get_color_frame());

生成近/远掩码
继续生成像素区域,以估计近处和远处的物体。我们使用基本的形态变换 来提高两个掩模的质量:
// Generate "near" mask image:
auto near = frame_to_mat(bw_depth);
cvtColor(near, near, CV_BGR2GRAY);
// Take just values within range [180-255]
// These will roughly correspond to near objects due to histogram equalization
create_mask_from_depth(near, 180, THRESH_BINARY);

// Generate "far" mask image:
auto far = frame_to_mat(bw_depth);
cvtColor(far, far, CV_BGR2GRAY);
// Note: 0 value does not indicate pixel near the camera, and requires special attention:
far.setTo(255, far == 0);
create_mask_from_depth(far, 100, THRESH_BINARY_INV);

调用 cv::GrabCut 算法
这两个掩码组合成一个猜测:
// GrabCut algorithm needs a mask with every pixel marked as either:
// BGD, FGB, PR_BGD, PR_FGB
Mat mask;
mask.create(near.size(), CV_8UC1);
mask.setTo(Scalar::all(GC_BGD)); // Set "background" as default guess
mask.setTo(GC_PR_BGD, far == 0); // Relax this to "probably background" for pixels outside "far" region
mask.setTo(GC_FGD, near == 255); // Set pixels within the "near" region to "foreground"
运行算法:
Mat bgModel, fgModel;
cv::grabCut(color_mat, mask, Rect(), bgModel, fgModel, 1, cv::GC_INIT_WITH_MASK);
并生成生成的图像:
// Extract foreground pixels based on refined mask from the algorithm
cv::Mat3b foreground = cv::Mat3b::zeros(color_mat.rows, color_mat.cols);
color_mat.copyTo(foreground, (mask == cv::GC_FGD) | (mask == cv::GC_PR_FGD));
cv::imshow(window_name, foreground);
狗图:

GitHub上面的源代码
#include <librealsense2 rs.hpp> // Include RealSense Cross Platform API
#include <opencv2 opencv.hpp>   // Include OpenCV API
#include "../cv-helpers.hpp"    // Helper functions for conversions between RealSense and OpenCV

int main(int argc, char * argv[]) try
{
    using namespace cv;
    using namespace rs2;

    // Define colorizer and align processing-blocks
    colorizer colorize;
    align align_to(RS2_STREAM_COLOR);

    // Start the camera
    pipeline pipe;
    pipe.start();

    const auto window_name = "Display Image";
    namedWindow(window_name, WINDOW_AUTOSIZE);

    // We are using StructuringElement for erode / dilate operations
    auto gen_element = [](int erosion_size)
    {
        return getStructuringElement(MORPH_RECT,
            Size(erosion_size + 1, erosion_size + 1),
            Point(erosion_size, erosion_size));
    };

    const int erosion_size = 3;
    auto erode_less = gen_element(erosion_size);
    auto erode_more = gen_element(erosion_size * 2);

    // The following operation is taking grayscale image,
    // performs threashold on it, closes small holes and erodes the white area
    auto create_mask_from_depth = [&](Mat& depth, int thresh, ThresholdTypes type)
    {
        threshold(depth, depth, thresh, 255, type);
        dilate(depth, depth, erode_less);
        erode(depth, depth, erode_more);
    };

    // Skips some frames to allow for auto-exposure stabilization
    for (int i = 0; i < 10; i++) pipe.wait_for_frames();

    while (waitKey(1) < 0 && getWindowProperty(window_name, WND_PROP_AUTOSIZE) >= 0)
    {
        frameset data = pipe.wait_for_frames();
        // Make sure the frameset is spatialy aligned
        // (each pixel in depth image corresponds to the same pixel in the color image)
        frameset aligned_set = align_to.process(data);
        frame depth = aligned_set.get_depth_frame();
        auto color_mat = frame_to_mat(aligned_set.get_color_frame());

        // Colorize depth image with white being near and black being far
        // This will take advantage of histogram equalization done by the colorizer
        colorize.set_option(RS2_OPTION_COLOR_SCHEME, 2);
        frame bw_depth = depth.apply_filter(colorize);

        // Generate "near" mask image:
        auto near = frame_to_mat(bw_depth);
        cvtColor(near, near, COLOR_BGR2GRAY);
        // Take just values within range [180-255]
        // These will roughly correspond to near objects due to histogram equalization
        create_mask_from_depth(near, 180, THRESH_BINARY);

        // Generate "far" mask image:
        auto far = frame_to_mat(bw_depth);
        cvtColor(far, far, COLOR_BGR2GRAY);
        far.setTo(255, far == 0); // Note: 0 value does not indicate pixel near the camera, and requires special attention
        create_mask_from_depth(far, 100, THRESH_BINARY_INV);

        // GrabCut algorithm needs a mask with every pixel marked as either:
        // BGD, FGB, PR_BGD, PR_FGB
        Mat mask;
        mask.create(near.size(), CV_8UC1);
        mask.setTo(Scalar::all(GC_BGD)); // Set "background" as default guess
        mask.setTo(GC_PR_BGD, far == 0); // Relax this to "probably background" for pixels outside "far" region
        mask.setTo(GC_FGD, near == 255); // Set pixels within the "near" region to "foreground"

        // Run Grab-Cut algorithm:
        Mat bgModel, fgModel;
        grabCut(color_mat, mask, Rect(), bgModel, fgModel, 1, GC_INIT_WITH_MASK);

        // Extract foreground pixels based on refined mask from the algorithm
        Mat3b foreground = Mat3b::zeros(color_mat.rows, color_mat.cols);
        color_mat.copyTo(foreground, (mask == GC_FGD) | (mask == GC_PR_FGD));
        imshow(window_name, foreground);
    }

    return EXIT_SUCCESS;
}
catch (const rs2::error & e)
{
    std::cerr << "RealSense error calling " << e.get_failed_function() << "(" << e.get_failed_args() << "):\n    " << e.what() << std::endl;
    return EXIT_FAILURE;
}
catch (const std::exception& e)
{
    std::cerr << e.what() << std::endl;
    return EXIT_FAILURE;
}
</opencv2></librealsense2>
用于避免碰撞的深度过滤
问题陈述
避免碰撞的问题优先考虑 具有可靠的深度而不是高填充率。
在基于立体的系统中,由于一些光学和算法效应,包括校正过程中的重复几何形状和摩尔纹图案,可能会发生不可靠的读数。
有几种最广为人知的方法可以删除此类无效的深度值:
- 如果可能,增加红外投影仪将在图像中 引入足够数量的噪声,并帮助算法正确解决有问题的情况。
- 除1之外,使用光学滤光片阻挡可见光以仅省略投影仪图案将消除错误的近邻深度值。
- D400系列相机包括一组控制深度失效的片上参数。加载自定义”高置信度”预设将有助于ASIC丢弃不明确的像素。
- 最后,可以应用软件 后处理来仅保留高置信深度值。
高置信度预设
用于在流式传输之前将自定义预设加载到设备:
rs2::pipeline pipe;

rs2::config cfg;
cfg.enable_stream(RS2_STREAM_DEPTH, 848, 480);
cfg.enable_stream(RS2_STREAM_INFRARED, 1);

std::ifstream file("./camera-settings.json");
if (file.good())
{
    std::string str((std::istreambuf_iterator<char>(file)), std::istreambuf_iterator<char>());

    auto prof = cfg.resolve(pipe);
    if (auto advanced = prof.get_device().as<rs400::advanced_mode>())
    {
        advanced.load_json(str);
    }
}</rs400::advanced_mode></char></char>
high_confidence_filter类
接下来,我们定义类。继承并实现 SDK 处理块模式使此算法可与其他 SDK 方法(如 和 ) 组合在一起。
特别是,将消耗同步深度和红外对,并输出新的同步对的缩减采样和滤波深度和红外帧。
high_confidence_filter
rs2::filter
rs2::pointcloud
rs2::alignhigh_confidence_filter
该算法背后的核心思想是,在红外图像中具有明确定义的特征的区域更有可能具有高置信度的相应深度。该算法在深度和红外图像上同时运行,并遮罩除边缘和角落之外的所有内容。
下采样步骤
缩减采样是任何深度处理算法中非常常见的第一步。关键的观察结果是,缩减采样会降低空间(X-Y)精度,但会保持Z精度( 下图中的绿轴,也就是竖直方向)。

它是如此普遍,以至于SDK以rs2::d ecimation_filter的形式提供了内置的缩减采样方法。
请务必注意, 使用标准 OpenCV 缩减像素采样对于深度图像并不理想。
在此示例中,我们展示了实现深度缩减采样的另一种正确方法。它在 概念上类似于 为每个 4×4 块选取一个非零深度值,但与 它不同的是选取 最接近 的深度值而不是中值。这 在避免碰撞的背景下是有道理的,因为我们希望保持与物体的最小距离。
rs2::decimation_filterrs2::decimation_filter
这种方法的朴素实现:
for (int y = 0; y < sizeYresized; y++)
        for (int x = 0; x < source.cols; x += DOWNSAMPLE_FACTOR)
        {
            uint16_t min_value = MAX_DEPTH;

            // Loop over 4x4 quad
            for (int i = 0; i < DOWNSAMPLE_FACTOR; i++)
                for (int j = 0; j < DOWNSAMPLE_FACTOR; j++)
                {
                    auto pixel = source.at<uint16_t>(y * DOWNSAMPLE_FACTOR + i, x + j);
                    // Only include non-zero pixels in min calculation
                    if (pixel) min_value = std::min(min_value, pixel);
                }

            // If no non-zero pixels were found, mark the output as zero
            if (min_value == MAX_DEPTH) min_value = 0;

            pDest->at<uint16_t>(y, x / DOWNSAMPLE_FACTOR) = min_value;
        }</uint16_t></uint16_t>
主过滤器
核心过滤器按以下操作顺序执行:
filter_edges(&sub_areas[i]); // Find edges in the infrared image
filter_harris(&sub_areas[i]); // Find corners in the infrared image
// Combine the two masks together:
cv::bitwise_or(sub_areas[i].edge_mask, sub_areas[i].harris_mask, sub_areas[i].combined_mask);

// morphology: open(src, element) = dilate(erode(src,element))
cv::morphologyEx(sub_areas[i].combined_mask, sub_areas[i].combined_mask,
    cv::MORPH_OPEN, cv::getStructuringElement(cv::MORPH_ELLIPSE, cv::Size(3, 3)));
// Copy masked depth values:
sub_areas[i].decimated_depth.copyTo(sub_areas[i].output_depth, sub_areas[i].combined_mask);
所有 OpenCV 矩阵都拆分为多个部分 – sub_areas[i]。这样做是为了帮助并行化代码,这样每个执行线程都可以在单独的图像区域上运行。
边缘过滤是使用 OpenCV Scharr 运算符完成的:
cv::Scharr(area->decimated_ir, area->scharr_x, CV_16S, 1, 0);
cv::convertScaleAbs(area->scharr_x, area->abs_scharr_x);
cv::Scharr(area->decimated_ir, area->scharr_y, CV_16S, 0, 1);
cv::convertScaleAbs(area->scharr_y, area->abs_scharr_y);
cv::addWeighted(area->abs_scharr_y, 0.5, area->abs_scharr_y, 0.5, 0, area->edge_mask);
cv::threshold(area->edge_mask, area->edge_mask, 192, 255, cv::THRESH_BINARY);
角落滤波是使用OpenCV Harris探测器完成的:
area->decimated_ir.convertTo(area->float_ir, CV_32F);

// Harris 角点检测API
cv::cornerHarris(area->float_ir, area->corners, 2, 3, 0.04);

cv::threshold(area->corners, area->corners, 300, 255, cv::THRESH_BINARY);
area->corners.convertTo(area->harris_mask, CV_8U);|
上面运用了 Harris 角点检测,相关教程:
[opencv_C++] 入门强推!!!【B站最全】_哔哩哔哩_bilibili
一幅图像分为:平坦区域 ,边缘 和角点 。
何为角点?
下面有两幅不同视角的图像,通过找出对应的角点进行匹配。
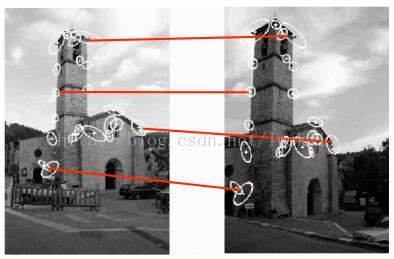
再看下图所示,放大图像的两处角点区域:
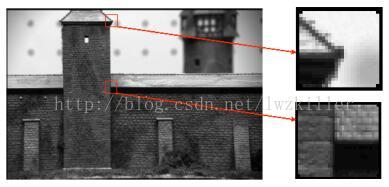
直观的概括下角点所具有的特征:
轮廓之间的交点;
对于同一场景,即使视角发生变化,通常具备稳定性质的特征;
该点附近区域的像素点无论在梯度方向上还是其梯度幅值上有着较大变化;
角点检测算法基本思想是什么?
算法基本思想是 使用一个固定窗口在图像上进行任意方向上的滑动,比较滑动前与滑动后两种情况, 窗口中的像素灰度变化程度, 如果存在任意方向上的滑动,都有着较大灰度变化,那么我们可以认为该窗口中存在角点。
软件开发工具包集成
该方法负责将输入帧转换为对象,并将生成的对象转换为新对象。这个额外的层确保了算法和 SDK 之间的无缝互操作性。
算法输出以后可用于点云生成和导出、流对齐、彩色可视化,并与其他 SDK 后处理块结合使用。
sdk_handlecv::Matcv::Matrs2::frame
检测到新的输入帧类型后,将生成新的 SDK 视频流配置文件,其分辨率大幅下降,并更新了内部函数。
‎sdk_handle
if (!_output_ir_profile || _input_ir_profile.get() != ir_frame.get_profile().get())
{
    auto p = ir_frame.get_profile().as<rs2::video_stream_profile>();
    auto intr = p.get_intrinsics() / DOWNSAMPLE_FACTOR;
    _input_ir_profile = p;
    _output_ir_profile = p.clone(p.stream_type(), p.stream_index(), p.format(),
        p.width() / DOWNSAMPLE_FACTOR, p.height() / DOWNSAMPLE_FACTOR, intr);
}</rs2::video_stream_profile>
输出图像准备就绪后,将其复制到新的:
rs2::frame
auto res_ir = src.allocate_video_frame(_output_ir_profile, ir_frame, 0,
    newW, newH, ir_frame.get_bytes_per_pixel() * newW);
memcpy((void*)res_ir.get_data(), _decimated_ir.data, newW * newH);
最后,两个生成的帧(深度和红外)一起输出为:
‎rs2::frameset
std::vector<rs2::frame> fs{ res_ir, res_depth };
auto cmp = src.allocate_composite_frame(fs);
src.frame_ready(cmp);</rs2::frame>
一旦包装为一种算法,就可以像任何其他 SDK 处理块一样应用该算法:
‎rs2::filter
rs2::frameset data = pipe.wait_for_frames();
data = data.apply_filter(filter);
Original: https://blog.csdn.net/m0_61897853/article/details/123074881
Author: DDsoup
Title: 关于 Intel Realsense 深度图像处理.1(C++)
原创文章受到原创版权保护。转载请注明出处:https://www.johngo689.com/701247/
转载文章受原作者版权保护。转载请注明原作者出处!