

📢博客主页:https://blog.csdn.net/as604049322
📢欢迎点赞 👍 收藏 ⭐留言 📝 欢迎讨论!
📢本文由 小小明-代码实体 原创,首发于 CSDN🙉
本月重读了《Pandas 百问百答》和《joyful-pandas》,结合群友提到的问题,对一些内容进行复盘总结。
以下内容主要包括容易遗忘的,能加深对原理理解的,能提升执行速度的,能更简单解决实际问题的等等。
本月若群友提出的问题,又涉及新的偏门的知识点,还会继续在本文更新,建议收藏本文后慢慢研读。
目前目录如下,可按需查看。
文章目录
- Excel日期列批量还原
- 继承体系与类型判断
- 类型转换
- Nullable类型处理空值
- DataFrame构建与遍历
- 交集并集差集异或集
- 索引过滤对齐与多级索引
- 时序升降采样与滑窗处理提速
- 分组聚合
- melt的扩展版wide_to_long
- 分组的整组筛选
- Pandas选项设置
- 综合小案例
* - 多列数据与单列列表互转
- 二分查找
- 自定义顺序排序
- 分组合并列里的内容
- 度分秒经纬度互转
- 2秒生成一百万条测试数据并排序
- 相邻日期超过 4 天则顺序编号
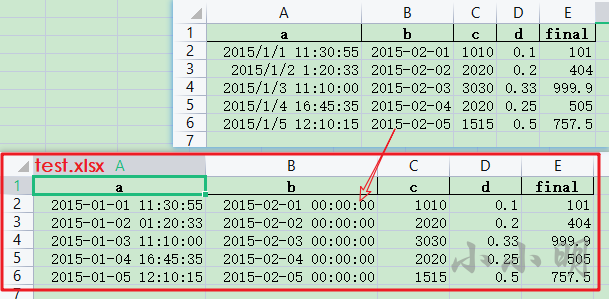
Excel日期列批量还原
如果我们使用Pandas读取Excel,其中日期列总是会被解析成datetime类型,导致写出Excel时,原本的日期列总是会带上全0的时间,例如:
import pandas as pd

df = pd.read_excel("time_data.xlsx")
df.to_excel("test.xlsx", index=False)

麻烦点的方法,我们可以取出其内部的对象,设置这列的显示格式,简单点的办法是获取其中的日期类型:
import pandas as pd

df = pd.read_excel("time_data.xlsx")
df.b = df.b.dt.date
df.to_excel("test.xlsx", index=False)
但这是日期列比较少而且确定的情况,如果我们需要批量处理很多Excel表,日期列不确定,是否有方法将所有的日期列批量还原,我的处理方法如下:
import datetime

for column, s in df.select_dtypes("datetime").iteritems():
    if (s.dt.time == datetime.time(0)).all():
        df[column] = s.dt.date
经过上述代码处理即可将所有日期列还原,写出Excel表时会自动设置为纯日期格式。
继承体系与类型判断
select_dtypes方法支持筛选指定类型的列,根据官方文档:
- 选择所有 数字类型的列,用
np.number或'number' - 选择 字符串类型的列,默认只能用
object,但这将返回 所有数据类型为object的列。若已将字符串转换为Nullable的string类型后,则只能使用string进行筛选。 - 选择 日期时间类型的列,用
np.datetime64、'datetime'或'datetime64' - 选择 timedelta 类型的列,用
np.timedelta64、'timedelta'或'timedelta64' - 选择 category 类型类别,用
'category' - 选择 datetimetz 类型的列,用
'datetimetz'或'datetime64[ns, tz]'
简易版select_dtypes实现:
def select_dtypes(df, dtypes):
    if not pd.api.types.is_array_like(dtypes):
        dtypes = [dtypes]
    return df[df.columns[df.dtypes.isin(dtypes)]]
Numpy官网上展示了类型的继承形式:
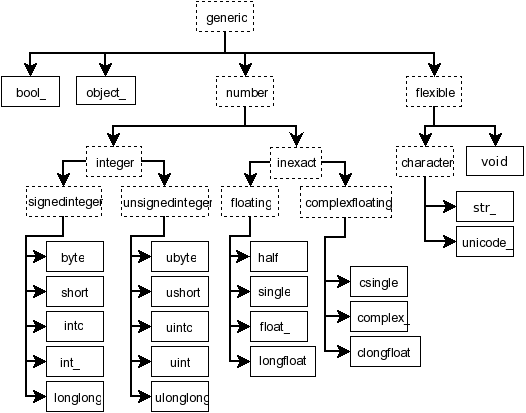
来自:https://numpy.org/doc/stable/reference/arrays.scalars.html
选择字符串类型除了可以写 df.select_dtypes(include="object")还可以简写为 df.select_dtypes("O")
但是前面的 df.b.dt.date返回的也是Object类型,会把这种列也筛选出来。
下面我们自行编码看看Numpy和pandas的类型继承体系,简易的方法如下:
def subdtypes1(dtype):
    subs = dtype.__subclasses__()
    if not subs:
        return dtype
    return [dtype, [subdtypes1(dt) for dt in subs]]
查看Numpy:
subdtypes1(np.generic)
[numpy.generic,
 [[numpy.number,
   [[numpy.integer,
     [[numpy.signedinteger,
       [numpy.int8,
        numpy.int16,
        numpy.intc,
        numpy.int32,
        numpy.int64,
        numpy.timedelta64]],
      [numpy.unsignedinteger,
       [numpy.uint8, numpy.uint16, numpy.uintc, numpy.uint32, numpy.uint64]]]],
    [numpy.inexact,
     [[numpy.floating,
       [numpy.float16, numpy.float32, numpy.float64, numpy.longdouble]],
      [numpy.complexfloating,
       [numpy.complex64, numpy.complex128, numpy.clongdouble]]]]]],
  [numpy.flexible,
   [[numpy.character, [numpy.bytes_, numpy.str_]],
    [numpy.void, [numpy.record]]]],
  numpy.bool_,
  numpy.datetime64,
  numpy.object_]]
查看Pandas:
subdtypes1(pd.core.dtypes.base.ExtensionDtype)
[pandas.core.dtypes.base.ExtensionDtype,
 [[pandas.core.dtypes.dtypes.PandasExtensionDtype,
   [pandas.core.dtypes.dtypes.CategoricalDtype,
    pandas.core.dtypes.dtypes.DatetimeTZDtype,
    pandas.core.dtypes.dtypes.PeriodDtype,
    pandas.core.dtypes.dtypes.IntervalDtype]],
  pandas.core.dtypes.dtypes.CategoricalDtype,
  pandas.core.dtypes.dtypes.PandasDtype,
  [pandas.core.arrays.masked.BaseMaskedDtype,
   [pandas.core.arrays.boolean.BooleanDtype,
    [pandas.core.arrays.numeric.NumericDtype,
     [[pandas.core.arrays.integer._IntegerDtype,
       [pandas.core.arrays.integer.Int8Dtype,
        pandas.core.arrays.integer.Int16Dtype,
        pandas.core.arrays.integer.Int32Dtype,
        pandas.core.arrays.integer.Int64Dtype,
        pandas.core.arrays.integer.UInt8Dtype,
        pandas.core.arrays.integer.UInt16Dtype,
        pandas.core.arrays.integer.UInt32Dtype,
        pandas.core.arrays.integer.UInt64Dtype]],
      [pandas.core.arrays.floating.FloatingDtype,
       [pandas.core.arrays.floating.Float32Dtype,
        pandas.core.arrays.floating.Float64Dtype]]]]]],
  pandas.core.arrays.sparse.dtype.SparseDtype,
  pandas.core.arrays.string_.StringDtype]]
这种形式可能阅读效果不佳,我们可以使用rich库做树形显示:
from rich.tree import Tree

def subdtypes(dtype, tree=None):
    if tree is None:
        tree = Tree(f'{dtype.__module__}.{dtype.__qualname__}')
    subs = dtype.__subclasses__()
    if not subs:
        return
    for dt in subs:
        sub_tree=tree.add(f'{dt.__module__}.{dt.__qualname__}')
        subdtypes(dt, sub_tree)
    return tree
显示Numpy:
import numpy as np
subdtypes(np.generic)
numpy.generic
├── numpy.number
│   ├── numpy.integer
│   │   ├── numpy.signedinteger
│   │   │   ├── numpy.int8
│   │   │   ├── numpy.int16
│   │   │   ├── numpy.intc
│   │   │   ├── numpy.int32
│   │   │   ├── numpy.int64
│   │   │   └── numpy.timedelta64
│   │   └── numpy.unsignedinteger
│   │       ├── numpy.uint8
│   │       ├── numpy.uint16
│   │       ├── numpy.uintc
│   │       ├── numpy.uint32
│   │       └── numpy.uint64
│   └── numpy.inexact
│       ├── numpy.floating
│       │   ├── numpy.float16
│       │   ├── numpy.float32
│       │   ├── numpy.float64
│       │   └── numpy.longdouble
│       └── numpy.complexfloating
│           ├── numpy.complex64
│           ├── numpy.complex128
│           └── numpy.clongdouble
├── numpy.flexible
│   ├── numpy.character
│   │   ├── numpy.bytes_
│   │   └── numpy.str_
│   └── numpy.void
│       └── numpy.record
├── numpy.bool_
├── numpy.datetime64
└── numpy.object_
查看Pandas:
import pandas as pd
subdtypes(pd.core.dtypes.base.ExtensionDtype)
pandas.core.dtypes.base.ExtensionDtype
├── pandas.core.dtypes.dtypes.PandasExtensionDtype
│   ├── pandas.core.dtypes.dtypes.CategoricalDtype
│   ├── pandas.core.dtypes.dtypes.DatetimeTZDtype
│   ├── pandas.core.dtypes.dtypes.PeriodDtype
│   └── pandas.core.dtypes.dtypes.IntervalDtype
├── pandas.core.dtypes.dtypes.CategoricalDtype
├── pandas.core.dtypes.dtypes.PandasDtype
├── pandas.core.arrays.masked.BaseMaskedDtype
│   ├── pandas.core.arrays.boolean.BooleanDtype
│   └── pandas.core.arrays.numeric.NumericDtype
│       ├── pandas.core.arrays.integer._IntegerDtype
│       │   ├── pandas.core.arrays.integer.Int8Dtype
│       │   ├── pandas.core.arrays.integer.Int16Dtype
│       │   ├── pandas.core.arrays.integer.Int32Dtype
│       │   ├── pandas.core.arrays.integer.Int64Dtype
│       │   ├── pandas.core.arrays.integer.UInt8Dtype
│       │   ├── pandas.core.arrays.integer.UInt16Dtype
│       │   ├── pandas.core.arrays.integer.UInt32Dtype
│       │   └── pandas.core.arrays.integer.UInt64Dtype
│       └── pandas.core.arrays.floating.FloatingDtype
│           ├── pandas.core.arrays.floating.Float32Dtype
│           └── pandas.core.arrays.floating.Float64Dtype
├── pandas.core.arrays.sparse.dtype.SparseDtype
└── pandas.core.arrays.string_.StringDtype
类型判断
以前我们判断一个变量是否是数值类型时使用过如下方法:
isinstance(num, (int, float))
或
from numbers import Number
isinstance(num, Number)
不过pandas本身也提供了判断方法:
pd.api.types.is_number(num)
当然pd.api.types中还有各种类型的判断方法:
print([_ for _ in dir(pd.api.types) if _.startswith("is")])
['is_array_like', 'is_bool', 'is_bool_dtype', 'is_categorical', 'is_categorical_dtype', 'is_complex', 'is_complex_dtype', 'is_datetime64_any_dtype', 'is_datetime64_dtype', 'is_datetime64_ns_dtype', 'is_datetime64tz_dtype', 'is_dict_like', 'is_dtype_equal', 'is_extension_array_dtype', 'is_extension_type', 'is_file_like', 'is_float', 'is_float_dtype', 'is_hashable', 'is_int64_dtype', 'is_integer', 'is_integer_dtype', 'is_interval', 'is_interval_dtype', 'is_iterator', 'is_list_like', 'is_named_tuple', 'is_number', 'is_numeric_dtype', 'is_object_dtype', 'is_period_dtype', 'is_re', 'is_re_compilable', 'is_scalar', 'is_signed_integer_dtype', 'is_sparse', 'is_string_dtype', 'is_timedelta64_dtype', 'is_timedelta64_ns_dtype', 'is_unsigned_integer_dtype']
可以很方便的判断指定变量是否为指定类型。
类型转换
类型推断infer_objects:任何类型都可以以object类型的形式存储
例如有很多列object内部实际存储着整数、浮点数、bool等就可以使用 infer_objects方法自动还原回正确的类型:
df = pd.DataFrame({"A": [1, 2], "B": [2., 3.4],
                   "C": [True, False], "D": ["xxm", "dmst"]}, dtype="object")
print(df.dtypes)
df = df.infer_objects()
print("自动推断后:")
print(df.dtypes)
A    object
B    object
C    object
D    object
dtype: object
自动推断后:
A      int64
B    float64
C       bool
D     object
dtype: object
对于字符串默认情况下我们只能以object类型的形式存储,但在1.0.0版本以后我们可以转换为Nullable的string类型,用于专门表示字符串类型。
一般情况下,我们进行类型转换使用astype方法,例如将文本转换为数字:
s = pd.Series(["1", "5", "8"])
s.astype("int")
但是假如上述字符串中存在某个无法被转换为数字的字符串,就会发生报错 ValueError: invalid literal for int() with base 10: xxx
除了我们事先将字符串转换到数字形式外,还可以使用 pd.to_numeric方法:
m = ['apple', 2, 3]
pd.to_numeric(m, errors='coerce')
errors参数指定了无法转换时的行为,coerce表示输出空值np.nan,ignore表示输出原始内容但最终列类型为object,而默认的raise表示无法转换时直接报错。
downcast参数表示向下转型,可以转换到可以存储目标数据的最小类型,例如如下数据转换为uint8:
m = ['1', 2, 3]
pd.to_numeric(m, errors='coerce', downcast='unsigned')
pandas的类似的转换命令还有两个时间相关的,先看看批量转换时间间隔。
指定时间间隔字符串:
m = ['5s', '1day', "3days", "4H", "6Min"]
pd.to_timedelta(m)
TimedeltaIndex(['0 days 00:00:05', '1 days 00:00:00', '3 days 00:00:00',
                '0 days 04:00:00', '0 days 00:06:00'],
               dtype='timedelta64[ns]', freq=None)
单位一致可以指定数值和单位:
pd.to_timedelta([5, 6, 3, 1], unit="D")
TimedeltaIndex(['5 days', '6 days', '3 days', '1 days'], dtype='timedelta64[ns]', freq=None)
日期转换方法pd.to_datetime参数较多,我们演示一些常见的方法。
指定日期格式的转换:
pd.to_datetime(['18000101',"19810102"], format='%Y%m%d', errors='ignore')
DatetimeIndex(['1800-01-01', '1981-01-02'], dtype='datetime64[ns]', freq=None)
注意:时间序列的空值以pd.NaT的形式存在:
s = pd.Series(['5/11/2010', '3-12-a020', '3/13/2011'])
pd.to_datetime(s, errors="coerce")
0   2010-05-11
1          NaT
2   2011-03-13
dtype: datetime64[ns]
列名全是【’year’, ‘month’, ‘day’, ‘minute’, ‘second’, ‘ms’, ‘us’, ‘ns’】之内的DataFrame可以整体被转换:
df = pd.DataFrame({'year': [2015, 2016],
                   'month': [2, 3],
                   'day': [4, 5]})
pd.to_datetime(df)
infer_datetime_format参数表示是否尝试对于第一个非空的时间字符串推断日期格式,如果可以被推断出来,则切换到一种更快的方法解析全部的时间字符串(假如已指定format,该参数被忽略):
s = pd.Series(['5/11/2010', '3/12/2020', '3/13/2011'])
pd.to_datetime(s, infer_datetime_format=True)
转换时间戳到日期:
pd.to_datetime([1575119387, 1575119687, 1575212636], unit='s')
DatetimeIndex(['2019-11-30 13:09:47', '2019-11-30 13:14:47',
               '2019-12-01 15:03:56'],
              dtype='datetime64[ns]', freq=None)
pd.to_datetime([1575119387982, 1575119687867, 1575212636675], unit='ms')
DatetimeIndex(['2019-11-30 13:09:47.982000', '2019-11-30 13:14:47.867000',
               '2019-12-01 15:03:56.675000'],
              dtype='datetime64[ns]', freq=None)
pd.to_datetime([1575119387982502912, 1575119687867502912, 1575212636675502912])
DatetimeIndex(['2019-11-30 13:09:47.982502912',
               '2019-11-30 13:14:47.867502912',
               '2019-12-01 15:03:56.675502912'],
              dtype='datetime64[ns]', freq=None)
pd.to_datetime转换时间戳的默认单位为纳秒,非纳秒时都需要指定一下单位。
还可以指定起始时间:
pd.to_datetime([0, 1, 2, 3], unit='D', origin=pd.Timestamp('2022-01-01'))
以上代码相当于:
pd.Timestamp('2022-01-01')+pd.to_timedelta(range(4), unit="D")
DatetimeIndex(['2022-01-01', '2022-01-02', '2022-01-03', '2022-01-04'], dtype='datetime64[ns]', freq=None)
Nullable类型处理空值
日常处理数据时,我们都会发现对于整数列一旦出现空值,整列就会自动变成浮点数类型:
pd.Series([1, np.nan]).dtype
dtype('float64')
能否在保留空值的情况下维持整数类型呢?那就是使用Nullable类型。
例如上述因为空值变成浮点数的列,我们可以使用转换到Nullable的整数类型:
s = pd.Series([np.nan, 1])
s.astype(pd.Int16Dtype())
0    <na>
1       1
dtype: Int16
</na>
当然也可以直接传入字符串:
s.astype("Int16")
四种Nullable类型:
Nullable类型直接传入字符串整数类型pd.Int64Dtype()”Int64″浮点数类型pd.Float64Dtype()”Float64″bool类型pd.BooleanDtype()”boolean”字符串类型pd.StringDtype()”string”
在上述4个 Nullable 类型中存储的缺失值,都会转为 pandas 内置的 pd.NA 。
boolean 这种Nullable类型和 bool 序列区别在于,含有缺失值时, boolean可以进行索引器中的选择,会把缺失值看作 False ,而bool列表则会直接报错。进行逻辑运算时, bool 类型在缺失处返回的永远是 False , boolean 会根据结果是否确定返回缺失值还是非缺失的确定的值。例如: True | pd.NA 中无论缺失值为什么值,必然返回 True ; False | pd.NA 中的结果会根据缺失值取值的不同而变化,此时返回 pd.NA ; False & pd.NA 中无论缺失值为什么值,必然返回 False 。
convert_dtypes可以自动将各列转换为Nullable类型:
df = pd.DataFrame({"A": [1, np.nan], "B": [2., np.nan],
                   "C": [True, np.nan], "D": ["xxm", np.nan]})
print(df.dtypes)
df = df.convert_dtypes()
print("自动转换后:")
print(df.dtypes)
A    float64
B    float64
C     object
D     object
dtype: object
自动转换后:
A      Int64
B      Int64
C    boolean
D     string
dtype: object
原本所有的字符串类型都会以 object 类型的 Series 进行存储,实际上 object 类型还可以存储字典、列表甚至DataFream等等对象,转换成 string 类型后,则会严格以字符串形式存储。
object 类型的 str 属性并不要求所有值都是字符串时才能使用,只需要序列中至少有一个可迭代(Iterable)对象即可,那么对于一个全部存储python列表的列,使用s.str[0]相当于取每个列表的第一个元素。
DataFrame构建与遍历
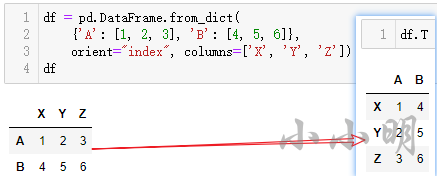
pd.DataFrame.from_records方法与将对象直接传入 pd.DataFrame的方法一致,下面介绍 pd.DataFrame.from_dict中一个直接传入 pd.DataFrame难以实现的用法:
pd.DataFrame.from_dict(
    {'A': [1, 2, 3], 'B': [4, 5, 6]},
    orient="index", columns=['X', 'Y', 'Z'])
转置直接使用.T:
对于json数据我们可以使用pd.json_normalize方法:
data = [{
        'CreatedBy': {'Name': 'User001'},
        'Lookup': {'TextField': 'Some text',
                   'UserField': {'Id': 'ID001', 'Name': 'Name001'}},
        'Image': {'a': 'b'}
        }]
pd.json_normalize(data)
CreatedBy.NameLookup.TextFieldLookup.UserField.IdLookup.UserField.NameImage.aUser001Some textID001Name001b
可以指定最大解析级别:
pd.json_normalize(data, max_level=1)
CreatedBy.NameLookup.TextFieldLookup.UserFieldImage.aUser001Some text{‘Id’: ‘ID001’, ‘Name’: ‘Name001’}b
一个内层带有JSON数组的例子:
data = [
    {
        "state": "Florida",
        "shortname": "FL",
        "info": {"governor": "Rick Scott"},
        "counties": [
            {"name": "Dade", "population": 12345},
            {"name": "Broward", "population": 40000},
            {"name": "Palm Beach", "population": 60000},
        ],
    },
    {
        "state": "Ohio",
        "shortname": "OH",
        "info": {"governor": "John Kasich"},
        "counties": [
            {"name": "Summit", "population": 1234},
            {"name": "Cuyahoga", "population": 1337},
        ],
    },
]
pd.json_normalize(data)
stateshortnamecountiesinfo.governorFloridaFL[{‘name’: ‘Dade’, ‘population’: 12345}, {‘name…Rick ScottOhioOH[{‘name’: ‘Summit’, ‘population’: 1234}, {‘nam…John Kasich
此时可以指定record_path参数:
result = pd.json_normalize(
    data, record_path="counties", meta=["state", "shortname", ["info", "governor"]]
)
result
namepopulationstateshortnameinfo.governorDade12345FloridaFLRick ScottBroward40000FloridaFLRick ScottPalm Beach60000FloridaFLRick ScottSummit1234OhioOHJohn KasichCuyahoga1337OhioOHJohn Kasich
遍历Pandas我们都知道iterrows 性能极差速度极慢,所以不作演示下面我们看到一个比一个快方法,首先准备10万测试数据:
df = pd.DataFrame({"a": np.random.randint(0, 1000, 100000),
                  "b": np.random.rand(100000)})
测试结果:
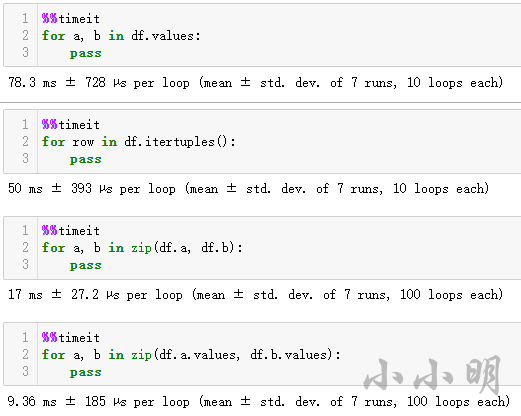
可以看到,zip遍历各列的numpy对象速度最快。
itertuples遍历返回的是命名元组,可以直接返回对应属性,例如:
Pandas(Index=0, a=637, b=0.849218922664699)
交集并集差集异或集
以前我们再原生python上:
a = set('abracadabra')
b = set('alacazam')
print(" 差集:", a - b)

print(" 并集:", a | b)

print(" 交集:", a & b)

print(" 异或集", a ^ b)
 差集: {'r', 'd', 'b'}
 并集: {'m', 'a', 'd', 'b', 'l', 'r', 'z', 'c'}
 交集: {'a', 'c'}
 异或集 {'r', 'd', 'b', 'l', 'm', 'z'}
pandas的Index对象也支持:
a = pd.Index(list('abracadabra'))
b = pd.Index(list('alacazam'))
print(" 差集:", a.difference(b))
print(" 并集:", a.union(b).unique())
print(" 交集:", a.intersection(b))
print(" 异或集:", a.symmetric_difference(b))
 差集: Index(['b', 'd', 'r'], dtype='object')
 并集: Index(['a', 'b', 'c', 'd', 'l', 'm', 'r', 'z'], dtype='object')
 交集: Index(['a', 'c'], dtype='object')
 异或集: Index(['b', 'd', 'l', 'm', 'r', 'z'], dtype='object')
Index可以很方便的转换为Series对象,相当于对单列的交集差集和并集。
Series对象若想要求交集除了转换为Index对象,可以直接使用isin方法:
a = pd.Series(list('abracadabra'))
a[a.isin(list('alacazam'))]
0     a
3     a
4     c
5     a
7     a
10    a
dtype: object
与Index的交集的差异在于会保留重复。
对于两个DataFrame求交集并集差集,采用如下方法:
pd.concat([df1, df2, df2]).drop_duplicates(keep=False)

df1.merge(df2, how='outer')

df1.merge(df2)

pd.concat([df1, df2]).drop_duplicates(keep=False)
相关文章:
Pandas自定义shift与DataFrame求差集
https://xxmdmst.blog.csdn.net/article/details/118887322
索引过滤对齐与多级索引
reindex的使用
假如我们有一张编码表和一张字母表,想要查询每一个字母对应的编码,假如编码表包含全部时:
s = pd.Series({"a": 1, "b": 2, "c": 3})
df = pd.DataFrame({"s": list("acbaac")})
df["d"] = s[df.s].values
df
假如字母表存在编码表找不到的字母:
df = pd.DataFrame({"s": list("acbddaac")})
此时使用上述方法则会报错目标索引找不到,我们可以使用reindex方法:
df["d"] = s.reindex(df.s).values
更简单的办法是:
df["d"] = df.s.map(s)
索引对象的get_indexer方法可以批量获取目标在索引中的角标位置:
a = pd.Index(['c', 'b', 'a'])
a.get_indexer(['c', 'a', 'd', 'b', 'b', 'c', 'a'])
array([ 0, 2, -1, 1, 1, 0, 2], dtype=int64)
不存在的元素会返回-1,get_loc则获取单个元素的位置,目标不存在会报错:
a.get_loc("b")
赋值时索引自动对齐
df = pd.DataFrame({"s": range(6)})
df.s = pd.Series({3: "v3", 5: "v5", 1: "v1", 7: "v7"})
df
结果:
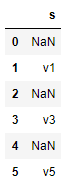
可以看到按照存在的索引一一赋值,多余的数据会自动被丢弃。
如果我们希望保留datafream中的没有被赋值的部分,除了可以fillna或combine_first重新填充回来外,还可以筛选要赋值的行:
df = pd.DataFrame({"s": range(6)})
t = pd.Series({3: "v3", 5: "v5", 1: "v1", 7: "v7"})
df.loc[t.index.intersection(df.index), "s"] = t
df
结果:
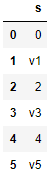
注意:loc传入的索引都必须在查找目标中存在,否则会报错。
所以对一个DataFream某列赋值一个Series时,一定要注意索引是否正确对应。如果索引不对应,仅值顺序一致,应该取出其numpy对象进行赋值。
多级索引
产生多级索引:
pd.MultiIndex.from_product([("a", "b"), range(2)])
MultiIndex([('a', 0),
            ('a', 1),
            ('b', 0),
            ('b', 1)],
           )
我们也可以使用原生python库生成类似的元组:
import itertools

list(itertools.product(("a", "b"), range(2)))
[('a', 0), ('a', 1), ('b', 0), ('b', 1)]
自己生成的元组可以使用 pd.MultiIndex.from_tuples方法转化成多级索引:
t = itertools.product(("a", "b"), range(2))
pd.MultiIndex.from_tuples(t)
可以通过 get_level_values 获得得到某一层的索引:
muti = pd.MultiIndex.from_product([("a", "b"), range(2)])
print(muti.get_level_values(0))
print(muti.get_level_values(1))
Index(['a', 'a', 'b', 'b'], dtype='object')
Int64Index([0, 1, 0, 1], dtype='int64')
多级索引的筛选
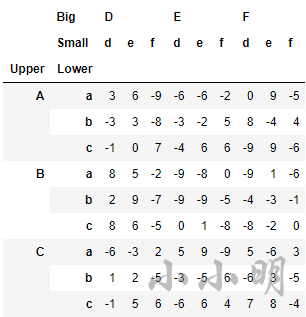
有一份如下样式的多级索引的数据:
np.random.seed(0)
L1, L2 = ['A', 'B', 'C'], ['a', 'b', 'c']
mul_index1 = pd.MultiIndex.from_product([L1, L2], names=('Upper', 'Lower'))
L3, L4 = ['D', 'E', 'F'], ['d', 'e', 'f']
mul_index2 = pd.MultiIndex.from_product([L3, L4], names=('Big', 'Small'))
df_ex = pd.DataFrame(np.random.randint(-9, 10, (9, 9)),
                     index=mul_index1,
                     columns=mul_index2)
df_ex
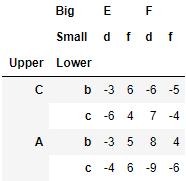
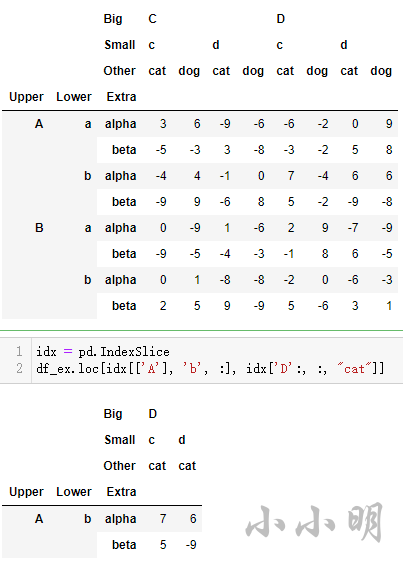
我们希望对每个层级都能分别指定筛选规则,可以使用 pd.IndexSlice对象:
idx = pd.IndexSlice
df_ex.loc[idx[['C', 'A'], 'b':], idx['E':, ["d", "f"]]]
筛选结果如下:
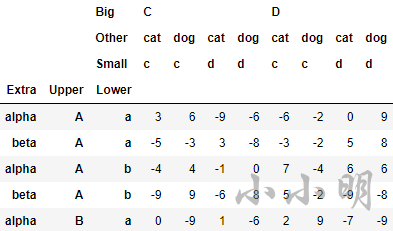
再测试一个三级索引的例子:
np.random.seed(0)
L1,L2,L3 = ['A','B'],['a','b'],['alpha','beta']
mul_index1 = pd.MultiIndex.from_product([L1,L2,L3],
             names=('Upper', 'Lower','Extra'))
L4,L5,L6 = ['C','D'],['c','d'],['cat','dog']
mul_index2 = pd.MultiIndex.from_product([L4,L5,L6],
             names=('Big', 'Small', 'Other'))
df_ex = pd.DataFrame(np.random.randint(-9,10,(8,8)),
                        index=mul_index1,
                        columns=mul_index2)
df_ex
筛选效果:
索引层的交换由 swaplevel 和 reorder_levels 完成,前者只能交换两个层,而后者可以交换任意层,两者都可以指定交换的是轴是哪一个,即行索引或列索引:
(
    df_ex.swaplevel(1, 2, axis=1)
    .reorder_levels([2, 0, 1], axis=0)
    .head()
)
删除索引层级:
df_ex.droplevel([1, 2], axis=0)
修改索引层的名称使用 rename_axis,修改索引的值使用 rename多级索引需要指定修改的层号 level和修改字典(或函数) 。
修改指定层级的索引可以使用如下方法:
df_ex.index = df_ex.index.set_levels(list('abcdefgh'), level=2)
时序升降采样与滑窗处理提速
对于如下时间序列数据:
s = pd.Series(np.random.rand(5), pd.date_range(
    "2022-01-01", periods=5, freq="2D"))
s
2022-01-01    0.563105
2022-01-03    0.340093
2022-01-05    0.472301
2022-01-07    0.526723
2022-01-09    0.857248
Freq: 2D, dtype: float64
降采样表示将数据聚合到规律的低频率:
s.resample("5D").sum()
2022-01-01    6
2022-01-06    9
Freq: 5D, dtype: int64
升采样表示将数据从低频率转换到高频率:
s.asfreq("D")
2022-01-01    1.0
2022-01-02    NaN
2022-01-03    2.0
2022-01-04    NaN
2022-01-05    3.0
2022-01-06    NaN
2022-01-07    4.0
2022-01-08    NaN
2022-01-09    5.0
Freq: D, dtype: float64
对于升采样产生的缺失值,我们除了可以使用fillna和ffill等空值填充方法外,还可以使用interpolate函数进行插值:
s.asfreq("D").interpolate()
2022-01-01    1.0
2022-01-02    1.5
2022-01-03    2.0
2022-01-04    2.5
2022-01-05    3.0
2022-01-06    3.5
2022-01-07    4.0
2022-01-08    4.5
2022-01-09    5.0
Freq: D, dtype: float64
interpolate函数的完整用法可参考:https://pandas.pydata.org/docs/reference/api/pandas.Series.interpolate.html
对rolling滑动窗口需要传入自定义函数并且数据量较大时,apply函数指定engine = ‘numba’,可能能够大幅度提速,示例:
s.rolling('30D').apply(lambda x: x.sum()/x.size, engine='numba', raw=True)
构造测试数据:
idx = pd.date_range('19800101', '20221231', freq='B')
data = np.random.randint(-1, 2, len(idx)).cumsum()
s = pd.Series(data, index=idx)
s
1980-01-01      1
1980-01-02      2
1980-01-03      3
1980-01-04      2
1980-01-07      3
             ...

2022-12-26   -177
2022-12-27   -178
2022-12-28   -179
2022-12-29   -180
2022-12-30   -179
Freq: B, Length: 11219, dtype: int32
效果:
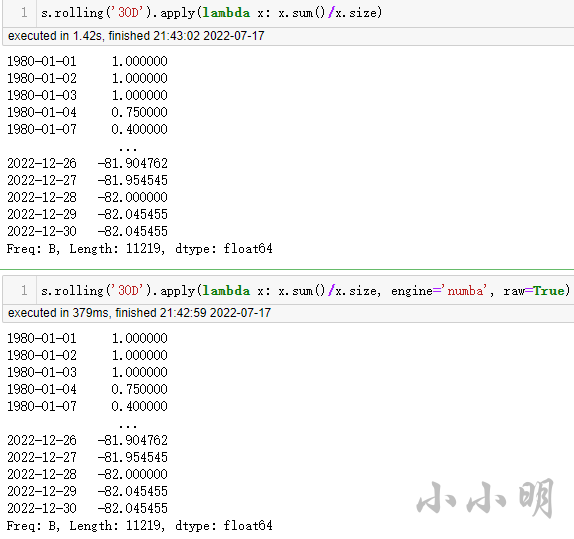
注意:仅pandas.core.window.rolling.Rolling对象的apply方法具备该参数,DataFrame和pandas.core.groupby.GroupBy对象的apply方法均不支持。而且Rolling对象的apply方法的engine参数在1.0.0以上版本才出现。
分组聚合
groupby 对象的完整属性和方法可参考:https://pandas.pydata.org/docs/reference/groupby.html
groupby 对象的属性
做分组操作时所调用的方法都来自于 pandas 中的 groupby 对象:
import pandas as pd
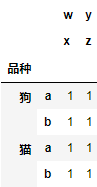
animals = pd.DataFrame({'品种': ['猫', '狗', '猫', '狗'],
'身高': [9.1, 6.0, 9.5, 34.0],
'体重': [7.9, 7.5, 9.9, 198.0]})
gb = animals.groupby("品种")
gb
<pandas.core.groupby.generic.dataframegroupby object at 0x000002985a85b548>
</pandas.core.groupby.generic.dataframegroupby>
组的个数:
gb.ngroups
2
每组对应的索引:
gb.groups
{'狗': [1, 3], '猫': [0, 2]}
获取指定组的内容,例如:
gb.get_group("狗")
等价于:
animals.query("品种=='狗'")
聚合函数agg
最实用的命名元组用法:
animals.groupby('品种').agg(
    最低身高=('身高', "min"),
    最高身高=('身高', "max"),
    平均体重=('体重', "mean"),
)
如果只对部分列进行一个操作并且不需要重命名可以使用基本用法:
animals.groupby('品种').agg({'身高': 'mean', '体重': 'mean'})
可以对单列执行多个聚合操作:
animals.groupby('品种').身高.agg(["min", "max"])
对单列执行每个聚合操作时都重命名列名:
animals.groupby('品种').身高.agg(
    最低="min",
    最高="max",
)
或者:
animals.groupby('品种').身高.agg([("最低", "min"), ("最高", "max")])
注意:agg也可以在未分组的DataFream或Series对象上使用
transform
transform与agg使用自定义函数处理时传入参数一致都是每列对应的Series对象,简单验证一下:
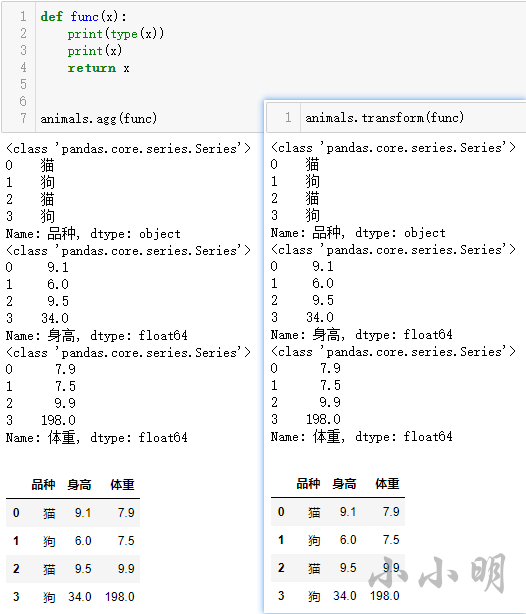
聚合时,传入agg的自定义函数必须返回聚合的标量值。
transform最后的返回结果是行列索引与数据源一致的 DataFrame ,当自定义函数返回一个标量时,结果会被广播到其所在的整个组形成行列索引与数据源一致的 DataFrame :
animals.groupby('品种').transform("min")
   身高  体重
0  9.1  7.9
1  6.0  7.5
2  9.1  7.9
3  6.0  7.5
我们一般会选取需要进行广播处理的那一列,例如:
animals.groupby('品种').身高.transform("min")
apply
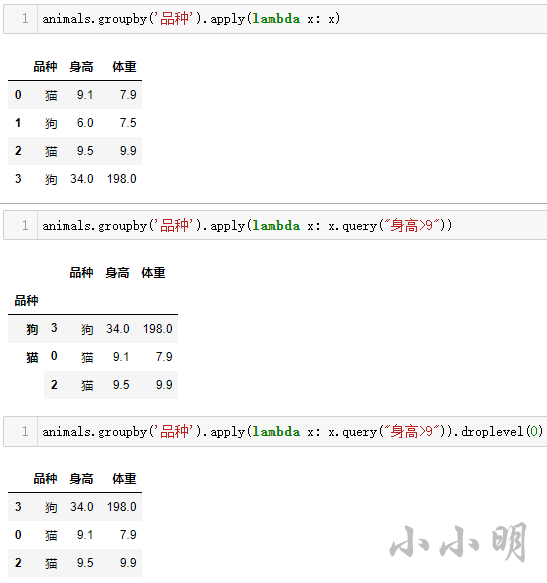
apply直接对DataFream操作传入自定义函数的对象也是每列对应的Series对象,对分组后DataFrameGroupBy对象执行apply操作,则传入的是按行索引被拆分的DataFream对象。
标量示例:计算BMI均值
animals.groupby('品种').apply(lambda x: (x.体重/x.身高**2).mean())
品种
狗    0.189807
猫    0.102547
dtype: float64
返回Series的情况:列索引为 Series 的索引
animals.groupby('品种').agg(最低身高=('身高', "min"), 平均体重=('体重', "mean"))
上述代码通过apply返回Series的形式达到同样的效果:
animals.groupby('品种').apply(lambda x: pd.Series([x.体重.min(), x.体重.mean()], index=['最低身高', '平均体重']))
返回DataFrame的情况:列索引为 Series 的索引
可以任意调整每组的结果:
animals.groupby('品种').apply(lambda x: pd.DataFrame(
    np.ones((2, 2), "int8"), index=['a', 'b'],
    columns=pd.Index([('w', 'x'), ('y', 'z')])
))
返回的结果出现多级索引只在自定义函数返回的DataFrame与输入的DataFrame索引不一致时才会出现,此时我们一般会使用droplevel方法将其删除,例如:
animals.groupby('品种').apply(lambda x: x.query("身高>9")).droplevel(0)
melt的扩展版wide_to_long
常用的pandas变形函数有pivot、pivot_table、melt、crosstab、explode和get_dummies,索引变形函数stack与unstack。
简单说明下,pivot和melt用于长宽表互转,即SQL所说的列转行与行转列。pivot_table实现了类似Excel的数据透视表,crosstab交叉表则是数据透视表的特殊情况只能进行计数统计。explode实现了将列表扩展到多行,get_dummies用于生成哑编码。
unstack 函数的作用是把行索引转为列索引, stack 用于把列索引压入行索引。stack与unstack结合groupby也可以实现pivot和melt同样的功能。
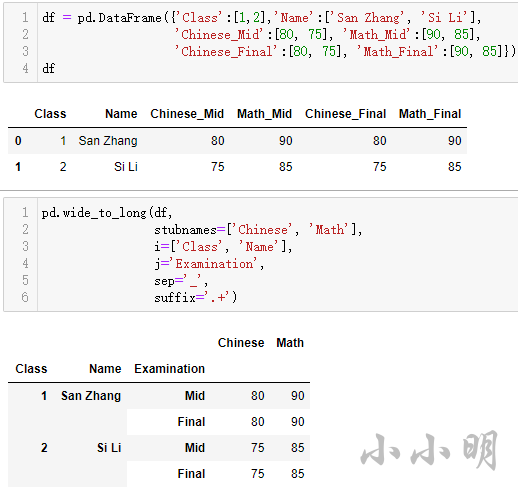
以上常用的函数不再讲述,现在只介绍wide_to_long。下面看看效果:
df = pd.DataFrame({'Class':[1,2],'Name':['San Zhang', 'Si Li'],
                   'Chinese_Mid':[80, 75], 'Math_Mid':[90, 85],
                   'Chinese_Final':[80, 75], 'Math_Final':[90, 85]})
pd.wide_to_long(df,
                stubnames=['Chinese', 'Math'],
                i=['Class', 'Name'],
                j='Examination',
                sep='_',
                suffix='.+')
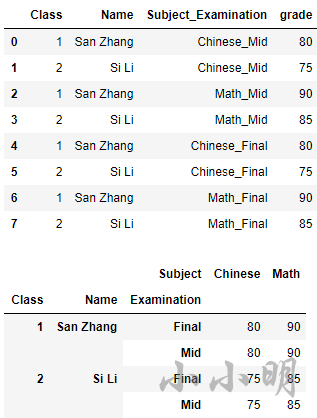
如果使用melt实现上述效果,则需要如下代码:
df_melt = df.melt(id_vars=['Class', 'Name'], value_vars=[
    "Chinese_Mid", "Math_Mid", "Chinese_Final", "Math_Final"],
    var_name="Subject_Examination",
    value_name='grade')
df_melt
df_melt[["Subject", "Examination"]] = df_melt.Subject_Examination.str.split(
    "_", expand=True)
df_melt.drop(columns=["Subject_Examination"], inplace=True)
df_melt.set_index(["Class","Name", "Examination", "Subject"]).unstack("Subject").droplevel(0, axis="columns")
分组的整组筛选
filter 方法可以对 groupby 对象进行组的筛选,其中自定义函数的输入参数为数据源构成的 DataFrame 本身。
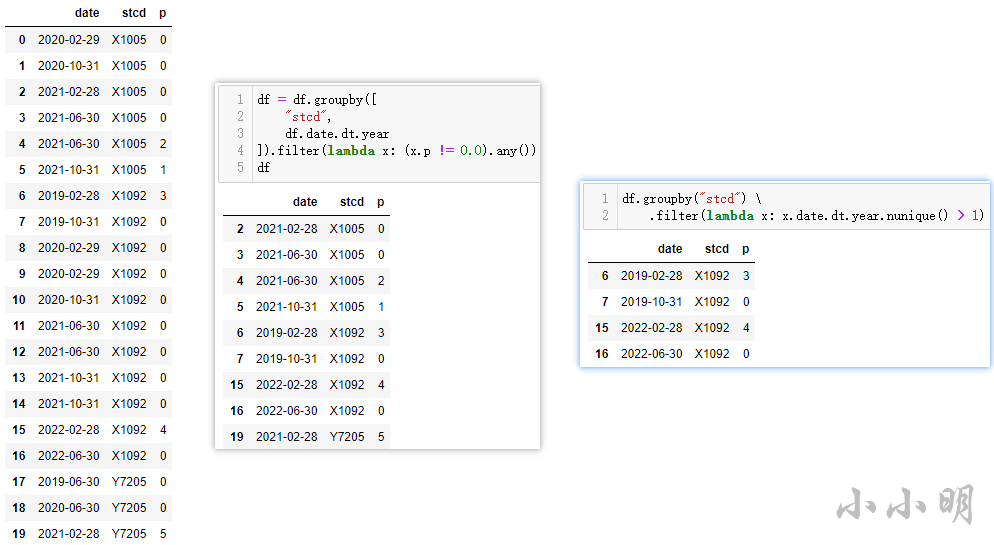
下面我们要求过滤掉每个站全年都是0的数据,以及每个站只有1年数据的站。准备测试数据:
import pandas as pd
import numpy as np
np.random.seed(0)
date = np.random.choice(pd.date_range(
    "2019-02-01", "2022-07-17", freq="4M"), 20)
stcd = np.random.choice(["X1005", "X1092", "Y7205"], 20)
p = np.random.permutation([0]*15+list(range(1, 6)))
df = pd.DataFrame({"date": date, "stcd": stcd, "p": p})
df.sort_values(["stcd", "date"], inplace=True, ignore_index=True)
df
过滤掉每个站全年都是0的数据:
df = df.groupby([
    "stcd",
    df.date.dt.year
]).filter(lambda x: (x.p != 0).any())
过滤掉只有1年数据的站:
df.groupby("stcd").filter(lambda x: x.date.dt.year.nunique() > 1)
Pandas选项设置
可用选项列表(出自:https://pandas.pydata.org/docs/reference/api/pandas.describe_option.html):
- compute.[use_bottleneck, use_numba, use_numexpr]
- display.[chop_threshold, colheader_justify, column_space, date_dayfirst, date_yearfirst, encoding, expand_frame_repr, float_format]
- display.html.[border, table_schema, use_mathjax]
- display.[large_repr]
- display.latex.[escape, longtable, multicolumn, multicolumn_format, multirow, repr]
- display.[max_categories, max_columns, max_colwidth, max_dir_items, max_info_columns, max_info_rows, max_rows, max_seq_items, memory_usage, min_rows, multi_sparse, notebook_repr_html, pprint_nest_depth, precision, show_dimensions]
- display.unicode.[ambiguous_as_wide, east_asian_width]
- display.[width]
- io.excel.ods.[reader, writer]
- io.excel.xls.[reader, writer]
- io.excel.xlsb.[reader]
- io.excel.xlsm.[reader, writer]
- io.excel.xlsx.[reader, writer]
- io.hdf.[default_format, dropna_table]
- io.parquet.[engine]
- io.sql.[engine]
- mode.[chained_assignment, data_manager, sim_interactive, string_storage, use_inf_as_na, use_inf_as_null]
- plotting.[backend]
- plotting.matplotlib.[register_converters]
- styler.format.[decimal, escape, formatter, na_rep, precision, thousands]
- styler.html.
- styler.latex.[environment, hrules, multicol_align, multirow_align]
- styler.render.[encoding, max_columns, max_elements, max_rows, repr]
- styler.sparse.[columns, index]
查看所有选项说明:
pd.describe_option()
传入选项名称即可过滤出含有指定名称的选项说明:
pd.describe_option("display")
设置选项:
pd.options.display.max_rows = 100
通过这种方式我们可以在敲出pd.options.后按下Tab键进行代码提示,从而找到需要的选项。
还可以通过set_option方法设置选项:
pd.set_option("max_r", 100)
选项的完整名称为 display.max_rows,但是set_option通过正则查找找到了唯一匹配的选项,如果正则找到多个匹配的选项则会报错。
reset_option方法可以一次重置多个选项(使用正则表达式) :
pd.reset_option("^display")
option_context() 方法可以在指定范围内使用选项:
In [21]: with pd.option_context("display.max_rows", 10, "display.max_columns", 5):
   ....:     print(pd.get_option("display.max_rows"))
   ....:     print(pd.get_option("display.max_columns"))
   ....:
10
5

In [22]: print(pd.get_option("display.max_rows"))
60

In [23]: print(pd.get_option("display.max_columns"))
0
更多用法可参考:https://pandas.pydata.org/docs/user_guide/options.html
综合小案例
多列数据与单列列表互转
df = pd.DataFrame([
    ['90', '51', '07'],
    ['99', '35', '33'],
    ['100', '14', '30'],
    ['99', '01', '11'],
    ['100', '08', '16']
])
df

s = df.apply(list, axis=1)
s

s.apply(pd.Series)
更多分列示例查看:
Pandas实现列表分列与字典分列的三个实例
https://xxmdmst.blog.csdn.net/article/details/112789571
二分查找
以前我们使用二分查找使用bisect库:
import bisect

a = [1, 3, 5]
print(bisect.bisect(a, 1), bisect.bisect(a, 2), bisect.bisect(a, 3))
print(bisect.bisect_left(a, 1), bisect.bisect_left(a, 2), bisect.bisect_left(a, 3))
print(bisect.bisect_right(a, 1), bisect.bisect_right(a, 2), bisect.bisect_right(a, 3))
1 1 2
0 1 1
1 1 2
事实上pandas内部有批量2分查找的方法:
ser = pd.Series([1, 3, 5])
print(ser.searchsorted([1, 2, 3]))
print(ser.searchsorted([1, 2, 3], side='left'))
print(ser.searchsorted([1, 2, 3], side='right'))
[0 1 1]
[0 1 1]
[1 1 2]
只不到bisect等价于bisect_right,searchsorted的side默认值为left。
自定义顺序排序
pandas实现自定义顺序排序除了利用辅助列以外就是利用category类型设置顺序,有如下数据:
sales = pd.DataFrame({'分公司': ['上海', '广州', '深圳', '北京', '上海', '深圳', '广州', '北京', '北京'],
                  '销售额': [26677, 16544, 15655, 36986, 18923, 44161, 26409, 93223, 56586],
                   '门店': ['上海一店', '广州二店',  '深圳二店', '北京一店', '上海二店',
                          '深圳一店',  '广州一店',  '北京二店', '北京三店']},
                  index=pd.Index(range(1, 10), name="序号"))
sales
我们希望按照 北京,上海,广州,深圳 的顺序进行排序,只需要设置一下category:
sales.分公司 = sales.分公司.astype("category").cat.set_categories(['北京', '上海', '广州', '深圳'])
或者我们可以直接创建category类:
sales.分公司 = pd.Categorical(sales.分公司, categories=['北京', '上海', '广州', '深圳'])
然后在按照分公司排序即可:
sales.sort_values(by='分公司')
分组合并列里的内容
目标:
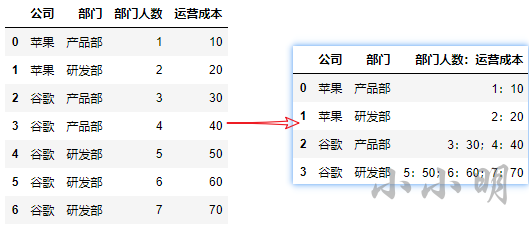
完整代码:
import pandas as pd

df = pd.DataFrame({'公司': ['苹果', '苹果', '谷歌', '谷歌', '谷歌', '谷歌', '谷歌'],
                   '部门': ['产品部', '研发部', '产品部', '产品部', '研发部', '研发部', '研发部'],
                  '部门人数': [1, 2, 3, 4, 5, 6, 7],
                   '运营成本': [10, 20, 30, 40, 50, 60, 70]})

df['部门人数:运营成本'] = df.部门人数.astype("str")+":"+df.运营成本.astype("str")
df.groupby(['公司', '部门'], as_index=False)['部门人数:运营成本'].agg(';'.join)
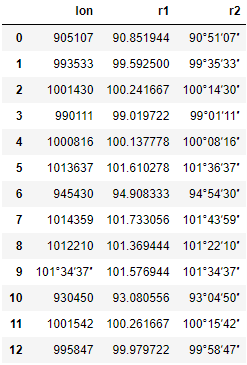
度分秒经纬度互转
测试数据:
df = pd.DataFrame({'lon': ['905107', '993533', '1001430', '990111', '1000816',
                           '1013637', '945430', '1014359', '1012210',
                           '101°34′37″', '930450', '1001542', '995847']})
度分秒转为小数度数:
import re

def func(x):
    return sum(int(num) / (60 ** i)
               for i, num in enumerate(re.match("(\d{2,3})[^\d]*(\d{2})[^\d]*(\d{2})[^\d]*$", str(x)).groups()))

df["r1"] = df.lon.apply(func)
小数度数转为度分秒:
def func(x):
    d, r = divmod(x, 1)
    m, r = divmod(r*60, 1)
    s = round(r*60)
    return f"{int(d):0>2}°{int(m):0>2}′{s:0>2}″"

df["r2"] = df.r1.apply(func)
df
最终结果:
2秒生成一百万条测试数据并排序
import pandas as pd
import numpy as np

sales_people = pd.Series({"陈天浩": "上海", "孙健": "上海", "王梓戎": "广东", "刘丹": "上海",
                          "刘颖": "上海", "刘雪": "天津", "章洋": "上海", "殷琳": "广东",
                          "李辉": "北京", "王玉": "吉林", "侯宁": "上海", "吴中岳": "广东",
                          "张林": "广东", "庄雷": "上海", "王宇": "吉林", "利坤": "上海",
                          "董丹丹": "广东", "蔡建平": "山东", "陈杨": "吉林", "蔡勇": "广东",
                          "李琳": "上海", "魏苍生": "天津", "刘帆": "天津", "戴雪": "上海",
                          "许亮": "吉林", "李智童": "山东", "钱国": "山东", "郭华锋": "吉林",
                          "阎云": "山东", "江敏": "上海"})
products = pd.Series({"苹果": 10, "梨": 8, "桃": 6.5, "葡萄": 15, "椰子": 20,
                      "西瓜": 30, "百香果": 12, "榴莲": 50, "桔子": 6, "香蕉": 7.5})
size = 1000000
date = np.random.choice(pd.date_range('2022-01-01', '2022-12-31'), size)
customer_id = np.random.randint(1, 1000, size)
sale_name = np.random.choice(sales_people.index, size)
region = sales_people[sale_name].values
product = np.random.choice(products.index, size)
price = products[product].values
quantity = np.random.randint(1, 10000, size)
revenue = price * quantity
df = pd.DataFrame({"交易日期": date, "客户ID": customer_id, "售货员": sale_name, "分公司": region,
                  "产品": product, "单价": price, "数量": quantity, "订单金额": revenue})
df.客户ID = "C"+df.客户ID.astype("str").str.zfill(4)
df.sort_values(['交易日期', '分公司', '售货员'], ignore_index=True, inplace=True)
df

相对于呆叔原文的3分钟生成1万条数据快了1万倍以上。原文:《不会爬,没数据?没关系!3分钟搞定1w+数据,超实用!》
相邻日期超过 4 天则顺序编号
测试数据生成:
import pandas as pd
import numpy as np

size = 5000000
df = pd.DataFrame({
    "id": np.random.randint(1, 501, size),
    "date": pd.date_range("2010-01-01", periods=size, freq="5T")
})
df.sort_values(["id", "date"], ascending=[True, False], inplace=True)
处理代码:
diff = (df.groupby("id")["date"].shift()-df.date) > pd.Timedelta("4 days")
diff_cumsum = diff.groupby(df.id).cumsum()+1
df["new_id"] = df.id.astype("str")+"-"+diff_cumsum.astype("str")
df

Original: https://blog.csdn.net/as604049322/article/details/125837926
Author: 小小明-代码实体
Title: 2022-07 Pandas进阶复盘汇总
原创文章受到原创版权保护。转载请注明出处:https://www.johngo689.com/696272/
转载文章受原作者版权保护。转载请注明原作者出处!