

1 UNet网络架构


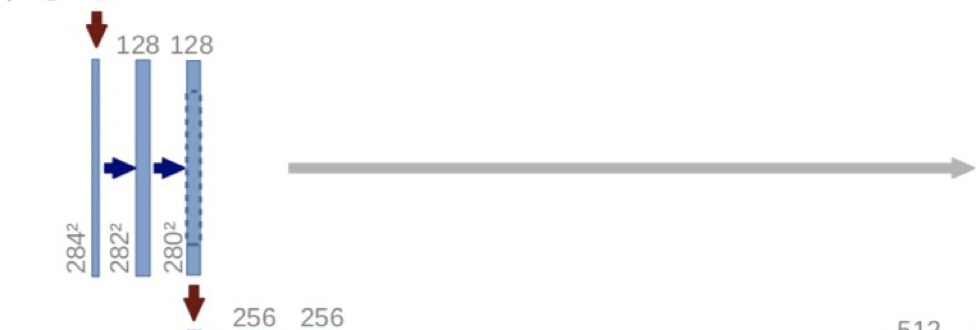
UNet网络由左编码部分,右解码部分和下两个卷积+激活层组成
- 编码部分
- 从图中可知:架构中是由4个重复结构组成:2个3×3卷积层,非线形ReLU层和一个stride为2的2×2 max pooling层(图中的蓝箭头,红箭头)
- 每一次下采样特征通道的数量加倍
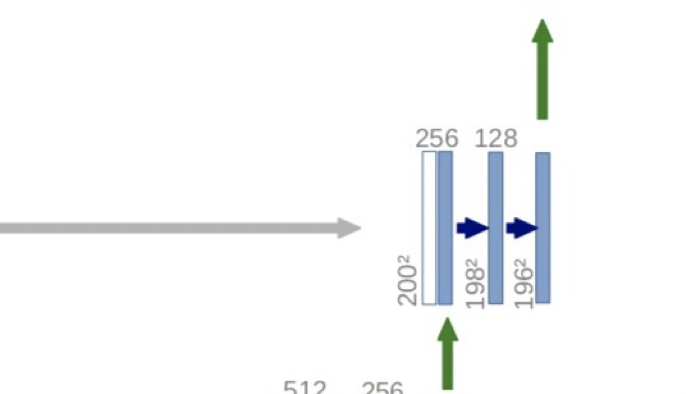
- 解码部分
- 和编码层类似,反卷积也有4个重复结构组成
- 每个重复结构前先使用反卷积,每次反卷积后特征通道数量减半,特征图大小加倍(绿箭头)
- 反卷积之后,反卷积的结果和编码部分对应步骤的特征图拼接起来(白/蓝块)
- 如果编码部分的特征图尺寸较大,需要进行裁剪后再拼接(左边深蓝色的虚线)
- 拼接后的特征图再进行2次3×3的卷积(右侧蓝箭头)
- 最后一层的卷积核为1×1 的卷积核,将64通道的特征图转化为特定类别数量(分类数量)的结果(青色箭头)
; 2 模型构建
2.1 数据集获取
from PIL import ImageOps
from tensorflow import keras
import numpy as np
import tensorflow as tf
from tensorflow.keras.layers import Input, Conv2D, Conv2DTranspose
from tensorflow.keras.layers import MaxPooling2D, Cropping2D, Concatenate
from tensorflow.keras.layers import Lambda, Activation, BatchNormalization, Dropout
from tensorflow.keras.models import Model
import random
import os
os.environ['TF_CPP_MIN_LOG_LEVEL'] = '2'
os.environ['KMP_DUPLICATE_LIB_OK'] = 'True'

input_dir = 'segdata/images/'

input_img_path = sorted([os.path.join(input_dir, fname)
                         for fname in os.listdir(input_dir) if fname.endswith('.jpg')])

target_dir = 'segdata/annotations/trimaps/'

target_img_path = sorted(os.path.join(target_dir, fname) for fname in os.listdir(
    target_dir) if fname.endswith('.png') and not fname.startswith('.'))

img_size = (160, 160)
batch_size = 32
num_classes = 4
使用的数据集是Oxford-IIIT Pet Dataset宠物图像分割数据集,包含37种宠物类别,其中有12种猫的类别和25种狗的类别,每个类别大约有200张图片,所有图像都具有品种,头部ROI和像素级分割的标注。
2.2 构建数据集生成器
class OxfordPets(keras.utils.Sequence):

    def __init__(self, batch_size, img_size, input_img_paths, target_img_paths):

        self.batch_size = batch_size

        self.img_size = img_size

        self.input_img_paths = input_img_paths

        self.target_img_paths = target_img_paths

    def __len__(self):
        return len(self.target_img_paths) // self.batch_size

    def __getitem__(self, idx):

        i = idx * self.batch_size

        batch_input_img_paths = self.input_img_paths[i:i + self.batch_size]
        batch_target_img_paths = self.target_img_paths[i:i + self.batch_size]

        x = np.zeros((batch_size,) + self.img_size + (3,), dtype='float32')
        for j, path in enumerate(batch_input_img_paths):
            img = load_img(path, target_size=self.img_size)
            x[j] = img

        y = np.zeros((batch_size,) + self.img_size + (1,), dtype='uint8')
        for j, path in enumerate(batch_target_img_paths):
            img = load_img(path, target_size=self.img_size,
                           color_mode='grayscale')
            y[j] = np.expand_dims(img, 2)
        return x, y
2.3 编码部分
编码部分的特点是:
- 架构中是由4个重复结构组成:2个3×3卷积层,非线形ReLU层和一个stride为2的2×2 max pooling层
- 每一次下采样后我们都把特征通道的数量加倍
- 每次重复都有两个输出:一个用于编码部分进行特征提取,一个用于解码部分的特征融合
def downsampling_block(input_tensor, filters):

    x = Conv2D(filters, kernel_size=3, padding='same')(input_tensor)

    x = BatchNormalization()(x)

    x = Activation('relu')(x)

    x = Conv2D(filters, kernel_size=3, padding='same')(x)

    x = BatchNormalization()(x)

    x = Activation('relu')(x)

    return MaxPooling2D(pool_size=2)(x), x
2.4 解码部分
- 和编码层类似,反卷积也有4个重复结构组成
- 每个重复结构前先使用反卷积,每次反卷积后特征通道数量减半,特征图大小加倍(绿箭头)
- 反卷积之后,反卷积的结果和编码部分对应步骤的特征图拼接起来(白/蓝块)
- 如果编码部分的特征图尺寸较大,需要进行裁剪后再拼接(左边深蓝色的虚线)
- 拼接后的特征图再进行2次3×3的卷积(右侧蓝箭头)
- 最后一层的卷积核为1×1 的卷积核,将64通道的特征图转化为特定类别数量(分类数量)的结果(青色箭头)
def upsampling_block(input_tensor, skip_tensor, filters):

    x = Conv2DTranspose(filters, kernel_size=2, strides=2,
                        padding='same')(input_tensor)

    _, x_height, x_width, _ = x.shape

    _, s_height, s_width, _ = skip_tensor.shape

    h_crop = s_height - x_height
    w_crop = s_width - x_width

    if h_crop == 0 and w_crop == 0:
        y = skip_tensor
    else:

        cropping = ((h_crop // 2, h_crop - h_crop // 2),
                    (w_crop // 2, w_crop - w_crop // 2))
        y = Cropping2D(cropping=cropping)(skip_tensor)

    x = Concatenate()([x, y])

    x = Conv2D(filters, kernel_size=3, padding='same')(x)

    x = BatchNormalization()(x)

    x = Activation('relu')(x)

    x = Conv2D(filters, kernel_size=2, padding='same')(x)

    x = BatchNormalization()(x)

    x = Activation('relu')(x)
    return x
2.5 模型构建

将编码部分和解码部分组合一起,就可构建UNet网络,在这里UNet网络的深度通过depth进行设置,并设置第一个编码模块的卷积核个数通过filter进行设置,通过以下模块将编码和解码部分进行组合:
def unet(imagesize, classes, fetures=64, depth=3):

    inputs = keras.Input(shape=(imagesize + (3,)))
    x = inputs

    skips = []
    for i in range(depth):
        x, x0 = downsampling_block(x, fetures)
        skips.append(x0)
        fetures *= 2

    x = Conv2D(filters=fetures, kernel_size=3, padding='same')(x)

    x = BatchNormalization()(x)

    x = Activation('relu')(x)

    x = Conv2D(filters=fetures, kernel_size=3, padding='same')(x)

    x = Activation('relu')(x)

    for i in reversed(range(depth)):
        fetures //= 2

        x = upsampling_block(x, skips[i], fetures)

    x = Conv2D(filters=classes, kernel_size=1, padding='same')(x)

    outputs = Activation('softmax')(x)
    return keras.Model(inputs=inputs, outputs=outputs)

model = unet(img_size, num_classes)
2.6 模型训练
2.6.1 数据集划分
数据集中的图像是按顺序进行存储的,在这里我们将数据集打乱后,验证集的数量1200,剩余的为训练集,划分训练集和验证集:
val_samples = 1200

random.Random(1).shuffle(input_img_path)
random.Random(1).shuffle(target_img_path)

train_input_img_paths = input_img_path[:-val_samples]
train_target_img_paths = target_img_path[:-val_samples]

val_input_img_paths = input_img_path[-val_samples:]
val_target_img_paths = target_img_path[-val_samples:]
2.6.2 数据集获取
train_gen = OxfordPets(batch_size, img_size, train_input_img_paths, train_target_img_paths)
val_gen = OxfordPets(batch_size, img_size, val_input_img_paths, val_target_img_paths)
2.6.3 模型编译和训练
model.compile(optimize='rmprop', loss='sparse_categorical_crossentropy')
model.fit(train_gen, epochs=10, validation_data=val_gen)
2.7模型预测
val_gen = OxfordPets(batch_size, img_size, val_input_img_paths, val_target_img_paths)
val_preds = model.predict(val_gen)

def display_mask(i):

    mask = np.argmax(val_preds[i], axis=-1)

    mask = np.expand_dims(mask, axis=-1)

    img = PIL.ImageOps.autocontrast(keras.preprocessing.image.array_to_img(mask))
    display(img)

i = 10

display(Image(filename=val_input_img_paths[i]))

img = PIL.ImageOps.autocontrast(load_img(val_target_img_paths[i]))
display(img)

display_mask(i)

Original: https://blog.csdn.net/m0_58475958/article/details/119709627
Author: 示木007
Title: 深度学习:目标分割|UNet网络模型及案例实现
原创文章受到原创版权保护。转载请注明出处:https://www.johngo689.com/690301/
转载文章受原作者版权保护。转载请注明原作者出处!