

文章目录
- 写在前面的话
- 一、明确功能目标
- 二、UI设计
* - 1.选择主界面
- 三、功能的实现
* - 1.构建信号槽,为关闭按钮添加功能
- 2.剥离yolo模型载入代码,载入训练好的模型,封装成函数
- 3.剥离yolo推理代码,封装成函数可以被方便的调用
- 4.使用Qlabel展示图片,并用QtWidgets.QApplication.processEvents()方法高速刷新
- 5.实时显示原图+显示推理后结果
- 结语
写在前面的话
最近参加了个小比赛,大概意思就是用yolov5实现一个害虫识别.前期一切顺利模型训练,检测什么的都完成了,但遇到了一个问题,每次进行推理都得用人家封装好的py文件,而且里面很多功能是我们不需要的,于是我就在想能不能把yolo的检测模块写成一个函数,传入numpy的array即可得出检测结果坐标.在查阅了大量资料后终于完成,而且检测精度和之前无区别.利用晚上时间简单写了个界面demo
一、明确功能目标
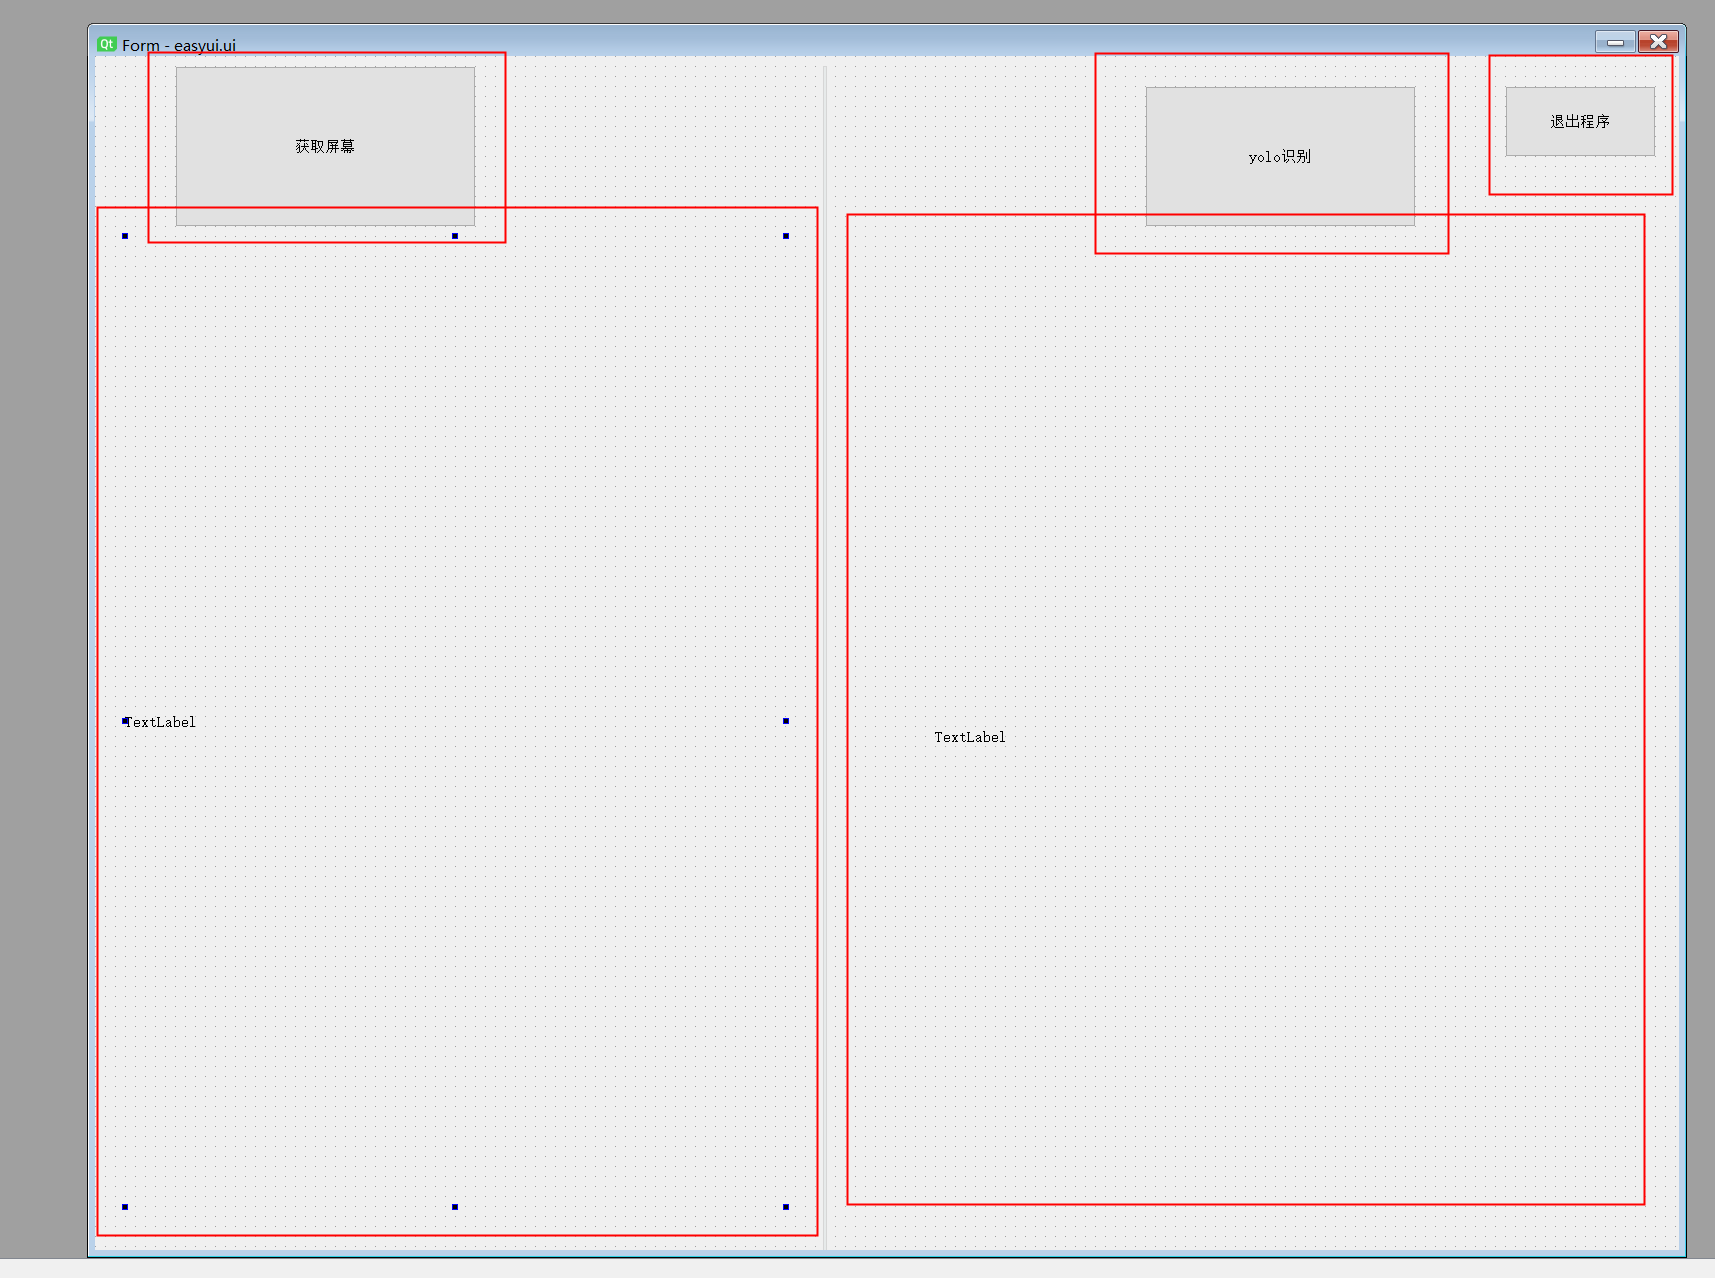
大概参考下布局
主要有三个按钮和两个文本框作为图片载体.
二、UI设计
1.选择主界面


采用无功能栏窗口
到此我们的界面大体上完工了,下面介绍如何实现按钮功能,以及图片的显示
; 三、功能的实现
1.构建信号槽,为关闭按钮添加功能
创建一个类,继承界面文件里的内容.连接好各自触发的函数


; 2.剥离yolo模型载入代码,载入训练好的模型,封装成函数
另写一个py文件,载入模型.当然,在主文件载入也可以

from models.experimental import attempt_load
from utils.torch_utils import select_device
WEIGHTS = 'runs/train/exp8/weights/best.pt'

def get_model():

    device = select_device('')
    half = device.type != 'cpu'
    model = attempt_load(WEIGHTS, map_location=device)

    stride = int(model.stride.max())
    names = model.module.names if hasattr(model, 'module') else model.names
    if half:
        model.half()

    return model, device, half, stride, names
3.剥离yolo推理代码,封装成函数可以被方便的调用
model, device, half, stride, names = get_model()
imgsz = check_img_size(IMGSZ, s=stride)
@torch.no_grad()

        def pred_img(img0):

            img = letterbox(img0, imgsz, stride=stride, auto=True)[0]

            img = img.transpose((2, 0, 1))[::-1]
            img = np.ascontiguousarray(img)
            model(torch.zeros(1, 3, *imgsz).to(device).type_as(next(model.parameters())))
            img = torch.from_numpy(img).to(device)
            img = img.half() if half else img.float()
            img = img / 255.0
            if len(img.shape) == 3:
                img = img[None]
            pred = model(img, augment=False, visualize=False)[0]

            pred = non_max_suppression(pred, CONF_THRES, IOU_THRES, None, False, max_det=1000)
            det = pred[0]
            im0 = img0.copy()
            gn = torch.tensor(im0.shape)[[1, 0, 1, 0]]
            annotator = Annotator(im0, line_width=LINE_THICKNESS, example=str(names))
            xywh_list = []
            if len(det):
                det[:, :4] = scale_coords(img.shape[2:], det[:, :4], im0.shape).round()
                for *xyxy, conf, cls in reversed(det):
                    c = int(cls)
                    xywh = (xyxy2xywh(torch.tensor(xyxy).view(1, 4)) / gn).view(-1).tolist()
                    xywh_list.append(xywh)
                    label = None if HIDE_LABELS else (names[c] if HIDE_CONF else f'{names[c]}{conf:.2f}')
                    annotator.box_label(xyxy, label, color=colors(c, True))
            im0 = annotator.result()
            print(xywh_list)
            return im0, xywh_list
4.使用Qlabel展示图片,并用QtWidgets.QApplication.processEvents()方法高速刷新
正常来说Qlabel只能接收本地保存的图片,但实际上可以用np.array转化到QImage格式
    monitor={
    'left':0,
    'top':0,
    'width':2000,
    'height':1300
}
    def openimage(self):
        while 1:
            img=sct.grab(monitor)
            img=np.array(img)
            shrink = cv2.cvtColor(img, cv2.COLOR_BGR2RGB)

            qt_img = QtGui.QImage(shrink.data,
                              shrink.shape[1],
                              shrink.shape[0],
                              shrink.shape[1] * 3,
                              QtGui.QImage.Format_RGB888)
            self.label.setPixmap(QtGui.QPixmap.fromImage(qt_img))
            QtWidgets.QApplication.processEvents()
解释一下代码:
使用mss库截图,转化为nparray格式,再用cv转化到rgb颜色格式.使用QtGui.QImage方法传入img,宽高,色彩等信息返回QImage格式.之后便可成功覆盖到Qlabel上.循环末尾记得加上QtWidgets.QApplication.processEvents()插入线程,才能实现高速刷新实测效率很高,仅有微小延迟.
界面+实时截图占用cpu30左右

5.实时显示原图+显示推理后结果
本来当时想用多线程解决.但后来相信觉得没必要,直接顺便赋值一下给label就可以了.
    def startyolo(self):
        @torch.no_grad()
        def pred_img(img0):

            img = letterbox(img0, imgsz, stride=stride, auto=True)[0]

            img = img.transpose((2, 0, 1))[::-1]
            img = np.ascontiguousarray(img)
            model(torch.zeros(1, 3, *imgsz).to(device).type_as(next(model.parameters())))
            img = torch.from_numpy(img).to(device)
            img = img.half() if half else img.float()
            img = img / 255.0
            if len(img.shape) == 3:
                img = img[None]
            pred = model(img, augment=False, visualize=False)[0]

            pred = non_max_suppression(pred, CONF_THRES, IOU_THRES, None, False, max_det=1000)
            det = pred[0]
            im0 = img0.copy()
            gn = torch.tensor(im0.shape)[[1, 0, 1, 0]]
            annotator = Annotator(im0, line_width=LINE_THICKNESS, example=str(names))
            xywh_list = []
            if len(det):
                det[:, :4] = scale_coords(img.shape[2:], det[:, :4], im0.shape).round()
                for *xyxy, conf, cls in reversed(det):
                    c = int(cls)
                    xywh = (xyxy2xywh(torch.tensor(xyxy).view(1, 4)) / gn).view(-1).tolist()
                    xywh_list.append(xywh)
                    label = None if HIDE_LABELS else (names[c] if HIDE_CONF else f'{names[c]}{conf:.2f}')
                    annotator.box_label(xyxy, label, color=colors(c, True))
            im0 = annotator.result()
            print(xywh_list)
            return im0, xywh_list
        while 1:
            img = sct.grab(monitor=monitor)
            img = np.array(img)
            img = cv2.cvtColor(img, cv2.COLOR_BGRA2RGB)
            shrink, aims = pred_img(img)
            qt_img = QtGui.QImage(shrink.data,
                              shrink.shape[1],
                              shrink.shape[0],
                              shrink.shape[1] * 3,
                              QtGui.QImage.Format_RGB888)
            qt_img1 = QtGui.QImage(img.data,
                    img.shape[1],
                    img.shape[0],
                    img.shape[1] * 3,
                    QtGui.QImage.Format_RGB888)
            self.label.setPixmap(QtGui.QPixmap.fromImage(qt_img1))
            self.label_2.setPixmap(QtGui.QPixmap.fromImage(qt_img))
            QtWidgets.QApplication.processEvents()
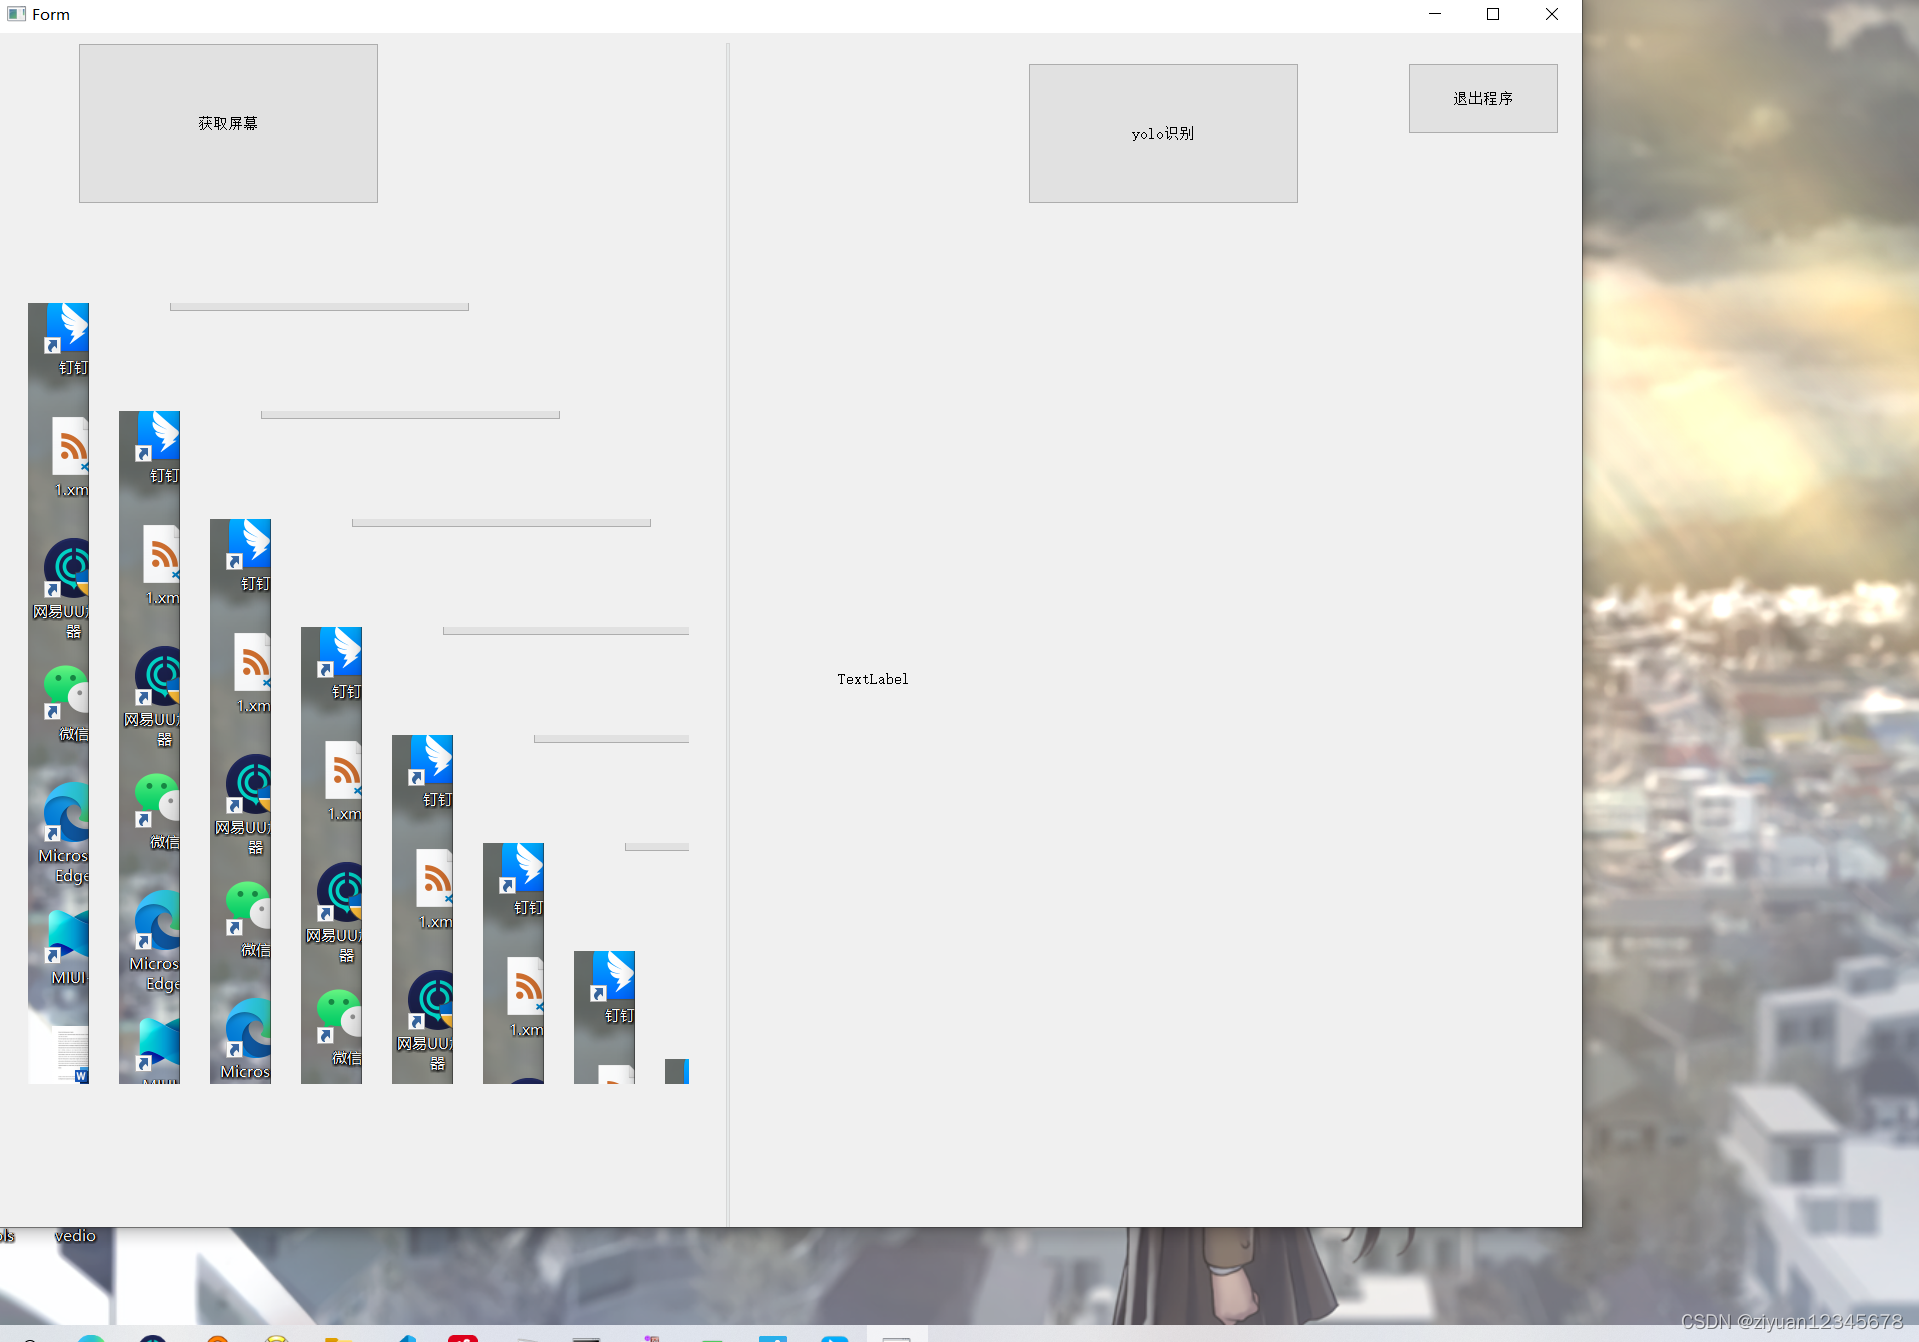
运行截图:

实时推理cpu占用极高,并没有什么实际作用.

结语
这个项目到这里也就结束了,目前也还是有很多问题的.例如点击关闭窗口后仅仅是ui关闭.开启的信号槽还在继续运行,必须手动ctrl+c一下结束程序.这个小项目用了我一个下午时间,算是个粗制滥造的东西.但应该不会再改善了把,哈哈
Original: https://blog.csdn.net/ziyuan12345678/article/details/124203082
Author: ziyuan12345678
Title: Pyqt5+Yolov5+Mss实现一个实时桌面检测软件
原创文章受到原创版权保护。转载请注明出处:https://www.johngo689.com/689403/
转载文章受原作者版权保护。转载请注明原作者出处!