

MM-Detection Logs(2022.04.01)
- 1. 创建环境
- 2. 激活环境
- 3. 安装PyTorch
- 4. 安装MMDetection依赖包
- 5. 安装MMDetection
- 6. 打开mmdetection项目
- 7. 在PyCharm中配置”open-mmlab”环境
-
创建环境
使用 conda 新建虚拟环境,命名为”open-mmlab”,终端输入命令:
conda create -n open-mmlab python=3.7 -y
- 激活环境
激活”open-mmlab”,切换到”open-mmlab”环境,终端输入命令:
source activate open-mmlab
- 安装PyTorch
PyTorch 官网:link
基于 PyTorch 官网安装 PyTorch 和 torchvision,”open-mmlab”环境下,终端输入命令:
conda install pytorch==1.7.1 torchvision==0.8.2 torchaudio==0.7.2 cudatoolkit=10.1 -c pytorch
备注:这里推荐PyTorch 1.7.1版本,我的环境是CUDA 10.1
- 安装MMDetection依赖包
安装 mmcv-full,”open-mmlab”环境下,终端输入命令:
pip install mmcv-full
我们建议使用预构建包来安装,如下:
pip install mmcv-full -f https://download.openmmlab.com/mmcv/dist/cu101/torch1.7.0/index.html
备注:”pip install mmcv-full -f https://download.openmmlab.com/mmcv/dist/{cu_version}/{torch_version}/index.html”中需要把命令行中的 {cu_version} 和 {torch_version} 替换成对应的版本。例如:上述代码对应的是 CUDA 10.1 和 PyTorch 1.7.1 的环境。PyTorch可忽略小版本,1.7.x都可以用1.7.0。
- 安装MMDetection
”open-mmlab”环境下,终端输入命令:
pip install mmdet
- 打开mmdetection项目
下载并在PyCharm中打开。项目地址:link
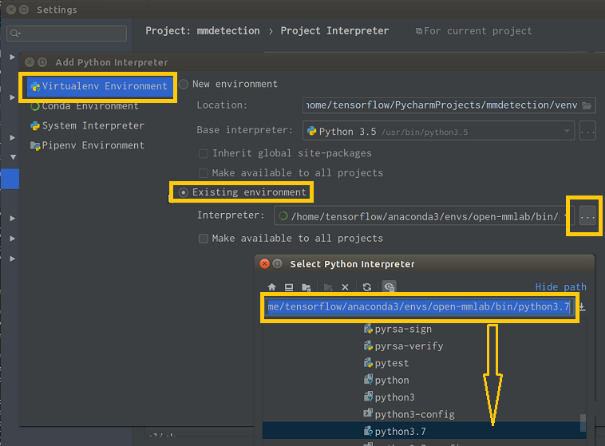
- 在PyCharm中配置”open-mmlab”环境

; 7. 验证
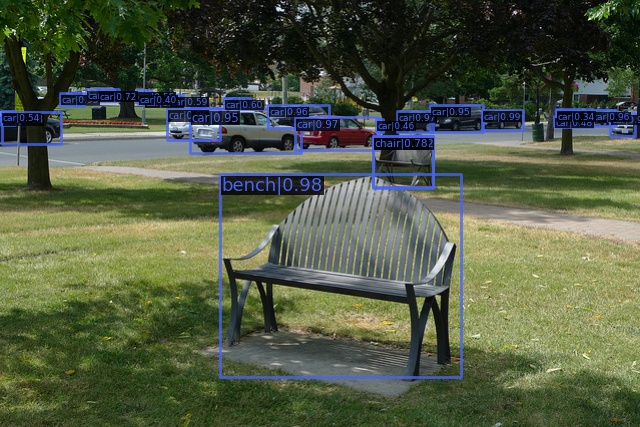
为了验证是否正确安装了 MMDetection 和所需的环境,我们可以运行示例的 Python 代码来初始化检测器并推理一个演示图像:
from mmdet.apis import init_detector, inference_detector

config_file = 'configs/faster_rcnn/faster_rcnn_r50_fpn_1x_coco.py'
从 model zoo 下载 checkpoint 并放在 checkpoints/ 文件下
网址为: http://download.openmmlab.com/mmdetection/v2.0/faster_rcnn/faster_rcnn_r50_fpn_1x_coco/faster_rcnn_r50_fpn_1x_coco_20200130-047c8118.pth
checkpoint_file = 'checkpoints/faster_rcnn_r50_fpn_1x_coco_20200130-047c8118.pth'
device = 'cuda:0'
初始化检测器
model = init_detector(config_file, checkpoint_file, device=device)
推理演示图像
result = inference_detector(model, 'demo/demo.jpg')
model.show_result('demo/demo.jpg', result, out_file='result.jpg')
备注:查看result.jpg正常即可。
Original: https://blog.csdn.net/qq_39430450/article/details/123957082
Author: Royhh1990
Title: MM-Detection Logs —— 环境搭建及安装(Linux)
原创文章受到原创版权保护。转载请注明出处:https://www.johngo689.com/687738/
转载文章受原作者版权保护。转载请注明原作者出处!