

图像分类学的差不多了,最近开始学一下目标检测,记录一下学习的过程。首先打算复现一下YOLO系列的算法,先从简单的yolo v1开始。
yolov1论文地址:https://arxiv.org/pdf/1506.02640.pdf
网络结构:
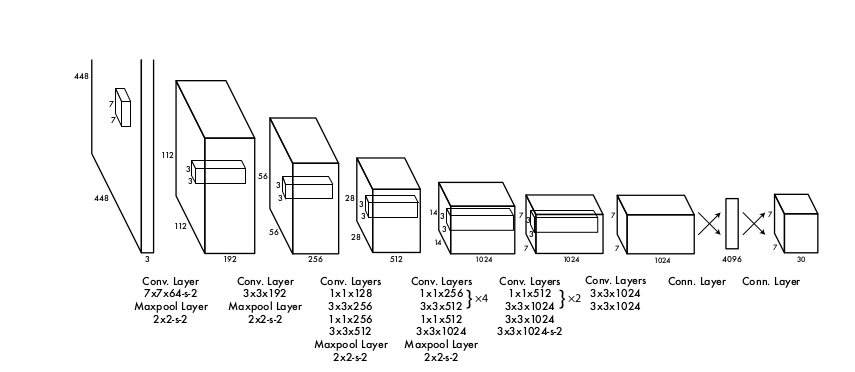

yolo是一个一阶段的端到端的算法,检测速度会比RCNN系列快很多,网络是一个24层的卷积层,最后的输出是一个7 _7_30的tensor,这是原文中作者设定的,讲一张图片划分为7 _7的grid,也就是待检测目标的中心点,也就是锚框。每个锚框预测两个bounding box。所以输出是7_7 _30的tensor,7_7就是锚框数量,30是20+5+5,其中20维是object的类别对应的概率,因为是用的是VOC2012数据集,5是每一个Bounding box的输出,包含(class,centre x,centre y,height,width)。yolo中作者是把目标检测当做一个多维度输出的回归问题。
; VOC 2012
这个数据集基本上是目标检测,语义分割学习和研究绕不开的数据集。下载地址:https://pjreddie.com/projects/pascal-voc-dataset-mirror/
下载解压后数据集长这样:
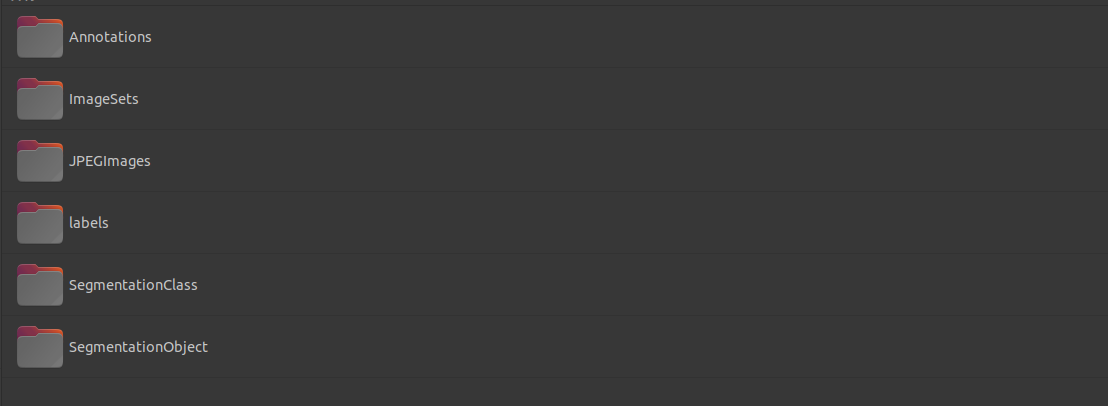
其中labels是我后面生成的,实际上并没有,其中目标检测对应的标注存在Annotations下面,以半结构化的XML格式存放的,长这样:
<annotation>
    <folder>VOC2012folder>
    <filename>2007_000027.jpgfilename>
    <source>
        <database>The VOC2007 Databasedatabase>
        <annotation>PASCAL VOC2007annotation>
        <image>flickrimage>
    source>
    <size>
        <width>486width>
        <height>500height>
        <depth>3depth>
    size>
    <segmented>0segmented>
    <object>
        <name>personname>
        <pose>Unspecifiedpose>
        <truncated>0truncated>
        <difficult>0difficult>
        <bndbox>
            <xmin>174xmin>
            <ymin>101ymin>
            <xmax>349xmax>
            <ymax>351ymax>
        bndbox>
        <part>
            <name>headname>
            <bndbox>
                <xmin>169xmin>
                <ymin>104ymin>
                <xmax>209xmax>
                <ymax>146ymax>
            bndbox>
        part>
        <part>
            <name>handname>
            <bndbox>
                <xmin>278xmin>
                <ymin>210ymin>
                <xmax>297xmax>
                <ymax>233ymax>
            bndbox>
        part>
        <part>
            <name>footname>
            <bndbox>
                <xmin>273xmin>
                <ymin>333ymin>
                <xmax>297xmax>
                <ymax>354ymax>
            bndbox>
        part>
        <part>
            <name>footname>
            <bndbox>
                <xmin>319xmin>
                <ymin>307ymin>
                <xmax>340xmax>
                <ymax>326ymax>
            bndbox>
        part>
    object>
annotation>
标注是相当精细的,把人的手脚头等位置都标注了出来,使用的是左上坐标以及右下坐标的方式来表达bounding box,在预处理中,我们先将图片对应的标注读取出来放到txt文件中,也就是上面的labels文件夹下,方便训练的时候读取。
代码
坐标转换
我们需要将Bounding box的表示从左上右下坐标的表示法转换成中心坐标和高宽的方式。
python
def corner_to_centre(size, box):
    """将bbox的表示形式从左上右下的点转换为中心点以及宽高的方式"""

    dw = 1.0 / size[0]
    dh = 1.0 / size[1]
    x = (box[0] + box[1]) / 2.0
    y = (box[2] + box[3]) / 2.0
    h = box[3] - box[2]
    w = box[1] - box[0]

    x = x * dw
    w = w * dw
    y = y * dh
    h = h * dh

    return (x, y, w, h)
将label从xml文件转到txt文件中
def convert_annotation_to_txt(image_id):
    """把图像image_id的xml标注文件转换为目标检测需要的label文件(txt)
    其中包含有多行,每行表示一个object,包含类别信息,以及bbox的中心坐标以及
    宽和高,并将四个物理量归一化
"""
    inflie = open(dataset_path + "/%s" % (image_id))
    image_id = image_id.split('.')[0]
    out_file = open('VOC2012/labels/%s.txt' % image_id, 'w')
    tree = ET.parse(inflie)
    root = tree.getroot()
    size = root.find('size')
    w = int(size.find('width').text)
    h = int(size.find('height').text)

    for obj in root.iter('object'):
        difficult = obj.find('difficult').text
        cls = obj.find('name').text
        if cls not in CLASSES or int(difficult) == 1:
            continue
        cls_id = CLASSES.index(cls)
        xmlbox = obj.find('bndbox')
        points = (float(xmlbox.find('xmin').text),
                  float(xmlbox.find('xmax').text),
                  float(xmlbox.find('ymin').text),
                  float(xmlbox.find('ymax').text),
                  )
        res = corner_to_centre((w, h), points)
        print(res)
        out_file.write(str(cls_id) + " " + " ".join([str(a) for a in res]) + '\n')
遍历文件
def make_label_txt():
    """在 labels文件夹下创建image_id.txt,对应每个image_id.xml提取出的bbox信息"""
    filenames = os.listdir(dataset_path)
    print(filenames)
    for filename in filenames:
        print(filename)
        convert_annotation_to_txt(filename)

make_label_txt()
经过上面的处理之后,就把图像的标注写到对应的txt文件中了,文件可能有多行,因为没张图片包含的object数目不固定。
7 0.508 0.505464480874317 0.98 0.4262295081967213
7 0.903 0.5819672131147541 0.122 0.07103825136612021
7 0.736 0.5614754098360656 0.17200000000000001 0.09562841530054644
每行的第一个数目表示物体类别的索引,2,3表示中心坐标,4,5表示高宽值,四个值一起表示bounding box的位置,值都做了归一化处理。
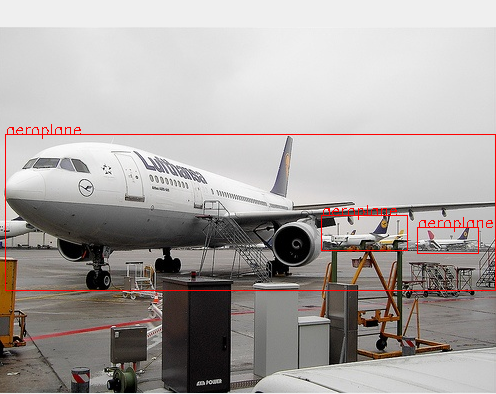
可视化显示label的转换看是否能还原回去。
import os
import shlex

import cv2
CLASSES = ['person', 'bird', 'cat', 'cow', 'dog', 'horse', 'sheep',
           'aeroplane', 'bicycle', 'boat', 'bus', 'car', 'motorbike', 'train',
           'bottle', 'chair', 'dining table', 'potted plant', 'sofa', 'tvmonitor']

data_path = r'VOC2012/JPEGImages'
def show_labels_img(imgname):
    """imgname是图象下标"""
    img = cv2.imread(data_path + '/' + imgname + '.jpg')
    h, w = img.shape[:2]
    print(w,h)
    print(w,h)
    label = []
    with open('VOC2012/labels/' + imgname + '.txt','r') as f:
        for label in f:
            label = label.split(' ')
            label = [float(x.strip()) for x in label]
            pt1 = (int(label[1] * w - label[3] * w / 2), int(label[2] * h - label[4] * h / 2))
            pt2 = (int(label[1] * w + label[3] * w / 2), int(label[2] * h + label[4] * h / 2))
            cv2.putText(img, CLASSES[int(label[0])], pt1, cv2.FONT_HERSHEY_SIMPLEX, 0.5, (0, 0, 255))
            cv2.rectangle(img, pt1, pt2, (0, 0, 255, 2))

    cv2.imshow('img', img)
    cv2.waitKey(0)

show_labels_img('2007_000033')
Original: https://blog.csdn.net/lwf1881/article/details/121597330
Author: spectrelwf
Title: Pytorch:yolov1系列(1)读取VOC2012数据集的目标检测标注
原创文章受到原创版权保护。转载请注明出处:https://www.johngo689.com/686322/
转载文章受原作者版权保护。转载请注明原作者出处!