

pandas.DataFrame()函数介绍!
文章目录
- 一. 创建DataFrame
* - 1.1. numpy创建
- 1.2. 直接创建
- 1.3. 字典创建
- 1.4. Series和DataFrame
- 二. DataFrame属性
* - 2.1. 查看列的数据类型
- 2.2. 查看DataFrame的头尾
- 2.3. 查看行名与列名
- 2.4. 查看数据值.values
- 2.5. 查看行列数
- 2.6. 切片和索引
- 三. DataFrame操作
* - 3.1. 转置T
- 3.2. 描述性统计describe()
- 3.3. 运算之求和(sum)、数乘(applay)及平方
- 3.4. 新增列
- 3.5. 两个DataFrame合并(join, concat)
- 3.6. 去重(重复行)drop_duplicates
- 3.7. dropna()删除缺失值
- 3.8. 数据合并pd.merge
– - 三. Pandas时间序列数据处理
* - 3.1. 创建时间对象
– - 3.2. 时间索引对象处理
– - 3.3. 填充缺失DataFrame.ffill和DataFrame.fillna填充
- 3.4. 时间的算术方法
– - 四. 特征提取之pd.get_dummies()
* - 4.1. one-hot encoding
- 4.2. dummy encoding
- 4.3. pandas的one-hot编码
- 五. 参考
- Pandas 的主要数据结构是 Series (opens new window)(一维数据)与 DataFrame (opens new window)(二维数据),这两种数据结构足以处理金融、统计、社会科学、工程等领域里的大多数典型用例。对于 R 用户,DataFrame 提供了比 R 语言 data.frame 更丰富的功能。Pandas 基于 NumPy (opens new window)开发,可以与其它第三方科学计算支持库完美集成。
- Pandas中文网:https://www.pypandas.cn/
- pandas documentation:https://pandas.pydata.org/pandas-docs/stable/index.html
- Pandas中文文档解析:https://www.5axxw.com/wiki/content/s82c2v


; 一. 创建DataFrame
- DataFrame是Python中Pandas库中的一种数据结构,它类似excel,是一种二维表。DataFrame的单元格可以存放数值、字符串等,这和excel表很像,同时DataFrame可以设置 列名columns与行名index。
1.1. numpy创建
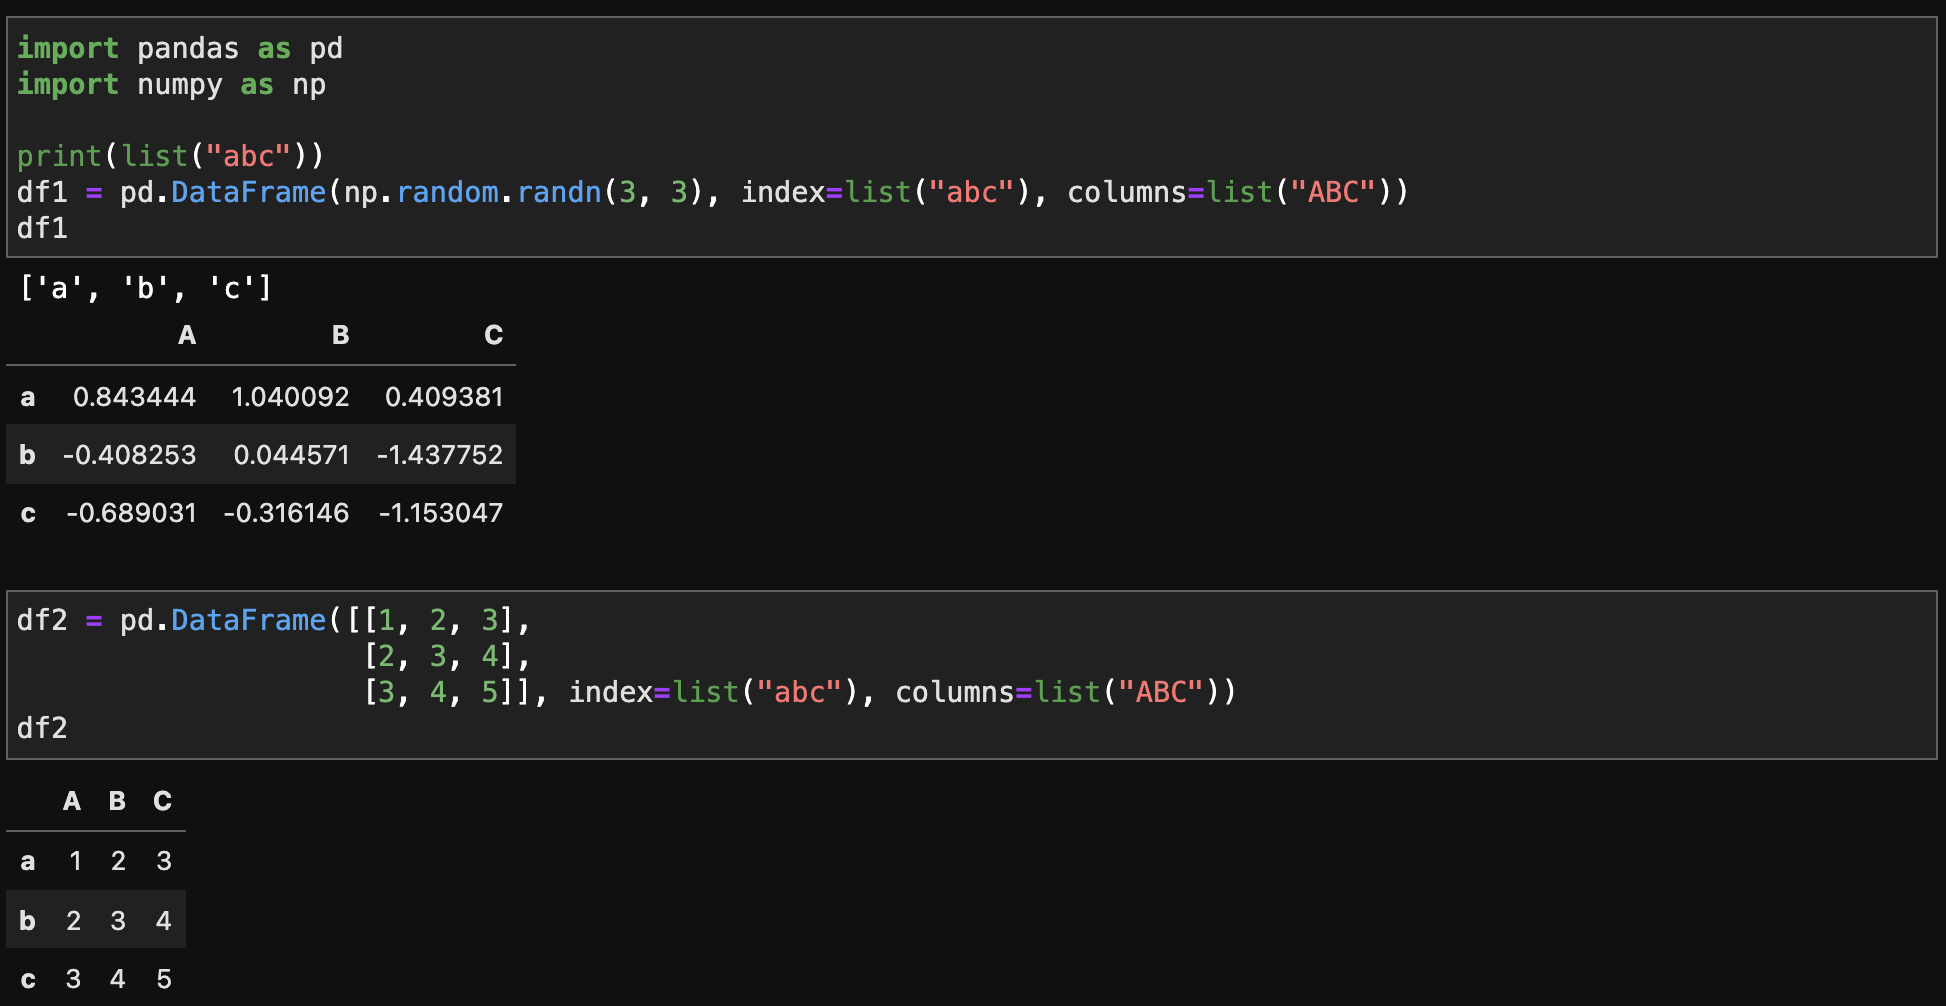
- 使用numpy函数创建: index和columns这两个参数是可选的,你可以选择不设置,而且这两个list是可以一样的。
import pandas as pd
import numpy as np

print(list("abc"))
df1 = pd.DataFrame(np.random.randn(3, 3), index=list("abc"), columns=list("ABC"))
1.2. 直接创建
- *直接创建:
df2 = pd.DataFrame([[1, 2, 3],
                    [2, 3, 4],
                    [3, 4, 5]], index=list("abc"), columns=list("ABC"))
1.3. 字典创建
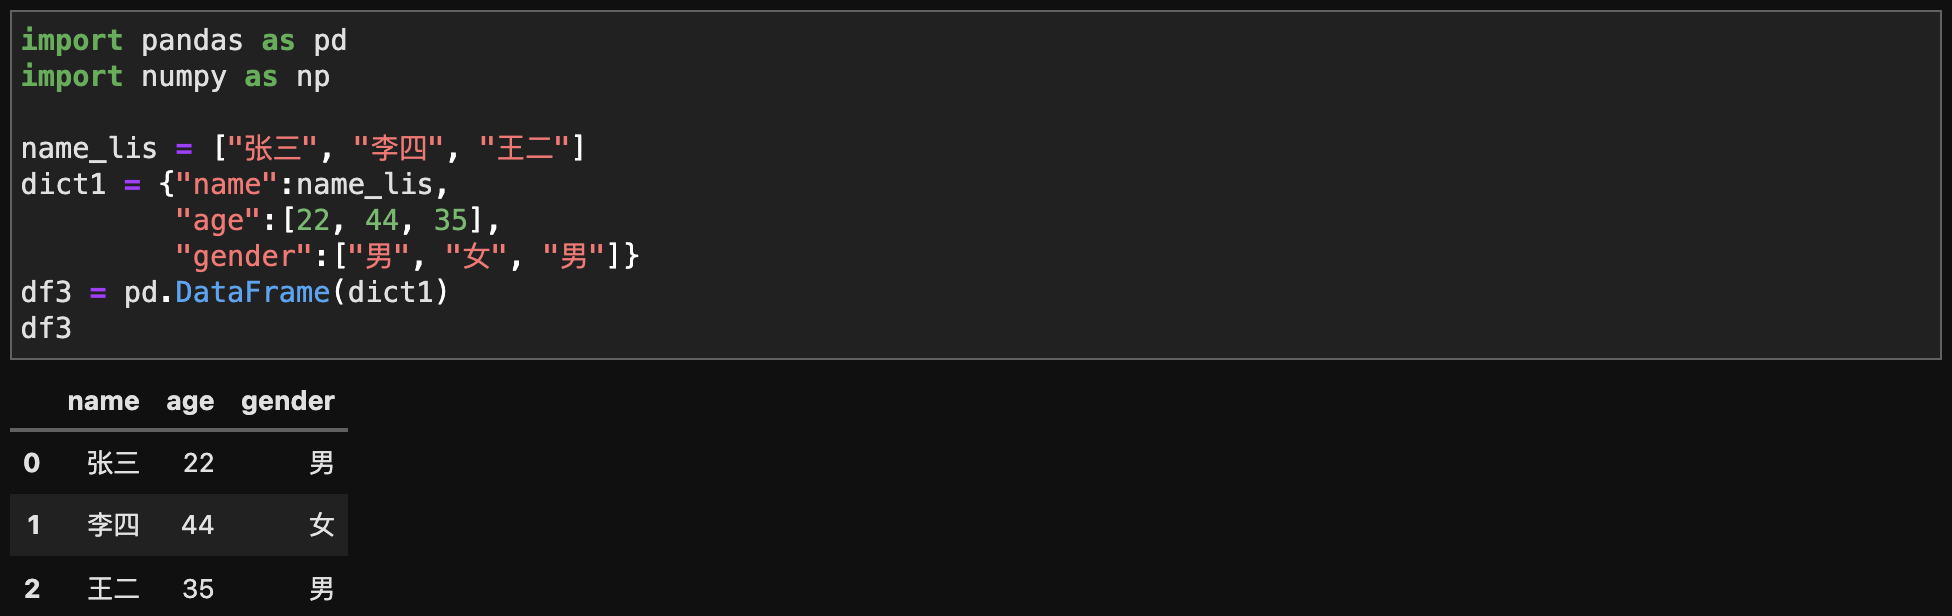
- *使用字典创建:
import pandas as pd
import numpy as np

dict1 = {"name":["张三", "李四", "王二"],
         "age":[22, 44, 35],
         "gender":["男", "女", "男"]}
df3 = pd.DataFrame(dict1)
1.4. Series和DataFrame
类型描述Series表格中的一个列,类似于
一维数组
DataFrame
二维
的表格型的数据结构
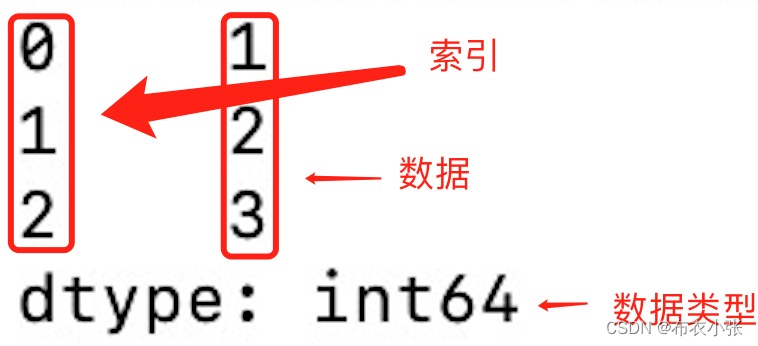
- Pandas Series类似表格中的一个列(column),类似于 一维数组,可以保存任何数据类型。
pandas.Series(data, index, dtype, name, copy)
参数说明:
- data:一组数据(ndarray 类型)。
- index:数据索引标签,如果不指定,默认从 0 开始。
- dtype:数据类型,默认会自己判断。
- name:设置名称。
- copy:拷贝数据,默认为 False。
import pandas as pd
a = [1, 2, 3]
myvar = pd.Series(a)
print(myvar)
- 具体可以看 Pandas数据结构-Series:https://www.runoob.com/pandas/pandas-series.html
二. DataFrame属性
2.1. 查看列的数据类型
df3.dtypes

2.2. 查看DataFrame的头尾
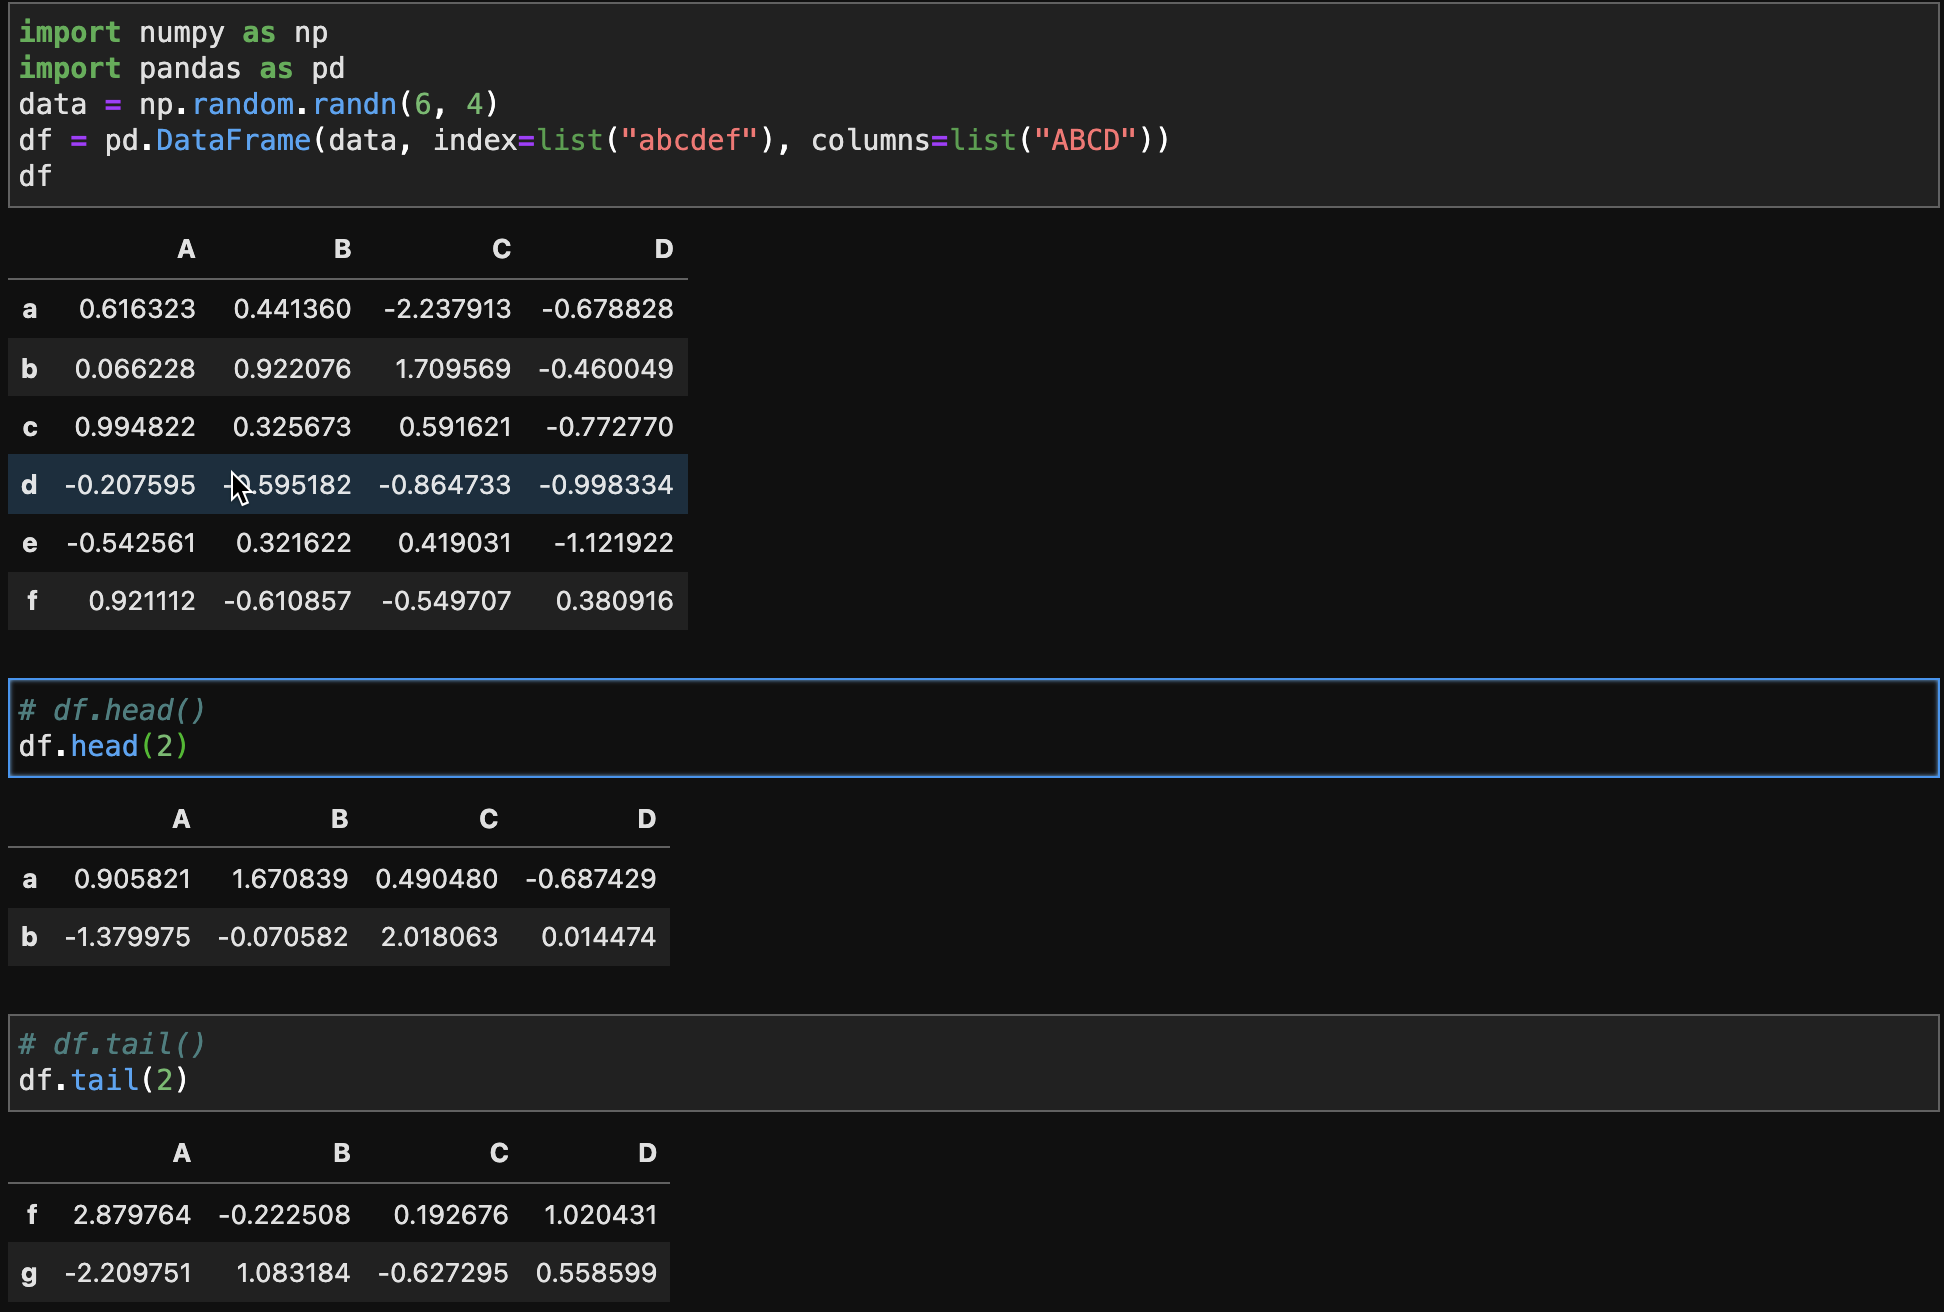
- 使用
head可以查看前几行的数据, 默认的是前5行,不过也可以自己设置。 - 使用
tail可以查看后几行的数据, 默认也是5行,参数可以自己设置。
import numpy as np
import pandas as pd
data = np.random.randn(6, 4)
df = pd.DataFrame(data, index=list("abcdef"), columns=list("ABCD"))

df.head(2)

df.tail(2)
2.3. 查看行名与列名
df.index
df.columns

2.4. 查看数据值.values
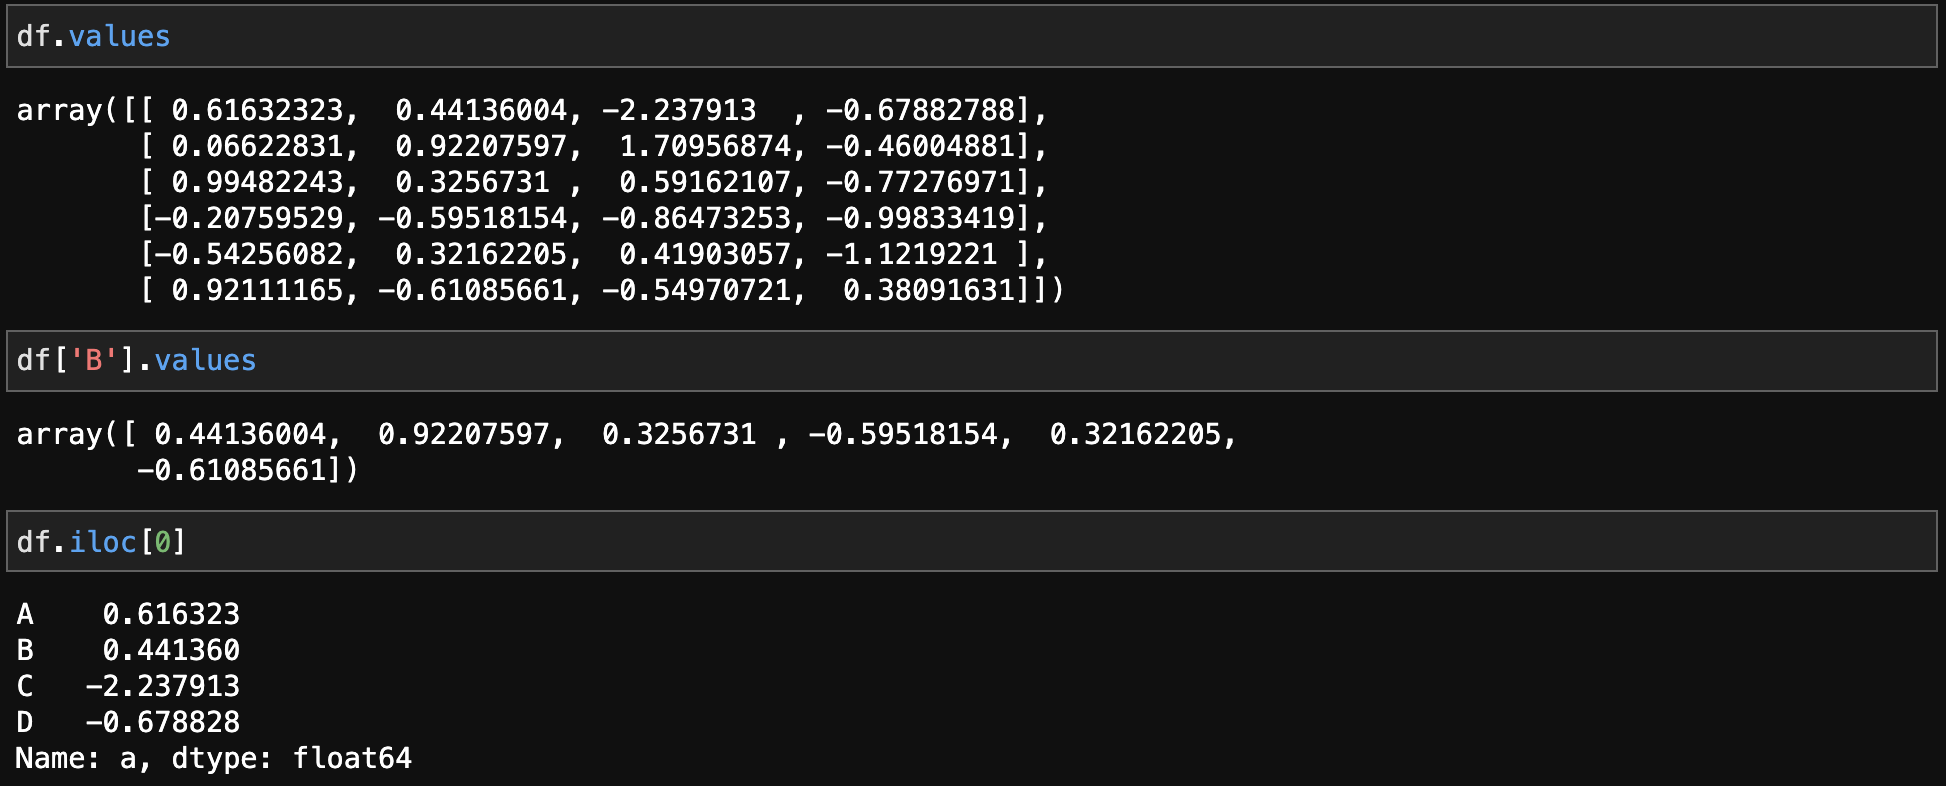
- 使用values可以查看DataFrame里的数据值, 返回的是一个ndarray(转成numpy类型)。
df.values
- 比如说查看 某一列所有的数据值。
df['B'].values
- 如果查看某一行所有的数据值。使用iloc查看数据值(但是好像只能根据行来查看?),iloc是根据数字索引(也就是行号)。
df.iloc[0]
2.5. 查看行列数
df.shape[0]
df.shape[1]
df.shape
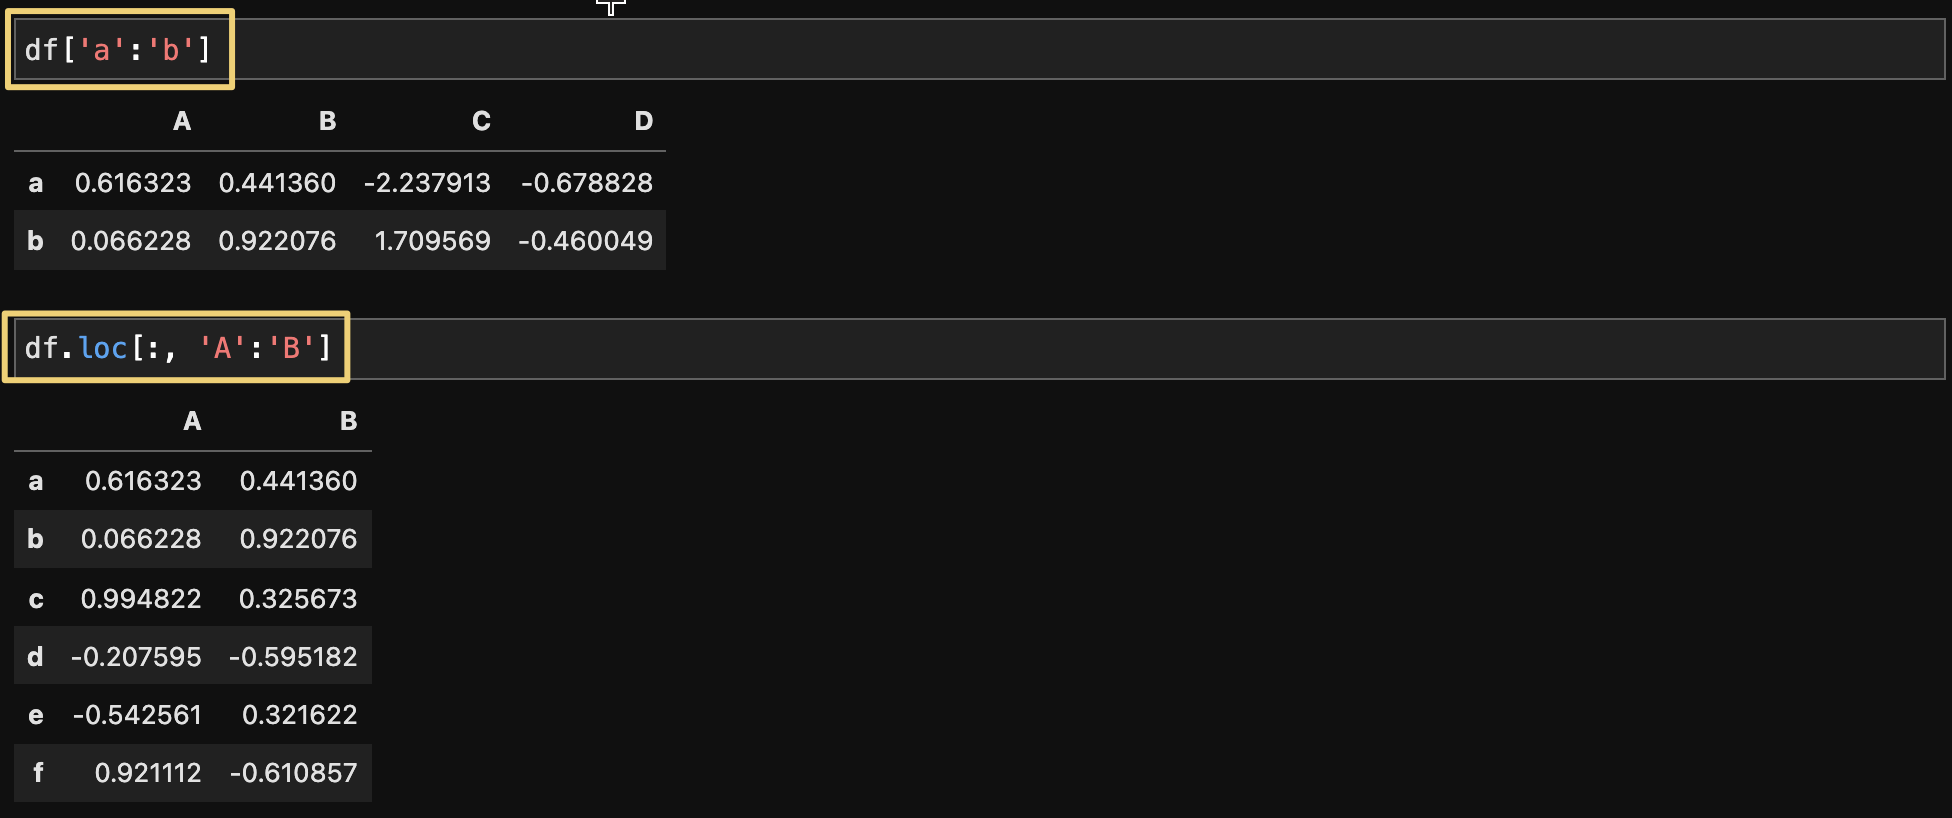
2.6. 切片和索引
- 使用冒号进行切片。
- 切片表示的是行切片
- *索引表示的是列索引
; 三. DataFrame操作
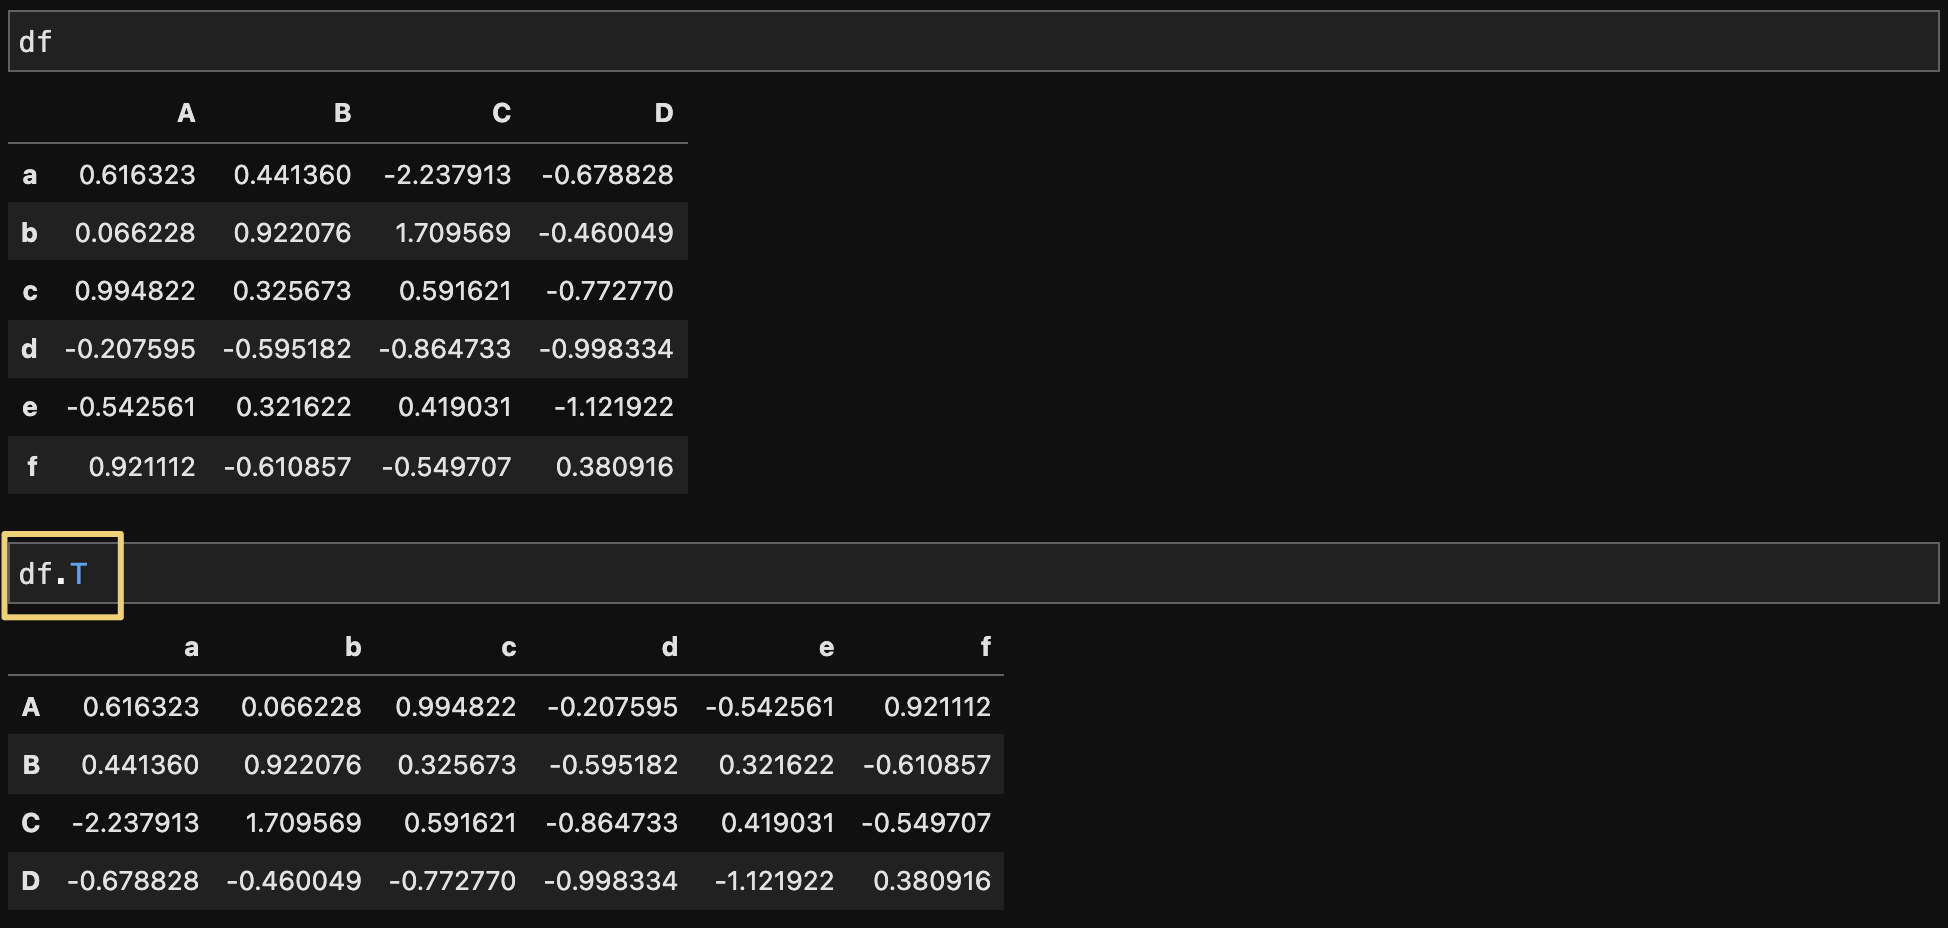
3.1. 转置T
- *直接字母T,线性代数上线。
; 3.2. 描述性统计describe()
df.describe()
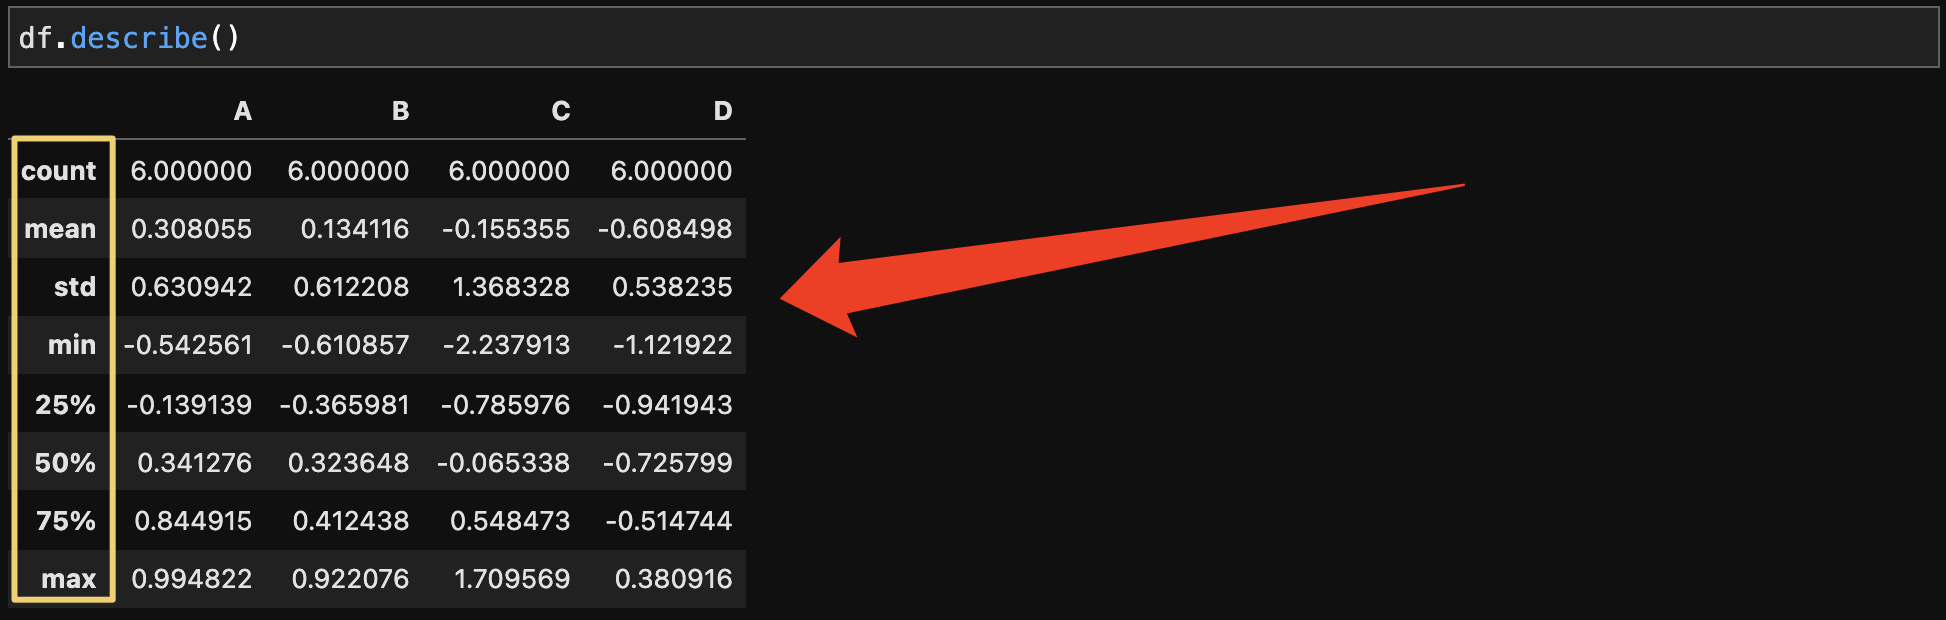
- 如果有的列是非数值型的,那么就不会进行统计。
- 如果想对 行进行描述性统计,转置后再进行describe。
3.3. 运算之求和(sum)、数乘(applay)及平方
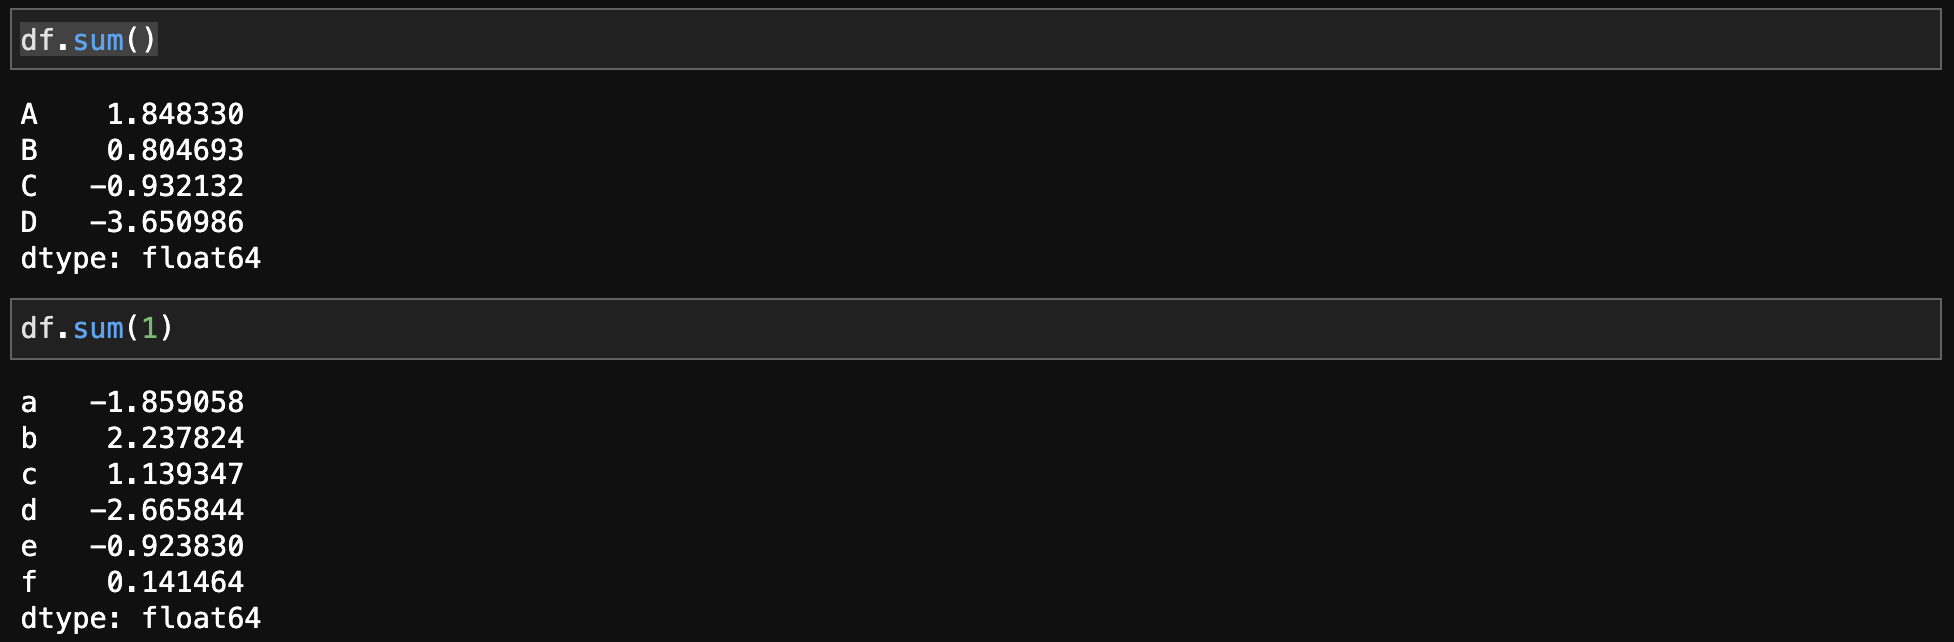
- 使用
sum()默认对每列求和,sum(1)为对每行求和。
df.sum()
df.sum(1)
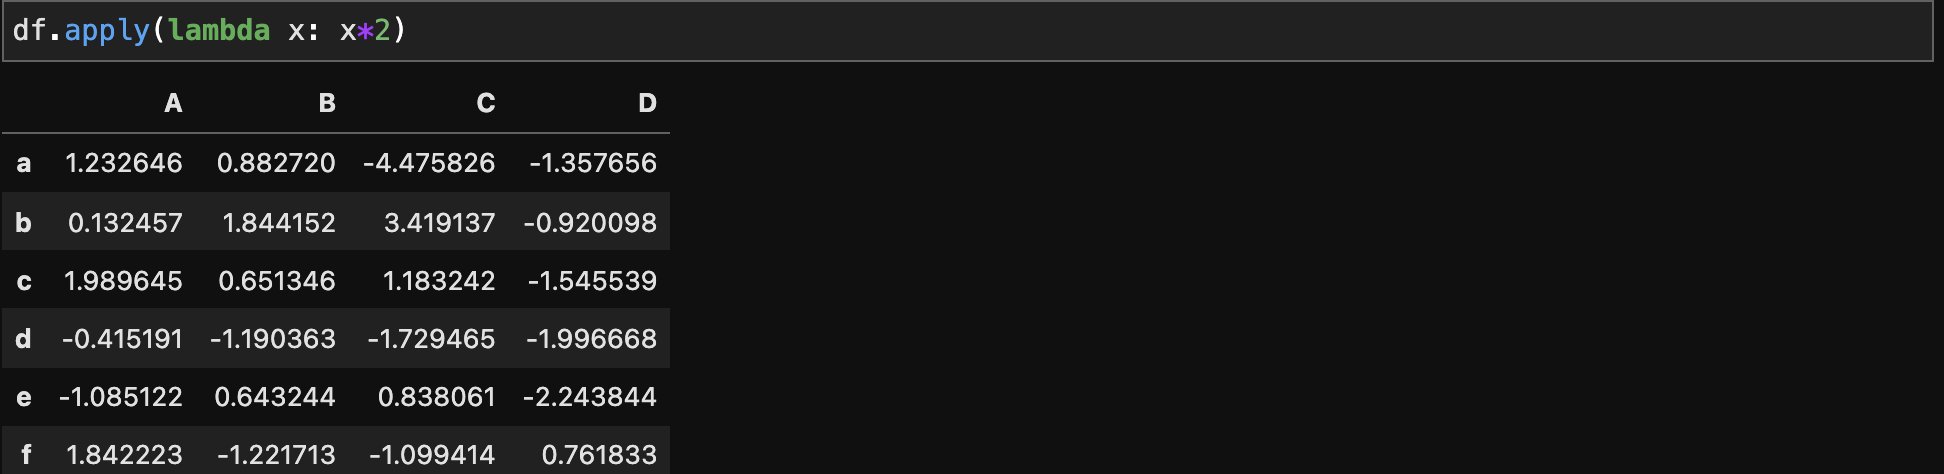
- 数乘运算使用
apply
df.apply(lambda x: x*2)
- 平方运算跟matlab类似,直接使用两个*。
df**2

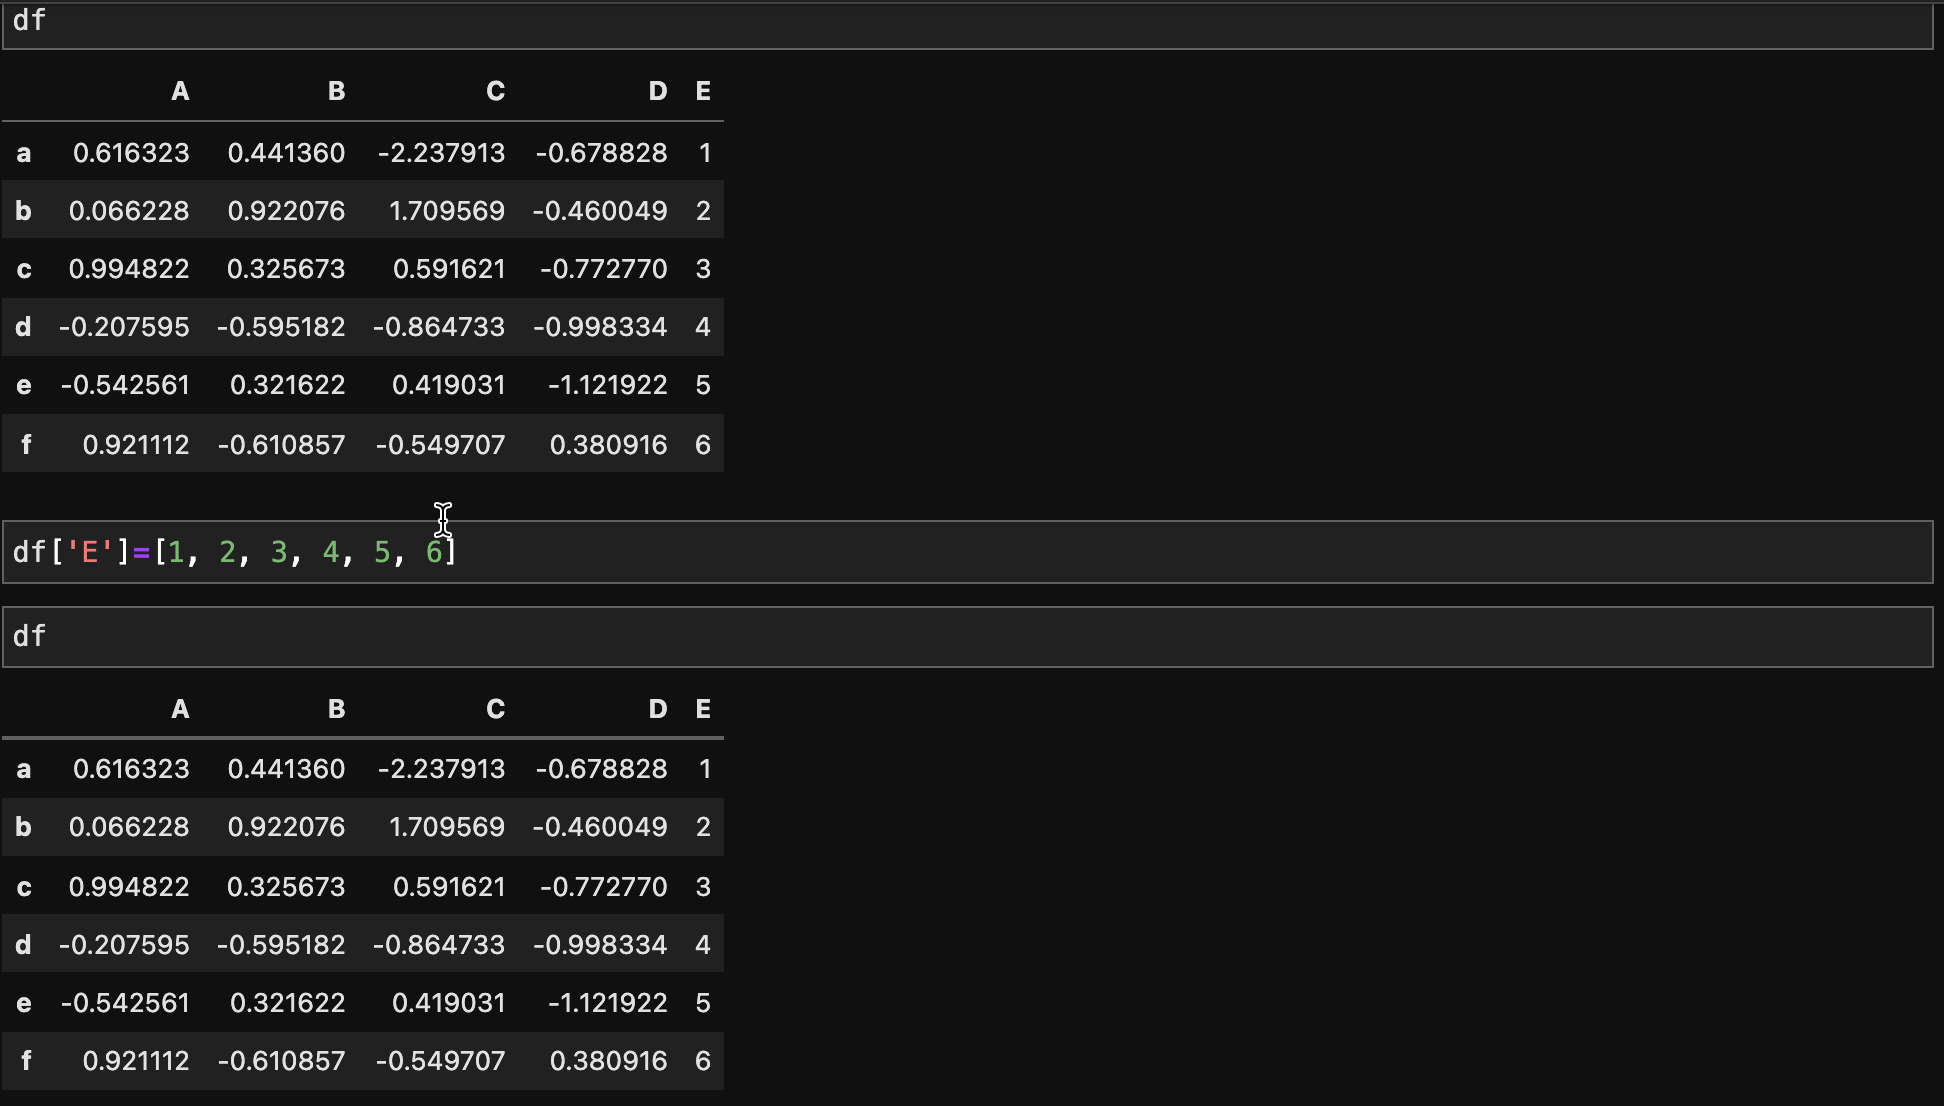
3.4. 新增列
- 扩充列可以直接像字典一样,列名对应一个list,但是注意list的长度要跟index的长度一致。
; 3.5. 两个DataFrame合并(join, concat)
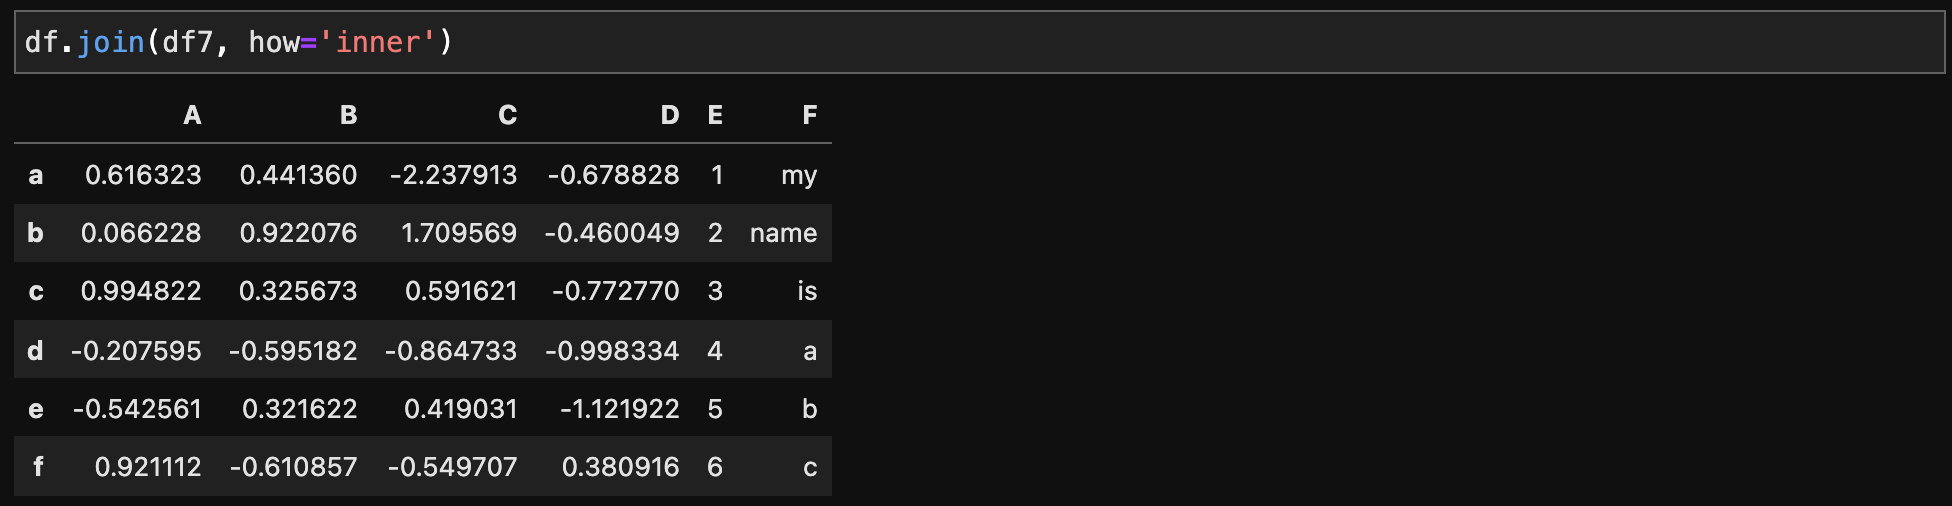
- 使用
join可以将两个DataFrame合并,但只根据行列名合并,并且以作用的那个DataFrame的为基准。

- 但是,join这个方法还有how这个参数可以设置,合并两个DataFrame的交集或并集。参数为
’inner’表示交集,'outer’表示并集。
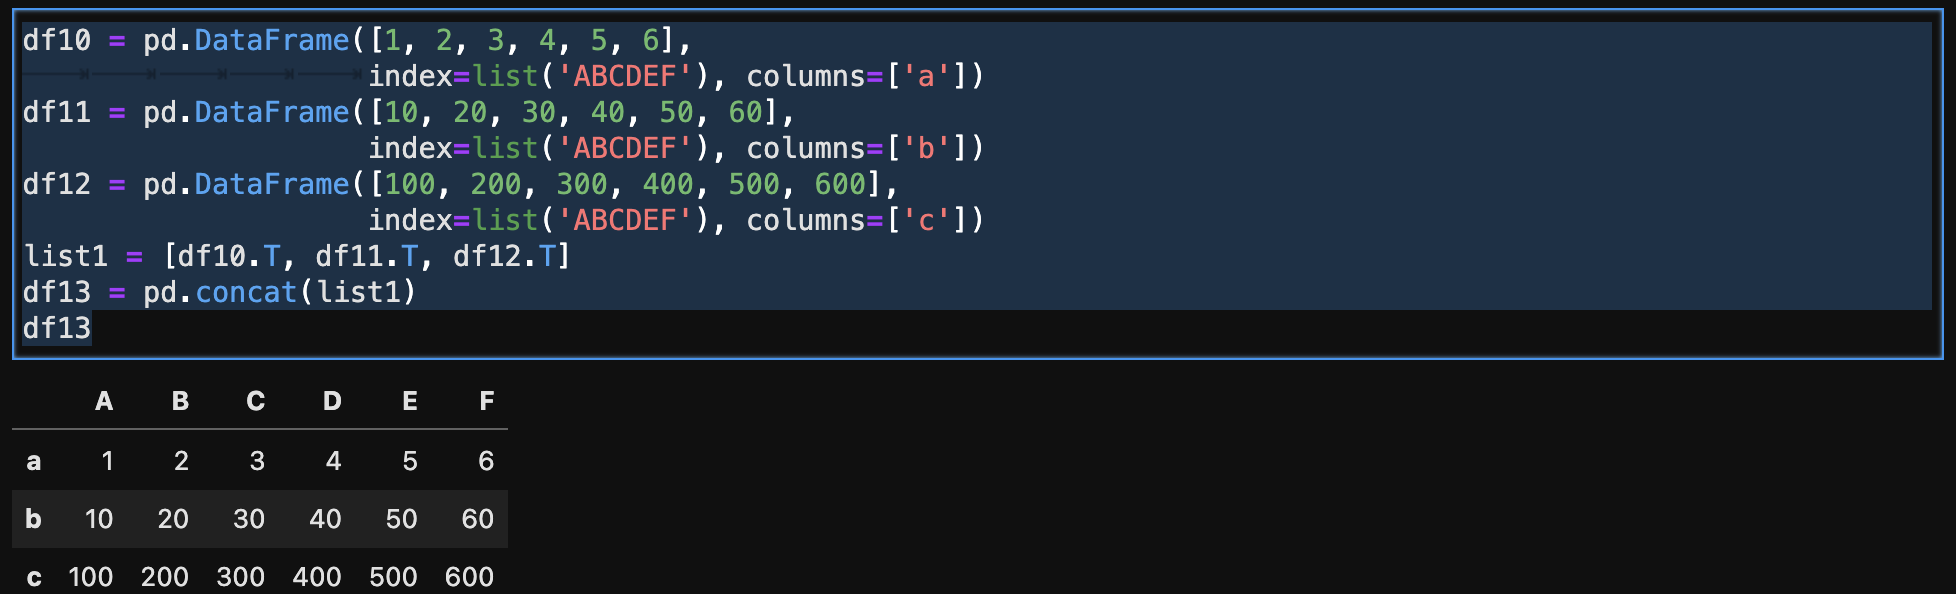
- 如果要合并多个Dataframe,可以用list把几个Dataframe装起来,然后使用concat转化为一个新的Dataframe。
df10 = pd.DataFrame([1, 2, 3, 4, 5, 6],
                    index=list('ABCDEF'), columns=['a'])
df11 = pd.DataFrame([10, 20, 30, 40, 50, 60],
                    index=list('ABCDEF'), columns=['b'])
df12 = pd.DataFrame([100, 200, 300, 400, 500, 600],
                    index=list('ABCDEF'), columns=['c'])
list1 = [df10.T, df11.T, df12.T]
df13 = pd.concat(list1)
df13
3.6. 去重(重复行)drop_duplicates
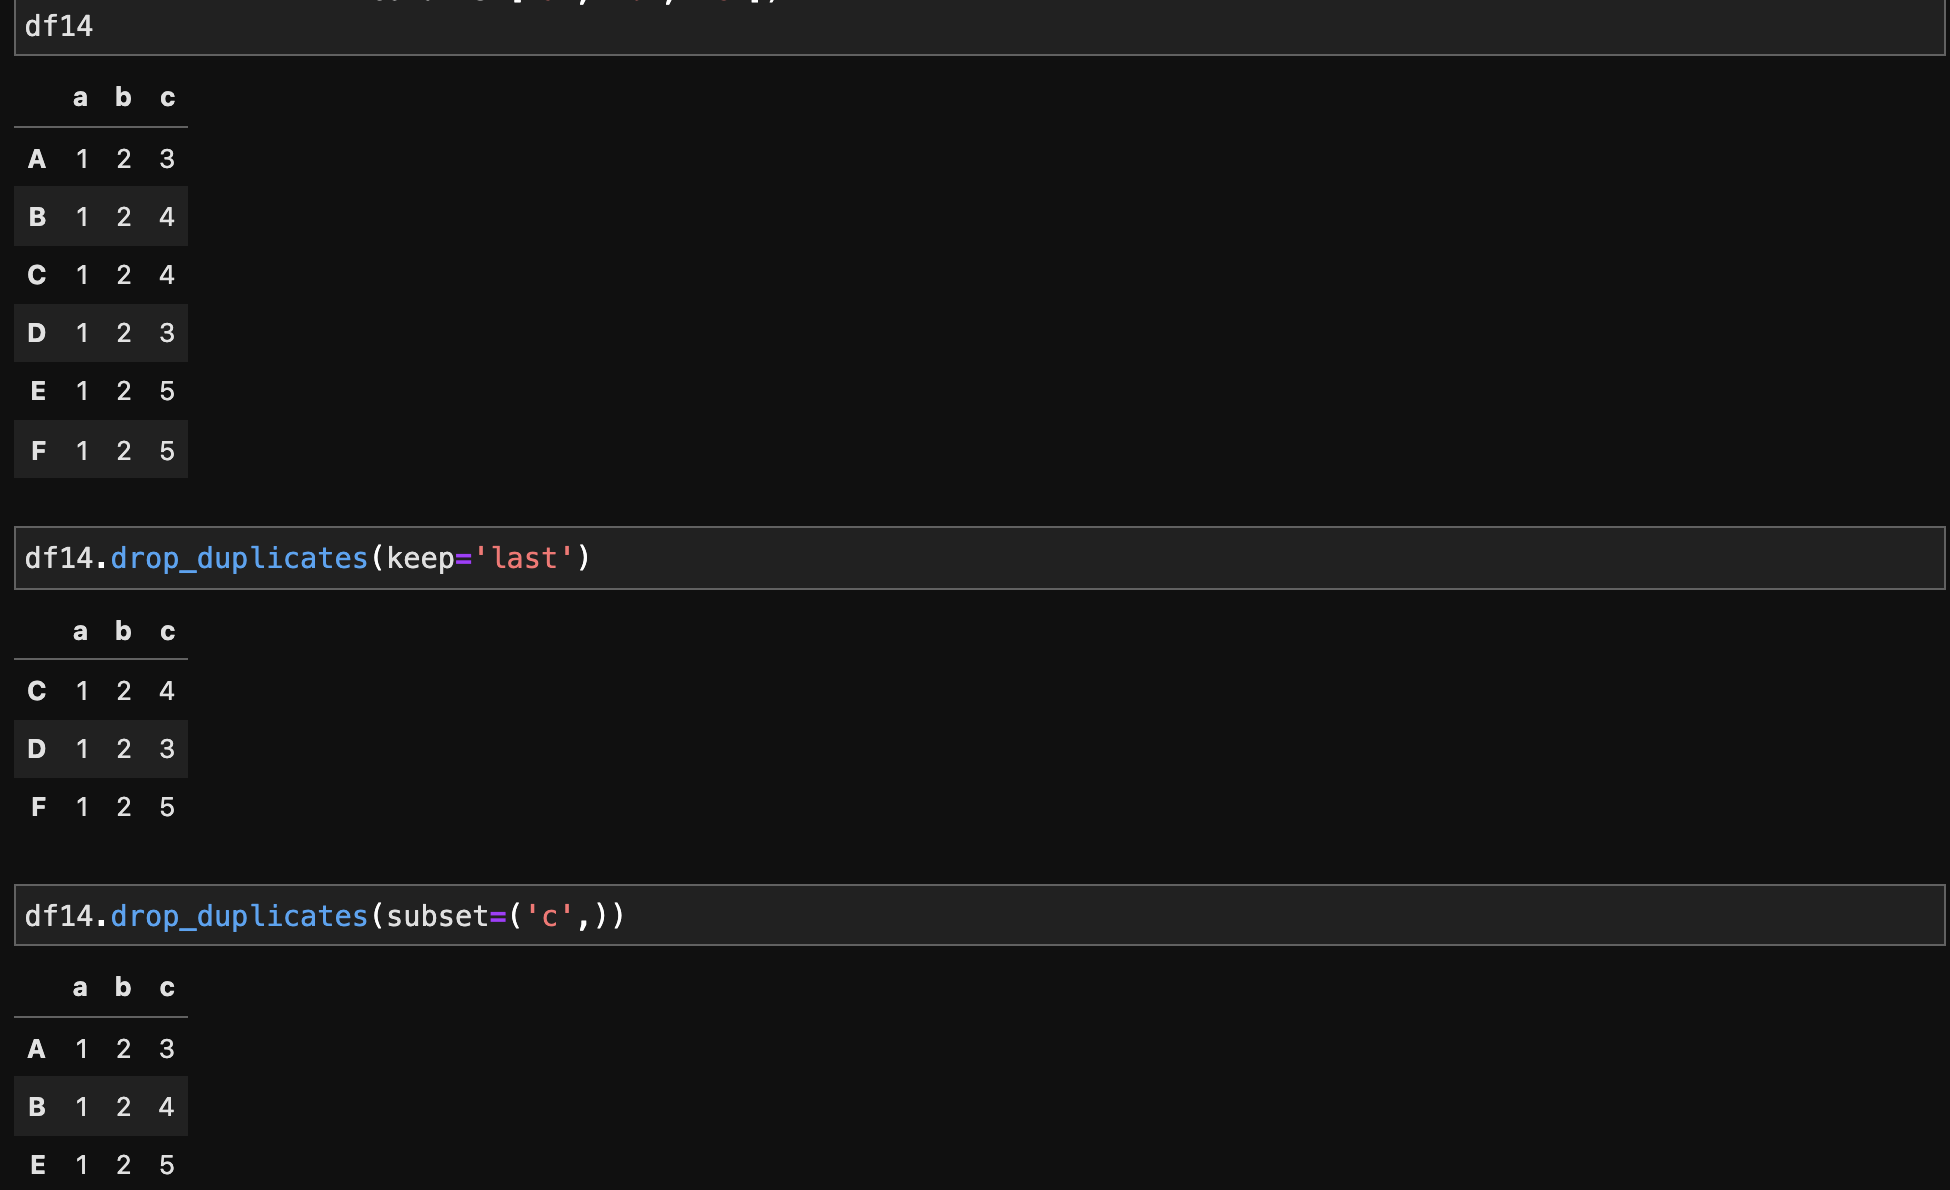
df.drop_duplicates(subset=None,
                   keep='first',
                   inplace=False
                   )
subset:指定是哪些列重复。keep:去重后留下第几行,{‘first’, ‘last’, False}, default ‘first’},如果是False,则去除全部重复的行。inplace:是否作用于原来的df。
df14 = pd.DataFrame(data=[[1, 2, 3],
                          [1, 2, 4],
                          [1, 2, 4],
                          [1, 2, 3],
                          [1, 2, 5],
                          [1, 2, 5]],
                    index=list('ABCDEF'),
                    columns=['a', 'b', 'c'])
- 去除重复行,保留重复行中最后一行
df14.drop_duplicates(keep='last')
- 去除
’c’列中有重复的值所在的行
df14.drop_duplicates(subset=('c',))
3.7. dropna()删除缺失值
- Python pandas中缺失值类型有哪些?如何对pandas缺失值进行判断? https://www.ycpai.cn/python/5vSjCfzT.html
- 在pandas中,缺失值类型有三种表示方法,分别是
np.nan,none,pd.NA,缺失值默认显示的数据是NaN。
dropna()方法,能够找到DataFrame类型数据的空值(缺失值),将空值所在的行/列删除后,将新的DataFrame作为返回值返回。
函数形式:dropna(axis=0, how='any', thresh=None, subset=None, inplace=False)

参数:
axis:轴。0或'index',表示按行删除;1或'columns',表示按列删除。
how:筛选方式。'any',表示该行/列只要有一个以上的空值,就删除该行/列;'all',表示该行/列全部都为空值,就删除该行/列。
thresh:非空元素最低数量。int型,默认为None。如果该行/列中,非空元素数量小于这个值,就删除该行/列。
subset:子集。列表,元素为行或者列的索引。如果axis=0或者'index',subset中元素为列的索引;如果axis=1或者'column',subset中元素为行的索引。由subset限制的子区域,是判断是否删除该行/列的条件判断区域。
inplace:是否原地替换。布尔值,默认为False。如果为True,则在原DataFrame上进行操作,返回值为None。
"""=====================================
@author : kaifang zhang
@time   : 2021/12/28 11:45 AM
@contact: kaifang.zkf@dtwave-inc.com
====================================="""
import pandas as pd

data = [[None, None, None, None, None, None, None, None, None, None, None, None, None, None, None, None],
        [None, None, None, None, None, None, None, None, None, None, None, None, None, None, None, None],
        [None, None, None, None, None, None, None, None, None, None, '欢迎使用', None, None, None, None, None],
        [None, None, None, None, None, None, None, None, None, None, None, None, None, None, None, None],
        [None, None, None, None, None, None, None, None, None, None, None, None, None, None, None, None],
        [None, None, None, None, None, None, None, '薪酬绩效数据自助查询系统', None, None, None, None, None, None, None, None],
        [None, None, None, None, None, None, None, None, None, None, None, None, None, None, None, None],
        [None, None, None, None, None, None, None, None, None, '最新薪资月的薪酬绩效数据', None, None, None, None, None, None],
        [None, None, None, None, None, None, None, None, None, None, None, None, None, None, None, None],
        [None, None, None, None, None, None, None, None, None, None, None, None, None, None, None, None],
        [None, None, None, None, None, None, None, None, None, None, None, None, None, None, None, None],
        [None, None, None, None, None, None, None, None, None, None, None, None, None, None, None, None],
        [None, None, None, None, None, None, None, None, None, None, None, None, None, None, None, None],
        [None, None, None, None, None, None, None, None, None, None, None, None, None, None, None, None],
        [None, None, None, None, None, None, None, None, None, None, None, None, None, None, None, None],
        [None, None, None, None, None, None, None, None, None, None, None, None, None, None, None, None],
        [None, None, None, None, None, None, None, None, None, None, '薪酬绩效明细', None, None, None, None, None],
        [None, None, None, None, None, None, None, None, None, None, None, None, None, None, None, None],
        [None, None, None, None, None, None, None, None, None, None, None, None, None, None, None, None],
        [None, None, None, None, None, None, None, None, None, '当前查询月份:', None, 44197, None, None, None, None],
        [None, None, None, None, None, None, None, None, None, '所在大区:', None, None, None, None, None, None],
        [None, None, None, None, None, None, None, None, None, '请输入:', '系统号', None, None, None, None, None],
        [None, None, None, None, None, None, None, None, None, '请输入:', '身份证后六位', None, None, None, None, None],
        [None, None, None, None, None, None, None, None, None, None, None, None, None, None, None, None],
        [None, None, None, None, None, None, None, None, None, None, None, None, None, None, None, None],
        [None, None, None, None, None, None, None, None, None, None, None, None, None, None, None, None],
        [None, None, None, None, None, None, None, None, None, None, None, None, None, None, None, None],
        [None, None, None, None, None, None, None, None, None, None, None, None, None, None, None, None],
        [None, None, None, None, None, None, None, None, None, None, None, None, None, None, None, None],
        [None, None, None, None, None, None, None, None, None, None, None, None, None, None, None, None]]
df_data = pd.DataFrame(data)
print(df_data.shape)

df_data.dropna(axis=0, how='all', inplace=True)
print(df_data.shape)

df_data.dropna(axis=1, how='all', inplace=True)
print(df_data.shape)
- Python-pandas的dropna()方法-丢弃含空值的行、列:https://blog.csdn.net/qq_17753903/article/details/89817371
3.8. 数据合并pd.merge
- 实现类似SQL的join操作,通过
pd.merge()方法可以自由灵活地操作各种逻辑的 数据连接、合并 等操作
可以将两个DataFrame或Series合并,最终返回一个合并后的DataFrame
pd.merge(left, right, how = 'inner', on = None, left_on = None, right_on = None,
         left_index = False, right_index = False, sort = True, suffixes = ('_x','_y'),
         copy = True, indicator = False, validate = None)
- 参数
- left、right:需要连接的两个DataFrame或Series,一左一右
- how:两个数据连接方式, 默认为inner,可设置inner、outer、left或right
- on:作为连接键的字段,左右数据中都必须存在,否则需要用left_on和right_on来指定
- left_on:左表的连接键字段
- right_on:右表的连接键字段
- left_index:为True时将左表的索引作为连接键,默认为False
- right_index:为True时将右表的索引作为连接键,默认为False
- suffixes:如果左右数据出现重复列,新数据表头会用此后缀进行区分,默认为_x和_y
3.8.1. 连接键(指定列)
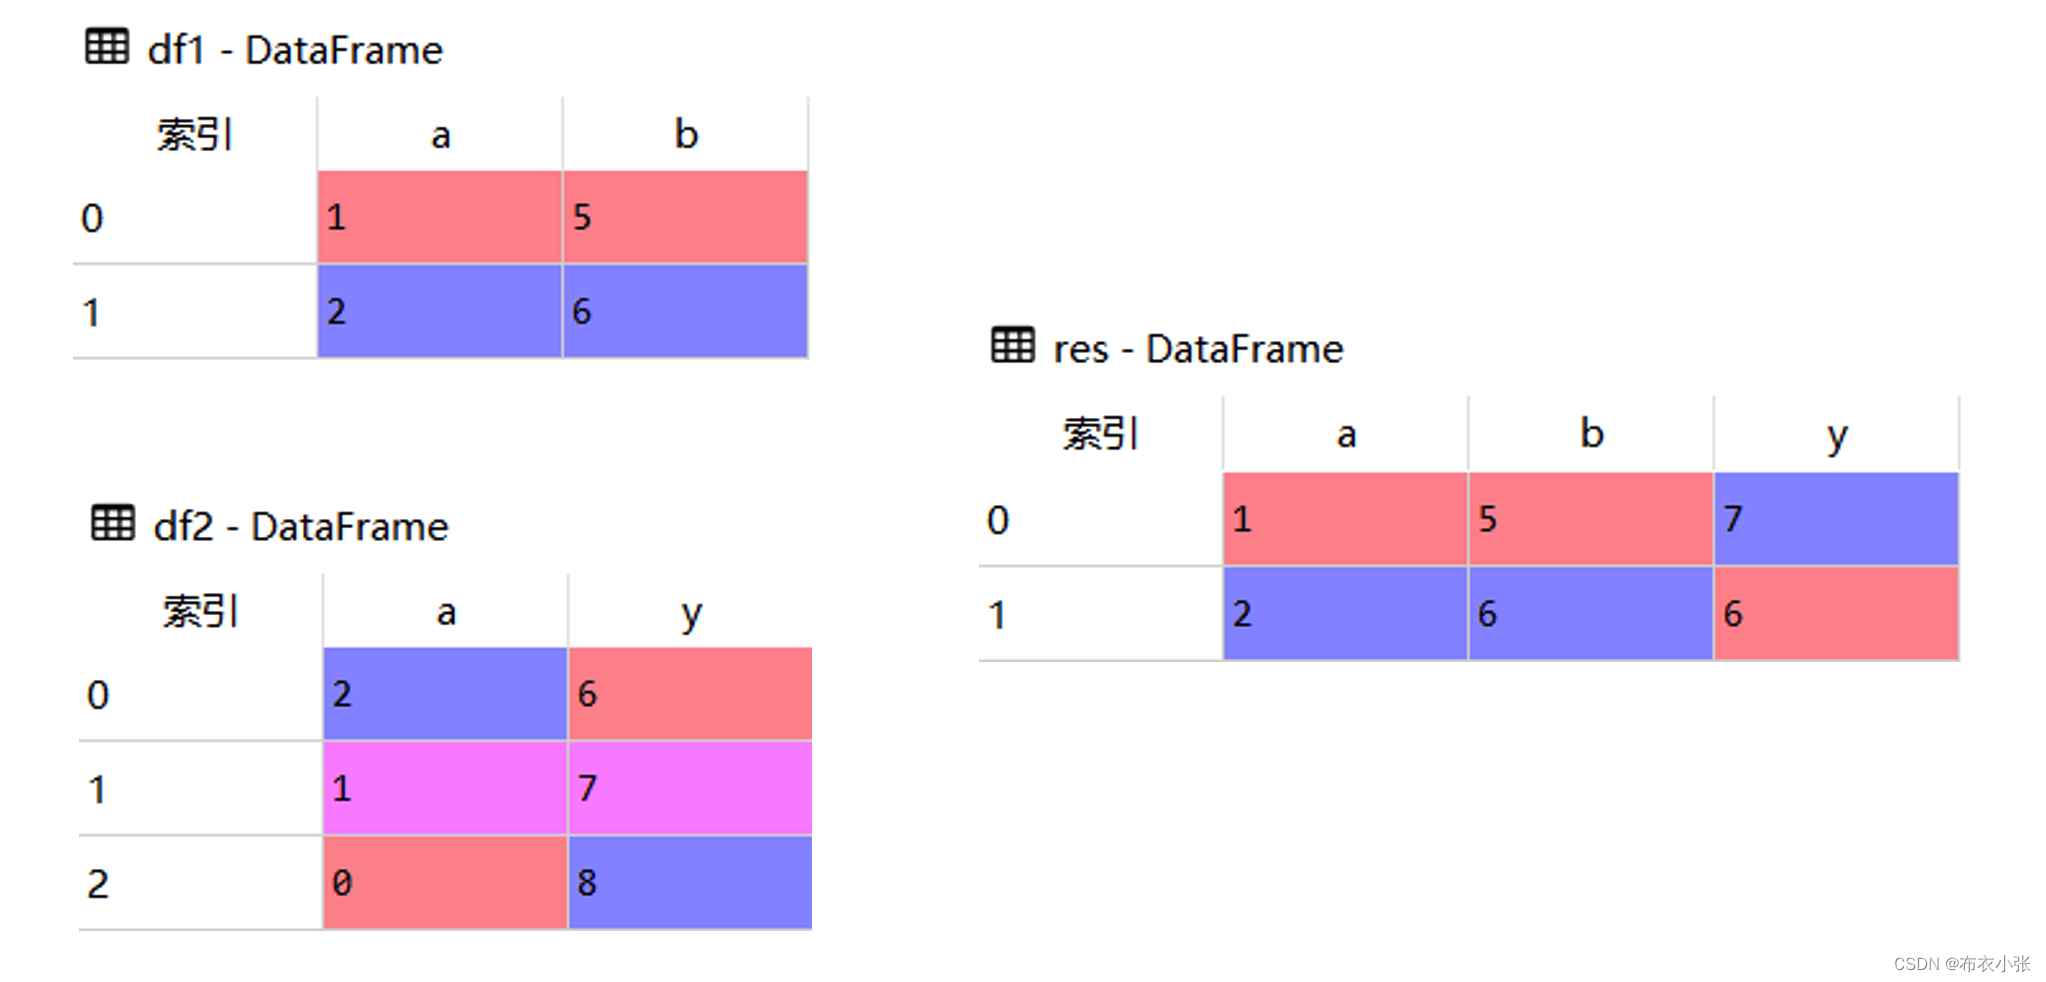
- 在数据连接时,如果没有指定根据哪一列(连接键)进行连接,Pandas会自动找到相同列名的列进行连接,并按左边数据的顺序取交集数据。为了代码的可阅读性和严谨性, *推荐通过on参数指定连接键
import pandas as pd

df1 = pd.DataFrame({'a':[1,2],'b':[5,6]})
df2 = pd.DataFrame({'a':[2,1,0],'y':[6,7,8]})

res = pd.merge(df1, df2, on='a')
3.8.2. 索引连接
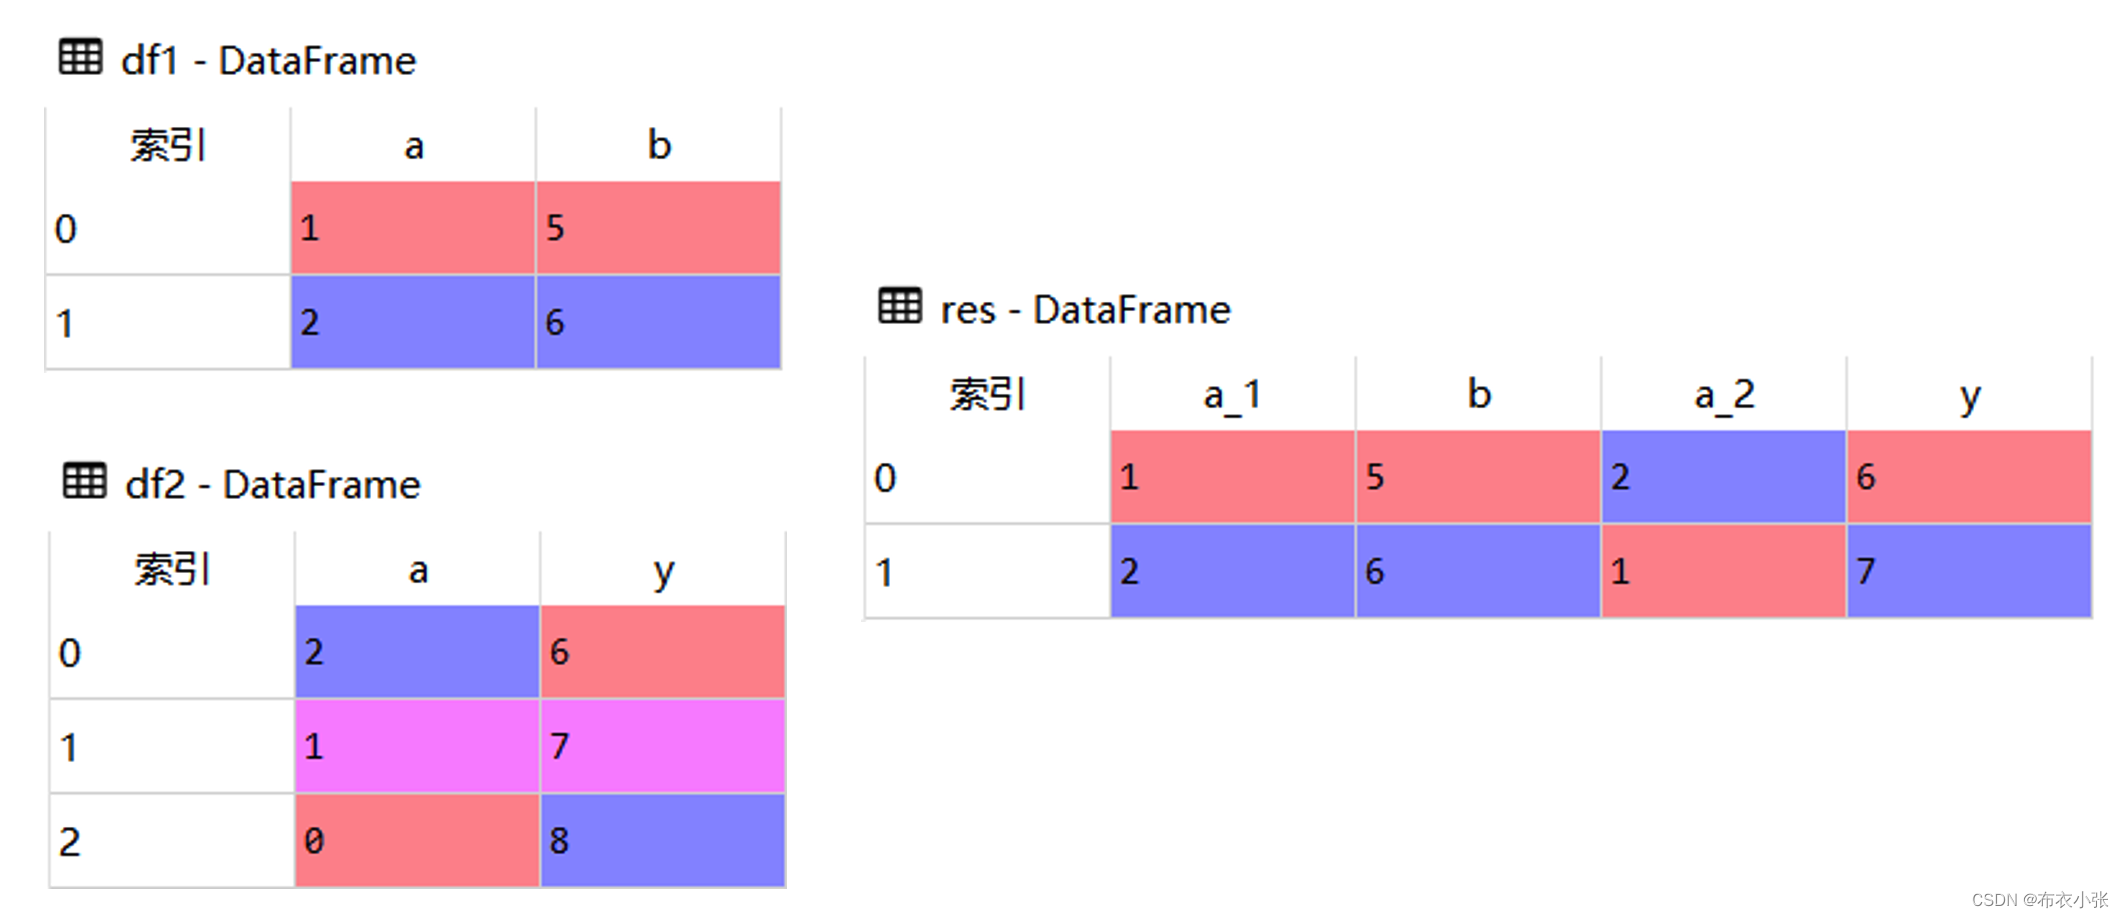
- 可以直接按索引进行连接,将 left_index和right_index设置为True,会以两个表的索引作为连接键
import pandas as pd

df1 = pd.DataFrame({'a':[1,2],'b':[5,6]})
df2 = pd.DataFrame({'a':[2,1,0],'y':[6,7,8]})

res = pd.merge(df1, df2, left_index=True, right_index=True, suffixes=('_1','_2'))
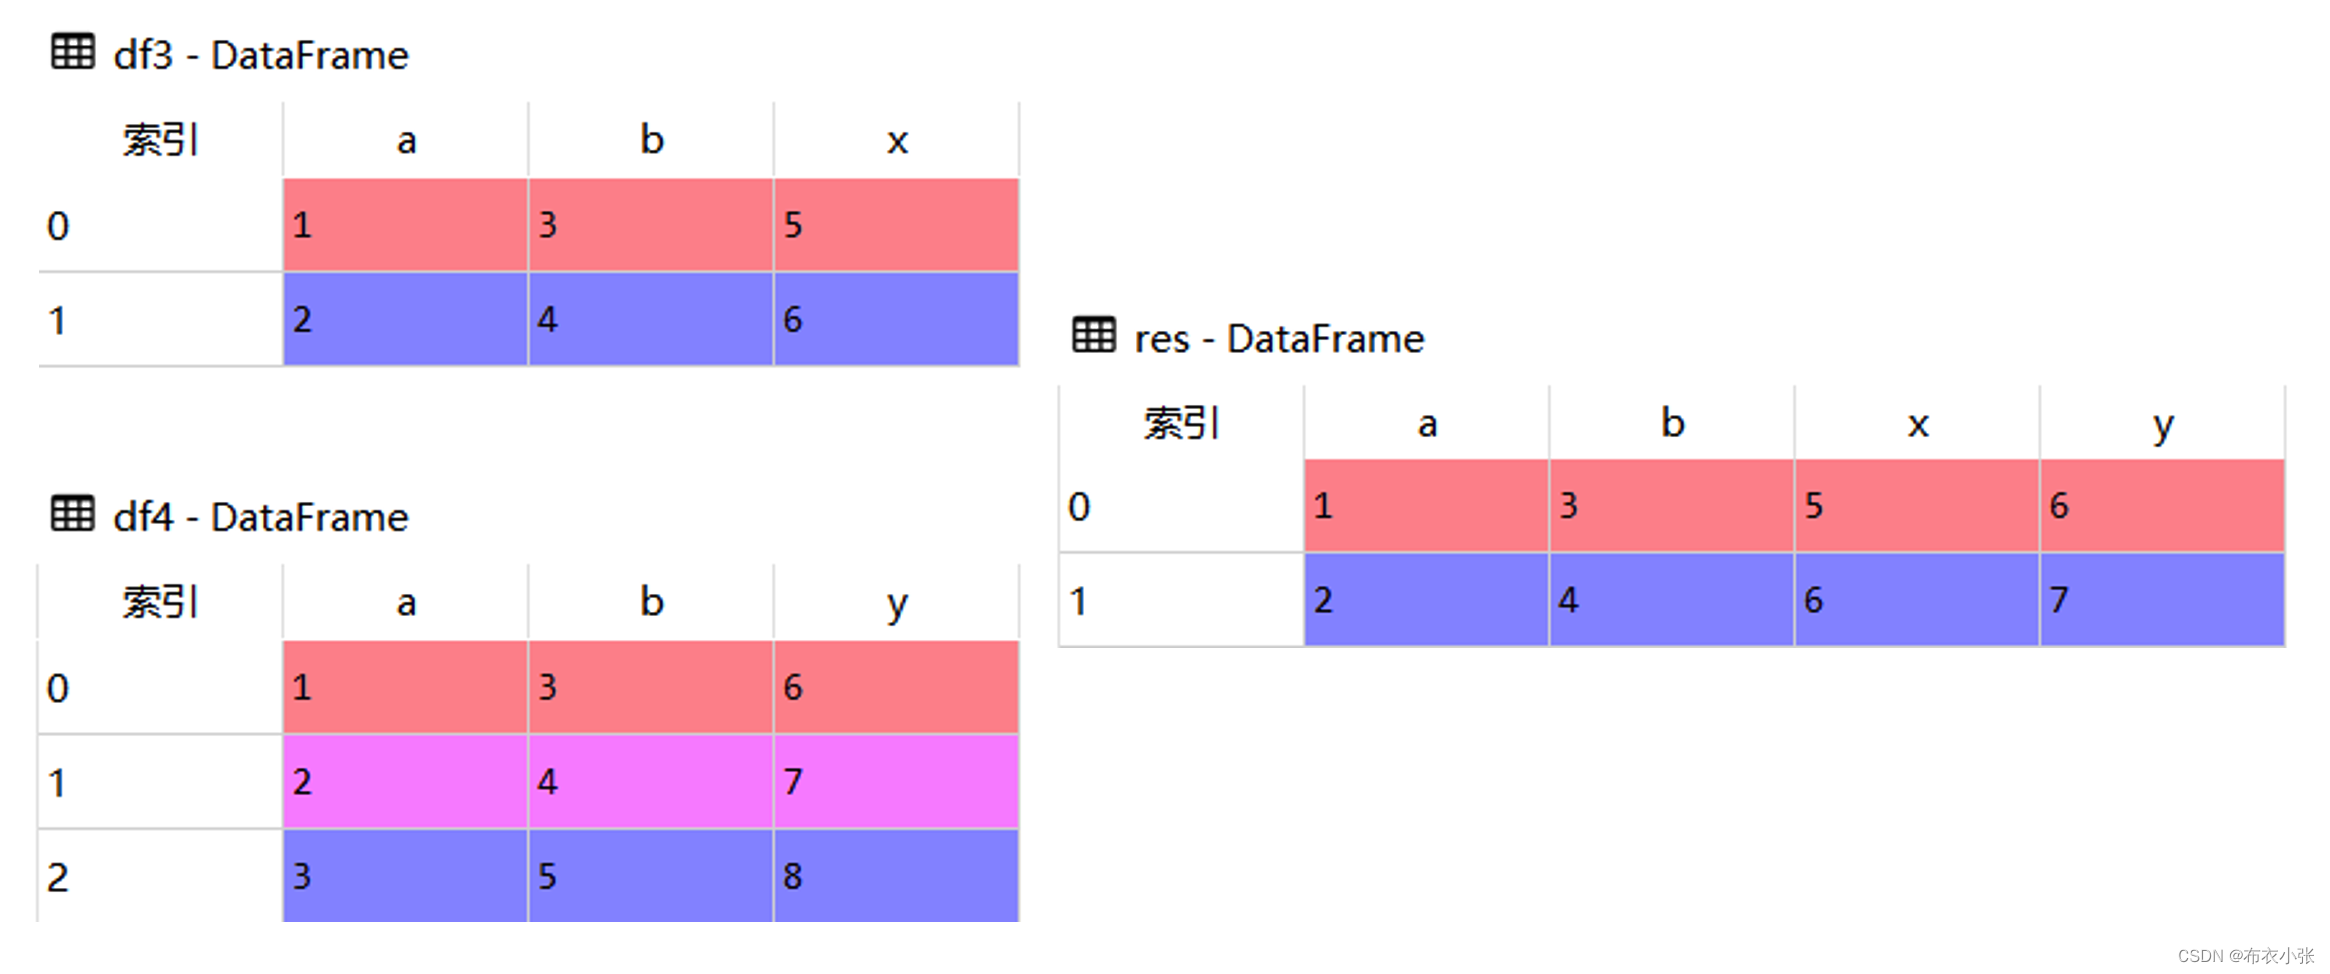
3.8.3. 多连接键
- 如果在合并数据时需要用多个连接键,可以以列表的形式将这些连接键传入on中
import pandas as pd

df3 = pd.DataFrame({'a':[1,2],'b':[3,4],'x':[5,6]})
df4 = pd.DataFrame({'a':[1,2,3],'b':[3,4,5],'y':[6,7,8]})

res = pd.merge(df3, df4, on=['a','b'])
3.8.4. 连接方法(默认的方式是inner join,取交集)
- how参数可以指定数据用哪种方法进行合并, 可以设置inner、outer、left或right。
- 默认的方式是inner join,取交集,也就是保留左右表的共同内容
- 如果是left join,左边表中所有的内容都会保留
- 如果是right join,右表全部保留
- 如果是outer join,则左右表全部保留。关联不上的内容为NaN
import pandas as pd
df3 = pd.DataFrame({'a':[1,2],'b':[3,4],'x':[5,6]})
df4 = pd.DataFrame({'a':[1,2,3],'b':[3,4,5],'y':[6,7,8]})

res1 = pd.merge(df3, df4, how='left', on=['a','b'])

res2 = pd.merge(df3, df4, how='right', on=['a','b'])

- *以下是其他的案例:
import pandas as pd
df3 = pd.DataFrame({'a':[1,2],'b':[3,4],'x':[5,6]})
df4 = pd.DataFrame({'a':[1,2,3],'b':[3,4,5],'y':[6,7,8]})

res3 = pd.merge(df3, df4, how='outer', on=['a','b'])

res4 = pd.merge(df3, df4, how='inner', on=['a','b'])

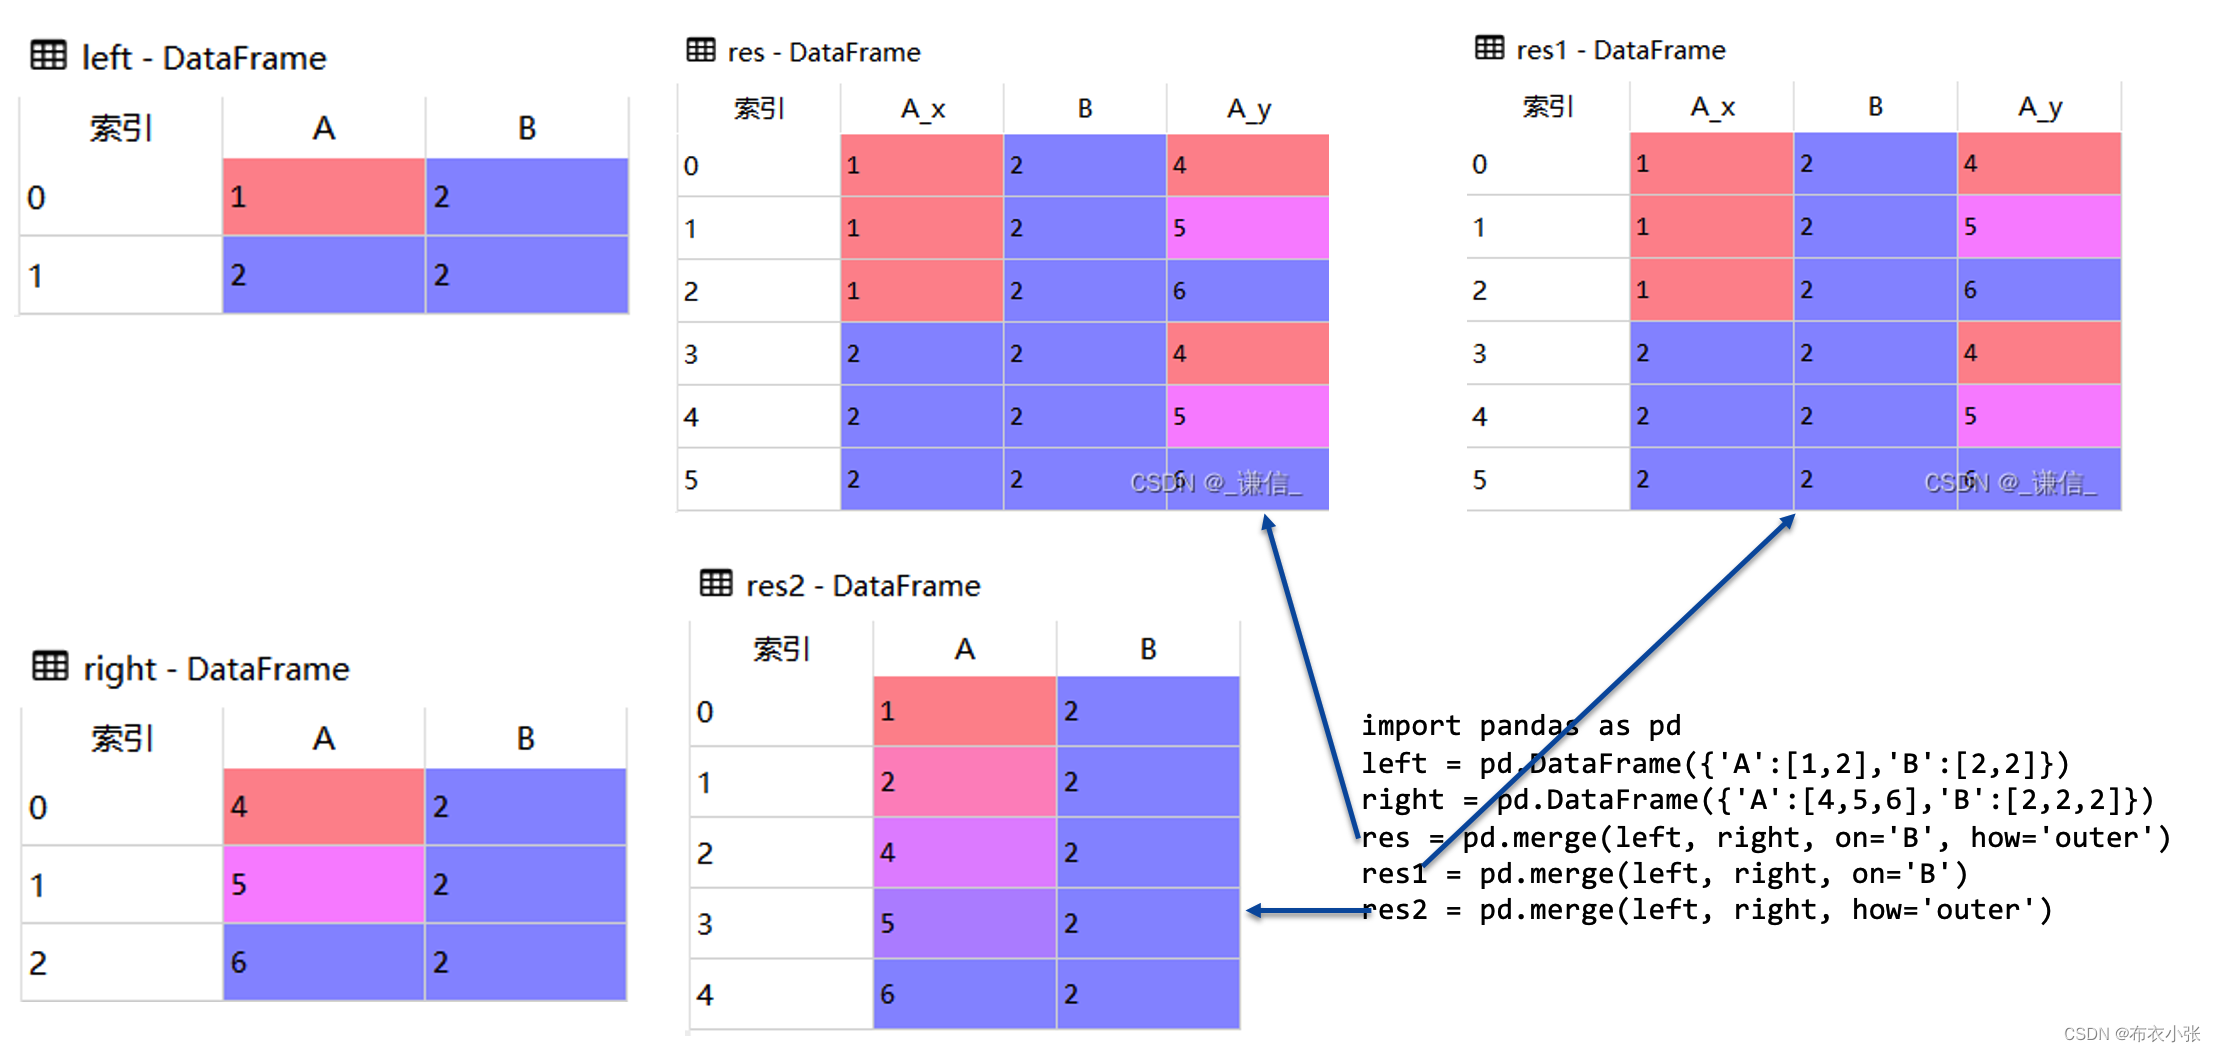
- *一个有重复连接键的例子
import pandas as pd
left = pd.DataFrame({'A':[1,2],'B':[2,2]})
right = pd.DataFrame({'A':[4,5,6],'B':[2,2,2]})
res = pd.merge(left, right, on='B', how='outer')
res1 = pd.merge(left, right, on='B')
res2 = pd.merge(left, right, how='outer')
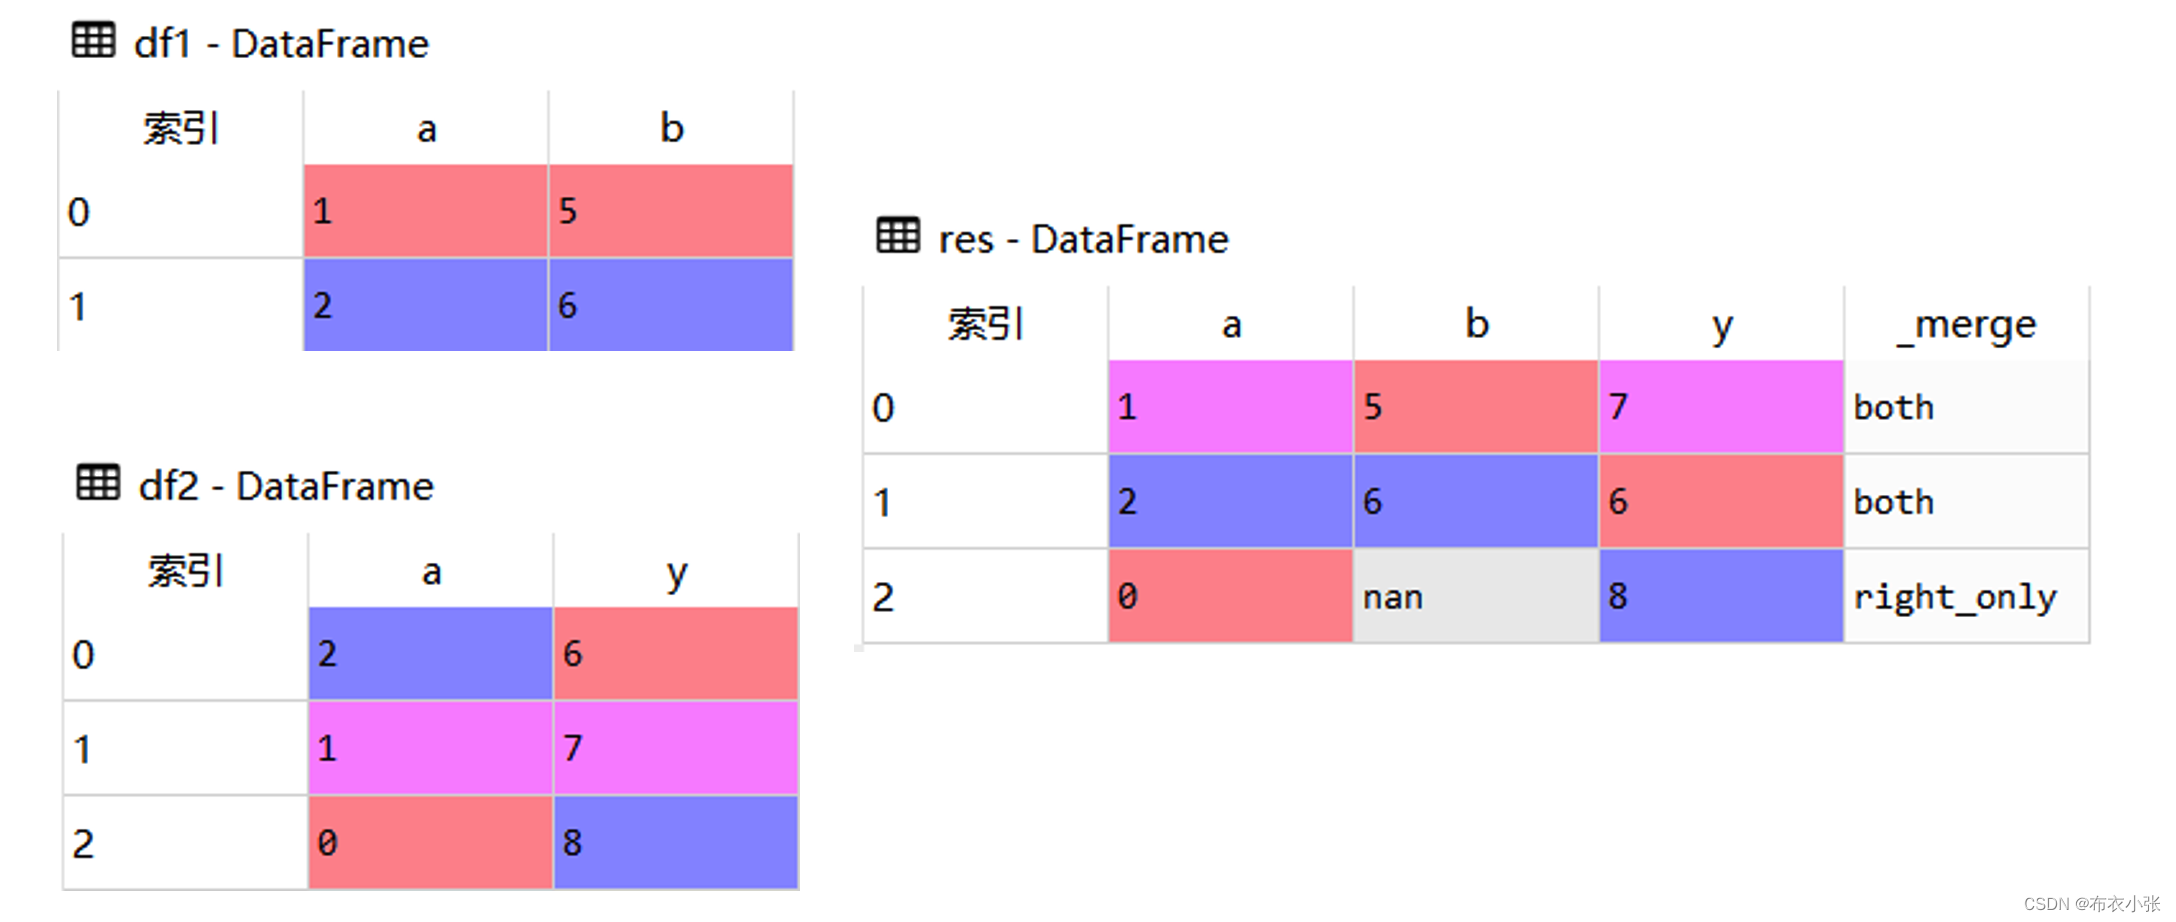
3.8.5. 连接指示
- 如果想知道数据连接后是左表内容还是右表内容,可以使用indicator参数显示连接方式。 如果将indicator设置为True,则会增加名为_merge的列,显示这列是从何而来
- _merge有以下三个值:
left_only:只在左表中;right_only:只在右表中;both:两个表都有
import pandas as pd
df1 = pd.DataFrame({'a':[1,2],'b':[5,6]})
df2 = pd.DataFrame({'a':[2,1,0],'y':[6,7,8]})

res = pd.merge(df1, df2, on='a', how='outer', indicator=True)
三. Pandas时间序列数据处理
3.1. 创建时间对象
- 在 Pandas 中关于时间序列的常见对象有 6 种,分别是:
- Timestamp(时间戳)
- DatetimeIndex(时间戳索引)
- Period(时间段)
- PeriodIndex(时间段索引)
- 以时间为元素的 Series
- 以时间索引的 DataFrame。
3.1.1. 创建时间戳pd.Timestamp
- Timestamp 时间戳表示 时间轴上的某一点,以下不同代码都可以生成相同时间戳。如创建时间为 2018 年 10 月 1 日的时间戳。
import pandas as pd

pd.Timestamp(2020, 10, 1)

pd.Timestamp("2018-10-1 10:00:1")

from datetime import datetime
pd.Timestamp(datetime(2018, 10, 1))
3.1.2. 创建时间段pd.Period(一个时间戳生成器)
- Period 时间段表示 时间轴上的某一 区间,以下代码都可以生成相同时间段。
b = pd.Period('2018-10', freq='M')

a = pd.Period('2018-10')
print(a)
print(a+1)
print(a-1)
3.1.3. 创建时间元素的Series,pd.to_datetime()
- Pandas 中常用 to_datetime() 函数可以创建以时间为元素的 Series。
df = ['2018-08-01', '2018-09-01', '2018-10-01']
pd.to_datetime(df)

df = pd.Series(['Sep 30, 2018', '2018-10-1', None])
pd.to_datetime(df)

df = pd.DataFrame({'year': [2017, 2018],
                   'month': [9, 10],
                   'day': [30, 1],
                   'hour': [23, 0]})
pd.to_datetime(df)
3.1.4. 创建时间索引pd.date_range和pd.bdate_range
- 在实际工作中,经常要生成含大量时间戳的超长索引,如果一个一个输入时间戳会很低效
- 如果时间戳是定频的,用 date_range() 与 bdate_range() 函数即可创 DatetimeIndex
- date_range 默认的频率是日历日,bdate_range 的默认频率是工作日
- 要生成带有时间戳的索引,可以使用 DatetimeIndex() 构造函数,并传入列表或 Series 对象:
- freq频率别名的列表链接
dates = ['2018-08-01', '2018-09-01', '2018-10-01']
index = pd.DatetimeIndex(dates)
index
- 实际运用中我们经常需要大量的的时间戳的索引。 可以使用 date_range() 和 bdate_range() 来批量创建相同时间间隔的时间戳索引。
- 创建以 2018 年 9 月 30 日为开始的 250 条时间索引,相邻索引 间隔时间长度为一个月。
index = pd.date_range('2018-9-30', periods=250, freq='M')
index
- 创建以 2018 年 10 月 1 日为开始的 111 条时间索引,相邻索引 间隔时间长度为一个工作日。
index = pd.bdate_range('2018-10-1', periods=111)
index
- 在 date_range() 和 bdate_range() 中可以巧妙使用 start,end, periods,freq 等参数的各种组合轻松批量创建时间索引。
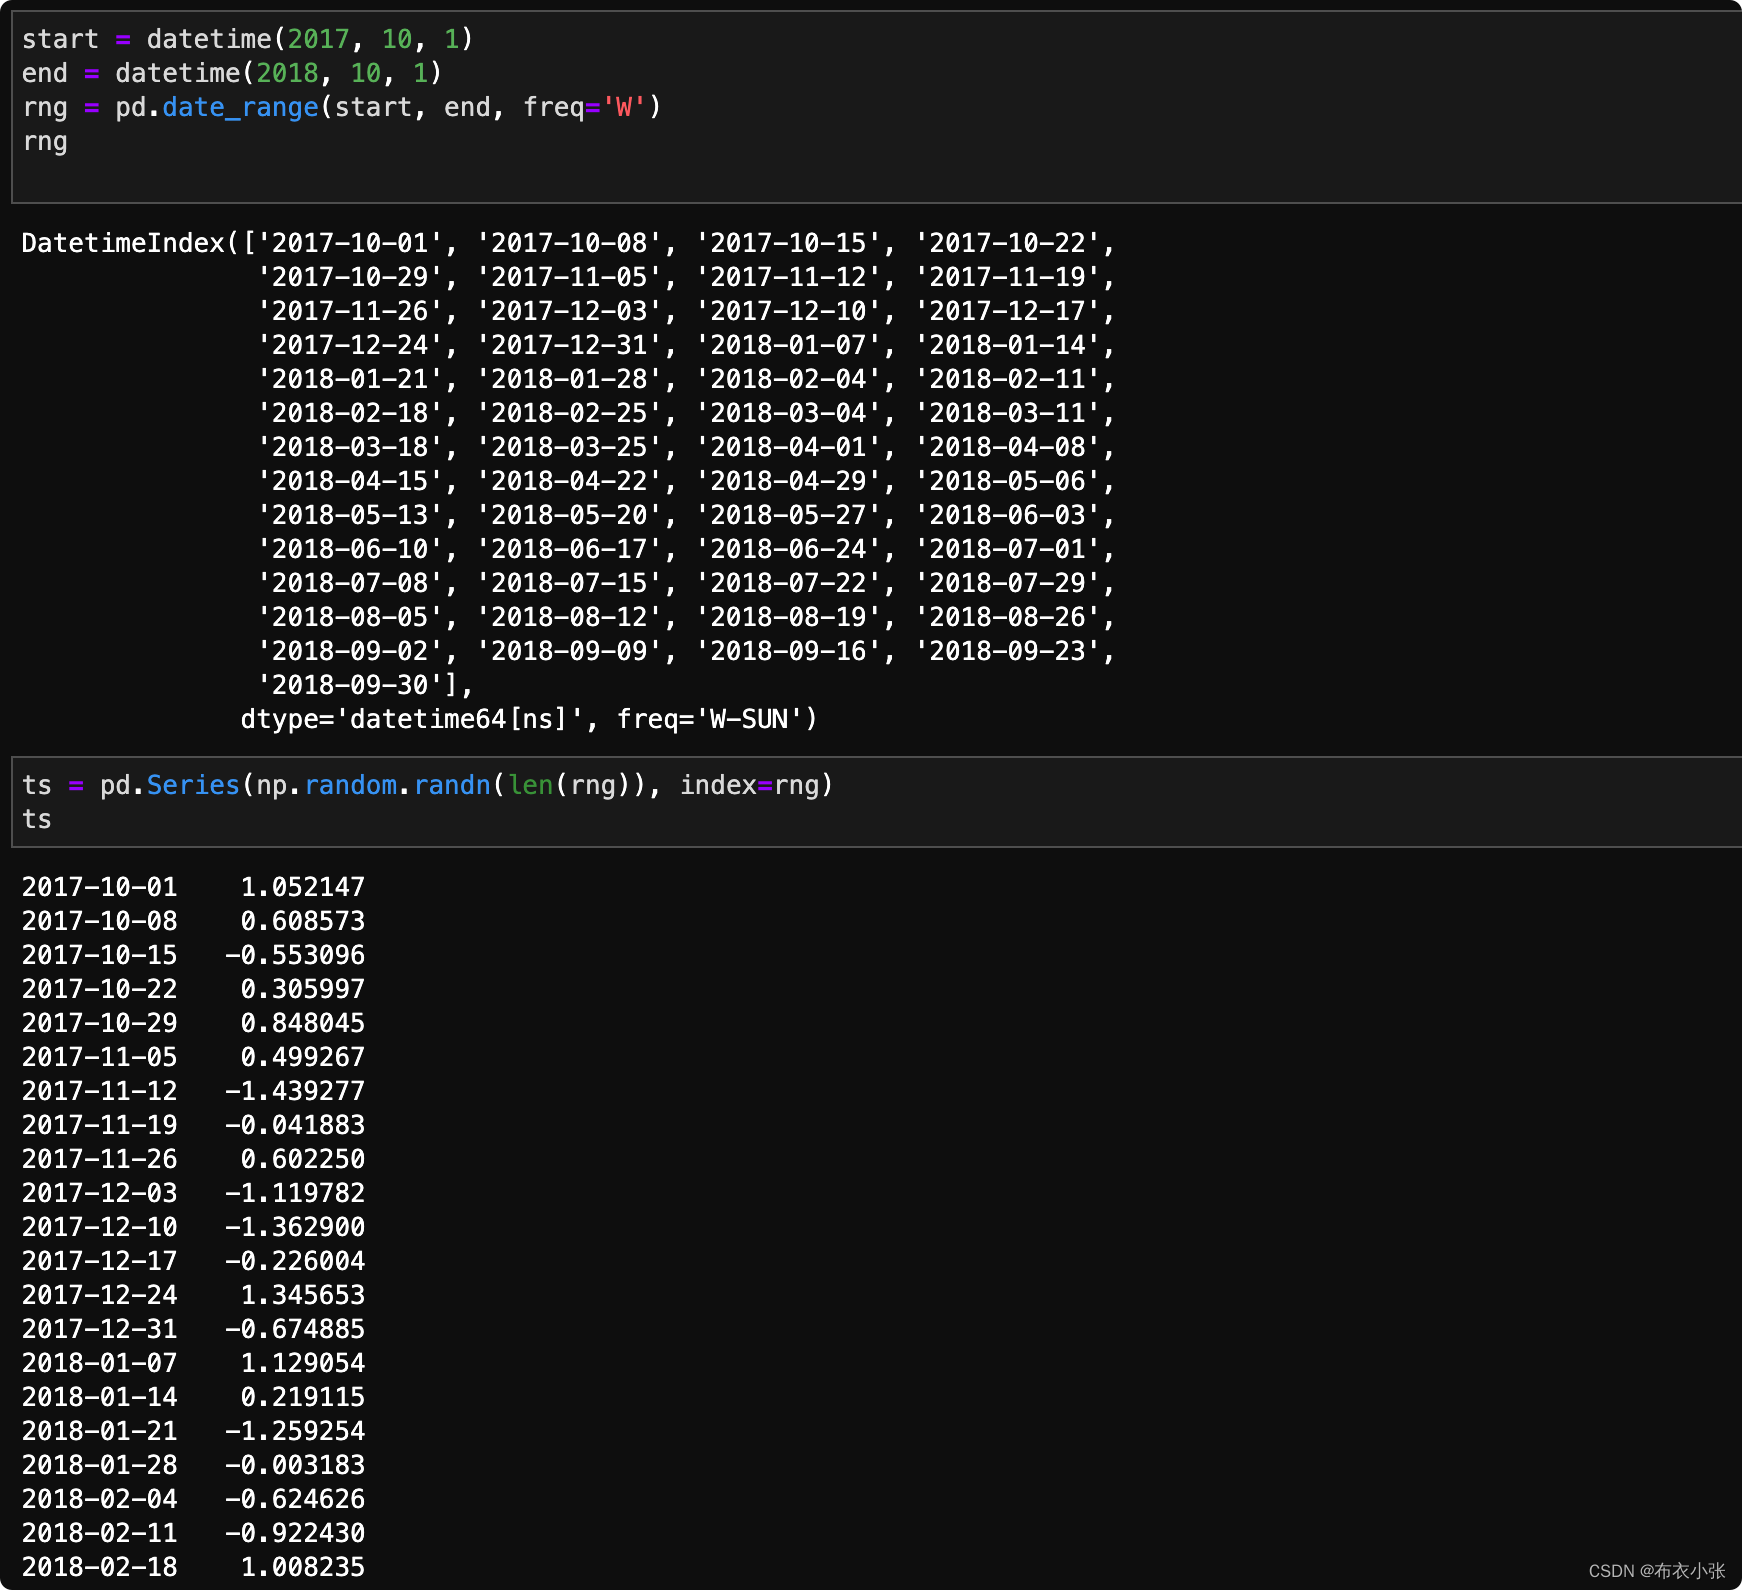
- 在 2017 年 10 月 1 日到 2018 年 10 月 1 日间,每隔一周创建一条索引。
from datetime import datetime

start = datetime(2017, 10, 1)
end = datetime(2018, 10, 1)
rng = pd.date_range(start, end, freq='W')
rng = pd.date_range('2017-10-1', '2018-10-1', freq='W')
rng
- 从 2018 年 10 月 1 日向前每隔一个工作日创建一条索引,共 250 条。
DatetimeIndex(['2017-10-17', '2017-10-18', '2017-10-19', '2017-10-20',
               '2017-10-23', '2017-10-24', '2017-10-25', '2017-10-26',
               '2017-10-27', '2017-10-30',
               ...

               '2018-09-18', '2018-09-19', '2018-09-20', '2018-09-21',
               '2018-09-24', '2018-09-25', '2018-09-26', '2018-09-27',
               '2018-09-28', '2018-10-01'],
              dtype='datetime64[ns]', length=250, freq='B')
3.1.4. 创建以时间为索引的Series 对象
- 以时间为索引的 Series 对象指的是在该 Series 中,元素的索引不再是 1、2、3、4、5……这样的序号,而是有序的日期和时间。
import numpy as np

dates = [pd.Timestamp('2018-08-01'), pd.Timestamp('2018-09-01'),
         pd.Timestamp('2018-10-01')]
ts = pd.Series(np.random.randn(3), index=dates)
ts
- *同样,时间段也能作为索引。
periods = [pd.Period('2018-08'), pd.Period('2018-09'), pd.Period('2018-10')]
ts = pd.Series(np.random.randn(3), periods)
ts
- 时间段也能作为索引创建 DataFrame 对象。在 _2017 年第一季度和 2018 年第四季度_之间每隔一个季度创建一条索引。
prng = pd.period_range('2017Q1', '2018Q4', freq='Q-NOV')

ps = pd.DataFrame(np.random.rand(len(prng)), columns=[
                  'A'], index=prng)
ps
3.2. 时间索引对象处理
; 3.2.1. 查找
ts[:10]
ts[::2]
ts[[0, 2, 6]]

ts["09/30/2018"]
ts[datetime(2018, 9, 30)]

ts["2017"]

ts["2018-9"]

ps[:datetime(2017, 12, 31)]

ps["2018-06"]
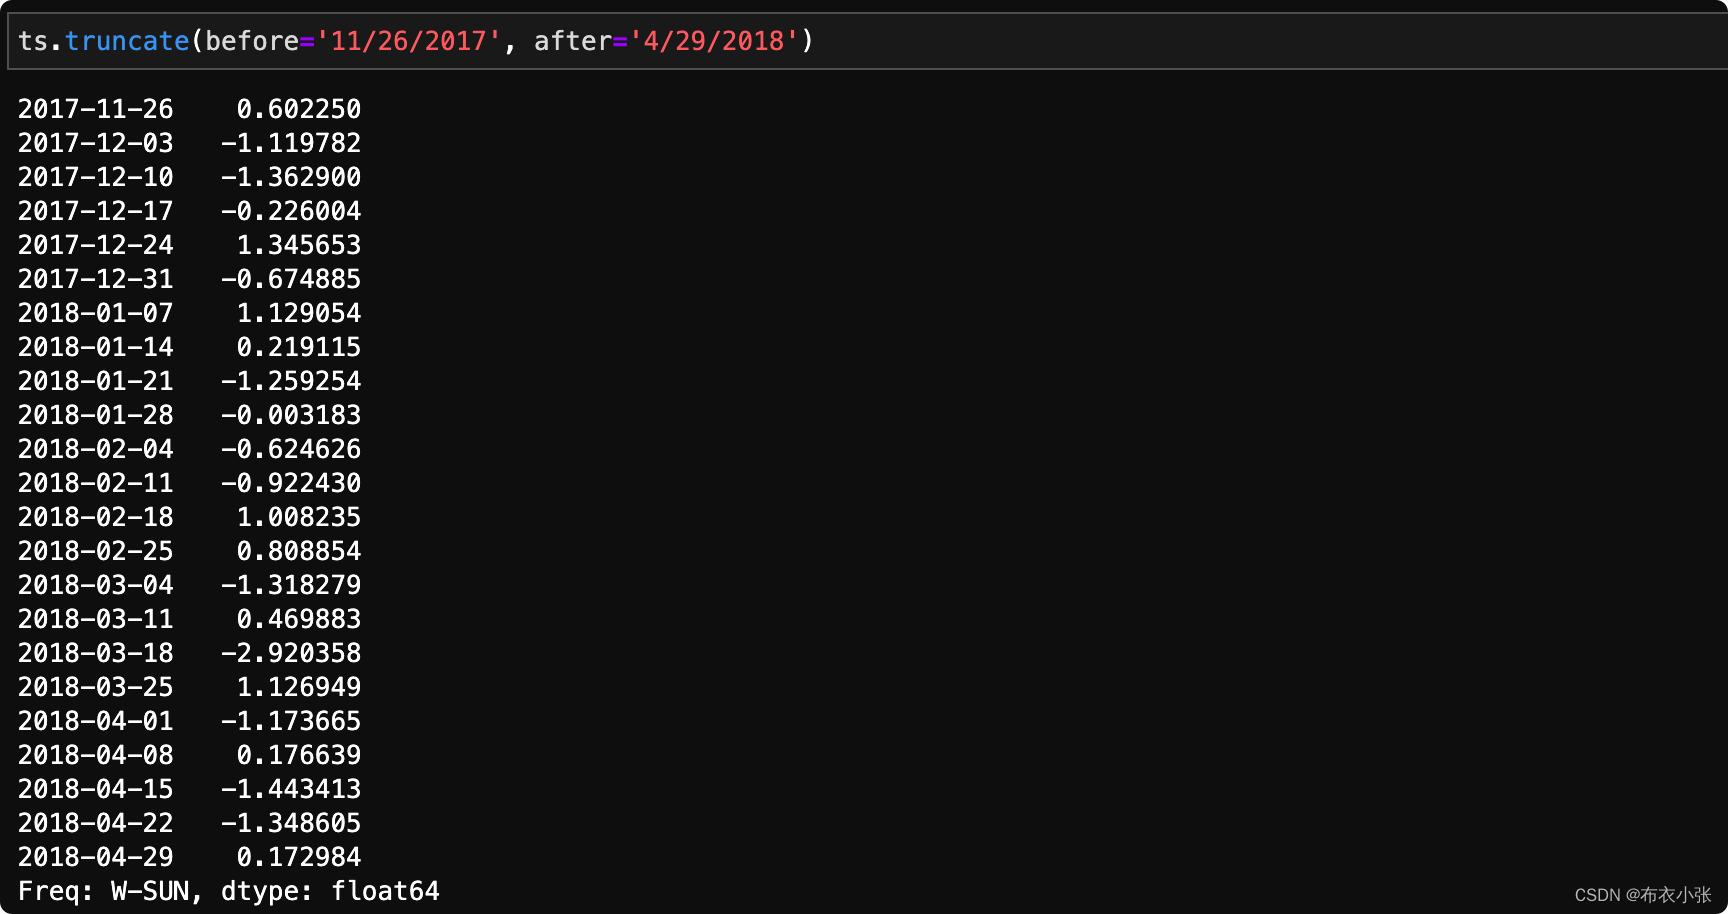
3.2.2. 切片(切下2017年11月26日与2018年4月29日间的记录)Dataframe.truncate
- https://pandas.pydata.org/pandas-docs/stable/reference/api/pandas.DataFrame.truncate.html
- 使用 truncate() 切下 2017 年 11 月 26 日与 2018 年 4 月 29 日间的记录。
; 3.2.3. 移动DataFrame.shift

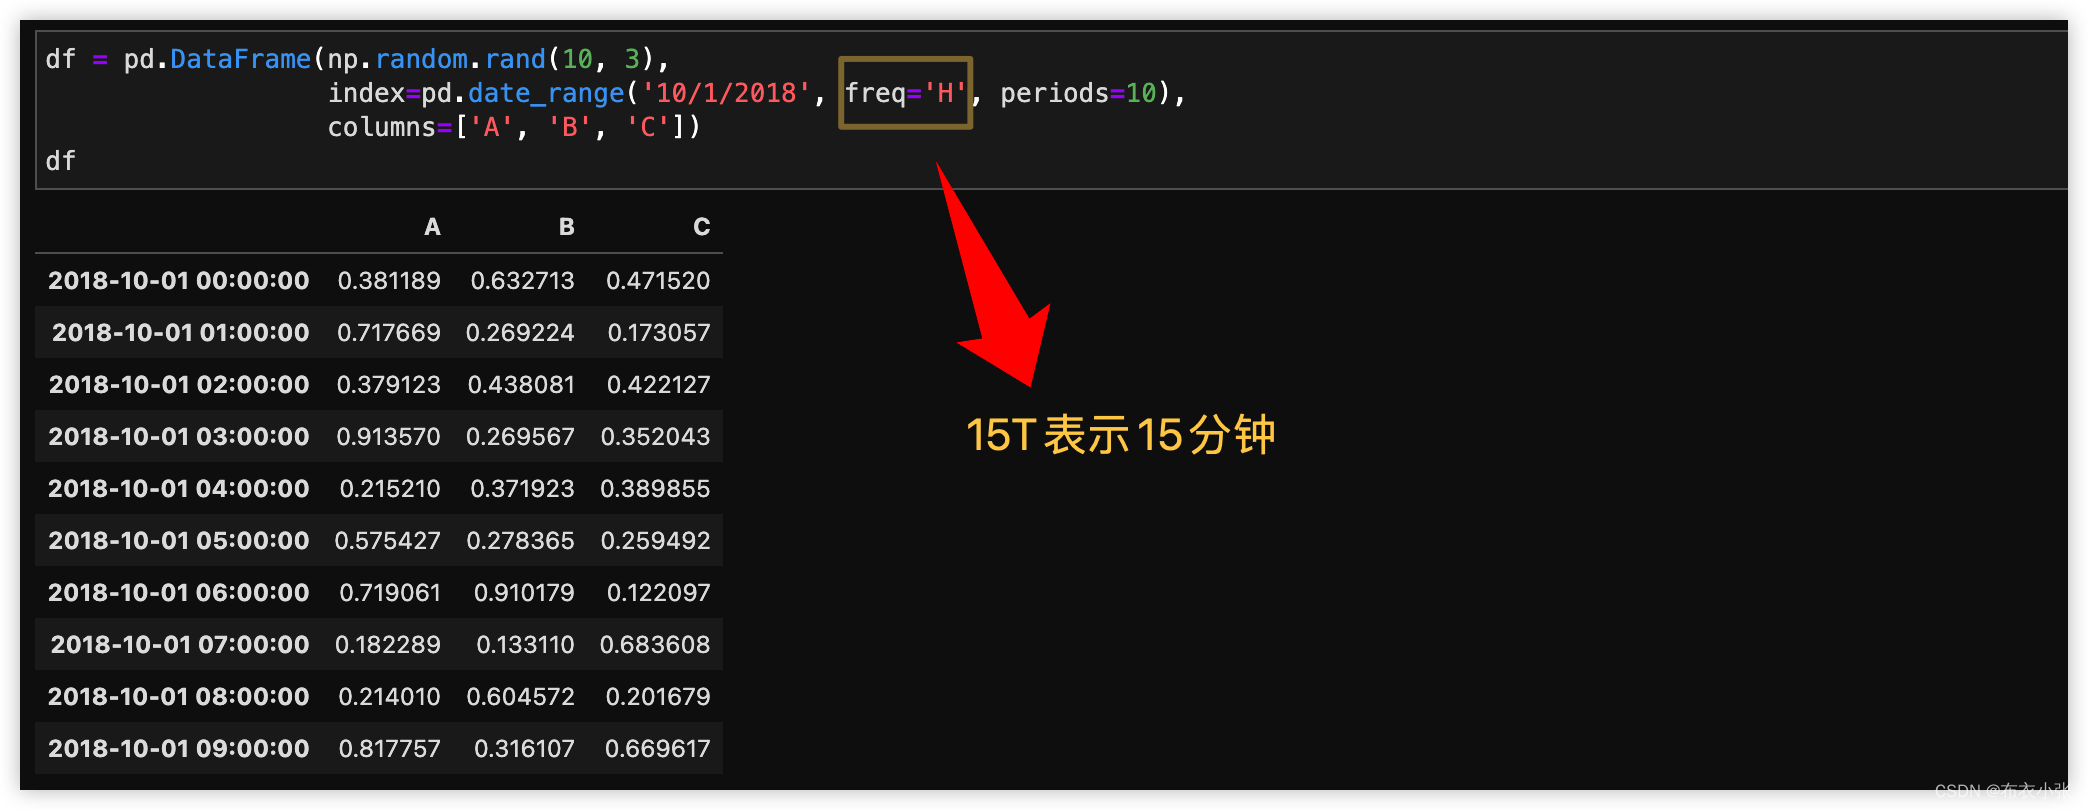
; 3.2.4. 重采样-改变相邻索引的时间间隔(DataFrame.resample)
- *为改变时间索引的个数,通过增大或减小相邻索引的时间间隔以达到减小或增加索引数量的效果
3.2.4.1. 下采样(增大时间间隔)
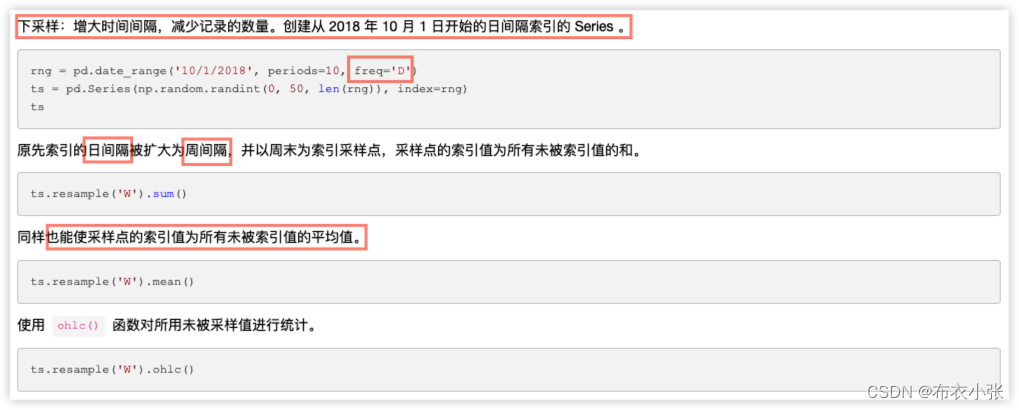
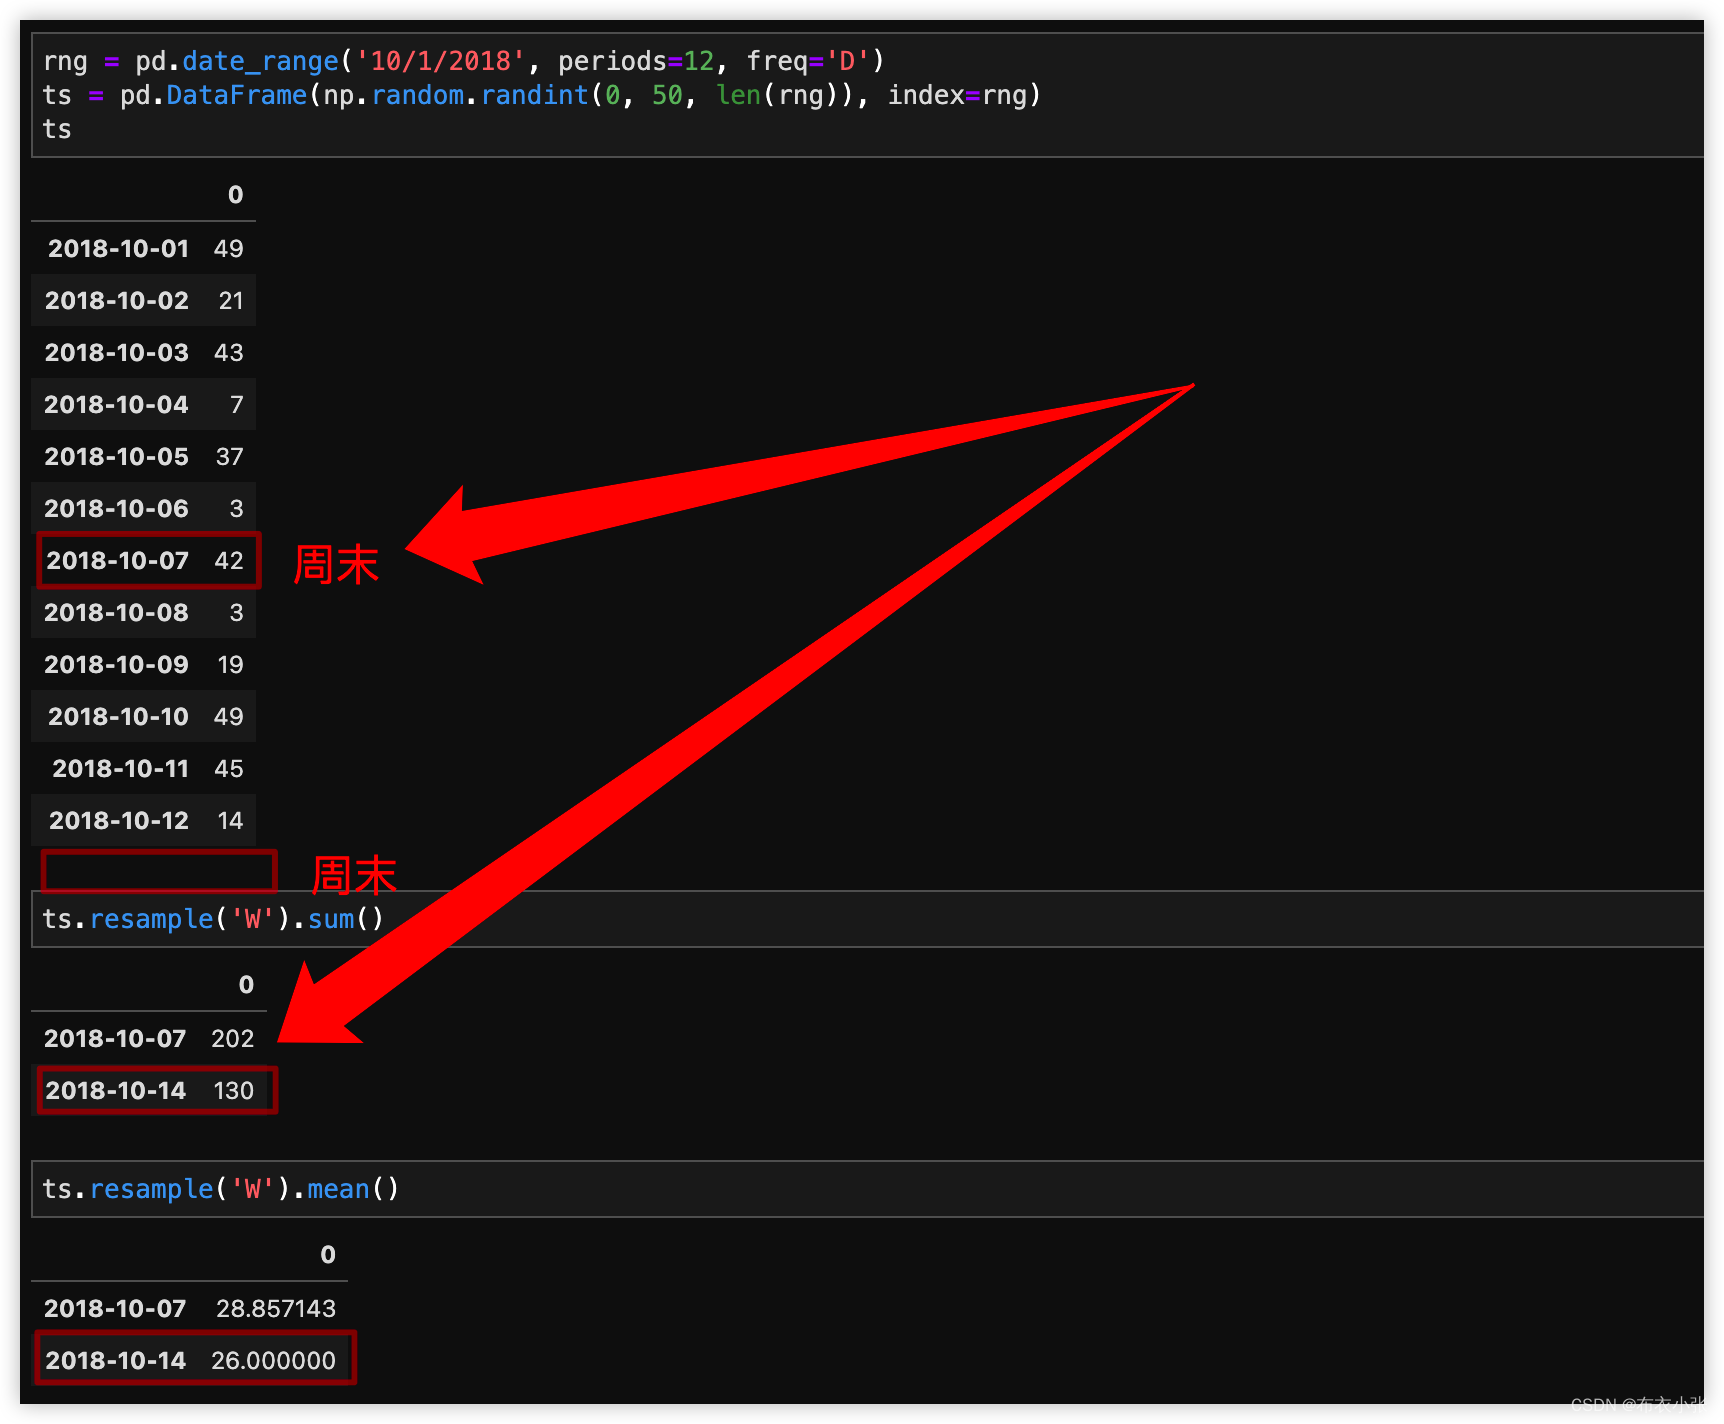
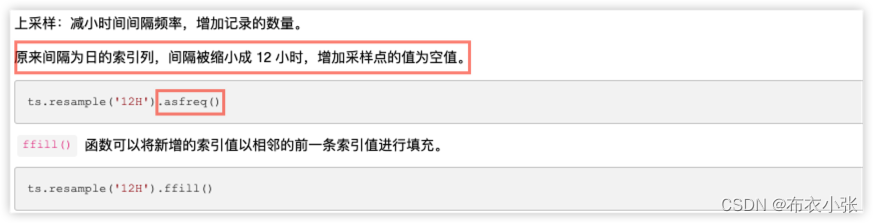
; 3.2.4.1. 上采样(增加记录的数量)
- *上采样:减小时间间隔频率, 增加记录的数量 。
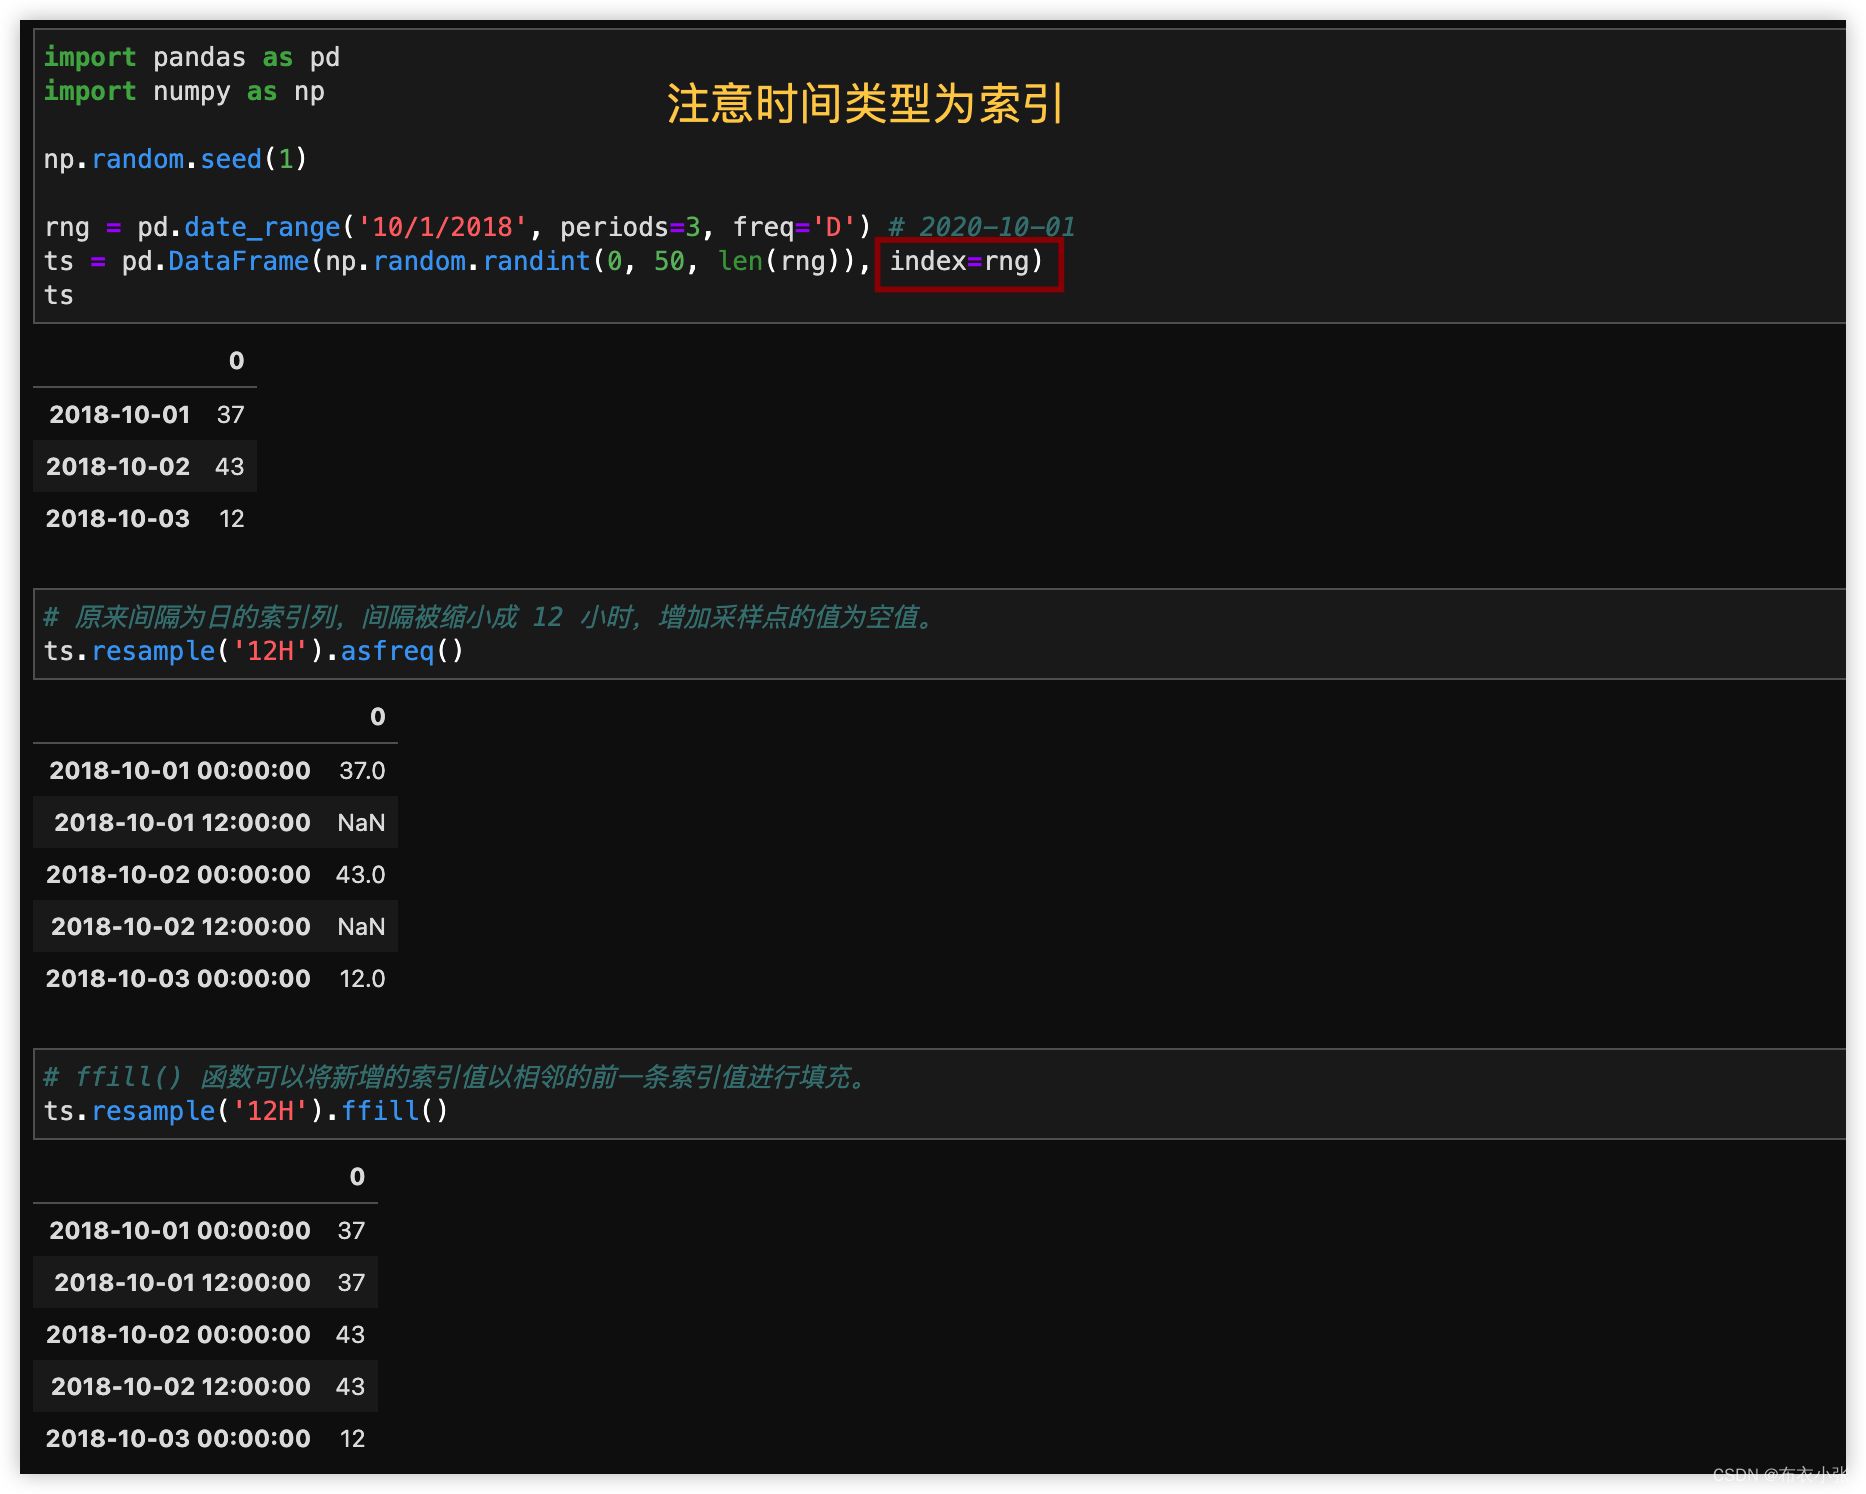
3.3. 填充缺失DataFrame.ffill和DataFrame.fillna填充
- Pandas dataframe.ffill()函数用于填充 DataFrame 中的缺失值。 “填充”代表”向前填充”,并将向前传播最后一个有效观察值。


import pandas as pd
import numpy as np

dic = {"a": [8, np.nan, np.nan, 6, 9], "b": pd.Series([np.nan, 6, np.nan, np.nan, 10]), "c": ["qq", np.nan, np.nan, np.nan, 88]}
df = pd.DataFrame(dic)
print("df = \n", df, sep="")

print("pd.isna(df) = \n", pd.isna(df), sep="")

print("pd.notna(df) = \n", pd.notna(df), sep="")

df2 = df.fillna(10,
                method=None,
                axis=1,
                limit=2,
                inplace=False)
print("用10替换后的df2 = \n", df2)

dic2 = {"a": 0, "b": 1, "c": 2}
df4 = df.fillna(dic2,
                axis=0,
                limit=2,
                inplace=False)
print("用字典替换后的df = \n", df4)

df5 = pd.DataFrame(np.arange(10).reshape((5, 2)), columns=["a", "b"])
df6 = df.fillna(df5, inplace=False)
print("用DataFrame替换后的df = \n", df6)

df3 = df.fillna(method="ffill",
                axis=0,
                limit=1,
                inplace=False)
print(df)
print("用前一个值替换后的df = \n", df3)
- pandas DataFrame.fillna()填充缺失函数的使用
https://blog.csdn.net/weixin_42118352/article/details/124993079 - Python Pandas dataframe.ffill()用法及代码示例https://vimsky.com/examples/usage/python-pandas-dataframe-ffill.html
- DataFrame.ffill官方:https://pandas.pydata.org/pandas-docs/stable/reference/api/pandas.DataFrame.ffill.html
3.4. 时间的算术方法
- 这块参考链接,介绍的很详细: https://www.cnblogs.com/wwj99/p/12237947.html
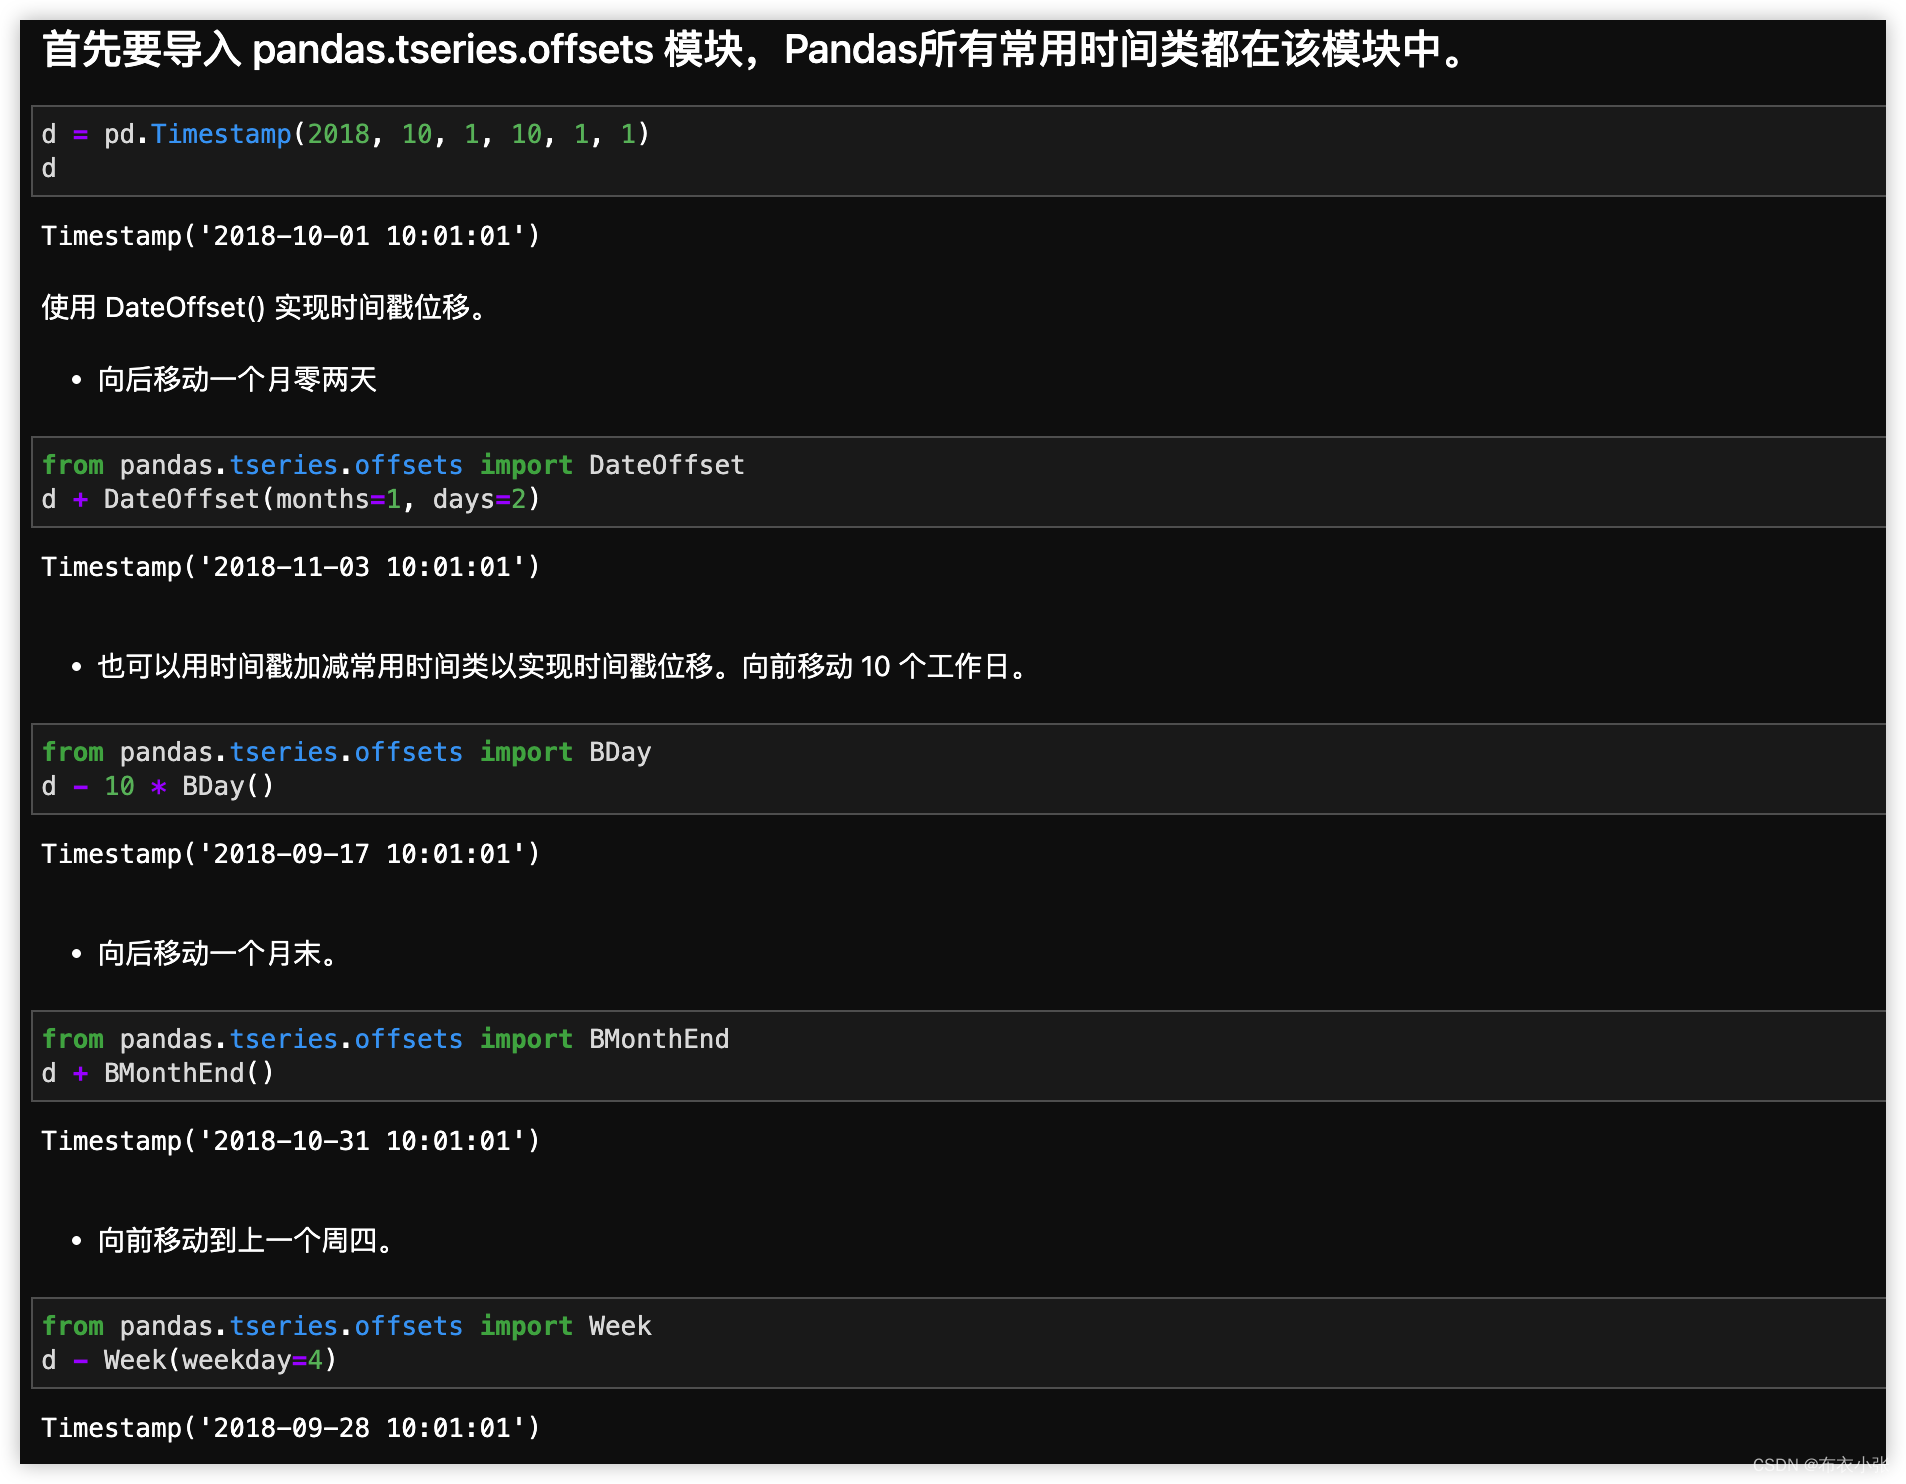
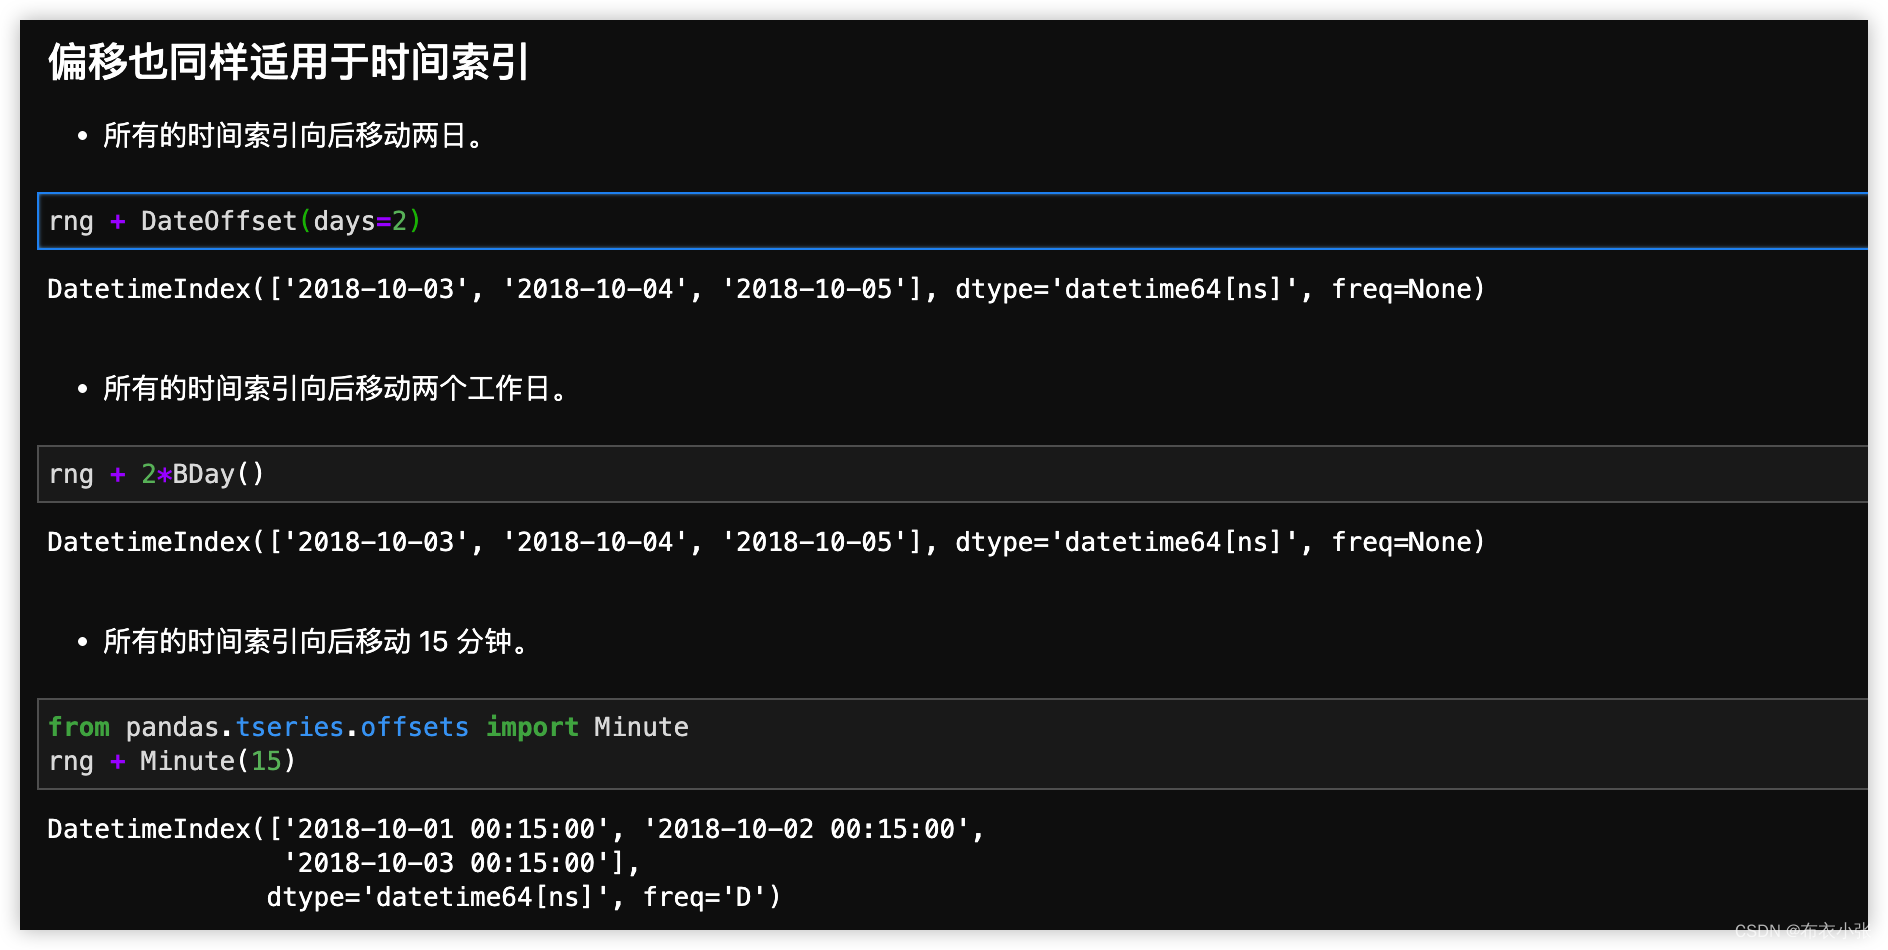
3.4.1. pandas.tseries.offsets模块
- 首先要导入
pandas.tseries.offsets模块, Pandas 所有常用时间类都在该模块中。下表是 Pandas 内建的一些时间类, 常用于时间索引的位移。

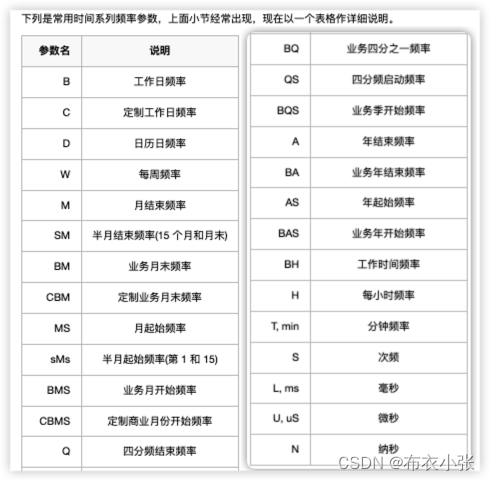
; 3.3.2. 常用时间系列频率参数表(重要)
- *下列是常用时间系列频率参数,上面小节经常出现,现在以一个表格作详细说明。
3.3.3. 使用3.3.1中常用频率参数组合创建时间索引
- *创建 10 条以 2018 年 10 月 1 日为开始,间隔为 1 天 1 小时 1 分钟 10 微秒的时间索引。
pd.date_range("2018-10-1", periods=10, freq='1D1H1min10U')
- 以下频率参数可以指定后缀以达到改变默认间隔点的效果。
- *创建 10 条以 2018 年 10 月 1 日为开始,间隔为每周三的时间索引。
pd.date_range("2018-10-1", periods=10, freq='W-WED')

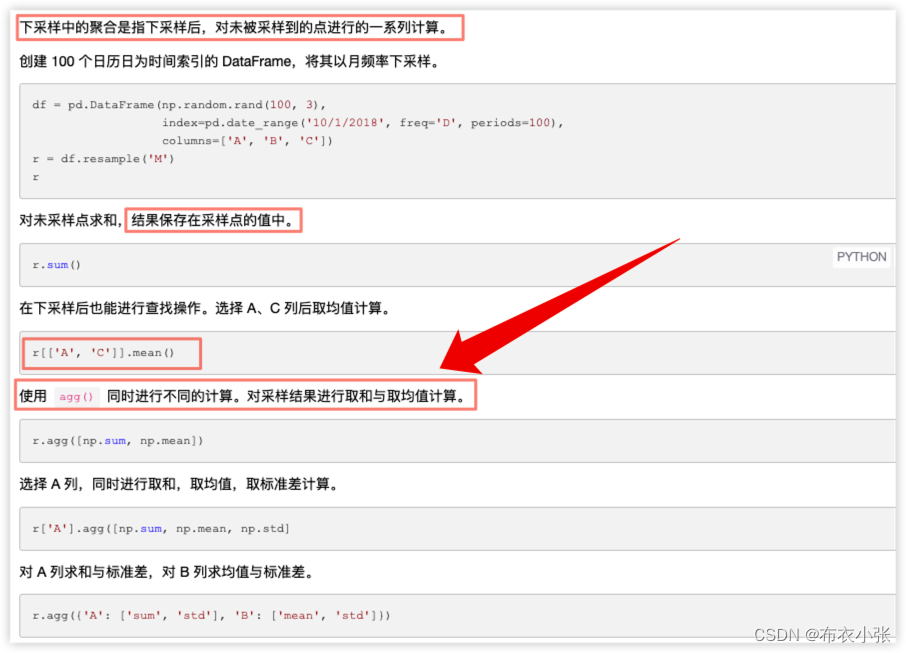
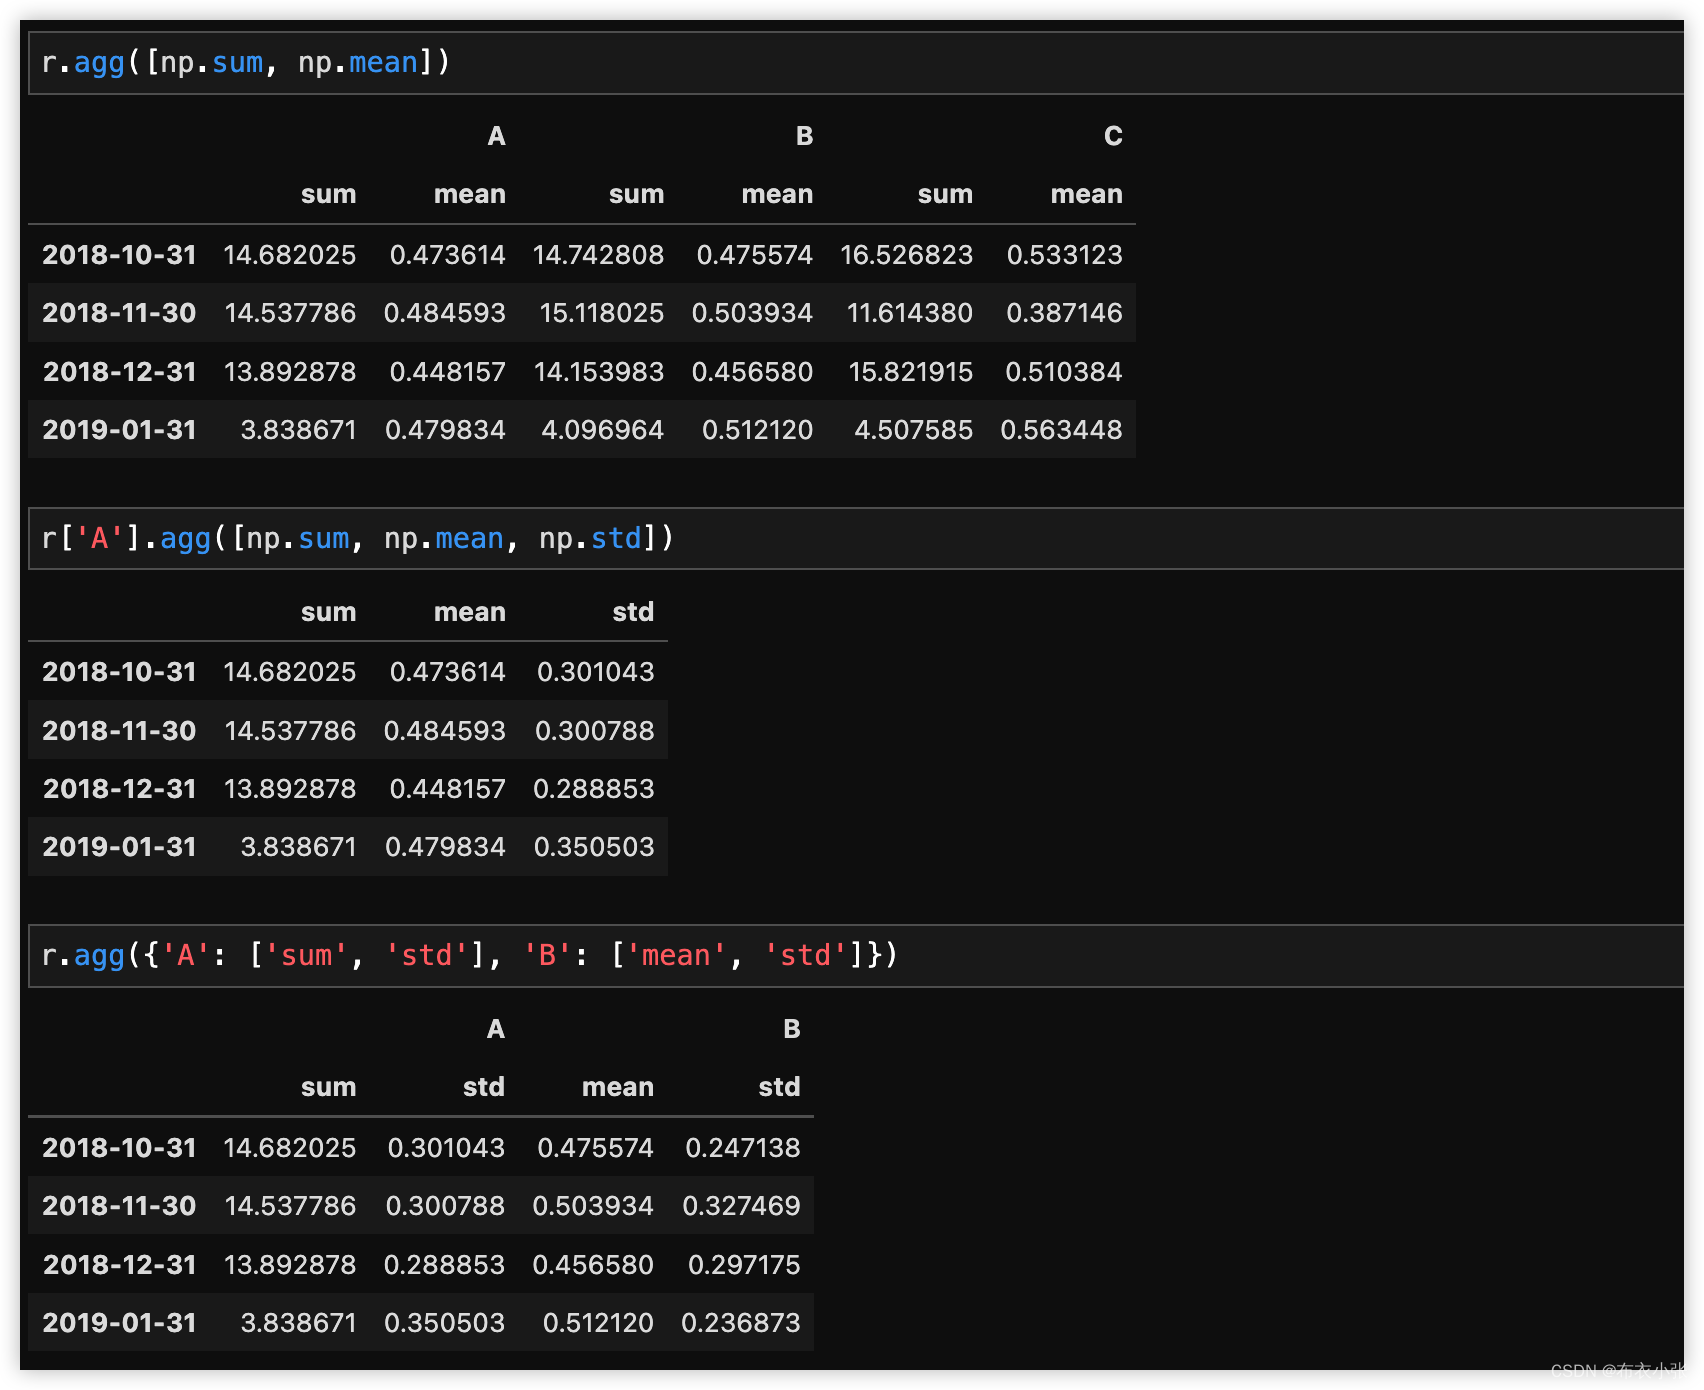
3.4.4. 下采样聚合
- 下采样中的聚合是指下采样后,对未被采样到的点进行的一系列计算。
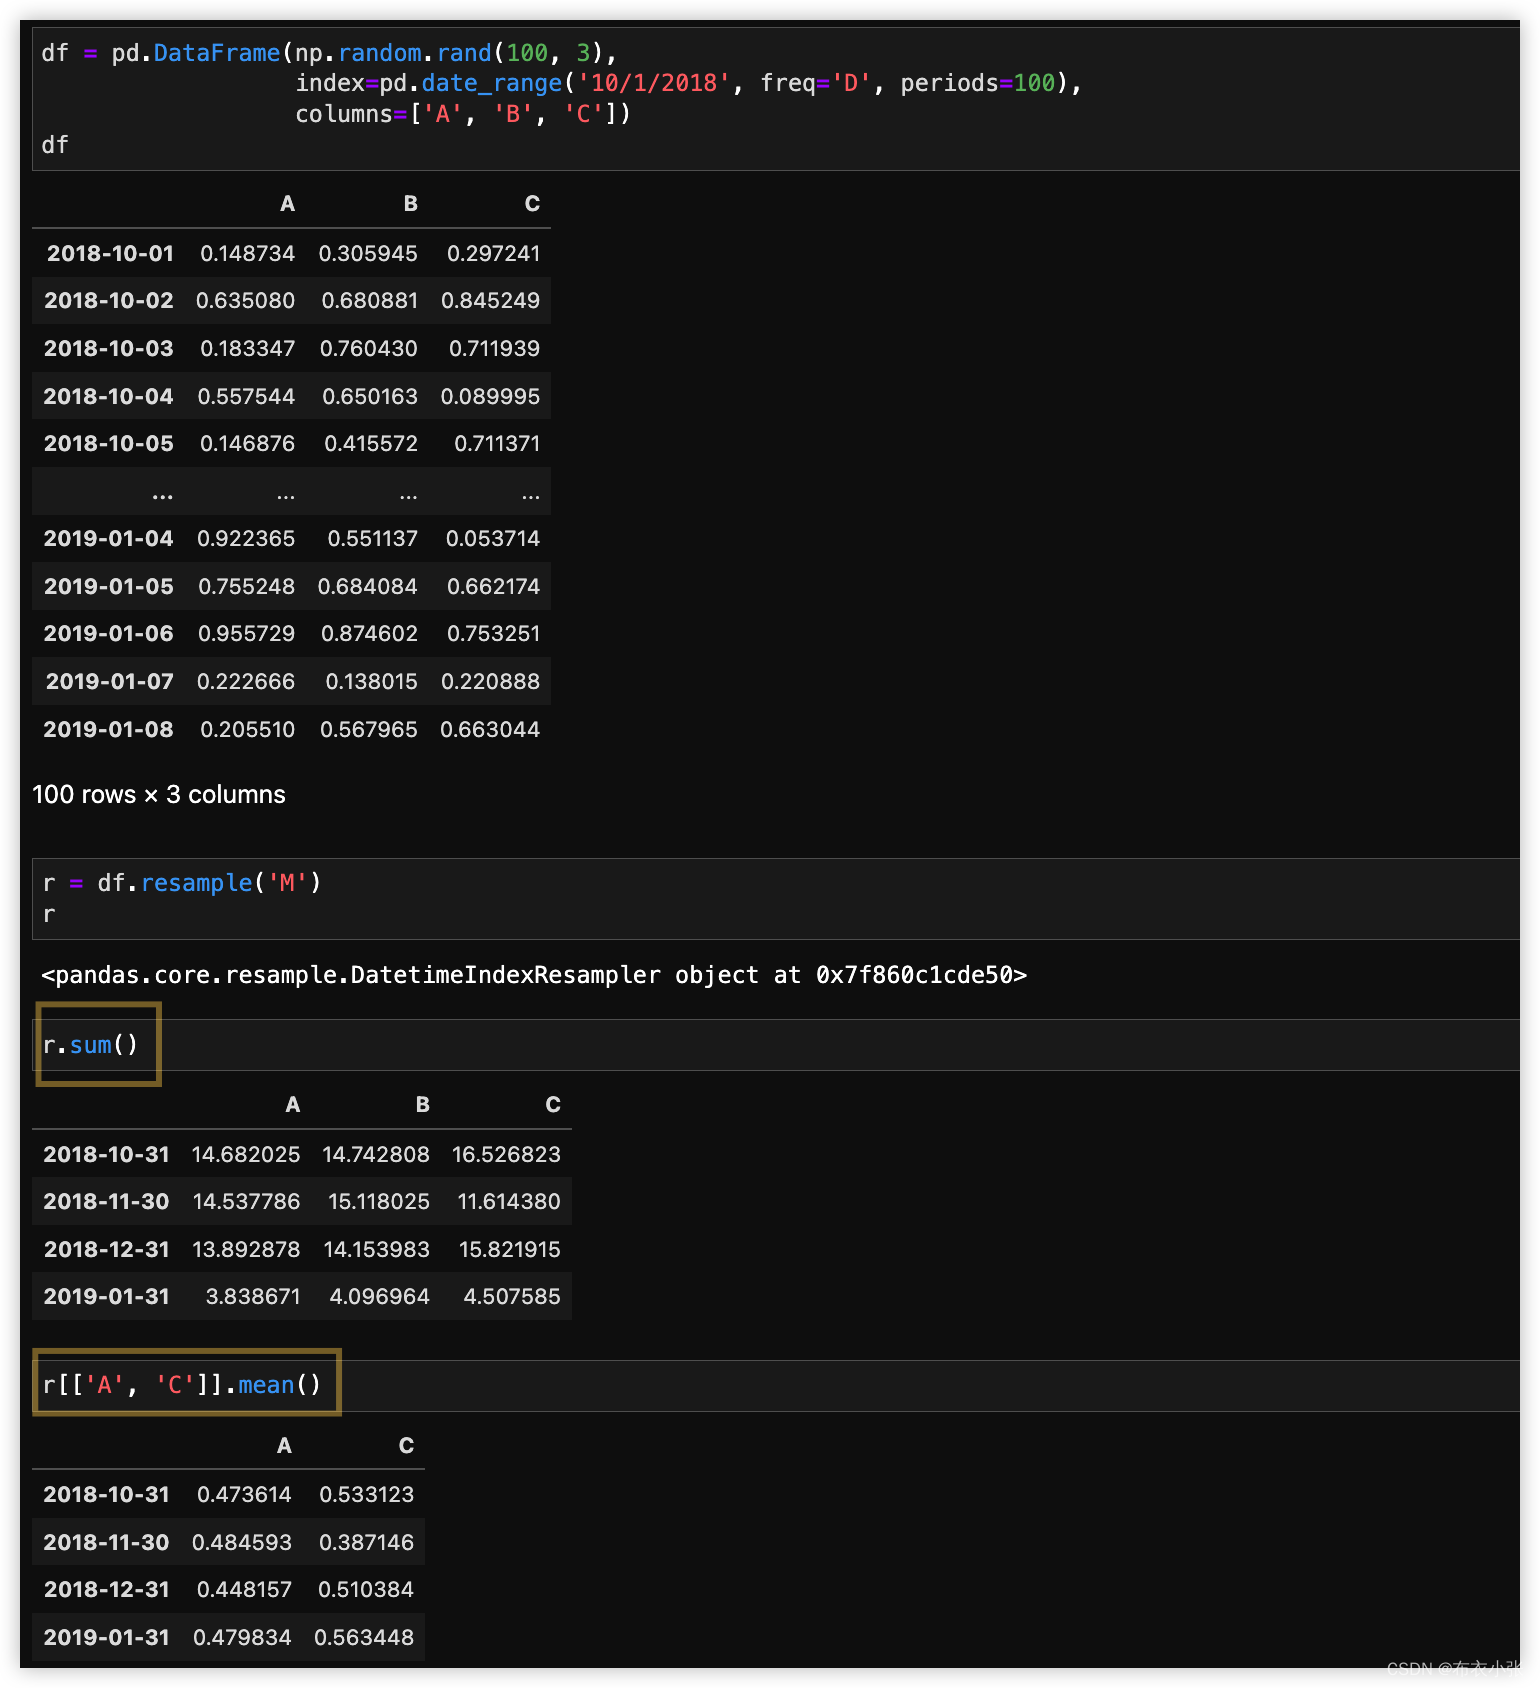
- 创建 100 个日历日为时间索引的 DataFrame,将其以 月频率下采样。
- 频率可以参考3.3.2中的表格。
- 创建 100 个日历日为时间索引的 DataFrame,将其以月频率下采样。
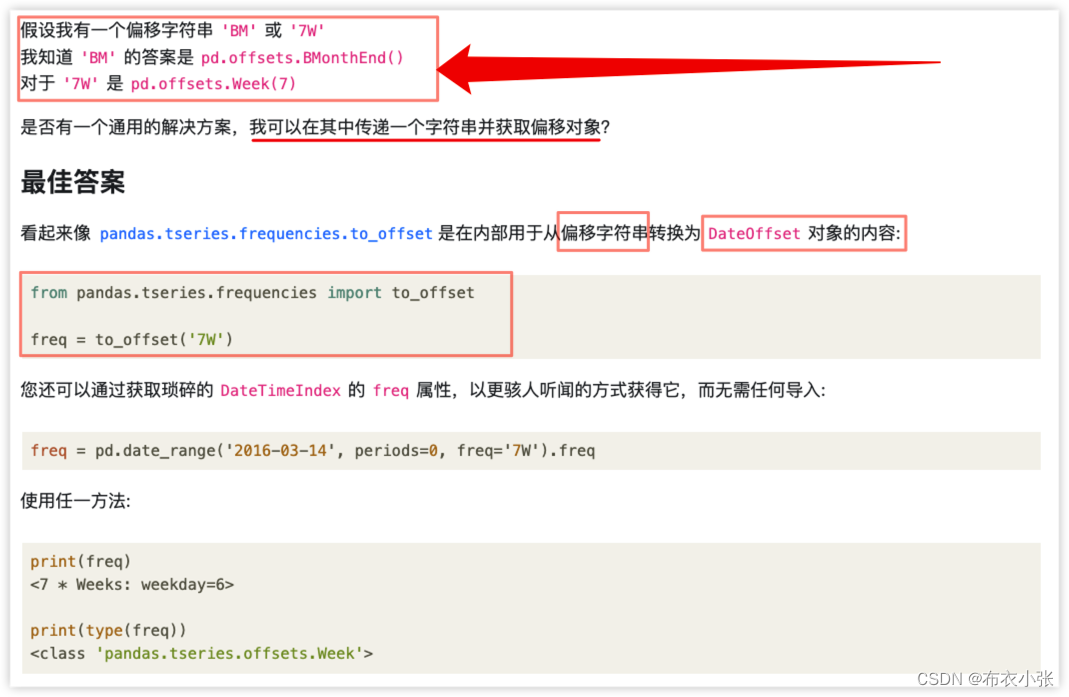
; 3.4.5. pandas.tseries.frequencies模块
- python – 给定偏移字符串,我如何获取 pandas.offsets 对象:https://www.coder.work/article/1273966
- https://github.com/pandas-dev/pandas/blob/main/pandas/tseries/frequencies.py#L390
- 一文讲解Python时间序列数据的预处理:https://z.itpub.net/article/detail/DC361B898CC85AF1172D9BD09D4236FB
- Pandas中时间序列的处理大全:https://www.cnhackhy.com/27337.htm
; 四. 特征提取之pd.get_dummies()
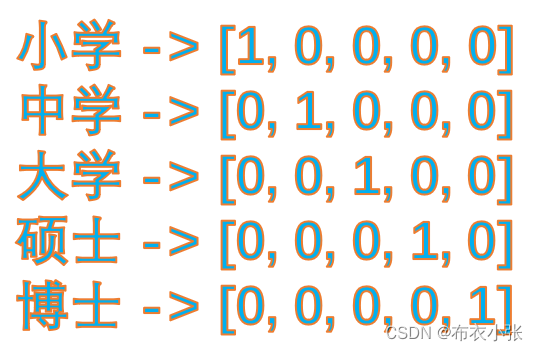
4.1. one-hot encoding
- one-hot的基本思想:将离散型特征的每一种取值都看成一种状态,若你的这一特征中有N个不相同的取值,那么我们就可以将该特征抽象成N种不同的状态,one-hot编码保证了每一个取值只会使得一种状态处于”激活态”,也就是说这N种状态中只有一个状态位值为1,其他状态位都是0。举个例子,假设我们以学历为例,我们想要研究的类别为小学、中学、大学、硕士、博士五种类别,我们使用one-hot对其编码就会得到:
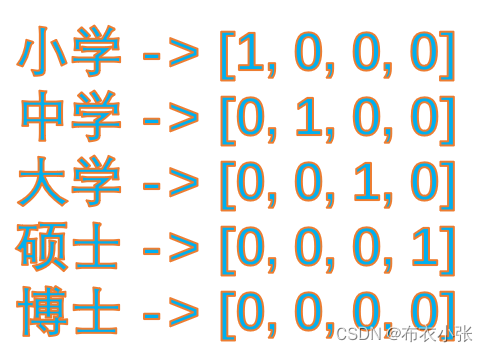
; 4.2. dummy encoding
- 哑变量编码 直观的解释就是任意的将一个状态位去除。还是拿上面的例子来说,我们用4个状态位就足够反应上述5个类别的信息,也就是我们仅仅使用前四个状态位 [0,0,0,0] 就可以表达博士了。只是因为对于一个我们研究的样本,他已不是小学生、也不是中学生、也不是大学生、又不是研究生,那么我们就可以默认他是博士,是不是。(额,当然他现实生活也可能上幼儿园,但是我们统计的样本中他并不是)。所以,我们用哑变量编码可以将上述5类表示成:
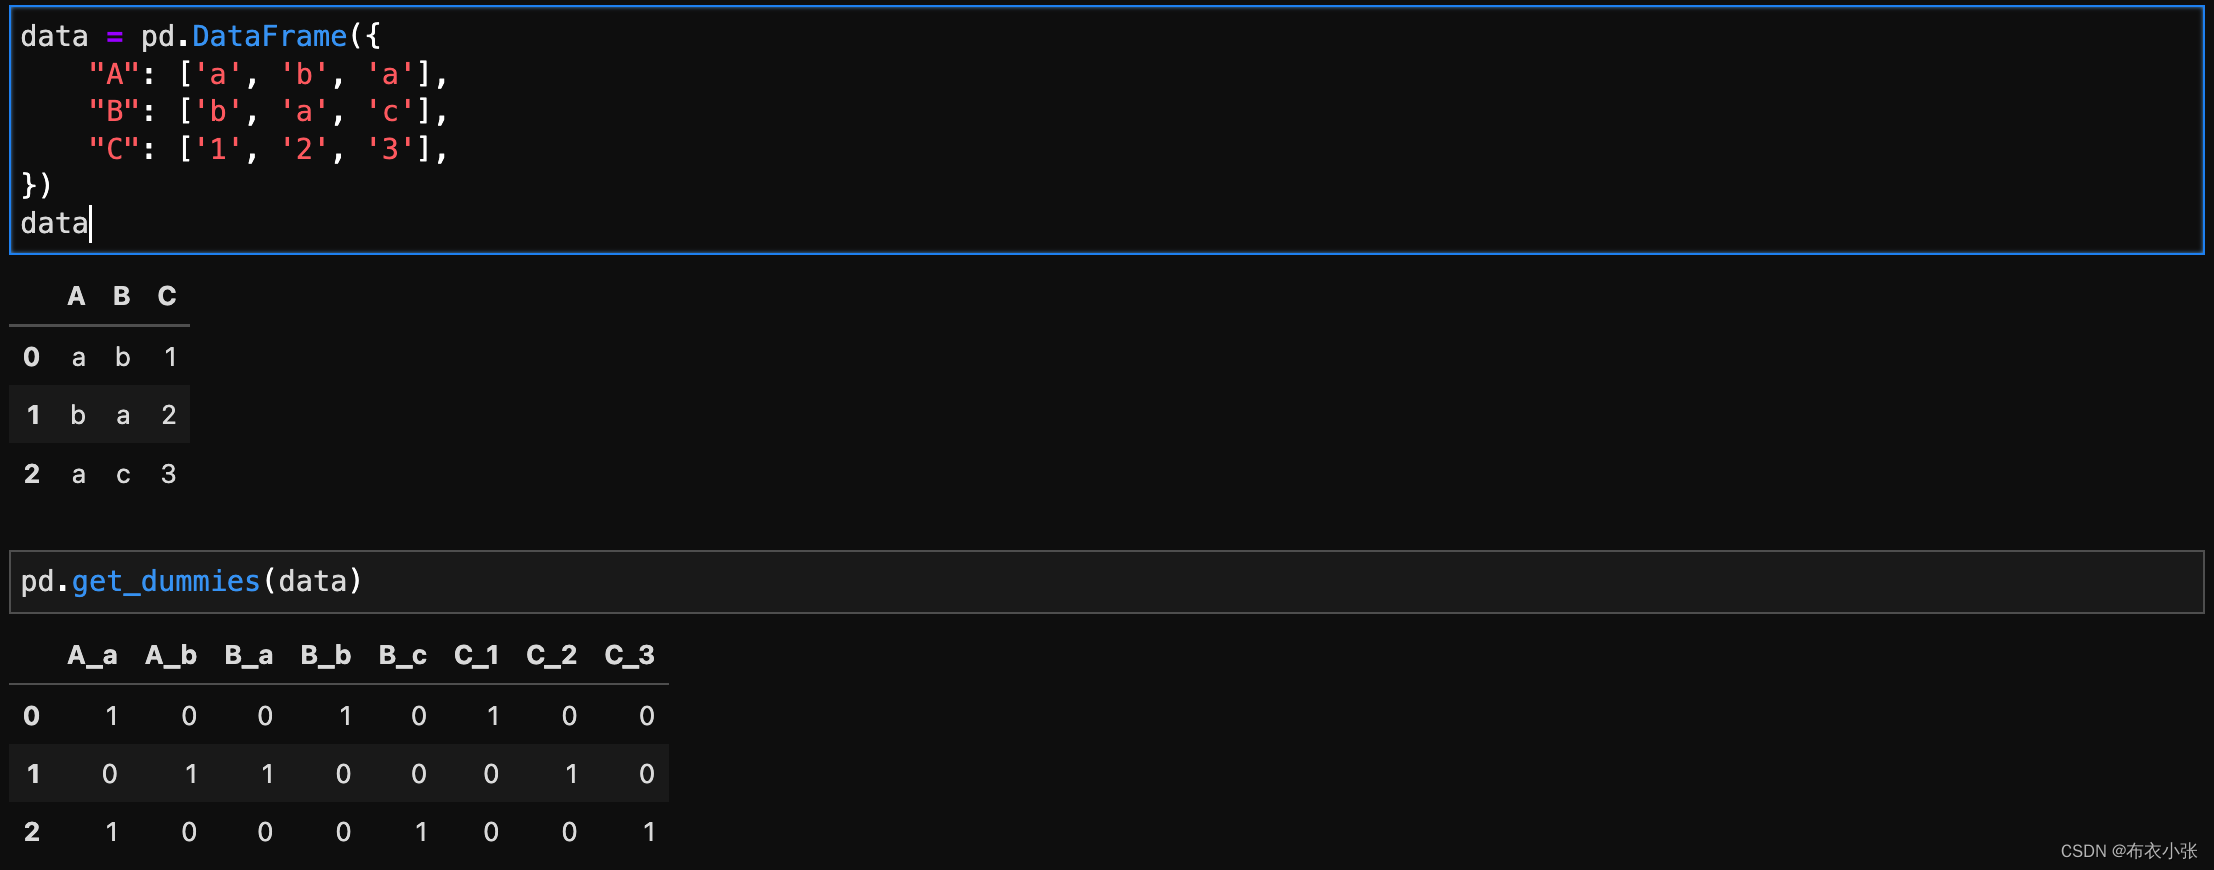
4.3. pandas的one-hot编码
- pandas提供对one-hot编码的函数是:pd.get_dummies(),官网API
- 对官网提供的example进行测试,发现有以下几点需要注意的地方:
- 1、Series里的 整数会按照one-hot进行编码,但是在DataFrame里面不会
- 2、特征的维度数量会有所增加
- 离散型特征编码方式:one-hot与哑变量: https://www.cnblogs.com/lianyingteng/p/7792693.html
; 五. 参考
- https://tefuirnever.blog.csdn.net/article/details/93708964
- https://www.cnblogs.com/IvyWong/p/9203981.html
- 数据合并 pd.merge:https://blog.csdn.net/Hudas/article/details/123010001
Original: https://blog.csdn.net/abc13526222160/article/details/121022952
Author: 布衣小张
Title: 『Python核心技术与实战』pandas.DataFrame()函数介绍
原创文章受到原创版权保护。转载请注明出处:https://www.johngo689.com/674385/
转载文章受原作者版权保护。转载请注明原作者出处!