

文章目录
摘要
segmentation_models_pytorch是一款非常优秀的图像分割库,albumentations 是一款非常优秀的图像增强库,这篇文章将这两款优秀结合起来实现多类别的图像分割算法。数据集选用CamVid数据集,类别有:’sky’, ‘building’, ‘pole’, ‘road’, ‘pavement’,’tree’, ‘signsymbol’, ‘fence’, ‘car’,’pedestrian’, ‘bicyclist’, ‘unlabelled’等12个类别。数据量不大,下载地址:mirrors / alexgkendall / segnet-tutorial · GitCode。
通过这篇文章,你可以学习到:
1、如何在图像分割使用albumentations 增强算法?
2、如何使用dice_loss和cross_entropy_loss?
3、如何segmentation_models_pytorch构架UNET++模型?
4、如何对分割数据做one-hot编码?
项目结构
项目的结构如下:

; 训练
新建train.py,插入一下代码:
import os
import numpy as np
import cv2
import albumentations as albu
import torch
import segmentation_models_pytorch as smp
from torch.utils.data import DataLoader
from torch.utils.data import Dataset as BaseDataset
导入需要的安装包,接下来编写数据载入部分。
CLASSES = ['sky', 'building', 'pole', 'road', 'pavement',
           'tree', 'signsymbol', 'fence', 'car',
           'pedestrian', 'bicyclist', 'unlabelled']
class Dataset(BaseDataset):
    """CamVid数据集。进行图像读取,图像增强增强和图像预处理.

    Args:
        images_dir (str): 图像文件夹所在路径
        masks_dir (str): 图像分割的标签图像所在路径
        class_values (list): 用于图像分割的所有类别数
        augmentation (albumentations.Compose): 数据传输管道
        preprocessing (albumentations.Compose): 数据预处理
"""

    def __init__(
            self,
            images_dir,
            masks_dir,
            augmentation=None,
            preprocessing=None,
    ):
        self.ids = os.listdir(images_dir)
        self.images_fps = [os.path.join(images_dir, image_id) for image_id in self.ids]
        self.masks_fps = [os.path.join(masks_dir, image_id) for image_id in self.ids]

        self.class_values = list(range(len(CLASSES)))
        self.augmentation = augmentation
        self.preprocessing = preprocessing

    def __getitem__(self, i):

        image = cv2.imread(self.images_fps[i])
        image = cv2.cvtColor(image, cv2.COLOR_BGR2RGB)
        mask = cv2.imread(self.masks_fps[i], 0)

        masks = [(mask == v) for v in self.class_values]
        mask = np.stack(masks, axis=-1).astype('float')

        if self.augmentation:
            sample = self.augmentation(image=image, mask=mask)
            image, mask = sample['image'], sample['mask']

        if self.preprocessing:
            sample = self.preprocessing(image=image, mask=mask)
            image, mask = sample['image'], sample['mask']
            print(mask.shape)
        return image, mask

    def __len__(self):
        return len(self.ids)
定义类别。类别的顺序对应mask的类别。
self.images_fps和self.masks_fps是图片的list和对应的mask图片的list。
self.class_values,类别对应的index,index的值对应mask上的类别值。
self.augmentation数据增强,使用albumentations增强。
self.preprocessing数据的预处理,包含归一化和标准化,预处理的方法来自smp.encoders.get_preprocessing_fn(ENCODER, ENCODER_WEIGHTS)。
接下来,解释__getitem__函数的内容:读取图片。
将图片转为RGB,cv2读取图片,默认是BGR,所以需要做转化。
接下来两行代码,实现将mask转为one-hot编码。输入的shape是(360,480)输出是(360,480,12)
图像增强。
图像预处理。
然后返回预处理后的图片和mask。
接下来是图片增强的代码:
def get_training_augmentation():
    train_transform = [
        albu.HorizontalFlip(p=0.5),
        albu.ShiftScaleRotate(scale_limit=0.5, rotate_limit=0, shift_limit=0.1, p=1, border_mode=0),
        albu.PadIfNeeded(min_height=384, min_width=480, always_apply=True, border_mode=0),
        albu.IAAAdditiveGaussianNoise(p=0.2),
        albu.IAAPerspective(p=0.5),
        albu.OneOf(
            [
                albu.CLAHE(p=1),
                albu.RandomBrightness(p=1),
                albu.RandomGamma(p=1),
            ],
            p=0.9,
        ),

        albu.OneOf(
            [
                albu.IAASharpen(p=1),
                albu.Blur(blur_limit=3, p=1),
                albu.MotionBlur(blur_limit=3, p=1),
            ],
            p=0.9,
        ),

        albu.OneOf(
            [
                albu.RandomContrast(p=1),
                albu.HueSaturationValue(p=1),
            ],
            p=0.9,
        ),
    ]
    return albu.Compose(train_transform)

def get_validation_augmentation():
    """调整图像使得图片的分辨率长宽能被32整除"""
    test_transform = [
        albu.PadIfNeeded(384, 480)
    ]
    return albu.Compose(test_transform)

def to_tensor(x, **kwargs):
    return x.transpose(2, 0, 1).astype('float32')

def get_preprocessing(preprocessing_fn):
    """进行图像预处理操作

    Args:
        preprocessing_fn (callbale): 数据规范化的函数
            (针对每种预训练的神经网络)
    Return:
        transform: albumentations.Compose
"""

    _transform = [
        albu.Lambda(image=preprocessing_fn),
        albu.Lambda(image=to_tensor, mask=to_tensor),
    ]
    return albu.Compose(_transform)
首先,我们一起查看get_training_augmentation里面的代码。这里比较复杂。这些需要注意的是PadIfNeeded方法。
由于UNet系列的文章经历了5次缩放,所以图片必须被32整除。所以通过填充的方式将图片的尺寸改为(384,480)。
同样,在验证集也要做这样的操作。
to_tensor函数是将图片的值转为tensor,并将维度做交换。由于cv2读取的图片和mask的onehot的维度都是(W,H,C),需要高改为(C,W,H)。
get_preprocessing是对数据做预处理,有归一化和标准化,然后,将图片和mask转为to_tensor。
接下来,将最重要的训练部分:
if __name__ == '__main__':
    ENCODER = 'efficientnet-b1'
    ENCODER_WEIGHTS = 'imagenet'
    ACTIVATION = 'softmax'
    DEVICE = 'cuda'

    model = smp.UnetPlusPlus(
        encoder_name=ENCODER,
        encoder_weights=ENCODER_WEIGHTS,
        classes=len(CLASSES),
        activation=ACTIVATION,
    )
    preprocessing_fn = smp.encoders.get_preprocessing_fn(ENCODER, ENCODER_WEIGHTS)
这部分的代码主要是定义模型。
模型选用unet++,解码器是efficientnet-b1,预训练权重为:imagenet。
定义类别。
preprocessing_fn获取 smp.encoders的预处理方法。
    DATA_DIR = './data/CamVid/'

    if not os.path.exists(DATA_DIR):
        print('Loading data...')
        os.system('git clone https://github.com/alexgkendall/SegNet-Tutorial ./data')
        print('Done!')

    x_train_dir = os.path.join(DATA_DIR, 'train')
    y_train_dir = os.path.join(DATA_DIR, 'trainannot')

    x_valid_dir = os.path.join(DATA_DIR, 'val')
    y_valid_dir = os.path.join(DATA_DIR, 'valannot')

    train_dataset = Dataset(
        x_train_dir,
        y_train_dir,
        augmentation=get_training_augmentation(),
        preprocessing=get_preprocessing(preprocessing_fn)
    )

    valid_dataset = Dataset(
        x_valid_dir,
        y_valid_dir,
        augmentation=get_validation_augmentation(),
        preprocessing=get_preprocessing(preprocessing_fn)
    )

    train_loader = DataLoader(train_dataset, batch_size=2, shuffle=True, num_workers=0)
    valid_loader = DataLoader(valid_dataset, batch_size=1, shuffle=False, num_workers=0)
这部分的代码主要是数据集加载。
定义数据集所在路径。
获取训练集和验证集的路径。
加载训练集和验证集。
将训练集和测试集放入DataLoader中,根据显卡的大小定义batch_size,训练集需要shuffle,验证集不需要。
然后,定义loss
    loss = smp.utils.losses.DiceLoss() + smp.utils.losses.CrossEntropyLoss()
    metrics = [
        smp.utils.metrics.IoU(threshold=0.5),
        smp.utils.metrics.Recall()
    ]

    optimizer = torch.optim.Adam([
        dict(params=model.parameters(), lr=0.0001),
    ])
loss是DiceLoss和CrossEntropyLoss组合。
评分标准为IoU和Recall。
优化器选用Adam。
train_epoch = smp.utils.train.TrainEpoch(
model,
loss=loss,
metrics=metrics,
optimizer=optimizer,
device=DEVICE,
verbose=True,
)
valid_epoch = smp.utils.train.ValidEpoch(
model,
loss=loss,
metrics=metrics,
device=DEVICE,
verbose=True,
)
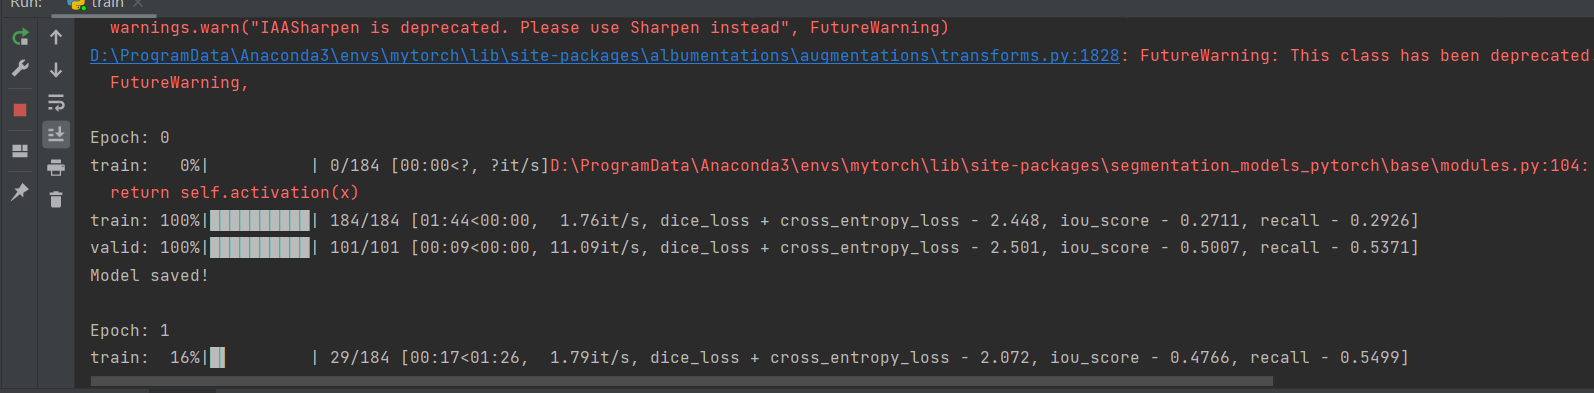
max_score = 0
for i in range(0, 40):
print('\nEpoch: {}'.format(i))
train_logs = train_epoch.run(train_loader)
valid_logs = valid_epoch.run(valid_loader)
if max_score < valid_logs['iou_score']:
max_score = valid_logs['iou_score']
torch.save(model, './best_model.pth')
print('Model saved!')
if i == 25:
optimizer.param_groups[0]['lr'] = 1e-5
print('Decrease decoder learning rate to 1e-5!')
创建TrainEpoch和ValidEpoch循环用来迭代数据集。
按照迭代次数循环,保存最好的模型。
完成上面的工作后就可以开始训练了。
测试
完成训练后就开始测试部分。
import os

import albumentations as albu
import cv2
import matplotlib.pyplot as plt
import numpy as np
import segmentation_models_pytorch as smp
import torch
from torch.utils.data import Dataset as BaseDataset

os.environ['CUDA_VISIBLE_DEVICES'] = '0'
导入所需要的包
CLASSES = ['sky', 'building', 'pole', 'road', 'pavement',
           'tree', 'signsymbol', 'fence', 'car',
           'pedestrian', 'bicyclist', 'unlabelled']
class Dataset(BaseDataset):
    """CamVid数据集。进行图像读取,图像增强增强和图像预处理.

    Args:
        images_dir (str): 图像文件夹所在路径
        masks_dir (str): 图像分割的标签图像所在路径
        class_values (list): 用于图像分割的所有类别数
        augmentation (albumentations.Compose): 数据传输管道
        preprocessing (albumentations.Compose): 数据预处理
"""

    def __init__(
            self,
            images_dir,
            masks_dir,
            augmentation=None,
            preprocessing=None,
    ):
        self.ids = os.listdir(images_dir)
        self.images_fps = [os.path.join(images_dir, image_id) for image_id in self.ids]
        self.masks_fps = [os.path.join(masks_dir, image_id) for image_id in self.ids]

        self.class_values = list(range(len(CLASSES)))

        self.augmentation = augmentation
        self.preprocessing = preprocessing

    def __getitem__(self, i):

        image = cv2.imread(self.images_fps[i])
        image = cv2.cvtColor(image, cv2.COLOR_BGR2RGB)
        mask = cv2.imread(self.masks_fps[i], 0)

        masks = [(mask == v) for v in self.class_values]
        mask = np.stack(masks, axis=-1).astype('float')

        if self.augmentation:
            sample = self.augmentation(image=image, mask=mask)
            image, mask = sample['image'], sample['mask']

        if self.preprocessing:
            sample = self.preprocessing(image=image, mask=mask)
            image, mask = sample['image'], sample['mask']

        return image, mask

    def __len__(self):
        return len(self.ids)

def get_validation_augmentation():
    """调整图像使得图片的分辨率长宽能被32整除"""
    test_transform = [
        albu.PadIfNeeded(384, 480)
    ]
    return albu.Compose(test_transform)

def to_tensor(x, **kwargs):
    return x.transpose(2, 0, 1).astype('float32')

def get_preprocessing(preprocessing_fn):
    """进行图像预处理操作

    Args:
        preprocessing_fn (callbale): 数据规范化的函数
            (针对每种预训练的神经网络)
    Return:
        transform: albumentations.Compose
"""

    _transform = [
        albu.Lambda(image=preprocessing_fn),
        albu.Lambda(image=to_tensor, mask=to_tensor),
    ]
    return albu.Compose(_transform)
上面的代码是数据加载和数据增强,和训练集的代码一样。
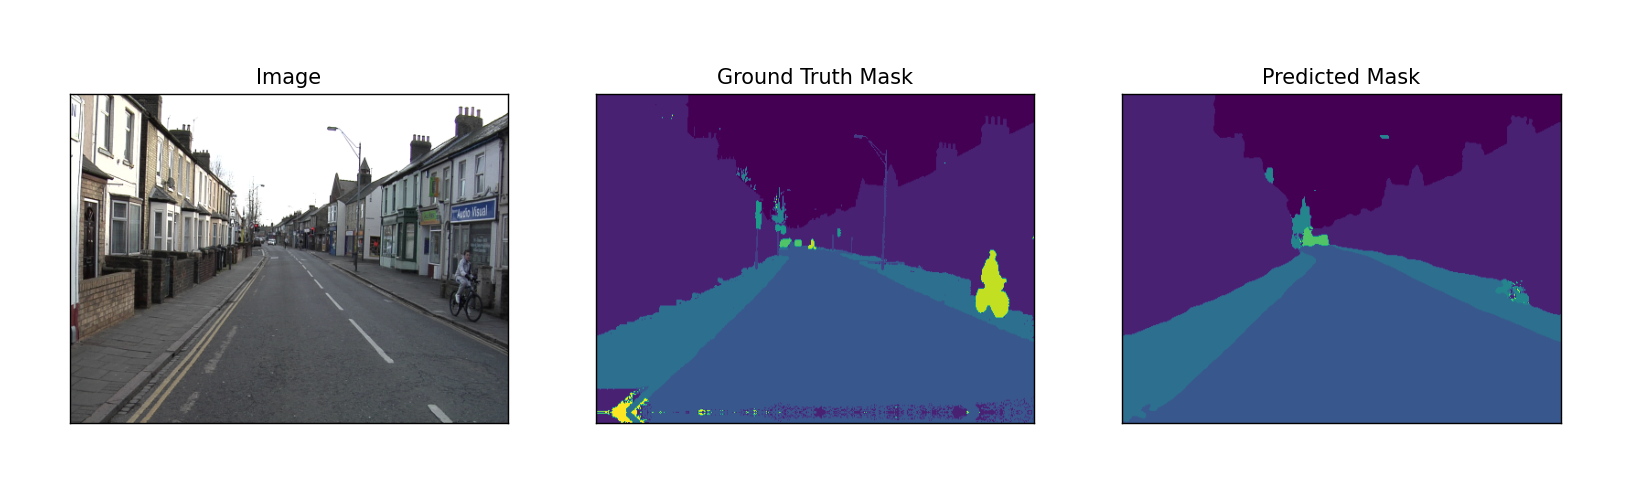
def visualize(**images):
    """PLot images in one row."""
    n = len(images)
    plt.figure(figsize=(16, 5))
    for i, (name, image) in enumerate(images.items()):
        plt.subplot(1, n, i + 1)
        plt.xticks([])
        plt.yticks([])
        plt.title(' '.join(name.split('_')).title())
        plt.imshow(image)
    plt.show()
可视化测试结果,展示原图,真实的mask,预测的mask。
if __name__ == '__main__':
DATA_DIR = './data/CamVid/'
x_test_dir = os.path.join(DATA_DIR, 'test')
y_test_dir = os.path.join(DATA_DIR, 'testannot')
ENCODER = 'efficientnet-b1'
ENCODER_WEIGHTS = 'imagenet'
ACTIVATION = 'softmax'
DEVICE = 'cuda'
preprocessing_fn = smp.encoders.get_preprocessing_fn(ENCODER, ENCODER_WEIGHTS)
best_model = torch.load('./best_model.pth')
test_dataset = Dataset(
x_test_dir,
y_test_dir,
augmentation=get_validation_augmentation(),
preprocessing=get_preprocessing(preprocessing_fn),
)
test_dataset_vis = Dataset(
x_test_dir, y_test_dir
)
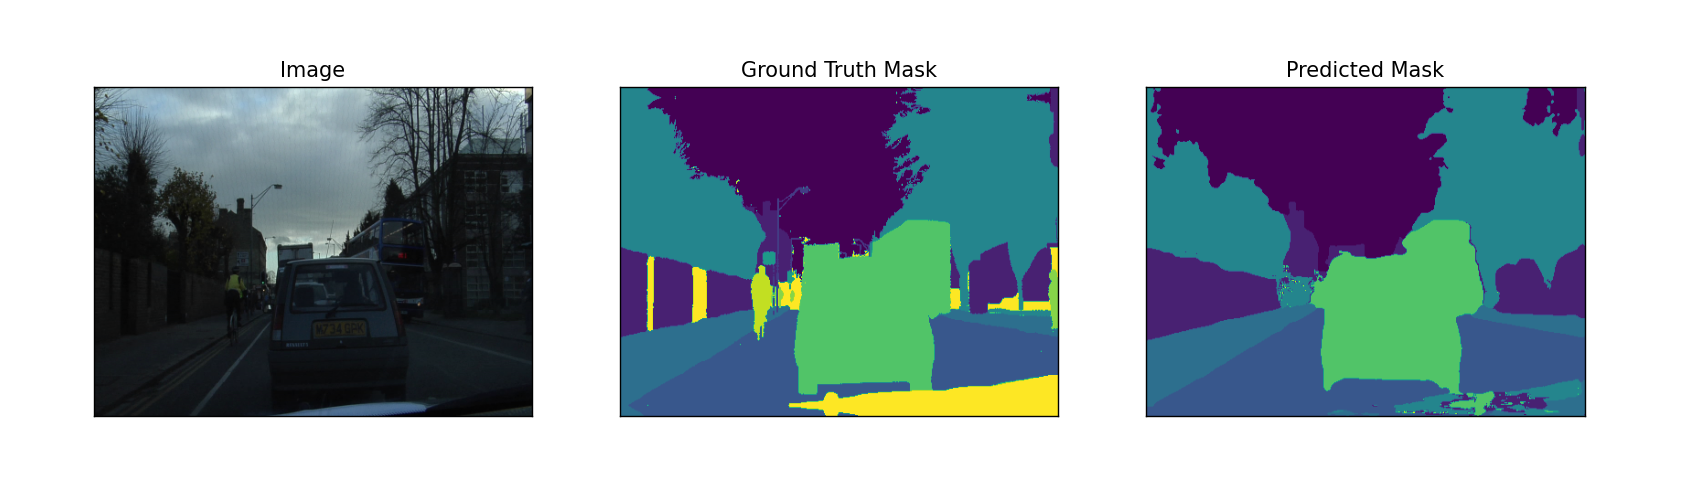
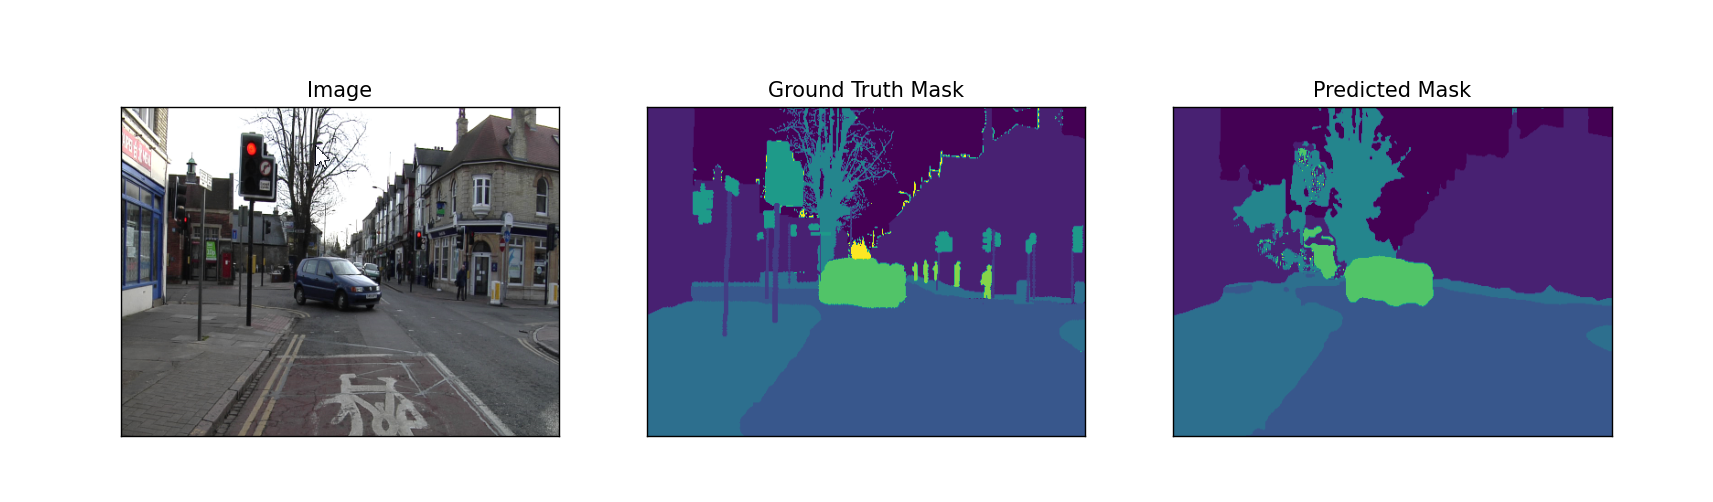
for i in range(3):
n = np.random.choice(len(test_dataset))
image_vis = test_dataset_vis[n][0].astype('uint8')
image, gt_mask = test_dataset[n]
gt_mask = (np.argmax(gt_mask, axis=0) * 255 / (gt_mask.shape[0])).astype(np.uint8)
x_tensor = torch.from_numpy(image).to(DEVICE).unsqueeze(0)
pr_mask = best_model.predict(x_tensor)
pr_mask = (pr_mask.squeeze().cpu().numpy())
pr_mask = (np.argmax(pr_mask, axis=0) * 255 / (pr_mask.shape[0])).astype(np.uint8)
gt_mask = cv2.resize(gt_mask, (480, 360))
pr_mask = cv2.resize(pr_mask, (480, 360))
visualize(
image=image_vis,
ground_truth_mask=gt_mask,
predicted_mask=pr_mask
)
获取测试集的路径。
定义ENCODER 为 ‘efficientnet-b1’,ENCODER_WEIGHTS 为imagenet,ACTIVATION为softmax。
获取预训练参数。
加载模型。
加载数据集。
加载没有做处理的图片。
随机选择3张图片从test_dataset_vis获取图片。
从test_dataset获取对应的图片和mask。
将mask放大255的范围。
预测图片,生成预测的mask。
将预测的mask也对应的放到255的范围。
然后重新resize到原来的尺寸。
可视化结果。
运行结果:
完成代码:
https://download.csdn.net/download/hhhhhhhhhhwwwwwwwwww/85291308
参考文章:
PyTorch图像分割模型——segmentation_models_pytorch库的使用_AI浩的博客-CSDN博客_pytorch图像分割模型
Original: https://blog.csdn.net/hhhhhhhhhhwwwwwwwwww/article/details/124590197
Author: AI浩
Title: 图像分割模型——segmentation_models_pytorch和albumentations 组合实现多类别分割
原创文章受到原创版权保护。转载请注明出处:https://www.johngo689.com/651210/
转载文章受原作者版权保护。转载请注明原作者出处!