

Ansible的介绍与安装
1、自动化与linux系统管理(为什么要学习自动化运维)
大多系统管理和基础架构管理都依赖于通过图形或者命令行用户界面执行的手动任务,系统管理员通常使用检查清单、其他文档或者记忆的例程来执行标准任务,这样的做法容易出错,系统管理员很容易跳过某个步骤或者错误的执行某个步骤,对步骤执行是否正确或者产生的预期的结果的验证通常有限。
自动化可以帮助我们避免手动管理系统和基础架构造成的问题。作为系统管理员,我们可以使用它来确保快速、正确地部署和配置所有系统。这样,我们可以自动执行日常计划中的重复性任务,从而空出时间并专注于更重要的事情。
2、什么是ansible?
Ansible是新出现的自动化运维工具,基于Python开发,集合了众多运维工具的优点,实现了批量系统配置、批量程序部署、批量运行命令等功能。
Ansible是一款开源自动化平台,它是一种简单的自动化语言,能够在ansible playbook中完美地描述IT应用基础架构。它也是一个自动化引擎,可运行ansible playbook。
Ansible功能很强大,可以利用ansible部署应用,也可将它用于配置管理、工作流自动化和网络自动化。Ansible可以用于编排整个应用生命周期。
Ansible围绕无代理架构构建。通常而言,ansible通过OpenSSH或WinRM连接它所管理的主机并且运行任务,方法通常是(但不总是)将称为ansible模块的小程序推送至这些主机。这些程序用于将系统置于需要的特定状态。在ansible运行完其任务后,推送的所有模块都会被删除。
Ansible是基于 paramiko 开发的,并且基于模块化工作,本身没有批量部署的能力。真正具有批量部署的是ansible所运行的模块,ansible只是提供一种框架。ansible不需要在远程主机上安装client/agents,因为它们是基于ssh来和远程主机通讯的。ansible目前已经已经被红帽官方收购。
3、ansible的优点
- 跨平台支持:ansible提供Linux、windows、unix和网络设备的无代理支持,适用于物理、虚拟、云和容器环境。
- 人类可读的自动化:ansible playbook采用YAML文本文件编写,易于阅读,有助于确保所有人都能理解它们的用途。
- 完美描述应用:可以通过ansible playbook进行每一种更改,并描述和记录应用环境的每一个方面。
- 轻松管理版本控制:ansible playbook和项目是纯文本,它们可以视作源代码,放在您的现有版本控制系统中。
- 支持动态清单:可以从外部来源动态更新ansible管理的计算机的列表,随时获取所有受管服务器的当前正确列表,不受基础架构或位置的影响。
- 编排可与其他系统轻松集成:能够利用环境中现有的HP SA、Puppet、Jenkins、红帽卫星和其他系统,并且集成到您的ansible工作中。
4、ansible管理方式
Ansible是一个模型驱动的配置管理器,支持多节点发布、远程任务执行。默认使用SSH进行远程连接。无需在被管节点上安装附加软件,可使用各种编程语言进行扩展。Ansible管理系统由控制主机和一组被管节点组成。控制主机直接通过SSH控制被管节点,被管节点通过 Ansible的资源清单 (inventory)来进行分组管理。
5、ansible系统架构
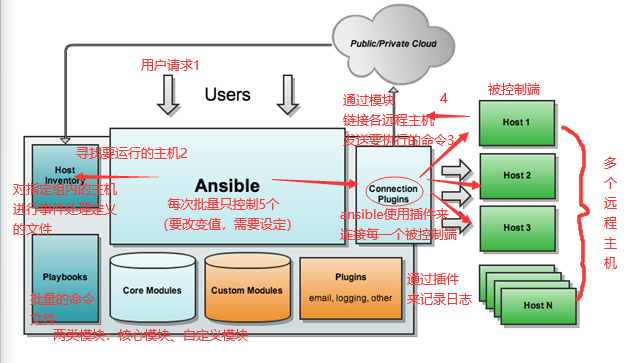

在控制主机时,ansible是如何知道哪些主机是被自己控制的呢?
这就需要一个Host Inventory(主机清单),用于记录ansible可以控制网络中的哪些主机。另外,要配置和管理这些主机,可以采用两种方式,一种是单一的命令实现,另外一种也可以使用palybook实现。单一的命令模式是采用不同的模块进行管理,一个模块类似于一些管理的命令,如top,ls,ping等等,适用于临时性的操作任务。如果需要执行一些例行性或经常性的操作,则需要采用playbook的方式,playbook类似于一个脚本,将多个模块按一定的逻辑关系进行组合,然后执行。ansible还支持一些插件,如邮件、日志等,在和远程主机通信时,也会采用类似的连接插件,这里使用则是SSH协议的插件进行通信。
上图中我们看到的主要模块如下:
Ansible:Ansible核心程序。
HostInventory:记录由Ansible管理的主机信息,包括端口、密码、ip等。
Playbooks:”剧本”YAML格式文件,多个任务定义在一个文件中,定义主机需要调用哪些模块来完成的功能。
CoreModules: 核心模块,主要操作是通过调用核心模块来完成管理任务。
CustomModules:自定义模块,完成核心模块无法完成的功能,支持多种语言。
ConnectionPlugins:连接插件,Ansible和Host通信使用
6、ansible任务执行模式
Ansible 系统由控制主机对被管节点的操作方式可分为两类,即 adhoc和 playbook:
- ad-hoc模式(点对点模式)
使用单个模块,支持批量执行单条命令。ad-hoc 命令是一种可以快速输入的命令,而且不需要保存起来的命令。 就相当于bash中的一句话shell。 - playbook模式(剧本模式)
是Ansible主要管理方式,也是Ansible功能强大的关键所在。 playbook通过多个task集合完成一类功能,如Web服务的安装部署、数据库服务器的批量备份等。可以简单地把playbook理解为通过组合多条ad-hoc操作的配置文件。
7、ansible工作流程

8、ansible部署
环境准备
服务器ip 主机名 系统 192.168.111.120 ansible Centos8 192.168.111.130 node1 Centos8 192.168.111.140 node2 Centos8 192.168.111.150 node3 Centos8
安装方法介绍
说明:只需要在控制节点安装ansible批量分发工具,其他被控制节点不需要任何操作。
安装yum源
[root@ansible ~]#curl -o /etc/yum.repos.d/CentOS-Base.repo https://mirrors.aliyun.com/repo/Centos-vault-8.5.2111.repo
[root@ansible ~]#sed -i -e '/mirrors.cloud.aliyuncs.com/d' -e '/mirrors.aliyuncs.com/d' /etc/yum.repos.d/CentOS-Base.repo
[root@ansible ~]#yum clean all
[root@ansible ~]#yum makecache
安装ansible
[root@ansible ~]#dnf -y install centos-release-ansible-29-1-2.el8.noarch
[root@ansible ~]#dnf  -y  install  ansible
查看ansible版本
[root@ansible ~]#ansible  --version
ansible 2.9.27
  config file = /etc/ansible/ansible.cfg
  configured module search path = ['/root/.ansible/plugins/modules', '/usr/share/ansible/plugins/modules']
  ansible python module location = /usr/lib/python3.6/site-packages/ansible
  executable location = /usr/bin/ansible
  python version = 3.6.8 (default, Dec  3 2020, 18:11:24) [GCC 8.4.1 20200928 (Red Hat 8.4.1-1)]
配置/etc/hosts
[root@ansible ~]#vim /etc/hosts
...

192.168.111.120  anslibe.example.com   anslibe
192.168.111.130  node1.example.com   node1
192.168.111.140  node2.example.com   node2
192.168.111.150  node3.example.com   node3
配置ssh的基于密钥认证
在ansible节点执行ssh-keygen命令,一直回车
[root@ansible ~]#ssh-keygen
Generating public/private rsa key pair.

Enter file in which to save the key (/root/.ssh/id_rsa):
Created directory '/root/.ssh'.

Enter passphrase (empty for no passphrase):
Enter same passphrase again:
Your identification has been saved in /root/.ssh/id_rsa.

Your public key has been saved in /root/.ssh/id_rsa.pub.

The key fingerprint is:
SHA256:SdccZA7h6z5UiussJrCkqPcQannKVhahJDeSMJEB888 root@ansible
The key's randomart image is:
+---[RSA 3072]----+
|X=        oo+    |
|==o.     . * .   |
|ooo..   . o +    |
| . +   . o ..    |
|  . E   S..o     |
| .++    ..o      |
|o=++     o.      |
|=.=.. o....      |
|++ ..o oo ..     |
+----[SHA256]-----+
[root@ansible ~]#ssh-copy-id  -i  ~/.ssh/id_rsa.pub  root@node1
/usr/bin/ssh-copy-id: INFO: Source of key(s) to be installed: "/root/.ssh/id_rsa.pub"
The authenticity of host 'node1 (192.168.111.130)' can't be established.

ECDSA key fingerprint is SHA256:0UQKIYmXwgllRaiKyKIR8RaO8bzS7GGb5180xGHoiMI.

Are you sure you want to continue connecting (yes/no/[fingerprint])? yes
/usr/bin/ssh-copy-id: INFO: attempting to log in with the new key(s), to filter out any that are already installed
/usr/bin/ssh-copy-id: INFO: 1 key(s) remain to be installed -- if you are prompted now it is to install the new keys
root@node1's password:

Number of key(s) added: 1

Now try logging into the machine, with:   "ssh 'root@node1'"
and check to make sure that only the key(s) you wanted were added.

[root@ansible ~]#ssh-copy-id  -i  ~/.ssh/id_rsa.pub  root@node2
/usr/bin/ssh-copy-id: INFO: Source of key(s) to be installed: "/root/.ssh/id_rsa.pub"
The authenticity of host 'node2 (192.168.111.140)' can't be established.

ECDSA key fingerprint is SHA256:0UQKIYmXwgllRaiKyKIR8RaO8bzS7GGb5180xGHoiMI.

Are you sure you want to continue connecting (yes/no/[fingerprint])? yes
/usr/bin/ssh-copy-id: INFO: attempting to log in with the new key(s), to filter out any that are already installed
/usr/bin/ssh-copy-id: INFO: 1 key(s) remain to be installed -- if you are prompted now it is to install the new keys
root@node2's password:

Number of key(s) added: 1

Now try logging into the machine, with:   "ssh 'root@node2'"
and check to make sure that only the key(s) you wanted were added.

[root@ansible ~]#ssh-copy-id  -i  ~/.ssh/id_rsa.pub  root@node3
/usr/bin/ssh-copy-id: INFO: Source of key(s) to be installed: "/root/.ssh/id_rsa.pub"
The authenticity of host 'node3 (192.168.111.150)' can't be established.

ECDSA key fingerprint is SHA256:0UQKIYmXwgllRaiKyKIR8RaO8bzS7GGb5180xGHoiMI.

Are you sure you want to continue connecting (yes/no/[fingerprint])? yes
/usr/bin/ssh-copy-id: INFO: attempting to log in with the new key(s), to filter out any that are already installed
/usr/bin/ssh-copy-id: INFO: 1 key(s) remain to be installed -- if you are prompted now it is to install the new keys
root@node3's password:

Number of key(s) added: 1

Now try logging into the machine, with:   "ssh 'root@node3'"
and check to make sure that only the key(s) you wanted were added.
将ansible本地的/etc/hosts文件发送给受控主机
在ansible节点使用如下命令
[root@ansible ~]#scp /etc/hosts  root@node1:/etc/hosts
The authenticity of host 'node1 (192.168.111.130)' can't be established.

ECDSA key fingerprint is SHA256:0UQKIYmXwgllRaiKyKIR8RaO8bzS7GGb5180xGHoiMI.

Are you sure you want to continue connecting (yes/no/[fingerprint])? yes
Warning: Permanently added 'node1,192.168.111.130' (ECDSA) to the list of known hosts.

root@node2's password:
hosts                                                                                 100%  335   221.3KB/s   00:00
[root@ansible ~]#scp /etc/hosts  root@node2:/etc/hosts
The authenticity of host 'node2 (192.168.111.140)' can't be established.

ECDSA key fingerprint is SHA256:0UQKIYmXwgllRaiKyKIR8RaO8bzS7GGb5180xGHoiMI.

Are you sure you want to continue connecting (yes/no/[fingerprint])? yes
Warning: Permanently added 'node2,192.168.111.140' (ECDSA) to the list of known hosts.

root@node2's password:
hosts                                                                                 100%  335   221.3KB/s   00:00
[root@ansible ~]#scp /etc/hosts  root@node3:/etc/hosts
The authenticity of host 'node3 (192.168.111.150)' can't be established.

ECDSA key fingerprint is SHA256:0UQKIYmXwgllRaiKyKIR8RaO8bzS7GGb5180xGHoiMI.

Are you sure you want to continue connecting (yes/no/[fingerprint])? yes
Warning: Permanently added 'node3,192.168.111.150' (ECDSA) to the list of known hosts.

root@node3's password:
hosts
在ansible主机和所有受控主机中创建student用户
[root@ansible ~]#useradd student
[root@ansible ~]#echo redhat | passwd --stdin student
更改用户 student 的密码 。
passwd:所有的身份验证令牌已经成功更新。

[root@node1 ~]#useradd student
[root@node1 ~]#echo redhat | passwd --stdin student
更改用户 student 的密码 。
passwd:所有的身份验证令牌已经成功更新。

[root@node2 ~]#useradd student
[root@node2 ~]#echo redhat | passwd --stdin student
更改用户 student 的密码 。
passwd:所有的身份验证令牌已经成功更新。

[root@node3 ~]#useradd student
[root@node3 ~]#echo redhat | passwd --stdin student
更改用户 student 的密码 。
passwd:所有的身份验证令牌已经成功更新。
student用户创建基于密钥认证
[student@ansible ~]$ssh-keygen
Generating public/private rsa key pair.

Enter file in which to save the key (/home/student/.ssh/id_rsa):
Created directory '/home/student/.ssh'.

Enter passphrase (empty for no passphrase):
Enter same passphrase again:
Your identification has been saved in /home/student/.ssh/id_rsa.

Your public key has been saved in /home/student/.ssh/id_rsa.pub.

The key fingerprint is:
SHA256:9s+ZowM5XCGmKUQ6TRjtySWauxzXSZmSbiQnRSRjDes student@ansible
The key's randomart image is:
+---[RSA 3072]----+
|  *X=            |
| ..B* . o .      |
|  +B.= * . .     |
| .=.X *   .      |
|  EB = oSo       |
|  o + o.=.       |
| . =     o.      |
|  o       .o.o   |
|          .o=.   |
+----[SHA256]-----+
student用户密钥发送给root
[student@ansible ~]$ssh-copy-id -i ~/.ssh/id_rsa.pub root@node1
/usr/bin/ssh-copy-id: INFO: Source of key(s) to be installed: "/home/student/.ssh/id_rsa.pub"
The authenticity of host 'node1 (192.168.111.130)' can't be established.

ECDSA key fingerprint is SHA256:0UQKIYmXwgllRaiKyKIR8RaO8bzS7GGb5180xGHoiMI.

Are you sure you want to continue connecting (yes/no/[fingerprint])? yes
/usr/bin/ssh-copy-id: INFO: attempting to log in with the new key(s), to filter out any that are already installed
/usr/bin/ssh-copy-id: INFO: 1 key(s) remain to be installed -- if you are prompted now it is to install the new keys
root@node1's password:

Number of key(s) added: 1

Now try logging into the machine, with:   "ssh 'root@node1'"
and check to make sure that only the key(s) you wanted were added.

[student@ansible ~]$ssh-copy-id -i ~/.ssh/id_rsa.pub root@node2
/usr/bin/ssh-copy-id: INFO: Source of key(s) to be installed: "/home/student/.ssh/id_rsa.pub"
The authenticity of host 'node2 (192.168.111.140)' can't be established.

ECDSA key fingerprint is SHA256:0UQKIYmXwgllRaiKyKIR8RaO8bzS7GGb5180xGHoiMI.

Are you sure you want to continue connecting (yes/no/[fingerprint])? yes
/usr/bin/ssh-copy-id: INFO: attempting to log in with the new key(s), to filter out any that are already installed
/usr/bin/ssh-copy-id: INFO: 1 key(s) remain to be installed -- if you are prompted now it is to install the new keys
root@node2's password:

Number of key(s) added: 1

Now try logging into the machine, with:   "ssh 'root@node2'"
and check to make sure that only the key(s) you wanted were added.

[student@ansible ~]$ssh-copy-id -i ~/.ssh/id_rsa.pub root@node3
/usr/bin/ssh-copy-id: INFO: Source of key(s) to be installed: "/home/student/.ssh/id_rsa.pub"
The authenticity of host 'node3 (192.168.111.150)' can't be established.

ECDSA key fingerprint is SHA256:0UQKIYmXwgllRaiKyKIR8RaO8bzS7GGb5180xGHoiMI.

Are you sure you want to continue connecting (yes/no/[fingerprint])? yes
/usr/bin/ssh-copy-id: INFO: attempting to log in with the new key(s), to filter out any that are already installed
/usr/bin/ssh-copy-id: INFO: 1 key(s) remain to be installed -- if you are prompted now it is to install the new keys
root@node3's password:

Number of key(s) added: 1

Now try logging into the machine, with:   "ssh 'root@node3'"
and check to make sure that only the key(s) you wanted were added.
student用户密钥发送给student用户
[student@ansible ~]$ssh-copy-id -i ~/.ssh/id_rsa.pub student@node1
/usr/bin/ssh-copy-id: INFO: Source of key(s) to be installed: "/home/student/.ssh/id_rsa.pub"
/usr/bin/ssh-copy-id: INFO: attempting to log in with the new key(s), to filter out any that are already installed
/usr/bin/ssh-copy-id: INFO: 1 key(s) remain to be installed -- if you are prompted now it is to install the new keys
student@node1's password:

Number of key(s) added: 1

Now try logging into the machine, with:   "ssh 'student@node1'"
and check to make sure that only the key(s) you wanted were added.

[student@ansible ~]$ssh-copy-id -i ~/.ssh/id_rsa.pub student@node2
/usr/bin/ssh-copy-id: INFO: Source of key(s) to be installed: "/home/student/.ssh/id_rsa.pub"
/usr/bin/ssh-copy-id: INFO: attempting to log in with the new key(s), to filter out any that are already installed
/usr/bin/ssh-copy-id: INFO: 1 key(s) remain to be installed -- if you are prompted now it is to install the new keys
student@node2's password:

Number of key(s) added: 1

Now try logging into the machine, with:   "ssh 'student@node2'"
and check to make sure that only the key(s) you wanted were added.

[student@ansible ~]$ssh-copy-id -i ~/.ssh/id_rsa.pub student@node3
/usr/bin/ssh-copy-id: INFO: Source of key(s) to be installed: "/home/student/.ssh/id_rsa.pub"
/usr/bin/ssh-copy-id: INFO: attempting to log in with the new key(s), to filter out any that are already installed
/usr/bin/ssh-copy-id: INFO: 1 key(s) remain to be installed -- if you are prompted now it is to install the new keys
student@node3's password:

Number of key(s) added: 1

Now try logging into the machine, with:   "ssh 'student@node3'"
and check to make sure that only the key(s) you wanted were added.
测试
[student@ansible ~]$mkdir ansible
[student@ansible ~]$cd ansible/
[student@ansible ~/ansible]$cp /etc/ansible/ansible.cfg  .
[student@ansible ~/ansible]$vim ansible.cfg
inventory      = /home/student/ansible/inventory  //取消注释路径改为/home/student/ansible/inventory
[student@ansible ~/ansible]$vim inventory
node1
node2
node3
[student@ansible ~/ansible]$ls
ansible.cfg  inventory
[student@ansible ~/ansible]$ ansible all -m ping
node1 | SUCCESS => {
    "ansible_facts": {
        "discovered_interpreter_python": "/usr/libexec/platform-python"
    },
    "changed": false,
    "ping": "pong"
}
node2 | SUCCESS => {
    "ansible_facts": {
        "discovered_interpreter_python": "/usr/libexec/platform-python"
    },
    "changed": false,
    "ping": "pong"
}
node3 | SUCCESS => {
    "ansible_facts": {
        "discovered_interpreter_python": "/usr/libexec/platform-python"
    },
    "changed": false,
    "ping": "pong"
}
Original: https://www.cnblogs.com/Alone-8712/p/16828458.html
Author: Alone-林
Title: Ansible的介绍与安装
原创文章受到原创版权保护。转载请注明出处:https://www.johngo689.com/642723/
转载文章受原作者版权保护。转载请注明原作者出处!