

最近新买电脑重装ubuntu玩深度学习,踩了两天坑总结处下列流程
一、重装系统(U盘方式)
ubuntu20.04镜像文件下载地址:
在ubuntu官网下载.iso镜像文件,然后使用UltralSO软件制作系统启动盘,UltralSO软件的下载直接去其官网下载就可以。


-
文件——打开——选择iso文件
-
启动——写入硬盘映像
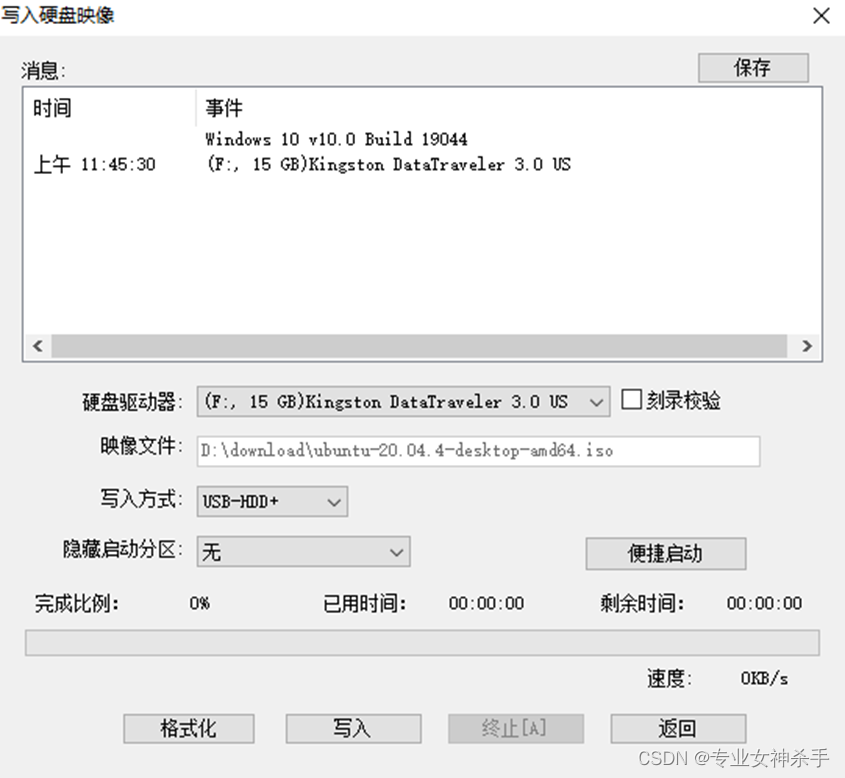
点击写入。这个过程会持续几分钟,消息框里显示”刻录完成”,一个系统盘就制作好了。
系统盘制作完成后,把制作好的系统盘插入需要重装系统的电脑中,开机时不停按ESC键进入BIOS模式。
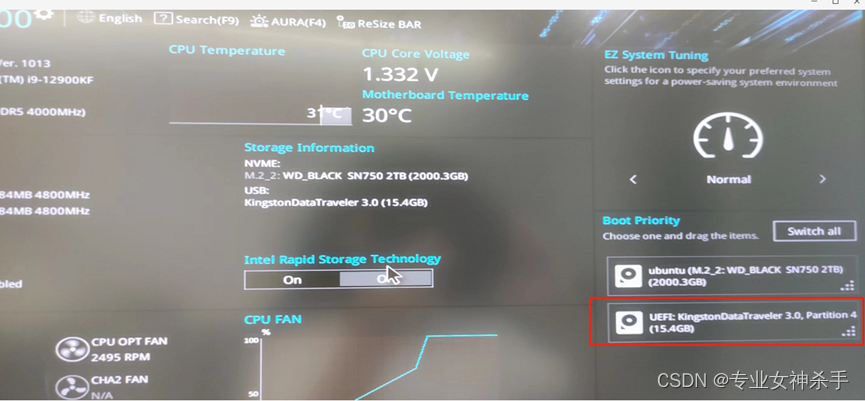
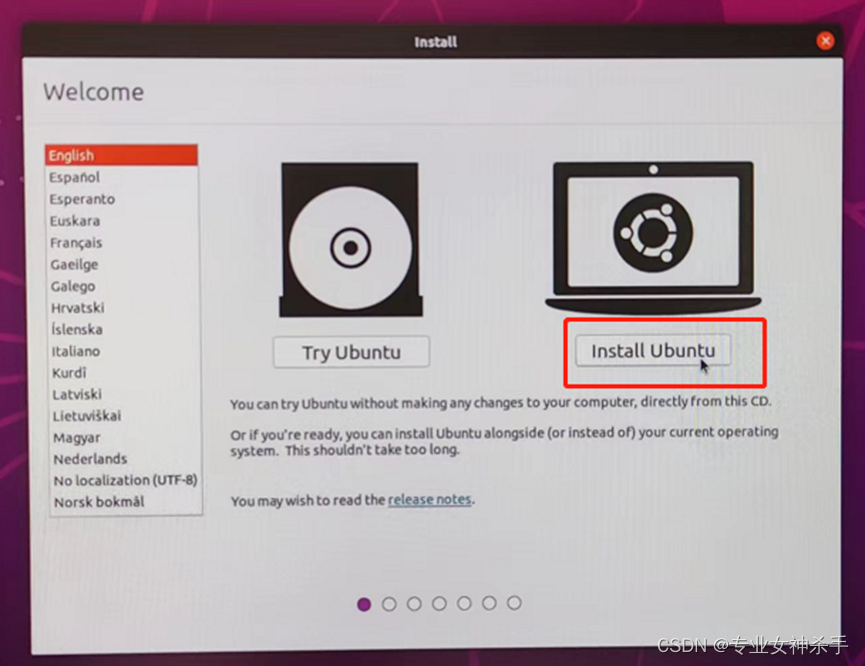
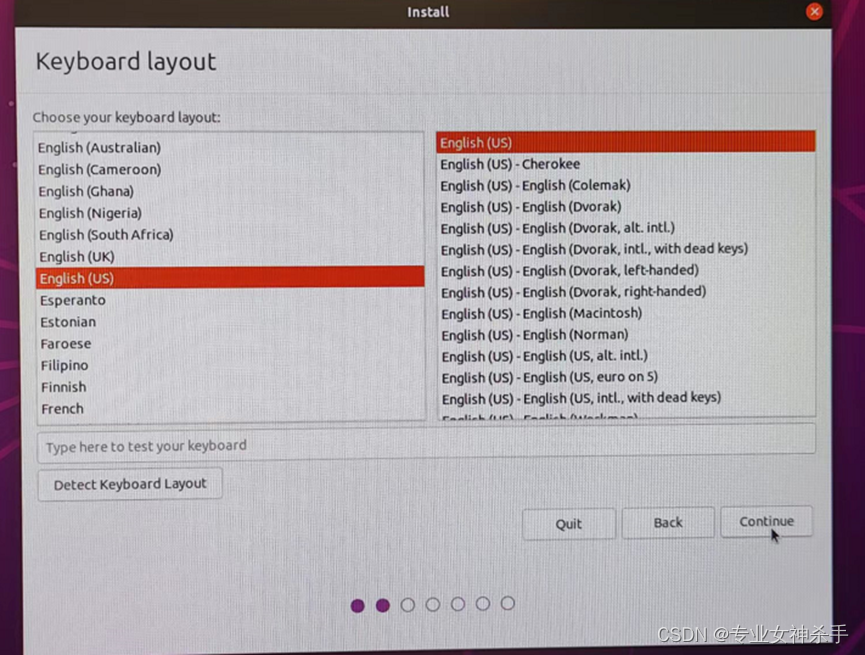
在Boot Priority里选择U盘启动,进入下一步,就能进入到ubuntu的安装步骤了。
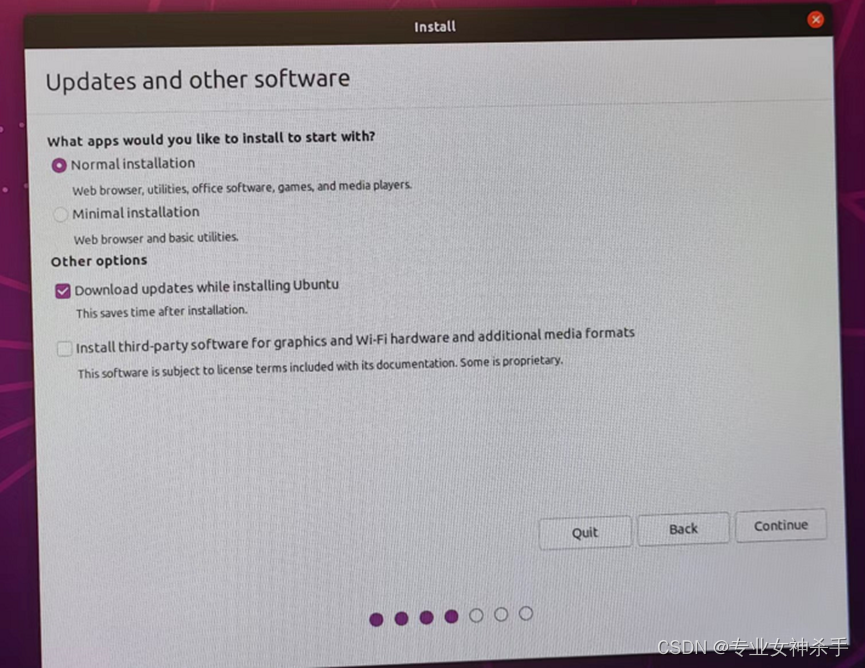
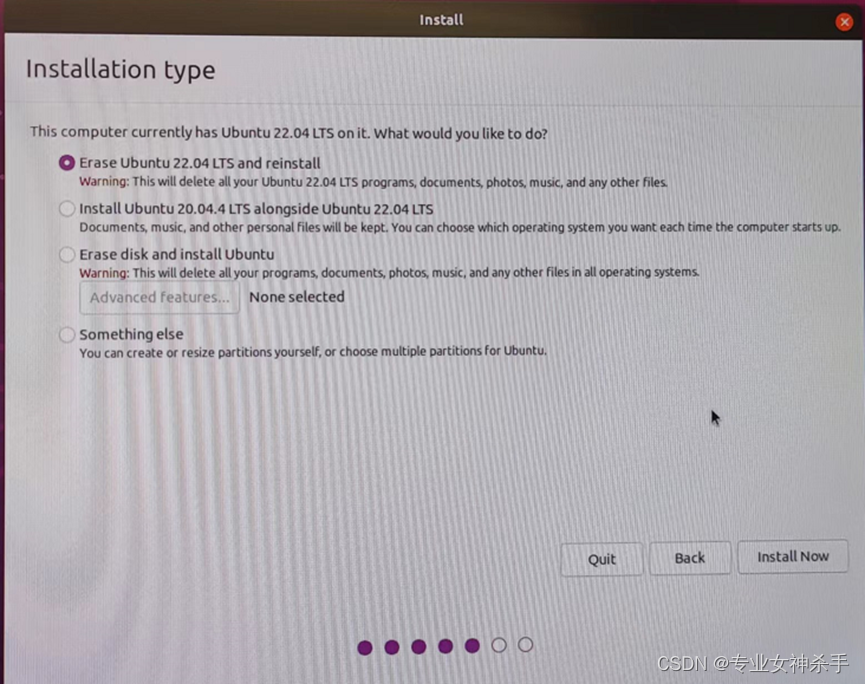
这一步根据自己的需求选择。选项1适合重装ubuntu,选项2适合双系统,选项3跟1差不多,就是清楚原来的所有系统文件。这几个英文解释不难吧。
到这一步,系统就安装完成了。拔掉U盘重启电脑就进入系统了。
安装完成后的第一件事,先把apt的源给换了吧。具体操作如下:
sudo /etc/apt/sources.list /etc/apt/sources.list.back
sudo gedit /etc/apt/sources.list
在sources.list文件里写入下面内容(在原来的基础上增加清华源)
默认注释了源码镜像以提高 apt update 速度,如有需要可自行取消注释
deb https://mirrors.tuna.tsinghua.edu.cn/ubuntu/ focal main restricted universe multiverse
deb-src https://mirrors.tuna.tsinghua.edu.cn/ubuntu/ focal main restricted universe multiverse
deb https://mirrors.tuna.tsinghua.edu.cn/ubuntu/ focal-updates main restricted universe multiverse
deb-src https://mirrors.tuna.tsinghua.edu.cn/ubuntu/ focal-updates main restricted universe multiverse
deb https://mirrors.tuna.tsinghua.edu.cn/ubuntu/ focal-backports main restricted universe multiverse
deb-src https://mirrors.tuna.tsinghua.edu.cn/ubuntu/ focal-backports main restricted universe multiverse
deb https://mirrors.tuna.tsinghua.edu.cn/ubuntu/ focal-security main restricted universe multiverse
deb-src https://mirrors.tuna.tsinghua.edu.cn/ubuntu/ focal-security main restricted universe multiverse

预发布软件源,不建议启用
deb https://mirrors.tuna.tsinghua.edu.cn/ubuntu/ focal-proposed main restricted universe multiverse
deb-src https://mirrors.tuna.tsinghua.edu.cn/ubuntu/ focal-proposed main restricted universe multiverse

#deb cdrom:[Ubuntu 22.04 LTS _Jammy Jellyfish_ - Release amd64 (20220419)]/ jammy main restricted

See http://help.ubuntu.com/community/UpgradeNotes for how to upgrade to
newer versions of the distribution.

deb http://cn.archive.ubuntu.com/ubuntu/ jammy main restricted
deb-src http://cn.archive.ubuntu.com/ubuntu/ jammy main restricted

## Major bug fix updates produced after the final release of the
## distribution.

deb http://cn.archive.ubuntu.com/ubuntu/ jammy-updates main restricted
deb-src http://cn.archive.ubuntu.com/ubuntu/ jammy-updates main restricted

## N.B. software from this repository is ENTIRELY UNSUPPORTED by the Ubuntu
## team. Also, please note that software in universe WILL NOT receive any
## review or updates from the Ubuntu security team.

deb http://cn.archive.ubuntu.com/ubuntu/ jammy universe
deb-src http://cn.archive.ubuntu.com/ubuntu/ jammy universe
deb http://cn.archive.ubuntu.com/ubuntu/ jammy-updates universe
deb-src http://cn.archive.ubuntu.com/ubuntu/ jammy-updates universe

## N.B. software from this repository is ENTIRELY UNSUPPORTED by the Ubuntu
## team, and may not be under a free licence. Please satisfy yourself as to
## your rights to use the software. Also, please note that software in
## multiverse WILL NOT receive any review or updates from the Ubuntu
## security team.

deb http://cn.archive.ubuntu.com/ubuntu/ jammy multiverse
deb-src http://cn.archive.ubuntu.com/ubuntu/ jammy multiverse
deb http://cn.archive.ubuntu.com/ubuntu/ jammy-updates multiverse
deb-src http://cn.archive.ubuntu.com/ubuntu/ jammy-updates multiverse

## N.B. software from this repository may not have been tested as
## extensively as that contained in the main release, although it includes
## newer versions of some applications which may provide useful features.

## Also, please note that software in backports WILL NOT receive any review
## or updates from the Ubuntu security team.

deb http://cn.archive.ubuntu.com/ubuntu/ jammy-backports main restricted universe multiverse
deb-src http://cn.archive.ubuntu.com/ubuntu/ jammy-backports main restricted universe multiverse

deb http://security.ubuntu.com/ubuntu jammy-security main restricted
deb-src http://security.ubuntu.com/ubuntu jammy-security main restricted
deb http://security.ubuntu.com/ubuntu jammy-security universe
deb-src http://security.ubuntu.com/ubuntu jammy-security universe
deb http://security.ubuntu.com/ubuntu jammy-security multiverse
deb-src http://security.ubuntu.com/ubuntu jammy-security multiverse

This system was installed using small removable media
(e.g. netinst, live or single CD). The matching "deb cdrom"
entries were disabled at the end of the installation process.

For information about how to configure apt package sources,
see the sources.list(5) manual.

deb [arch=amd64] http://archive.ubuntu.com/ubuntu focal main universe
保存退出,更新一下源
sudo apt update
sudo apt upgrade
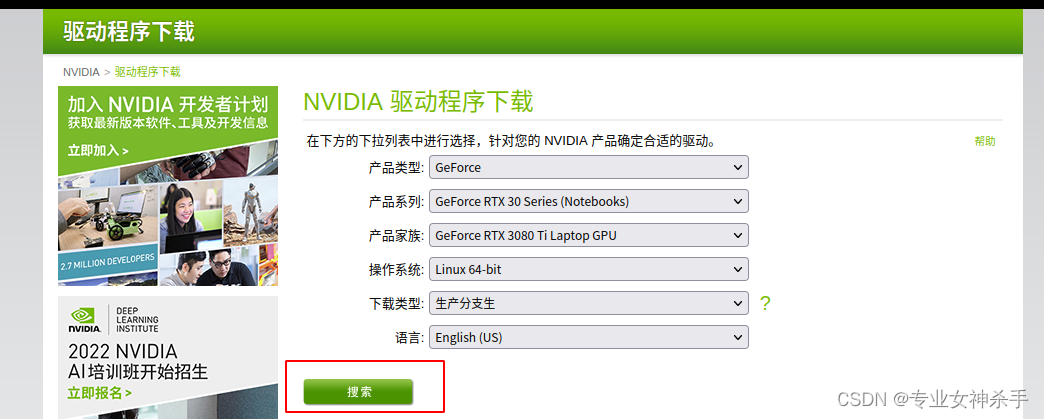
二. 显卡驱动安装
去nvidia官网下载显卡驱动,因为我这里用的是3080ti,所以选择的是3080ti,下载地址:官方驱动 | NVIDIA
下载完成后是一个runfile
这里有两个问题:
- 驱动的安装需要gcc和make,所以先检查自己的电脑是否已经安装了安装了gcc和make
sudo apt install gcc
Sudo apt install make
- 因为我们的系统里有一个 nouveau的驱动了,所以要先禁用nouveau再安装nvidia的驱动。
sudo gedit/etc/modprobe.d/blacklist.conf
在文件末尾加入两行内容
blacklist nouveau
options nouveau modeset=0
使其生效
sudo update-initramfs -u
然后重启 reboot
重启之后安装驱动
替换为自己的驱动即可
sudo sh NVIDIA-Linux-x86_64-515.57.run
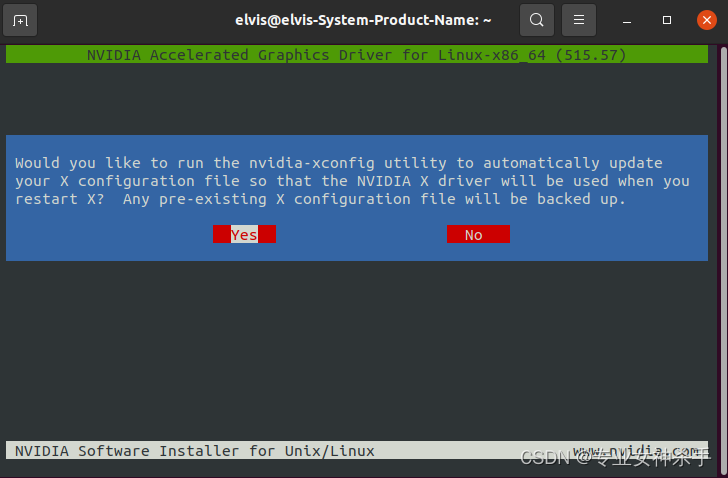
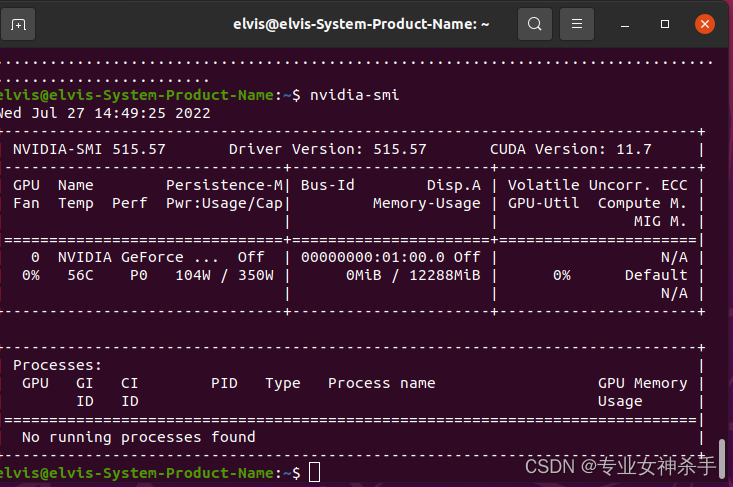
选择Yes, 安装完成后,验证驱动的安装是否成功,出现显卡信息即可。
nvidia-smi
踩过的坑:
我最开始安装的是ubuntu22.04,那个版本在安装nvidia驱动时,提示错误,错误信息为:you appear to be running an x server please exit x before installing。这是因为系统本身带有一个用来显示的驱动,解决办法有两个
- 禁用lightdm,进入命令行模式,再安装系统
- 给电脑装个todesk, 使用另外一台电脑远程操控此电脑,远程安装驱动。(亲测可行)
另外一个坑是,ubuntu22.04的gcc版本是gcc-11,ubuntu20.04的gcc版本是gcc-9,在安装之前要考虑自己的需求,如需要使用paddlepaddle, 则不要安装ubuntu22.04。
三. cuda和cudnn安装
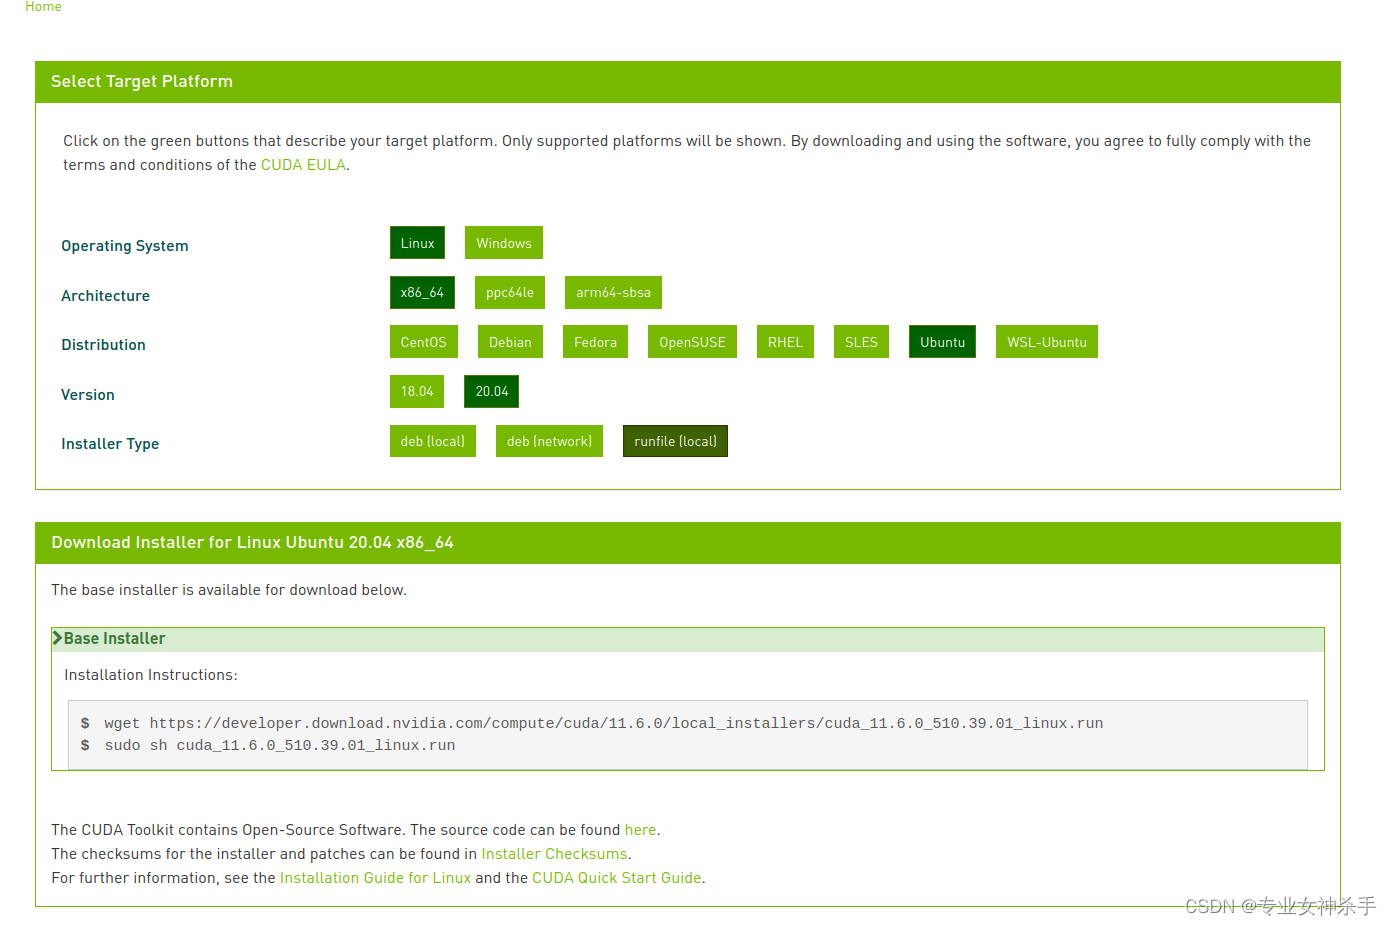
cuda下载地址:CUDA Toolkit Archive | NVIDIA Developer
选择一个cuda版本安装,下载对应的runfile文件,注意要和驱动版本搭配。具体参考 新装Ubuntu系统基本环境安装配置(conda)_专业女神杀手的博客-CSDN博客_ubuntu 安装conda
我这里选择的是cuda11.6
安装cuda
sudo sh cuda_11.6.0_510.39.01_linux.run
常规安装即可,因为上一步已经安装过nvidia驱动了,所以出现选择安装组件时,要把Driver选项去掉,继续安装完成即可。
接下来配置cuda的系统路径,首先打开家目录下的.bashrc文件
sudo gedit ~/.bashrc
在文件的末尾添加如下内容:
added install cuda
export PATH=/usr/local/cuda-11.6/bin${PATH:+:${PATH}}
export LD_LIBRARY_PATH=/usr/local/cuda-11.6/lib64${LD_LIBRARY_PATH:+:${LD_LIBRARY_PATH}}
保存并关闭文件,完成配置。更新环境:
source ~/.bashrc
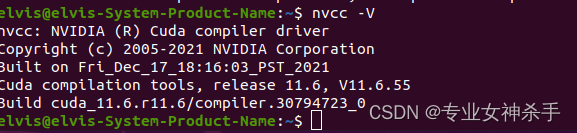
最后检查cuda是否安装成功
nvcc -V
cuda安装完成后,下一步是cudnn的安装
进入官网https://developer.nvidia.com/rdp/cudnn-download
注意下载cudnn要先注册一下,注册完登录后才能下载
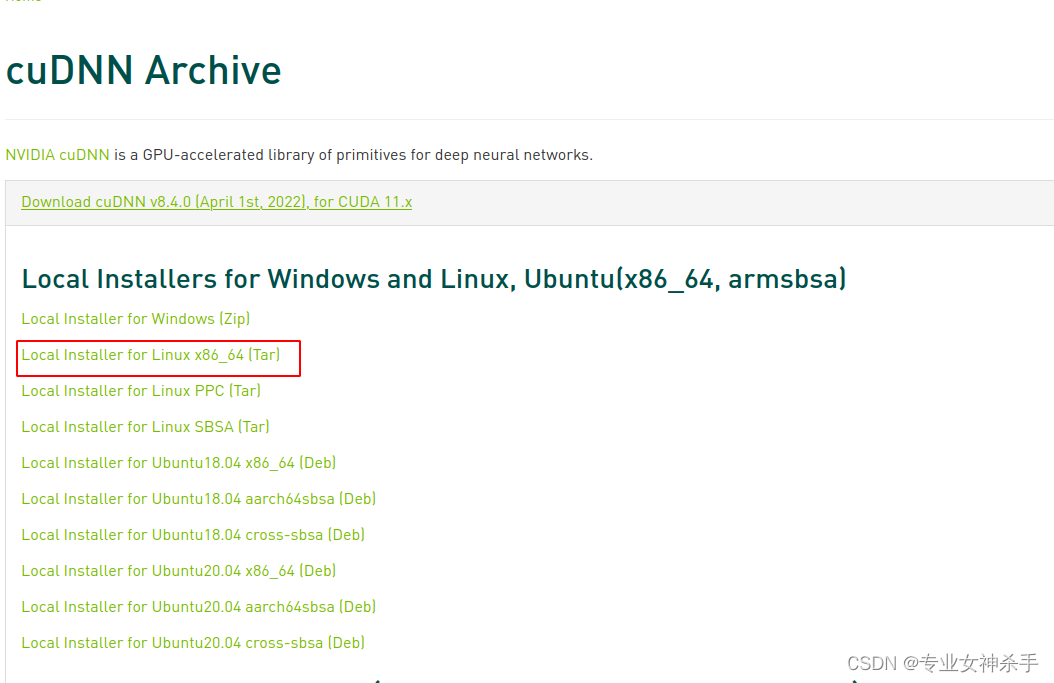
解压下载的cudnn的.tar.xz文件,命名为cudnn(随意啦),进行下列操作
sudo cp cudnn/include/cudnn.h /usr/local/cuda/include/
sudo cp cudnn/include/cudnn_version.h /usr/local/cuda/include
sudo cp cudnn/lib64/libcudnn* /usr/local/cuda/lib64/ -d
sudo chmod a+r /usr/local/cuda/include/cudnn.h
sudo chmod a+r /usr/local/cuda/lib64/libcudnn*
然后验证cudnn安装成功
cat /usr/local/cuda/include/cudnn_version.h | grep CUDNN_MAJOR -A 2
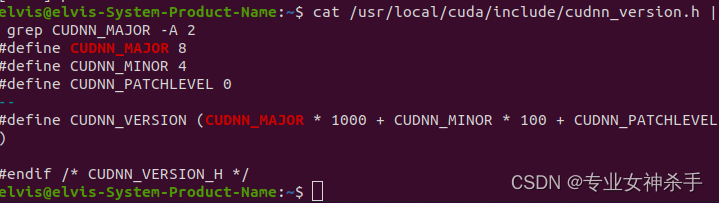
至此,cuda和cudnn安装完毕。
四. conda管理python环境
到清华大学镜像里下载annaconda安装包,下载anaconda的sh文件。
Index of /anaconda/archive/ | 清华大学开源软件镜像站 | Tsinghua Open Source Mirror
bash Anaconda3-5.3.1-Linux-x86_64.sh
配置conda环境变量
sudo gedit ~/.bashrc
在文件末尾添加
选择自己的anaconda安装路径
export PATH="/home/elvis/anaconda3/bin:$PATH"
更新一下:
source ~/.bashrc
最后输入conda -V检验一下,出现conda的版本信息即安装成功。
安装完成后,记得更新一下pip的源,是为pip install下载提供服务的。
cd ~                   # 进入家目录
mkdir .pip          # 新建.pip隐藏文件夹
cd .pip                  # 进入.pip文件夹
touch pip.conf   # 新建pip.conf文件
sudo gedit pip.conf      # 用gedit编辑pip.conf文件
在pip.conf中写入
[global]

index-url=https://pypi.tuna.tsinghua.edu.cn/simple

timeout = 6000

[install]

trusted-host=pypi.tuna.tsinghua.edu.cn

disable-pip-version-check = true
保存退出。
最后贴个二维码,给有钱的兄弟们开开心。

Original: https://blog.csdn.net/Eyesleft_being/article/details/126020113
Author: 专业女神杀手
Title: 【史上最全】重装ubuntu20.04系统基本环境配置
原创文章受到原创版权保护。转载请注明出处:https://www.johngo689.com/625668/
转载文章受原作者版权保护。转载请注明原作者出处!