

- 简介
S pring 和 M ybaits 整合
- 创建项目
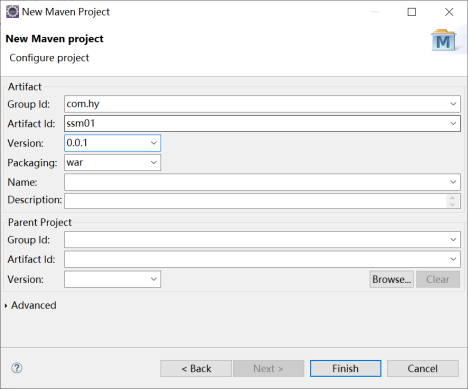


2 .1 mybaits 和Spring 整合的jar 包
mybaits 和S pring 整合的官网:http://mybatis.org/spring/zh/index.html ;
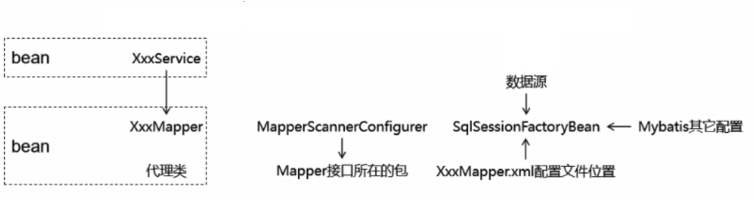
2 .1.1 思路:
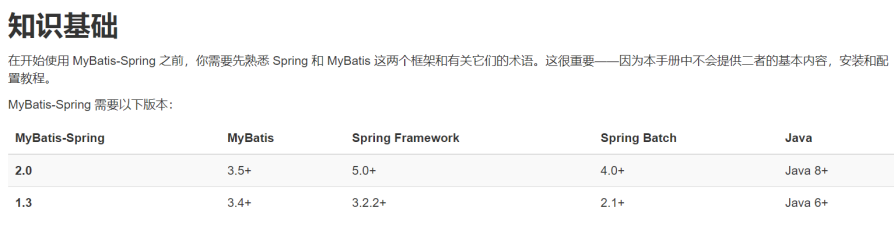
2 .1.2 M yBatis -Spring
这个jar 包是mybaits 提供的。

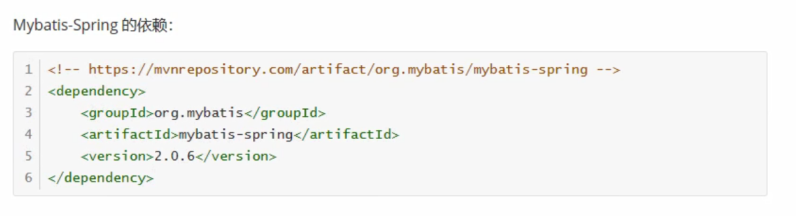
2 .2 mybatis 和spring 整合所需要的jar 包
要和 Spring 一起使用MyBatis ,需要在Spring 应用上下文中定义至少两样东西:一个 SqlSessionFactory 和至少一个数据映射器类。
在 MyBatis-Spring 中,可使用SqlSessionFactoryBean 来创建 SqlSessionFactory 。 要配置这个工厂 bean ,只需要把下面代码放在Spring 的XML 配置文件中:
还需要 S pring 对ORM 框架支持的jar 包
2.3 spring 和mybaits 整合,完整的pom 文件
xmlns:xsi= “http://www.w3.org/2001/XMLSchema-instance”
xsi:schemaLocation= “http://maven.apache.org/POM/4.0.0 http://maven.apache.org/xsd/maven-4.0.0.xsd”>
1.8
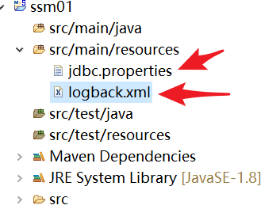
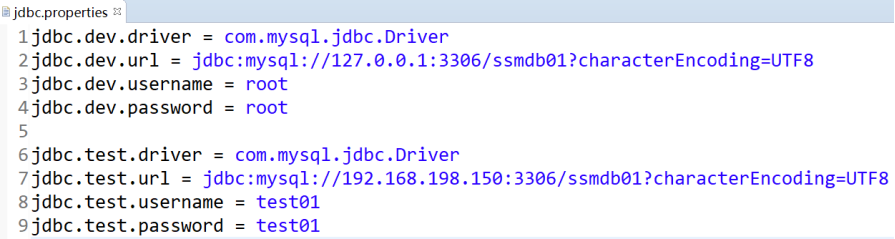
2 .4 创建jdbc .properties 和 logback .xml日志文件
xml version = “1.0” encoding = “UTF-8”?>
< configuration debug = “true” >
< appender name = “STDOUT”
class = “ch.qos.logback.core.ConsoleAppender” >
< encoder >
< pattern > [%d{HH:mm:ss.SSS}] [%-5level] [%thread] [%logger] [% msg ]%n pattern>
encoder>
appender>
< root level = “INFO” >
< appender-ref ref = “STDOUT” />
root>
< logger name = “com.hy.mapper” level = “DEBUG” />
< logger name = “com.hy.test” level = “DEBUG” />
configuration>
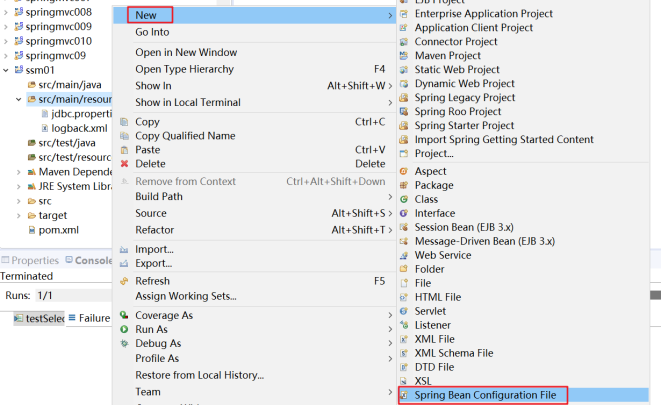
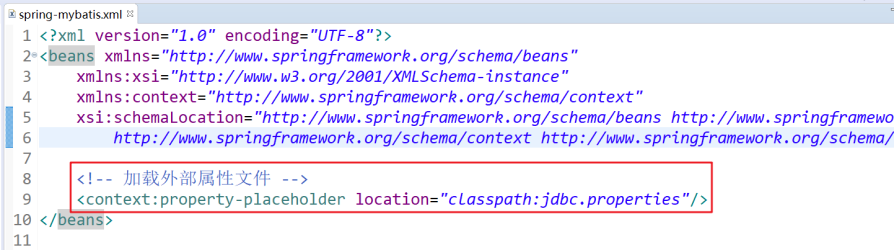
2 .5 首先建立spring 和mybaits 的配置的文件 spring-mybatis.xml
2 .5.1 加载外部属性文件
2 .5.2 配置数据源
“1.0” encoding= “UTF-8”?>
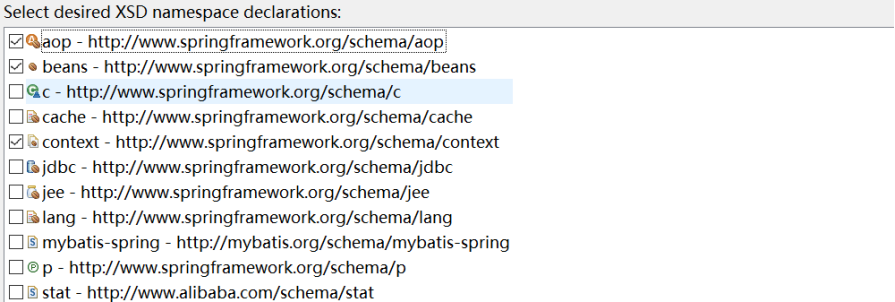
xmlns:xsi= “http://www.w3.org/2001/XMLSchema-instance”
xmlns:context= “http://www.springframework.org/schema/context”
xsi:schemaLocation= “http://www.springframework.org/schema/beans http://www.springframework.org/schema/beans/spring-beans.xsd
http://www.springframework.org/schema/context http://www.springframework.org/schema/context/spring-context-4.3.xsd”>
< bean id = “druidDataSource” class = “com.alibaba.druid.pool.DruidDataSource” >
< property name = “driverClassName” value = “${jdbc.dev.driver}” />
< property name = “url” value = “${jdbc.dev.url}” />
< property name = “username” value = “${jdbc.dev.username}” />
< property name = “password” value = “${jdbc.dev.password}” />
bean>
2 .5.3 测试是否能连接上数据库
package com.hy.test;
import java.sql.Connection;
import java.sql.SQLException;
import javax.sql.DataSource;
import org.junit.Test;
import org.junit.runner.RunWith;
import org.slf4j.Logger;
import org.slf4j.LoggerFactory;
import org.springframework.beans.factory.annotation.Autowired;
import org.springframework.test.context.ContextConfiguration;
import org.springframework.test.context.junit4.SpringJUnit4ClassRunner;
@RunWith(SpringJUnit4ClassRunner. class)
@ContextConfiguration(“classpath:spring-mybatis.xml”)
public class Test01 {
@Autowired
private DataSource dataSource;
private Logger logger = LoggerFactory. getLogger(this.getClass());
@Test
public void testConnection() throws SQLException {
Connection connection = dataSource.getConnection();
logger.debug(connection.toString());
}
}

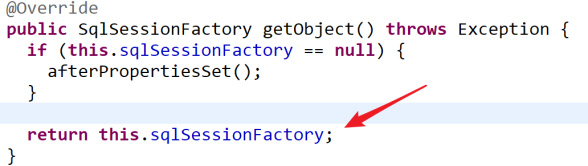
- 配置Sql S ession F actory B ean
SqlS essionF actoryB ean 是由MyB atis 提供的 package org.mybatis.spring;

SqlS essionF actoryB ean 实现了 F actoryB ean 这个接口,

这个接口是由Spring 提供的。

会调用 getO bject 方法得到一个 对象,这个对象是


3 .1 配置方式[风格1 ]
1 )风格1:保留Mybaits 全局配置文件(核心配置文件mybatis-config.xml)
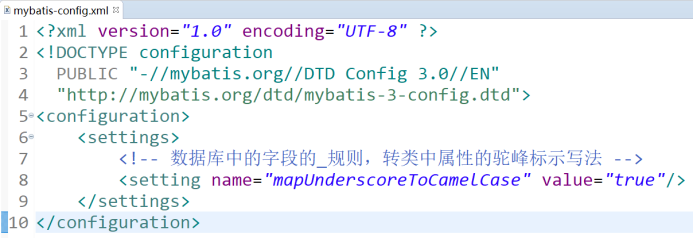
3 .1.1 创建Mybatis 全局配置文件
“1.0” encoding= “UTF-8” ?>
PUBLIC “-//mybatis.org//DTD Config 3.0//EN”
“http://mybatis.org/dtd/mybatis-3-config.dtd”>

3 .1.2 配置Sql S ession F actory B ean
3 .1.3 配置Mapper 接口类型的bean 扫描器 M apper ScannerConfiguration
配置 Mapper 接口类型的bean 扫描器
3 .1.4 创建c om.hy.bean. E mp & Emp M apper 接口 & EmpMapper.xml映射文件
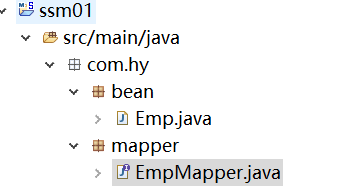
package com.hy.bean;
import lombok.AllArgsConstructor;
import lombok.Getter;
import lombok.NoArgsConstructor;
import lombok.Setter;
import lombok.ToString;
@NoArgsConstructor
@AllArgsConstructor
@Setter
@Getter
@ToString
public class Emp {
private Long empId; //用包装类有null 值
private String empName;
private String empPwd;
private String empGender;
private Double empSalary; //用包装类有null 值
//构造方法(去ID 的)
public Emp(String empName, String empPwd, String empGender, Double empSalary) {
super();
this.empName = empName;
this.empPwd = empPwd;
this.empGender = empGender;
this.empSalary = empSalary;
}
}
package com.hy.mapper;
import java.util.List;
import java.util.Map;
import com.hy.bean.Emp;
public interface EmpMapper {
abstract public Emp selectById(long empId);
abstract public int insert(Emp emp);
abstract public int deleteById(long empId);
abstract public int update(Emp emp);
abstract public int updateByMap(Map
abstract public Integer selectCount();
abstract public Map
abstract public List
abstract public int insertWithKey(Emp emp);
}
“1.0” encoding= “UTF-8” ?>
PUBLIC “-//mybatis.org//DTD Mapper 3.0//EN”
“http://mybatis.org/dtd/mybatis-3-mapper.dtd”>
“selectById” resultType= “com.hy.bean.Emp”>
select emp_id empId,emp_name empName,emp_pwd empPwd,emp_gender empGender , emp_salary empSalary
from sys_emp where emp_id = #{empId}
3 .1.5 测试
package com.hy.test;
import java.sql.SQLException;
import org.junit.Test;
import org.junit.runner.RunWith;
import org.slf4j.Logger;
import org.slf4j.LoggerFactory;
import org.springframework.beans.factory.annotation.Autowired;
import org.springframework.test.context.ContextConfiguration;
import org.springframework.test.context.junit4.SpringJUnit4ClassRunner;
import com.hy.bean.Emp;
import com.hy.mapper.EmpMapper;
@RunWith(SpringJUnit4ClassRunner. class)
@ContextConfiguration(“classpath:spring-mybatis.xml”)
public class Test02 {
@Autowired
private EmpMapper empMapper;
private Logger logger = LoggerFactory. getLogger(this.getClass());
@Test
public void testEmpMapper () throws SQLException {
Emp emp = empMapper.selectById(1);
logger.debug(emp.toString());
}
}

3 .1 配置方式[风格 2]
2 )风格2 :彻底舍弃Mybaits 全局配置文件(核心配置文件mybatis-config.xml),所有的一切在spring 的配置文件中配。

3.2 注意,扫描包的时候分开扫描
spring-mybaits.xml 只扫描Service ,
而Mapper 是用mybatis 自带的扫描器MapperS cannerConfigurer 扫描
3.3 spring-mybatis.xml 完整的配置
“1.0” encoding= “UTF-8”?>
xmlns:xsi= “http://www.w3.org/2001/XMLSchema-instance”
xmlns:context= “http://www.springframework.org/schema/context”
xmlns:tx= “http://www.springframework.org/schema/tx”
xsi:schemaLocation= “http://www.springframework.org/schema/beans http://www.springframework.org/schema/beans/spring-beans.xsd
http://www.springframework.org/schema/context http://www.springframework.org/schema/context/spring-context-4.3.xsd
http://www.springframework.org/schema/tx http://www.springframework.org/schema/tx/spring-tx-4.3.xsd”>
3.4 mybatis-config.xml
“1.0” encoding= “UTF-8” ?>
PUBLIC “-//mybatis.org//DTD Config 3.0//EN”
“http://mybatis.org/dtd/mybatis-3-config.dtd”>
- 编程式事务
事务功能的相关操作全部通过自己编写代码来实现:
Connection conn = …;
try {
//开启事务:关闭事务的自动提交
conn.setAutoCommit(false);
//核心操作
//提交事务
conn.commit();
}catch(Exception e){
//回滚事务
conn.rollBack();
}finally{
//释放数据库连接
conn.close();
}
编程式的实现方式存在缺陷:
1 )具体操作过程中,所有细节都需要程序员自己来完成,比较繁琐。
2 )代码复用性不高:如果没有有效抽取出来,每次实现功能都需要自己编写代码,代码就没有得到复用。
- 声明式事务
既然事务控制的代码有规律可循,代码的结构基本是确定的,所以框架就可以将固定模式的代码抽取出来,进行相关的封装。
封装起来后,我们只需要在配置文件中进行简单的配置即可完成操作。
好处1 :提高开发效率
好处2 :消除了冗余的代码
好处3 :框架会综合考虑相关领域中在实际开发环境下有可能遇到的各种问题,进行了健壮性、性能等各个方面的优化
编程式事务:自己写代码实现功能
声明式事务:通过配置让框架实现功能
5.1 事务管理器
5.1.1 Spring 5.2 以前
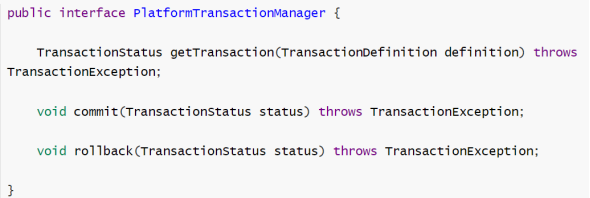
5 .1.2 从Spring 5.2 开始
PlatformTransactionManager 接口本身没有变化,它继承了TransactionManager。TransactionManager 接口中什么都没有,它的存在的意义是定义一个技术体系。

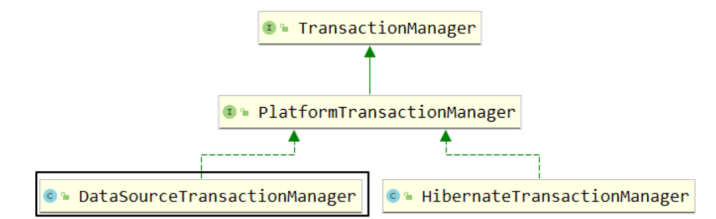
我们现在要使用的事务管理器是org.springframework.jdbc.datasource. DataSourceTransactionManager,将来整合 Mybatis 用的也是这个类。
5.2 DataSourceTransactionManager 类中的主要方法:
doBegin():开启事务
doCommit():提交事务
doRollback():回滚事务
doSuspend():挂起事务
doResume():恢复挂起的事务
- 添加Service 层
6.1 EmpService 接口 & EmpServiceImpl实现类
package com.hy.service;
import com.hy.bean.Emp;
public interface EmpService {
abstract public Emp listById(long empId);
}
@Service
public class EmpServiceImpl implements EmpService{
@Autowired
private EmpMapper empMapper;
public Emp listById(long empId) {
Emp emp = empMapper.selectById(empId);
return emp;
}
}
6.2 扫描@ Service 组件

6.3 测试
package com.hy.test;
import java.sql.SQLException;
import org.junit.Test;
import org.junit.runner.RunWith;
import org.slf4j.Logger;
import org.slf4j.LoggerFactory;
import org.springframework.beans.factory.annotation.Autowired;
import org.springframework.test.context.ContextConfiguration;
import org.springframework.test.context.junit4.SpringJUnit4ClassRunner;
import com.hy.bean.Emp;
import com.hy.service.EmpService;
@RunWith(SpringJUnit4ClassRunner. class)
@ContextConfiguration(“classpath:spring-mybatis.xml”)
public class Test03 {
@Autowired
private EmpService empService;
private Logger logger = LoggerFactory. getLogger(this.getClass());
@Test
public void testEmpService() throws SQLException {
Emp emp = empService.listById(1);
logger.debug(emp.toString());
}
}
6 .4 E mp M apper 添加两个更新方法 & EmpMapper.xml
package com.hy.mapper;
import java.util.List;
import java.util.Map;
import org.apache.ibatis.annotations.Param;
import com.hy.bean.Emp;
public interface EmpMapper {
abstract public void updateEmpNameById(@Param(“empId”) long empId, @Param(“empName”)String empName);
abstract public void updateEmpSalaryById(@Param(“empId”) long empId, @Param(“empSalary”)Double empSalary);
abstract public Emp selectById(long empId);
}
“1.0” encoding= “UTF-8” ?>
PUBLIC “-//mybatis.org//DTD Mapper 3.0//EN”
“http://mybatis.org/dtd/mybatis-3-mapper.dtd”>
“selectById” resultType= “com.hy.bean.Emp”>
select emp_id empId,emp_name empName,emp_pwd empPwd,emp_gender empGender , emp_salary empSalary
from sys_emp where emp_id = #{empId}
update sys_emp set emp_name = #{empName} where emp_id = #{empId}
update sys_emp set emp_salary = #{empSalary} where emp_id = #{empId}
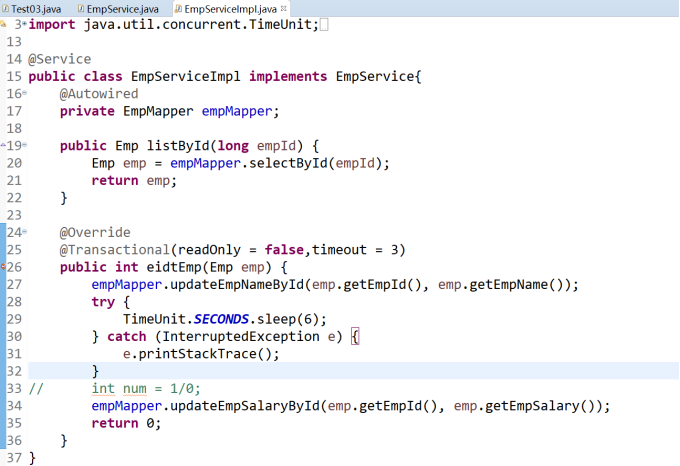
6 .5 E mp S ervice 接口& EmpServiceImpl
package com.hy.service;
import com.hy.bean.Emp;
public interface EmpService {
abstract public Emp listById(long empId);
abstract public int eidtEmp(Emp emp);
}
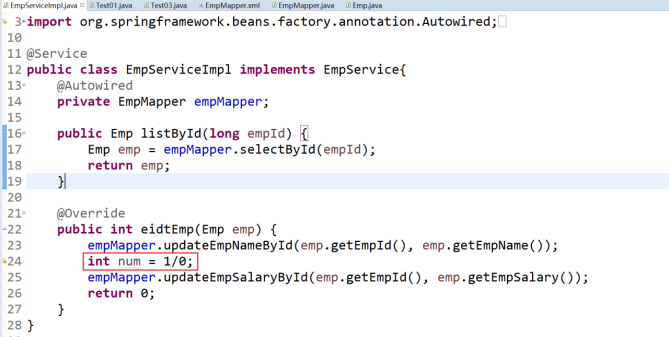
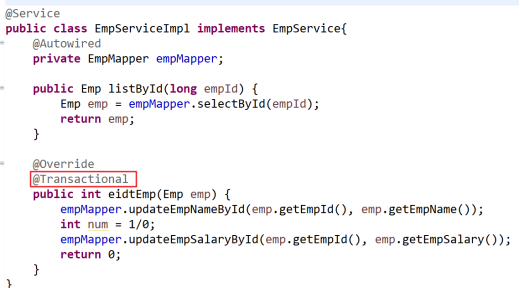
在editE mp 方法中我们会根据empI d ,两次修改sys_emp表列的值
package com.hy.service.impl;
import org.springframework.beans.factory.annotation.Autowired;
import org.springframework.stereotype.Service;
import com.hy.bean.Emp;
import com.hy.mapper.EmpMapper;
import com.hy.service.EmpService;
@Service
public class EmpServiceImpl implements EmpService{
@Autowired
private EmpMapper empMapper;
public Emp listById(long empId) {
Emp emp = empMapper.selectById(empId);
return emp;
}
@Override
public int eidtEmp(Emp emp) {
empMapper.updateEmpNameById(emp.getEmpId(), emp.getEmpName());
empMapper.updateEmpSalaryById(emp.getEmpId(), emp.getEmpSalary());
return 0;
}
}
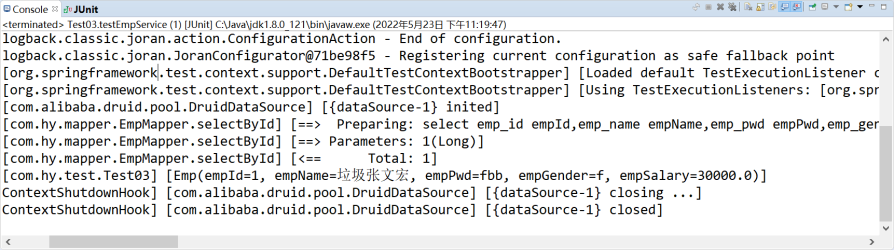
6 .6 测试类,测试不使用事务的情况
package com.hy.test;
import java.sql.SQLException;
import org.junit.Test;
import org.junit.runner.RunWith;
import org.slf4j.Logger;
import org.slf4j.LoggerFactory;
import org.springframework.beans.factory.annotation.Autowired;
import org.springframework.test.context.ContextConfiguration;
import org.springframework.test.context.junit4.SpringJUnit4ClassRunner;
import com.hy.bean.Emp;
import com.hy.service.EmpService;
@RunWith(SpringJUnit4ClassRunner. class)
@ContextConfiguration(“classpath:spring-mybatis.xml”)
public class Test03 {
@Autowired
private EmpService empService;
private Logger logger = LoggerFactory. getLogger(this.getClass());
@Test
public void testEmpService() throws SQLException {
Emp emp = empService.listById(1);
logger.debug(emp.toString());
}
@Test
public void testEmpService2() throws SQLException {
Emp emp = new Emp(1L, “范冰冰plus3”, “fbbplus”, “f”, 1315d);
empService.eidtEmp(emp);
}
}
出现异常的情况
- 事务
7.1 编程式事务
事务功能的相关操作全部通过自己编写代码来实现:
Connection conn = …;
try {
//开启事务:关闭事务的自动提交
conn.setAutoCommit(false);
//核心操作
//提交事务
conn.commit();
}catch(Exception e){
//回滚事务
conn.rollBack();
}finally{
//释放数据库连接
conn.close();
}
编程式的实现方式存在缺陷:
1 )具体操作过程中,所有细节都需要程序员自己来完成,比较繁琐。
2) 代码复用性不高:如果没有有效抽取出来,每次实现功能都需要自己编写代码,代码就没有得到复用。
7.2 声明式事务
既然事务控制的代码有规律可循,代码的结构基本是确定的,所以框架就可以将固定模式的代码抽取出来,进行相关的封装。
封装起来后,我们只需要在配置文件中进行简单的配置即可完成操作。
好处1 :提高开发效率
好处2 :消除了冗余的代码
好处3 :框架会综合考虑相关领域中在实际开发环境下有可能遇到的各种问题,进行了健壮性、性能等各个方面的优化
编程式事务:自己写代码实现功能
声明式事务:通过配置让框架实现功能
7.3 事务管理器
7.3.1 Spring 5.2 以前

7 .3.2 从Spring 5.2 开始
PlatformTransactionManager 接口本身没有变化,它继承了TransactionManager。TransactionManager 接口中什么都没有,它的存在的意义是定义一个技术体系。


我们现在要使用的事务管理器是org.springframework.jdbc.datasource. DataSourceTransactionManager,将来整合 Mybatis 用的也是这个类。
7.4 DataSourceTransactionManager 类中的主要方法:
doBegin():开启事务
doCommit():提交事务
doRollback():回滚事务
doSuspend():挂起事务
doResume():恢复挂起的事务
事务的挂起和恢复,主要是事务传播行为所体现的。
8 基于注解的声明式事务
事务通常都是加到业务逻辑层,针对XxxService 类使用事务
8.1 配置声明式事务,需要添加新的依赖
Spring 持久化层支持的jar 包,Spring 在执行持久化操作与持久化技术进行整合过程中,需要使用orm,tx,jdbc 三个jar 包
导入orm 包就可以通过maven 的依赖传递把其他两个也导入进来。

8.2 给事务管理器装配一下数据源&。
8 .3 开启基于注解的声明式事务

8.4 给Emp S er viceImpl方法上加上注解@Transactional
给X xxS erviceI mpl 类的方法中加上@Transactional 注解,Spring 会自动的给这个方法加上事务。
8.6 完整的配置spring -mybaits.xml
“1.0” encoding= “UTF-8”?>
xmlns:xsi= “http://www.w3.org/2001/XMLSchema-instance”
xmlns:context= “http://www.springframework.org/schema/context”
xmlns:tx= “http://www.springframework.org/schema/tx”
xsi:schemaLocation= “http://www.springframework.org/schema/beans http://www.springframework.org/schema/beans/spring-beans.xsd
http://www.springframework.org/schema/context http://www.springframework.org/schema/context/spring-context-4.3.xsd
http://www.springframework.org/schema/tx http://www.springframework.org/schema/tx/spring-tx-4.3.xsd”>
8.6 测试
8.6.1 配置日志观察效果
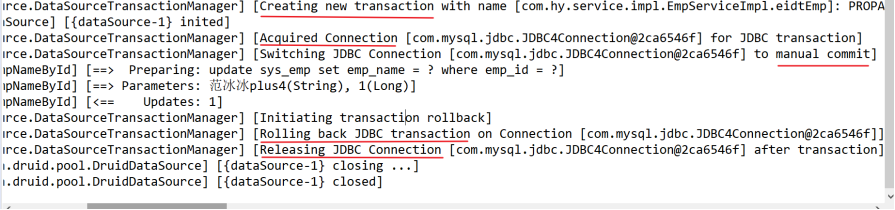
8.6.2 通过日志观察事务
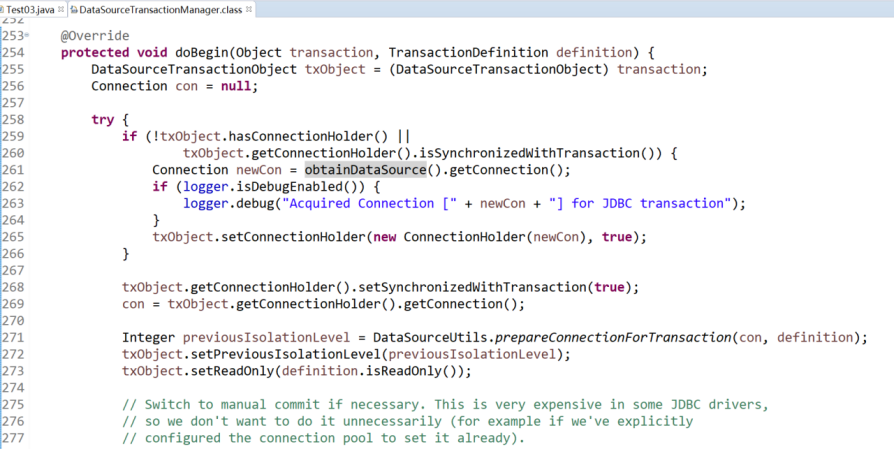
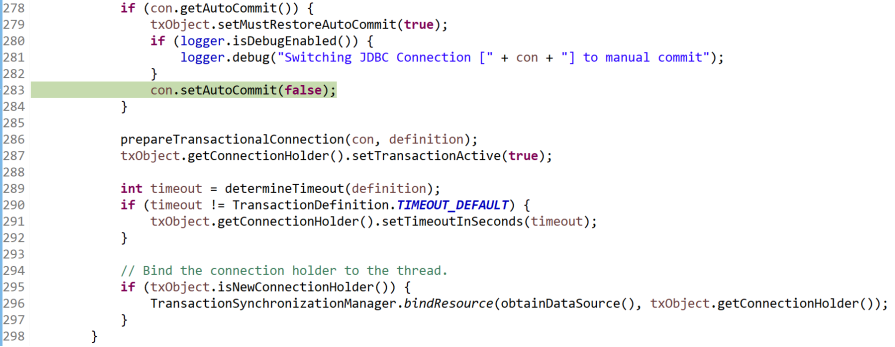
8 .6.3 通过debug 源码的模式观察事务

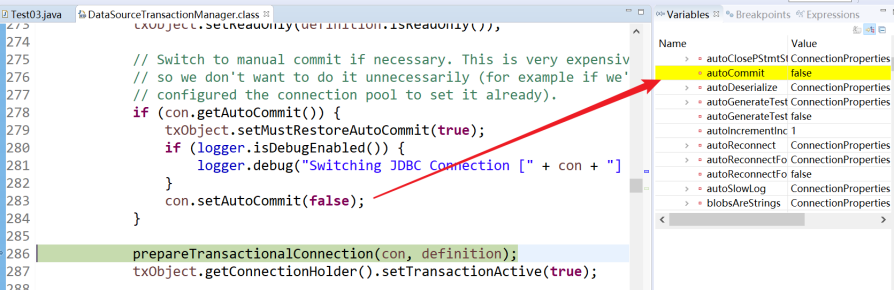
1 )开启事务的方法:d oBegin
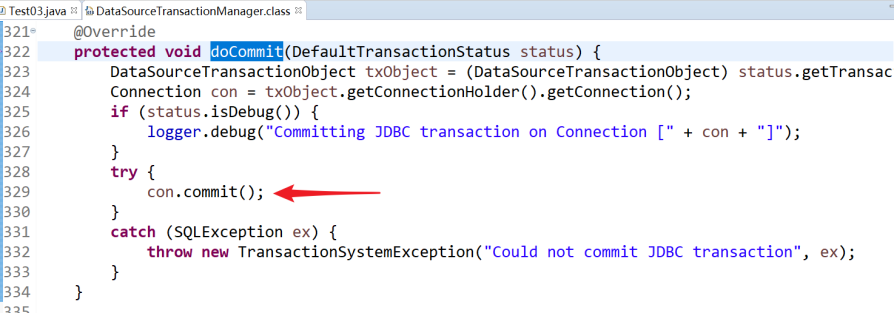
2 )提交事务的方法
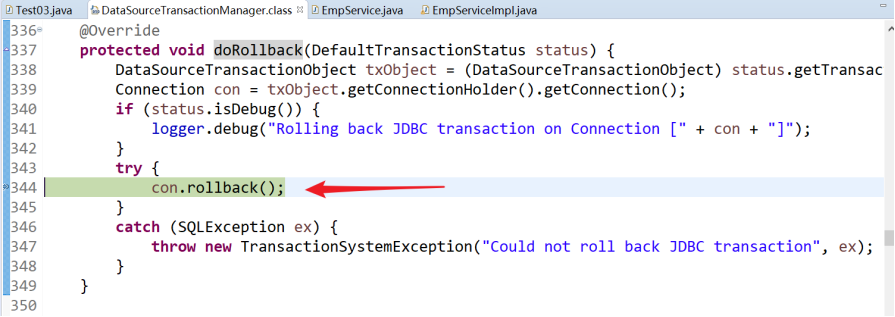
3)回滚事务的方法
8.7 查询开启事务
8.7.1 创建一个E mp Service & E mp S er viceImpl
package com.hy.service;
public interface EmpService {
abstract public Emp listById(long empId);
}
package com.hy.service.impl;
import org.springframework.stereotype.Service;
import org.springframework.transaction.annotation.Transactional;
import com.hy.mapper.EmpMapper;
import com.hy.service.EmpService;
@Service
public class EmpServiceImpl implements EmpService {
@Autowired
private EmpMapper empMapper;
@Transactional
@Override
public Emp listById(long empId) {
Emp emp = empMapper.selectById(empId);
return emp;
}
}
获取数据库链接
切换数据库链接为手动提交
提交事务
释放链接
[org.springframework.jdbc.datasource.DataSourceTransactionManager] [Creating new transaction with name [com.hy.service.impl.EmpServiceImpl.listById]: PROPAGATION_REQUIRED,ISOLATION_DEFAULT,readOnly]

这里为了现实效果,所以为查询配置了事务。
9 事务的属性,这些属性可以设置但不是必须设置
1) 事务的只读属性
2) 事务的超时属性
3) 回滚和不回滚的异常
4) 事务的隔离级别
5) 事务传播行为
9.1 事务属性:只读
对一个查询操作来说,如果我们把它设置成只读,就能明确告诉数据库,这个操作不涉及写(添加,删除,修改)操作,这样数据库就能够针对查询操作来进行优化。
readO nly 并不是所有数据库都支持。
9 .1.1 设置方式
@Transaction(readOnly = true) //readOnly = true 把当前事务属性设置为只读,默认为false
9 .1.2 针对增删改操作设置只读属性

加了只读注解后,会有哪些影响呢?
比如做报表或者做统计:
只读事务的好处,作为ORM 框架优化的暗号,保证读一致性,事务内不允许DML 操作,否则报错
只读事务的场景,如统计,保证统计结果准确性。
只读事务里,也可以在只读事务里使用select… for update
因为只读事务,所有查询都是在一个事务里,所以可以配合mysql 的事务隔离级别理解一下
(比如,你的mysql 隔离事务是RR 的,那么在只读事务注解里,多次查询同一个表的范围数据,结果是一致的,如果不是在同一个事务里,那么前后查询可能会读到的数据条数不一致,造成幻读),如果隔离级别是RC 的,可以不用在只读事务里,因为每次查询都会读取到已提交的数据
1 0 .@ T ran sactional注解放在类上
1 0.1 生效原则
如果一个类中每一个方法上都使用了@Transactional 注解,那么就可以将@T ransactional 注解提取到类上,反过来说:@Transactional 注解在类级别上标记,会影响到类中的每一个方法。同时,类级别标记的@Transactional 注解中设置的事务属性也会延续影响到方法执行时的事务属性。除非在方法上由设置了@Transactional注解。
对一个方法来说,离它最近的@Transactional注解中的事务属性设置生效。
1 0.2 用法举例
在类级别@Transactional 注解中设置只读,这样类中所有的查询方法都不需要设置@T ransactional注解了,因为对查询操作来说,其他属性通常不需要设置,所以使用公共设置即可。
然后在这个基础上,对增删改方法设置@Transactional 注解readO nly 属性为false 。
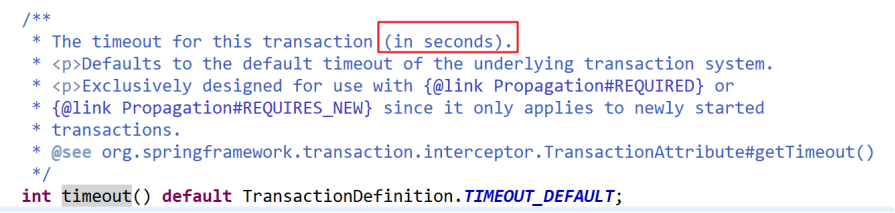
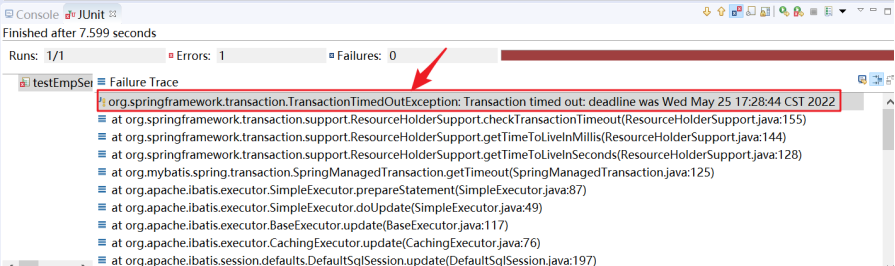
1 1.事务的属性:超时
事务在执行过程中,有可能因为遇到某些问题,导致程序卡主,从而长时间占用数据库资源,大概的原因可能是因为程序运行出现了问题(Java 或是MySQL)或是网络出现问题。
此时,这个很可能出问题的程序应该被执行回滚操作,撤销它已做的操作,事务回滚,把资源让出来,让其他正常程序可以执行。
总计:超时回滚,释放资源。别让一个事务占用一个资源太长的时间。

单位是秒。
1 2. 事务属性:回滚和不回顾你的异常
默认情况:只针对运行时异常进行事务回滚,编译时异常不回滚。
//抛出编译时异常,测试是否回滚
new FileInputStream(“xxxxx”); 方法后面throws FileNotFoundException
将回滚的异常扩大到Exception 的范围。
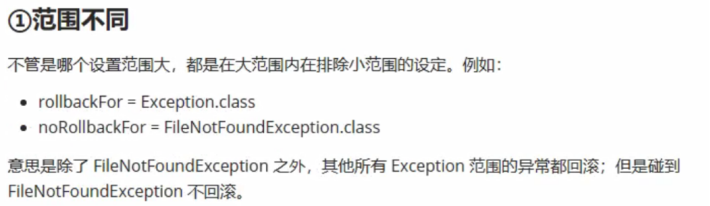
1 2.1 设置回滚的异常

1 2.2 设置不回滚的异常

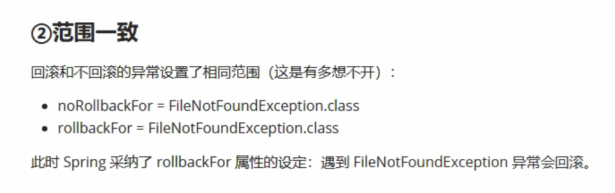
1 2.3 回滚和不回滚异常同时设置
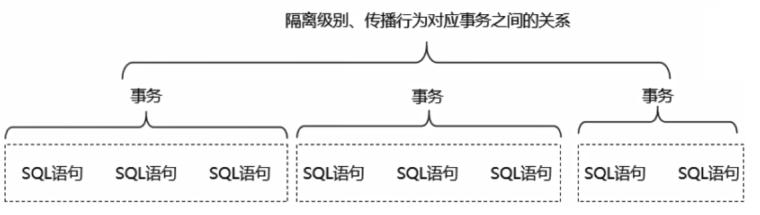
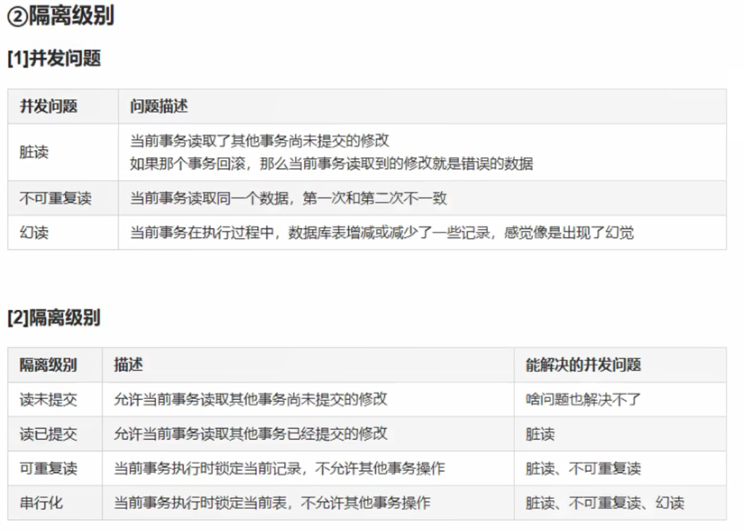
1 3. 事务属性:事务的隔离级别:
事务的隔离级别和事务的传播行为,都是指事务和事务之间的关系。 之前说的事务的属性,超时,回滚,只读都是事务考虑一个事务内部之前是事情。

Original: https://www.cnblogs.com/lijili/p/16693077.html
Author: 雾里看瓜
Title: SSM保姆级从创建项目到使用,包括事务和设置回滚
原创文章受到原创版权保护。转载请注明出处:https://www.johngo689.com/621732/
转载文章受原作者版权保护。转载请注明原作者出处!