

一、修改配置文件config-sharding.yaml,并重启服务
#
Licensed to the Apache Software Foundation (ASF) under one or more
contributor license agreements. See the NOTICE file distributed with
this work for additional information regarding copyright ownership.
The ASF licenses this file to You under the Apache License, Version 2.0
(the "License"); you may not use this file except in compliance with
the License. You may obtain a copy of the License at
#
http://www.apache.org/licenses/LICENSE-2.0
#
Unless required by applicable law or agreed to in writing, software
distributed under the License is distributed on an "AS IS" BASIS,
WITHOUT WARRANTIES OR CONDITIONS OF ANY KIND, either express or implied.
See the License for the specific language governing permissions and
limitations under the License.
#
######################################################################################################
#
Here you can configure the rules for the proxy.
This example is configuration of sharding rule.
#
######################################################################################################
#
#schemaName: sharding_db
#
#dataSources:
ds_0:
url: jdbc:postgresql://127.0.0.1:5432/demo_ds_0
username: postgres
password: postgres
connectionTimeoutMilliseconds: 30000
idleTimeoutMilliseconds: 60000
maxLifetimeMilliseconds: 1800000
maxPoolSize: 50
minPoolSize: 1
ds_1:
url: jdbc:postgresql://127.0.0.1:5432/demo_ds_1
username: postgres
password: postgres
connectionTimeoutMilliseconds: 30000
idleTimeoutMilliseconds: 60000
maxLifetimeMilliseconds: 1800000
maxPoolSize: 50
minPoolSize: 1
#
#rules:
#- !SHARDING
tables:
t_order:
actualDataNodes: ds_${0..1}.t_order_${0..1}
tableStrategy:
standard:
shardingColumn: order_id
shardingAlgorithmName: t_order_inline
keyGenerateStrategy:
column: order_id
keyGeneratorName: snowflake
t_order_item:
actualDataNodes: ds_${0..1}.t_order_item_${0..1}
tableStrategy:
standard:
shardingColumn: order_id
shardingAlgorithmName: t_order_item_inline
keyGenerateStrategy:
column: order_item_id
keyGeneratorName: snowflake
bindingTables:
- t_order,t_order_item
defaultDatabaseStrategy:
standard:
shardingColumn: user_id
shardingAlgorithmName: database_inline
defaultTableStrategy:
none:
#
shardingAlgorithms:
database_inline:
type: INLINE
props:
algorithm-expression: ds_${user_id % 2}
t_order_inline:
type: INLINE
props:
algorithm-expression: t_order_${order_id % 2}
t_order_item_inline:
type: INLINE
props:
algorithm-expression: t_order_item_${order_id % 2}
#
keyGenerators:
snowflake:
type: SNOWFLAKE
props:
worker-id: 123
######################################################################################################
#
If you want to connect to MySQL, you should manually copy MySQL driver to lib directory.
#
######################################################################################################
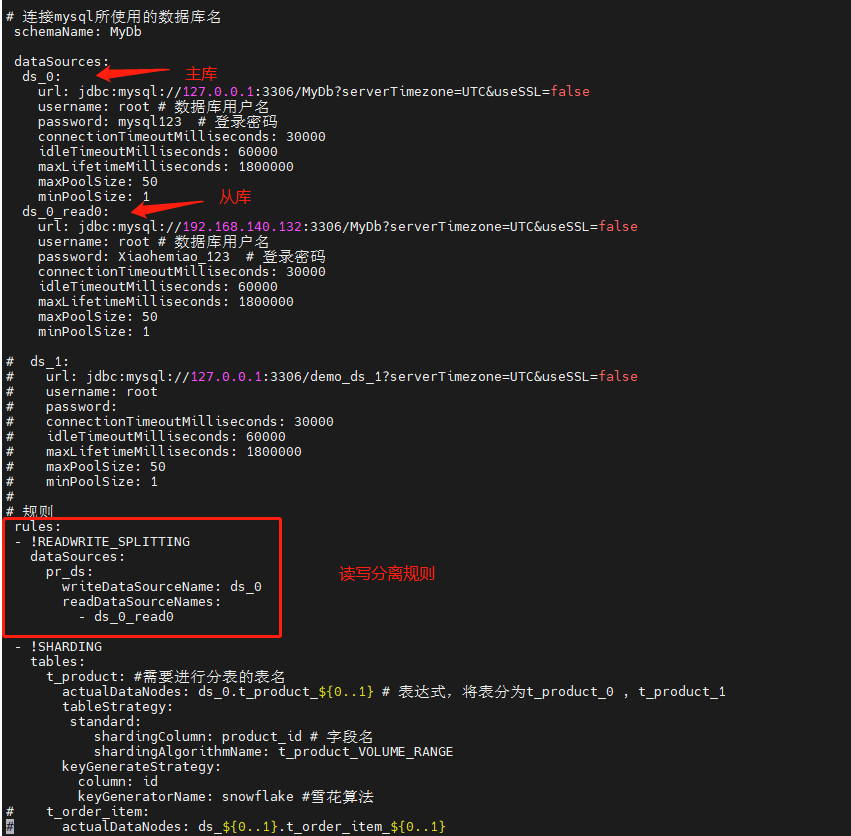
连接mysql所使用的数据库名
schemaName: MyDb
dataSources:
ds_0: # 主库
url: jdbc:mysql://127.0.0.1:3306/MyDb?serverTimezone=UTC&useSSL=false
username: root # 数据库用户名
password: mysql123 # 登录密码
connectionTimeoutMilliseconds: 30000
idleTimeoutMilliseconds: 60000
maxLifetimeMilliseconds: 1800000
maxPoolSize: 50
minPoolSize: 1
ds_0_read0: # 从库
url: jdbc:mysql://192.168.140.132:3306/MyDb?serverTimezone=UTC&useSSL=false
username: root # 数据库用户名
password: Xiaohemiao_123 # 登录密码
connectionTimeoutMilliseconds: 30000
idleTimeoutMilliseconds: 60000
maxLifetimeMilliseconds: 1800000
maxPoolSize: 50
minPoolSize: 1
ds_1:
url: jdbc:mysql://127.0.0.1:3306/demo_ds_1?serverTimezone=UTC&useSSL=false
username: root
password:
connectionTimeoutMilliseconds: 30000
idleTimeoutMilliseconds: 60000
maxLifetimeMilliseconds: 1800000
maxPoolSize: 50
minPoolSize: 1
#
规则
rules:
- !READWRITE_SPLITTING #读写分离规则
dataSources:
pr_ds:
writeDataSourceName: ds_0
readDataSourceNames:
- ds_0_read0
- !SHARDING
tables:
t_product: #需要进行分表的表名
actualDataNodes: ds_0.t_product_${0..1} # 表达式,将表分为t_product_0 , t_product_1
tableStrategy:
standard:
shardingColumn: product_id # 字段名
shardingAlgorithmName: t_product_VOLUME_RANGE
keyGenerateStrategy:
column: id
keyGeneratorName: snowflake #雪花算法
t_order_item:
actualDataNodes: ds_${0..1}.t_order_item_${0..1}
tableStrategy:
standard:
shardingColumn: order_id
shardingAlgorithmName: t_order_item_inline
keyGenerateStrategy:
column: order_item_id
keyGeneratorName: snowflake
bindingTables:
- t_order,t_order_item
defaultDatabaseStrategy:
standard:
shardingColumn: user_id
shardingAlgorithmName: database_inline
defaultTableStrategy:
none:
#
shardingAlgorithms:
t_product_VOLUME_RANGE: # 取模名称,可自定义
type: VOLUME_RANGE # 取模算法
props:
range-lower: '5' # 最小容量为5条数据,仅方便测试
range-upper: '10' #最大容量为10条数据,仅方便测试
sharding-volume: '5' #分片的区间的数据的间隔
t_order_inline:
type: INLINE
props:
algorithm-expression: t_order_${order_id % 2}
t_order_item_inline:
type: INLINE
props:
algorithm-expression: t_order_item_${order_id % 2}
#
keyGenerators:
snowflake: # 雪花算法名称,自定义名称
type: SNOWFLAKE
props:
worker-id: 123

上述配置是同时有做容量范围分片
二、数据准备
在中间件中ShardingSphere中创建MyDb数据库,并创建相关表和插入数据
-- 创建表
SET NAMES utf8mb4;
SET FOREIGN_KEY_CHECKS = 0;

-- ----------------------------
-- Table structure for t_product
-- ----------------------------
DROP TABLE IF EXISTS t_product;
CREATE TABLE t_product  (
  id varchar(225) CHARACTER SET utf8mb4 COLLATE utf8mb4_general_ci NOT NULL,
  product_id int(11) NOT NULL,
  product_name varchar(255) CHARACTER SET utf8mb4 COLLATE utf8mb4_general_ci NOT NULL,
  PRIMARY KEY (id, product_id) USING BTREE
) ENGINE = InnoDB CHARACTER SET = utf8mb4 COLLATE = utf8mb4_general_ci ROW_FORMAT = Dynamic;

SET FOREIGN_KEY_CHECKS = 1;

-- 插入表数据
INSERT INTO t_product(product_id,product_name) VALUES(1,'one');
INSERT INTO t_product(product_id,product_name) VALUES(2,'two');
INSERT INTO t_product(product_id,product_name) VALUES(3,'three');
INSERT INTO t_product(product_id,product_name) VALUES(4,'four');
INSERT INTO t_product(product_id,product_name) VALUES(5,'five');
INSERT INTO t_product(product_id,product_name) VALUES(6,'six');
INSERT INTO t_product(product_id,product_name) VALUES(7,'seven');
三、查看数据
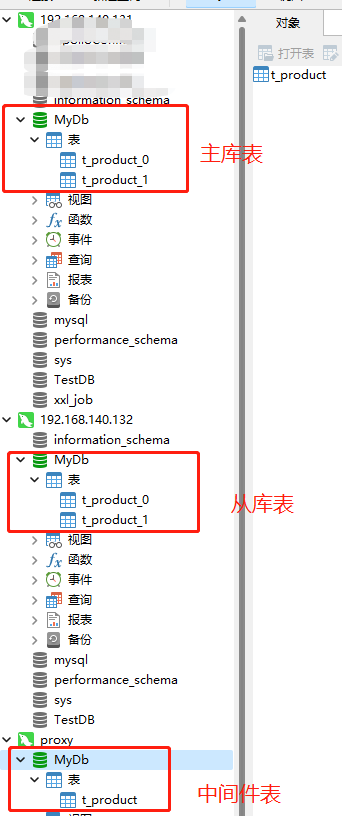
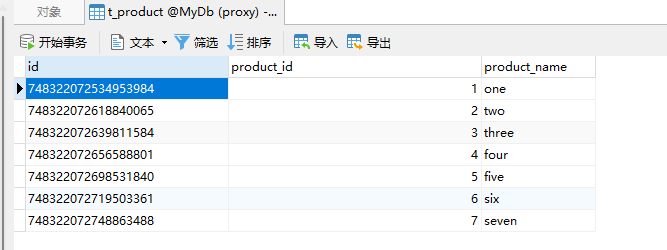
1、查看shardingsphere中间件t_product表数据
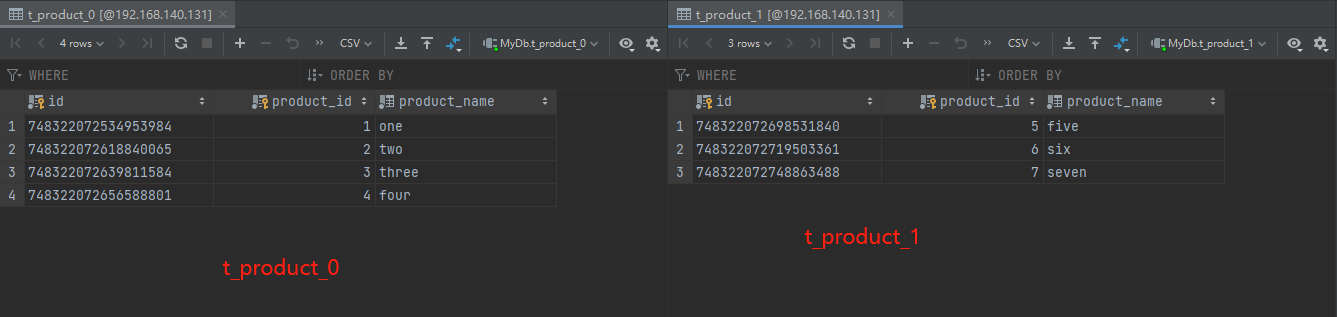
2、主库192.168.140.131数据
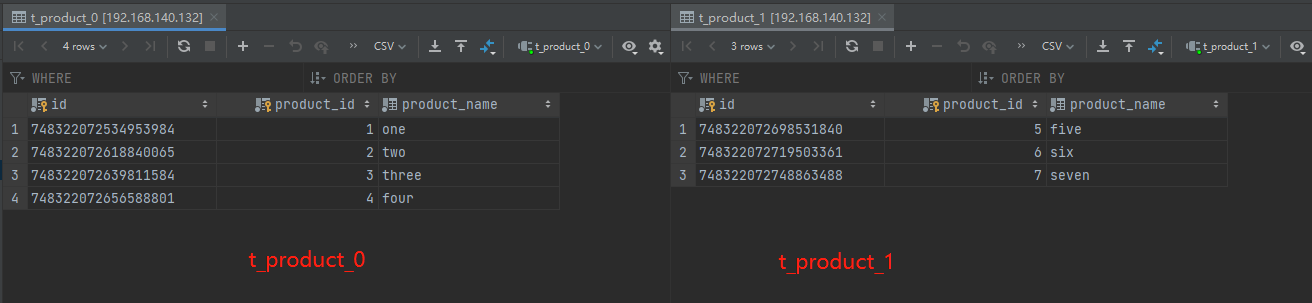
3、从库192.168.140.132数据
Original: https://www.cnblogs.com/sportsky/p/16414683.html
Author: SportSky
Title: ShardingSphere-proxy-5.0.0建立mysql读写分离的连接(六)
原创文章受到原创版权保护。转载请注明出处:https://www.johngo689.com/609978/
转载文章受原作者版权保护。转载请注明原作者出处!