

在springboot中有很多starter,很多是官方开发的,也有是个人或开源组织开发的。这些starter是用来做什么的呐?
一、认识starter
所谓的starter,在springboot中其实是一个依赖,是springboot官方为了方便开发者更好的管理依赖而开发的,像前边提到的mybatis的starter,
<dependency>
            <groupid>org.mybatis.spring.boot</groupid>
            <artifactid>mybatis-spring-boot-starter</artifactid>
            <version>2.1.3</version>
</dependency>
这是一个在springboot中使用mybatis的starter,看下其包含了哪些内容,下面是该starter中包含的依赖,
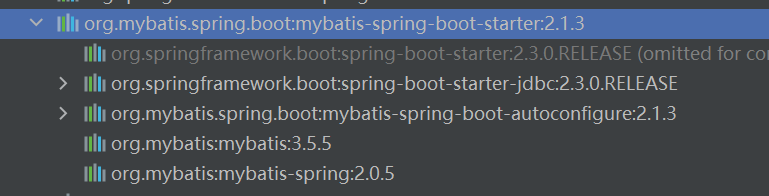

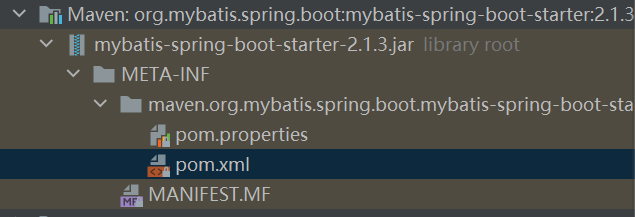
更有意思的一点是mybatis-spring-boot-starter没有代码,
也就是说 mybatis-spring-boot-starter不具备实际功能,仅仅提供所需的依赖。那么是如何把mybatis相关的内容注入到springboot中的呐,是因为mybatis中有两位一个依赖”mybatis-spring-boot-autoconfigure”,该依赖中有有关自动配置的相关内容,先混个眼熟,
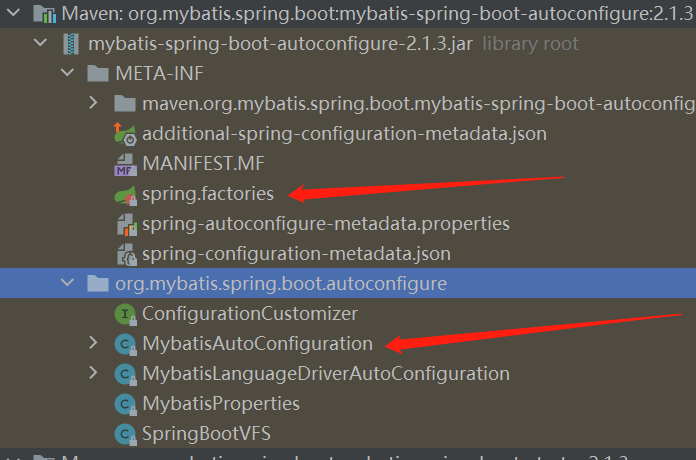
其中,META-INF下的spring.factories和MybatisAutoConfiguration两个文件是重点,后面会重点分析springboot自动配置的原理。
现在,现在对starter有了一个清析的认识, starter提供一个组件集成springboot的入口,包含了需要的依赖以及自动配置类。
下面,看下springboot提供了哪些starter。
二、starter汇总
2.1、spring-boot-starter
其依赖为,
<dependency>
      <groupid>org.springframework.boot</groupid>
      <artifactid>spring-boot-starter</artifactid>
    </dependency>
2.2、spring-boot-starter-web
这个是开发springboot web项目时的starter,
<dependency>
      <groupid>org.springframework.boot</groupid>
      <artifactid>spring-boot-starter-web</artifactid>
    </dependency>
2.3、spring-boot-starter-jdbc
和jdbc相关的,其依赖为
<dependency>
      <groupid>org.springframework.boot</groupid>
      <artifactid>spring-boot-starter-jdbc</artifactid>
    </dependency>
2.4、spring-boot-starter-activemq
和activeMQ相关的
<dependency>
      <groupid>org.springframework.boot</groupid>
      <artifactid>spring-boot-starter-activemq</artifactid>
    </dependency>
2.5、spring-boot-starter-data-elasticsearch
和ES相关的
<dependency>
      <groupid>org.springframework.boot</groupid>
      <artifactid>spring-boot-starter-data-elasticsearch</artifactid>
    </dependency>
2.6、spring-boot-starter-data-jpa
和JPA相关的
<dependency>
      <groupid>org.springframework.boot</groupid>
      <artifactid>spring-boot-starter-data-jpa</artifactid>
    </dependency>
2.7、spring-boot-starter-data-mongodb
和mongodb相关的
<dependency>
      <groupid>org.springframework.boot</groupid>
      <artifactid>spring-boot-starter-data-mongodb</artifactid>
    </dependency>
2.8、spring-boot-starter-quartz
和定时任务相关的
 <dependency>
      <groupid>org.springframework.boot</groupid>
      <artifactid>spring-boot-starter-quartz</artifactid>
    </dependency>
2.9、mybatis-spring-boot-starter
和mybatis相关的
<dependency>
            <groupid>org.mybatis.spring.boot</groupid>
            <artifactid>mybatis-spring-boot-starter</artifactid>
            <version>2.1.3</version>
        </dependency>
还有很多starter,这里暂且列举那么多,有个名称上的区别大家发现没,有的是”spring-boot-starter-XX”,有的是”XX-spring-boot-starter”,对于前者可以理解为是springboot官方提供的,对于后者可以理解为是第三方自己开发,我们如果自己开发一个其命名规范最好遵循后者。
三、自定义starter
前边说了很多有关官方的starter,现在自定义一个starter,有如下要求,该starter的名字暂定为:”customer-spring-boot-starter”,其包含一个依赖”customer-spring-boot-autoconfigurer”,在”customer-spring-boot-autoconfigurer”中会读取前缀为”my.customer”的配置文件,并且把MyCustomerService注入到springboot中,现在看要如何自定义一个starter。
3.1、customer-spring-boot-starter
从”mybatis-spring-boot-starter”知道,XX-spring-boot-starter是一个空项目,在该项目中会依赖XX-spring-boot-autoconfigurer,下面新建空项目”customer-spring-boot-starter”,
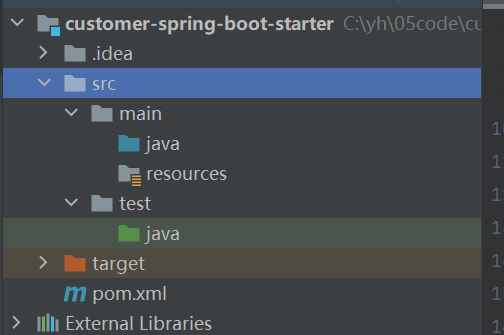
对于src目录完全可以删除,这里暂时保留,重点看下pom.xml文件,我这里仅依赖了”customer-spring-boot-autoconfigurer”,
<?xml version="1.0" encoding="UTF-8"?>
<project xmlns="http://maven.apache.org/POM/4.0.0" xmlns:xsi="http://www.w3.org/2001/XMLSchema-instance" xsi:schemalocation="http://maven.apache.org/POM/4.0.0 http://maven.apache.org/xsd/maven-4.0.0.xsd">
    <modelversion>4.0.0</modelversion>
    <groupid>org.example</groupid>
    <artifactid>customer-spring-boot-starter</artifactid>
    <version>1.0-SNAPSHOT</version>
    <properties>
        <maven.compiler.source>8</maven.compiler.source>
        <maven.compiler.target>8</maven.compiler.target>
    </properties>
    <dependencies>
        <!--自动配置模块-->
        <dependency>
            <groupid>org.example</groupid>
            <artifactid>customer-spring-boot-autoconfigurer</artifactid>
            <version>1.0-SNAPSHOT</version>
        </dependency>
    </dependencies>
</project>
“customer-spring-boot-starter”就这样了,打包安装到本地仓库即可。
3.2、customer-spring-boot-autoconfigurer
相对于”customer-spring-boot-starter”来说,”custoerm-spring-boot-autoconfigurer”要复杂一些。建一个普通的maven项目即可,
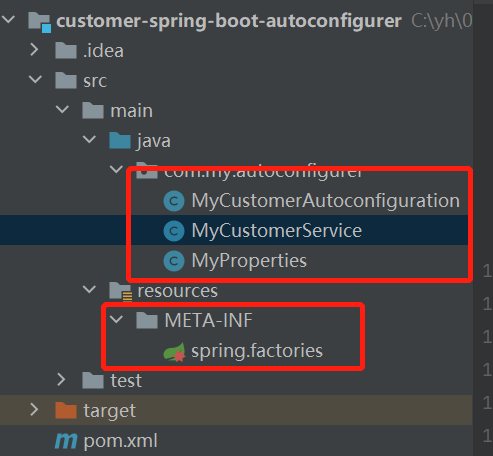
先看MyProperties文件吧,该文件负责读取配置文件(application.properties)文件中前缀为”my.customer”的配置,
MyProperties.java
package com.my.autoconfigurer;

import org.springframework.boot.context.properties.ConfigurationProperties;
/**
 * 读取配置文件中的配置
 * 读取前缀为my.customer的配置
 * @date 2022/6/12 17:06
 */
@ConfigurationProperties(prefix = "my.customer")
public class MyProperties {
    private String name;
    private String code;

    public String getName() {
        return name;
    }
    public void setName(String name) {
        this.name = name;
    }

    public String getCode() {
        return code;
    }
    public void setCode(String code) {
        this.code = code;
    }
}
该类中使用了@ConfigurationProperties注解用来读取配置文件,所以要引入spring-boot-autoconfigure的依赖,后边pom.xml会体现。下面看要注入的服务,
MyCustomerService.java
package com.my.autoconfigurer;

/**
 * 自定义的服务类
 * @date 2022/6/12 17:05
 */
public class MyCustomerService {
    //MyProperties的引用
    private MyProperties myProperties;

    public MyProperties getMyProperties() {
        return myProperties;
    }
    public void setMyProperties(MyProperties myProperties) {
        this.myProperties = myProperties;
    }
    //自定义方法
    public void myCustomerMethod(){
        System.out.println("name:"+myProperties.getName()+",code:"+myProperties.getCode());
    }
}
这个类也很简单,有一个MyProperties的属性,另外有一个自定义方法myCustomerMethod方法。主角要登场了,自动配置类,
MyCustomerAutoconfiguration.java
package com.my.autoconfigurer;

import org.springframework.boot.context.properties.EnableConfigurationProperties;
import org.springframework.context.annotation.Bean;
import org.springframework.context.annotation.Configuration;

/**
 * 自定义的自动配置类
 * @date 2022/6/12 17:11
 */
@Configuration
@EnableConfigurationProperties(MyProperties.class)
public class MyCustomerAutoconfiguration {
   //向springboot的容器中注入名为"myCustomerService"的实例
    @Bean
    public MyCustomerService myCustomerService(MyProperties myProperties){
        MyCustomerService myCustomerService=new MyCustomerService();
        myCustomerService.setMyProperties(myProperties);
        return myCustomerService;
    }
}
上面就是一个简单的自定义配置类。配置完这些完了吗,还没有,重量级选手登场,在src/resources下新建”META-INF”文件夹,且在下面新建文件”spring.factories”,

该文件的内容为,
org.springframework.boot.autoconfigure.EnableAutoConfiguration=com.my.autoconfigurer.MyCustomerAutoconfiguration
配置这样一个key-value即可,key只能为”org.springframework.boot.autoconfigure.EnableAutoConfiguration”,value就是自定义的配置类,如果有多个使用”,”分割即可。另外该文件的名称也只能是”spring.factories”
上面的这些配置完成,最后看下pom.xml文件,
<?xml version="1.0" encoding="UTF-8"?>
<project xmlns="http://maven.apache.org/POM/4.0.0" xmlns:xsi="http://www.w3.org/2001/XMLSchema-instance" xsi:schemalocation="http://maven.apache.org/POM/4.0.0 http://maven.apache.org/xsd/maven-4.0.0.xsd">
    <modelversion>4.0.0</modelversion>
    <groupid>org.example</groupid>
    <artifactid>customer-spring-boot-autoconfigurer</artifactid>
    <version>1.0-SNAPSHOT</version>
    <properties>
        <maven.compiler.source>8</maven.compiler.source>
        <maven.compiler.target>8</maven.compiler.target>
    </properties>
    <dependencies>
    <!--springboot的自动配置依赖-->
        <dependency>
            <groupid>org.springframework.boot</groupid>
            <artifactid>spring-boot-autoconfigure</artifactid>
            <version>2.3.3.RELEASE</version>
        </dependency>
    </dependencies>
</project>
至此,自定义自动配置完成,打包安装到本地仓库即可。
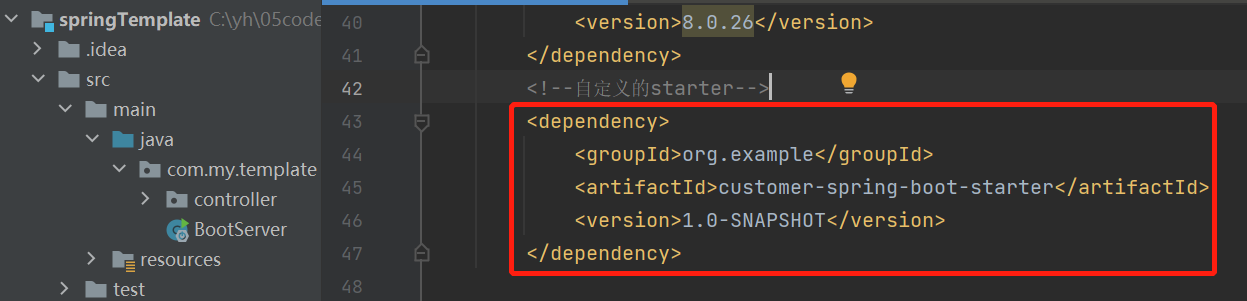
3.3、使用customer-spring-boot-starter
上面已经完成了第一个自定义的starter,到了真金验证的时候了,
导入”customer-spring-boot-starter”依赖,
写个测试类,测试下是否自动导入了”MyCustomerService”类,
package com.my.template.controller;

import com.my.autoconfigurer.MyCustomerService;
import org.springframework.beans.factory.annotation.Autowired;
import org.springframework.stereotype.Controller;
import org.springframework.web.bind.annotation.RequestMapping;
import org.springframework.web.bind.annotation.ResponseBody;

/**
 * 测试自动配置类
 * @date 2022/6/12 17:46
 */
@Controller
public class MyController {
    //自动注入的类
    @Autowired
    private MyCustomerService myCustomerService;

    @RequestMapping("test")
    @ResponseBody
    public void test(){
        myCustomerService.myCustomerMethod();
    }
}
另外在application.properites文件中配置自定义的配置文件,
#自定义配置
my.customer.name=hello
my.customer.code=autoconfiguration
启动服务,看下打印结果,

可以看到打印的和配置的是一样的,证明自定义的自动配置类成功,就是说自定义starter成功。
四、总结
本文从”mybatis-spring-boot-starter”开始,分析了一个starter的组成部分,然后总结了常用的starter,重点是实现了一个自定义的starter,并成功获取到自定义的配置。
1、starter包含要注入的类的依赖及自定配置模块(XX-spring-boot-autoconfigure);
2、自动配置模块(XX-spring-boot-autoconfigure)包含自动配置类及spring.factories文件;
不知道小伙伴对springboot如何实现自动配置好奇吗,我们下期见。

Original: https://www.cnblogs.com/teach/p/16368650.html
Author: 良工说技术
Title: 我的第一个springboot starter
原创文章受到原创版权保护。转载请注明出处:https://www.johngo689.com/594160/
转载文章受原作者版权保护。转载请注明原作者出处!