

SpringBoot笔记
1.开端介绍
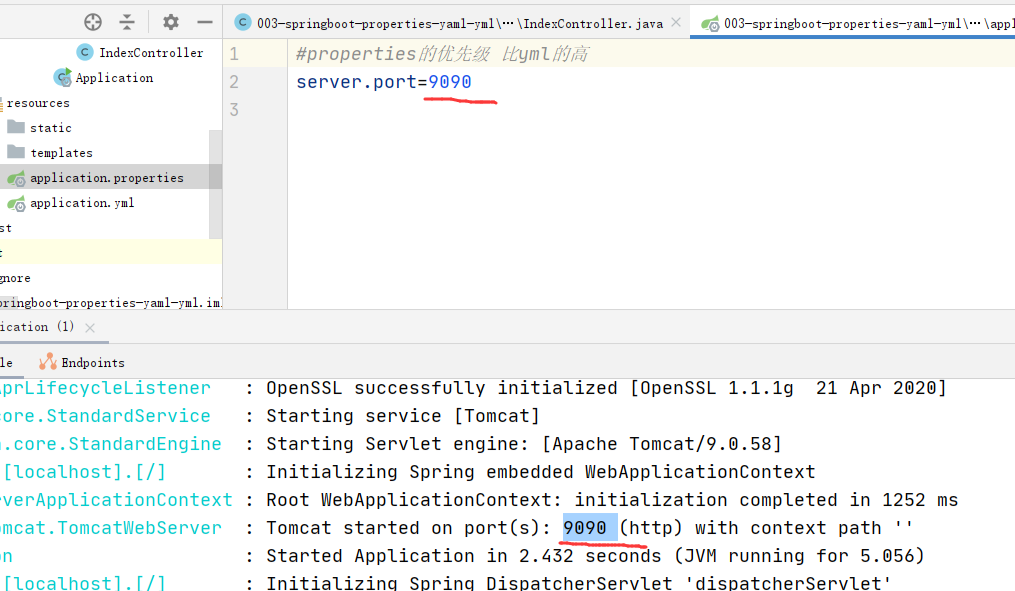
1.两种核心配置文件同时存在(properties的优先级高于yml)

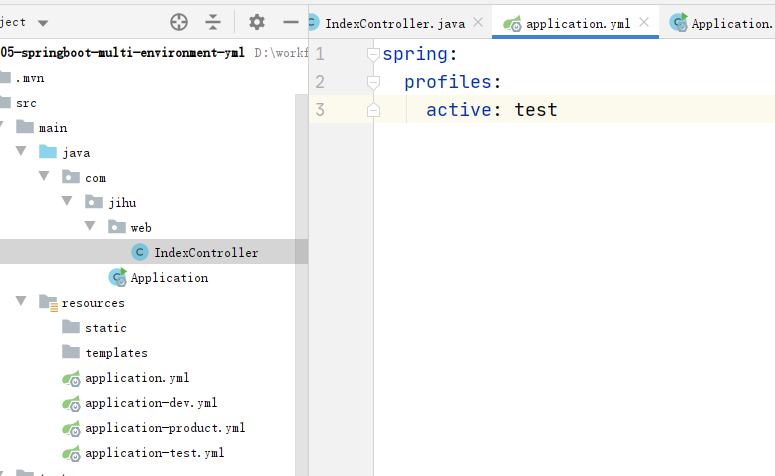
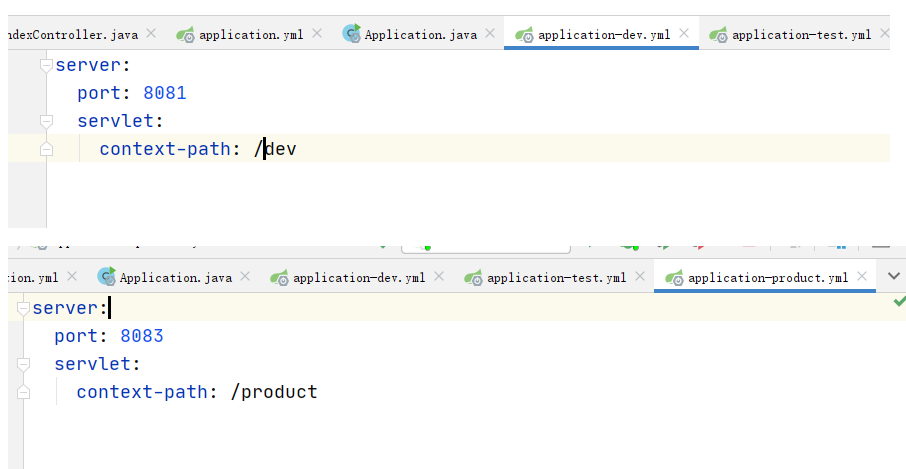
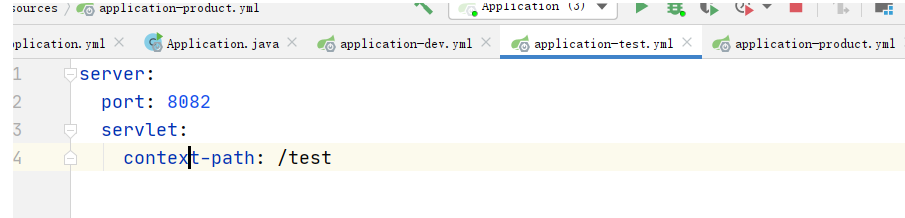
2.多环境下核心配置文件
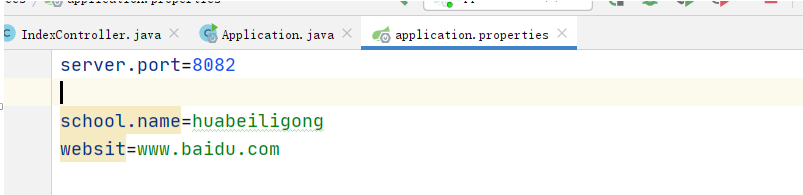
3.获取自定义配置

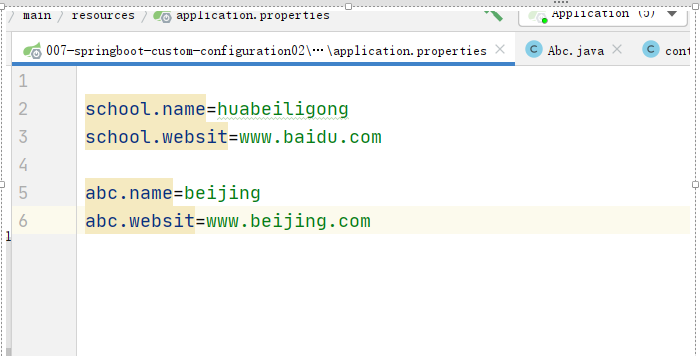
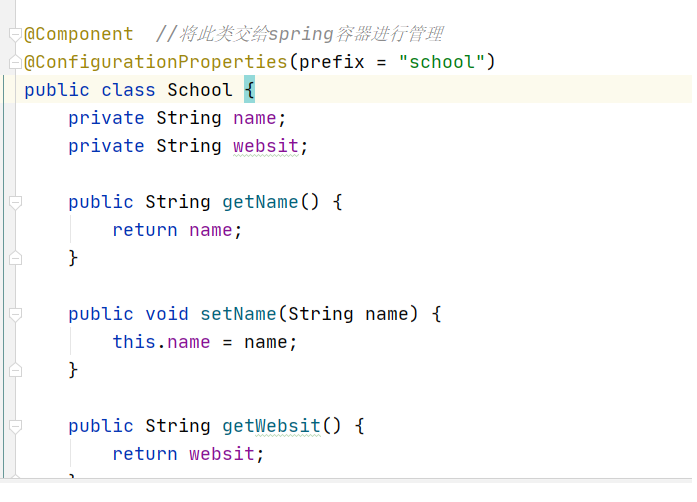
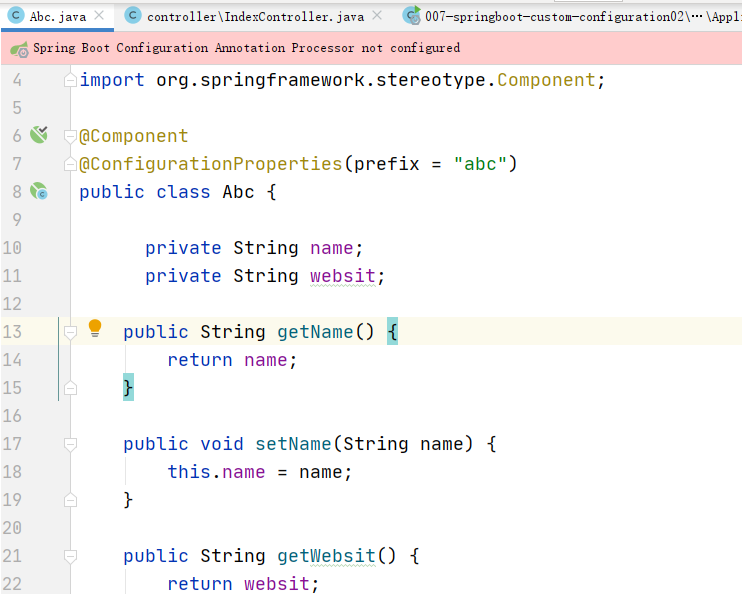
4.将自定义配置映射到对象
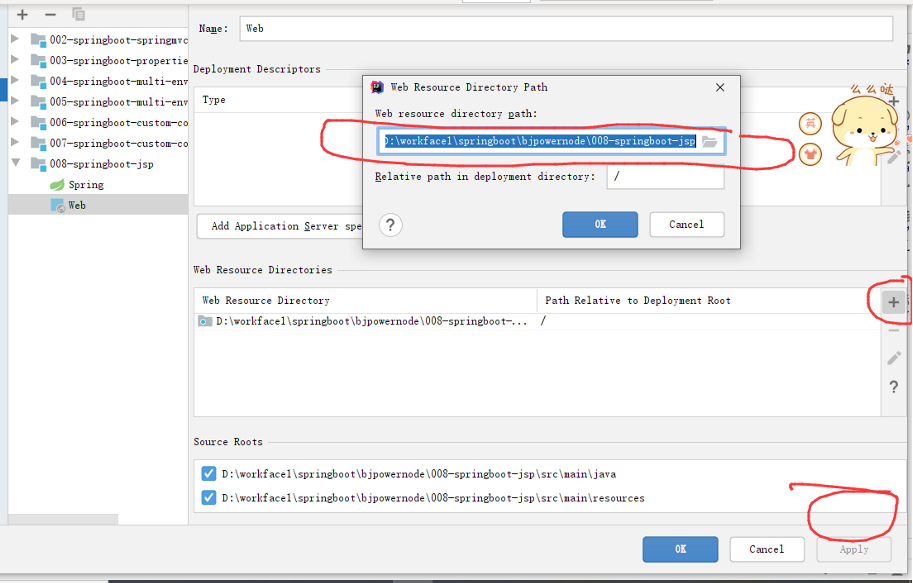
5.springboot集成jsp
org.apache.tomcat.embed
tomcat-embed-jasper
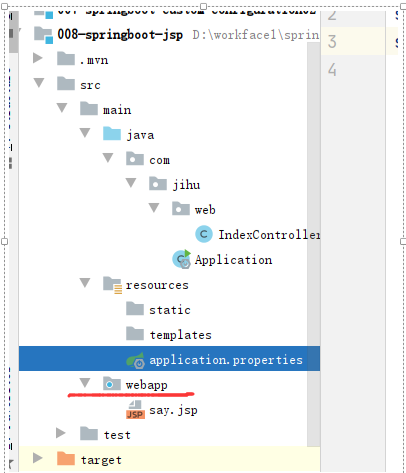
src/main/webapp
META-INF/resources
*.*
2. springboot框架web开发
1.集成mybatis 所需的依赖
mysql
mysql-connector-java
runtime

org.mybatis.spring.boot
mybatis-spring-boot-starter
2.2.0
2.Mybatis创建逆向工程 (步骤)
org.mybatis.generator
mybatis-generator-maven-plugin
1.3.6

GeneratorMapper.xml
true
true
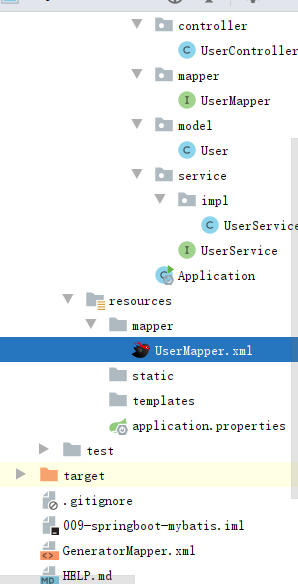
GeneratorMapper.xml:
application.properties:(指定了mybatis映射文件路径)
#设置连接数库的配置
spring.datasource.driver-class-name=com.mysql.cj.jdbc.Driver
spring.datasource.url=jdbc:mysql://localhost:3306/ssm1?useUnicode=true&characterEncoding=UTF-8&useJDBCCompliantTimezoneShift=true&useLegacyDatetimeCode=false&serverTimezone=Asia/Shanghai
spring.datasource.username=root
spring.datasource.password=123456

#指定mybatis映射文件的路径
mybatis.mapper-locations=classpath:mapper/*.xml
server.port=9001
开启扫描mapper的两种办法
第一种
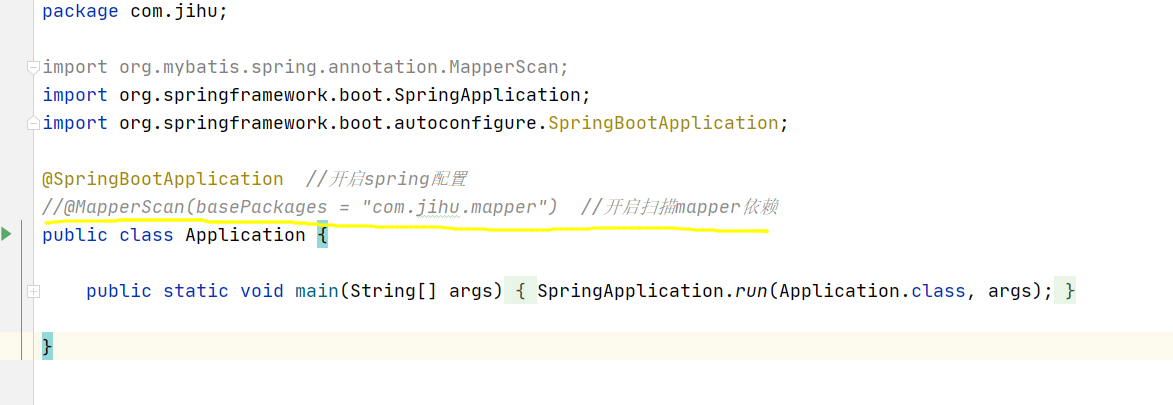
第二种
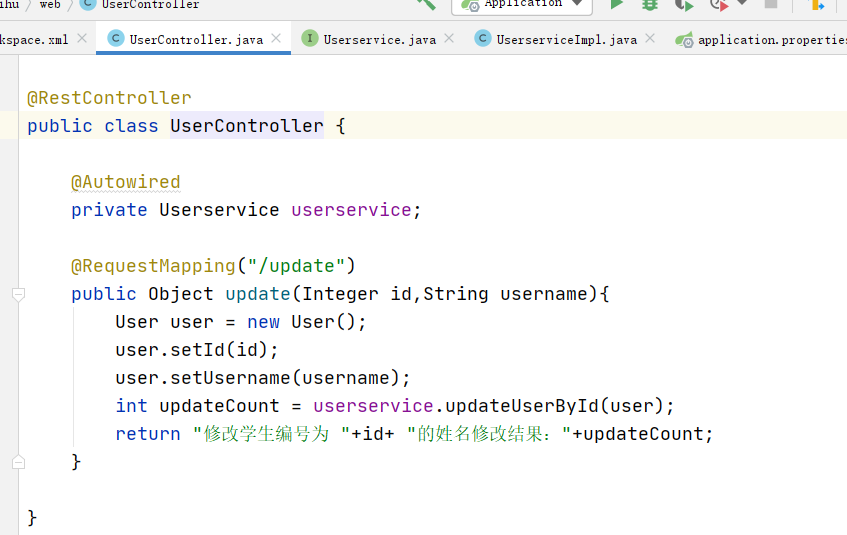
UserController
@RestController
public class UserController {

    @Autowired
    private UserService userService;

    @RequestMapping("/user")
    public Object user(Integer id){
        User user = userService.queryUserById(id);
        return user;
    }
}
UserService
public interface UserService {

    //根据学生id查询详情
    User queryUserById(Integer id) ;

}
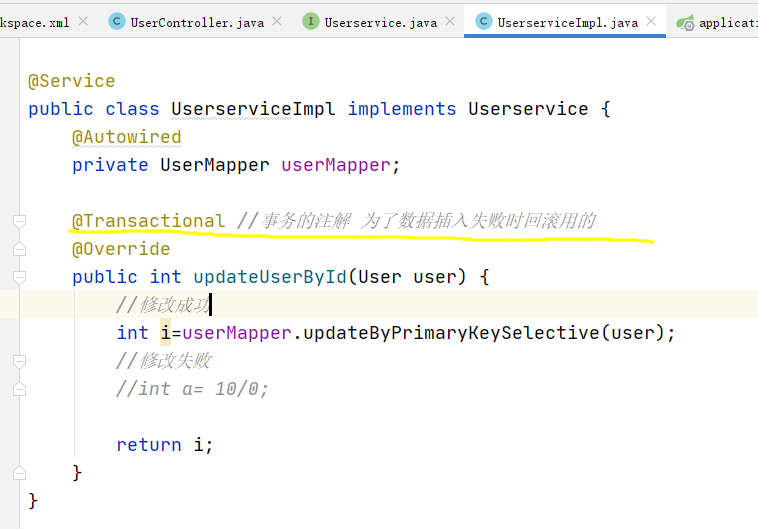
UserServiceImpl
@Service
public class UserServiceImpl implements UserService {

    @Autowired
    private UserMapper userMapper;

    @Override
    public User queryUserById(Integer id) {

        return userMapper.selectByPrimaryKey(id);
    }
}
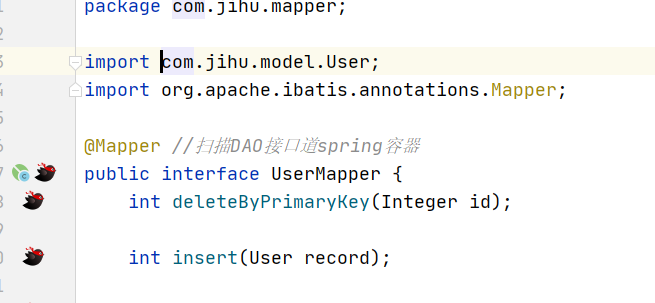
UserMapper
package com.jihu.mapper;

import com.jihu.model.User;
import org.apache.ibatis.annotations.Mapper;

@Mapper //扫描DAO接口道spring容器
public interface UserMapper {
    int deleteByPrimaryKey(Integer id);

    int insert(User record);

    int insertSelective(User record);

    User selectByPrimaryKey(Integer id);

    int updateByPrimaryKeySelective(User record);

    int updateByPrimaryKey(User record);
}
UserMapper.xml
    id, username, password

    select

    from user
    where id = #{id,jdbcType=INTEGER}

    delete from user
    where id = #{id,jdbcType=INTEGER}

    insert into user (id, username, password
      )
    values (#{id,jdbcType=INTEGER}, #{username,jdbcType=VARCHAR}, #{password,jdbcType=VARCHAR}
      )

    insert into user

        id,

        username,

        password,

        #{id,jdbcType=INTEGER},

        #{username,jdbcType=VARCHAR},

        #{password,jdbcType=VARCHAR},

    update user

        username = #{username,jdbcType=VARCHAR},

        password = #{password,jdbcType=VARCHAR},

    where id = #{id,jdbcType=INTEGER}

    update user
    set username = #{username,jdbcType=VARCHAR},
      password = #{password,jdbcType=VARCHAR}
    where id = #{id,jdbcType=INTEGER}
User
@Data
public class User {
    private Integer id;

    private String username;

    private String password;
}
3.springboot支持事务
springboot项目下使用事务:
事务是一个完整的功能,也叫做是一个完整的业务
事务只跟什么sql语句有关系? 事务只跟DML语句有关系:增删改
DML,DQL,DDL,TCL,DCL
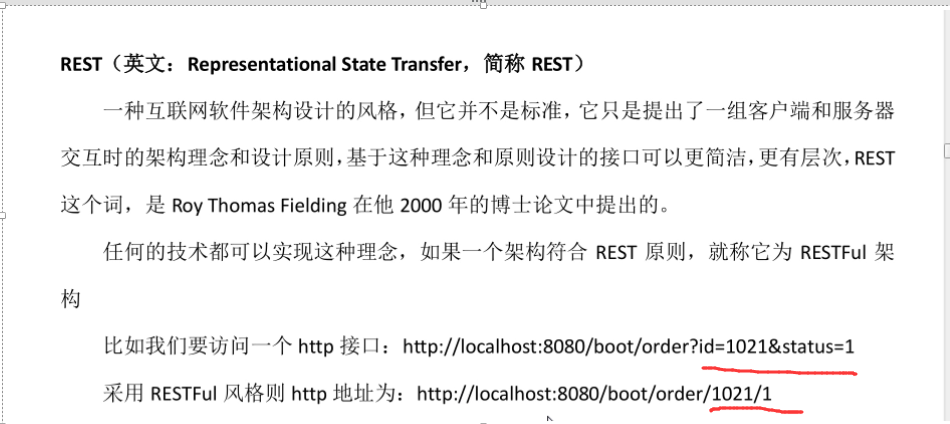
4.使用 RESTful
5.拦截器(重要)
springboot使用拦截器步骤:
a.定义一个拦截器,实现HandlerInterceptor接口
b.创建一个配置类(即:在SpringMVC配置文件中使用 mvc:interceptors标签)
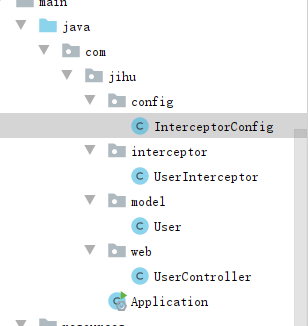
InterceptorConfig
package com.jihu.config;
import com.jihu.interceptor.UserInterceptor;
import org.springframework.context.annotation.Configuration;
import org.springframework.web.servlet.config.annotation.InterceptorRegistry;
import org.springframework.web.servlet.config.annotation.WebMvcConfigurer;

@Configuration  //定义此类为配置文件(即相当于之前的xml配置文件)
public class InterceptorConfig implements WebMvcConfigurer {

    @Override
    public void addInterceptors(InterceptorRegistry registry) {
        //要拦截user下的所有访问请求,必须用户登录后才能访问,
        //但是这样拦截的路径中有一些是不需要用户登录也可访问的
        String[] addPathPattererns = {
                "/user/**"
        };
        //要排除的路径,排除的路径说明不需要用户登录也可以访问
        String[] excludePathPatterns={
                "/user/out","/user/error","/user/login"
        };

        registry.addInterceptor(new UserInterceptor()).addPathPatterns(addPathPattererns).excludePathPatterns(excludePathPatterns);
    }
}
UserInterceptor
public class UserInterceptor implements HandlerInterceptor {

    @Override
    public boolean preHandle(HttpServletRequest request, HttpServletResponse response, Object handler) throws Exception {
        System.out.println("进入拦截器----------------");
        //编写业务拦截的规则
        //从session中获取用户的信息
        User user = (User) request.getSession().getAttribute("user");

        //判断用户是否登录
        if (user == null){
            //未登录
            response.sendRedirect(request.getContextPath() + "/user/error");
            return  false;
        }

        return true;
    }

    @Override
    public void postHandle(HttpServletRequest request, HttpServletResponse response, Object handler, ModelAndView modelAndView) throws Exception {

    }

    @Override
    public void afterCompletion(HttpServletRequest request, HttpServletResponse response, Object handler, Exception ex) throws Exception {

    }
}
UserController
package com.jihu.web;
import com.jihu.model.User;
import org.springframework.web.bind.annotation.RequestMapping;
import org.springframework.web.bind.annotation.RestController;

import javax.servlet.http.HttpServletRequest;

@RestController
@RequestMapping("/user")
public class UserController {

    //用户登录请求
    @RequestMapping("/login")
    public Object login(HttpServletRequest request){
        //将用户信息存放到session
        User user = new User();
        user.setId(1002);
        user.setUsername("zhangsan");
        request.getSession().setAttribute("user",user);
        return "Login Success";
    }

    //该请求需要用户登录之后才可以访问
    @RequestMapping("/center")
    public Object center(){
        return "See Center Message";
    }

    //该请求不登录也可以访问
    @RequestMapping("/out")
    public Object out(){
        return "out";
    }

    //如果用户未登录访问了需要登录才可访问的请求,之后会跳转至该请求路径
    @RequestMapping("/error")
    public Object error(){
        return "error";
    }

}
User
@Data
public class User {

    private Integer id;
    private String username;
}
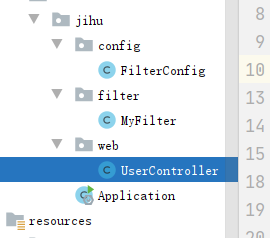
6.使用 filter(过滤器)
案例1:使用 注解方式
案例2:使用 注册组件方式
案例1;
MyFilter
package com.jihu.filter;

import javax.servlet.*;
import javax.servlet.annotation.WebFilter;
import java.io.IOException;

@WebFilter(urlPatterns = "/myfilter")
public class MyFilter implements Filter {
    @Override
    public void doFilter(ServletRequest servletRequest,
        ServletResponse servletResponse, FilterChain filterChain)
         throws IOException, ServletException {
        System.out.println("------------您已进入过滤器-------------");

        filterChain.doFilter(servletRequest,servletResponse);
    }
}
Application
@SpringBootApplication
@ServletComponentScan(basePackages = "com.jihu.filter")
public class Application {

    public static void main(String[] args) {
        SpringApplication.run(Application.class, args);
    }

}
案例2:
@Configuration  //定义此类为配置类
public class FilterConfig {

    @Bean
    public FilterRegistrationBean myFilterRegistrationBean(){

        //注册过滤器
        FilterRegistrationBean filterRegistrationBean = new FilterRegistrationBean(new MyFilter());
        //添加过滤路径
        filterRegistrationBean.addUrlPatterns("/user/*");

        return filterRegistrationBean;

    }

}
MyFilter
public class MyFilter  implements Filter {
    @Override
    public void doFilter(ServletRequest servletRequest, ServletResponse servletResponse, FilterChain filterChain) throws IOException, ServletException {
        System.out.println("------------您已进入过滤器  22222-------------");

        filterChain.doFilter(servletRequest,servletResponse);
    }
}
UserController
@RestController
public class UserController {

    @RequestMapping("/user/detail")
    public  String userDetail(){
        return "/user/detail";
    }

    @RequestMapping("/center")
    public  String center(){
        return "center";
    }

}
7.设置字符编码
springboot 框架下设置字符编码
第一种实现方式: 使用CharacterEncodingFilter
第二种实现方式: springboot字符编码设置(强力推荐)
第一种方式:
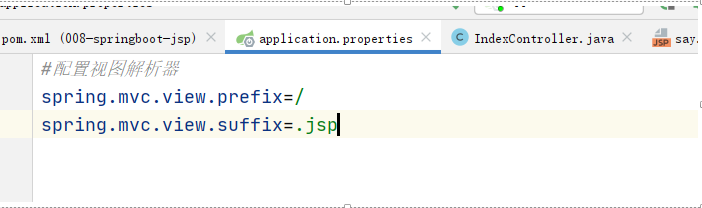
application.properties
#设置请求响应字符编码
server.servlet.encoding.enabled=true
server.servlet.encoding.force=true
server.servlet.encoding.charset=utf-8
MyServlet
package com.jihu.servlet;

import javax.servlet.ServletException;
import javax.servlet.annotation.WebServlet;
import javax.servlet.http.HttpServlet;
import javax.servlet.http.HttpServletRequest;
import javax.servlet.http.HttpServletResponse;
import java.io.IOException;

@WebServlet(urlPatterns = "/myservlet")
public class MyServlet extends HttpServlet {

    @Override
    protected void doGet(HttpServletRequest req, HttpServletResponse resp) throws ServletException, IOException {

        resp.getWriter().println("i love 中国");
        //统一设置浏览器编码格式
        resp.setContentType("text/html;charset=utf-8");
        resp.getWriter().flush();
        resp.getWriter().close();
    }

    @Override
    protected void doPost(HttpServletRequest req, HttpServletResponse resp) throws ServletException, IOException {
        super.doPost(req, resp);
    }
}
Application
@SpringBootApplication
@ServletComponentScan(basePackages = "com.jihu.servlet")
public class Application {

    public static void main(String[] args) {
        SpringApplication.run(Application.class, args);
    }

}
第二种方式:
application.properties
#关闭springboot 的http字符编码支持
#只有关闭该选项后,spring字符编码过滤器才生效
server.servlet.encoding.enabled=false
SystemConfig
package com.jihu.config;
import org.springframework.boot.web.servlet.FilterRegistrationBean;
import org.springframework.context.annotation.Bean;
import org.springframework.context.annotation.Configuration;
import org.springframework.web.filter.CharacterEncodingFilter;

@Configuration
public class SystemConfig {

    @Bean
    public FilterRegistrationBean characterEncodingFilterRegistrationBean(){

        //创建字符编码过滤器
        CharacterEncodingFilter characterEncodingFilter = new CharacterEncodingFilter();
        //设置强制使用指定字符编码
        characterEncodingFilter.setForceEncoding(true);
        //设置指定字符编码
        characterEncodingFilter.setEncoding("UTF-8");

        FilterRegistrationBean filterRegistrationBean = new FilterRegistrationBean();

        //设置字符编码过滤器
        filterRegistrationBean.setFilter(characterEncodingFilter);
        //设置字符编码过滤器路径
        filterRegistrationBean.addUrlPatterns("/*");
        return filterRegistrationBean;
    }

}
MyServlet
package com.jihu.servlet;

import javax.servlet.ServletException;
import javax.servlet.annotation.WebServlet;
import javax.servlet.http.HttpServlet;
import javax.servlet.http.HttpServletRequest;
import javax.servlet.http.HttpServletResponse;
import java.io.IOException;

@WebServlet(urlPatterns = "/myservlet")
public class MyServlet extends HttpServlet {

    @Override
    protected void doGet(HttpServletRequest req, HttpServletResponse resp) throws ServletException, IOException {

        resp.getWriter().println("i love 中国");
        //统一设置浏览器编码格式
        resp.setContentType("text/html;charset=utf-8");
        resp.getWriter().flush();
        resp.getWriter().close();
    }

    @Override
    protected void doPost(HttpServletRequest req, HttpServletResponse resp) throws ServletException, IOException {
        super.doPost(req, resp);
    }
}
Application
@SpringBootApplication
@ServletComponentScan(basePackages = "com.jihu.servlet")
public class Application {

    public static void main(String[] args) {
        SpringApplication.run(Application.class, args);
    }

}
8.logback日志
resources/logback-spring.xml
            debug

            %date [%-5p] [%thread] %logger{60} [%file : %line] %msg%n

            UTF-8

        D:/log/stdout.log

            %date [%-5p] %thread %logger{60} [%file : %line] %msg%n

            D:/log/stdout.log.%d{yyyy-MM-dd}.log
            30
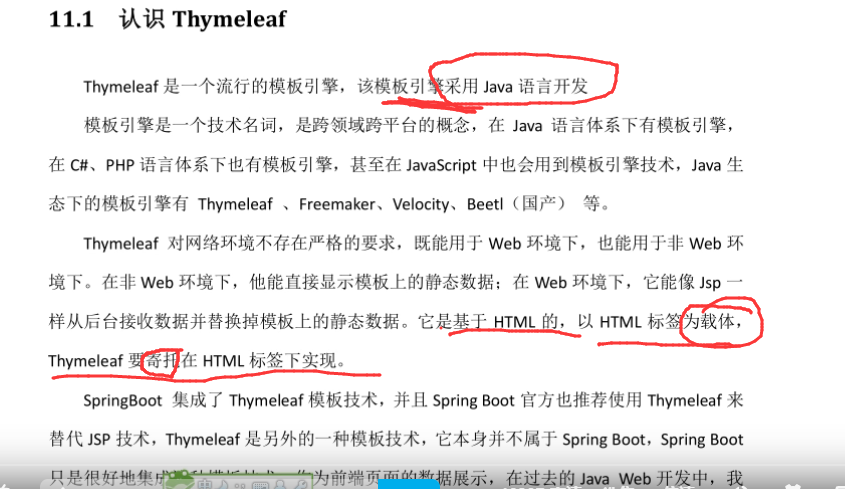
3.thymeleaf
使用 thymeleaf 时必须加上 命名空间
<html lang="en" xmlns:th="http://www.thymeleaf/org">
</html>
1.thymeleaf概述
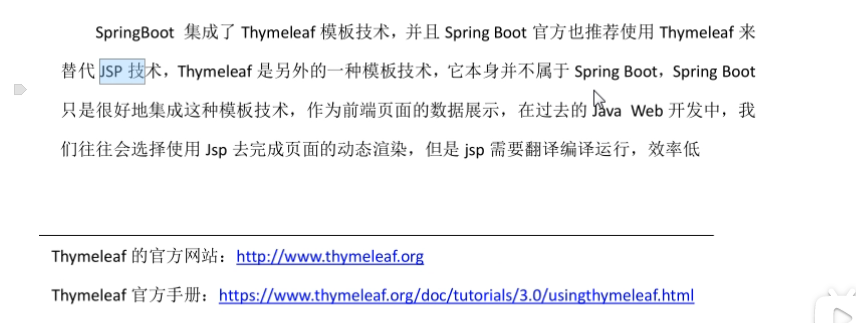
2.springboot集成thymeleaf
application.properties
#设置thymeleaf模板引擎的缓存,设置为false(关闭), 默认为true(开启)
spring.thymeleaf.cache=false

#设置thymeleaf模板引擎的前缀/后缀(可选项)
spring.thymeleaf.prefix=classpath:/templates/
spring.thymeleaf.suffix=.html
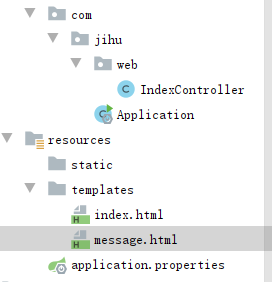
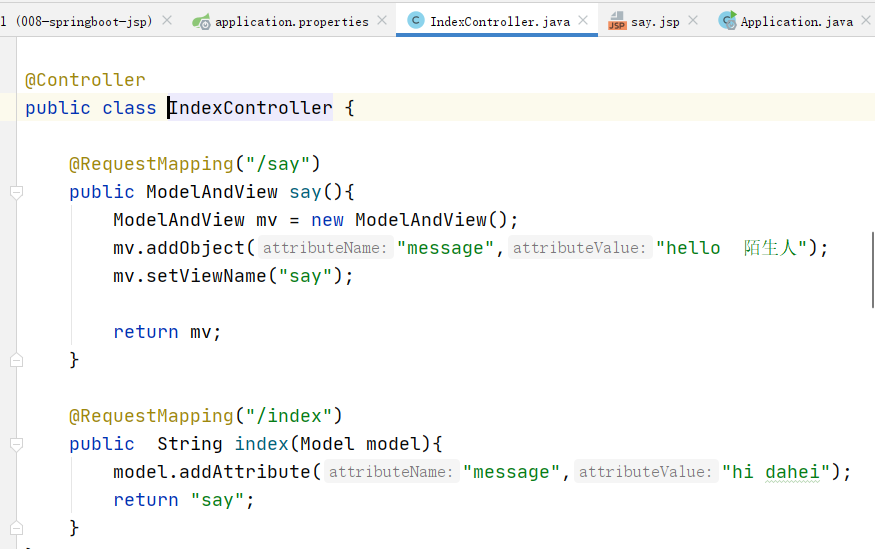
IndexController
package com.jihu.web;
import org.springframework.stereotype.Controller;
import org.springframework.ui.Model;
import org.springframework.web.bind.annotation.RequestMapping;
import org.springframework.web.servlet.ModelAndView;

@Controller
public class IndexController {

    @RequestMapping("/message")
    public ModelAndView message(){
        ModelAndView mv = new ModelAndView();
        mv.addObject("msg","你好 China!");
        mv.setViewName("message");
        return mv;
    }

    @RequestMapping("/index")
    public String index(Model model){
        model.addAttribute("data","SpringBoot 引擎设置");
        return "index";
    }

}
message.html
    Title

xxx
xxx

Thymeleaf
Thymeleaf
index.html
    Title

3
3.thymeleaf表达式–4种路径表达式
application.properties
#设置thymeleaf模板引擎的缓存,设置为false(关闭), 默认为true(开启)
spring.thymeleaf.cache=false

#设置thymeleaf模板引擎的前缀/后缀(可选项)
spring.thymeleaf.prefix=classpath:/templates/
spring.thymeleaf.suffix=.html
UserController
package com.jihu.web;

import com.jihu.model.User;
import org.springframework.stereotype.Controller;
import org.springframework.ui.Model;
import org.springframework.web.bind.annotation.PathVariable;
import org.springframework.web.bind.annotation.RequestMapping;
import org.springframework.web.bind.annotation.ResponseBody;

@Controller
public class UserController {

    @RequestMapping("/user/detail")
    public String user(Model model){

        User user = new User();
        user.setId(1001);
        user.setUsername("lisi");
        user.setAge(24);
        model.addAttribute("user",user);
        return "userDetail";
    }

    @RequestMapping("/url")
    public String url(Model model){
        model.addAttribute("id",1005);
        model.addAttribute("username","zhangsan");
        model.addAttribute("age",28);
        return "url";
    }

    @RequestMapping("/test")
    public @ResponseBody String test(String username){
        return "请求路径/test,参数是:"+username;
    }

    @RequestMapping("/test1")
    public @ResponseBody String test1(Integer id,String username,Integer age){
        return "请求路径/test1,参数id:"+id+",username:"+username+",age:"+age;
    }

    @RequestMapping("/test2/{id}")
    public @ResponseBody String test2(@PathVariable("id") Integer id){
        return "ID="+id;
    }
    @RequestMapping("/test3/{id}/{username}")
    public @ResponseBody String test3(@PathVariable("id") Integer id,
                                      @PathVariable("username") String username  ){
        return "ID="+id+"-----username="+username;
    }

    @RequestMapping("/url2")
    public  String url2(){
        return "url2";
    }

    @RequestMapping("/property")
    public  String property(){
        return "property";
    }
}
User
@Data
public class User {

    private Integer id;
    private String username;
    private Integer age;
}
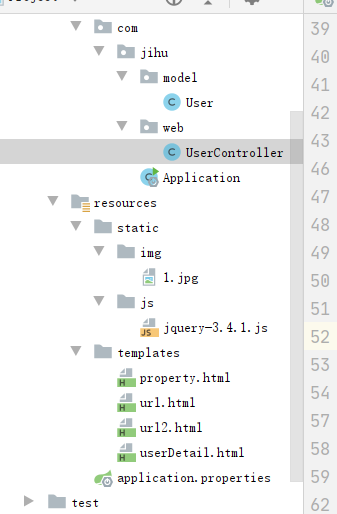
property.html
    常见属性

    用户编号;
    用户姓名;
    用户年龄;

    用户编号;
    用户姓名;
    用户年龄;

    function test() {

            alert("------");
    }

submit11
submit22
url.html
    Title

URL路径表达式 : @{...}

a标签中的绝对路径(没有参数)
传统写法:跳至百度
路径表达式:转跳到动力节点
转跳至:/user/detail
传统写法调至:/user/detail

URL路径表达式,相对路径【没有参数】(实际开发中推荐使用)
跳转到:/user/detail

相对路径(带参数)
相对路径,带参数

相对路径(带参数,后台获取的参数值)

相对路径,带参数,后台获取的参数值

相对路径(带多个参数,后台获取的参数值)

相对路径(带多个参数:后台获取的参数值)
强烈推荐使用:@{}相对路径(带多个参数:后台获取的参数值)

 请求路径为RESTful风格

 请求路径为RESTful风格
url2.html
    Title

        $(function () {
          //  alert("----");
            alert($("#username").val());
        });
userDetail.html
    Title

 标准变量表达式 ;${}  (推荐)
用户编号:
用户姓名:
用户年龄:

 选择变量表达式(星号表达式) ;*{}  ->(不推荐)

    用户编号:
    用户姓名:
    用户年龄:

 标准变量表达式与选择变量表达式的混合使用  -> (不推荐)
用户编号:
用户姓名:
用户年龄:
3.循环遍历数组
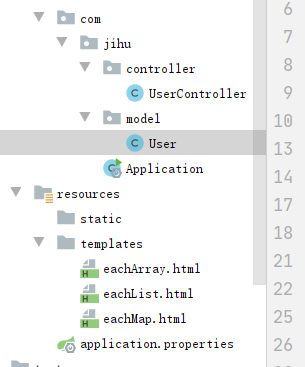
UserController
package com.jihu.controller;

import com.jihu.model.User;
import org.springframework.stereotype.Controller;
import org.springframework.ui.Model;
import org.springframework.web.bind.annotation.RequestMapping;

import java.util.ArrayList;
import java.util.HashMap;
import java.util.List;
import java.util.Map;

@Controller
public class UserController {

    @RequestMapping("/each/list")
    public  String eachList(Model model){
        List userList = new ArrayList<>();
        for (int i = 0; i < 10; i++) {
            User user = new User();
            user.setId(100+i);
            user.setNick("尹"+1);
            user.setPhone("1234561421"+i);
            user.setAddress("北京大兴"+i);
            userList.add(user);
        }
        model.addAttribute("userList",userList);
        return "eachList";
    }

    @RequestMapping("/each/Map")
    public  String eachMap(Model model){
        Map userMap = new HashMap<>();
        for (int i = 0; i < 10; i++) {
            User user = new User();
            user.setId(100+i);
            user.setNick("尹"+1);
            user.setPhone("1234561421"+i);
            user.setAddress("北京大兴"+i);
           userMap.put(i,user);
        }
        model.addAttribute("userMap",userMap);
        return "eachMap";
    }

    @RequestMapping("/each/array")
    public  String eacharray(Model model){
       User[] userarray= new User[10];
        for (int i = 0; i < 10; i++) {
            User user = new User();
            user.setId(100+i);
            user.setNick("尹"+1);
            user.setPhone("1234561421"+i);
            user.setAddress("北京大兴"+i);
           userarray[i]=user;
        }
        model.addAttribute("userarray",userarray);
        return "eachArray";
    }
}
User
@Data
public class User {

    private Integer id;
    private String nick;
    private String  phone;
    private String address;
}
循环遍历Array数组(eachArray.html)
<!DOCTYPE html>
<html lang="en" xmlns:th="http://www.thymeleaf.org">
<head>
<meta charset="UTF-8">
<title>循环遍历Array数组</title>
</head>
<body>
<h1>循环遍历Array数组(使用方法同list一样)</h1>
</body>
</html>
循环遍历list集合(eachList.html)
循环遍历list集合
循环遍历Map集合(eachMap.html)
循环遍历Map集合
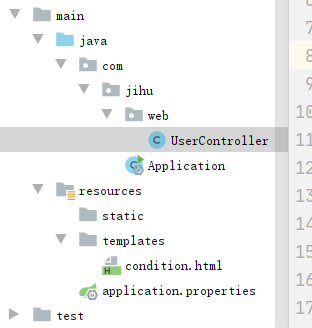
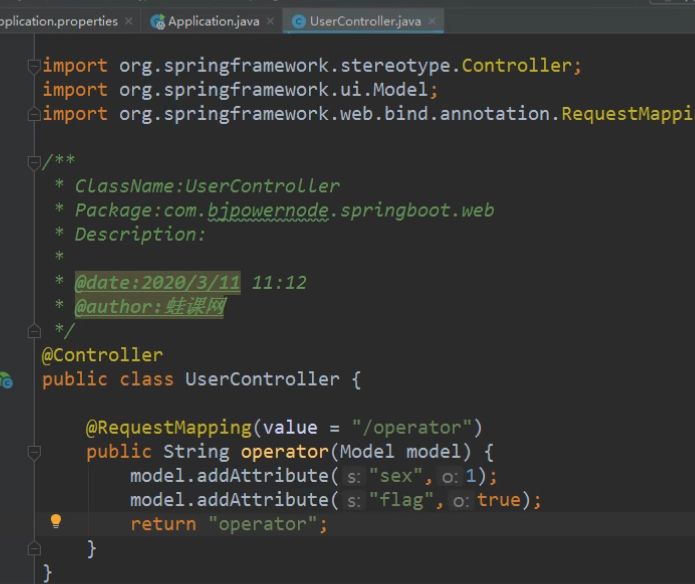
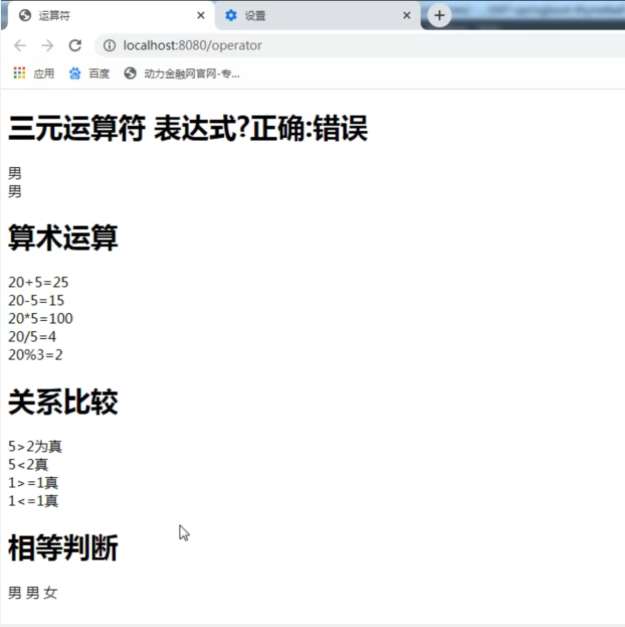
4.条件判断 (th:if)
UserController
@Controller
public class UserController {

    @RequestMapping("/condition")
    public String condition(Model model){
        model.addAttribute("sex",1);
        model.addAttribute("flag",true);
        model.addAttribute("productType",0);
        return  "condition";
    }
}
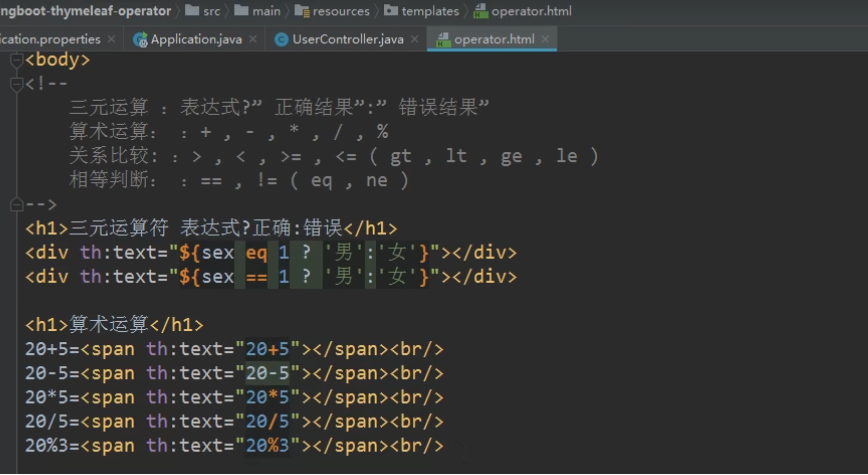
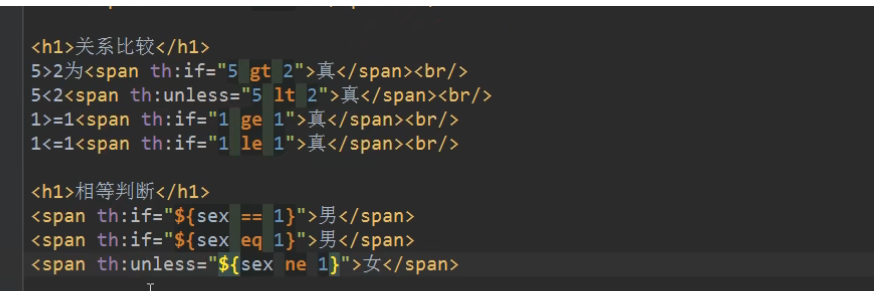
condition.html
    条件判断

 th:if 用法:如果满足条件显示(执行),否则相反

    男

    女

th:unless  用法:与th:if用法想法,即条件判断取反

    女

 th:switch/th:case用法

    产品0
    产品1
    无此产品
5.内敛表达式 (th:inline)
UserController
@Controller
public class UserController {

    @RequestMapping("/inline")
    public String inline(Model model){
        model.addAttribute("data","springboot  111");
        return "inline-test";
    }
}
inline-test.html
    Title

内敛文本: th:inline="text"

    [[${data}]]

数据outside:  [[${data}]]

  内敛脚本 th:inline="javascript"

    function showData() {
        alert([[${data}]]);
    }

展示数据
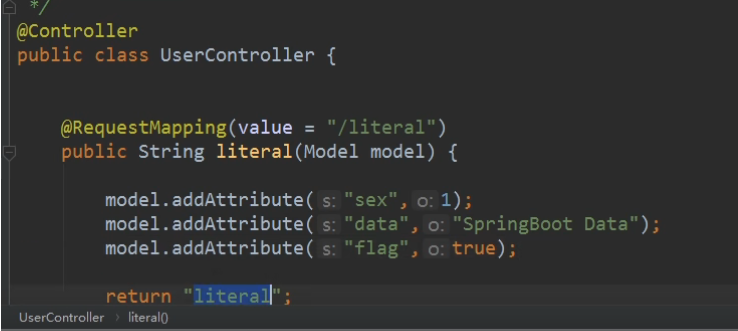
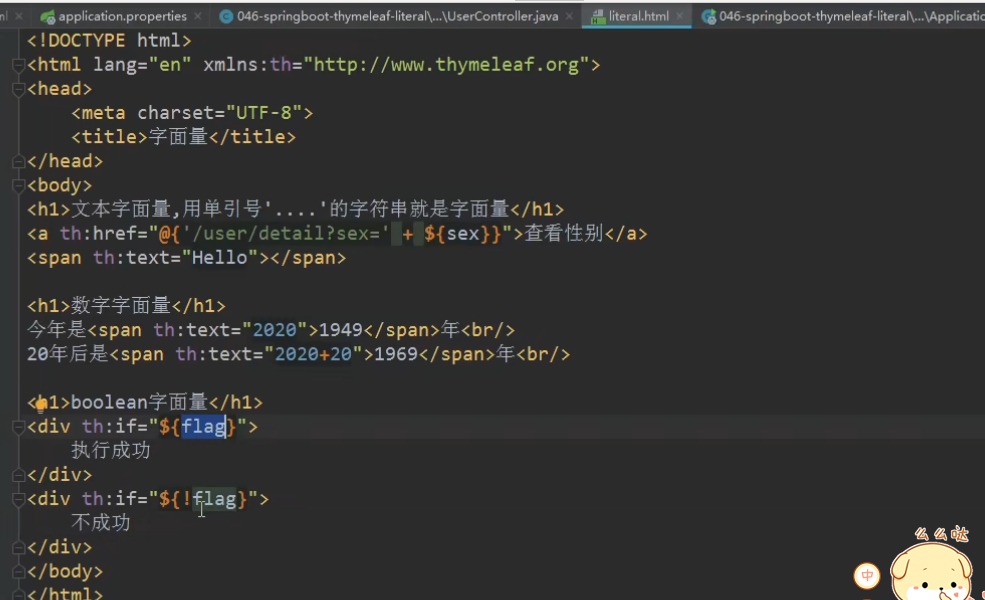
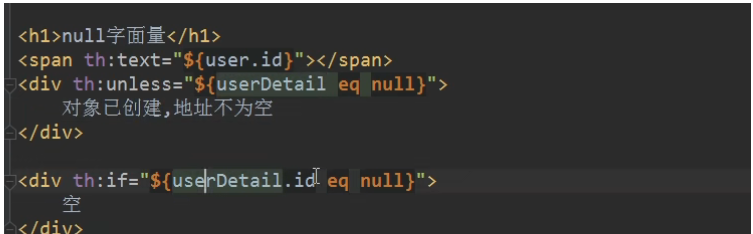
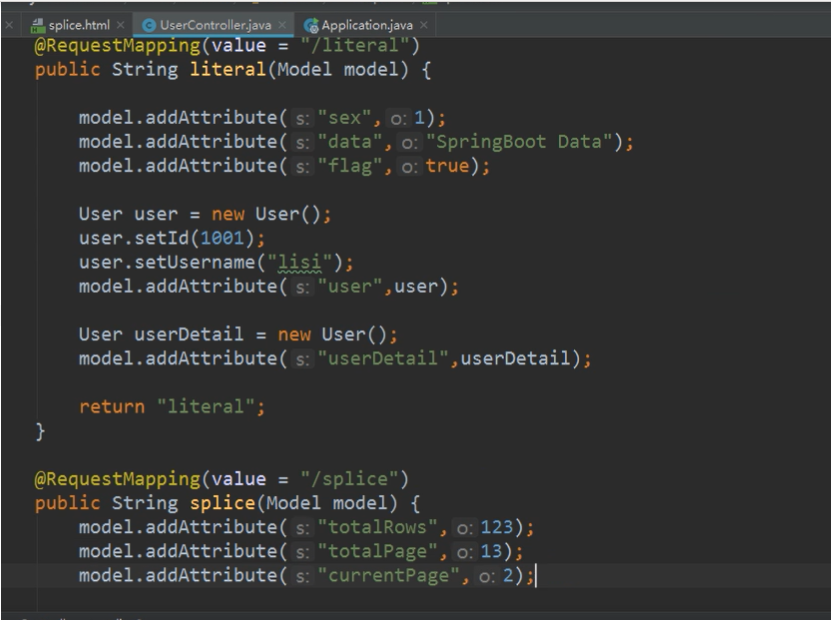
7.字面量

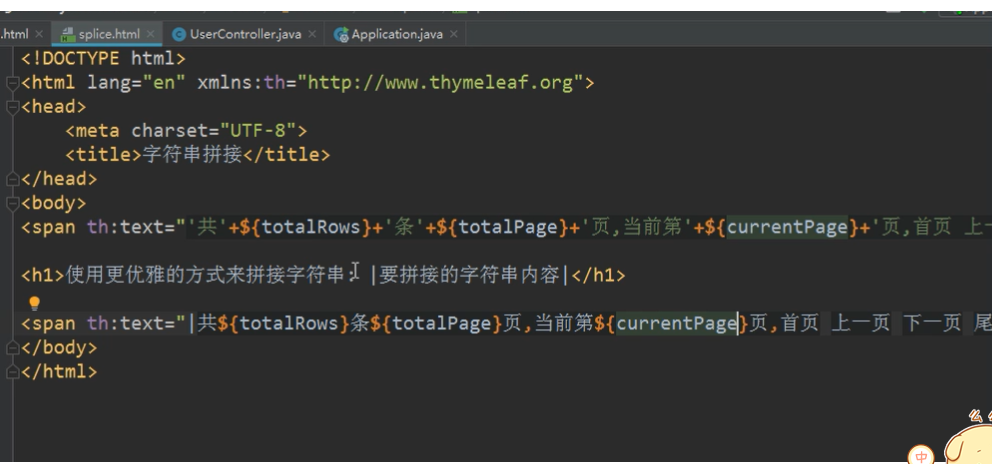
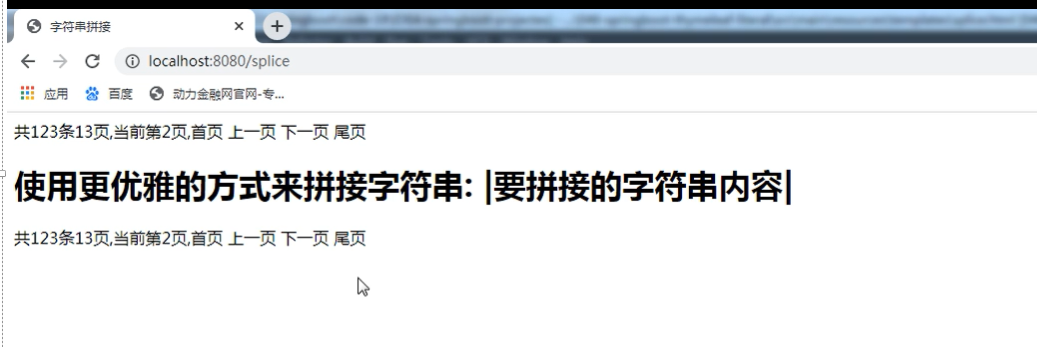
8.字符串拼接
9.数学运算
10.基本表达式对象
UserController
@Controller
public class UserController {
    @RequestMapping("/index")
    public String index(HttpServletRequest request, Model model,Integer id){
        model.addAttribute("username","lisi");
        request.getSession().setAttribute("data","sessionData");
        return "index";
    }
}
index.html
    Title

从SESSION中获取值

    //http://localhost:8080/springboot/user/inedx
    //获取协议名称
    var scheme = [[${#request.getScheme()}]];
    //获取服务器端口号
    var serverName = [[${#request.getServerName()}]];
    //获取服务器端口号
    var serverPort = [[${#request.getServerPort}]];
    //获取上下文根
    var contextPath = [[${#request.getContextPath()}]];  //现在上下文根为空

    var allPath = scheme+"://"+serverName+":"+serverPort+contextPath;
    alert(allPath);

    var requestURL = [[${#httpServletRequest.requestURL}]]; //http://localhost:8080/index
    var queryString = [[${#httpServletRequest.queryString}]];  //null   获取的参数  //id=101

    alert(requestURL);
    alert(queryString);
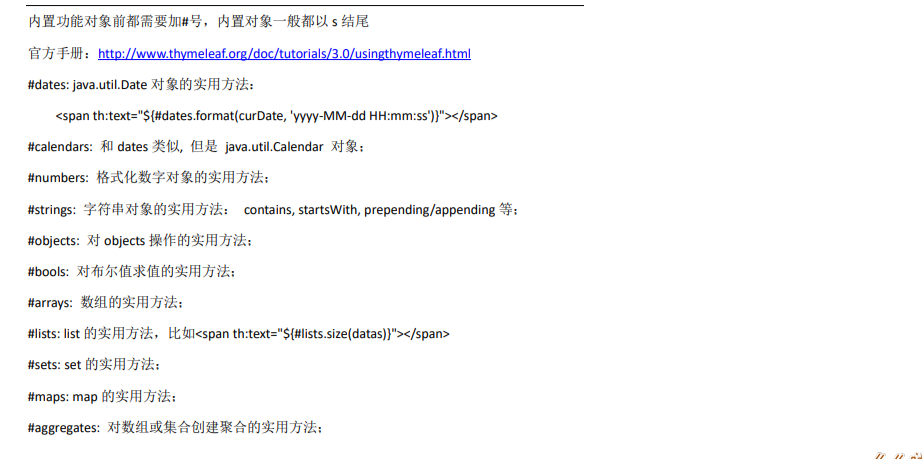
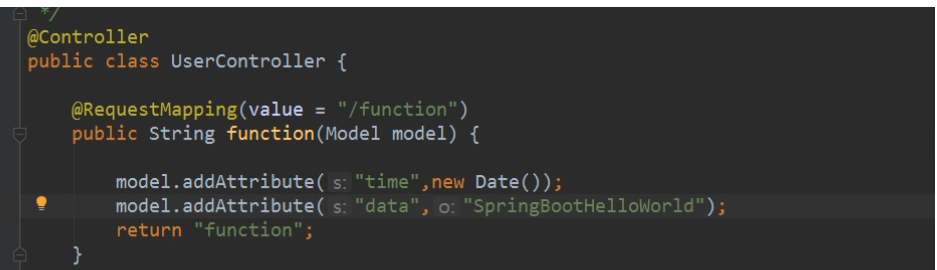
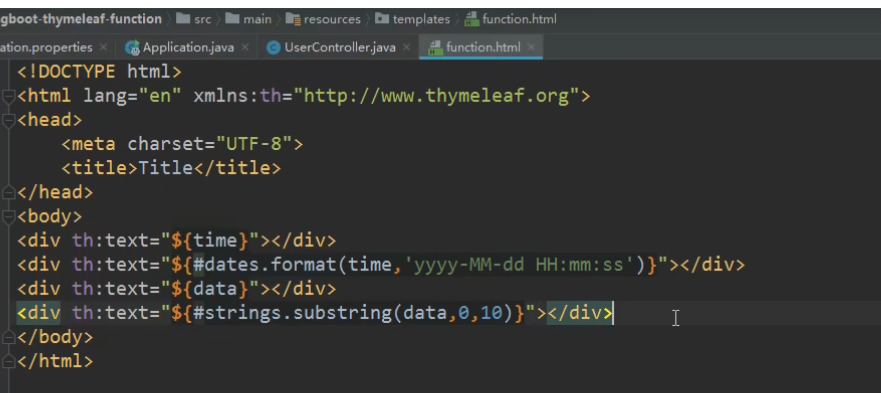
11.功能表达式对象(了解)

Original: https://www.cnblogs.com/yin-jihu/p/16097644.html
Author: 爲誰心殇
Title: SpringBoot快速入门
原创文章受到原创版权保护。转载请注明出处:https://www.johngo689.com/593393/
转载文章受原作者版权保护。转载请注明原作者出处!