

基本介绍
首次启动 Halo 项目时需要安装博客并注册用户信息,当博客安装完成后用户就可以根据注册的信息登录到管理员界面,下面我们分析一下整个过程中代码是如何执行的。
博客安装
项目启动成功后,我们可以访问 http://127.0.0.1:8090 进入到博客首页,或者访问 http://127.0.0.1:8090/admin 进入到管理员页面。但如果博客未安装,那么页面会被重定向到安装页面:


这是因为 Halo 中定义了几个过滤器,分别为 ContentFilter、ApiAuthenticationFilter 和 AdminAuthenticationFilter。这三个过滤器均为 AbstractAuthenticationFilter 的子类,而 AbstractAuthenticationFilter 又继承自 OncePerRequestFilter,其重写的 doFilterInternal 方法如下:
protected void doFilterInternal(HttpServletRequest request, HttpServletResponse response,
    FilterChain filterChain) throws ServletException, IOException {
    // Check whether the blog is installed or not
    Boolean isInstalled =
        optionService
            .getByPropertyOrDefault(PrimaryProperties.IS_INSTALLED, Boolean.class, false);

    // 如果博客未安装且当前并不是测试环境
    if (!isInstalled && !Mode.TEST.equals(haloProperties.getMode())) {
        // If not installed
        getFailureHandler().onFailure(request, response, new NotInstallException("当前博客还没有初始化"));
        return;
    }

    try {
        // Check the one-time-token
        // 进行一次性 token 检查
        if (isSufficientOneTimeToken(request)) {
            filterChain.doFilter(request, response);
            return;
        }

        // 一次性 token 验证失败则需要做身份认证
        // Do authenticate
        doAuthenticate(request, response, filterChain);
    } catch (AbstractHaloException e) {
        getFailureHandler().onFailure(request, response, e);
    } finally {
        SecurityContextHolder.clearContext();
    }
}
doFilterInternal 方法的主要逻辑为:
- 判断博客是否已安装,如果未安装且当前并非测试环境,那么由 failureHandler 处理 NotInstallException 异常并退出,否则继续向下执行。
- 进行一次性 token 检查(本文并未使用到),如果一次性 token 验证成功则将该请求交付给下一个过滤器;如果失败则执行 doAuthenticate 方法对用户进行身份认证。若在发生异常,那么由 failureHandler 的 onFailure 方法处理该请求。
继承了 AbstractAuthenticationFilter 的子类都会根据上述逻辑处理用户的请求,只不过在不同的子类过滤器中,身份认证逻辑和 failureHandler 会有一定差异。下图展示了一个请求经过 Filter 的过程:

可见,不同的过滤器之间拦截的请求并没有交集,因此一个请求最多会被一个过滤器处理。当我们访问 http://127.0.0.1:8090 时,该请求会被 ContentFilter 拦截,然后执行 doFilterInternal 方法,由于博客未安装,所以由 failureHandler 处理 NotInstallException 异常。ContentFilter 中定义的 failureHandler 属于 ContentAuthenticationFailureHandler 类,该类中 onFailure 方法定义如下:
public void onFailure(HttpServletRequest request, HttpServletResponse response,
    AbstractHaloException exception) throws IOException, ServletException {
    if (exception instanceof NotInstallException) {
        // 重定向到 /install
        response.sendRedirect(request.getContextPath() + "/install");
        return;
    }

    // Forward to error
    request.getRequestDispatcher(request.getContextPath() + "/error")
        .forward(request, response);
}
上述代码表示,当异常为 NotInstallException,就将请求重定向到 /install:

/install 请求在 MainController 中定义,且该请求又会被重定向到 /admin/index.html#install:
@GetMapping("install")
public void installation(HttpServletResponse response) throws IOException {
    String installRedirectUri =
        StringUtils.appendIfMissing(this.haloProperties.getAdminPath(), "/") + INSTALL_REDIRECT_URI;
    // /admin/index.html#install
    response.sendRedirect(installRedirectUri);
}

index.html 文件位于 /resource/admin 目录下, #install 表示定位到 index.html 页面的 install 表单,也就是上文中展示的安装页面。
值得注意的是,当我们访问 http://127.0.0.1:8090/admin 时,请求并不会被过滤器处理(三个过滤器均放行了 /admin),但页面还是被重定向到了安装页面,这是因为 MainController 中也定义了 /admin 请求的重定向规则:
@GetMapping("${halo.admin-path:admin}")
public void admin(HttpServletResponse response) throws IOException {
    String adminIndexRedirectUri =
        HaloUtils.ensureBoth(haloProperties.getAdminPath(), HaloUtils.URL_SEPARATOR)
            + INDEX_REDIRECT_URI;
    // /admin/index.html
    response.sendRedirect(adminIndexRedirectUri);
}
可见,访问 /admin 时,请求会被重定向到 /admin/index.html,但直接访问 index.html 还并不能显示安装页面,因为 URL 中并没有添加定位标识 #install。查看 index.html 中的代码后可以发现,当该页面打开时,浏览器会自动访问 /favicon.ico 和 /api/admin/is_installed, /api/admin/is_installed 会被过滤器放行,但 /favicon.ico 却会被 ContentFilter 拦截,之后又是两个重定向,最终让我们看到安装页面:

在安装页面填写完信息后,点击 “安装” 按钮,触发 /api/admin/installations 请求,请求中携带着我们填写的博客信息:
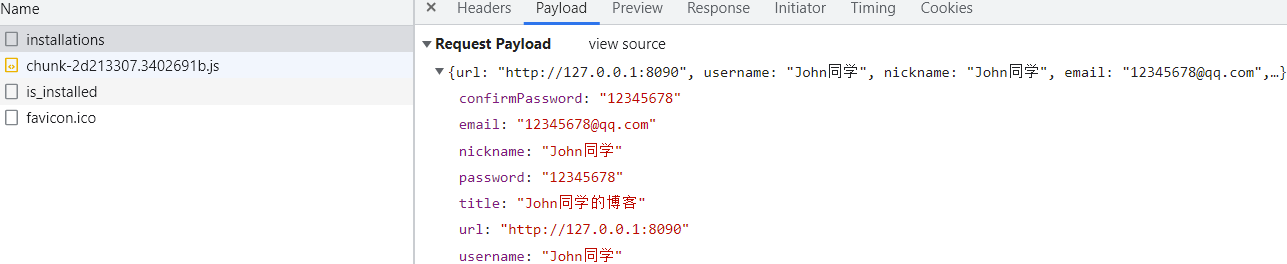
/api/admin/installations 在 InstallController 中定义,主要处理逻辑为:
public BaseResponse installBlog(@RequestBody InstallParam installParam) {
    // Validate manually
    ValidationUtils.validate(installParam, CreateCheck.class);

    // Check is installed
    boolean isInstalled = optionService
        .getByPropertyOrDefault(PrimaryProperties.IS_INSTALLED, Boolean.class, false);

    if (isInstalled) {
        throw new BadRequestException("该博客已初始化,不能再次安装!");
    }

    // Initialize settings
    initSettings(installParam);

    // Create default user
    User user = createUser(installParam);

    // Create default category
    Category category = createDefaultCategoryIfAbsent();

    // Create default post
    PostDetailVO post = createDefaultPostIfAbsent(category);

    // Create default sheet
    createDefaultSheet();

    // Create default postComment
    createDefaultComment(post);

    // Create default menu
    createDefaultMenu();

    eventPublisher.publishEvent(
        new LogEvent(this, user.getId().toString(), LogType.BLOG_INITIALIZED, "博客已成功初始化")
    );

    return BaseResponse.ok("安装完成!");
}
- 初始化博客的系统设置:也可以称为初始化选项信息,例如将安装选项 is_installed 置为 true,将博客标题 blog_title 置为我们填写的标题等,这些信息会被保存到 options 表中。
- 保存用户信息:也就是我们填写的姓名、email 等,在这些信息存储到 users 表之前,系统会将用户的密码进行加密处理,并为用户分配一个头像。
- 创建默认的分类:分类名称为 “默认分类”。
- 创建默认的文章:访问博客首页时看到的文章 “Hello Halo”。
- 创建默认的页面:访问博客首页时看到的页面,标题为 “关于页面”。
- 创建默认的评论:评论的 postId 为文章 “Hello Halo” 的 id,即表示该评论是属于 “Hello Halo” 的评论。
- 创建默认的菜单:设置了 4 个一级菜单、菜单对应的 URL 以及菜单在首页排列的优先级,例如 “首页” 的优先级为 0(最高优先级),因此排列在第一位,访问的 URL 为 “/”,因此点击 “首页” 时会触发 “/” 请求。
- 发布 LogEvent 事件:记录 “博客已成功初始化” 的系统日志。
用户登录
上文中提到,当用户访问 /admin 时,请求会被重定向到 /admin/index.html,而访问 index.html 时,默认显示的是登录表单,此时浏览器中的 URL 为 admin/index.html#/login?redirect=%2Fdashboard,这是由 index.html 引入的的 js 文件 https://cdn.jsdelivr.net/npm/halo-admin@1.4.13/dist/js/app.22ce7788.js(后文中将其简称为 js 文件)设置的,表示登录成功后重定向到 “Halo Dashboard” 界面(与定位 install 一样,这里是定位到 dashboard)。用户可填写 “用户名/邮箱” 和 “密码” 进行登录,登录按钮会触发 /api/admin/precheck 请求,该请求的处理逻辑为:
@PostMapping("login/precheck")
@ApiOperation("Login")
@CacheLock(autoDelete = false, prefix = "login_precheck")
public LoginPreCheckDTO authPreCheck(@RequestBody @Valid LoginParam loginParam) {
    final User user = adminService.authenticate(loginParam);
    return new LoginPreCheckDTO(MFAType.useMFA(user.getMfaType()));
}
上述方法首先调用 authenticate 方法验证用户的登录参数,然后告知前端登录参数是否正确以及是否需要输入两步验证码(默认关闭)。authenticate 方法会根据用户名/邮箱从 users 表中获取用户的信息,并判断当前用户账号是否有效,如果有效则继续判断登录的密码与设置的密码是否相同,如果密码正确则返回 User 对象:
public User authenticate(@NonNull LoginParam loginParam) {
    Assert.notNull(loginParam, "Login param must not be null");

    String username = loginParam.getUsername();

    String mismatchTip = "用户名或者密码不正确";

    final User user;

    try {
    // Get user by username or email
    // userName 是用户名还是邮箱
    user = ValidationUtils.isEmail(username)
    ? userService.getByEmailOfNonNull(username) :
    userService.getByUsernameOfNonNull(username);
    } catch (NotFoundException e) {
    log.error("Failed to find user by name: " + username);
    // 记录登录失败的日志
    eventPublisher.publishEvent(
    new LogEvent(this, loginParam.getUsername(), LogType.LOGIN_FAILED,
    loginParam.getUsername()));

    throw new BadRequestException(mismatchTip);
    }

    // 用户账号的有效时间 expireTime 必须小于当前时间, 否则无法正常登录,这个东西就很奇怪
    userService.mustNotExpire(user);

    // 检查登录密码是否正确
    if (!userService.passwordMatch(user, loginParam.getPassword())) {
    // If the password is mismatch
    eventPublisher.publishEvent(
    new LogEvent(this, loginParam.getUsername(), LogType.LOGIN_FAILED,
    loginParam.getUsername()));

    throw new BadRequestException(mismatchTip);
    }

    return user;
}
虽然 /api/login/precheck 返回的是一个 LoginPreCheckDTO 对象,但实际上前端收到的是一个 BaseResponse 对象,这是因为 Halo 中会使用 AOP 对 Controller 的响应进行封装:

默认情况下是不开启两步验证码的(MFAType 的默认值为 0),因此响应中的 needMFACode 为 false。如果需要,那么可在管理员页面的 “用户” -> “个人资料” -> “两步验证” 处开启。浏览器收到上图中的响应后,会自动发送 /api/admin/login 请求(由 js 文件设置),但如果开启了两步验证码,那么还需要输入验证码才能继续访问 /api/admin/login。
/api/admin/login 会向用户返回一个 AuthToken 对象:
@PostMapping("login")
@ApiOperation("Login")
@CacheLock(autoDelete = false, prefix = "login_auth")
public AuthToken auth(@RequestBody @Valid LoginParam loginParam) {
    return adminService.authCodeCheck(loginParam);
}
authCodeCheck 方法的处理逻辑为:
public AuthToken authCodeCheck(@NonNull final LoginParam loginParam) {
    // get user
    final User user = this.authenticate(loginParam);

    // check authCode
    // 检查两步验证码
    if (MFAType.useMFA(user.getMfaType())) {
        if (StringUtils.isBlank(loginParam.getAuthcode())) {
        throw new BadRequestException("请输入两步验证码");
    }
    TwoFactorAuthUtils.validateTFACode(user.getMfaKey(), loginParam.getAuthcode());
    }

    if (SecurityContextHolder.getContext().isAuthenticated()) {
        // If the user has been logged in
        throw new BadRequestException("您已登录,请不要重复登录");
    }

    // Log it then login successful
    // 记录登录成功的日志
    eventPublisher.publishEvent(
    new LogEvent(this, user.getUsername(), LogType.LOGGED_IN, user.getNickname()));

    // Generate new token
    // 为用户生成 token
    return buildAuthToken(user);
}
上述方法首先调用 authenticate 方法获取用户,然后检查两步验证码(如果设置的话),接着记录登录成功的日志,最后为用户生成一个 token,token 可作为用户的身份标识,服务器可以根据 token 验证用户的身份,而无需用户名和密码。token 的生成逻辑如下:
private AuthToken buildAuthToken(@NonNull User user) {
    Assert.notNull(user, "User must not be null");

    // Generate new token
    AuthToken token = new AuthToken();

    token.setAccessToken(HaloUtils.randomUUIDWithoutDash());
    token.setExpiredIn(ACCESS_TOKEN_EXPIRED_SECONDS);
    token.setRefreshToken(HaloUtils.randomUUIDWithoutDash());

    // Cache those tokens, just for clearing
    cacheStore.putAny(SecurityUtils.buildAccessTokenKey(user), token.getAccessToken(),
                      ACCESS_TOKEN_EXPIRED_SECONDS, TimeUnit.SECONDS);
    cacheStore.putAny(SecurityUtils.buildRefreshTokenKey(user), token.getRefreshToken(),
                      REFRESH_TOKEN_EXPIRED_DAYS, TimeUnit.DAYS);

    // Cache those tokens with user id
    cacheStore.putAny(SecurityUtils.buildTokenAccessKey(token.getAccessToken()), user.getId(),
                      ACCESS_TOKEN_EXPIRED_SECONDS, TimeUnit.SECONDS);
    cacheStore.putAny(SecurityUtils.buildTokenRefreshKey(token.getRefreshToken()), user.getId(),
                      REFRESH_TOKEN_EXPIRED_DAYS, TimeUnit.DAYS);

    return token;
}
可以发现,token 中包含了 accessToken(随机生成的 UUID)、refreshToken(随机生成的 UUID)以及 accessToken 和 refreshToken 的过期时间。其中 accessToken 是用来做身份认证的,而 refreshToken 的作用是实现 token 的 “无痛刷新”。具体来讲,后端返回 token 信息后,浏览器会同时保存 accessToken 和 refreshToken,如果 accessToken 过期,那么当浏览器发送请求时,服务器会返回 “Token 已过期或不存在” 的失败响应,此时浏览器可以发送 /api/admin/refresh/{refreshToken} 请求,通过 refreshToken 向服务器申请一个新的 token(包括 accessToken 和 refreshToken),然后使用新的 accessToken 重新发送之前未处理成功的请求。因此,accessToken 和 refreshToken 是绑定在一起的,且 refreshToken 的过期时间(Halo 中设置的是 30 天)要大于 accessToken(1 天)。上述代码中,服务器使用 cacheStore 存储用户 id 和 token ,cacheStore 是项目中的内部缓存,它使用 ConcurrentHashMap 作为容器。
用户登录成功后浏览器获得的响应:

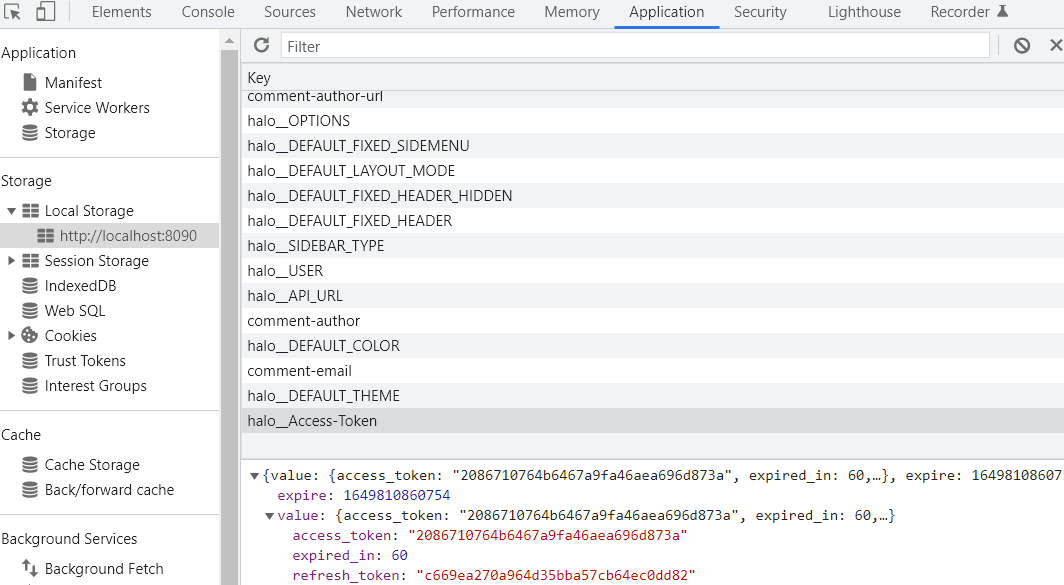
浏览器将 token 保存在了 Local Storate:
当浏览器下次请求资源时,会将 accessToken 存入到 Request Headers 中 Admin-Authorization 头域:

accessToken 过期后,浏览器使用 refreshToken 申请新的 token:

浏览器中 token 的保存、token 过期后的重新申请以及 Header 中 token 的添加都是由 js 文件设置的。另外,前文中提到,过滤器拦截请求后首先要进行一次性 token 检查,如果失败则需要验证用户的身份,而 Admin-Authorization 头域就是用于身份认证的,例如上图中的请求 api/admin/users/profiles 会被 AdminAuthenticationFilter 拦截,因为并未设置一次性 token,因此需要进行身份认证,而 AdminAuthenticationFilter 的身份认证逻辑为:
protected void doAuthenticate(HttpServletRequest request, HttpServletResponse response,
FilterChain filterChain) throws ServletException, IOException {

    // 如果未设置认证
    if (!haloProperties.isAuthEnabled()) {
        // Set security
        userService.getCurrentUser().ifPresent(user ->
        SecurityContextHolder.setContext(
        new SecurityContextImpl(new AuthenticationImpl(new UserDetail(user)))));

        // Do filter
        filterChain.doFilter(request, response);
    return;
    }

    // 获取 token, 从请求的 Query 参数中获取 admin_token 或者从 Header 中获取 Admin-Authorization
    // Get token from request
    String token = getTokenFromRequest(request);

    if (StringUtils.isBlank(token)) {
    throw new AuthenticationException("未登录,请登录后访问");
    }

    // 根据 token 从 cacheStore 缓存中获取用户 id
    // Get user id from cache
    Optional optionalUserId =
    cacheStore.getAny(SecurityUtils.buildTokenAccessKey(token), Integer.class);

    if (!optionalUserId.isPresent()) {
        throw new AuthenticationException("Token 已过期或不存在").setErrorData(token);
    }

    // 获取用户
    // Get the user
    User user = userService.getById(optionalUserId.get());

    // Build user detail
    UserDetail userDetail = new UserDetail(user);

    // 将用户信息存储到 ThreadLocal 中
    // Set security
    SecurityContextHolder
    .setContext(new SecurityContextImpl(new AuthenticationImpl(userDetail)));

    // Do filter
    filterChain.doFilter(request, response);
}
- 如果博客未设置身份认证,那么将 users 表中的第一个用户作为当前用户,并存储到 ThreadLocal 容器中,ThreadLocal 可用于在同一个线程内的多个函数或者组件之间传递公共信息。如果开启了身份认证,则继续向下执行。
- 获取 token,也就是从请求的 Query 参数中获取 admin_token 或者从 Header 中获取 Admin-Authorization。
- 根据 token 从 cacheStore 缓存中获取用户 id,查询出用户后将用户存储到 ThreadLocal 中,身份认证通过。
以上便是用户输入账号密码来登录管理员页面的过程。
用户登出
用户退出登录时,触发 /api/admin/logout 请求,请求的处理逻辑是清除掉用户的 token:
public void logout() {
    adminService.clearToken();
}
clearToken 方法如下:
@PostMapping("logout")
@ApiOperation("Logs out (Clear session)")
@CacheLock(autoDelete = false)
public void clearToken() {
    // 检查 ThreadLocal 是否为空
    // Check if the current is logging in
    Authentication authentication = SecurityContextHolder.getContext().getAuthentication();

    if (authentication == null) {
        throw new BadRequestException("您尚未登录,因此无法注销");
    }

    // 获取当前用户
    // Get current user
    User user = authentication.getDetail().getUser();

    // 清除 accessToken
    // Clear access token
    cacheStore.getAny(SecurityUtils.buildAccessTokenKey(user), String.class)
    .ifPresent(accessToken -> {
        // Delete token
        cacheStore.delete(SecurityUtils.buildTokenAccessKey(accessToken));
        cacheStore.delete(SecurityUtils.buildAccessTokenKey(user));
    });

    // 清除 refreshToken
    // Clear refresh token
    cacheStore.getAny(SecurityUtils.buildRefreshTokenKey(user), String.class)
    .ifPresent(refreshToken -> {
        cacheStore.delete(SecurityUtils.buildTokenRefreshKey(refreshToken));
        cacheStore.delete(SecurityUtils.buildRefreshTokenKey(user));
    });

    eventPublisher.publishEvent(
    new LogEvent(this, user.getUsername(), LogType.LOGGED_OUT, user.getNickname()));

    log.info("You have been logged out, looking forward to your next visit!");
}
- 检查 ThreadLocal 是否为空,为空表示用户并未登陆。
- 获取当前用户并清除 cacheStore 中与用户相关的 token。
- 记录用户登出日志。
博客首页
上文介绍的登录和登出指的是在管理员界面上的操作,实际上 127.0.0.1:8090 才是博客的首页。当我们访问 / 时,ContentIndexController 中的 index 方法会处理请求:
@GetMapping
public String index(Integer p, String token, Model model) {

    PostPermalinkType permalinkType = optionService.getPostPermalinkType();

    if (PostPermalinkType.ID.equals(permalinkType) && !Objects.isNull(p)) {
        Post post = postService.getById(p);
        return postModel.content(post, token, model);
    }

    return this.index(model, 1);
}
index(model, 1) 指的是显示博客的第一页:
public String index(Model model,
        @PathVariable(value = "page") Integer page) {
    return postModel.list(page, model);
}
postModel.list 方法的逻辑如下:
public String list(Integer page, Model model) {
    // 获取每页显示的文章数量
    int pageSize = optionService.getPostPageSize();
    Pageable pageable = PageRequest
        .of(page >= 1 ? page - 1 : page, pageSize, postService.getPostDefaultSort());

    // 查询出所有已发布的文章, 默认按照发布时间降序排列
    Page postPage = postService.pageBy(PostStatus.PUBLISHED, pageable);
    Page posts = postService.convertToListVo(postPage);

    // 将文章以及相关属性存入到 model 中
    model.addAttribute("is_index", true);
    model.addAttribute("posts", posts);
    model.addAttribute("meta_keywords", optionService.getSeoKeywords());
    model.addAttribute("meta_description", optionService.getSeoDescription());
    // 返回已激活主题文件中的 index.ftl
    return themeService.render("index");
}
- 查看博客每页显示的文章数量,默认是 10。
- 查询出所有已发布的文章并对其排序,默认按照发布时间降序排列。
- 将文章以及相关属性存入到 model 中,Halo 中使用的是 FreeMaker 模板引擎,将信息存入到 model 后前端可通过 EL 表达式获取到这些内容。
- 返回 “index” 路径,该路径指向已激活主题(默认主题为
caicai_anatole)的 index.ftl 文件,该文件可生成我们看到的博客主页。
博客首页:

Original: https://www.cnblogs.com/johnlearning/p/16188606.html
Author: John同学
Title: Halo 开源项目学习(三):注册与登录
原创文章受到原创版权保护。转载请注明出处:https://www.johngo689.com/592880/
转载文章受原作者版权保护。转载请注明原作者出处!